1
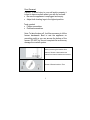
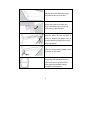
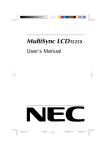
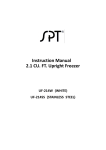
1.5 cu. ft. Upright Freezer
USER’S MANUAL
Model: UF-150W/UF-150SS
CAUTION :
This appliance is not intended for use by young
children or infirm persons without supervision. Young
children should be supervised to ensure that they do
not play with the appliance
Dear customer:
Thank you for buying this upright freezer. To ensure
that you get the best results from your new freezer,
please take time to read through the simple
instructions in this booklet.
Please ensure that the packing material is disposed of
in accordance with the current environmental
requirements.
Old refrigerator equipments may contain CFC’s which
will damage the ozone layer. Please contact your local
waste disposal department for advice on safe
disposal.
This appliance must only be used for its intended
purpose.
1
INSTALLATION
Unit Placement
Place the appliance in a location where it is strong
enough to support its total weight when fully loaded.
In order to prevent vibration and noise, the freezer
must be leveled by adjusting the front leveling legs
This is a “free-standing” application. Choose a
well-ventilated location with no less than 3 inches of
clearance around the freezer.
Locate the freezer away from direct sunlight and heat
sources such as an oven or boiler.
For your safety, please read the following information
Warning: This appliance must be grounded.
WARNING:
1. Risk of child entrapment. Before you throw away
your old refrigerator or freezer:
Take off doors
Leave the shelves in place so children may
not climb inside.
2. Do not use extension cords.
2
USE OF THE APPLIANCE
Before plugging in your freezer for the first time,
remove all packaging materials, clean freezer with a
damp soft cloth then wipe dry.
Temperature Control
There is a thermostat control knob located inside the
freezer. Markings on the control knob are: MIN / NOR /
MAX / OFF. MIN being the warmest setting and MAX
is the coldest setting. It is recommended to set the
knob at NOR position for normal use.
Lock
This freezer is equipped with a built-in lock and two
keys are supplied.
Storing Frozen Food
When using the freezer for the first time or after
defrosting, turn the temperature control to MAX setting
for at least two hours before introducing food to be
stored.
All frozen food products should be placed in the
freezer as soon as possible to avoid the frozen food
from defrosting.
Storage recommendation printed on the food’s
packaging should always be followed.
3
Freezing Fresh Food
Ensure that your freezing operations are carried out
under the most hygienic conditions as freezing alone
does not sterilize the food. It is advisable to freeze the
food by packing it into separate meal portions and not
in bulk form. Never put hot or even warm foodstuffs
into the freezer. Prior to storing the frozen food, pack it
in plastic bags, aluminum sheets or freezing
containers and place into the freezer.
Defrosting
Remove the electrical plug from the wall socket, open
the door and remove all contents. Defrost using a
plastic scraper, or let the temperature rise naturally
until the frost melts. Then wipe away the remaining ice
and water. Once finished, plug the freezer back in and
check the thermostat knob is on the correct setting. It
is recommended to defrost when ¼” of frost develops
on the walls.
Cleaning your freezer
Always unplug unit before cleaning. Mix a solution of 2
tbsp baking soda to 1 qt water. Dampen cloth in this
solution to clean and then dry with soft cloth.
4
Door Reversal
Caution: To avoid injury to your self and/or property, it
is best to have someone assist you with the reversal.
Be sure the appliance is unplugged and empty.
Adjust both leveling legs to the highest position.
Tools needed:
Phillips screwdriver
Flathead screwdriver
Note: To take the door off, it will be necessary to tilt the
freezer backwards. Best to rest the appliance on
something solid so you can access the bottom of the
freezer. DO NOT lay the unit complete flat as this may
damage the coolant system.
Start by removing the bracket from
bottom of freezer. Unscrew the two
screws from bottom bracket and remove.
Screws / Bottom bracket / Foot
5
Slide the door down, away from hinge
pin located on the top of the door.
Remove the plastic cover from door
hinge. Unscrews the two screws and
transfer them to the other side.
Secure the top hinge and slide the door
back into place. Be sure the door is
facing up. Replace the plastic over on
the top bracket by pressing down until it
clicks into position.
Place and secure bottom bracket as well
as the foot on other side.
Check that door is aligned both
horizontally and vertically. Check the
seals are closed on all sides before
finally tightening the bottom hinge.
Re-adjust the leveling feet.
6
Troubleshooting
Please check the following:
The freezer is not working
- Check the plug is inserted correctly and firmly into
the wall socket
- Check there is power to the wall socket by
plugging in another appliance.
- Check the fuse.
The freezer is noisy when running
- Make sure freezer is level and not in contact with
another appliance or furniture.
- A gentle trickling sound is normal; this is likely
coolant flowing through the unit.
- Sound of compressor – compressor will run more
frequently when temperature is high.
The freezer does not cool sufficiently
- If the door has been opened too often, or it has
been left open for a while it will take time for the
freezer to reach its set temperature.
- Be sure the unit has sufficient clearance,
especially in the rear. Obstructed airflow will
reduce cooling efficiency.
7
Storage
If the freezer is not to be used for a long period of time,
proceed as follows:
- Unplug freezer from power supply.
- Clean the unit by following above cleaning
instructions. Dry completely.
- Leave the door open or ajar to prevent unpleasant
odors from building.
Note for household refrigerating appliances:
- Try not to open door too often, especially when
weather is humid and hot. Close door as soon as
possible.
- Check that unit is properly ventilated periodically
(adequate air circulation behind the appliance).
- For household refrigerating appliances, under
normal temperature condition, set the thermostat
at the middle setting.
- Before loading the freezer with fresh foods, allow
them to cool to ambient temperature first.
- Ice and frost layer increase energy consumption,
defrost and clean with ice is 1/4'” thick.
- Keep the rear wall clean of dust or impurities.
- Always consider instructions stated under
Placement, otherwise energy consumption may be
substantially higher.
8
Your Guarantee
If this product is found to be faulty as a result of faulty materials or workmanship
within one year from date of purchase, it will be repaired free of charge.
This guarantee is subject to the following terms:
• Sunpentown must be notified of the fault.
• Proof of purchase must be presented to Sunpentown’s nominated
representative.
• The warranty will be void if the product if modified, misused or repaired by an
unauthorized person.
• The warranty after repair will not be extended beyond the original 1year period.
• All replacement parts will be new or reconditioned.
• Parts, which are replaced, become the property of Sunpentown.
• The warranty applies for the use of the product in the USA only.
What is NOT COVERED:
•
Warranty does not include freight charges.
•
Incidental or consequential damage caused by possible defects with this
product.
•
Damage to product caused by improper power supply voltage, accident, fire,
floods or acts of nature.
•
Failure of product resulting from unauthorized modifications to the product.
•
Improper installation or failure to perform the necessary maintenance.
This GUARANTEE is in addition to your Statutory Rights
SUNPENTOWN INTERNATIONAL INC.
14625 Clark Ave. City of Industry, CA 91745
Tel: 800-330-0388 / [email protected]
www.sunpentown.com
9