1
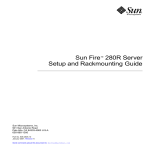
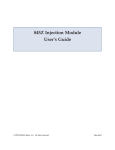
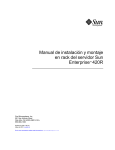
Sun Enterprise™ 420R Server Setup
and Rackmounting Guide
Sun Microsystems, Inc.
901 San Antonio Road
Palo Alto, CA 94303-4900 U.S.A.
650-960-1300
Part No. 816-1096-10
May 2001, Revision A
Send comments about this document to: [email protected]
Copyright 2001 Sun Microsystems, Inc., 901 San Antonio Road, Palo Alto, CA 94303-4900 U.S.A. All rights reserved.
This product or document is distributed under licenses restricting its use, copying, distribution, and decompilation. No part of this product or
document may be reproduced in any form by any means without prior written authorization of Sun and its licensors, if any. Third-party
software, including font technology, is copyrighted and licensed from Sun suppliers.
Parts of the product may be derived from Berkeley BSD systems, licensed from the University of California. UNIX is a registered trademark in
the U.S. and other countries, exclusively licensed through X/Open Company, Ltd.
Sun, Sun Microsystems, the Sun logo, AnswerBook2, docs.sun.com, and Solaris are trademarks, registered trademarks, or service marks of Sun
Microsystems, Inc. in the U.S. and other countries. All SPARC trademarks are used under license and are trademarks or registered trademarks
of SPARC International, Inc. in the U.S. and other countries. Products bearing SPARC trademarks are based upon an architecture developed by
Sun Microsystems, Inc.
The OPEN LOOK and Sun™ Graphical User Interface was developed by Sun Microsystems, Inc. for its users and licensees. Sun acknowledges
the pioneering efforts of Xerox in researching and developing the concept of visual or graphical user interfaces for the computer industry. Sun
holds a non-exclusive license from Xerox to the Xerox Graphical User Interface, which license also covers Sun’s licensees who implement OPEN
LOOK GUIs and otherwise comply with Sun’s written license agreements.
Federal Acquisitions: Commercial Software—Government Users Subject to Standard License Terms and Conditions.
DOCUMENTATION IS PROVIDED “AS IS” AND ALL EXPRESS OR IMPLIED CONDITIONS, REPRESENTATIONS AND WARRANTIES,
INCLUDING ANY IMPLIED WARRANTY OF MERCHANTABILITY, FITNESS FOR A PARTICULAR PURPOSE OR NON-INFRINGEMENT,
ARE DISCLAIMED, EXCEPT TO THE EXTENT THAT SUCH DISCLAIMERS ARE HELD TO BE LEGALLY INVALID.
Copyright 2001 Sun Microsystems, Inc., 901 San Antonio Road, Palo Alto, CA 94303-4900 Etats-Unis. Tous droits réservés.
Ce produit ou document est distribué avec des licences qui en restreignent l’utilisation, la copie, la distribution, et la décompilation. Aucune
partie de ce produit ou document ne peut être reproduite sous aucune forme, par quelque moyen que ce soit, sans l’autorisation préalable et
écrite de Sun et de ses bailleurs de licence, s’il y en a. Le logiciel détenu par des tiers, et qui comprend la technologie relative aux polices de
caractères, est protégé par un copyright et licencié par des fournisseurs de Sun.
Des parties de ce produit pourront être dérivées des systèmes Berkeley BSD licenciés par l’Université de Californie. UNIX est une marque
déposée aux Etats-Unis et dans d’autres pays et licenciée exclusivement par X/Open Company, Ltd.
Sun, Sun Microsystems, le logo Sun, AnswerBook2, docs.sun.com, et Solaris sont des marques de fabrique ou des marques déposées, ou
marques de service, de Sun Microsystems, Inc. aux Etats-Unis et dans d’autres pays. Toutes les marques SPARC sont utilisées sous licence et
sont des marques de fabrique ou des marques déposées de SPARC International, Inc. aux Etats-Unis et dans d’autres pays. Les produits portant
les marques SPARC sont basés sur une architecture développée par Sun Microsystems, Inc.
L’interface d’utilisation graphique OPEN LOOK et Sun™ a été développée par Sun Microsystems, Inc. pour ses utilisateurs et licenciés. Sun
reconnaît les efforts de pionniers de Xerox pour la recherche et le développement du concept des interfaces d’utilisation visuelle ou graphique
pour l’industrie de l’informatique. Sun détient une licence non exclusive de Xerox sur l’interface d’utilisation graphique Xerox, cette licence
couvrant également les licenciés de Sun qui mettent en place l’interface d’utilisation graphique OPEN LOOK et qui en outre se conforment aux
licences écrites de Sun.
LA DOCUMENTATION EST FOURNIE “EN L’ETAT” ET TOUTES AUTRES CONDITIONS, DECLARATIONS ET GARANTIES EXPRESSES
OU TACITES SONT FORMELLEMENT EXCLUES, DANS LA MESURE AUTORISEE PAR LA LOI APPLICABLE, Y COMPRIS NOTAMMENT
TOUTE GARANTIE IMPLICITE RELATIVE A LA QUALITE MARCHANDE, A L’APTITUDE A UNE UTILISATION PARTICULIERE OU A
L’ABSENCE DE CONTREFAÇON.
Please
Recycle
Contents
1.
Preparation
5
Getting Started
6
Unpack the System
6
Verify the Kit Contents
2.
Rack Installation
Tools Required
7
11
11
Before You Begin
Safety Precautions
12
12
Prepare the Rack Enclosure
13
Attach the Mounting Brackets to Each Slide Assembly
Install the Slide Assemblies Into the Rack Enclosure
Install the Server Into the Rack Enclosure
What Next
3.
14
17
21
24
System Setup
25
Connect the Power Cord
26
Connect the Ethernet Cable
Install Options
29
30
Install a System Console
30
Restore the Rack Enclosure
33
iii
Power On the System
iv
34
Install the Operating System
37
Read Online Documentation
37
Sun Enterprise 420R Server Setup and Rackmounting Guide • May 2001
CHAPTER
1
Preparation
This guide shows you how to install the Sun Enterprise™ 420R workgroup server
into a Sun expansion cabinet or other EIA-compliant rack enclosure.
The following tasks and information topics are covered in this guide:
■
■
■
■
Getting Started — page 2
■
Unpack the System — page 2
■
Verify the Kit Contents — page 2
Rack Installation — page 11
■
Tools Required — page 11
■
Safety Precautions — page 12
■
Prepare the Rack Enclosure — page 13
■
Attach the Mounting Brackets to Each Slide Assembly — page 14
■
Install the Slide Assemblies Into the Rack Enclosure — page 17
■
Install the Server Into the Rack Enclosure — page 21
System Setup — page 25
■
Connect the Power Cord — page 26
■
Connect the Ethernet Cable — page 29
■
Install Options — page 26
■
Install a System Console — page 30
■
Restore the Rack Enclosure — page 33
■
Power On the System — page 34
■
Install the Operating System — page 37
■
Read the Online Documentation — page 37
Rack Enclosure Requirements — page 39
1
Getting Started
To install a Sun Enterprise server, complete the following tasks in the order listed:
■
Unpack the system and verify the kit contents. See Chapter 1.
■
Rackmount the server. See Chapter 2.
■
Set up and power-on the server and install the operating system. See Chapter 3.
Unpack the System
Your system is shipped from the factory with most internal options installed.
Peripherals that are not factory installed are shipped separately. Unpacking
instructions are printed on the outside of the shipping carton.
Inspect all shipping cartons for evidence of physical damage. If a shipping carton is
damaged, request that the carrier’s agent be present when the carton is opened.
Keep all contents and packing material for the agent’s inspections.
Check that you’ve received all of the parts you ordered. Contact Sun Microsystems
or your distributor/reseller if you are missing anything.
2
Sun Enterprise 420R Server Setup and Rackmounting Guide • May 2001
Verify the Kit Contents
The shipping carton contains the following parts:
■
Sun Enterprise 420R workgroup server
■
Accessory box
Accessory box
Sun Enterprise 420R server
Chapter 1
Preparation
3
Accessory Box Contents
The accessory box contains the following parts:
Long mounting brackets (2)
Assorted hardware
Slide assemblies (2)
Short mounting
brackets (2)
Power cords(s)
Key
Torque indicator driver
Customer documentation
Wrist strap
Rack Buddy
4
Sun Enterprise 420R Server Setup and Rackmounting Guide • May 2001
The accessory box contains a plastic bag of assorted hardware: screws, nuts, and
washers, shown in actual size. You will need this hardware to install the
rackmounting brackets and slide assemblies.
10-32 x 3/4
screw (8)
8-32 x 3/8
screw (8)
flat
lock
nut (8)
washer (8) washer (8)
Note – Bar nuts are required (but not included) for non-threaded rack enclosures.
See your rack enclosure instructions for more information. Bar nuts are not used in
Sun rack enclosures.
Chapter 1
Preparation
5
6
Sun Enterprise 420R Server Setup and Rackmounting Guide • May 2001
CHAPTER
2
Rack Installation
This chapter provides step-by-step instructions for rackmounting the server into a
Sun expansion cabinet or other EIA-compliant rack enclosure.
To rackmount a Sun Enterprise 420R server, complete the following tasks in the
order listed:
■
“Prepare the Rack Enclosure” on page 13
■
“Attach the Mounting Brackets to Each Slide Assembly” on page 14
■
“Install the Slide Assemblies Into the Rack Enclosure” on page 17
■
“Install the Server Into the Rack Enclosure” on page 21
The Sun Enterprise 420R Server Rackmounting Overview included with your
documentation set illustrates the rackmounting steps in a convenient, graphical
overview. This chapter provides detailed information about each step.
Tools Required
■
Phillips #2 screwdriver
■
Flat-blade screwdriver
■
Set of Allen wrenches to remove the side panels on some rack enclosures
■
An adjustable wrench to tighten the nuts on the mounting brackets
11
Before You Begin
■
Unpack the system and verify the contents. See Chapter 1 for instructions.
■
Unpack the accessory box and place the slide assemblies, mounting brackets, and
hardware on a clear surface.
■
Verify that you have the components and hardware shown in “Accessory Box
Contents” on page 8.
■
Read the rack enclosure requirements described in Appendix A of this guide.
■
Read the Safety Precautions that follow.
Safety Precautions
For a complete description of the safety precautions to follow when installing a Sun
Enterprise 420R server, see the Sun Enterprise 420R Server Owner’s Guide.
!
!
12
Caution – Install the system as low as possible into the rack enclosure. For best
stability, do not install the system above equipment that weighs less than it does.
Caution – The system is heavy. In the following procedures, two people are
required to move the system. Two people are also required to align and install the
slide assemblies into the rack.
Sun Enterprise 420R Server Setup and Rackmounting Guide • May 2001
!
Caution – For proper ventilation, each system in the rack enclosure requires 28
square inches (181 square cm) of unrestricted airflow into the front of the system,
and 23 square inches (148 square cm) of unrestricted exhaust port at the back of the
system. Maintain a minimum 1.5 inches (3.8 cm) clearance between the system and
any front or back doors. See Appendix A for more information.
Prepare the Rack Enclosure
1.Open and remove (if applicable) the front and back doors of the rack enclosure.
See the instructions provided with your rack enclosure.
2.Stabilize the rack enclosure by extending its anti-tip legs or bolting the rack
securely to the floor.
See the instructions provided with your rack enclosure.
3.Remove the side panels from the rack enclosure, if applicable.
See the instructions provided with your rack enclosure. Removing the side panels
can improve access to the nuts and screws that are installed when securing the
system in the rack enclosure.
Chapter 2
Rack Installation
13
Attach the Mounting Brackets to Each
Slide Assembly
Attach a short and a long mounting bracket to the outside of each slide assembly.
Repeat these steps for each slide assembly.
1. Attach a short mounting bracket to the front of each slide assembly.
a. Extend the slide assembly to expose the holes for the front mounting bracket.
Release the coil spring catch on the inner rail to extend the slide assembly.
Slide assembly
Coil spring catch
Front
Inner rail
Holes for front mounting bracket
Runner
14
Sun Enterprise 420R Server Setup and Rackmounting Guide • May 2001
b. Position a short bracket over the front end of the slide assembly.
The lip of the bracket should face the front of the slide assembly, as shown.
c. Secure the short bracket to the slide assembly. Use two 8-32 panhead screws
with a flat washer, a lock washer, and a nut for each screw.
Slide assembly
Short bracket
Front
Chapter 2
Rack Installation
15
2. Attach a long mounting bracket to the rear end of each slide assembly.
a. Position the long bracket over the rear end of the slide assembly.
Align the elongated slots at the end of the long bracket over the holes on the slide
assembly, as shown.
b. Secure the long bracket loosely to the slide assembly. Use two 8-32 panhead
screws, flat washers, lock washers, and nuts for each long bracket.
Do not tighten the screws completely. You may need to adjust the mounting
bracket when you install the slide assembly into the rack enclosure.
Long bracket
Rear
Slide assembly
Front
Runner
Inner rail
3. Push in the inner rail and runner on each slide assembly.
a. Push the inner rail all the way into the slide assembly. If necessary, release the
coil spring catch.
b. Push in the runner until it stops.
16
Sun Enterprise 420R Server Setup and Rackmounting Guide • May 2001
Install the Slide Assemblies Into the
Rack Enclosure
1. Locate and mark the correct positions on the rack’s vertical mounting rails to
install the slide assemblies.
Allow four rack unit spaces (7.0 inches/17.78 cm) or 12 holes per server.
Because the holes on a standard rack enclosure are arranged in sets of 3 holes
spaced 5/8ths, 5/8ths, 4/8ths of an inch apart, determining which holes to use
for attaching a slide assembly depends on exactly where you locate the
system.
You can either count the holes so that each slide assembly is installed at the same
height front-to-back and side-to-side in the rack or use the Rack Buddy included
with your system documentation. Mark the location on the rack enclosure with a felt
tip marker or masking tape.
Install the slide assemblies into the lowest available position. If this is the first
system you are installing into the rack, use holes 3 and 4 or 5. Install additional
servers from the base up.
Rack Buddy
To use the Rack Buddy, complete these steps:
a. Place the Rack Buddy over the left front vertical rack rail. See the next figure.
b. Move the bottom of the Rack Buddy to the exact location on the rack rail where
the bottom of the system will be located.
c. Adjust the Rack Buddy so that the bottom server screw mounting location is
centered on the space in the Rack Buddy.
Chapter 2
Rack Installation
17
d. Looking through the three glide holes on the Rack Buddy, locate the two rack
rail holes that are most visible through the Rack Buddy and mark them.
Use these two rack rail holes to attach the slide assembly to the rack rail. You will
only use two of the three holes to attach the slide assembly. The assembly bracket
has three holes to allow for the differences in spacing between the rack rail holes.
Mark the corresponding holes on the right front vertical rack rail.
Rack
rail holes
Server
mounting
hole
18
Sun Enterprise 420R Server Setup and Rackmounting Guide • May 2001
2. Attach one slide assembly to the right rack mounting rail, and the other slide
assembly to the left rack mounting rail. See the next figure.
a. With the help of an assistant, position the slide assembly on the inside of the
rack enclosure with the short mounting bracket facing the front of the rack.
Count the holes so that each slide assembly is installed at the same height
front-to-back and side-to-side in the rack or use the Rack Buddy as described
in Step 1.
b. Attach the front short mounting bracket of one slide assembly to the
front rail on the rack.
Secure the slide bracket assembly to the front mounting rail using two
Phillips 10-32 panhead screws. Use the holes you marked in Step 1. Fingertighten the screws. Do not tighten the screws completely until all the screws
are in place and the slide assemblies are level.
c. Attach the long mounting bracket of the same slide assembly to the back rail of
the rack.
Secure the slide bracket assembly to the back mounting rail using two Phillips
10-32 panhead screws. Finger-tighten the screws. Do not tighten the screws
completely until all the screws are in place and the slide assemblies are level.
Chapter 2
Rack Installation
19
Note – You may need to slide the rear mounting bracket forward or backward on
the slide assembly to accommodate the depth of the rack.
3. Completely tighten all of the rackmounting screws.
a. Make sure that the slide assemblies are level front-to-back and left-to-right.
b. Tighten the eight 10-32 screws that secure the slide assemblies to the vertical
rack rails.
c. Tighten the four 8-32 screws that secure the long mounting brackets to the slide
assemblies.
Tighten 8-32 screws
Tighten 10-32 screws
20
Sun Enterprise 420R Server Setup and Rackmounting Guide • May 2001
Install the Server Into the Rack Enclosure
1. Verify that the runner on each slide assembly is pushed as far back as possible
into the slide assembly, as shown.
a. Push in the inner rail on each slide assembly until it reaches the stops that are
located furthest away from the front of the rack.
b. Push in the runner until it stops in the slide assembly.
Stops
Runner
Inner rail
Stops
Chapter 2
Rack Installation
21
2. Lift the server (one person on each side of the server) and approach the rack
enclosure with the back of the server facing the rack enclosure.
!
Caution – The system is heavy. Two people are required to move the system.
3. Align the crimped end of the inner glides on the server with the slide bracket
assemblies in the rack enclosure.
22
Sun Enterprise 420R Server Setup and Rackmounting Guide • May 2001
4.Slide the server evenly into the rack enclosure until the inner glides stop in the
slide.
5. On each side of the chassis, push in the flat spring catch on each inner glide and
push the server all the way into the rack.
Flat spring catch
Chapter 2
Rack Installation
23
6.Secure the chassis to the left and right vertical rails at the front of the rack.
Use a Phillips #2 screwdriver to tighten the four captive screws that secure the
system in the rack enclosure. These screws are in recessed access holes in the
decorative panels affixed to the system’s front panel, as shown.
Note – If you removed the side panels from the rack enclosure, leave them off until
after you complete the procedures in Chapter 3.
What Next
Go to Chapter 3 and complete the procedures for connecting the power cord and
cables to the back panel, powering on the system, and installing the operating
system.
24
Sun Enterprise 420R Server Setup and Rackmounting Guide • May 2001
CHAPTER
3
System Setup
This chapter explains how to attach all the cords and cables needed to get the server
up and running. Where software is involved, this chapter explains some of what you
need to do, and points you to the appropriate software manuals for the rest of the
information.
Complete the following tasks to finish setting up your system:
■
“Connect the Power Cord” on page 26
■
“Connect the Ethernet Cable” on page 29
■
“Install Options” on page 30
■
“Install a System Console” on page 30
■
“Restore the Rack Enclosure” on page 33
■
“Power On the System” on page 34
■
“Install the Operating System” on page 37
■
“Read the Online Documentation” on page 37
If you need to power off your system, see:
■
Sun Enterprise 420R Server Owner’s Guide
25
Connect the Power Cord
1. Turn the front panel keyswitch to the Standby position.
26
Sun Enterprise 420R Server Setup and Rackmounting Guide • May 2001
2. Connect the AC power cord to the right power inlet labeled 1 at the back of the
system.
3. Connect the other end of the AC power cord to the power sequencer in the rack
enclosure or to an AC outlet.
See the instructions provided with your rack enclosure for information about the
power sequencer. The outlet must connect the system to a 15A circuit in North
America and Japan, and to a 10A circuit in Europe.
Note – If your server includes a second power supply, connect the second AC
power cord to the left power inlet labeled 2. You may connect the second power
supply to the same AC circuit as the first supply. However, for increased system
redundancy, you should connect the two power supplies to separate circuits.
Note – This system is suitable for use with IT Power Systems.
Chapter 3
System Setup
27
4. Tie-wrap the power cord(s) to the strain relief(s) on the back panel.
The Sun Enterprise 420R server is shipped with two strain reliefs attached to the
back panel. A strain relief is a plastic tie-wrap on a base that is inserted into the back
panel of the system. Use these reliefs to manage the power cords when you slide the
system in and out of the rack enclosure.
To tie-wrap a power cord, wrap the loose end of the tie-wrap around the cord and
insert it into the opening on the base of the strain relief. Pull the end to tighten the
tie-wrap.
To release the tie-wrap from the cord, press down the tab on the strain relief base
and loosen the tie wrap.
Strain reliefs
Tab
28
Sun Enterprise 420R Server Setup and Rackmounting Guide • May 2001
Connect the Ethernet Cable
Connect a twisted-pair Ethernet (TPE) cable to the standard Ethernet port on the
back of your system.
1. Connect the TPE cable to the RJ-45 connector on the system back panel.
2. Connect the other end of the cable into the TPE outlet in the wall or the floor.
Chapter 3
System Setup
29
Install Options
Many of the options ordered with your system may have been pre-installed at the
factory. For information about how to install other options, see the Sun Enterprise
420R Server Service Manual or contact your qualified Sun service provider. For
information about installing an additional internal disk drive, see the Sun Enterprise
420R Server Owner’s Guide.
Install a System Console
To install the server software, or to diagnose a problem, you need some way to enter
system commands and view system output. You can do one of the following:
■
Establish a tip connection from another Sun system.
■
Connect an ASCII terminal to serial port A.
■
Install a graphics card, monitor, and keyboard on your server. These components
are not shipped with the server.
How to Set Up a tip Connection
For information about establishing a tip connection, see the Sun Enterprise 420R
Server Owner’s Guide.
30
Sun Enterprise 420R Server Setup and Rackmounting Guide • May 2001
How to Connect an ASCII Terminal
1. Connect the terminal’s data cable to serial port A on the server’s back panel.
2. Connect the terminal’s power cord to a grounded AC power outlet.
3. Set the terminal to receive:
■
At 9600 baud
■
An 8-bit signal with no parity and 1 stop bit
Chapter 3
System Setup
31
How to Install a Graphics Console
To install a local graphics console you need a PCI-based graphics card, a monitor,
and a Sun-compatible keyboard, mouse and mouse pad. These components are not
shipped with your system. See the Sun Enterprise 420R Server Owner’s Guide for more
information.
1. Install the graphics card into a vacant PCI slot.
See the Sun Enterprise 420R Server Service Manual or contact your qualified Sun
service provider.
2. Attach the monitor’s video cable to the graphics card’s video port.
Tighten the thumbscrews to secure the connection.
3. Connect the monitor’s power cord to a grounded AC power outlet.
32
Sun Enterprise 420R Server Setup and Rackmounting Guide • May 2001
4. Connect the mouse to the keyboard.
5. Connect the keyboard to the system.
Restore the Rack Enclosure
See the instructions provided with your rack enclosure to complete these steps.
1. Route and manage the cables within the rack cabinet.
2. Retract the enclosure’s anti-tip legs, if applicable.
3. Replace the side panels, if applicable.
4. Replace the front and back doors, if applicable.
Chapter 3
System Setup
33
Power On the System
Caution – Never move the system when the system power is on. Movement can
cause catastrophic disk drive failure. Always power off the system before moving it.
Caution – Before you power on the system, make sure that the cover is properly
installed.
1. Turn on power to any peripheral and external storage devices.
2. Turn on power to the monitor or terminal, if applicable.
3. Turn the front panel keyswitch to the Power-On/Off position.
34
Sun Enterprise 420R Server Setup and Rackmounting Guide • May 2001
4. Press the front panel Power button once.
Note – The system may take anywhere from 30 seconds to two minutes before video
is displayed on the system monitor or the OK prompt appears on an attached
terminal. This time depends on the level of power-on self-test (POST) diagnostics
being performed.
Chapter 3
System Setup
35
5. Turn the keyswitch to the Locked position.
The Locked position prevents accidentally powering-off the system.
Note – If you need to power off the system, see the Sun Enterprise 420R Server
Owner’s Guide for more information.
36
Sun Enterprise 420R Server Setup and Rackmounting Guide • May 2001
Install the Operating System
If you are installing the Solaris 7 or later operating environment, refer to the
documentation accompanying your Solaris™ software and see the Sun Enterprise
420R Server Owner’s Guide for installation information.
If you are installing the Solaris 2.6 Hardware 5/98 operating environment, you
must use the Operating Environment Installation CD included with your system.
During the installation process, this CD installs certain software upgrade patches
that support Solaris releases running at the 450 MHz CPU speed.
This CD does not provide the content of the Solaris releases. You need to have the
Solaris media kit for the Solaris 2.6 Hardware 5/98 operating environment in order
to install the Solaris software itself. At the appropriate point in the installation
process, the Operating Environment Installation CD prompts you to install the Solaris
software.
This CD is not required if you are using the Solaris 7 or later operating environment.
For installation instructions, see the document included with Operating Environment
Installation CD.
Refer to the documentation accompanying your Solaris software and the Sun
Enterprise 420R Server Owner’s Guide for installation information.
Read the Online Documentation
The documentation kit contains a CD-ROM disc with online documentation that
describes how to use, service, and maintain your system. Refer to the documents
supplied with the CD-ROM disc for further instructions.
Chapter 3
System Setup
37
38
Sun Enterprise 420R Server Setup and Rackmounting Guide • May 2001
APPENDIX
A
Rack Enclosure Requirements
The server is designed so that you can install it into a Sun 72-inch (184-cm) tall
Sun expansion cabinet or other EIA-compliant industry-standard rack enclosure
that meets the requirements listed in the table below. You need a Sun
rackmounting kit for each server that you will rackmount.
Rack Enclosure Feature
Requirement
Load Bearing Capacity
The rack must firmly support the weight of a Sun Enterprise
420R server (75 lbs, 34 kg), plus the weight of the rackmounting
hardware, plus the weight of any other installed devices.
Vertical Space
Requirements
Each server requires four rack units (7 inches, 17.78 cm) of
vertical space for rack installation. A 72-inch (183-cm)
cabinet can hold up to nine servers.
Airflow
The system requires 113 cfm at 40o C and 10,000 feet.
This air-flow rate corresponds to 328 lb/hr at any
altitude and to 78 cfm at 40o C and sea level.
For proper ventilation, each system in the rack enclosure
requires 28 square inches (181 square cm) of unrestricted
airflow into the front of the system, and 23 square inches
(148 square cm) of unrestricted exhaust port at the back of the
system. Maintain a minimum 1.5 inches (3.8 cm) clearance
between the system and any front or back doors.
39
Rack Enclosure Feature
Requirement
Vertical Mounting Rail
Requirements
The rack must have two pairs of vertical mounting rails (one
pair in front, one in back) that conform to the EIA (RETMA)
standard for mounting hole spacing.
Left-side-to-right-side rail spacing (mounting hole center to
mounting hole center) for front and back rails must be 18.3
inches (46.5 cm).
Front-to-back rail spacing must be at least 26.875 inches (68.26
cm) and not more than 34.875 inches (88.5 cm) from the outside
face of the front rail to the outside face of the back rail.
Front and back vertical rail mounting faces must be parallel
with each other and with the front plane of the rack.
Doors and Panels
If you are using a Sun expansion cabinet, you can remove the
front door and the side panels to increase access to the system.
Otherwise, see the instructions provided with the rack
enclosure.
EMI Requirements
Electromagnetic interference (EMI) shielding requirements are
met by the system chassis and metal side panels, which remain
in place when the unit is rack mounted.
Anti-Tilt Protection
The rack must be bolted securely to the floor or equipped with
a sturdy and extendable anti-tip leg. You must prevent the
cabinet from tilting forward when one or more systems or
devices are fully extended out the front of the rack.
Minimum Service Access
An area not less than 3 feet (1 meter) deep and 6 feet
(2 meters) wide must be available in front of the rack
for installation and service access.
When fully extended on its mounting rail slides, the system will
protrude 29.75 inches (75.6 cm) forward of the rack’s front
vertical mounting rails.
Fire Containment
40
The rack enclosure must meet Underwriters Laboratories, Inc.
and TUV Rheinland of N.A. requirements for fire containment.
Sun Enterprise 420R Server Setup and Rackmounting Guide • May 2001