1
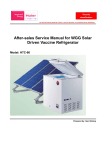
1.5 Cu.Ft. Compact Refrigerator
MODEL: CCR15CE1B
Installation
INSTALLATION
Location
When selecting a position for your unit you should make sure the floor is flat and firm, and
the room is well ventilated with an average room temperature of between 16°C and 32°C.
Avoid locating your unit near a heat source, e.g. cooker, boiler or radiator. Also avoid direct
sunlight as it may increase the electrical consumption. Extreme cold ambient temperatures
may also cause the unit not to perform properly. This unit is not designed for use in a garage
or outdoor installation. Do not drape the unit with any covering.
When installing the unit, ensure that 100 mm of free space is left at both sides, 100 mm at
the rear and 200 mm at the top of the unit. The door can be opened to the right or the left,
depending on what better suits the location. Please ensure there is adequate space for the
door to fully open.
• If you want to have the door swing reversed, we recommend that you contact a
qualified technician. You should only try to reverse the door yourself if you believe
that you are qualified to do so.
• All parts removed must be saved to do the reinstallation of the door. You should
rest the unit on something solid so that it will not slip during the door change
process. Do not lay the unit flat as this may damage the coolant system. Ensure the
unit is unplugged and empty.
Reversing the Door Swing
Tools required: Phillips style screwdriver / Flat bladed screwdriver / Hexagonal spanner
• Ensure the unit is unplugged and empty.
• Adjust the two levelling feet to their highest position.
• To take the door off it is necessary to tilt the unit backwards. You should rest the
unit on something solid so that it will not slip during the door reversing process.
• All parts removed must be saved to do the reinstallation of the door.
• Do not lay the unit flat as this may damage the coolant system.
• We recommend that 2 people handle the unit during assembly.
1. Tilt the unit slightly towards the rear and
prop it securely. Two people are required
to tilt the unit during the door reversal
process.
5
INSTALLATION
2. Remove the top right hinge cover.
3. Undo the screws. Then remove the hinge
bracket.
4. Remove the top left screw cover.
5. Move the core cover from left side to
right side. And then lift the door and
place it on a padded surface to prevent it
from scratching.
6
INSTALLATION
6. Remove the screws and bottom hinge.
Then remove the adjustable feet from
both side.
Unscrew
7. Unscrew and remove the bottom hinge
pin, turn the bracket over and replace it.
Unscrew
Screw
8. Refit the bracket fitting the bottom hinge
pin. Replace both adjustable feet.
Screw
7
INSTALLATION
9. Place the door back on. Ensure the door
is aligned horizontally and vertically
so that the seals are closed on all sides
before finally tightening the top hinge.
10.Insert the hinge bracket and screw it to
the top of the unit.
11.Use a spanner to tighten it if necessary.
12.Put the hinge cover and the screw cover
back.
13.With the door closed, check that the
door is aligned horizontally and vertically
and that the seals are closed on all sides
before finally tightening the bottom
hinge. Re-adjust the levelling feet as
needed.
8
INSTALLATION
Levelling the Unit
To do this adjust the two levelling feet at the
front of the unit.
If the unit is not level, the door and magnetic
seal alignments will not be covered properly.
Cleaning Before Use
Wipe the inside of the unit with a weak solution of bicarbonate soda. Then rinse with warm
water using a ‘wrung-out’ sponge or cloth. Wash the shelf in warm soapy water and dry
completely before replacing in the unit. Clean the exterior of the unit with a damp cloth.
If you require more information refer to the Cleaning section.
• Before Plugging in YOU MUST
Check that you have a socket which is compatible with the plug supplied with the
unit.
• Before Turning On!
Do not turn on until two hours after moving the unit. The coolant fluid needs time
to settle.
Before Using Your Unit
Before placing any food in your unit, turn it on and wait for 24 hours, to make sure it is
working properly and to allow it time to fall to the correct temperature. Your unit should not
be overfilled.
9
Product Overview
Font View
Ice Box
Adjustable
Shelf
Door Racks
Thermostat
Control Dial
(at rear side)
Levelling Feet
Rear View
Thermostat
Control Dial
(at rear side)
10
Operation
Switching On Your Unit
1. Connect the mains cable to the mains socket. The
internal temperature of your unit is controlled by a
thermostat. There are six settings, of which position
5 is the coldest and position 0 turns the unit off.
2. Adjust the thermostat control dial to the desired
position, bear in mind that the higher the
number, the lower the temperature. Position 3
recommended setting when operating at normal
room temperature (between 16°C and 38°C).
3. The unit may not operate at the correct
temperature if it is in a particularly hot or a
particularly cold room, or if you open the door
often.
4
3
5
2
0
1
4. To ensure that the unit is cool enough to sufficiently
chill your food, wait 24 hours before filling it with
food.
Adjusting the Temperature
The internal temperature of the unit is controlled by a thermostat. The recommended position
is between 1 to 3 for colder working environments (i.e. during winter) and between 4 to 5 for
hotter environments. Please adjust according to the environment.
Noises Inside the Unit!
You may notice that your unit makes some unusual noises. Most of these are perfectly normal,
but you should be aware of them!
These noises are caused by the circulation of the refrigerant liquid in the cooling system. It has
become more pronounced since the introduction of CFC free gases. This is not a fault and will
not affect the performance of your unit. This is the compressor motor working, as it pumps the
refrigerant around the system.
11
Shopping for Chilled Foods
•
Take a quick look at the chilled food package and make sure it is in perfect condition.
•
Try to keep chilled food together whilst shopping and on the journey home as this will help
to keep the food cold.
•
Don’t buy chilled food unless you can chill it straight away. Specially insulated bags can be
bought from most supermarkets and hardware shops. These bags can keep chilled food cold
for longer while transporting.
•
Food that has been left in a car or at room temperature for a prolonged period of time could
raise the food temperature to a dangerous level, which allows harmful bacteria to grow.
•
Always unpack and place chilled food in the unit before storing dry food.
Tips for Keeping Food in the Unit
12
•
Cooked meats/fishes should always be stored on a shelf above raw meats/fishes to avoid
bacterial transfer. Keep raw meats/fishes in a container which is large enough to collect
juices and cover it properly. Place the container on the lowest shelf.
•
Leave space around your food, to allow air to circulate inside the unit. Ensure all parts of the
unit are kept cool.
•
To prevent transfer of flavours and drying out, pack or cover the food separately. Fruit and
vegetables do not need to be wrapped.
•
Always let pre-cooked food cool down before you put in the unit. This will help to maintain
the internal temperature of the unit.
•
To prevent cold air escaping from the unit, try to limit the number of times you open the
door. We recommend that you only open the door when you need to put food in or take
food out.
Cleaning
Defrosting
Frost might build up in the unit after it has been used for a period of time. Scrape away the frost
using a plastic scraper (not included).
Do not use a metal or sharp instrument to scrap away the frost, nor should you use any
electrical appliances to aid defrosting.
We recommend that defrosting should be carried out when the frost layer builds up to 10 mm
(0.39”). Choose a time when the stock of frozen food is low, follow these procedures:
1. Take out the food, turn the unit off at the mains supply and leave the door open. Ideally, the
frozen food should be put into another freezer. If this is not possible, wrap the food in several
sheets of newspaper or large towels and then a thick blanket to keep it cool.
2. Place a shallow bowl or pan below the unit. Scrape away the frost
using the plastic scraper. Defrosting the remaining frost can be
speeded up by placing a bowl of hot water inside the unit and
closing the door. As the solid frost loosens, scrape it away with the
plastic scraper and remove.
3. When defrosting is complete, clean your unit’s interior and exterior.
Cleaning the Interior and the Exterior of the Unit
•
•
Remove the shelf before cleaning.
Wipe the inside of the unit with a weak solution of bicarbonate soda and then rinse with
warm water using a ‘wrung-out’ sponge or cloth. Wipe completely dry before replacing the
shelf.
•
Use a damp cloth to clean the exterior, and then wipe with a standard furniture polish. Make
sure that the door is closed to avoid the polish getting on the magnetic door seal or inside
the unit.
•
The grille of the condenser at the back of the unit and the adjacent components can be
vacuumed using a soft brush attachment.
Cleaning Tips
Condensation may appear on the outside of the unit. This may be due to a change in room
temperature. Wipe off any moisture residue. If the problem continues, please contact a qualified
technician for assistance.
13
Maintenance
Care When Handling / Moving the Unit
Hold the unit around its sides or base when moving it. Under no circumstances should it be
lifted by holding the edges of the top surface.
Servicing
The unit should be serviced by an authorised engineer and only genuine spare parts should be
used. Under no circumstances should you attempt to repair the unit yourself. Repairs carried
out by inexperienced persons may cause injury or serious malfunction. Contact a qualified
technician.
Switching Off for Long Periods of Time
When the unit is not in use for a long period of time, disconnect it from the mains supply, empty
all food and clean the appliance, leaving the door ajar to prevent unpleasant smells.
Disposal
Old units still have some residual value. An environmentally friendly method of disposal will
ensure that valuable raw materials can be recovered and used again. The refrigerant used in
your unit and insulation materials require special disposal procedures. Ensure that none of the
pipes on the back of the unit are damaged prior to disposal.
Up to date information concerning options of disposing of your old unit and packaging from
the new one can be obtained from your local council office.
When disposing of an old unit break off any old locks or latches and remove the door as a
safeguard.
14
Safety Warnings
For your continued safety and to reduce the risk of injury or electric shock, please follow all the
safety precautions listed below.
•
Read all instructions carefully before using the unit and keep them for future reference.
•
Retain the manual. If you pass the unit onto a third party, make sure to include this manual.
•
Keep ventilation openings in the unit enclosure clear of obstructions.
•
Do not use mechanical devices or other means to accelerate the defrosting process, other
than those recommended by the manufacturer.
•
Do not use electrical appliances inside the food storage compartments of the freezer, unless
they are of the type recommended by the manufacturer.
•
If the mains cable is damaged, it must be replaced by the manufacturer, its service agent or a
qualified technician in order to avoid a hazard.
•
Choose a location for your unit away from heat sources such as radiators or fires as
refrigerant and vesicant are burnable.
•
Young children should be supervised to ensure that they do not play with the unit.
•
Do not damage the refrigerant circuit (applicable only for appliances with refrigeration
circuits which are accessible to the user).
•
The unit must be maneuvered by a minimum of 2 persons.
•
This unit is not intended for use by persons (including children) with reduced sensory or
mental capabilities, or lack of experience and knowledge unless they have been given
supervision or instructions concerning the use of the freezer by a person responsible for
their safety.
•
If your unit is fitted with a lock to prevent children being trapped inside, keep the key out of
reach and not in the vicinity of the unit.
•
Do not store volatile or flammable substances in the unit.
•
Do not store bottles or glass containers in the unit. Contents can expand when frozen (fizzy
drinks) which may break the bottle and damage the unit.
WARNING
IT IS HAZARDOUS FOR ANYONE OTHER THAN AUTHORISED SERVICE PERSONNEL TO
CARRY OUT SERVICING OF REPAIRS WHICH INVOLVE THE REMOVAL OF COVERS.
TO AVOID THE RISK OF AN ELECTRICAL SHOCK DO NOT ATTEMPT REPAIRS YOURSELF.
16