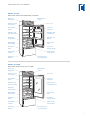
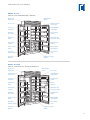
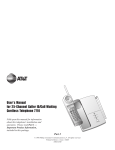
1
USE & CARE GUIDE
Caring for your Built-In refrigerator and everything in it.
CONTENTS
Sub-Zero Built-In Refrigeration
3
Sub-Zero Built-In Features
4
Sub-Zero Built-In Models
5
Sub-Zero Built-In Use & Care
12
Keeping Food at Its Best
31
Food Storage Recommendations
35
Water Filtration System Performance Data
40
State of California Certification
42
Troubleshooting Guide
43
Service Information
46
Sub-Zero Warranty
47
As you read this Use & Care Information,
take particular note of the CAUTION and
WARNING symbols when they appear.
This information is important for safe and
efficient use of the Sub-Zero equipment.
signals a situation where minor injury or
product damage may occur if you do not
follow instructions.
states a hazard that may cause serious
injury or death if precautions are not
followed.
In addition, this Use & Care Information may
signal an IMPORTANT NOTE which highlights
information that is especially important.
SUB-ZERO® is a registered trademark of Sub-Zero, Inc.
S U B - Z E R O B U I LT- I N R E F R I G E R AT I O N
THANK YOU
D U A L R E F R I G E R AT I O N
Thank you for purchasing your new Sub-Zero
Built-In unit. With Sub-Zero, you can rely on a
60-year tradition of quality and reliability. The
Built-In line brings together the latest and
finest features in home refrigeration to give
you the freshest food possible.
The Built-In line continues the Sub-Zero
tradition of superior quality and reliability.
Sub-Zero pioneered the development of our
dual refrigeration system, giving you
optimum fresh and freezer food storage in
ideal self-contained sections. Both refrigerator
and freezer maintain accurate, consistent
temperatures. Dual refrigeration keeps your
food fresh longer than any other system
available.
Sub-Zero’s design, beauty and quality are
reflected in the broad range of standard
features that put Sub-Zero in a class by itself.
The custom-design appearance of the
Sub-Zero Built-In line gives you options no
other line offers, whether you have chosen a
framed, overlay/ flush inset, stainless steel or
glass door style unit.
Your Sub-Zero is protected by a warranty that
is one of the finest in the industry. Take a
moment to read the warranty statement on
page 47 and refer to it should service become
necessary.
This Use & Care Information will answer
most of your questions about the features,
operation and maintenance of your Built-In
unit. If you have questions that are not
addressed here, call Sub-Zero Customer
Service at 800-222-7820 or visit our website,
subzero.com.
With dual refrigeration, the freezer maintains
a constant temperature within one degree of
the temperature you set within our range of
-5˚F (-21˚C) to +5˚F (-15˚C), without unwanted
moisture and odor from the refrigerator. Similarly, you can adjust the refrigerator temperature within a range of 34˚F (1˚C) to 45˚F (7˚C),
for proper humidity levels tailored for longer
food life expectancy.
CONTACT
INFORMATION
Sub-Zero
Customer Service:
800-222-7820
Website:
subzero.com
The dual refrigeration system also means
there is no transfer of fresh food odors to
frozen food or ice. The Sub-Zero system does
not freeze the moisture out of the air in the
fresh food section.
Sub-Zero dual refrigeration is also more
energy efficient than old-fashioned single
refrigeration systems. When the refrigerator
is used frequently during the day it does not
require the freezer to circulate its very cold,
dry air to the refrigerator. Instead, the refrigerator uses moist air to keep fresh foods fresh
and energy use minimal.
3
S U B - Z E R O B U I LT- I N F E AT U R E S
B U I LT- I N F E AT U R E S
Classic framed models—the look that made
Sub-Zero famous—feature an innovative
grille and handle design.
ACCESSORIES
Optional accessories are available
through your
Sub-Zero dealer. To
obtain local dealer
information, visit
the Showroom
Locator section of
our website,
subzero.com.
Overlay models blend seamlessly into your
overall room design and complement
surrounding cabinetry.
New flush inset application allows the unit
to be flush with surrounding cabinetry.
Options include using custom panels or
Sub-Zero accessory panels in classic,
platinum and carbon stainless steel. Classic
stainless steel models feature wrapped
doors, stainless steel tubular handles and
flip-up grille, designed specifically to
enhance the aesthetics of today’s professional looking kitchens.
Models BI-36RG, BI-30UG and BI-36UG offer
a unique feature—a glass door. These units
each come in the framed, overlay/ flush
inset, or classic stainless steel design and
meet stringent energy requirements.
Glass door models add a contemporary
look that is quite unique and innovative,
with subdued interior lighting.
Shallow-depth design means access is easy
to any area of the refrigerator.
Built-In combination models have the
Sub-Zero dual refrigeration system, which
ensures the freshest food and energy efficiency at the same time. You have precise
independent control of the refrigerator and
freezer sections.
All Built-In models have a microprocessor
to give you better control, automatic
defrosting that senses, then adapts to your
use patterns, and a service indicator light.
Our microprocessor continuously monitors
each section, and should a problem arise,
the processor will turn on the
indicator in the control display panel.
These appliances are Star-K compliant
to meet strict religious regulations in
conjunction with specific instructions
found on www.star-k.org.
4
Controls are up front and easy to use.
They give you digital readings for quick,
easy-to-read reference. Up-front controls
also keep you informed about the operation
of the unit on a continuous basis.
All Built-In models have a flip-up grille,
making it even easier to clean your
condenser and access your water filter.
Water Filtration—our microbiological water
filter ensures you have the cleanest ice and
water possible.
Air Purification—bacteria, odors and gases
are removed by this advanced air purification system.
Bright lighting spreads even illumination
throughout each section. The source of the
illumination is concealed.
A door alarm will let you know with an
audible chime if your refrigerator or freezer
door is left ajar.
The full-extension, high-humidity crisper
drawer(s) are large and deep, with smooth
sides and removable dividers in most
models.
The steel reinforced cantilevered glass
shelves make repositioning quick and easy.
They’re easy to clean and spill proof.
In-door shelves are adjustable in one-inch
increments for complete flexibility.
The dairy compartment is adjustable,
with one-door access. The dairy shelf is
magnetically sealed to maintain freshness.
Over-and-under models offer a full-extension freezer drawer.
Ice maker provides high-quality, crescentshaped ice.
Max Ice feature increases the rate of ice
production for a 24 hour period.
Magnetic gaskets around all doors give
extra-tight seals.
Our solid-core doors improve insulation
and structural integrity.
Solid, adjustable kickplate gives a true
built-in look and conforms to American
Institute of Architects standards.
S U B - Z E R O B U I LT- I N M O D E L S
MODEL BI-36R
ALL REFRIGERATOR
Easy-access,
flip-up grille
Lighted, electronic
control panel
Door closer
Air purification
system
Location of
rating plate
Adjustable, spillproof glass shelves
Adjustable dairy
compartment
Adjustable door
shelves
Refrigerator
storage drawers
User reference
cards
Stationary door
shelves
High-humidity
crisper drawer
Four-sided
magnetic gaskets
WARRANTY
Sub-Zero products
are covered by a
two, five and
twelve year residential warranty
(exclusions apply).
See warranty
details at the end
of this guide.
Removable
kickplate
MODEL BI-36RG
ALL REFRIGERATOR WITH GLASS DOOR
Easy-access,
flip-up grille
Lighted, electronic
control panel
Door closer
Air purification
system
Location of
rating plate
Adjustable, spillproof glass shelves
Triple-pane, UVresistant glass door
Refrigerator
storage drawers
User reference
cards
High-humidity
crisper drawer
Four-sided
magnetic gaskets
Removable
kickplate
5
S U B - Z E R O B U I LT- I N M O D E L S
MODEL BI-36F
ALL FREEZER
Easy-access,
flip-up grille
Lighted, electronic
control panel
Water filtration
system
Door closer
Location of
rating plate
Adjustable wire
shelves
Automatic ice
maker
Adjustable door
shelves
Removable ice
container
Freezer storage
baskets
Removable
kickplate
6
Four-sided
magnetic gaskets
S U B - Z E R O B U I LT- I N M O D E L S
MODEL BI-30U
OVER-AND-UNDER REFRIGERATOR | FREEZER
Easy-access,
flip-up grille
Water filtration
system
Lighted, electronic
control panel
Door closer
Air purification
system
Location of
rating plate
Adjustable, spillproof glass shelves
Adjustable dairy
compartment
Refrigerator
storage drawer
Adjustable door
shelves
High-humidity
crisper drawer
User reference
cards
Automatic ice
maker
Four-sided
magnetic gaskets
Removable ice
container
Two-tier freezer
storage baskets
Removable
kickplate
Full-extension rollout freezer drawer
MODEL BI-30UG
OVER-AND-UNDER WITH GLASS DOOR
Easy-access,
flip-up grille
Water filtration
system
Lighted, electronic
control panel
Door closer
Air purification
system
Location of
rating plate
Adjustable, spillproof glass shelves
Triple-pane, UVresistant glass door
Refrigerator
storage drawer
High-humidity
crisper drawer
User reference
cards
Automatic ice
maker
Four-sided
magnetic gaskets
Removable ice
container
Two-tier freezer
storage baskets
Removable
kickplate
Full-extension rollout freezer drawer
7
S U B - Z E R O B U I LT- I N M O D E L S
MODEL BI-36U
OVER-AND-UNDER REFRIGERATOR | FREEZER
Easy-access,
flip-up grille
Water filtration
system
Lighted, electronic
control panel
Door closer
Air purification
system
Location of
rating plate
Adjustable, spillproof glass shelves
Adjustable dairy
compartment
Refrigerator
storage drawer
Adjustable door
shelves
High-humidity
crisper drawer
User reference
cards
Automatic ice
maker
Four-sided
magnetic gaskets
Removable ice
container
Two-tier freezer
storage baskets
Removable
kickplate
Full-extension rollout freezer drawer
MODEL BI-36UG
OVER-AND-UNDER WITH GLASS DOOR
Easy-access,
flip-up grille
Water filtration
system
Lighted, electronic
control panel
Door closer
Air purification
system
Location of
rating plate
Adjustable, spillproof glass shelves
Triple-pane, UVresistant glass door
Refrigerator
storage drawer
High-humidity
crisper drawer
User reference
cards
Automatic ice
maker
Four-sided
magnetic gaskets
Removable ice
container
Two-tier freezer
storage baskets
Removable
kickplate
8
Full-extension rollout freezer drawer
S U B - Z E R O B U I LT- I N M O D E L S
MODEL BI-36S
SIDE-BY-SIDE REFRIGERATOR | FREEZER
Easy-access,
flip-up grille
Water filtration
system
Door closers
Lighted, electronic
control panel
Location of
rating plate
Adjustable dairy
compartment
Adjustable
door shelves
Air purification
system
Automatic ice
maker
Adjustable, spillproof glass shelves
Removable ice
container
Adjustable door
shelves
Freezer storage
baskets
High-humidity
crisper drawer
Four-sided
magnetic gaskets
User reference
cards
Removable
kickplate
Refrigerator storage
drawers
9
S U B - Z E R O B U I LT- I N M O D E L S
MODEL BI-42S
SIDE-BY-SIDE REFRIGERATOR | FREEZER
Easy-access,
flip-up grille
Water filtration
system
Door closers
Lighted, electronic
control panel
Location of
rating plate
Adjustable dairy
compartment
Adjustable
door shelves
Air purification
system
Automatic ice
maker
Adjustable, spillproof glass shelves
Removable ice
container
Adjustable door
shelves
Freezer storage
baskets
High-humidity
crisper drawer
Four-sided
magnetic gaskets
User reference
cards
Removable
kickplate
Refrigerator storage
drawers
MODEL BI-42SD
SIDE-BY-SIDE WITH ICE | WATER DISPENSING
Easy-access,
flip-up grille
Lighted, electronic
control panel
Adjustable dairy
compartment
Location of
rating plate
Air purification
system
Automatic ice
maker
Bulk ice
dispenser
Removable ice
container
Adjustable, spillproof glass shelves
Adjustable
door shelves
Adjustable door
shelves
Freezer storage
baskets
High-humidity
crisper drawer
Four-sided
magnetic gaskets
User reference
cards
Removable
kickplate
10
Water filtration
system
Door closers
Refrigerator storage
drawers
S U B - Z E R O B U I LT- I N M O D E L S
MODEL BI-48S
SIDE-BY-SIDE REFRIGERATOR | FREEZER
Easy-access,
flip-up grille
Water filtration
system
Door closers
Lighted, electronic
control panel
Location of
rating plate
Adjustable dairy
compartment
Adjustable
door shelves
Air purification
system
Automatic ice
maker
Adjustable, spillproof glass shelves
Removable ice
container
Adjustable door
shelves
Freezer storage
baskets
High-humidity
crisper drawer
Four-sided
magnetic gaskets
User reference
cards
Removable
kickplate
Refrigerator storage
drawers
MODEL BI-48SD
SIDE-BY-SIDE WITH ICE | WATER DISPENSING
Easy-access,
flip-up grille
Water filtration
system
Door closers
Lighted, electronic
control panel
Adjustable dairy
compartment
Location of
rating plate
Air purification
system
Automatic ice
maker
Bulk ice
dispenser
Removable ice
container
Adjustable, spillproof glass shelves
Adjustable
door shelves
Adjustable door
shelves
Freezer storage
baskets
High-humidity
crisper drawer
Four-sided
magnetic gaskets
User reference
cards
Removable
kickplate
Refrigerator storage
drawers
11
S U B - Z E R O B U I LT- I N U S E & C A R E
ELECTRONIC CONTROL SYSTEM
The Electronic Control System of your
Sub-Zero Built-In unit monitors and accurately
displays temperatures within one degree of
your preset temperature. It also monitors operation of the unit and lets you know if there’s a
problem. You’ll find the Control Center located
in the refrigerator section of all models, except
Model BI-36F where it is in the freezer section.
Refer to the illustration below.
TEMPERATURE CONTROL
The temperature ranges are -5˚F (-21˚C) to +5˚F
(-15˚C) in the freezer section, and 34˚F (1˚C) to
45˚F (7˚C) in the refrigerator section. It is
normal for temperatures to fluctuate slightly,
depending on external influences such as an
open door, the degree of humidity and room
temperature.
IMPORTANT NOTE: Always allow 24 hours
for the unit to reach the temperature you set.
POWER
Your new Built-In unit was thoroughly
inspected and tested before it was shipped
from the Sub-Zero factory. Temperatures are
preset at 38˚F (3˚C) in the refrigerator section
and 0˚F (-18˚C) in the freezer section.
Temperatures are displayed in the Control
Center display panel.
For combination units, there are two sets of
COLDER and WARMER key pads on the
Control Center, one for the refrigerator section
and the other for the freezer section. Models
BI-36R, BI-36RG and BI-36F have only one set
of COLDER and WARMER key pads.
All Sub-Zero Built-In models feature a POWER
key pad on the Control Center. This key pad
will turn off all electrical power to the unit.
When the power is off, the OFF indicator light
will be visible in the Control Center display
panel. This POWER key pad means you don’t
have to shut off power at the circuit breaker or
wall receptacle. The key pad can be used
during service or extended vacations.
To adjust the temperature in either section,
depress the COLDER or WARMER key pads
on the Control Center.
Display
Panel
Electronic control center
display panel
12
Colder / Warmer
Key Pads
Temperature adjustment key pads
S U B - Z E R O B U I LT- I N U S E & C A R E
ELECTRONIC CONTROL SYSTEM
ALARM FEATURE
SABBATH MODE (STAR-K)
All Built-In models have an alarm feature with
an audible chime if the door is left ajar.
All Built-In models feature the Sabbath Mode.
This is for certain religious observances where
the lights and ice maker function need to be
turned off.
The alarm will sound after 30 seconds. It can
be deactivated by depressing the ALARM key
pad. When the alarm is activated, the
indicator will be visible in the Control Center
display panel.
ICE MAKER CONTROL
Built-In models with an ice maker feature an
ICE MAKER key pad on the Control Center.
This key pad switches the power to the ice
maker system on or off. When the ice maker
system is on, the
indicator will be illuminated in the Control Center display panel. The
ice maker can also be turned on using the
MAX ICE key pad, activating the Max Ice
feature. The
indicator will be illuminated in
the Control Center display panel when this
feature is on. Use the ICE MAKER key pad to
shut down the ice maker during extended vacations.
To initiate Sabbath Mode, while the unit is on
press the POWER key pad so that OFF is
visible in the Control Center display panel.
Your unit will be off.
Then press and hold the POWER key pad for
10 seconds. This will turn the unit back on and
will disable the lights and ice maker. To return
the unit to normal operating conditions, press
and release the POWER key pad.
If you have questions about Star-K compliance,
visit www.star-k.org.
VISUAL SERVICE DISPLAY
The Control Center monitors refrigerator and
freezer temperatures as well as the ice maker
system. If there is a temperature or ice maker
problem, you’ll be alerted by an illuminated or
flashing
indicator in the Control Center
display panel. The
indicator may also be
illuminated if the condenser needs cleaning.
Before calling for service, please check and see
if your condenser area needs cleaning. See
Condenser Cleaning, page 28.
Control Panel (Model BI-30UG)
Display Panel
13
S U B - Z E R O B U I LT- I N U S E & C A R E
R E F R I G E R AT O R S T O R A G E
STORAGE DRAWERS
ACCESSORIES
Optional accessories are available
through your
Sub-Zero dealer. To
obtain local dealer
information, visit
the Showroom
Locator section of
our website,
subzero.com.
To remove a storage drawer in the refrigerator
section, pull the drawer out until it stops.
Lift the font of the drawer slightly and pull
the drawer straight forward. Refer to the
illustration below.
IMPORTANT NOTE: If the door is limited to a
90-degree door opening, the shallow door
shelves will need to be removed from the
bottom of the door in order to remove a
drawer.
DOOR SHELVES AND DAIRY
COMPARTMENT
The door shelves and dairy compartment are
adjustable within the guides of the door liner.
NOTE: Glass door models do not have door
shelves or a dairy compartment.
To remove a shelf or the dairy compartment,
lift it up and out from the bottom. To reinstall,
push it down into the guides. Refer to the
illustration below.
To reinstall, push the drawer slides back into
the refrigerator. Align the drawer with the
slides, then push the drawer straight back on
to the slides until it stops. The front of the
drawer should drop slightly and click when it is
properly engaged onto the slides.
Refrigerator storage drawer
removal
14
Door shelf removal
S U B - Z E R O B U I LT- I N U S E & C A R E
R E F R I G E R AT O R S T O R A G E
ADJUSTABLE GLASS SHELVES
Be sure to read and understand the following
instructions before removing or adjusting
shelves. To remove or adjust shelves, first tilt
the shelf up at the front, then lift it up and
out of the tracks on the rear wall of the
refrigerator. Refer to the illustration below.
Glass shelves should warm to room
temperature before immersing in warm
water.
If the door is limited to a 90-degree opening,
you'll need to clear the door shelves in order
to remove a shelf. Lift and pivot the end of the
shelf nearest the door upward, and remove.
To replace a shelf, insert it in the tracks at the
rear of the refrigerator with the front of the
shelf raised slightly. As you push the shelf in,
lower the front of the shelf until it locks into
position.
IMPORTANT NOTE: Always be careful in
handling glass shelves to prevent breaking or
scratching the interior.
Adjustable glass shelf removal
15
S U B - Z E R O B U I LT- I N U S E & C A R E
FREEZER STORAGE
FREEZER BASKET REMOVAL
All freezer and side-by-side models: First,
unload the freezer basket. To remove the
basket, pull it out until it stops. Behind the
bottom two corners of the front face of the
basket are metal clips. Pull these clips toward
the front of the basket and lift and rotate the
basket up.
IMPORTANT NOTE: To remove the baskets
from Models BI-36S, BI-42S or BI-42SD, the
basket must be raised and pulled through the
opening in the door liner after disengaging the
basket from the slides.
IMPORTANT NOTE: If Models BI-36F or BI-36S
are limited to a 90-degree opening, it may be
necessary to remove the basket and/or shelf
above in order to remove the basket.
Over-and-under models: First, unload the
freezer baskets. To remove the upper freezer
basket, lift up on the front and pull forward to
release the basket. To remove the lower freezer
basket, lift the basket directly upward and out.
Refer to the illustration below.
To reinstall the lower freezer basket, insert the
basket into the four corner retainers. To reinstall the upper freezer basket, position the
basket onto the slide rails. Slide the basket
towards the back. You should hear an audible
click when the engagement is made.
IMPORTANT NOTE: Unload the freezer
baskets before removing.
To reinstall, push the drawer slides back into
the freezer. Align the basket with the slides,
and push the basket straight back onto the
slides until it stops. Press downward on the
front of the basket to engage the basket clips
with the slides.
Freezer basket removal—all freezer
and side-by-side models
16
Freezer basket removal—
over-and-under models
S U B - Z E R O B U I LT- I N U S E & C A R E
FREEZER STORAGE
ICE BUCKET REMOVAL
Over-and-under models and Model BI-36F:
To remove the ice bucket, pull the freezer
drawer or basket out until it stops and lift the
ice bucket out.
Models BI-42SD and BI-48SD: To remove the
ice bucket, pull the bucket out part of the way,
then rotate the right side of the bucket as you
continue to pull the bucket out. Refer to the
illustration below.
Models BI-36S, BI-42S and BI-48S: To
remove the ice bucket, pull the bucket forward
until it stops. Next, lift the bucket to clear the
carrier assembly along the back edge of the
bucket. Once the bucket has cleared the
assembly, continue to pull forward and out. If
the door is limited to a 90-degree opening,
repeat the procedure, but when lifting the ice
bucket out, pivot the right side of the bucket
toward you and out. This will allow the ice
bucket to clear the door. Refer to the illustration below.
Ice bucket removal—
Models BI-36S, BI-42S and BI-48S
Ice bucket removal—
Models BI-42SD and BI-48SD
17
S U B - Z E R O B U I LT- I N U S E & C A R E
I C E M A K E R O P E R AT I O N
The ice maker in your Sub-Zero freezer is fully
automatic and has been tested at the factory.
To start making ice, activate the ICE MAKER
key pad on the Control Center.
The ice maker system will not shut off if the ice
bucket is not in place.
When removing the ice bucket for an extended
period, deactivate the ice maker by depressing
the ICE MAKER key pad on the Control Center.
ICE PRODUCTION
The ice maker is designed to produce enough
ice for normal family use. The timing of icemaking cycles will vary depending on load
conditions, door openings and room temperature. On average, you can expect a cycle of ice
(eight cubes per cycle) every two hours.
MAX ICE FEATURE
The Max Ice feature increases the rate of ice
production for times where you need more
than normal. The increased ice production will
last for 24 hours, at which time it will return to
the normal production level. You can expect
about a 40% increase in ice production when
this feature is turned on.
To initiate the Max Ice feature, press the
MAX ICE key pad on the Control Center so
that the
indicator is visible in the display
panel. Refer to the illustration below.
To turn off the Max Ice feature, simply press
the MAX ICE key pad and the unit will return
to normal ice production.
The ice maker operates on water pressure of
30 (2.1 bar) to 100 psi (6.9 bar). In some cases,
a reverse osmosis water filter system may not
be able to maintain the minimum pressure.
IMPORTANT NOTE: If ice is not used regularly
it tends to fuse together. To avoid this, empty
and replace the ice in the container as needed.
Max Ice
Key Pad
Max Ice key pad
18
S U B - Z E R O B U I LT- I N U S E & C A R E
A I R P U R I F I C AT I O N S Y S T E M
All Sub-Zero Built-In models (except Model
BI-36F) include an advanced air purification
system. This system reduces bacteria, odors,
and even ethylene gas, which causes premature ripening in fruits and vegetables. The air
purification cartridge has been factory installed
and is located inside the refrigerator, on the
right-hand side of the back wall.
The air purification cartridge will last for
approximately one year. The
indicator will
flash in the Control Center display panel when
it needs to be replaced. To replace the
cartridge, grab the outside cover from the
bottom and pull it forward. It will flip up and
expose another flap and the cartridge. Refer to
the illustration below. Pull the flap forward
from the top, which will cause the cartridge to
pop out of position. Remove the cartridge.
REPLACEMENT CARTRIDGES
Replacement air purification cartridges can be
ordered by calling 888-210-4985 or online at
subzerowolfstore.com or subzero.com.
LAMP CONTAINS MERCURY
Manage in accordance with
disposal laws. See: www.lamprecycle.org
or call 1-800-555-0050.
IMPORTANT NOTE: The warranty for the air
purification cartridge supplied with the unit
only covers defects in materials or workmanship and not replacement due to normal use.
To replace, put the new cartridge into place,
with the connector pointing down. Once in
place, close the flap until you hear a click.
Then flip down the outside cover until it closes
against the wall.
Once the air purification cartridge has been
replaced, press the PURE AIR keypad on the
Control Center for 5 seconds. This will reset
the air purification indicator and will no longer
be displayed.
Air purification cartridge
19
S U B - Z E R O B U I LT- I N U S E & C A R E
WAT E R F I LT R AT I O N S Y S T E M
All Sub-Zero Built-In models except Models
BI-36R and BI-36RG feature a microbiological
water filtration system that supplies filtered
water to the ice maker and water dispenser to
produce great-tasting water and ice. The water
filter has been factory installed behind the
grille assembly. Refer to the illustration below.
It is important that the operation, maintenance
and filter replacement requirements be carried
out as scheduled.
INITIAL WATER FILTER USE
When using the water filter for the first time, it
is necessary to clear any air from the water
system and allow the filter to assist in cleaning
the water lines. For non-dispenser models, this
is done by discarding the first two full buckets
of ice. For dispenser models, dispense multiple
glasses of water for a period of two minutes.
WATER FILTER CARTRIDGE MONITOR
The water filter cartridge is rated for 235
gallons (890 L) or one year, whichever comes
first. The electronic control system monitors
the life of the water filter cartridge and indicates when it needs to be replaced. When it is
time to replace the water filter cartridge, the
indicator will be visible in the Control
Center display panel. Follow the steps to
replace the water filter cartridge on the following page.
Once the filter cartridge has been replaced, the
water filter reset button must be pressed and
held for 5 seconds. This will reset the water
filter life monitor and the
indicator will no
longer be displayed. Refer to the illustration
below for the location of the filter reset button.
Although it is designed to last for up to one
year of use, the actual life of the filter cartridge
may vary with water supply conditions. Therefore, it is recommended that the filter cartridge
be replaced when the
indicator is
displayed, if the ice cubes become hollow or
smaller, or the water flow from the dispenser
has slowed significantly.
IMPORTANT NOTE: The warranty for the
water filter cartridge supplied with the unit
only covers defects in materials or workmanship and not replacement due to normal use.
Water Filter
Reset Button
Water Filter
Water filter location
20
S U B - Z E R O B U I LT- I N U S E & C A R E
WAT E R F I LT R AT I O N S Y S T E M
WATER FILTER CARTRIDGE REPLACEMENT
REPLACEMENT FILTER CARTRIDGES
1) Lift the grille assembly to access the water
filter. To lift the grille, pull out on the
bottom edge of the grille and tilt the grille
frame forward.
Replacement water filter cartridges can be
ordered by calling 888-210-4985 or online at
subzerowolfstore.com or subzero.com.
2) To remove the old filter cartridge, simply
push the cartridge in and then pull it out.
There will be water in the filter cartridge, so
it is normal for a small amount of water to
spill out. Refer to the illustration below.
3) Remove the new filter cartridge from its
packaging and carefully remove the caps.
4) Line up the cartridge so that the locking
tabs can be inserted into the filter head.
5) Push the cartridge in until you hear a click.
The new cartridge is securely installed if it
cannot be removed by pulling on it slightly.
6) For non-dispenser models, the first two full
buckets of ice produced should be discarded
after the new filter cartridge has been
installed. Allow 24 hours before discarding
the first bucket of ice. For dispenser models,
dispense several glasses of water for a
period of two minutes. This will help clean
the water system and clear air from the line.
7) Be sure to press and hold the water filter
reset button for 5 seconds after replacing
the filter. Refer to the illustration on page 20.
Water Filter
Water filter cartridge removal
21
S U B - Z E R O B U I LT- I N U S E & C A R E
I C E A N D WAT E R D I S P E N S E R
For dispenser Models BI-42SD and BI-48SD,
the automatic ice and water dispenser gives
you both ice and chilled water without having
to open doors.
ICE DISPENSING
Models BI-42SD and BI-48SD have a feature
that limits the maximum amount of ice that is
dispensed each time the ICE key pad on the
glasswell is pressed.
ICE DISPENSER OPERATION
To dispense ice, hold down the ICE key pad for
approximately two seconds. The dispenser will
meter out ice for about two seconds, collect
the ice directly above the glass, then drop the
ice into the glass. If less ice is desired, hold the
ICE key pad down for less than two seconds. If
more ice is desired, hold the ICE key pad down
until the dispensing cycle repeats.
To operate the ice dispenser for Models
BI-42SD and BI-48SD, set a glass on the water
grille of the glasswell, and press and hold the
ICE key pad on the glasswell until you have
the ice you need. For larger quantities of ice,
open the refrigerator door and place an ice
container under the dispenser chute, then
press the BULK ICE pad on the left hand wall
inside the refrigerator section. Refer to the
illustration below.
IMPORTANT NOTE: Be sure that dispenser
key pads are clean and dry when pressed to
avoid problems with the dispenser operation.
After initial ice maker start-up, discard the first
few batches of ice—they may be discolored by
the new system plumbing.
ICE DISPENSER OPERATING TIPS
If there’s no ice, make sure the ice maker
system is turned on and
indicator is illuminated in the Control Center display panel.
Use a sturdy glass to catch ice crescents.
Fragile glasses can break. Also, to avoid
breakage, make sure that the glass is
sitting vertically on the water grille.
Make sure that the water filter cartridge is
in place or that the water filtration system is
in bypass mode. A separate bypass plug is
required to bypass the water filtration
system. This bypass plug (part #7005018) is
available from your Sub-Zero dealer. Refer
to the installation instructions provided with
the bypass plug.
Water
Key Pad
Ice
Key Pad
Lock
Indicator
Touch Pad
Bulk Ice
Light
Key Pad
Water
Grille
Bezel
Glasswell—Models BI-42SD
and BI-48SD
22
Bulk ice dispenser—
Models BI-42SD and BI-48SD
S U B - Z E R O B U I LT- I N U S E & C A R E
I C E A N D WAT E R D I S P E N S E R
Make sure there is a supply of ice in the ice
bucket. See Ice Bucket Removal, page 17.
Make sure the ice bucket is all the way in
and engaging the auger motor at the back
of the bucket. If it is not all the way back,
push on the ice bucket and depress the ICE
key pad on the glasswell at the same time.
Press the ICE key pad on the glasswell. If
you do not hear auger motor noise, wait
five minutes, then try again. If you do not
hear auger noise after the second try, call
your Sub-Zero authorized service center.
If the ice dispenser is not used for a long
period, the ice may fuse together. To avoid
this, empty the ice bucket as needed.
WATER DISPENSER OPERATION
To operate the water dispenser for Models
BI-42SD and BI-48SD, set a glass on the water
grille of the glasswell, and press and hold the
WATER key pad on the glasswell until the
glass is filled.
The first time you use the water dispenser,
purge the water system and storage tank for
three minutes. This will clear out any air in the
system, along with foreign material in the new
plumbing connection.
Initially, for water to dispense properly, the
WATER key pad must be depressed and held
until water flows from the dispenser. You may
have to hold the key pad for 60 seconds for
water to fill the internal reservoir tank.
IMPORTANT NOTE: The chilled water reservoir tank is mounted inside the refrigerator
section. It will take several hours to chill the
water to the refrigerator temperature during
the original fill or after a lot of water is used.
Limit continuous ice and/or water
dispenser operation to seven minutes or
less, to avoid damaging the equipment.
DISPENSER LIGHTS
For dispenser models, there are three lighting
states than can be cycled by pressing the
LIGHT key pad on the glasswell.
All lights OFF
All lights ON (blue key pad and white
glasswell)
Key pad lights ON only
During water or ice dispensing, all lights will
illuminate until dispensing is complete, then
lights will return to their previous state.
DISPENSER WATER GRILLE
For dispenser models, a water grille at the
base of the glasswell will catch and evaporate
small spills. Because there is no drain in this
area, do not pour water into the water grille.
To clean the area, remove the water grille by
pressing the front left corner of the grille and
lifting it out.
LOCK
For dispenser models, the lock feature is used
to prevent unintended ice and water dispensing. When the dispenser is locked, all key pads
on the glasswell are deactivated to allow
cleaning or to prevent small children from
using the dispenser.
To activate the lock feature, hold down the
LIGHT key pad on the glasswell until the key
pad lights flash once and the red LOCK icon is
illuminated (approximately five seconds). The
lights will remain in the state they were in
before the lock feature was activated.
To deactivate the lock feature, hold down the
LIGHT key pad until the key pad lights flash
once and the red LOCK icon is no longer illuminated (approximately five seconds). The
lights will remain in the state they were in
before the lock feature was deactivated.
23
S U B - Z E R O B U I LT- I N U S E & C A R E
VA C AT I O N T I M E
For extended vacations, shut off power to the
unit. Empty the unit and block the doors open
slightly. A 1" (25 mm) space will let fresh air in
to keep the interior dry and fresh.
For short vacations, remove all perishable
items. Shut off the ice maker and empty the
ice bucket. Do not change the control settings.
If the unit is put into service temporarily and
later shut off, block the doors open to allow
fresh air to circulate inside the unit. Be sure to
shut off power to the unit.
If your religious observances (Sabbath Mode)
require turning off the lights and ice maker,
see Sabbath Mode, page 13.
24
Be sure to block doors open when unit is
not in service. Moisture buildup during
even the shortest amount of run time
could attack the interior metal surfaces.
S U B - Z E R O B U I LT- I N U S E & C A R E
O P E R AT I O N S
DOOR AND DRAWER CLOSING
CONDENSER FAN MOTOR
Over-and-under models: Your refrigerator
door has a door closing cam to help in closing
the door. With the door opened to about 110
degrees, the cam will hold in the open position
if the door is stopped. As you close the door,
the cam will take over at about 15 degrees to
help close the door.
All Sub-Zero Built-In models have a fan behind
the grille to cool the compressor area. This fan
runs with either compressor.
Your freezer drawer has a self-closing mechanism. The incline, built into roller assemblies
on the drawer, uses gravity to assist in closing
the drawer.
If your Built-In unit is positioned in a corner,
you may want to install an optional door stop,
which limits door opening to 90 degrees. This
door stop is provided with each Built-In model
and is shipped in a plastic bag in the grille
area.
DOOR CLOSING
All refrigerator, all freezer and side-by-side
models: Your refrigerator and freezer doors
have spring-loaded closure mechanisms. As
the doors are closed, the door closure engages
to help close and seal the doors. A 90-degree
door stop is provided with each unit and is
shipped in a plastic bag in the grille area.
AUTOMATIC DEFROST
Your Sub-Zero unit is equipped with an automatic defrost system. The refrigerator section
will defrost during each off cycle of the refrigerator compressor. The freezer section is
controlled by an energy-saving Adaptive
Defrost system, which defrosts as needed.
SOUNDS
You may hear some noises in the normal operation of the unit. Surrounding acoustics like
walls, floors and cabinets may affect the sound
of your unit. For example, a gurgling or
running water sound is probably refrigerant
circulating through the tubing. In Models
BI-42SD and BI-48SD, the ice dispenser motor
inside the refrigerator door closes five seconds
after either the ICE or WATER key pad is
released.
During the ice maker cycle you may hear the
sound of ice dropping into the container or the
water valve operating while refilling the ice
maker with water. During the freezer defrost
you may hear crackling and/or sizzling as the
heat from the defrost element clears the frost
from the freezer coil and water runs into the
water pan.
While the compressors are in operation, you
may hear a slight hum. During the start-up and
shutdown of the compressor, you may feel
vibration for a few seconds.
Some of these noises may be enhanced when
the unit door(s) are open.
25
S U B - Z E R O B U I LT- I N U S E & C A R E
CLEANING
STAINLESS STEEL EXTERIOR
SIGNATURE
POLISH
Signature Polish
is available from
Signature Limited
Laboratory,
P. O. Box 13436,
Dayton, Ohio
45413-0436, or
call 877-376-5474
(toll free).
Classic and platinum stainless steel
finishes: To clean the exterior of the classic
and platinum stainless steel finishes, use a
soft, nonabrasive stainless steel cleaner like
Signature Polish and apply with a soft 100%
lint-free cloth.
Signature Polish is available from Signature
Limited Laboratory, P. O. Box 13436, Dayton,
Ohio 45413-0436, or 877-376-5474 (toll free).
Carbon stainless steel finish: Carbon
stainless steel can be cleaned with mild soap
and water.
The carbon stainless steel finish uses the
interest of brushed steel to bring out the
maximum metallic luster of its charcoal
background.
Different light types and source locations can
result in variations in shading on different
components and areas of large appliances.
These variations are normal with the carbon
finish and add to the unique character of
colored stainless steel.
26
To bring out the natural luster of all three
finishes, lightly wipe the surface with a waterdampened microfiber cloth followed by a dry
polishing chamois. All work should follow the
grain direction of the finish. Better results are
obtained by keeping the cloth in continuous
contact with the stainless steel.
Under no circumstances should you use
a metallic or highly abrasive cleaner or
cloth, as this will remove the carbon
finish or scratch the classic or platinum
finishes.
S U B - Z E R O B U I LT- I N U S E & C A R E
CLEANING
INTERIOR CLEANING
GLASSWELL CLEANING
To clean interior surfaces and removable parts,
wash with a mild solution of soap and lukewarm water with a little baking soda. Rinse
and dry thoroughly. Avoid getting water on
lights, Control Center and display panel.
To clean the glasswell of Models BI-42SD and
BI-48SD, use a mild solution of soap and water
with a little baking soda. Wipe up spills after
removing the dispenser water grille.
Do not submerge or pour hot water over
cold glass shelves.
For the stainless steel areas of the glasswell on
Models BI-42SD and BI-48SD, you may use the
Stainless Steel Exterior cleaning procedure
described on page 26.
Do not use vinegar, rubbing alcohol or
other alcohol-based cleaners on any
interior surface.
27
S U B - Z E R O B U I LT- I N U S E & C A R E
CLEANING
CONDENSER CLEANING
CLEANING COMBINATION UNITS
In all Sub-Zero Built-In models, the condenser
is located behind the grille. First, pull out on
the bottom edge of the grill and tilt forward.
Then using a soft bristle brush, vacuum to
remove dust and lint from the condenser.
Refer to the illustration below for location of
the condenser. NOTE: To avoid bending the
condenser fins, be sure to vacuum in the direction of the fins (up and down). Clean the
condenser area every three to six months.
For over-and-under and side-by side models,
it is possible to turn off one section of your
combination unit for an extended period
without disrupting the other.
Before cleaning the unit, shut the electricity off at the control panel. When you
clean the condenser, wear gloves to avoid
injury from the sharp condenser fins.
First, turn the unit off. Press and hold the
WARMER key pad of the section you want to
disable. While holding the WARMER key pad,
depress the POWER key pad. Then,release
both key pads. The disabled section will
appear blank in the Control Center display
panel. Repeat the process to turn the section
back on. See Electronic Control System,
page 12.
Failure to clean the condenser could
result in temperature loss or mechanical
failure or damage.
Condenser
Location of condenser
28
Display
Panel
Control center display panel
S U B - Z E R O B U I LT- I N U S E & C A R E
L I G H T I N G I N F O R M AT I O N
IMPORTANT NOTE: When the refrigerator or
freezer doors are left open for a long time, the
lights may go off. This protects the internal
parts from overheating. To reset the light
system, close the door for 15 to 30 minutes.
Your Sub-Zero Built-In unit contains unique
40 watt appliance bulbs (part #7006999) in
refrigerator and freezer sections.
OVERHEAD LIGHTING
You’ll need to remove the light shield in the
top of the refrigerator or freezer to replace the
bulbs. Place your hands under the light shield
and slide back slowly until the key slots on the
sides of the light shield drop past the
mounting studs in the upper brackets. Then
remove the shield. The bulbs are now accessible. Refer to the illustration below.
Models BI-36RG, BI-30UG and BI-36UG: Like
all Sub-Zero units, lights in glass door models
will fully illuminate when the door is open.
With the BI-36RG, BI-30UG and BI-36UG,
however, you have the option of having
subdued lighting even with the door closed.
You can easily turn this feature off by depressing the LIGHT ON/OFF key pad on the Control
Center. The
indicator will appear when
accent lights are enabled.
Light shield removal
29
S U B - Z E R O B U I LT- I N U S E & C A R E
L I G H T I N G I N F O R M AT I O N
FREEZER LIGHTING
Models BI-30U, BI-30UG, BI-36U and
BI-36UG: Freezer lighting is located in upper
front section of the freezer compartment. To
remove the light shield, gently compress the
shield to release it from the supporting guides.
Models BI-42S and BI-48S: Freezer basket
lighting is located above the ice bucket. To
access the bulbs, remove the ice bucket. Next,
push the ice bucket assembly to the back of
the unit. Once the assembly is against the back
wall of the unit, the bulb will be accessible
under the fixed shelf in front of the icemaker.
Models BI-42SD and BI-48SD: Freezer
lighting above the ice bucket is accessible by
removing the ice bucket. See Ice Bucket
Removal, page 17. Once the bucket has been
removed, remove the light shield. See
Overhead Lighting, page 29.
Freezer lighting below the Ice bucket is accessible by removing the glass light shield. To
remove the glass, press the plastic lip up and
pull the glass out of the supporting guides.
Freezer basket lighting is located below the
fixed shelf on the back wall of the freezer. To
access the light first remove the freezer basket
below the fixed shelf. To remove the light
shield, gently compress the shield to release it
from the supporting guides.
Shut off power at the control panel
before changing light bulbs. Wear protective gloves when handling bulbs.
CRISPER LIGHTING
Crisper drawer lighting is located behind the
upper crisper drawer and mounted to the back
wall of the refrigerator. To remove the light
shield first remove the crisper drawer. Next
remove the upper crisper shelf. Then place
both hands under the bottom right and left
sides of the light shield and push upward.
See illustration below.
Light shield removal
30
K E E P I N G F O O D AT I T S B E S T
KEEPING FOOD FRESH
Your Sub-Zero unit features our unique dual
compressor refrigeration system to keep
food fresher longer. However, the quality and
safety of your food also depends on how you
handle it.
The information in this section gives you the
most up-to-date handling and storage
recommendations to help you keep food at its
best. If you have specific questions that are not
addressed here, contact a University or County
Extension Service or your local utility
company.
Most food inevitably deteriorates over time.
From the very beginning until it is consumed,
food undergoes changes. Microorganisms get
into food, multiply and cause spoiling.
Enzymes that occur naturally in food continue
the ripening process even after the food is
harvested. Improper temperatures cause food
to deteriorate faster. Changes in humidity
cause wilting and shriveling that can lead to
spoiling.
HANDLING RECOMMENDATIONS
Follow the recommended storage times and
temperatures in this guide. Your Sub-Zero
unit helps to slow the ripening process by
tailoring temperatures to each section as
needed.
Use specially designed compartments for
dairy foods, deli foods and fresh produce.
These compartments maintain temperature
and humidity levels that keep specific food
groups fresh.
Rotate food in refrigeration units, using a
first-in, first-out system.
When food does spoil, it’s usually obvious.
It becomes moldy, has an off-odor and
looks rotten. But there are times when
spoiling may not be so apparent. If you
think a food has been stored too long,
discard it. Don’t taste it to check if it’s okay.
Sub-Zero’s dual refrigeration system is
specifically designed to combat these changes
and keep your food fresh longer. The individual refrigerator and freezer systems have been
designed to maintain accurate, consistent
temperatures and proper humidity levels for
longer food life expectancy. Dual refrigeration
eliminates transfer of fresh food odors to
frozen food or ice and does not freeze the
moisture out of the air in the fresh food
section.
In addition, good handling practices can
minimize the rate of changes in food.
31
K E E P I N G F O O D AT I T S B E S T
K E E P I N G F O O D S A F E T O E AT
Most food-borne illness is caused by bacteria
such a Staphylococcus, Salmonella, E-coli and
Clostridium botulinum, the bacteria that
causes botulism. These bacteria grow rapidly
at temperatures between 40˚F (4˚C) and 140˚F
(60˚C), a range that’s called the Danger Zone.
Never leave food in the danger zone for more
than two hours. When the bacteria have multiplied to the millions in warm temperatures,
they cause illness. Some bacteria cause flu-like
symptoms, while others cause serious illness
or even death. Young children, the elderly and
people who are already ill are more likely to
become sick from food poisoning.
To reduce your risk of food-borne illness, use
the following techniques to keep your food
safe to eat:
WHEN YOU’RE SHOPPING
Place packages of raw meat, seafood or
poultry in plastic bags to keep them from
dripping on other foods.
Shop for meat, seafood and poultry last.
Don’t leave these foods in a hot car when
you’ve finished shopping. Take along a
cooler in hot weather or when you have to
travel long distances.
Check use by and sell by dates on foods to
make sure they’re fresh. Use extra care
when buying deli food. Buy only the
amount you will use in 1–2 days. Discard
hot or cold deli food that has been at room
temperature for more than two hours.
32
WHEN YOU STORE FOOD
Monitor temperatures of the refrigerator
and freezer sections on the electronic
control panel of your Sub-Zero unit.
Keep the refrigerator temperature at 40˚F
(4˚C) or below and freezer temperature at
0˚F (-18˚C).
Follow the recommended refrigerator and
freezer storage times and temperatures in
this guide.
Store raw meat, poultry and seafood
separate from other foods. Keep juices from
these packages from dripping on other
food.
Never taste food that looks or smells
strange to test its freshness. Discard it.
For refrigerator storage, leave raw meat,
poultry and seafood in its original wrapper
unless it is torn. Repeated handling can
introduce bacteria to these foods.
Wrap food stored in the refrigerator unit in
foil or plastic wrap, or place it in plastic
bags or airtight containers to keep it from
drying out. Date all packages.
For freezer storage, use freezer wrap,
freezer-quality plastic bags or aluminum foil
over the commercial wrap if foods will be
stored in the freezer for more than a couple
of months. This minimizes dehydration and
quality loss. Single layers of aluminum foil
may tear and cause freezer burn.
K E E P I N G F O O D AT I T S B E S T
K E E P I N G F O O D S A F E T O E AT
WHEN YOU PREPARE FOOD
Clean everything that comes in contact with
food.
Wash your hands for 20 seconds before and
after handling food.
Sanitize counters, equipment and utensils
after handling raw meat, seafood or poultry.
Rinse with a diluted chlorine bleach
solution, one teaspoon to a quart of water.
WHEN YOU COOK FOOD
Cook meat to an internal temperature of
165˚F (75˚C) or above, poultry to 180˚F
(80˚C) or above. For cuts more than 2"
(51 mm) thick, use a meat thermometer to
check the temperature. For thinner cuts,
clear juices (not pink) are a sign of
doneness.
Use clean kitchen towels, sponges and
cloths. Replace sponges every few weeks.
If you are cooking frozen meat or poultry
that has not been defrosted, increase the
cooking time to 1 1/2 times the time required
for thawed items.
Use disposable plastic gloves if you have
an infected cut or burn on your hands.
Roast meats or poultry in oven temperatures of 325˚F (165˚C) or above.
Thaw food in the refrigerator or microwave
oven, not on the counter. When you thaw
food in a microwave oven, cook it immediately.
Cook eggs until the yolk and white are firm,
not runny.
Marinate food only in the refrigerator.
Rinse poultry and seafood in cold water
before cooking.
Avoid cross-contamination in preparing
food. Keep raw meat, poultry and seafood
and their juices away from other food. For
example, don’t use the same surface and
utensils for preparing raw meat, poultry
and seafood that you use for preparing
salad ingredients.
Thoroughly clean your plastic and wooden
cutting boards. Wash with hot water and
soap and rinse with a diluted chlorine
bleach solution of one teaspoon to a quart
of water.
Don’t use recipes in which eggs remain raw
or partially cooked.
If your microwave has a temperature probe,
use it. Check temperatures of meat and
poultry in at least three spots. Rotate foods
during microwaving.
Don’t taste raw or partially cooked meat,
poultry, eggs or fish.
WHEN YOU HAVE LEFTOVERS
Refrigerate or freeze cooked leftovers in
small, covered containers within 2 hours
after cooking. Make sure there is adequate
air space around the containers so that food
can cool down quickly.
Remove the stuffing from meat or poultry
and store it separately.
Date packages of leftovers and use within a
safe period of time.
Cover and reheat leftovers thoroughly
before serving.
Bring sauces, soups and gravy to a boil.
Heat other foods to 165˚F (75˚C).
If you think food may be spoiled, discard it.
When in doubt, throw it out.
33
K E E P I N G F O O D AT I T S B E S T
FRESH FOOD STORAGE
FROZEN FOOD STORAGE
Shelf life of fresh foods varies depending on
how fresh it is when you buy it. To keep your
food fresher longer, follow the recommended
storage tips.
Freezer Storage: Wrap foods in material
designed for frozen food storage. The wrap
must seal out air and moisture. Do not
refreeze thawed meats.
Vegetables: Wash vegetables in cool water
and drain. Store in airtight containers or plastic
wrap. Vegetables stay fresh longer in high
humidity storage.
Ice Cream: The firmness of the ice cream will
depend on its cream content. Higher quality
ice creams usually have a higher cream
content, requiring colder freezer temperatures
to maintain their firmness. Soft ice cream is
not always an indication of a temperature
problem.
Fruits: Wash and dry fresh fruits. Store more
aromatic fruits in plastic bags. Most fruits stay
fresh longer in low humidity storage.
Prepackaged Meats: Store in original packaging. After opening, rewrap tightly in plastic
wrap or aluminum foil.
Fresh Meats, Fish and Poultry: Remove store
wrappings, then rewrap in plastic wrap, foil or
waxed paper and refrigerate immediately.
Make sure your refrigerator and freezer doors
close freely and completely. Overloading will
affect temperatures inside the unit. Do not fill
your freezer with large quantities of unfrozen
foods expecting them to fast freeze. Give the
freezer ample time to circulate cold air around
unfrozen items before adding additional items.
Eggs: Store eggs unwashed in their carton or
a portable egg tray. Use within 3 weeks.
SUGGESTED FOOD STORAGE
Milk, Cream and Cottage Cheese: Keep
carton closed. Store on refrigerator shelf and
use within 1–2 weeks.
Cheese: Store in original packaging until ready
to use. After opening, rewrap tightly in plastic
wrap or aluminum foil.
Leftovers: Let cool and cover tightly with
plastic wrap or foil. Airtight plastic containers
work well to prevent drying out and odor
transfer.
ETHYLENE
Some fruits and vegetables will produce
ethylene, a gas that initiates the ripening
process. Ethylene can cause premature
ripening in some foods, while in others, it can
actually cause damage. To reduce unnecessary
spoilage of your fresh produce, do not store
ethylene producing fruits and vegetables with
those that are ethylene sensitive. Refer to the
chart on page 37.
34
The food storage charts on the following pages
give you specific information to help you keep
food safe and keep it at its best quality. The
recommended storage temperatures will help
you determine optimal storage conditions for
your food. As a general rule, food that is
handled properly and kept at temperatures
below 40˚F (4˚C) will be safe to eat.
Storing food at temperatures below 40˚F (4˚C)
keeps it out of the Danger Zone. The storage
times for refrigeration will help keep food from
spoiling or becoming dangerous to eat. The
time limits for frozen foods are to maintain
flavor and texture. Food kept frozen longer
than the recommended time will still be safe to
eat, but its quality may diminish.
F O O D S T O R A G E R E C O M M E N D AT I O N S
F I S H , M E AT S A N D P O U LT RY
Recommended
Temperature
Storage Life
(refrigerator)
Storage Life
(freezer)*
Comments
FRESH FISH & SEAFOOD
cod, flounder, haddock
sole bluefish, perch
mackerel, salmon
shrimp, oysters
34˚F
34˚F
34˚F
34˚F
(1˚C)
(1˚C)
(1˚C)
(1˚C)
2
2
4
1
days
days
days
day
6
2–3
5–9
6
months
months
months
months
Freeze in original wrap up to 2 weeks. Use
freezer wrap, freezer-quality plastic bags
or aluminum foil over the commercial wrap
if foods will be frozen for more than a
couple of months.
3–5
3–5
3–5
1–2
days
days
days
days
6–12
6–9
4–6
3–4
months
months
months
months
Freeze in original wrap up to 2 weeks. Use
freezer wrap, freezer-quality plastic bags
or aluminum foil over the commercial wrap
if foods will be frozen for more than a
couple of months.
F R E S H M E AT
beef steaks, roasts
lamb chops, roasts
pork and veal chops, roasts
variety meats (tongue, liver, etc.)
34–35˚F
34–35˚F
34–35˚F
34–35˚F
(1–2˚C)
(1–2˚C)
(1–2˚C)
(1–2˚C)
H A M B U R G E R , G R O U N D & S T E W M E AT S
hamburger, stew meats,
ground turkey, veal, pork, lamb
and mixtures
34–35˚F (1–2˚C)
1–2 days
3–4 months
Freeze in original wrap up to 2 weeks. Use
freezer wrap, freezer-quality plastic bags
or aluminum foil over the commercial wrap
if foods will be frozen for more than a
couple of months.
34–35˚F
34–35˚F
34–35˚F
34–35˚F
(1–2˚C)
(1–2˚C)
(1–2˚C)
(1–2˚C)
1 week
2 weeks
3–5 days
2 weeks
1–2
1–2
1–2
1–2
months
months
months
months
Freeze in freezer wrap. Check ”sell by”
dates. Do not use more than 1 week
after this date.
34–35˚F
34–35˚F
34–35˚F
34–35˚F
(1–2˚C)
(1–2˚C)
(1–2˚C)
(1–2˚C)
7 days
1–2 days
7 days
2–3 weeks
1
1–2
1–2
1–2
month
months
months
months
Keep wrapped, and store at recommended
refrigerator temperatures.
34–35˚F
34–35˚F
34–35˚F
34–35˚F
(1–2˚C)
(1–2˚C)
(1–2˚C)
(1–2˚C)
5–7
7
3–5
3–4
1
1–2
1–2
1–2
month
months
months
months
For freezer storage, drain juices.
H OT D O G S & L U N C H M E AT S
hotdogs (opened package)
hotdogs (unopened package)
lunch meats (opened package)
lunch meats (unopened package)
B AC O N & S A U S AG E
bacon
raw sausage (pork, beef, turkey)
smoked breakfast links or patties
hard sausage (pepperoni, jerky sticks)
HAM & CORNED BEEF
corned beef
ham, whole
ham, half
ham, slices
days
days
days
days
F R E S H P O U LT RY
chicken or turkey, whole
chicken or turkey, pieces
duck or goose
34–35˚F (1–2˚C)
34–35˚F (1–2˚C)
34–35˚F (1–2˚C)
1–2 days
1–2 days
1–2 days
12 months
9 months
6 months
Freeze in original wrap up to 2 weeks. Use
freezer wrap, freezer-quality plastic bags
or aluminum foil over the commercial wrap
if foods will be frozen for more than a
couple of months.
* Recommended freezer storage temperature is 0˚F (-18˚C).
35
F O O D S T O R A G E R E C O M M E N D AT I O N S
F R E S H V E G E TA B L E S
Recommended
Temperature
Storage Life
(refrigerator)
34–36˚F
34˚F
34–36˚F
40–45˚F
34˚F
34˚F
36–38˚F
34˚F
2–3
1–2
2–3
7–10
7–9
3–4
2–4
3
weeks
weeks
weeks
days
days
months
weeks
weeks
Wash vegetables in cool water and drain. Store in airtight
container or plastic wrap.
Comments
F R E S H V E G E TA B L E S
anise
artichokes
asparagus
beans, green / snap / lima*
bean sprouts
beets
belgian endive
bok choy
(1–2˚C)
(1˚C)
(1–2˚C)
(4–7˚C)
(1˚C)
(1˚C)
(2–3˚C)
(1˚C)
Most vegetables should be stored in higher humidity.
broccoli
brussels sprouts
cabbage
carrots
cauliflower
celeriac
celery
chinese broccoli
34˚F
34˚F
34˚F
34˚F
34˚F
34˚F
34˚F
34˚F
(1˚C)
(1˚C)
(1˚C)
(1˚C)
(1˚C)
(1˚C)
(1˚C)
(1˚C)
1–2
3–5
3–6
1–5
3–4
6–8
1–2
10–14
weeks
weeks
weeks
months
weeks
months
months
days
Discard any fresh vegetables that are moldy or have other signs
of spoilage and wipe out the refrigerator compartment.
chinese cabbage
corn, sweet
cucumbers*
daikon
eggplant*
endive / escarole
garlic
horseradish
34˚F
34˚F
45˚F
34˚F
45˚F
34˚F
34˚F
34˚F
(1˚C)
(1˚C)
(7˚C)
(1˚C)
(7˚C)
(1˚C)
(1˚C)
(1˚C)
2–3
5–8
10–14
4
1–2
2–3
6–7
10–12
months
days
days
months
weeks
weeks
months
months
Refer to the list of ethylene sensitive and ethylene producing
vegetables and fruits.
jerusalem artichokes
kale
kohlrabi
leeks
lettuce
mushrooms
okra*
onions, bulb
34˚F
34˚F
34˚F
34˚F
34˚F
34˚F
45˚F
34˚F
(1˚C)
(1˚C)
(1˚C)
(1˚C)
(1˚C)
(1˚C)
(7˚C)
(1˚C)
1–2
1–2
10–14
2
2–3
1–2
1–2
1–6
weeks
months
days
months
weeks
weeks
weeks
months
7–10
1–2
4–5
1–2
2–3
2–3
3–4
2–3
days
months
months
weeks
weeks
weeks
months
weeks
onions, green
parsley
parsnips
peas, pods and shelled
peppers, bell*
peppers, chile
pumpkins*
radicchio
34˚F
34˚F
34˚F
34˚F
45˚F
45˚F
38–45˚F
34˚F
(1˚C)
(1˚C)
(1˚C)
(1˚C)
(7˚C)
(7˚C)
(3–7˚C)
(1˚C)
For fresh-cut produce, follow storage directions on package.
* Sensitive to chill injury, a cause of spoilage. Damage may not be apparent until the vegetable is returned to a warmer temperature.
NOTE: See food preservation guide for complete instructions on freezing vegetables. Recommended freezer storage temperature is 0˚F (-18˚C).
36
F O O D S T O R A G E R E C O M M E N D AT I O N S
F R E S H V E G E TA B L E S
Recommended
Temperature
Storage Life
(refrigerator)
Comments
F R E S H V E G E TA B L E S
radishes
romaine
rutabagas
salsify
shallots
snow peas
spinach
squash, summer*
34˚F
34˚F
34˚F
34˚F
34˚F
34˚F
34˚F
40–45˚F
(1˚C)
(1˚C)
(1˚C)
(1˚C)
(1˚C)
(1˚C)
(1˚C)
(4–7˚C)
tamarillos
tomatoes (ripe)
turnips
water chestnuts
watercress
37–40˚F
46–50˚F
34˚F
34–36˚F
34˚F
(3–4˚C)
(8–10˚C)
(1˚C)
(1–2˚C)
(1˚C)
1–2
2–3
4–6
2–4
6
1–2
10–14
1–2
months
weeks
months
months
months
weeks
days
weeks
Wash vegetables in cool water and drain. Store in airtight
container or plastic wrap.
10
1–3
4–5
2–4
2–3
weeks
weeks
months
months
weeks
Discard any fresh vegetables that are moldy or have other signs
of spoilage and wipe out the refrigerator compartment.
Most vegetables should be stored in higher humidity.
For fresh-cut produce, follow storage directions on package.
Refer to the list of ethylene sensitive and ethylene producing
vegetables and fruits.
* Sensitive to chill injury, a cause of spoilage. Damage may not be apparent until the vegetable is returned to a warmer temperature.
NOTE: See food preservation guide for complete instructions on freezing vegetables. Recommended freezer storage temperature is 0˚F (-18˚C).
ETHYLENE GAS
ETHYLENE PRODUCING FOODS
apples
apricots
avocados
ripening bananas
cantaloupe
cherimoyas
figs
guavas
honeydew
kiwifruit
mamey sapote
mangoes
mangosteen
nectarines
papayas
passion fruit
peaches
pears
persimmons
plantains
plums
prunes
quince
tomatoes
eggplant
unripe kiwifruit
leafy greens
lettuce
okra
peas
peppers
spinach
squash
sweet potatoes
watercress
watermelon
ETHYLENE SENSITIVE FOODS
unripe bananas
green beans
belgian endive
broccoli
brussels sprouts
cabbage
carrots
cauliflower
chard
cucumbers
NOTE: Do not store ethylene producing foods with ethylene sensitive foods.
37
F O O D S T O R A G E R E C O M M E N D AT I O N S
FRESH FRUITS
Recommended
Temperature
Storage Life
(refrigerator)
apples* (macintosh,
grimes golden,
yellow newtown)
apples
apricots
asian pears
avocados*
blackberries
blood oranges
blueberries
cantaloupe*
34–40˚F (1–4˚C)
1–2 months
30˚F
34˚F
34˚F
40˚F
34˚F
40–44˚F
34˚F
36–41˚F
(-1˚C)
(1˚C)
(1˚C)
(4˚C)
(1˚C)
(4–7˚C)
(1˚C)
(2–5˚C)
3–6
1–2
5–6
2–4
2–3
3–8
10–18
2–3
months
weeks
months
weeks
days
weeks
days
weeks
cassavas
cherries, sweet
clementines
cranberries*
figs, fresh
grapes
guavas*
honeydew
34˚F
34˚F
40˚F
36–40˚F
34˚F
34˚F
40–45˚F
45˚F
(1˚C)
(1˚C)
(4˚C)
(2–4˚C)
(1˚C)
(1˚C)
(4–7˚C)
(7˚C)
1–2
2–3
2–4
2–4
7–10
2–3
2–3
3–4
months
weeks
weeks
months
days
weeks
weeks
weeks
Fully ripe fruits should be stored in the refrigerator at recommended temperatures to slow down the ripening process.
kiwifruit
kumquats
lychees
nectarines
oranges*
papayas*
peaches
pears
34˚F
40˚F
35˚F
34˚F
34–45˚F
45˚F
34˚F
34˚F
(1˚C)
(4˚C)
(2˚C)
(1˚C)
(1–7˚C)
(7˚C)
(1˚C)
(1˚C)
4–6
2–4
3–5
2–4
3–8
1–3
2–4
2–3
weeks
weeks
weeks
weeks
weeks
weeks
weeks
weeks
Discard any fresh fruits that are moldy or have other signs of
spoilage and wipe out the refrigerator compartment.
Comments
FRESH FRUITS
persimmons
pineapple*
plums and prunes
pomegranates*
quinces
raspberries
rhubarb
strawberries
34˚F
45˚F
34˚F
40˚F
34˚F
34˚F
34˚F
34˚F
(1˚C)
(7˚C)
(1˚C)
(4˚C)
(1˚C)
(1˚C)
(1˚C)
(1˚C)
tangerines
watermelon*
40˚F (4˚C)
45˚F (7˚C)
3–4
2–4
2–5
2–3
2–3
3–6
2–3
7–10
Wash and dry most fruits, and store in the crisper compartment.
(Do not wash berries and cherries until you are ready to use
them, however.)
Most fruits should be stored in lower humidity.
To hasten the ripening process, you can place unripe fruit in a
paper bag that has holes poked in it. Close the bag and set it on
a counter. The fruit will produce ethylene, a gas that initiates
the ripening process. Check the bag each day.
Refer to the list of ethylene sensitive and ethylene producing
vegetables and fruits.
months
weeks
weeks
months
months
days
weeks
days
2–4 weeks
2–3 weeks
* Sensitive to chill injury, a cause of spoilage. Damage may not be apparent until the fruit is returned to a warmer temperature.
NOTE: See food preservation guide for complete instructions on freezing fruits. Recommended freezer storage temperature is 0˚F (-18˚C).
38
F O O D S T O R A G E R E C O M M E N D AT I O N S
D E L I F O O D S , D A I RY P R O D U C T S A N D O T H E R F O O D S
Recommended
Temperature
Storage Life
(refrigerator)
Storage Life
(freezer)*
Comments
DELI FOODS
thinly sliced lunch meats
egg, chicken, tuna and ham salads
macaroni salads
pre-stuffed chops, chicken breasts
store-prepared convenience meals
34–35˚F
34–35˚F
34–35˚F
34–35˚F
34–35˚F
(1–2˚C)
(1–2˚C)
(1–2˚C)
(1–2˚C)
(1–2˚C)
1–2
3–5
3–5
1
1–2
days
days
days
day
days
34–35˚F
34–35˚F
34–35˚F
34–35˚F
34–35˚F
34–35˚F
34–35˚F
34–35˚F
(1–2˚C)
(1–2˚C)
(1–2˚C)
(1–2˚C)
(1–2˚C)
(1–2˚C)
(1–2˚C)
(1–2˚C)
3
1–2
2
3–6
3–4
1
1
1–2
months
weeks
weeks
months
weeks
year
month
weeks
NR
NR
NR
NR
NR
Check ”use by” or ”sell by” dates.
These foods do not freeze well. If you need
to freeze, do so immediately, not after they
have been held in the refrigerator.
DA I RY F O O D S
butter
cottage or ricotta cheese
cream cheese
natural cheese (cheddar, brick, etc.)
process cheese
grated Parmesan or Romano
yogurt
whole, lowfat or skim milk
1 year
4 weeks
6–8 months
6–8 months
Check ”sell by” dates.
Store cheese in original packaging until
ready to use. After opening, rewrap tightly
in plastic wrap or aluminum foil.
Thaw frozen cheese in the refrigerator to
reduce crumbling.
EGGS
fresh, in shell
hard cooked
liquid pasteurized or egg substitutes
opened
unopened
34˚F (1˚C)
34–35˚F (1–2˚C)
34–35˚F (1–2˚C)
34–35˚F (1–2˚C)
3 weeks
1 week
3 days
10 days
NR
NR
NR
1 year
Keep fresh eggs refrigerated.
Do not eat hard cooked eggs that have
been at room temperature for more than
2 hours.
C O O K E D M E AT & P O U LT RY L E F TOV E R S
cooked meat and meat dishes
gravy and meat broth
fried or plain chicken, pieces
cooked poultry dishes
pieces covered with broth, gravy
chicken nuggets, patties
34–35˚F
34–35˚F
34–35˚F
34–35˚F
34–35˚F
34–35˚F
(1–2˚C)
(1–2˚C)
(1–2˚C)
(1–2˚C)
(1–2˚C)
(1–2˚C)
3–4
1–2
3–4
3–4
1–2
1–2
days
days
days
days
days
days
2–3
2–3
4
4–6
6
1–3
months
months
months
months
months
months
Refrigerate or freeze leftovers in covered
shallow containers within 2 hours after
cooking. Reheat leftovers to 165˚F (74˚C).
SOUPS & STEWS
vegetable
meat added
34–35˚F (1–2˚C)
34–35˚F (1–2˚C)
3–4 days
3–4 days
2–3 months
2–3 months
Reheat to at least 165˚F (74˚C) before
serving.
* Recommended freezer storage temperature is 0˚F (-18˚C). (NR) stands for not recommended for freezing.
39
WAT E R F I LT R AT I O N S Y S T E M P E R F O R M A N C E D ATA S H E E T
S U B - Z E R O M I C R O B I O L O G I C A L WAT E R F I LT E R ( R E P L A C E M E N T C A RT R I D G E # 7 0 0 5 0 1 7 )
IMPORTANT NOTICE: Read this Performance Data Sheet carefully and compare the capabilities of this unit with your actual water treatment needs. It is
recommended that, before purchasing a water treatment unit, you have your water supply tested to determine your actual water treatment needs.
Tested and certified by NSF International against NSF/ANSI Standard 42 for the
reduction of Chlorine Taste & Odor, Nominal Particulate, Class I; and against
NSF/ANSI Standard 53 for the reduction of Asbestos, Lead, Mercury, MTBE,
Toxaphene, Turbidity and VOCs.
This system has been tested according to NSF/ANSI 42/53 for reduction of the substances listed below. The concentration of the indicated substances in water
entering the system was reduced to a concentration less than or equal to the permissible limit for water leaving the system, as specified in NSF/ANSI 42/53.
Product Water Concentration
Max. Permissible
Product Water
Average Minimum Concentration
% Reduction
NSF
Standard
Influent Challenge
Concentration
Average Influent
Concentration
Average
Max. Effluent
Chlorine, Taste & Odor
42
2.0 mg/L ± 10%
2.03 mg/L
0.05 mg/L
0.05 mg/L
>97.5%
>97.5%
≥ 50%
Particulate, Class I
(0.5 to <1 micron)
42
At least 10,000
particles/ml
20,000,000/ml
1,613/ml
2,900/ml
>99.9%
>99.9%
≥ 85%
Asbestos
53
107 to 108 fibers/L†
83 MF/L
<0.17 MF/L
<0.17 MF/L
>99%
>99%
99%
Lead at pH 6.5
53
0.15 mg/L ± 10%
0.148 mg/L
0.001 mg/L
0.001 mg/L
99.3%
99.3%
0.010 mg/L
Lead at pH 8.5
53
0.15 mg/L ± 10%
0.148 mg/L
0.001 mg/L
0.001 mg/L
99.3%
99.3%
0.010 mg/L
Mercury at pH 6.5
53
0.006 mg/L ± 10%
0.006 mg/L
<0.0002 mg/L
<0.0002 mg/L
96.6%
96.6%
0.002 mg/L
Mercury at pH 8.5
53
0.006 mg/L ± 10%
0.006 mg/L
<0.0002 mg/L
<0.0002 mg/L
96.5%
96.5%
0.002 mg/L
MTBE
53
0.015 mg/L ± 20%
0.014 mg/L
0.0013 mg/L
0.0029 mg/L
90.9%
78.9%
0.005 mg/L
Toxaphene
53
0.015 mg/L ± 10%
0.015 mg/L
<0.001 mg/L
<0.001 mg/L
93.1%
93.1%
0.003 mg/L
Substance
Turbidity
53
11 ± 1 NTU
11.8 NTU
0.14 NTU
0.20 NTU
98.8%
98.3%
0.5 NTU
VOC*
53
300 ± 30 μg/L
301 μg/L
1.2 μg/L
8.7 μg/L
99.6%
97.1%
≥ 95%
General test water parameters: pH = 7.5±0.5; Temp = 68±5 ˚F (20±3 ˚C); Pressure = 60 psi (4.1 bar) @ 0.5 gpm (1.9 Lpm)
*Refer to table on following page for organic chemicals included by VOC surrogate testing;
† Fibers greater than 10 μm in length
O P E R AT I N G S P E C I F I C AT I O N S
Capacity: 235 gallons (890 L); up to twelve months
Water Supply: Cold water only
Pressure Requirement: 30 – 100 psi (2.1 – 6.9 bar)
Temperature: 33 – 100˚F (0.6 – 38˚C)
Flow Rate: 0.5 gpm (1.9 Lpm)
Cyst, virus and bacteria reduction tested by BioVir Labs and approved by the
California Department of Public Health, per the certificate following this data sheet.
Substance
Log Reduction
% Reduction
Cyst
3.5
99.95%
Virus
4
99.99%
Bacteria
6
99.9999%
S Y S T E M O P E R AT I O N & R E P L A C E M E N T F I LT E R I N F O R M AT I O N
Use replacement water filter cartridge part number 7005017, which can be ordered by calling 888-210-4985 or online at subzerowolfstore.com or
subzero.com. Replacement filter pricing information can be found at subzerowolfstore.com or subzero.com.
Replace water filter cartridge when the filter life indicator is displayed, or if the ice cubes become hollow or small, or when the water flow has slowed
significantly.
Change filter cartridge at least every twelve months. High sediment areas may require more frequent filter cartridge replacement.
This filter system must be installed, operated, maintained and filters replaced as required in order for the product to perform as advertised. Complete
installation and operation instructions, parts and service availability, and standard warranty are included with the product when shipped.
SPECIAL NOTES
Do not use for the treatment of water that is visually contaminated (cloudy) or has an obvious contamination source, such as contamination by raw
sewage. State of Wisconsin Required Statement: Do not use in Wisconsin with water that is microbiologically unsafe, or of unknown quality, without
adequate point-of-entry (i.e. whole house) disinfection before this device.
Note that while the testing was performed under standard laboratory conditions, actual performance of this water filter system may vary based on local
water conditions. In addition, the contaminants or other substances removed or reduced by this water filter are not necessarily in all users’ water.
This filter contains silver as a preservative.
This filter system is protected by U.S. Patent Nos. 6,630,016; 6,660,172; 6,770,204; 6,835,311; 6,866,704; applicable foreign patents; and patents pending.
U.S. EPA Est. No. 69625-CT-001
DISCLAIMER: The performance claims of this product are rated for service only up to the gallon capacity limit designated on the Manufacturer’s Performance Data Sheet. No expectation for performance shall survive such limit, and use of this product should be discontinued after such limit is reached.
Use of this product constitutes Buyer’s understanding and acceptance of this Disclaimer.
40
Manufactured for: Sub-Zero Freezer Company, PO Box 44130, Madison, WI 53744-4130. Phone: (800) 222-7820
WAT E R F I LT R AT I O N S Y S T E M P E R F O R M A N C E D ATA S H E E T
O R G A N I C C H E M I C A L S I N C L U D E D B Y V O C S U R R O G AT E T E S T I N G
Influent Challenge
Concentration (mg/L)
Chemical Reduction
Percent
Max. Permissible Product
Water Concentration (mg/L)
alachlor
0.050
>98
0.001
atrazine
0.100
>97
0.003
benzene
0.081
>99
0.001
carbofuran
0.190
>99
0.001
carbon tetrachloride
0.078
98
0.0018
chlorobenzene
0.077
>99
0.001
chloropicrin
0.015
99
0.0002
2,4-D
0.110
98
0.0017
dibromochloropropane (DBCP)
0.052
>99
0.00002
o-dichlorobenzene
0.080
>99
0.001
p-dichlorobenzene
0.040
>98
0.001
1,2-dichloroethane
0.088
95
0.0048
1,1-dichloroethylene
0.083
>99
0.001
cis-1,2-dichloroethylene
0.170
>99
0.0005
trans-1,2-dichloroethylene
0.086
>99
0.001
1,2-dichloropropane
0.080
>99
0.001
cis-1,3-dichloropropylene
0.079
>99
0.001
dinoseb
0.170
99
0.0002
endrin
0.053
99
ethylbenzene
0.088
>99
0.001
ethylene dibromide (EDB)
0.044
>99
0.00002
haloacetonitriles (HAN):
bromochloroacetonitrile
dibromoacetonitrile
dichloroacetonitrile
trichloroacetonitrile
0.022
0.024
0.0096
0.015
98
98
98
98
0.0005
0.0006
0.0002
0.0003
haloketones (HK):
1,1-dichloro-2-propanone
1,1,1-trichloro-2-propanone
0.0072
0.0082
99
96
0.0001
0.0003
heptachlor (H-34, Heptox)
0.080
>99
0.0004
heptachlor epoxide
0.0107
98
0.0002
Substance
0.00059
hexachlorobutadiene
0.044
>98
0.001
hexachlorocyclopentadiene
0.060
>99
0.000002
lindane
0.055
>99
0.00001
methoxychlor
0.050
>99
0.0001
pentachlorophenol
0.096
>99
0.001
simazine
0.120
>97
0.004
styrene
0.150
>99
0.0005
1,1,2,2-tetrachloroethane
0.081
>99
0.001
tetrachloroethylene
0.081
>99
0.001
toluene
0.078
>99
0.001
2,4,5-TP (silvex)
0.270
99
0.0016
tribromoacetic acid
0.042
>98
0.001
1,2,4-trichlorobenzene
0.160
>99
0.0005
1,1,1-trichloroethane
0.084
95
0.0046
1,1,2-trichloroethane
0.150
>99
0.0005
trichloroethylene
0.180
>99
0.001
trihalomethanes (includes):
chloroform (surrogate chemical)
bromoform
bromodichloromethane
chlorodibromomethane
0.300
95
0.015
xylenes (total)
0.070
>99
0.001
41
S TAT E O F C A L I F O R N I A C E RT I F I C AT I O N
42
TROUBLESHOOTING GUIDE
F R E Q U E N T LY A S K E D Q U E S T I O N S
ICE PRODUCTION
TEMPERATURE
IMPORTANT NOTE: Make sure that the power
is on for your ice maker. The
indicator will
be visible in the Control Center display panel.
IMPORTANT NOTE: Unless the unit is being
serviced, make sure the power for your unit is
on. If the unit is not on, OFF will be visible in
the Control Center display panel.
IMPORTANT NOTE: Dispose of the first two
buckets of ice produced by your new unit to
ensure that pipe residue or other particles
associated with new water lines are not
consumed.
Q: My ice maker isn’t producing very much ice.
A: On average, you can expect a cycle of ice
(eight cubes per cycle) every two hours.
Increased ice production can be achieved
with the Max Ice feature.
Q: My ice is freezing together and clumping.
A: If ice is not used regularly it tends to fuse
together. You may need to discard the ice
and allow ice to be replenished.
Q: My ice tastes funny and is discolored.
A: Sub-Zero Built-In models have an integrated water filtration system. Check to see
if the
indicator is displayed in the
Control Center display panel. If so, your
water filter needs to be replaced.
Q: My ice cubes seem small or water is
dispensing very slowly.
A: The water filter may need to be replaced.
NOISE
Q: Why do I hear my unit running constantly?
A: It is normal to hear the operation of fans
and motors. Sounds will be accentuated
based on the placement of the unit and
overall room design.
CONTACT
INFORMATION
Q: How do I adjust the temperatures?
A: To adjust temperatures, refer to Temperature Control, page 12.
Q: What are the suggested temperature
settings?
Sub-Zero
Customer Service:
800-222-7820
Website:
subzero.com
A: The recommended settings are 38˚F (3˚C)
for the refrigerator section and 0˚F
(-18˚C) for the freezer section.
Q: Condensation is forming on the inside and
outside of my unit.
A: In climates with higher humidity, condensation will form and is considered normal.
Leaving the door open for a long period of
time may also contribute to condensation
forming on the inside your unit.
Q: My unit isn’t cooling properly.
A: Clean the condenser area as outlined on
page 28.
DOOR OPERATION
Q: Why is my door hard to open?
A: Your unit was designed for an airtight seal.
A vacuum seal can form after the door is
closed. Wait several seconds for pressure to
equalize before reopening the door.
Q: The door on my unit is opening too fast and
hitting the wall or surrounding cabinets.
A: The unit may not be leveled properly or a
door stop may be required. Install the
optional 90-degree door stop provided with
the unit.
43
TROUBLESHOOTING GUIDE
TROUBLESHOOTING
CONTACT
INFORMATION
Sub-Zero
Customer Service:
800-222-7820
Website:
subzero.com
If your Built-In unit is not operating properly,
use the following troubleshooting guide before
calling your Sub-Zero authorized service
center. This guide will save you time and
trouble and may help you avoid the expense of
a service call.
Refrigerator/Freezer is not running
Is there electrical power to the unit?
Is the home circuit breaker or fuse off?
Is the refrigerator/freezer control on?
Is the condenser area clean?
The
indicator is illuminated or flashing
in the Control Center display panel
The microprocessor has sensed a
problem with the operating system. There
may be instructions in the Control Center
display panel to solve the problem.
This may also indicate that the condenser
needs cleaning. Follow the Condenser
Cleaning procedure outlined on page 28.
If this occurs, turn the unit off with the
POWER key pad and then restart by
depressing the key pad again. If the
indicator is still present, call Sub-Zero
Customer Service at 800-222-7820.
Has a door or drawer been left open for an
extended period? Be sure that food is not
obstructing proper door or drawer closing.
Has one section been manually disabled?
See Cleaning Combination Units, page 28.
Is the unit in showroom mode? Call
Sub-Zero Customer Service at 800-222-7820
for instruction on taking the unit out of this
mode.
If the unit is still not running, it may be in
defrost mode.
Wait 30 minutes and try to restart again.
Refrigerator/Freezer is warmer than usual
The flashing
with audible chime and
indicators are both flashing in the Control
Center display panel
Check for excess water near the unit. If you
see excess water, turn off the water at the
shut-off valve. Also, verify temperatures
inside the unit and manage the contents
accordingly. Once you have verified there is
an issue, call Sub-Zero Customer Service
immediately at 800-222-7820. The audible
chime can be reset for 24 hours by holding
the ALARM key and depressing the
POWER key.
Is the control set properly?
Is the condenser area clean?
Has a door or drawer been left open for an
extended period? Be sure that food is not
obstructing proper door or drawer closing.
Has a large amount of food been added
recently?
Refrigerator/Freezer runs for long periods
of time
Is the condenser area clean?
Has a door or drawer been left open for an
extended period? Be sure that food is not
obstructing proper door or drawer closing.
Has a large amount of food been added
recently?
On hot days and in warm room temperatures, the motor runs longer.
There may be normal operation noises
related to refrigerant circulation, fan operation, ice maker operation, defrost cycle or
compressor operation.
44
TROUBLESHOOTING GUIDE
TROUBLESHOOTING
Refrigerator/Freezer is frosted up
Has a door or drawer been left open for an
extended period? Be sure that food is not
obstructing proper door or drawer closing.
Are door(s) and/or drawer closing and
sealing properly? Contact your dealer if
door(s) are not adjusted properly. NOTE:
When opening the freezer drawer, you may
notice a side-to-side motion in the drawer.
This motion is normal, with the tolerance
built into the drawer slides. When the
drawer is closed it will automatically adjust
and close with correct alignment.
There is no ice
Is the ice bucket in position?
Is the ice maker turned on?
Is a filter or bypass plug installed?
Is the water supply connected?
There is an odor inside the unit
Replace air purification system cartridge.
Clean the unit thoroughly.
Cover all food tightly.
Clean the unit drain pipe.
You hear unusual noises
These noises may be normal operating
sounds related to refrigerant circulation, fan
operation, ice maker operation, defrost
cycle or compressor operation. Noises may
be more noticeable when door(s) are open.
You hear occasional buzzing
Is the water supply connected to ice maker
and turned on?
Condensation forms inside the unit
This is normal during periods of higher
humidity (summer) and with frequent door
openings.
Are door(s) and/or drawer closing and
sealing properly?
Clean the drain pan.
Light bulb needs to be replaced
See Lighting Information, page 29.
Shut off power to the unit at the circuit
breaker before replacing light bulbs. Wear
protective gloves when handling bulbs.
You need product information
Call Sub-Zero Customer Service at
800-222-7820 or visit our website,
subzero.com, for planning, installation
and product information.
You need service
Condensation forms outside the unit
During periods of high humidity, some
condensation may appear on outside
surfaces. The condensation will disappear
when the humidity drops. Be sure that
door(s) and/or drawer are closing and
sealing properly. If condensation persists,
contact your Sub-Zero authorized service
center.
Outside of the freezer section heats up
Clean the condenser area.
If service is necessary, maintain the quality
built into your Sub-Zero unit by calling a
Sub-Zero authorized service center.
To obtain the name and number of a
Sub-Zero authorized service center, check
the Contact & Support section of our
website, subzero.com or call Sub-Zero
Customer Service at 800-222-7820.
When calling for service, you will need the
model and serial number of your unit. Both
numbers are listed on the product rating
plate located at the top of the side frame,
inside the unit, close to the hinge.
45
S E RV I C E I N F O R M AT I O N
S E RV I C E I N F O R M AT I O N
This Use & Care Information book gives you
the tools necessary to preserve food at
optimum quality in your Built-In unit. Keep
doors and drawers closed as much as possible
whenever the unit is operating.
CONTACT
INFORMATION
Sub-Zero
Customer Service:
800-222-7820
Website:
subzero.com
If you do need service, be sure to have the
model and serial number when you call. You’ll
find these numbers on the product rating plate
located at the top of the side frame, inside the
unit, close to the hinge. Refer to pages 5–11 for
location of the rating plate for your specific
model. For warranty purposes, you will also
need the date of installation and the name of
your Sub-Zero dealer. Record this information
below for future reference.
Model Number
Serial Number
PRODUCT REGISTRATION
Register your new Sub-Zero today so that we
may ensure your satisfaction. You may register
by one of the following options:
1) Mail in the completed Sub-Zero Product
Registration Card.
2) Register online at subzero.com.
3) Register by phone by calling the Sub-Zero
Customer Service Department at
800-222-7820.
The model and serial numbers of your unit
are printed on the enclosed Sub-Zero Product
Registration Card. If you provide us with your
e-mail address, we will send you exciting new
product updates and recipes as they become
available, along with information on special
events.
Installation Date
Sub-Zero Authorized Service Center and Phone
Sub-Zero Dealer and Phone
BEFORE CALLING FOR SERVICE
Before calling a Sub-Zero authorized service
center, refer to the Troubleshooting Guide on
pages 43–45. Check the household fuse or
circuit breaker to see if it has been blown or
tripped and that the electrical connection to
the appliance has not been disconnected.
A power outage may also have caused a
disruption in service.
The information and images in this guide are
the copyright property of Sub-Zero, Inc. Neither
this book nor any information or images
contained herein may be copied or used in
whole or in part without the express written
permission of Sub-Zero, Inc.
©Sub-Zero, Inc. all rights reserved.
46
Sub-Zero Products Limited Warranty
RESIDENTIAL USE ONLY
FULL FIVE YEAR SEALED SYSTEM WARRANTY
LIMITED SIXTH THROUGH TWELFTH YEAR WARRANTY ON THE SEALED SYSTEM
FULL TWO YEAR WARRANTY ON TOTAL PRODUCT*
FULL FIVE YEAR SEALED SYSTEM WARRANTY
For five years from the date of original installation, your Sub-Zero warranty covers all parts and labor to repair or
replace any components that prove to be defective in materials or workmanship in the sealed system. The sealed
system consists of the compressor, condenser, evaporator, drier and all connecting tubing.
FULL TWO YEAR WARRANTY*
For two years from the date of original installation, your Sub-Zero warranty covers all parts and labor to repair or
replace any part of the product, that proves to be defective in materials or workmanship.
LIMITED SIXTH THROUGH TWELFTH YEAR SEALED SYSTEM WARRANTY
From the 6th through the 12th year from the date of original installation, your Sub-Zero warranty covers all parts
that prove to be defective in materials or workmanship in the sealed system (parts only). The sealed system
consists of the compressor, condenser, evaporator, drier and all connecting tubing.
TERMS APPLICABLE TO EACH WARRANTY
All service provided by Sub-Zero under the above warranty must be performed by an authorized Sub-Zero service
center, unless otherwise specified by Sub-Zero. Service will be provided in the home during the normal business
hours. This warranty applies only to products installed for normal residential use. Details regarding a non-residential warranty are available upon request.
The warranty applies only to products installed in any one of the fifty states of the United States, the District of
Columbia or the ten provinces of Canada. This warranty does not cover any parts or labor to correct any defect
caused by negligence, accident or improper use, maintenance, installation, service or repair, including but not
limited to improper removal and reinstallation (whether in the unit or at a remote location) of the condensing unit.
THE REMEDIES DESCRIBED ABOVE FOR EACH WARRANTY ARE THE ONLY ONES THAT SUB-ZERO WILL
PROVIDE, EITHER UNDER THESE WARRANTIES OR UNDER ANY WARRANTY ARISING BY OPERATION OF
LAW. SUB-ZERO WILL NOT BE RESPONSIBLE FOR ANY CONSEQUENTIAL OR INCIDENTAL DAMAGES
ARISING FROM THE BREACH OF THESE WARRANTIES OR ANY OTHER WARRANTIES, WHETHER EXPRESS,
IMPLIED OR STATUTORY.
Some states do not allow the exclusion or limitation of incidental or consequential damages, so the above limitation or exclusion may not apply to you. This warranty gives you specific legal rights and you may also have other
legal rights, which vary from state to state.
To receive parts and/or service and the name of the Sub-Zero authorized service center nearest you, contact your
Sub-Zero dealer, distributor or the Sub-Zero Customer Service Department, P. O. Box 44130, Madison Wisconsin, 53744-4130; check the Contact & Support section of our website, subzero.com, or call 800-222-7820.
*Stainless Steel (classic, platinum and carbon) doors, panels, product frames and stainless interior surfaces are
covered by a limited 60 day parts and labor warranty for cosmetic defects.
*Replacement water filter and air purification cartridges are not covered by the product warranty.
47
SUB-ZERO, INC.
P. O . B O X 4 4 1 3 0
MADISON, WI 53744-4130
7002838 REV-C
4 /2008
800.222.7820
SUBZERO.COM