1
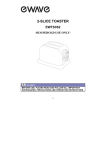
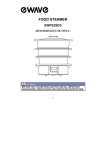
MULTI OVEN
(PIZZA/HOT DOG/GRILL)
EWMO2SD17
-HOUSEHOLD USE ONLY-
CAUTION:
BEFORE USE, PLEASE READ AND FOLLOW ALL IMPORTANT
SAFEGUARDS, PRECAUTIONS AND OPERATING INSTRUCTIONS.
1
Table of Contents
Safety Instructions -------------------------------------------- 3-5
Parts and Features -------------------------------------------- 6
Operating Instructions --------------------------------------- 7-9
Cleaning and Maintenance --------------------------------- 9
Warranty ---------------------------------------------------------- 10
2
What You Need to Know About Safety Instructions
Warning and Important Safety Instructions appearing in this manual are not
meant to cover all possible conditions and situations that may occur. Common
sense, caution and care must be exercised when installing, maintaining, or
operating appliance.
Always contact your dealer, distributor, service agent or manufacturer about
problems or conditions you do not understand.
When using electrical appliances, basic safety precaution should always be
followed, including the following:
IMPORTANT SAFEGUARDS
1) Read all instructions.
2)
3)
4)
5)
6)
7)
This appliance is for household use only. Do not use outdoors.
Do not use this appliance for other than its intended use.
Before using for the first time, check if voltage indicated on the base
of the appliance corresponds to the voltage in your home.
Do not turn the power on unless this appliance is properly assembled.
Close supervision is necessary when any appliance is used by or
near children.
Do not operate any appliance with a damaged cord or plug, or after
the appliance malfunctions or has been damaged in any manner.
3
8)
9)
10)
11)
12)
13)
14)
15)
16)
17)
18)
19)
20)
21)
22)
23)
24)
25)
Return appliance to authorized service center for examination, repair
or adjustment.
The use of attachments or accessories not recommended or sold by
the manufacturer may result in fire, electric shock or injury.
Unplug the appliance from the outlet when not in use, assembling
and disassembling, and before cleaning. Make sure the appliance
cools down completely before assembling, disassembling and
cleaning.
Do not let cord hang over edge of table or counter, or touch hot
surfaces.
Do not touch hot surfaces. Use handles or knobs.
Leave about 6-8 inches open spaces all around the exterior of this
appliance.
Do not place anything on top of this toaster oven.
Do not operate the appliance on a wall-mount, shelf, or near
flammable materials such as blinds, curtains, etc.
Oversize foods or metal utensils must not be inserted in a toaster
oven as they may create a fire or risk of electric shock.
If the electric circuit is overloaded with other appliance, this appliance
may not operate properly. The toaster oven should be operated on a
separate electrical circuit from other operating appliance.
Store only the accessories provided with this unit inside the oven. Do
not store any other materials in this oven when not in use.
A fire may occur if the appliance is covered or touching flammable
materials including curtains, draperies, walls or alike, when in
operation.
Do not place any cardboard, paper, plastic or alike inside the oven.
Do not cover crumb tray or any part of the oven with metal foil. This
will cause overheating of the oven.
To disconnect, turn the control to OFF, then remove the plug. Always
hold the plug, but never pull the cord.
All containers placed inside the oven must not be airtight. Also, they
need to have enough room to allow for expansion of fluids.
Clean this appliance regularly as built-up of grease may cause a fire.
Do not clean with metal scouring pads. Pieces can break off the pad
and touch electrical parts involving a risk of electric shock.
Stale toast, croutons, crackers may catch fire inside this appliance.
Watch the toasting process carefully.
4
26) Use only a soapy damp rag to clean the glass on oven door. Do not
use any sharp utensils as this may damage the glass and possibly
cause breaking of the glass.
27) Do not place on or near a hot gas or electric burner, or in a heated
oven.
28) Extreme caution should be exercised when using containers
constructed of other than metal or glass.
WARNING:
To protect against electric shock, fire, and injury to persons, do
not immerse main cord, plug or unit in water or any other liquid.
CAUTION:
This product is equipped with a polarized plug (one blade is wider
than the other blade) as a safety feature to reduce the risk of
electrical shock. This plug will fit into a polarized outlet only one
way. This is a safety feature. If you are unable to insert the plug
into the electrical outlet, try reversing the plug. If the plug still
does not fit, contact a qualified electrician.
Never use the plug with an extension cord unless the plug can be
fully inserted into the extension cord. Do not alter the plug of the
appliance or any extension cord used with this appliance. Do not
attempt to defeat the safety purpose of the polarized plug.
SAVE THESE INSTRUCTIONS
5
Parts and Features
1. Door Handle
2. Glass Door
3. Hotdog Roller
4. Control Panel
5. Feet
6. Power Cord
7. Bake/Drip Tray
8. BBQ Grill Pan Aattachment
9. Pizza Pan
10. Wire Rack
11. Dust Cover Attachment
12. Hotdog Roller Attachment
SPECIFICATIONS:
•
•
•
•
Voltage Rating: 120V 60Hz
Power Rating: 1440 Watts
Maximum Capacity: 17 litres / 0.6 cu ft.
Convection Fan / Beep Alert When Ready / LED Digital Display
6
Before Your First Use
Carefully unpack the toaster oven and remove all packaging materials. Select a
flat, heat -resistant, non-flammable surface to place toaster oven. Do not immerse
the toaster oven in water or other liquid. To remove any dust that may have
accumulated on the removable parts during packaging, clean the surface with
damp cloth and remove any stickers (except for any warning/caution stickers)
Before first use, heat up the oven empty and leave the door open for at least ten
minutes. This will burn off an excess lubricants found in the oven’s heating
elements and is not harmful. A little smoke may be normal to be produced and
will disappear in short while during usage.
Operating Instructions
Please familiarize yourself with the following oven parts and accessories prior to
the usage:
PARTS & ACCESSORIES
• Wire Rack: For toasting, baking, and general cooking in casserole
dishes and standard pans.
• Bake/Drip Tray: For use in broiling and roasting meat, poultry, fish, and
various other foods including bakery.
• BBQ Grill Pan: For half-ridged, half-skillet surface on top of oven that
can be used for a variety of foods.
• Dost Cover: Used as a lid when not in use.
• Pizza Tray: For use when cooking pizza.
• Hotdog Roller Attachment: For use when cooking hotdogs.
Orientation of
Wire Rack
YES
NO
CAUTION:
Be sure to remove all paper and plastic wrap/packaging from the
food before cooking.
CAUTION:
The surface of the oven will get hot during and after use. Keep
your hands safe by not touching the surface.
7
CONTROL PANEL
TIME: When permitted by a function, a user may adjust the time by pressing this
button first then by pressing the arrow buttons. An increment of 1 min will be
allowed per each push of a button (arrows). A user may hold the “TIME” button
until desired setting has been selected and release the button to set the timer.
TEMP: When permitted by a function, a user may adjust the temp by pressing
this button first then by pressing the arrow buttons. An increment of 10F will be
allowed per each push of a button (arrows). A user may hold the “TEMP” button
until desired setting has been selected and release the button to set the
temperature.
A. TOAST: Press this button to toast bread(s). When
pressed, preset browning control will be selected at 4.
Press the arrows to adjust the browning from 1 through 9.
B. PIZZA: Press this button to cook pizza. When
pressed, preset timer will be selected at 30min & preset
temp will be selected at 420F. To change timer, press
“TIME” to adjust the time up to 40min by pressing the
arrows. To change temp, press “TEMP” to adjust the
temp up to 450F by pressing the arrows. (200F min)
C. BBQ Grill: Press this button to grill at top. Make sure
grill plate is place properly on top of the unit before
selecting this function. When pressed, preset timer will
be selected at 1:00hr. To adjust timer, press “TIME” to
adjust the time up to 2:00hr max by pressing the arrows.
*Temp cannot be altered during this function.
D. Hot Dog: Press this button to cook hot dogs at top.
Make sure the hot dog roller is placed properly on top of
the unit before selecting this function. When pressed,
preset timer will be selected at 10min. To adjust timer,
press “TIME” to adjust the time up to 1HR max by
pressing the arrows.
E. Convection: Press this button to cook foods w/
convection fan motor. (faster cooking) When pressed,
preset timer will be selected at 45min & preset temp will
be selected at 450F. To adjust timer, press “TIME” to
adjust the time up to 2HR max by pressing the arrows.
To adjust temp, press “TEMP” to adjust the temp down
to 300F by pressing the arrows.
8
F. Broil: Press this button to cook foods that will take longer time to broil. When
pressed, preset timer will be selected at 2:00HR & preset temp will be selected at
400F. To adjust timer or temp, press “TEMP” or “TIME” buttons and press the
arrows to select the preferred settings.
Cleaning and Maintenance
COMPLETELY CLEAN AND DRY ALL PARTS AFTER EVERY USE.
1.
2.
3.
4.
5.
6.
Unplug the oven and allow it to cool completely before any cleaning or
maintenance.
Never allow water to spill on the tempered glass door when it is still warm.
To clean interior walls, use a damp cloth and a mild liquid soap solution or a
soapy solution on a sponge. Never use harsh abrasives corrosive products.
These could damage the oven surfaces.
Do not use abrasive cleaners, as they could leave scratches on the body.
Simply wipe the exterior with a clean cloth and dry thoroughly.
Wire rack and bake tray are dishwasher safe. If heavily soiled, soak in hot
sudsy water or use a nylon-scouring pad or nylon brush.
Never wrap the cord around the outside of the oven.
USEFUL TIPS
1. Never place a dish on the open door of the oven.
2. When steaming occurs, set the thermostat on a moderate temperature in
order to prevent excessive evaporation. If necessary, lengthen the cooking
time.
3. After heavy steaming, let the oven cool down and leave the door open. Wipe
away any trace of steam or vapor.
SAVE THESE INSTRUCTIONS
9
Limited Warranty
This Ewave product is warranted, to the original purchaser or gift recipient, to be
free from any manufacturing defects under normal use and conditions for a
period of one (1) year from the date of purchase as shown on retailer’s receipt.
The obligation of MC Appliance under this warranty shall be limited to repair or
replacement (at our option) during the warranty period, of any part that proves to
be defective in material or workmanship under normal installation and use. The
product is to be returned to MC Appliance or an Authorized Service Center
POSTAGE PREPAID. A copy of the original receipt along with your name,
address and phone number must accompany products returned. Include a
description of the defect along with the date you purchased the product.
This warranty shall be invalid if the product is damaged as a result of misuse,
abuse, negligence, defacement, destruction, accident, fire or other casualties or
alterations in any manner. Improper repair, improper use of electrical voltages or
currents, alteration of serial number, maintenance by any person or entity other
than our own Service Facility or Center, or any use not in conformity with product
instruction, shall render this warranty invalid.
MC Appliance assumes no responsibility for damage resulting from the use of
this product in a manner or location other than that for which it was intended.
WARRANTY CONDITIONAL TO NORMAL AND NON-COMMERCIAL USE OF
THIS APPLIANCE FOR DOMESTIC USE ONLY.
For the nearest Authorized Service Center, contact:
Ewave Customer Service: 1-888-775-0202
Or visit our website at www.mcappliance.com
10