1
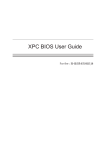
KSC-52 Micro DVR User Guide
1.
2.
3.
4.
5.
6.
7.
Getting Started: Basic Functions .................................................................................................................... 2
Uploading Video Files to a PC ....................................................................................................................... 3
Viewing the Files ............................................................................................................................................ 7
Using the Remote Control .............................................................................................................................. 8
Taking Photos ................................................................................................................................................. 9
Operating Tips .............................................................................................................................................. 10
Additional Information ................................................................................................................................. 10
Camera
Lens
Microphone
Status LED
Reset switch
access hole
Front View
Back View
Covert Systems, LLC 12305 E. Triple T Ln, Prescott Valley, AZ 86315 928-759-2121 Fax 928-759-2144
1.
Getting Started: Basic Functions
a) First, charge the KSC52’s internal battery: With both KSC52 slide switches (Power and Remote) in the
OFF position, connect the KSC52 to an active USB port on a PC. The PC must be powered up for the
USB port to be active. The LED light on the KSC52 will light Red, indicating the internal battery is
charging. When the Red light goes out, the battery is fully charged. Out of the box, it will take a few
hours to charge.
b) Next, get familiar with the KSC52 in its basic (stand-alone) mode. There are two ways to use it; standalone, or with remote control. Refer to the diagrams on the cover page of this document. Note that the
camera lens is in the small movable plastic cap on top, on the same side as the pocket clip (back side).
This is so that when the KSC52 is placed into a shirt pocket, placing the clip on the outside of the shirt
points the lens toward the subject, as shown below:
c) Once the KSC52 battery is charged, try a few sample videos. The KSC52 is designed to capture video of
a person (average height) from the waist up, standing at normal “interview” distance (about six
feet)from you, with the KSC52 placed into your shirt pocket, and with the movable plastic lens holder in
a vertical position. In order to do that the lens is angled slightly upward in its holder. That means if the
subject is much farther from you, or you want to capture video of an area as you walk through, you may
have to tilt the plastic forward slightly forward to bring the camera lens down. It takes some practice to
get a feel for this, so we recommend you spend some time just trying a few different things. Do a series
of very short video captures (30 seconds or so) then review them so you can see what works best for
you.
To turn on the KSC52, make sure the Remote slide switch is off, then move the Power slide switch to
the on position. After a few seconds the LED will start flashing green to indicate the unit is recording.
To stop recording, move the Power switch to the off position. After about 5 seconds the green LED will
stop flashing and the LED will flash Blue once. That means recording has been stopped and the file has
been saved. Now it’s time to connect the KSC52 to your PC to upload the video files.
KSC-52 Micro DVR
2
User Manual
2.
Uploading Video Files to a PC
The very first time you connect the KSC52 to a PC, Windows has to recognize the KSC52, then load driver files
so it can communicate with the KSC52.
a) With both the Remote and Power slide switches in the off position, connect the KSC52 to an active USB
port on the PC. Use the short USB cable supplied with the KSC52 (a longer cable will not work):
This end
plugs
into the
PC’s USB
port
b) Slide the KSC52 Power switch to the on position. Since this is the first time you have connected the
KSC52 to the PC, Windows will have to perform some setup. After about 5 seconds, Windows will
detect the KSC52; you will see the message Found New Hardware displayed followed by a series of
other dialog messages indicating that Windows has found and installed drivers. When this process is
complete (about 15 seconds), you can go to the Windows Start button, then select My Computer and
you should see the KSC52 appearing as if it was just another storage device, like a hard drive. It will
look like the following (Drive F on my PC):
KSC-52 Micro DVR
3
User Manual
Folder
icon for
the KSC52
c) Click on the Folder to open it, the contents look as follows:
d) Don’t worry about MicroVi8002.exe and mpegable DS decoder v2.1 Setup .exe, right now just click
on the DCIM folder to open it. Inside there is another file called Video.
KSC-52 Micro DVR
4
User Manual
e) Open the Video folder, inside will be the files you recorded. Their icons will look like this:
f) Select the video files and drag them onto your desktop, or move them to wherever you want to store
them. You can copy, move, rename, and delete the video files just as with any other file in the Windows
environment. To delete the files from the KSC52 memory, go back into the Video folder, select, and
delete the files.
g) To disconnect the KSC52 from the PC, slide the KSC52 Power switch to the off position. Wait about 5
seconds, then unplug the cable from the KSC52 or the PC. The green LED will flash several more times,
then flash blue once to indicate the KSC52 is off. If you don’t unplug the unit from the USB port, the
KSC-52 Micro DVR
5
User Manual
green light will continue to flash even after the KSC52 Power switch is off. Don’t worry, when you
unplug the USB cable the LED will stop flashing.
PC Connectivity Troubleshooting
When you connect any device to a PC USB port, Windows detects, then establishes a basic communications
link with the device. The device tells Windows what it is, plus provides information such as the data rate it is
designed to operate with. Windows then adjusts settings so it can work with the device.
Sometimes this “handshaking” isn’t successful. Sometimes the USB port can get confused, kind of like when a
Web browser gets hung up or crashes. You might see an error message displayed such as “The USB device has
malfunctioned” or “Windows does not recognize the device”, or nothing happens at all. In this case:
A.
Check to make sure that all KSC52 switches are off (both Power and Remote), unplug the USB
cable, then reconnect the USB cable, and slide the KSC52 Power switch to the on position. Watch
the status LED; it will be steady Red if the KSC52 battery is not fully charged, but then it should
start flashing green to indicate the KSC52 is on. Watch the My Computer or Windows Explorer
window (whichever you are using) to see if the icon for the KSC52 appears indicating the KSC52 is
connected.
B.
If the KSC52 still doesn’t connect, turn the KSC52 power switch off, unplug the USB cable from the
PC, then restart the PC. When the PC is fully booted up, plug in the USB cable, then slide the
KSC52 Power switch on. Watch the status LED; it will be steady Red if the KSC52 battery is not
fully charged, but then it should start flashing green to indicate the KSC52 is on. Watch the My
Computer or Windows Explorer windows to see if the icon for the KSC52 appears.
C.
Like any electronic device with a microprocessor, it is possible under rare circumstances for the
processor to get “confused” (like when your computer crashes). While very unlikely, if you’ve tried
everything and the KSC52 still won’t connect or function properly, try the software reset. On the
back of the KSC52, there are several rows of indentations. One of these is a very small hole in the
case (see the illustrations on page 1). The end of a small paperclip works perfect for this. With the
KSC52 Power switch on, insert the clip end into the small hole and press down. You’ll feel a
microswitch close; hold it down for about 3 seconds and release. This resets the KSC52.
D.
There is also the possibility, though also rare, that the USB port on the PC may not be working. Try
another USB port.
E.
Last but not least, is the KSC52 battery sufficiently charged for the KSC52 to operate? If the LED
was glowing red when the KSC52 was connected to the USB port and will not Flash Green when the
KSC52 Power switch is moved to the on position, low battery may be the problem.
Procedures A and B above typically resolve connectivity issues.
KSC-52 Micro DVR
6
User Manual
3.
Viewing the Files
The video files generated by the KSC52 are in MPEG-4 format, and your PC must be capable of playing this
type of video file. If Windows Media Player is installed on the PC, it will play the files after you run a software
utility named mpegable DS decoder v2.1 Setup .exe that updates Windows Media Player.
Remember mpegable DS decoder v2.1 Setup .exe and MicroVi8002.exe and from #2(d) previously? With the
KSC52 connected to the PC, open the KSC52’s folder in Windows (as in step 2(c)). Double-click on the
mpegable DS decoder v2.1 Setup .exe icon to run this program. You only need to run this once, the first time
you use the KSC52 with a PC. It updates the PC’s installed version of Windows Media Player so it can play
MPEG-4. If for some reason you don’t want to do this, you can play the KSC52’s video files using any software
that will play an MPEG-4 format video file (such as Quicktime). You just won’t be able to play them with
Windows Media Player.
You can open the files in Windows Media Player by starting Windows Media Player then opening the video
files from within Windows Media Player, or by double-clicking on a video file icon then telling Windows to use
Windows Media Player to open the file. The first time you try to view the files by double-clicking on their
icons, Windows may display a box asking what program it should use to open the files. If you will be using
Windows Media Player, put a checkmark in the box “Select from List” then click Ok. Select Windows Media
Player from the list displayed. Then check the option to always use that program. Finally, click Ok.
When Windows Media Player opens, it will display an error message complaining about the file extension not
being recognized by Windows and asking whether you want it to play the file. Select “don’t ask me again for
this extension” then click Yes. That’s it! You won’t be bothered again next time you want to play the video
files.
MicroVi8002.exe is the KSC52 management software. Any time you want to change any settings, options, etc
for the KSC52 you start this program by double-clicking on it then make the changes you want. Now doubleclick on the MicroVi8002.exe icon (where it is located on your PC); this will display the following window:
KSC-52 Micro DVR
7
User Manual
This series of screens is what you use to set operating parameters for the KSC52 (if you wish to change them).
When you start this application, the System Option Setting screen shown above displays first. You can click on
the other tabs (Operation Password Setting, ID Setting, or Date/Time Setting to bring up their corresponding
options windows. Most of the time you will not need to use this; the KSC52 defaults to automatic time/date
update (from the PC), 640x480 resolution, and Remote Control enabled. Browse through the screens and their
options; this is self-explanatory. Don’t set up a password unless you really need to and if you do, make sure you
remember it; write it down. If you forget it, it’s not straightforward to reset. If you ever use the software reset as
in Section 3(D) above, you mat need to reset some of these options if you had changed them from the default
settings.
4.
Using the Remote Control
You don’t actually need the Remote Control unit to use the KSC52 for its basic video recording function; you
can put the KSC52 in your shirt pocket, then reach up and slide the Power switch on/off through the shirt fabric
and it works just fine. For the Beat Officer on patrol, this is typical because carrying around the (small) remote
control, or trying to access it in a pinch, isn’t very practical.
KSC-52 Micro DVR
8
User Manual
But the remote control makes the KSC52 more covert; you can have the remote in your pocket and completely
control the KSC52 without ever removing your hand from that pocket. Remote control is also the only way to
use the KSC52’s picture taking function. Here’s an overview of the remote:
The antenna does NOT extend out, so don’t pull on it. The controls you will use most are the PWR button,
Video Recording button, and the Photo Shooting button. Place the KSC52 in your shirt pocket, or clipped onto
an item of clothing, or wherever you have it positioned for use. Have the KSC52 Power switch OFF, but the
KSC52 Remote switch ON. Then when you are getting prepared to record, press the PWR button on the
Remote and hold it down for about 3 seconds. Don’t press it more than once. Just one solid press, hold for 3,
then release. That will turn the KSC52 on in a “standby” mode: powered-up, but not yet recording. When you
are ready to record, press the Video Recording button down, in the same way: Just one solid press, hold for 3,
then release. It takes the KSC52 about another 3 seconds to begin recording. When you want to stop the
recording, press the Video Recording button again, the same way. Don’t worry about turning the Remote itself
on or off; like other remotes it is on only when it is being used. The Remote Control is powered by a small
battery that is generally good for about one year of use before requiring replacement.
It takes a little practice to gain confidence that this process is really working; you should try it a number of
times with the KSC52 in front of you near the Remote unit so you can watch the KSC52 status LED flash green
when you turn on the unit, then flash periodically when you start the recording, and finally stop green flashing
and finish with a blue flash to indicate the recording has stopped and the file saved. It doesn’t take long to get it
down pat.
5.
Taking Photos
You must use the Remote Control function to do this. See Section #5 above for information on using the
Remote Control.
KSC-52 Micro DVR
9
User Manual
The default (and highest) resolution is 1280 x 1024; you can change that using the setup software (see Section
#4).
To snap one or more photos, with the KSC52 Remote control enabled and the KSC52 turned on from the
Remote Control, simply press the Remote Control Photo Shooting button to take the picture. Photo files are
stored in the Pic folder, alongside the Video folder. Open the Pic folder and you will see the files listed.
6.
Operating Tips
When you connect the KSC52 to your PC, the KSC52 appears in Windows Explorer as an icon with the name
Removable Disk. It looks to Windows like any hard drive or other storage media attached to the PC. You click
on the icon to open the folder and view the contents. Any files including video files and photos are located in
their respective Video and Pic subfolders. Viewing, moving, and copying or deleting files is the same as for any
other files in the Windows operating system.
Store files somewhere on your PC that is easily accessible; you can create desktop shortcuts to their folders for
easy access.
As discussed briefly at the start of this document, the KSC52 and its lens positioning is designed to see the
average height person from the waist up standing in front of you at a distance of about six feet with the KSC52
in your shirt pocket. If you are very tall, or the subject you are recording is very tall, or the distance to the
subject is greater, you may need to adjust the lens angle. The movable lens holder of the KSC52 allows you to
change the lens angle upward or downward about 30 degrees. You should practice with the KSC52, try different
shots, in different situations, to get familiar with this.
If you are holding the KSC52 in your hand you likely will just want to keep the lens in the straight up position
since you can point the KSC52 as needed. If you have placed the KSC52 in some stationary position, consider
the lens angle and distance to the subject. If you have time before the event to be recorded, try a few shots just
to be sure you have everything positioned to get what you want.
Also try the KSC52 with different lighting so you get a feel for its capabilities. As for any camera, how the unit
performs in low light conditions is determined by the light gathering capability of the lens. The KSC52’s lens
does an excellent job for such a small lens, but especially if you are using it on patrol remember that it will have
limitations under low light conditions. But even in pitch darkness the audio function and provides that record of
the situation. Up until now that’s all we’ve had as a portable tool for patrol officers; digital voice recorders that
could be worn on the duty belt or hand held.
7.
Additional Information
Refer to the documentation that comes with the KSC52 for more information on the Remote Control status light
functions, or for reference only; the operating instructions are confusing. Use the operating instructions in this
document.
S. Oster
Covert Systems, LLC
October, 2009
KSC-52 Micro DVR
10
User Manual