1
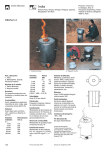
HOW TO MAKE AN UPESI STOVE
Guidelines for small businesses
Vivienne Abbott
Clare Heyting
Rose Akinyi
CONTENTS
Acknowledgements
Chapter 1
Introduction
1
Chapter 2
Before you begin
4
Chapter 3
Preparing the clay
9
Chapter 4
How to make an Upesi liner
12
Chapter 5
Firing the stove liners
23
Chapter 6
Marketing
26
Chapter 7
How to build an Upesi stove
28
Chapter 8
How to use an Upesi stove
31
Chapter 9
How to use an Upesi stove
32
About the moulds
Good ideas from other potters
36
39
Appendices
Appendix 1
Appendix 2
Glossary
Further reading
40
41
© Intermediate Technology Kenya 1995
ISBN 9966 9606 0 0
Illustrations by Debbie Riviere
Cover photo Neil Cooper. A member of the Keyo Womens Group attaching the pot-rests onto the main
mould
Originally printed by Africa Church Information Service, Nairobi
Acknowledgments
The authors would like to acknowledge the contribution of Moses Agumba, who 'outlined all the salient
procedures' that are followed in a standard liner production process. We would also like to thank Keyo
Women Group who worked with Clare Heyting to enable her to fully understand all aspects of the liner
production and to take all the photographs that were needed for Debbie Riviere to be able to produce the
illustrations. In addition, we thank Tim Jones and Angela Langenkamp for sharing their knowledge and
experiences.
Chapter One
INTRODUCTION
Every home in every country in the world uses some form of cooking equipment. Some people cook with
electricity, while others use gas or kerosene. However, in about half of the world's homes, people use
biomass fuels such as charcoal, wood, animal dung and agricultural waste such as maize cobs, coffee
husks, crushed sugarcane stocks and rice husks.
During the 1970s and early 1980s it was assumed that use of these fuels was the main cause of the
deforestation that threatened large areas of Africa, Asia and South America. As a result, many governments
and development agencies introduced improved cooking stoves which burnt fuel more efficiently. They
believed that the improved stoves w6uld help to slow down the rate of deforestation.
It has, however, become clear that deforestation is mainly caused by other factors, such as clearing land for
agriculture and timber extraction, rather than by fuel collection. Thus, people who rely on biomass fuels are
actually the victims of deforestation rather than the offenders. It has also become obvious that improved
stoves can bring other "hidden" benefits, which justify their continued promotion.
Collecting fuel is hard work and takes up a lot of time. It is usually the responsibility of women and
children. A woman spends many hours every week walking to collect fuelwood, and carrying it back home
on her head; any reduction in the amount of fuel she needs will allow her to save valuable time and effort.
In cases where fuel is purchased (notably in urban areas, where charcoal is commonly used), improved
stoves can lead to cash savings. In some cases, women may choose to use the same amount of fuel as
before, but are able to do more with it; they can cook more frequently, or boil water for drinking. Biomass
fuels also give off smoke which can cause both respiratory and eye infections. Improved stoves bum the
fuel more efficiently and so reduce the amount of smoke to which cooks are exposed.
As a result, improved stoves are now promoted as a means of improving the quality of life for poor
households which rely on biomass as their main source of fuel rather than as a solution to the problem of
deforestation.
One type of improved stove - the Upesi (also known as the Maendeleo) - has met with great success in
Kenya. There have been many enquiries about the stove from other countries, particularly in East Africa.
This book, which will help to answer many of those enquiries, provides a step-by-step guide on the
production of the Upesi. It touches briefly on other aspects of stove production such as firing methods and
marketing, and provides details of where to obtain further information.
It is important to note that the Upesi stove is not necessarily suitable for use throughout Africa. Local
needs vary according to local circumstances: environment, culture and cooking methods all play a part in
determining the most appropriate type of stove. However, the book will help project workers to decide if the
Upesi is the most appropriate.
The Upesi stove
The Upesi stove is a simple pottery cylinder (known as the liner) which is built
into a mud surround in the kitchen. It is designed to bum wood, although it can
also bum crop waste such as maize stalks and cobs, and animal dung. Fuel is
fed into the fire through an opening at the front of the stove. The stove does not
have a chimney, but produces less smoke than an open fire. This is because it
bums fuel more efficiently.
Fig. 1.1 A Upesi liner
The Upesi is designed for one pot, but two or more stoves can be installed side by side so that the cook can
use more than one pot. The stove's three strong pot rests can support a range of commonly used pots, with
round and flat bottoms. However, it is unsuitable for very small pots, or very wide ones such as the
Ethiopian mtad.
Fig.1.2. A Upesi stove
History of the Upesi
Upesi stove
The Upesi was developed in the mid-1980s, as part of the Special Energy Project that was run by the
Kenyan Ministry of Energy and the German government agency, GTZ. The Kenyan national women's
organization, Maendeleo ya Wanawake, helped to design the stove, and as a result the Upesi began its life
as the "Maendeleo". The name "Upesi" - a Swahili word meaning "fast" - was adopted in the early 1990s to
make the stove more marketable.
Early tests by the Special Energy Project showed that, compared with the three-stone open fire, the Upesi
consistently used over 40 per cent less fuel. Further tests have shown that it reduces smoke by up to 60
per cent. Many users report that they are also able to cook much more quickly on an Upesi than on an open
fire. The main disadvantage of the Upesi is that it gives out less light and heat than an open fire. This can
be a major problem in highland areas. Cooks may also have to cut their fuel into small pieces so that it will
fit into the stove.
GTZ began training small-scale businesses in central
Kenya to produce Upesi stoves. In west Kenya,
Intermediate Technology Development Group (ITDG)
and its local partner, Kenya Energy and Environment
Non-governmental Organizations (KENGO), trained
groups of women potters, including the Keyo Women's
Group, which is one of Kenya's largest stove producers.
The stoves were originally distributed by the Ministry
of Agriculture's extension agents, the Home Economics
Officers (HEOs). They sold them, with the help of
transport subsidies from the Special Energy Project,
for "less than the price of a chicken". This made many
people aware of the stove, but distribution was limited
and production was slow. In 1992, ITDG carried out a
marketing study to establish how best to market the stove
Fig. 1.3 A Upesi stove for less than the
Price of a chicken
commercially, and so stimulate both demand and production levels. On the commercial market, the price
of a stove includes full production costs plus a profit margin for producers, distributors, wholesalers,
retailers and installers. An Upesi stove now costs between KShs 100 and KShs 150 (approximately £2).
This is slightly less than the price of a chicken. The market has grown significantly, which is a good sign
that the Upesi meets the needs of its users for a clean, efficient, fast-cooking stove.
Chapter Two
BEFORE YOU BEGIN
Upesi liners can be made by potters using a mould to shape clay into the form of stove liners. These are
then dried, fired and built into the kitchen as an Upesi stove.
If you want to start producing Upesi stove liners, you will need to consider the following:
Pottery skills: do you have them?
If no one in the project has pottery skills, making
pottery stoves will be difficult. There are many
different aspects in the identification of pottery
clays, the preparation of the clay, making the
stoves, firing the stoves, and understanding the
causes of, and solutions to problems that may
occur. Experienced potters know where to find
the clays, how to prepare and handle them, and
how to fire them. A potter's experience will help
solve problems in the production process.
Learning to make an Upesi stove is quite easy for
a skilled potter, but is more difficult for a person
with no pottery experience.
Fig. 2.1 Easy for a skilled potter
If no one in your project has any pottery skills, you could consider sending one or two people for training to
learn basic pottery skills. This type of training could take several months.
Do you
you have a source of good clay?
Where there is good clay, there will usually be a history of pottery, and potters who know where to find the
clay sources and how to prepare that particular clay. If, however, there are no pottery activities in your area,
you will need to find a clay source.
Seek out local knowledge. If there are no potters working now,
find out if there were any in the past. Ask older people. If you do
not succeed in finding a clay source this way, there are places
you can look. Wells, long-drop latrines and other excavations will
show you what types of soil and clay are there. If you can find a
source of clay in this way, you will know at what depth it can be
found. Once you have established that clay is available, you may
be able to find more accessible sources. Natural clay deposits
are often found along river banks. Alternatively, if you know an
area where the earth has large, deep cracks in the dry season,
then this soil may have a high clay content. Look for places
where the soil has been dug. If the surface left by a spade or hoe
is shiny this may indicate a high clay content.
F
Fig. 2.2 Testing the clay
There are some simple tests that you can do at this stage to find out whether the soil has clay in it, and
whether it can be used for pottery. Remove any twigs and stones, then knead a handful of the soil (add
some water if it is too dry). Try to roll it into a long thin snake shape and coil this into a circle. If you can
do this without the soil cracking then the soil has quite a lot of clay in it and may be suitable for pottery.
You can also try to make a small thumb pot from the clay. Take a small handful of the soil and roll it into a
ball (about 2-3 cm diameter), then push your thumb into the ball and squeeze the clay between your
thumb and finger, gradually forming a small pot. If you are able to make a pot, you have found a pottery
clay that may be suitable for producing stove liners.
These tests will give you an indication of whether you have found usable
clay. It is important to remember that not all pottery clays are good for
making stoves. Therefore, you will need to test the clay further before you
are sure it is suitable. A simple test to find out if your clay is suitable for
stove liner production is to measure the shrinkage of the clay. Make several
test bars which are 15 x 5 x 1 cm. Mark a length of exactly 10 cm on each
bar, dry them for at least a week, and fire them. Measure between the
original 10cm marks. If the original 10 cm marks are still more than 9 cm
apart, you may have a suitable clay. If the 10 cm has shrunk to less than 9
cm (i.e. the shrinkage is more than 10%) the clay is not likely to be suitable
for making stoves. Nevertheless, you can try adding more sand to the clay
and repeating the test.
Fig. 2.3 Making a thumb pot
The only sure test to find out if the clay is suitable for stoves is to take it through the whole process of
moulding, drying and firing. Then try building and using some stoves for cooking to see if they are strong
and will last.
Ideally, you need to find a source of clay that is large
enough to last for at least a few years. Otherwise you will
need to keep testing new sources. You should also
consider whose land the clay is on, whether you will be
allowed to collect clay there and if you have to pay for it.
If the clay is a long way from your workshop, you should
also calculate the cost of transporting it.
Fig. 2.4 A test bar
Do you have all the materials you need?
You will need a source of water, an adequate supply of fuel for firing and a source of fine sand to mix with
the clay. Some clays contain sand when they are dug from the ground. Others are mostly pure clay. As
clays with high sand content are best for making liners, even if local potters do not mix sand into their clay
for making pots, you will probably need additional sand in the clay for making stove liners. If sand is not
available, you can use grog. These are broken pieces of pottery ground to a coarse powder.
Equipment and work space
Stove liner production requires investment of time, money and other resources such as working space. The
mould equipment will cost at least £ 100. In addition, you will need a place to work and a place to store
liners while they are drying. Although you can start production on a small scale by working under a tree and
storing liners in your house, if it is to become a viable business, in the longer term you will need to invest
in a workshop and a kiln. Production economics in Kenya indicate that making fewer than 100 stoves a
month is not viable.
Is the Upesi stove appropriate?
To find out if the Upesi stove is appropriate in your area, you will need to carry out some market research
and field tests to investigate the following:
•
•
•
•
•
•
Do people need stoves?
Do they need it or like it enough to buy one?
Have you tested the stove in your area? Do people like it?
Is the Upesi stove suitable for cooking local foods in the type of pots that people use in your area?
Do the people often rely on their fire for light or warmth?
Does the stove need to be adapted to local needs?
Will it be profitable to produce stove liners for sale?
• How much will the liners cost to produce?
• Can people afford to buy the stove liners at a price that is profitable for the producers?
• Is it profitable to make stove liners, or are other products more profitable?
Marketing. Do you have a plan?
• How many stove liners will you be able to produce and sell each month?
• Where will you sell the stove liners?
• How will you promote your new product?
• How will you transport the stove liners to customers and to retailers?
These are all very important questions to answer before you start stove production. If you cannot sell the
stoves at a profit, your project will fail.
Quality control
Quality control is a very important part of stove production. Quality control means ensuring that every stove
produced for sale is of high quality.
•
•
Each stove liner should be of the correct size and shape so that
it will be efficient.
The pot-rests should all be the same height and thickness. The
door should be cut so that it is big enough to feed in fuel.
Fig. 2.5 A good quality liner
•
•
Each stove liner must be durable. It should not break during transportation or when it is first used.
Each stove liner should be attractive and well finished so that customers will want to buy it.
Lack of quality control can result in the following problems:
Stove liners crack during drying or firing, which means the
potters have wasted time and money.
•
•
•
•
Stoves crack when they are first used which means
angry customers who complain.
Stoves are not easy to use, which means dissatisfied
customers.
Stoves that are less efficient than they should be will
disappoint customers.
Stove liners that are unattractive will be very difficult
to sell.
Fig 2.6 Poor quality liners
The quality control needed for stove liners is different from that needed for pots. This is because pots can
be all different sizes or shapes, and they will still work well. The Upesi stove has been carefully designed to
be as efficient as possible, and so each liner must be accurately produced if it is to work efficiently. There
are certain points in the production process where quality control is vital. These points have been marked
in the text with the symbol:
Chapter Three
PREPARING THE CLAY
In this
•
•
•
section we will introduce some common methods of clay preparation. These are:
dry grinding
pit soaking
the "Keyo method"
Remember, however, that one of the best ways to find out how clay is prepared in your area is to ask local
potters.
Dry grinding
The clay is dug out, dry or wet, then broken up into small pieces and dried thoroughly. When dry, it is
ground to a fine powder. Traditionally, this is done using a grinding stone. The clay powder can then be
mixed with the correct quantity of fine sieved sand. The correct mix will depend on the type of clay. Then
water is added carefully to form a workable
clay. The clay is wrapped in polythene and left
to rest for two to three weeks. This method is
advantageous in that stones and lumps are
removed or ground up. Manual grinding is slow
and labour intensive. In addition; the dust
produced is dangerous if breathed in. Since
the stove liners use quite large quantities of
clay, manual grinding is not especially suitable
for stove production.
Fig. 3.1 Dry grinding clay
Pit soaking
The clay is dug out, dry or wet, and broken up into small pieces, then dried thoroughly. It is mixed with a
lot of water so that it dissolves. This mixture can be sieved to remove stones, then allowed to soak in a
brick-lined pit. When the clay has broken down
and settled, excess water is drained off,
evaporated or allowed to soak away. When the
clay is sufficiently dry to handle, sand can be
mixed in the right proportion. The correct mix
will depend on the type of clay. The clay is then
wrapped in polythene and left to rest. This
method can be used to prepare large quantities
of clay, though building enough pits can be
costly. The clay can be soaked in an old oil
drum. Excess water can be taken off when the
clay has settled, and the clay can be tipped
onto sacks to dry out.
F
Fig. 3.2 Pit soaking clay
The Keyo method
The clay is dug out, wet or dry, and is broken up into small pieces. Water is carefully added, and the wet
clay is wrapped in polythene paper and left to soak up the water. When the clay is soft, the correct quantity
of sieved sand is added
and mixed using a
spade or hoe. The
correct mix will depend
on the type of clay. This
mixture is pounded or
trodden to crush any
lumps, then wrapped in
polythene and left to
rest. After this, the clay
is sorted by hand to
remove any stones or
lumps. It is then
wrapped in polythene
paper again and rested
for at least a few weeks
until ready for use.
Fig. 3.3 The Keyo method
Whichever method is used, the important things to remember are:
• The clay must have no stones or lumps in it.
• The clay must be very well mixed.
• The clay must be rested enough for it to be plastic. This may be days, weeks or even months.
Resting allows several important changes to take place in the clay structure. In addition, it makes
the clay plastic and workable.
• The clay should have a high sand content (or other non-clay particles) but must still be workable.
• The clay mixture must be consistent. You must ensure that you use the same amounts of clay,
sand, and other additives every time.
Other additives
There are other ingredients that potters sometimes add to their clay. These fall into two main categories:
Non-clay particles that serve the same purpose as sand. Examples of non-clay additives that "open
up" the clay and reduce shrinkage include:
• termite soil
• volcanic ash
• grog. This is finely ground fired but broken pottery, which is hard to grind by hand. Fine sand,
if available, is often a better choice. Alternatively, you can manufacture grog by grinding and
sieving dried clay then putting it in a pot in the fire or kiln.
Fine biomass particles that bum up during firing, leaving small spaces in the pottery, thus making
it lighter and more porous. Examples of biomass additives that bum out during firing, and open up
the clay are:
• rice husks, wheat chaff, coffee husks
• sawdust
• finely chopped grass
• charcoal dust
• cow dung. This is mainly composed of biomass. (The bacteria help to mature the clay.)
Chapter Four
HOW TO MAKE AN UPESI LINER
You will need:
Materials
•
•
•
Prepared clay (see Chapter 3)
Water
Fine, sieved ash
Equipment
•
•
•
•
•
•
•
•
•
•
•
A table or work board
Paddle mould (see Appendix 1)
Pot-rest mould (see Appendix 1)
Cutting mould (see Appendix 1)
Knife
Plastic spatulas for smoothing
Polythene sheets
Cardboard, wooden board~: or sacking
Place to store the stoves while they dry
Cloth
Wire
Fig.4.1. The Equipment
Moulding the stove liner
Step 1
Wipe the base plate and inside of the mould with a damp cloth. Then sprinkle it with fine sieved ash to
make a "non-stick" surface. This will prevent your liner sticking to the mould when you turn it out. It is
important that the inside of the mould is covered evenly with ash.
The base plate coated with ash
Wiping the inside of the mould
Sprinkling the inside of the mould with ash
Removing excess ash
Fig. 4.2 Creating a "non-stick" surface
Wedge the clay to remove any air that is trapped. To do this, take a block of clay the size of a large brick
and cut it in half with a short length of wire. Slam the top half onto the bottom half, then turn the clay.
Repeat the procedure until all the air bubbles have gone.
Fig. 4.3 Cutting a block of clay into half and slamming the top half onto the bottom half (wedging)
Step 3
Lay a plastic sheet on a flat surface, the floor or a table top. Mould two slabs of clay, each about 50 cm
long, 30 cm wide and 5 cm thick. Each slab should be large enough to cover more than half of the inside
of the mould.
Fig. 4.4 Making slabs
Step 4
Lift one of the slabs and carefully ease it into the mould so as not to disturb the ash layer. Push it against
the inside wall of the mould. Repeat this with your second slab, which should overlap the first slab on each
side.
Fig. 4.5 Putting the slabs in the mould and pushing the slabs against the inside walls
Step 5
Compact the seams where the slabs join, using your fist, until the seams become invisible.
Fig. 4.6 Compacting the seams
Fig. 4.7 Filling holes
Step 6
Remove any excess clay from around the top of the mould and use this to fill in any holes or gaps in the
clay.
Step 7
Attach the paddle to the central shaft, and lower it gently until it touches
the clay. Sprinkle a little water on the surface of the clay and rotate the
paddle slowly so that the blade squeezes the clay against the mould wall
and scrapes off any excess clay. Continue to rotate the blade, pushing it
down a little after each turn. Remove any build-up of clay on the paddle
with your other hand.
Fig. 4.8 Rotating the paddle
Step 8
When the paddle blade reaches the correct depth it will scrape the top
edge of the mould. Stop the paddle and fill any holes in the clay, sprinkle
with a little water, and rotate the blade faster to smooth the surface.
Watch for any air trapped in the clay; if the clay surface swells as the blade
approaches, then open up the air bubble and fill the area with more clay.
Fig. 4.9 Removing air bubbles
Step 9
To remove the paddle when you have finished moulding, sprinkle on a little more water and rotate the
paddle quickly for two to three turns. Holding the handle in one hand and the top of the paddle in the
other, lift the paddle out while it is turning so that it leaves no mark on the clay.
Fig. 4.11 The mould body in the liner
Fig. 4.10 Removing the paddle
Do not use too much water because this can cause the stove to crack during drying or firing.
Step 10
Lift the mould body off the mould base complete with the clay stove liner. Turn it upside down onto
cardboard or sacking in the storage place, tapping the mould gently on the floor to loosen the clay liner.
Alternatively, turn the liner out onto a wooden board, and carry it to the storage place.
Fig. 4.13 Turning the mould upside down
Fig. 4.14 Turning out the liner
Step 11
Smooth the bottom of the liner, and check the areas where the clay slabs were joined. Ideally they should
be smooth and hardly visible. If not, repair the joints using more clay if necessary. Do not just smooth over
the joint. Make sure that the clay in the joint is fully combined.
Fig 4.15 Smoothing the liner
Step 12
Cover the liners in sacking or polythene to slow the drying process, especially if the weather is hot and dry.
If the liners dry too fast, they may crack.
Fig. 4.16 Covered liners
Step 13
Wipe the mould clean after making each stove and wash it thoroughly when you finish moulding the last
stove. The mould should be left completely clean and dry, ready for making the next stove.
Finishing the stove liner
Handle each wet stove with great care. Avoid pushing it out of shape, because although it can be reshaped
it may crack later during drying or firing.
Step 14
Leave the liner to dry for a day, to make the clay firmer. If the climate is cool or wet, you may have to leave
it for two days. Do not move the liner. Place the template of the door against the stove. Cut out the door
using a wet knife, and smooth out its edges.
Fig. 4.17 Cutting the door
Fig. 4.18 Removing the clay
Keep the knife at the correct angle to ensure that the inner door measurement is ~ the same as the outer
one.
Step 15
Leave the liner to dry for one more day or until it is dry enough to be moved
without being damaged. Carefully turn the liner the right way up.
Fig. 4.19 The stove liner
Step 16
Mark the positions of the pot-rests by laying three fingers inside the liner next to the door and then making
a vertical mark on the clay surface. Make four more marks at intervals of 1 cm away from the door. Repeat
this on the other side of the door.
To make the final pot-rest, make another mark directly opposite the middle of the door; then make two
more marks, 1 cm on either side of the first mark. It is very important that the pot-rests are equally spaced.
This ensures that the cooking pot will be stable on the stove.
Fig. 4.20
Marking the positions of the pot-rests
Fig. 4.21
An alternative way of making sure that the pot-rests are equally spaced is to make a template marking
where the pot-rests should go. The template is an equilateral triangle (a triangle, with all sides equal) made
of metal bar or wood, with each side measuring 35 cm.
Step 17
Sprinkle a little ash inside the pot-rest mould and tip out any excess to
make a "non-stick" surface.
Fig 4.22 A pot-rest mould
Step 18
Make three large eggs from the clay. Note that it must not be very
wet. To make a pot-rest, press one of the clay eggs into the pot-rest
mould, making sure that it completely fills the mould. Remove any
excess clay. To remove it from the mould, stick a small ball of clay
to the clay surface and pull the pot-rest free from the mould. Make
two more pot-rests in the same way.
Fig. 4.23 Making pot-rests
Step 19
To attach the pot-rests to the liner, scratch the two surfaces which are to be
joined and coat each surface with a thick watery clay mix (slip). Attach the top
of the pot-rest to the top of the liner, holding it firmly in place as you bend the
pot-rest down to attach it to the inside of the liner. Ensure that there is no air
trapped in the joint, as this can cause the pot-rest to break off during firing.
Repeat the process for the other two potrests. The top of the pot-rests should
be 1 cm higher than the top of the stove. Make sure all three pot-rests are the
same shape and size and that all the joints are smooth and well finished.
Fig. 4.24 Attaching the pot-rests
Step 20
Smooth the stove, using a little water and a plastic spatula. Complete
the stove by decorating or putting an identifying stamp on it. This
stamp should identify where the liner was made. It can be carved in
wood or rubber like an office stamp.
F
Fig. 4.25 Putting the stamp
The stove has to be attractive and functional. If you want to sell it, someone ~ has to like its appearance to
want to buy it.
Step 21
Dry the stove liners for two to three weeks. If the climate is hot and dry, cover the liners in polythene or
sacking for the first week to prevent them from drying too fast and cracking. If the climate is damp, the
liners can be left to dry without being covered. When the liners look and feel completely dry, they should be
put in the sun on a dry surface, for two to three days.
Fig. 4.26 Drying the liners
Notes on drying stove liners
Stove liners have much thicker walls than most traditional pots. This means that they will take longer to
dry. It is important to dry the liners as slowly and evenly as possible.
DO NOT
put
put
put
put
wet
wet
wet
wet
liners
liners
liners
liners
in direct sunlight to dry
in a draughty or windy place to dry
directly on a cement floor
in a hot tin-roofed shed without covering them.
DO
put wet liners in a cool humid place for the first few days of drying
put cardboard, sacking, cloth, dried grass or leaves under the liners, especially if they are
to stand on a cement floor
cover wet liners for the first few days of drying with sacking, cloth, cardboard or even
banana leaves. If you use polythene, make small holes in it to allow some moisture to
escape.
After about one week the liners will be hard. They can then be uncovered and left in a shaded area for at
least one more week. The stoves should be sun-dried for the last few days before firing.
Your stove is now ready for firing!
But before firing you should do a quality control check. Check each stove for cracks or other defects. If
stoves have small cracks at this stage, most probably they will break during firing. If you fire a poor quality
stove, you will be wasting both the clay and fuel. Remember that you can re-use the clay from any stoves
you reject before firing.
Chapter Five
FIRING THE STOVE LINERS
Firing is the process of baking sun-dried clay into pottery. During firing, the clay structure changes and it
becomes a brittle substance which will no longer dissolve in water. Most clays change colour during firing.
Stove liners can be fired in a traditional potter's bonfire or pit. However, it is important to remember that
because the walls of the liner are thicker than most traditional pottery products, they need to be fired for a
longer period than pots. The experience of firing Upesi liners in Kenya has shown that if temperatures of
600-700°C are reached and held for two to three hours, the liners will be adequately fired. The total firing
time is, of course, much longer as it includes the heating and cooling time.
Fig. 5.1 A traditional potter's bonfire pit
While you can never totally prevent pots or liners from cracking during firing, you can minimize these
losses. It is realistic to expect a few liners to crack. If fewer than 10 per cent of the liners crack during
firing, then you are on the right track. Liners will crack if the temperature in the kiln rises too fast as the
firing begins. There are several possible reasons for this. If any remaining water in the clay reaches boiling
point too quickly, it gets trapped, expanding suddenly as it becomes steam, and cracks the liner. The clay
itself also expands as it is heated. If this happens too fast, the liner may crack.
Cracking will also occur if the temperature in the kiln drops too fast during cooling. This is because the
pottery will contract suddenly and crack. Liners may also crack if heated unevenly. This could happen if
the temperature rises too fast on one side of the bonfire, or if the bonfire cools down unevenly due to wind
or draught.
Experienced potters should be familiar with what causes cracks and how to prevent them. Trial and error
will help you to understand the causes of cracking and how to remedy the situation. Chapter 9 gives you
some practical advice on what to do if your liners crack during firing. Bear in mind, however, that every clay
is different, and you will need to experiment with your clay to discover the best way of firing your stoves.
The most important points to remember in order to improve the firing are:
• slow the heating stage of the firing
• slow the cooling stage of the firing
• make sure that the heat during firing is evenly distributed
• maintain temperatures of 600-700°C for at least two to three hours.
Stove liners have thick walls and you should be careful that they are properly fired. Partly fired liners may
look all right, but will crumble when they get wet or after a short period of use.
If you hold a liner with one hand and tap it with the other, or using a short stick, you should hear it ring. An
under-fired liner will sound dull. Traditional potters will be familiar with this process as it is used to check
pots.
Fuel for firing
Given that improved cooking stoves aim, among other things, to reduce the amount of fuelwood required,
this fact should also be considered at the production phase. Most potters who produce traditional pots or
improved stoves use fuel wood and dried grass as the main fuels for firing. Some potters use other
agricultural waste such as stalks, leaves and even dung. There are alternative fuels, although most of these
require the use of a specialized kiln. Examples include coffee husks, rice husks, old engine oil, or even gas
or electricity. Start with the technology and fuel that you have experience in using. If this is the traditional
bonfire or pit, you can try enclosing the fire with a simple brick or mud wall.
You can reduce the fuel needed for firing by:
• keeping the heat in the "kiln" or bonfire by enclosing the fire
• improving the combustion of the fuel by ensuring that sufficient air reaches the fire
• firing a larger number of stoves together. This would mean having an appropriate sized kiln in
which you would fire a full load of stoves each time.
Fig. 5.2 A "Better Bonfire" kiln developed by Intermediate Technology
Once you have established that stove liner production is possible and that there is a market for the product,
it may be worth considering investing in a kiln or an improved bonfire. This can save fuel, improve the
quality of your liners and reduce the number of liners that crack during firing.
Chapter Six
MARKETING
Marketing is all about how to sell the stoves. There is no point in potters making stoves if they cannot sell
them at a profit. Stoves provide benefits to the users only if they reach those users. If your project aims to
reach the users through the commercial market, people must be informed about the stoves and should be
persuaded to go and buy one.
The four basic principles of marketing, known as the four Ps, are: Product, Price, Place and Promotion.
Product
Have a good product to sell. In this case it is the stove. Ensure that the stove is
what your customers want, and that it is attractive as well as useful. It is
important that your stove has a good marketing name. The name should be
short and catchy. It is advisable to have a name that tells people something
good about the stove. An example is Upesi which tells people that the stove is
fast. You should choose a name that people in your area will understand and
remember.
Fig. 6.1 Upesi logo
Price
Getting the price right is a very important part of marketing. The stove must be affordable. At the same
time, it must be profitable for the producers to make, for distributors to transport and for retailers to sell. If
making and selling the stove is not profitable, then the project cannot succeed unless the price is
subsidized. Providing subsidies is not a sustainable approach. In order to work out the selling price of the
stove you will need to calculate all the costs of production. These include the cost of materials, all the
labour involved and the cost of likely losses and breakages. If the figure is doubled, you will get a
reasonable estimate of the likely selling price, including overheads/equipment, marketing and transport
costs, and profit margins.
Many development projects want to keep the price low. But experience has shown that it is better to start
with a higher price and let market competition bring the price down. A higher price to start with gives the
stove an image of being a valuable product. Later on when customers find it cheaper, they will feel that
they are getting a bargain. A higher price also attracts producers and retailers to start a stove business.
Place (or distribution)
If the stove is to sell, then it must be in the right place. It is possible that some customers will come to the
stove producers to buy the stoves. In some cases, the stoves will have to be transported to markets,
retailers or even directly to customers. This distribution may be done by the stove producers themselves or
by traders (often known as "middlemen"). Distribution takes time and costs money, so include it in the
selling price. Find out where other similar types of products are sold and how they are distributed. The
distribution of the Upesi stove is not simple because pottery stoves are breakable and the Upesi needs to
be installed after it is bought. This can be done by an installer or by the buyer.
Promotion
The Upesi stove is a new product, so you will have to introduce it to your potential customers. You need to
persuade them that it is a product that they want to buy. Aim to create a positive image of the stove.
Emphasize that it is a modern, desirable and useful product. Find out what people like about the stove and
use that information to develop your promotion campaign. Develop short, clear marketing slogans. Explore
different ways of communicating your messages about the stove. You could try demonstrating the stove in
markets, or visiting local women groups to
show them the stoves. You could also print
posters or calendars, demonstrate the stove
at agricultural shows or health clinics, or
advertise the stove on the radio.
Fig 6.2 Promoting stoves
Chapter Seven
HOW TO BUILD AN UPESI STOVE
You will need:
• an Upesi liner
• three wheelbarrows of soil (this should ideally be good building soil which is
• sticky but strong when compacted, such as murram)
• two wheelbarrows of stones (about fist size)
• a large bowl and a bucket of water
• a hoe or shovel
• a flat piece of wood or a panga
• a handful of small flat stones
• half a bucket of the best mixture you know for smearing walls. Ash, cow dung and clay is a good
mixture.
Three wheelbarrows of soil
Handful of small flat stones
Two wheelbarrows of stone
Bucket of water
Upesi liner
Fig 7.1 Some of the materials required
Fig. 7.2 Mixing murram with water
Step 1
Mix the soil with a little water until it just holds together in a ball when you squeeze it. Soak the liner in
water.
Step 2
Choose a site for your stove. This should be a place where it will not
be rained on. It should face the direction from which air flows into
the room. Mark the area to be covered by the stove and make the
foundation by laying stones over the area. Cover the foundation stones
with the soil mix and compact it with a flat piece of wood or panga, to
make it level, flat and strong.
Fig. 7.3 Building the foundation
Step 3
Stand the pottery liner on the foundation with the liner door facing the
kitchen door. Make sure the stove is level by putting a pan or sufuria with
water on the stove. Check that the water covers the bottom of the pan
evenly. If not, adjust the liner until it is level.
Fig 7.4 Stand the pottery liner on the foundation
Step 4
Put more stones and soil around the liner, leaving the door clear. Compact the soil until it just reaches the
top of the liner, leaving the pot-rests free.
Step 5
Make sure that you have a wood-rest area in front of the stove door
to support the fuelwood. Finish shaping and smoothing the stove
until it looks attractive.
Step 6
Put a layer of small flat stones at the bottom of the firebox and tap
them level. Let the stove dry for seven days, then smear with
traditional plaster. This could be a mixture of clay, ash and cow
dung. Allow the stove to dry for three more days.
Fig. 7.5 Putting stones and soil around the liner
Your stove is now ready. First, light a small fire to ensure that it is completely dry! Remember that the
stove can be built to suit the user. There are many options. The stove can be built with a big surround that
can be used like a table or shelf. Alternatively, you can build a small one to fit into a small kitchen. It can
also be built high or low to suit the cook. Two liners can be installed next to each other as a double stove,
but remember to leave enough space between them so that there is room for a large pot on each liner.
Fig. 7.6 The double Upesi stove
Chapter Eight
HOW TO USE AN UPESI STOVE
The Upesi stove is designed for household use and is suitable for both large and small families. Although
many people think that it is too small for large families using big cooking pots, a bigger stove would be less
efficient. It is not different from the three-stone fire in the way that it is used, and all the common types of
cooking pots in Kenya fit on it.
The Upesi is designed as a wood-burning stove, and it works best with dry firewood. It uses less firewood
than the three-stone fire. You only need two or three sticks of wood. If you use too much wood you may
block the door of the stove so air will not reach the fire, making the fire smoky. If the fire is too big, you
will be wasting fuel and you may bum the food.
There are some things you can do to use your stove more efficiently. You should:
• use small sticks of dry wood
• use lids on pots
• simmer, rather than boil, food
• soak beans or other pulses before cooking
• cut food into small pieces so that they cook faster
• put out the fire when you have finished cooking and save the remaining fuel. (Do not throw water
on it as this may crack the stove)
• after putting out the fire, put a pot of water on the stove to heat. This water could be used for
washing up
In addition to wood, other common fuels such as maize cobs and stalks, can be used with the Upesi. Do
not use it to bum charcoal as it will be very inefficient.
A well-made stove should last for several years once it is installed in the kitchen. The liner should be
treated with care, like any pottery item. If the liner cracks after it has been installed, it can still be used.
Remember that the whole stove needs maintenance. It should be re-smeared regularly before the mud
surround cracks or crumbles. If the mud surround does crack, you can repair it by wetting the area with a
little water, cutting open the crack and filling it with small stones and more of the mud mixture. Then resmear the whole stove. The stove can also be moved and reinstalled in a new kitchen if required.
Chapter Nine
COMMON PROBLEMS: QUESTIONS AND ANSWERS
Q The stove liner crumbles when I try to remove it from the mould. What should I do?
A The clay mixture could be too dry. Try adding more water, and give it time to soak evenly into the clay.
Probably you do not have good pottery clay. Have you tried the tests, i.e. making a thumb pot, or
making a sausage and coiling it into a circle?
If the same clay you are using is used by potters to make pots, then check whether you are collecting
the same type of clay (e.g. from the same depth) and preparing it in the correct way. You could try
resting the clay for a longer time.
If these do not work, then you may have added too much sand. Try reducing the amount of sand. If
this still does not work, then what you are using contains too little clay and is not suitable. Try to find
a better source of clay.
Q The stove loses its shape when I turn it out of the mould. Why?
A
It sounds as if your clay is too wet. You should work with clay that is as dry as possible. Use a minimal
amount of water as you we moulding.
Q Why won't my liner mould smoothly?
A
Make sure that the paddle blade is clean and smooth before you start moulding.
You may have lumps, stones, or other large particles in the clay. These need to be sorted and removed
from the clay mixture before moulding. If the clay appears to swell as the paddle moves over it, and a
lump appears behind the paddle, you have air trapped in the clay. You should remove the clay around
that area and replace it. Be careful not to trap more air.
Q My liners crack during drying. Why?
A
There are several possible reasons for this problem. Maybe you are drying your stoves too fast. Try
slowing the drying process by covering the stoves for the first week with sacking or even polythene. In
the case of polythene, make small holes to allow the condensed water to escape. You can also make
the atmosphere in your storage space cooler and more moist. For example, if you are storing the stoves
in a metal-roofed room, try putting matting under the metal roof to keep the room cooler. Or if your
area is very dry, hang a polythene sheet or a wet sack over the doorway to your store, or sprinkle water
on the floor. Make sure that there is no draught.
It is also possible that your clay has very high shrinkage. Try doing the shrinkage test (see Chapter 2).
If this is the case, you can reduce the shrinkage by adding more sand to the mixture.
Finally, it is possible that your clay has not "rested" sufficiently. Try resting your clay for a longer
period. This could take several months, so you need to plan ahead and collect, prepare and store clay
while you use what you had previously prepared. Make sure that the clay does not dry out during
resting. The clay must remain moist. The resting enables the water to distribute evenly through the
clay.
Repairing cracks is not recommended, as this is difficult to do properly and the cracks usually
reappear during the firing.
Q
Why do our liners crack and break during firing?
A
If your liners have small cracks or defects before firing, they are likely to break during firing. So,
remember to do the quality check before firing and to remove any stoves with cracks or other defects.
If you have small stones or air bubbles in the clay mixture, these will cause the stoves to crack when
they are fired. Look carefully at the broken surfaces of a few cracked stoves. You may be able to see
small stones or places where an air bubble was trapped. To prevent this, sort the clay well and remove
any stones. Wedge the clay well to remove any air bubbles.
If your stoves are still damp when they go into the kiln or fire, they will crack as the moisture
evaporates and expands. Dry the stoves well before firing. If possible put the stoves in the sun to dry
out for the last few days or into a warm kiln immediately after the last firing and leave them to dry.
If your firing process is too fast or too hot, the stoves will crack. Slow down the firing process by
heating up the kiln slowly. Uneven distribution of heat or cold draughts in your fire or kiln will cause
cracking. If stoves in one area of the fire are broken, this could be the cause. A damp kiln or firing pit
may cause your stoves to crack.
Built-in stresses in the clay can also cause cracks during firing. For example, if a wet stove is
mishandled and then pushed back into shape, it may crack during firing. Certain design features such
as sharp corners also cause stress. Therefore, avoid sharp corners around doors or where the pot-rests
join.
You could also check if the liners have cracks along the joints. Try scratch and slip.
Q My fired liners tend to crumble, especially when they get wet. Why?
A
It is likely that your stoves have not been fired enough. They may need to be fired at a higher
temperature for a longer period. Remember that the stoves have much thicker wall sections than most
traditional pottery. If the clay you are using is not used to make other pottery products, it is possible
that it does not have sufficient pure clay in it to fire properly. Try making a thin-walled pot and firing it
to see if it cracks or crumbles.
Q
My fired liners are "blue" in colour and have small cracks on the surface.
Why?
A
You are over-firing your liners. Either your fire is too hot or you are firing the stoves for too long. Use
less fuel once the kiln or fire is hot. Alternatively, you could reduce the air flow into the fire in order to
control it.
Why do my stoves have small cracks around the potpot-rests?
Q
A
Either the clay you are using for the pot-rests is too wet, or you are using too much water when you
attach the pot-rests.
Q
Why do the potpot-rests break off from my stoves during firing?
A
Either air is being trapped in the joint between the pot-rest and the stove wall, or the joint is not
being made properly. Use the same clay for the pot-rests as that used for the stove body. Make a
strong joint by scratching both surfaces and applying slip. Try to ensure that the clay from the two
surfaces really combines.
Q
My stoves
stoves seem fine. Unfortunately, they do not look round.
A
Either your clay mix is too wet so the stoves distort when they are tipped out of the mould or you are
not handling them carefully when they are wet and so they become distorted.
Q
Our stoves are fine during firing, but they crack when first used. What can we do?
A
It is possible that your clay does not have enough sand mixed into it. Try increasing the amount of
sand in the mixture.
Appendix 1
ABOUT THE MOULDS
Although it is possible to make the stoves without a mould, stoves can be made faster and more accurately
using moulds. The mould ensures that the important dimensions are always the same and correct.
The paddle mould
The paddle mould is made of mild steel. There are three sections:
The base plate
This is a circular plate cut from sheet
steel. It has a minimum thickness of 3
mm with a "stem" of about 20 mm
diameter welded at the centre. Three
counter-sunk holes enable it to be
screwed to a table or bench and three
locating studs enable the mould body
to be accurately located on the base
plate.
The mould body
This is a conical sheet-steel section
measuring a minimum of 1.5 mm in
thickness with a collar welded on the
bottom (minimum of2 mm thick). The
collar has three locating holes so that
the mould body can be accurately
located on the base plate.
F
i
g
.
A
1
.
1
Fig. A1.1 Sections of the paddle mould
The paddle
This is made up of two pieces of steel pipe welded together at right- angles so that the vertical paddle stem
fits over the stem on the base plate. The horizontal pipe is the paddle handle. A steel blade is welded
between the pipes. The outer edge of the blade is curved to one side at an angle of 45°. This is designed to
squeeze the clay against the mould body as it is moulded.
Fig. A1.2 An assembled mould
The cutting mould
The cutting mould is made from sheet-steel cut in the same shape as the
conical section of the mould body. The door shape is also cut out. It is
rolled but not welded closed, and can be made from much thinner sheet.
Fig. A1.3 The cutting mould
The potpot-rest mould
The pot-rest mould can be made of either plaster or cement. Cement is usually cheaper and more durable.
To make a cement pot-rest mould you will need:
• clay
• approximately 1 kg of cement powder
• an equal amount of fine sieved sand
• some soap
• a little water
• a plastic box that is about 25 cm long, 15 cm wide and 10 cm high, or a small cardboard box and
some polythene
Step 1
Make a "perfect" pot-rest by hand (or using a mould if you can borrow one). Try it on a stove but do not fix
it to the stove. Lay your perfect pot-rest flat.
Step 2
Wet the soap and rub it inside the
plastic box to form a non-stick layer.
If you do not have a plastic box then
line a small cardboard box with
polythene. This does not need soap.
Next, lay your perfect pot-rest in the
box.
Step 3
Mix the cement and sand together
and add sufficient water to make a
thick mixture that can be poured.
Pour the cement mix over the potrest
so that it is completely covered, then
add to a depth of about 10 mm. Tap
the box gently to release any air
bubbles in the cement.
Fig. A1.4 Making a pot-rest mould
Step 4
Leave the cement to cure (harden), but keep it wet for two days to make it stronger. Let the mould dry out,
remove it from the box, and remove the clay pot-rest from the mould. There is your pot-rest mould!
Appendix 2
GOOD IDEAS FROM OTHER POTTERS
The simple mould
Some women potters in south-western Uganda suggested that the paddle mould was more complicated
than it needs to be. They thought that a simple mould made from thinner metal could be used without a
paddle. The clay could be scraped smooth on the inside using a piece of calabash or a plastic spatula. It
works, and is much cheaper, but it is slower and does not ensure that the thickness of the stove wall is
correct. Experienced potters can make good stoves with this type of mould.
The "naked" Upesi
Some potters from Kabale in Uganda saw the Upesi stove and copied it. However, they made it with a base,
three small legs and two handles. They also decorated it. This type of stove could be used with or without
installation. If it is not installed, it will most likely break. You need to have very good quality clay to make
this type of stove. The naked Upesi is proving quite popular in the market testing.
Fig. A2.1 The "naked" Upesi
The portable Upesi
Early in their project, Keyo Women Group realized that the Upesi could be fitted in a metal cladding and
sold as a portable stove. This design is quite expensive compared to the ordinary Upesi, but it is very
popular.
Fig. A2.2 The portable Upesi
GLOSSARY
Clay
a natural substance of very fine flat particles which can slide across each other, making a
pliable material that can be shaped into pots or stoves
Firing
the process of baking clay pots or stoves
Grog
Grog
this can be made by grinding broken pottery to a fine powder. It can also be made by
grinding dry clay and then firing the powder
Kiln
an oven or furnace in which dried clay products are fired
Kneading
working the clay by hand to improve its plasticity
Plasticity
the characteristic of moist clay that makes it pliable and workable, so that it can be
shaped into pots or stoves
Pottery
fired clay items
Resting
leaving wet clay, usually wrapped in polythene or leaves, for several weeks or longer. This
allows the water particles to distribute evenly through the clay particles and strengthens
the micro-structure of the clay
Scratch and slip a method of joining two clay surfaces by scratching or scoring both surfaces to roughen
them and applying slip as a glue, before joining the surfaces
Slip
a thick mixture of clay and water with a consistency of porridge that is used as a "glue" to
hold pieces of clay together
Wedging
a method of mixing clay by hand to form a homogeneous texture free of air bubbles
FURTHER READING
Anura Gaspe, Peter Messer and Pete Young, Clay Testing - A Manual on the Clay/Non-clay Ratio
Measurement Technique, IT Publications, London
Bill Stewart et. al, Improved Wood, Waste and Charcoal Burning Stoves - A Practitioner's Manual, IT
Publications, London
Pete Young and Caroline Ashley, Stoves for Sale (available from ITDG)
Tim Jones, Handbook for the Manufacture and Use of the Paddle Mould for the Production of Ceramic
Cooking Stoves in Developing Countries (available from GTZ Household Energy Programme, D-65 726
Eschborn, Germany)
Tim Jones, Practical Tips for Potters Making Improved Cooking Stoves - A Manual for Potters and Stove
Promoters (contact UK Tel/Fax +44 1539446811 or via ITDG)
Clay Materials for the Self-reliant Potter (available from GA TE-GTZ, PO Box 5180, D6236 Eschborn,
Germany)
Feasibility Studies - Training Activities and Guidelines to Determine if a Business is a Good Idea (available
from OEF International, 1815 H Street, NW, 11th Floor, Washington, DC 20006)
Forming Techniques for the Self-reliant Potter (available from GA TE-GTZ, PO Box 5180, D-6236
Eschborn, Germany)
Marketing Strategy - Training Activities for Entrepreneurs (available from OEF International, 1815 H Street,
NW, 11th Floor, Washington, DC 20006)
This series of booklets based on the experience in East Africa includes:
• People Approach: A Guide to Participatory Household Energy Needs Assessment
• Appropriate Household Energy Technology Development: Training Manual
• How to Build and Use a Better Bonfire Kiln
• Appropriate Mud Stoves in East Africa
Practical Actiion
The Schumacher Centre for Technology and Development
Bourton-on-Dunsmore
Rugby, Warwickshire, CV23 9QZ
United Kingdom
Tel: +44 (0)1926 634400
Fax: +44 (0)1926 634401
E-mail: [email protected]
Website: http://www.practicalaction.org/
Practical Action East Africa
P O Box 39493
Nairobi
Kenya
Tel: +254 (0)20 719313, 715293, 719413
Fax: +254 (0)20 710083
E-mail: [email protected]