1
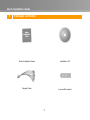
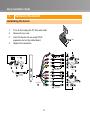
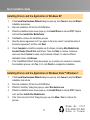
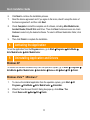
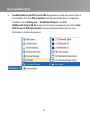
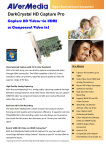
AVerMedia DarkCrystal HD Capture SDK C727 English Quick Guide Quick Installation Guide 1 Package Contents Quick Installation Guide Installation CD Dongle Cable Low profile bracket 1 Quick Installation Guide 2 Hardware Installation Installating the device 1. 2. 3. Turn off and unplug the PC from wall outlet. Remove the pc case. Insert the device into an empty PCI-E expansion slot on the motherboard. Replace the case back. 4. HDMI Port Example: Slot 6 15 8 2 7 2 (not supplied) 2 2 9 Camcorder 3 HDMI Cable (not supplied) 2 100 15 11 (not supplied) 4 Example: 15 2 AV_IN 1 4 HDMI 2 3 Camcorder 14 2 Dongle Cable 5 13 12 14 2 Component Cable (not supplied) Camcorder 3 4 Quick Installation Guide Making the Connections 1 2 3 HDMI Cable (not supplied) Camcorder Video Game 9 10 11 4 5 6 VCR/VCD/DVD Player Dongle Cable (Black) 12 13 14 7 S-Video Cable (not supplied) (Red) 15 8 1. (White) (Yellow) Composite Cable (not supplied) (Blue) (Green) Component Cable (not supplied) Example AVerMedia DarkCrystal HD Capture SDK is compatible with all range of Audio-Video Receivers. Via HDMI* or Component** Inputs, you can enjoy High-Definition Multimedia right on your desktop computer. For example without any delays in real time, you can Play Video Games Consoles such as PlayStation 3; enjoy watching Blue-ray movies through Blue-ray players. Even more, with AVerMedia DarkCrystal HD Capture SDK, you can record your home videos from Personal Camera connected via HDMI or Component connector. AVerMedia DarkCrystal HD Capture SDK equipped with standard definition S-Video and Composite inputs so you can transfer your favorite VCR Video Tapes in Digital Format or record your success in winning Video Games from PlayStation 3. * To preview HDMI source with HDCP (High-Bandwidth Digital Content Protection) encryption, a copy-protection scheme of HDMI specification, your HDMI display devices must be HDCP compliant. Please note that HDMI contents with HDCP encryption cannot be recorded. ** Copyrighted content cannot be recorded. 3 Quick Installation Guide 2. With AVer MediaCenter PIP (Picture-In-Picture) / PBP ( P i c t u r e -B y- P i c t u r e ) d i s p l a y m o d e yo u c a n simultaneously enjoy HDMI or Component video in one window and in the other window watch video from composite video or S-video sources. For more information, please refer to the user’s manual. 3 Driver and the Application Installation After the device is installed properly, turn on the computer. The system will automatically detect the new device. Simply skip the wizard, and insert the supplied installation CD to install the driver and software utility. 4 Quick Installation Guide Installing Drivers and the Application in Windows XP 1. 2. 3. 4. 5. 6. 7. If the Found New Hardware Wizard dialog box pops up, click Cancel to skip the Wizard installation procedures. Place the installation CD into the CD-ROM drive. When the installation main screen pops up, click Install Driver to activate C727 Capture card and then Install AVer MediaCenter. Click Next to continue the installation process. Read the license agreement and if you agree to the terms, check “I accept the terms of the license agreement” and then click Next. Check Complete to install the complete set of software, including AVer MediaCenter, Acrobat Reader, DirectX 9.0c and Drivers. Then click Next to continue. Advanced users can check Custom to select only the desired software. To select a different destination folder, click Browse. If the “InstallShield Wizard” dialog box promps you to restart your computer to complete the installation process, click Yes. If not, click Finish to complete the installation. Installing Drivers and the Application in Windows Vista™/ Windows 7 1. 2. 3. 4. 5. If the Found New Hardware Wizard dialog box pops up, click Cancel to skip the Wizard installation instructions. Place the installation CD into the CD-ROM drive. When the “AutoPlay” dialog box pops up, select Run Autorun.exe. When the installation main screen pops up, click Install Driver to activate C727 Capture card, and then Install AVer MediaCenter. If the “User Account Control” dialog box pops up, click Allow / Yes to continue the process. 5 Model No.: C727 P / N 300A C 7 27-D H F Made in Taiwan Quick Installation Guide 6. 7. 8. 9. 4 Click Next to continue the installation process. Read the license agreement and if you agree to the terms, check“I accept the terms of the license agreement” and then click Next. Check Complete to install the complete set of software, including AVer MediaCenter, Acrobat Reader, DirectX 9.0c and Driver. Then click Next. Advanced users can check Custom to select only the desired software. To select a different destination folder, click Browse. Then click Finish to complete the installation. Activating the Application To run the application from the Programs menu, go to Start Programs AVerMedia AVer MediaCenter AVer MediaCenter. 5 Uninstalling Application and Drivers Windows XP To remove the installed software utility from the operation system, go to Start Programs AVerMedia AVer MediaCenter Uninstaller Remove All Next OK Finish. Windows Vista™ / Windows 7 1. 2. 3. To remove the installed application from the operation system, go to Start All Programs AVerMedia AVer MediaCenter Uninstaller. When the “User Account Control” dialog box pops up, click Allow / Yes. Check Remove All Next OK Finish. 6 Quick Installation Guide 6 1. 2. 3. Important Information If DirectX 9.0c or above is not installed in your system, the installation CD will automatically install it during the process of installation. Make sure your system has DirectX 9.0c or above installed so that the software utility can function properly. If your system doesn’t have Acrobat Reader, the installation wizard will automatically be called up during the process of installation. You might encounter the following problems when using Adobe Premiere Pro CS4 in hardware environment installed a C727 device. Adobe Premiere Pro CS4 starts up utilizing the default audio capture device for the operation system; therefore, if you set C727 to be the default audio capture device, with C727’s Audio/ Video filter, Adobe Premiere will take up C727 and cause the plug-ins unable to utilize C727 normally. To solve the problem described above, take either of the following steps: 3.1 Before using Adobe Premiere Pro CS4, right click Volume icon on the lower right of Windows screen and select Recording Devices or go to Start -> Control Panel -> Sounds and Audio Devices to disable C727 to be the default audio capture device. In this case, you need to enable C727 to be the default audio capture device before using applications such 7 Quick Installation Guide as WME9, AMCAP, Adobe Flash Media Live Encoder. 3.2 4. Before using Adobe Premiere Pro CS4, go to Control Panel -> Sound -> Recording and set one of the other devices as the default audio capture device. rd To import Component and HDMI video sources via a 3 party software under Microsoft Windows OS, please follow the instructions below. 4.1 When selecting a secondary route from the video input dropdown menu, select Composite for Component. 4.2 When selecting a secondary route from the video input dropdown menu, select SVideo for HDMI. 8 Quick Installation Guide 5. AVerMedia DarkCrystal HD Capture SDK also provides you with open source codes in the installation CD. Click SDK Installation and follow the instructions to complete the installation. Go to All Programs -> AVerMedia EZCapture. Use C727 SDKDemoAP_Delphi/ VB/ VC testing tools for function development and refer to Filter SDK Document/ SDK Specisfication function development documents for more information on function development. 9