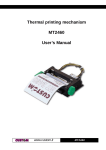
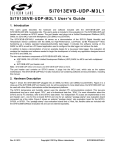
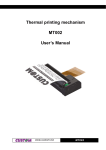
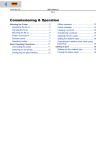
1
04/02 Rev. 2.15-01
MANUAL
Page 1
TTX 207 – Da Capo
Setup, Operation, Service
General notes ............................................... 2
Before using the printer.... ......................... 2
Copyright ................................................... 2
Initiation ......................................................... 3
Unpacking the printer ................................ 3
Setting up and connecting the printer ....... 3
Connections .................................................. 4
Insertion/removal of material ......................... 5
Operation ...................................................... 6
Connecting to a computer / starting .......... 6
Functions of display keys .......................... 6
Functions of LED elements ....................... 6
Adjustment of DIP switches ...................... 7
Maintenance and care .................................. 8
Changing and cleaning the printhead ....... 8
Cleaning the feed roller ............................. 9
Cleaning of gap sensor ............................. 9
Cleaning of material guiding parts ............. 9
Label material ............................................. 10
Trouble shooting ..........................................11
Status Printout ............................................. 13
Sensor Check Routine ................................13
Access to routine .....................................13
Gap sensor ..............................................13
Micro switch/printhead lever ....................13
Material end sensor .................................13
Technical Specifications ..............................14
Anhang / Appendix ......................................16
Zeichensatztabelle / Font table ................16
Linien und Rechtecke / Lines and rectangles
17
Interne Fonts / Internal fonts ....................18
Interne Barcodes / Internal bar codes ......21
Index ............................................................22
04/02 Rev. 2.15-01
MANUAL
Setup, Operation, Service, page 2
TTX 207 – Da Capo
General notes
Before using the printer....
The following warning hints and precautions contained in these Operating Instructions must be strictly observed. This will considerably contribute to the
safe and expert operation of your printer.
Exclusively original parts and accessories available from the manufacturer
are to be used in order to maintain the service life of your prlnter. The use of
parts not in compliance with the exacting demands made by the manufacturer may result in unnecessary sources of troubles.
The housing of the unit must exclusively be opened by authorized technical
personnel only.
Insertion/Exchange material should be carrled out only by especially instructed personnel (Set Up Mode!).
On operation with open cover, fingers, hair, clothes, jewelry, etc. may be
caught by and get into the unit in the print modul.
At a material width less than 65 m the thrust screw has to be tightend.
Release printhead by opening the pressing lever during longer periods of no
operation.
Wait at least 10 seconds before switching unit back „ON“.
Do not remove, insert or exchange PLUG IN CARDS until after at least 60
seconds from switching „OFF“ the device.
Copyright
This User Manual and its contents are subject to copyright. The publisher‘s
prior written consent must be obtained for reproduction of the Manual as a
whole or part thereof.
Avery reserves the right to technical and other alterations without prior notice.
04/02 Rev. 2.15-01
MANUAL
Setup, Operation, Service, page 3
TTX 207 – Da Capo
Initiation
Unpacking the printer
1. Remove top foamed packing.
2. Take printer out of cardboard box.
For carrying your printer, take it by the base plate.
Front cover, reel holder and motor of optional knife must not be used as carrying handles.
Setting up and connecting the printer
1. Check mains voltage setting and fuses.
– The fuses can be replaced by removal of the fuse element (Fig. 1).
– Mains voltage variation is possible by turning the insert.
CAUTION!
Mains voltage can kill you!
– Pull off the mains connector befor you check or change the mains voltage
setting!
– Pull off the mains connector befor you check or replace the fuse!
2. Insert current supply into lining designated for this purpose at the rear side
of unit.
3. Switch „ON“ of unit.
04/02 Rev. 2.15-01
MANUAL
Setup, Operation, Service, page 4
TTX 207 – Da Capo
Connections
All connectors are located at the rear side.
A Centronics or alternatively a serial V.24/DB 25 (RS232) interface interface
is integrated.
Before connecting/disconnecting the interface cable and the stacker switch
„OFF“ all devices.
Only devices may connected to the interface and stacker connector which
are approved to ICE 950 and VDE 0805 and are in compliance to SELV.
(not supported)
Fig. 1: Connections on the printer backside.
04/02 Rev. 2.15-01
MANUAL
Setup, Operation, Service, page 5
TTX 207 – Da Capo
Insertion/removal of material
CAUTION!
Danger of pulling in and tearing off of hair, jewellery, loose clothing, etc.!
– Don´t let long hair, loose sleeves, jewellery, etc. hang into the printer!
1. Hang document material in reel holder in a way to ensure anticlockwise
unwinding.
2. Open pressure lever (red).
3. Insert material underneath the printhead according to sketch,
rial transport is automatically.
further mate-
4. Close pressure lever.
5. When using notched material, adjust gap sensor to the gap position.
At a material width less than 65 m the thrust screw (Fig. 2) has to be tightened.
6. Switch „ON“ printer - the green LED glows at the operation panel (eventually
switch to OFFLINE). By depression of the FEED-key a material feed can be
advanced. At punched material one label length is advanced, continous
material is transport as long as FEED-key is operated.
Removal of material Material can be removed after opening the pressure lever.
Fig. 2: Material winding diagram.
04/02 Rev. 2.15-01
MANUAL
Setup, Operation, Service, page 6
TTX 207 – Da Capo
Operation
Connecting to a computer / starting
1. Connect interface cable from computer to the printer. Switch on the printer,
the green LED glows (LED = small, round light emitting element).
2. By depressing the ON/OFF key, the printer is switched to „ONLINE mode“,
the yellow LED glows and the printer is ready to receive data and to print
labels.
Functions of display keys
ON / OFF
– Switch to the ONLINE or OFFLINE mode. ONLINE mode is indicated by
the yellow LED, the unit is ready to receive data.
– Control break of a print job, the yellow LED flashes fast - rest quantity!
– If an error is indicated (red LED) the error will be confirmead after its correction by depressing the ON/OFF key.
FEED
– In the OFFLINE mode a material feed can be advanced. At punched material one label length is advanced, continous material is transport as long
as FEED-key is operated.
– If an error is indicated the error code may be called off via the yellow LED
– The controlled break of a current print job will be cancelled.
CUT
Reserved for optional functions.
Functions of LED elements
The operation panel shows 3 LED‘s in order to indicate the operation modes.
POWER
(Green) This LED glows, if printer is switched on.
ERROR
(Red) Indication of an error (end of media........)
DATA
(Yellow) LED glows if printer is switched to ONLINE mode.
– LED flashes if unit prints, receives data or generates an image.
– LED flashes fast if current print job is interrupted - rest quantity!
– Indication of error code with 5 short/long flash signals called off by pressing
the FEED key.
04/02 Rev. 2.15-01
MANUAL
Setup, Operation, Service, page 7
TTX 207 – Da Capo
Adjustment of DIP switches
Left of the mains plug there are located 8 DIP switches (Fig. 1) with which the
parameters may adjusted as follows.
A modification of a DIP switch position will be effictive after newly switching
„ON“ the device.
Fig. 3: DIP switch settings.
04/02 Rev. 2.15-01
MANUAL
Setup, Operation, Service, page 8
TTX 207 – Da Capo
Maintenance and care
Carefull and regular maintenance will raise the performance and longevity of
the printer, especially that of the printhead. Generally regard: Keep any dirt
out off the print module! Remove any deposits of paper, adhesive and preprint colors off the printhead, feed roller and gap sensor periodically.
Changing and cleaning the printhead
1. Switch unit off and pull off mains plug!
2. Open pressure lever.
3. Remove material.
Disconnect printhead plug after at least 3 minutes from switching off the unit!
4. Unscrew knurled screws at printhead holder and remove.
5. Draw out the printhead carefully.
6. Clean print head with dust-free cloth and cleansing liquor only.
Metal objects must never get into contact with printhead surface! Never use
knives or objects with sharp edges for cleaning.
7. Proceed assembly of printhead in reverse order.
Special care is to be taken that printhead is supported flush on holding plate
and completely flush towards the guide mechanism (looks like a tooth) (Fig.
4) to warrant inprint according to the O-line as well as damages of the printhead.
Fig. 4: The print head must cling thightly to its holder (upper figure).
04/02 Rev. 2.15-01
MANUAL
Setup, Operation, Service, page 9
TTX 207 – Da Capo
Cleaning the feed roller
1. Switch unit off and pull off mains plug!<D>
2. Remove material.
3. Remove insertion plate by loosen two knurled screws below the plate.
4. Clean the accessable section of print roller with dust-free cloth and cleansing liquor only. Advance print roller by switching on the printer, close printhead lever,press FEED key - the roller turns a quarter round.
5. Switch unit off and pull off mains plug!
Never use knives or objects with sharp edges for cleaning.
Cleaning of gap sensor
According to the materials applied, the light barrier is to be cleaned from materials residues and dust by means of compressed air.
With heavy contamination additional cleaning by using a dust-free cloth and
cleansing liquor is recommended.
Cleaning of material guiding parts
According to the materials applied any residues at material baffles is to be
cleaned regularly.
Contaminated surfaces influence the feed of material which will reduce the
print quality.
04/02 Rev. 2.15-01
MANUAL
Setup, Operation, Service, page 10
TTX 207 – Da Capo
Label material
The printer is designed for thermal direct printing. The label material should
be of low abrasive behaviour of the surface structure and low start temperature for the colour development.
If the material is extremely abrasive, the printhead is faster worn as usual.
Similar conditions prevail with high start temperature. Material and printhead
require a longer cooling down period, the printing quality is more critical and
the printhead is faster worn as on a normal rate.
Fig. 5: Specifications for label material.
04/02 Rev. 2.15-01
MANUAL
Setup, Operation, Service, page 11
TTX 207 – Da Capo
Trouble shooting
Errors during operation are indicated by means of the red LED at the operation panel.
By pressing the FEED key an error code may be called off via the yellow LED
in order to recogneize the kind of error.
After correction of the error the error indication has to be confirmed by pressing the ON/OFF key. After switching the printer to ONLINE mode the job will
be continued. Partly printed labels will be repeated.
LED-Code
Error
Measure
•••– –
Pressing lever open
Close lever, punch is re-initialized, job will be continued.
••– ••
Material end
Insert material and check
position of gap sensor,
punch is re-initialized, job
will be continued.
••• ••
NOVRAM read error
Call service technician
•– •••
NOVRAM write error
Call service technician
•••– •
No gap found on 3 or more 1. Check gap definition in
labels
printing mask.
2. Check whether correct
material is inserted.
3. Check whether light barrier is cleaned.
4. Check material guide and
position of light barrier.
••– – •
RS232 - Transmission Error Check adjustments: baud
rate, stop bits, no. of data
bits and correct them at
computer and/or printer if
neccessary. Check transmitting line and external influences.
•– • – •
RS 232 - Reception Buffer
overflow
•– – – •
RS232 - Reception error pa- Check parity adjustment
rity
and correct it at computer
and/or printer if neccessary.
••••–
Memory Allocation Error
Call service technician
•– • •–
Font Allocation Error
Call service technician
••– •–
Unknown Interrupt
Call service technician
Check synchronisation of
data transmitting and correct it at computer and/or
printer if neccessary.
Tab. 1: Blink codes of the yellow LED (•= short lighting up, – =long lighting up).
04/02 Rev. 2.15-01
MANUAL
Setup, Operation, Service, page 12
TTX 207 – Da Capo
LED-Code
O––O–
Error
Measure
Speedo Error
Call service technician
Tab. 1: Blink codes of the yellow LED (•= short lighting up, – =long lighting up).
04/02 Rev. 2.15-01
MANUAL
Setup, Operation, Service, page 13
TTX 207 – Da Capo
Status Printout
Status printout for indication of internal data and print test. Please use material with width of appr. 100 mm width.
Access to status
printout
Press and keep pressed ON/OFF key for 3 seconds.Simultaneously switch
the unit on.The green LED becomes illuminated, the print starts.
Abortion
Press ON/OFF key until print stops.
Sensor Check Routine
Access to routine
Press and keep press CUT key for 3 seconds. Simultaneously switch the unit
on. The function is indicated by means of the LED‘s. The sensors/switch can
be selected by pressing the corresponding keys.
Gap sensor
Press ON/OFF key
Green
Air or very opac backing paper is measured.
Red
Backing paper or thin paper is measured.
Orange
Cardboard etc is measured.
Micro switch/printhead lever
Press FEED key
Green or orange are illuminated when opening or closing the lever.
Material end sensor
Press CUT key
With material the orange LED glows, without material the green one.
04/02 Rev. 2.15-01
MANUAL
Setup, Operation, Service, page 14
TTX 207 – Da Capo
Technical Specifications
Print Technologie
Thermal Direct Print with Thickfilm Printhead
Resolution
8 Dots/mm - Standard
Print Width
104 mm
Emulation
EasyPlug
Print Speed
100 mm/s (approx. 4“/s)
Interface
Parallel, optional serial
Memory
1 MB dynamic RAM
Print Ratio
100% 1:1, Batch and mixed version
Gap recognition /
gap dimensions
Self-initializing gap sensor with 11mm variable adjusting range
Fonts
– Length of punch: 0.8 to 14mm, width: min. 4mm
– Optional reflex marking sensor with 11mm variable adjusting range; marker length: 4mm, width: min. 10mm
17 Fonts inclusive OCR-A and OCR-B
Character modifica- Scaling in X/Y-direction up to factor 8, rotation 90, 180, 270 degrees
tion
Bar codes
EAN 8 und 13 mit Add-On 2 und 5, UPC-A, UPC-E,
Code 39, Code 93, Code ITF, Codabar, Code 128,
Code 2/5M, Code 2/5I, Code 2/5 5-Strich, EAN 128
Bar code modification
Scaling in X-direction up to factor 8, in Y-direction from 1 to 100mm, rotation
90, 180, 270 degrees
Graphics
Download is supported
Graphics modification
Scaling in X/Y-direction up to factor 8, rotation 90, 180, 270 Grad
Material Stock
Width: 110 mm, Inner diameter: 1 1/2“, 2“, 3“, 4“
Outer diameter: 190mm
Media Material
Self adhesive, plastics and card boards compatable to Thermal direct print
with a weight of 70 up to 240gr/sqm and a thickness of 0.05 up to 0.3 mm.
Label Size
Width: 19.1 to 127 mm, length: 5 to ca. 700 mm
Mains voltage
115 / 230 V, +/-10%
04/02 Rev. 2.15-01
MANUAL
Setup, Operation, Service, page 15
TTX 207 – Da Capo
Mains frequency
50 Hz
Fuse
230 V - 1.6 A slowblow
115 V - 2.5 A slowblow
Power consumption max. 200 W
Ambient conditions Operating temperatur: +5 to +35 °C
Storage temperatur: -20 to +70 °C
Humidity: 45 to 75%, non condensing
Noise
<75 dB(A)
Weight
9 kg
Dimensions
285 x 242 x 350 mm (W x H x D)
Construction
Compact and light weight construction in especially shielded housing; all mobile axles pivoted; open assembly of parts and components for easy operating and service.
04/02 Rev. 2.15-01
Anhang / Appendix
Zeichensatztabelle / Font table
BEDIENUNGSANLEITUNG / MANUAL
TTX 207 – Da Capo
Fonts, bar codes, Seite/Page 15
04/02 2.14-01
Linien und Rechtecke / Lines and rectangles
BEDIENUNGSANLEITUNG
TTX 207 – Da Capo
, Seite / page 16
04/02 2.14-01
Interne Fonts / Internal fonts
BEDIENUNGSANLEITUNG
TTX 207 – Da Capo
, Seite / page 17
04/02 2.14-01
BEDIENUNGSANLEITUNG
TTX 207 – Da Capo
, Seite / page 18
04/02 2.14-01
BEDIENUNGSANLEITUNG
TTX 207 – Da Capo
, Seite / page 19
04/02 2.14-01
Interne Barcodes / Internal bar codes
BEDIENUNGSANLEITUNG
TTX 207 – Da Capo
, Seite / page 20
04/02 Rev. 2.15-01
MANUAL
Setup, operation, service, page 22
TTX 207 – Da Capo
Index
A
Ambient conditions 15
B
Bar codes 14
Blink-Codes der gelben LED 11
C
Character modification 14
Copyright 2
D
Dimensions 15
DIP switches, adjustment 7
Display keys 6
E
Emulation 14
F
Feed roller, cleaning 9
Fonts 14
Fuse 15
G
Gap recognition / gap dimensions 14
Gap sensor, cleaning 9
Graphics 14
I
Interface 14
L
Label material 10
Label material, inserting 5
Label Size 14
LED elements 6
LED-Code 11
M
Mains
Frequency 15
voltage 14
Maintenance and care 8
Material guiding parts, cleaning 9
Material Stock 14
Memory 14
N
Noise 15
P
Power consumption 15
Print Ratio 14
Print Speed 14
Print Width 14
Printhead, changing 8
R
Removal of material 5
Resolution 14
S
Sensor Check 13
Setting up printer 3
Status Printout 13
T
Technical Specifications 14
Trouble shooting 11
U
Unpacking the printer 3
W
Warning hints 2
Weight 15