1
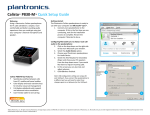
Setting up your Plantronics Calisto Pro with a Avaya/ATT Partner Phone:
1. Plug the connector cord into jack labeled “Tel” on the bottom of the Calisto Pro base.
If your Partner phone has an auxiliary jack, plug the other end of the connector cord into
it. The jack is labeled “AUX” and located on either the underside or back of the phone
(often hidden beneath a plastic platform). If your phone does not have an auxiliary jack,
then use the included jack splitter. The jack splitter allows you to connect the Calisto Pro
and your Partner phone to the same wall jack.
2. Plug the appropriate end of the power cord into the bottom of the Calisto Pro base.
Connect the other end to an electrical outlet.
3. Place the Calisto handset/remote and headset into the base to charge. Allow the remote
at least 16 hours minimum before using the first time, or until the full battery icon is
displayed in the upper right-hand corner of the screen. On the headset, press down firmly
when placing the it into the base. The headset indicator will light up solid red while
charging. Allow the headset to charge for at least 3 hours before using the first time, or
until the headset indicator light turns solid blue.
Remember: The Partner phone is special in that it can use a single-line headset system,
like the Calisto Pro, to answer any number of phone lines. In addition, no handset lifter is
required to do so. The Calisto may not display your caller ID information.
Using your Plantronics Calisto Pro with a ATT/Avaya Partner Phone.
How to answer a call:
When the phone rings press the TALK/FLASH button on your remote. The call should
now be answered with the headset.
How to place a call on hold:
Press the TALK/FLASH button on your remote. You should hear an intercom dial tone.
Now press END. Your call is now on hold.
Retrieving a call from hold:
In order to retrieve a call from hold you must go back to your Partner phone and press the
line that is on hold.
How to transfer a call with an announcement:
Press the TALK/FLASH button once. You will hear an intercom dial tone, which means
the call is parked. Now, dial the extension to which you want to transfer the call. The
phone will ring. When someone answers, announce the call. If he/she accepts the call,
press END and the call will be transferred. If no one is available at that extension, press
TALK/FLASH and you will be returned to the call.
How to make an intercom call:
Press the TALK/FLASH button to get an open line (you cannot place an intercom call
while on the line with a caller). You should hear a dial tone. Now press the (*) key and
71. This activates the intercom feature. Now, simply dial the extension of the person you
wish to intercom and your voice will be heard through the intercom. Press END when
done.
How to make a conference call:
After you are connected with the first party, press the TALK/FLASH button. This will
give you an intercom dial tone, which means the first party is now parked. Press 9 to get
an outside line, then dial the new phone number (note: If you are conferencing someone
from an inside line press TALK/FLASH and dial their extension). When the second party
answers, press the TALK/FLASH button once. You should now be connected with both
parties. In the event that the number is busy, or if there is no answer, press END and you
will return to the first party.
When you are ready to end the conference call, press TALK/FLASH to hang up on both
callers; if you want to continue speaking with the first caller, press END and the last
caller will be dropped.