Transcript
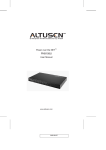
4
7
KE8220 Rear View
1
2
3
4
Operation
After KE8220 is powered on, the Main Screen appears with the LAN / WLAN IP address.
8
Configuring AltusenVNC
If this is the first time you run AltusenVNC, the AltusenVNC Settings dialog box appears.
Online Registration
International:
• http://support.aten.com
North America:
• http://www.aten-usa.com/product_registration
Technical Phone Support
International:
• 886-2-8692-6959
China:
• 86-10-5255-0110
Japan:
• 81-3-5323-7178
Korea:
• 82-2-467-6789
North America:
• 1-888-999-ATEN Ext: 4988
United Kingdom:
• 44-8-4481-58923
KE8220 Virtual VNC Console Quick Start Guide
®
© Copyright 2010 ATEN International Co., Ltd. www.aten.com
Altusen and the Altusen logo are trademarks of ATEN International Co., Ltd.
All rights reserved. All other trademarks are the property of their respective owners.
This product is RoHS compliant
1
PAPE-1214-W00G Printing Date: 06/2010
1. Power Jack
2. Console Ports
3. WLAN Port
4. LAN Port
5
Package Contents
Wireless-G USB Adapter
The complete package consists of:
2
1 KE8220 Virtual VNC Console
1 Wireless-G USB Adapter
1 Rack Mount Kit
1 Power Adapter
1 Software CD
1 User Manual
1 Quick Start Guide
2
1
Connect to the KE8220 with your computer’s wireless networking program. Select the desired KE8220 from the list and
click Connect.
1. Enter a name for the remote computer. Remote computer names can be up to 16 characters long. By default, the
computer’s name is displayed. You can change the name by selecting the field and typing in a new name. The
KE8220 uses this name, and the computer’s IP address, to identify the computer on a network.
2. Type a password for the remote computer. Passwords can be up to 8 characters long. Users must enter this
password when connecting to the remote computer from the KE8220.
3. Under Network, type the port that AltusenVNC will use to communicate with the KE8220. If you don’t have any
reason to change this, use the default port setting (6998).
4. Under View Settings:
• Select Match KE8220 Display Resolution if you wish AltusenVNC to resize the remote computer’s display
resolution to match that of the KE8220 when they are connected. After the connection is ended, the remote
computer’s display resolution will revert to the original setting. Matching the display resolutions enables
KE8220 users to view the remote computer’s entire desktop environment in Full Screen mode without
scroll bars.
• Select Remove Wallpaper for KE8220 to remove the remote computer’s wallpaper from the KE8220’s display.
Removing wallpaper improves performance by reducing the amount of processing power and network bandwidth
required to transmit the remote computer’s display to the KE8220.
• Select Capture Alpha Blending to display the remote computer’s alpha blending on the KE8220’s display.
Note: Enable Capture Alpha Blending to improve the display of computers running Windows Vista.
5. Click OK to save your changes. Or, click Cancel to close the dialog box without saving changes.
1. USB Connector
2. Cap
Requirements
KE8220 Virtual VNC Console
6
Hardware Installation
The following equipment is required for the KE8220 Virtual VNC Console:
• An XGA, or SXGA monitor or projector
• USB keyboard and mouse; or, PS/2 keyboard and mouse (requires ATEN PS/2-to-USB adapter)
• Wireless-G USB Adapter is required for wireless presentation
Installing the KE8220 Virtual VNC Console
The KE8220 supports the following keyboard layouts:
To install the KE8220 Virtual VNC Console:
If AltusenVNC is running, the AltusenVNC icon will appear in the notification area of the taskbar.
Icon
Meaning
AltusenVNC is running; however, currently no KE8220 are connected.
AltusenVNC is running and at least one KE8220 is connected.
1.Connect the display device to the HDB-15 port. The port is marked with a monitor icon.
• English (United Kingdom)
• English (United States)
• French
• German
• Italian
• Japanese
• Korean
• Spanish
2.Install the Wireless-G USB Adapter for wireless presentation.
Pushing Video to the KE8220
To install the Wireless-G USB Adapter:
(1) Remove the cover from the KE8220 WLAN port.
(2) Remove the cap from the Wireless-G USB Adapter.
(3) Using moderate pressure, insert the Wireless-G USB Adapter into the WLAN port. Ensure that the USB
Enter the IP address from the main screen into your computer's web browser to access the KE8220 webpage and download
a copy of the AltusenVNC executable file. The default WLAN IP address is 192.168.1.60.
connector seats properly in the USB port.
Remote Computers
3. Plug the power adapter into an appropriate AC power source, and then plug the power adapter cable into the
Remote computers must have the following:
• AltusenVNC software installed
• Connection to the network and a valid IP address
power jack on the back of the KE8220.
Cables
To push video from the remote computer to a KE8220:
1. Right-click the AltusenVNC icon in the notification area of the taskbar. The Push Video to KE8220 dialog
box appears.
2. Enter the KE8220's IP address, or select the KE8220 from the list.
3. Click Connect. Depending on the Video Push option selected in the graphical OSD, a dialog box may appear
on the KE8220 user’s screen requesting that the user accept or refuse the connection. If the KE8220 user does not
respond within 10 seconds, the attempt to connect is aborted. If the connection is successful, the color of the
Altusen VNC icon will change to blue and the remote computer’s desktop environment will appear on the KE8220
display device. Or, click Cancel to close the dialog box without connecting to the KE8220.
4. Click Disconnect to close the connection to the KE8220.
The KE8220 requires 1 Cat 5 cable to connect to your Ethernet network
Operating Systems
AltusenVNC is compatible with the following operating systems:
• Microsoft® Windows® 2000 and higher
9
2-1
3
Specifications
Function
KE8220 Front View
3
1
1. RESET Button
2. WLAN LED
3. 10/100 Mbps LED
4. LINK LED
5. POWER LED
2
3
4
5
1
2-2
2-3
Save the file to any location on your computer.
Double-click the saved file to start AltusenVNC.
Keyboard
Console Ports Video
Mouse
Connectors Power
LAN
WLAN
Switches
Reset
WLAN
10/100 Mbps
LEDs
Link
Power
Video
Power Consumption
Operating Temp.
Environment
Storage Temp.
Humidity
Housing
Physical Properties
Weight
Dimensions (L x W x H)
KE8220
1 x USB Type A Female (White)
1 x HDB-15 Female (Blue)
1 x USB Type A Female (White)
1 x DC Jack
1 x RJ-45 Female
1 x USB Type A Female (White)
1 x Semi-recessed Pushbutton
1 (Orange/Green)
1 (Orange/Green)
1 (Green)
1 (Green/Orange)
1280 x 1024 @ 60 Hz
DC5.3V, 3.8W
0–50° C
-20–60° C
0–80% RH, Non-condensing
Metal
0.50 kg
20.00 x 8.00 x 2.50 cm
* The specifications and pictures are subject to change without notice.