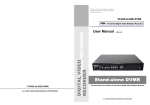
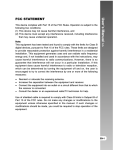
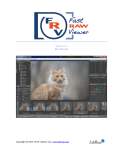
1
DC E53 Digital Camera
User’s Manual
Welcome
Copyright
Copyright 2004 by BENQ Corporation. All rights reserved. No part of this publication may be
reproduced, transmitted, transcribed, stored in a retrieval system or translated into any language or
computer language, in any form or by any means, electronic, mechanical, magnetic, optical, chemical, manual or otherwise, without the prior written permission of this company.
Disclaimer
BENQ Corporation makes no representations or warranties, either expressed or implied, with
respect to the contents hereof and specifically disclaims any warranties, merchantability or fitness
for any particular purpose. Further, BENQ Corporation reserves the right to revise this publication
and to make changes from time to time in the contents hereof without obligation of this company
to notify any person of such revision or changes.
*Windows, Internet Explorer and Outlook Express are trademarks of Microsoft Corporation. Others are copyrights of their respective companies or organizations.
Taking care of your camera
• Do not use your camera in the following environmental range: temperature below 0°C or above
40°C.
• Do not use or store your camera in the environments listed below:
– Direct sunlight
– High and dusty places
– Next to an air conditioner, electric heater or other heat sources
– In a closed car that is in direct sunlight
– Unstable locations
• If your camera becomes wet, wipe it with a dry cloth as soon as possible.
• Salt or seawater may cause severe camera damage.
• Do not use organic solvents such as alcohol, etc., to clean your camera.
• If the lens is dirty, use a lens brush or soft cloth to clean the lens. Do not touch the lens with your
fingers.
• To prevent electric shock, do not attempt to disassemble or repair your camera by yourself.
• Water may cause a fire or electric shock. Therefore, store your camera in a dry place.
• Do not use your camera outdoors when it is raining or snowing.
• Do not use your camera in or near water.
• If a foreign substance or water gets in your camera, please turn the power off immediately and disconnect the batteries and the power adapter. Remove the foreign substance or water, and send it
to the maintenance center.
• Transfer the data to the computer as soon as possible to avoid losing your images and/or video
clips.
BenQ DC 5530 User’s Manual
1. Touring your DC E53 ..................................................... 1
1.2.1 Front View ......................................................1
1.2.2 Rear View .......................................................2
1.2.3 Status LED Indicator ..........................................2
2. Preparing Your DC E53 for Use ...................................... 3
2.1
2.2
2.3
2.4
Inserting the Battery ................................................... 3
Charging the Battery ................................................... 3
Loading an SD Card....................................................4
Turning the Power On/Off ..........................................4
3. Using the DC E53 ........................................................... 5
3.1 LCD Monitor Icons ....................................................5
3.1.1 Photography Mode ............................................5
3.1.2 Video Mode ....................................................5
3.1.3 Video Playback Mode ......................................... 6
3.1.4
Still Image Playback Mode .................................. 6
3.1.5 LCD Monitor Display
........................................6
3.1.6 Setting the Operation Mode .................................6
3.2 Capturing Pictures......................................................7
3.2.1 Changing Camera Settings ................................... 7
3.3 Recording Movies.....................................................10
3.4 Deleting Files ...........................................................10
3.4.1 Erasing in Photography Mode (Quick Erase) ..........10
3.4.2 Erasing in Playback Mode..................................10
3.5 Using Playback Mode................................................ 11
3.5.1 Reviewing Still Images ......................................11
3.5.2 Playing Back Video Clips ................................... 11
I
English
1.1 Checking the Package Contents ....................................1
1.2 DC E53 Components .................................................1
BenQ DC 5530 User’s Manual
3.5.3 Attaching Voice Memos .................................... 11
English
3.5.4 Viewing a Thumbnail Display .............................12
3.5.5 Zoom Playback...............................................12
3.5.6 Slideshow Display ...........................................12
3.5.7 Protecting Images ...........................................13
3.5.8 Setting DPOF ................................................. 14
3.6 Setup Menus............................................................15
3.6.1 Picture Menu ................................................. 15
3.6.2 Function Menu ..............................................17
3.6.3 Playback Menu ...............................................19
3.6.4 Setup Menu ...................................................19
4. PC Dependent Features ................................................ 22
4.1 Installing the Digital Camera Software .........................22
4.2 Transferring Files with your PC ..................................22
4.3 Viewing Images on TV ..............................................23
5. Service information ...................................................... 24
II
BenQ DC 5530 User’s Manual
1
TOURING YOUR DC E53
English
1.1 Checking the Package Contents
The package includes the following items:
1.
2.
User manual
DC E53 digital camera
3. USB cable
4. SD card
5. Battery
6. Hand strap
7. DC E53 software
CD-ROM
8. Camera pouch
9. AV cable
10. Conversion adapter
11. AC adapter
7
User Manual
1
8
9
2
10
B
3
4
5
11
6
If any of the items are missing or appear to be damaged, contact your dealer. Save the
packaging in the event you need to ship your camera for service.
1.2 DC E53 Components
1.2.1 Front View
1.
2.
3.
4.
Shutter button
Power button
Built-in flash
Mode switch
–
Playback
–
5.
6.
7.
8.
9.
10.
1
2
3
4
5
Movie
6
–
Still picture
Self-timer LED
Speaker
Lens/Lens cover
Conversion adapter terminal
Tripod socket
Microphone
7
8
9
10
Touring your DC E53
1
BenQ DC 5530 User’s Manual
1.2.2 Rear View
English
1.
2.
3.
4.
5.
6.
7.
8.
9.
10.
11.
12.
13.
Status LED
Zoom out/Zoom in buttons
Strap holder
Menu button
Erase button
Display button
Flash/Right navigation button
Battery/SD card compartment
Self-timer/Down navigation button
Set button
EV compensation/Backlight/Left
navigation button
Focus/Up navigation button
LCD panel
2
1
3
4
5
6
13
7
8
12 11 10
9
1.2.3 Status LED Indicator
Color
State
During Power Off
During Photography
On
The completion of battery charge
AE or AF is locked with the
shutter button held halfway
down
—
Flashing
Battery charging in
progress
—
—
On
Battery charging error
Green
Red
Orange
2
Writing to SD card in
progress
Connected to a PC
Connected to a PC
(SD card is inserted)
Flashing
—
Image not in focus
—
On
—
Flash is charging
—
Flashing
—
Hardware malfunction
Touring your DC E53
SD card is not
inserted
BenQ DC 5530 User’s Manual
2
PREPARING YOUR DC E53 FOR USE
English
2.1 Inserting the Battery
1. Turn the camera off.
2. Slide open the battery/SD card cover on
the side of the camera.
3. Insert the battery in the direction of the
arrow with the correct polarity into the
battery compartment.
4. Close the battery/SD card cover.
To remove the battery, open the battery
compartment and press the orange battery
release switch. The battery pops out.
Battery
release
Notes
•
•
•
Use only the specified battery type.
If you are not going to use the battery for an extended period of time, remove it
from the camera to prevent leakage or corrosion.
Avoid using the battery in extremely cold environments as low temperatures can
shorten the battery life and reduce camera performance.
2.2 Charging the Battery
A brand new battery or one that has not been used for an extended period of time might
affect the number of pictures that can be taken. Therefore, to maximize its performance and
lifetime, we recommend that you fully charge the battery and discharge it for at least one
complete cycle before use. Using the optional AC power adapter charges the battery. Make
sure that the camera’s power is off and then insert the battery before starting.
1. Insert the conversion adapter into the conversion adapter
terminal of the camera as shown in the illustration.
2. Insert one end of the AC power adapter into the DC IN
terminal of the conversion adapter.
3. Insert the other end of the AC adapter into a wall outlet.
The status LED flashes green when charging starts and
lights green when fully charged. It lights red when a
charging error occurs.
It is recommended to fully discharge the battery before
charging. Charging time varies according to the ambient
temperature and the battery status. If you want to use the camera when the battery charging
is in progress, use the camera with the AC power adapter connected.
Preparing Your DC E53 for Use
3
BenQ DC 5530 User’s Manual
English
2.3 Loading an SD Card
All images and video clips taken by the camera are stored in an SD (Secure Digital) Card. You
cannot take pictures or record movies if an SD card is not inserted.
1. Make sure the camera is off and then open the
battery/SD card cover.
2. Insert an SD Card:
If you cannot insert the card, check the
orientation.
3. Close the battery/SD card cover.
To remove the SD card, make sure the camera is off.
Open the battery/SD card cover. Press lightly on the
edge of the memory card and it will eject. Format
your SD card before use. Refer to 3.6.4.2 “Format”
on page 20.
2.4 Turning the Power On/Off
Insert the battery and an SD card before starting.
• Turning the power on
Press the POWER button for two seconds to turn the power on.
The status LED lights green and the camera is initialized.
• Turning the power off
Press the POWER button to turn the power off.
The power turns off automatically when the camera has not been used for a specified
period of time. To resume operation, press the power button again. Refer to 3.6.4.5 “Auto
Off ” on page 20 for further details. After the power is turned on, it may take several
seconds to charge the flash.
4
Preparing Your DC E53 for Use
BenQ DC 5530 User’s Manual
3
USING THE DC E53
English
3.1 LCD Monitor Icons
This section describes the icons on the LCD monitor in each operating mode.
3.1.1 Photography Mode
1. Zoom status
2. Voice memo
3. Remaining battery status
Full / Medium / Low /
Empty
4. Flash
5. Histogram
6. Focus area
(appears when the shutter button is
pressed halfway.)
7. Capture mode
8. Image size
9. Possible number of shots
10. Quality
11. Date and time
12. Self-timer
13. Unsteady hold warning
14.
Exposure compensation
Backlight correction
15. Metering
16. White balance
17. Focus
18. Still image mode
3.1.2 Video Mode
1.
2.
3.
4.
5.
6.
7.
8.
9.
Movie mode
Zoom status
Remaining battery status
Image size
Possible recording time / elapsed time
Quality
Recording indicator
Self-timer
Focus
Using the DC E53
5
BenQ DC 5530 User’s Manual
English
3.1.3 Video Playback Mode
1.
2.
3.
4.
5.
6.
7.
8.
Video status bar
Elapsed time
File number
Folder number
Protect
Mode
Play mode
Sound off (When the
button is pressed
during video playback.)
9. Total time
3.1.4 Still Image Playback Mode
1.
2.
3.
4.
5.
Mode
File number
Folder number
Protect
Voice memo
3.1.5 LCD Monitor Display
Press the LCD button to select the display format. In Still Image or Movie mode, preview
image with full OSD information is displayed. Press it repeatedly to switch between full
OSD, OSD with histogram display, basic display with no OSD information or LCD switched
off. In movie mode, the LCD status cannot be changed.
3.1.6 Setting the Operation Mode
Use the mode switch to set the camera to take still images or movies, or review pictures or
movies.
6
Using the DC E53
BenQ DC 5530 User’s Manual
3.2 Capturing Pictures
3.2.1 Changing Camera Settings
Camera settings can be changed with the five-way
2
1
button.
1. SET: Enters the menu page and confirms the
chosen setting.
2. Up/Focus: Scrolls upwards in menus and
3
5
enables you to choose the appropriate focus
(macro) setting.
4
3. Right/Flash: Scrolls right and enables you to
choose the appropriate flash setting.
4. Down/Self-timer: Scrolls downwards, toggles the self-timer on and off, and selects the
desired self-timer mode.
5. Left/Exposure Compensation/Backlight Correction: Scrolls left, toggles the exposure on
and off, and toggles the backlight correction on and off.
3.2.1.1
Changing the Focus
Photographs can be taken with the distance to the subject set by auto focus,
macro, or
infinity. The settings will be maintained even when the power is turned off or when Auto OFF
is activated.
1. Slide the mode switch to
or
.
2. Toggle the /
button to select the desired focus mode.
Each press of the button selects a macro or landscape mode and displays it on the screen.
Using the DC E53
7
English
Follow these steps to take pictures:
1. Frame the shot in the LCD panel.
2. Press the shutter button down halfway to focus and
adjust the exposure.
3. Hold the camera still and press the shutter button.
The focus area frame turns blue and the viewfinder LED
lights green when the camera is in focus and the exposure is
calculated. If the focus or exposure is not suitable, the
frame of the focus area turns yellow and the viewfinder LED flashes red.
If the photographic preview is set to “ON” (3.6.2.5 “Preview” on page 18), a preview of the
captured image will be displayed while the image is being recorded onto the SD card.
BenQ DC 5530 User’s Manual
3.2.1.2
Changing the Flash
English
Use the flash for taking photographs when there is insufficient light. The flash firing mode
can be set to suit the photographic conditions.
1. Slide the mode switch to
.
2. Toggle the
button to select the desired flash mode.
Each press of the button selects a flash mode and displays it on the screen.
Icon
Flash mode
Blank
Auto
The flash fires automatically to suit the photographic conditions.
Red-eye reduction
Reduces the red-eye phenomenon when you want to take natural
looking photographs of people and animals in low-light conditions.
Forced flash
The flash always fires.
Suppressed flash
The flash does not fire.
Night scene
Use this mode when taking pictures of people in the dark or at
night. When the Night Scene is selected, the flash mode is fixed to
Slow Synchronization. (the flash is fired at a slower shutter speed.)
3.2.1.3
Description
Changing the Exposure Value/backlight Correction
Photographs can be taken with the overall screen intentionally made brighter or darker.
Exposure can be set in steps of 0.3 EV units and the setting range of the exposure
compensation is: -2.0 to +2.0. The larger the value, the brighter the image.
1. Slide the mode switch to
and press the
Backlight Correction and
2. Increase or decrease the exposure value with the
3.2.1.4
button to toggle between
Exposure Compensation.
/
buttons.
Setting the Self-Timer
This setting enables photographs to be taken with the self-timer (10 sec., 2 sec., 10+2 sec.)
1. Slide the mode switch to
or
.
2. Toggle the
button to select the setting.
Each press of the button selects one of the self-timer options and displays it on the screen.
3. Compose the picture, press the shutter button down halfway, then press it down fully. The
self-timer LED flashes and the photograph is taken after the preset time has elapsed. The
countdown is displayed on the LCD monitor. To cancel the self-timer at any time before
the photograph is taken, press the SET button.
8
Using the DC E53
BenQ DC 5530 User’s Manual
3.2.1.5
Using the Zoom
1. Slide the mode switch to
or
and press
2. Compose the picture with the zoom button.
to turn on the LCD monitor.
– Pressing the
button zooms in on the subject and enlarges the subject on the LCD
monitor.
– Pressing the
button provides a wider angle picture. The lens position moves
according to the zoom button setting.
3. Press the shutter button down halfway, then press it down fully to take the picture.
• Using the Digital Zoom
Using a combination of 3 times optical zoom and
4 times digital zoom permits zoom photography
of up to 12 times to suit the subject and the
4
distance. Refer to 3.6.2.4 “Digital Zoom” on
page 18 to enable the digital zoom. Once enabled, press
repeatedly until the zoom
slider moves into the red portion of the zoom bar.
3.2.1.6
Recording Voice Memos
A voice memo can be recorded for up to 30 seconds in still image mode immediately after a
still image is captured or in playback mode while viewing the picture. To see how to enable
recording of voice memos, see 3.6.2.2 “Voice Memo” on page 18.
1. Slide the mode switch to
.
2. Compose the picture and press the shutter button.
• VOICE RECORDING is displayed on the screen and the voice memo recording starts.
3. Press the shutter button one more time to stop recording at any time within the
30 second interval.
• VOICE RECORD END will be displayed and the recording will end. The icon is
displayed for those images that have been recorded with a voice memo.
Using the DC E53
9
English
The camera features both digital and optical zoom.
• Using the Optical Zoom
Zoom photography allows you to take zoom photographs up to 3 times the size of wideangle photography depending on the distance up to the subject. You can also enlarge the
center of the screen and take photographs in the digital zoom mode.
BenQ DC 5530 User’s Manual
English
3.3 Recording Movies
This mode enables you to record video clips at a resolution of 320 x 240 or 640 x 480
pixels. Voice can also be recorded along with the video.
1. Slide the mode switch to
.
2. Compose the picture and adjust the zoom with the zoom button.
• Optical zoom and digital zoom can be set while composing.
3. Press the shutter button to start recording. Press the shutter button a second time to stop
the recording of the video clip.
Notes
•
•
•
In movie mode, the LCD monitor cannot be turned off.
When recording a video clip, flash photography is not possible.
Digital zoom is not available while composing the image at a resolution
of 640 x 480 pixels.
3.4 Deleting Files
You can delete images and video clips using the quick delete function in record mode or the
menu in playback mode.
3.4.1 Erasing in Photography Mode (Quick Erase)
The Quick delete function enables you to erase the last image in still image or movie mode.
1. Slide the mode switch to
2. Press the
or
.
button. The last image and quick delete menu appear on the screen.
3. Press the SET button to erase the image.
3.4.2 Erasing in Playback Mode
To erase a single image, selected images, or all images:
1. Slide the mode switch to
. The last image is displayed on the screen.
2. Select the image you want to erase with the
/
buttons.
3. Press the
button. The deletion menu is displayed.
4. Select one of the following options with the
/
buttons and press the SET button.
• Single: Erases the selected image or the last image.
• All: Erases all of the images on the SD card except for the protected images.
• Select: Erases a number of selected images.
5. Press the SET button to delete the selected images.
If you chose the Select option, all the images are displayed in the thumbnail display. Select the
image you want to erase with the
/
/ / buttons, and press the
button. The
icon is displayed. Press the erase button a second time to cancel the operation. Repeat this
procedure and select all the images that you want to erase.
10
Using the DC E53
BenQ DC 5530 User’s Manual
3.5 Using Playback Mode
You can view still images on the LCD monitor in the playback mode.
1. Slide the mode switch to
. The last image appears on the screen.
2. Press the
/
buttons to scroll forward or backward through the images.
3. Press the LCD button to switch through complete OSD information on the screen, no
OSD information, and image with histogram on the screen.
4. Pressing the
/
buttons during image playback will rotate the image by 90 degrees
counter clockwise/clockwise respectively.
Notes
•
The
icon is displayed with the video data. Video clips cannot be
rotated.
•
The
icon is displayed with images which have an audio memo
recorded. Press the SET button to playback the voice memo data.
The information display status cannot be changed for video clips.
•
3.5.2 Playing Back Video Clips
You can play back video clips and voice recorded on the camera.
1. Slide the mode switch to
. The last image appears on the screen.
2. Press the
/
buttons to select the desired video clip indicated by the movie icon.
3. Press the SET button to start playing the video clip.
4. Press the / buttons during playback to rewind or fast forward the movie clip.
5. Press the
button to stop playback and return to the start of the video clip.
6. Press the SET button to pause video playback. Press the SET button again to restart
playback.
3.5.3 Attaching Voice Memos
A maximum of 30 seconds of audio can be recorded along with still images. The voice memo
can be recorded only once.
1. Slide the mode switch to
. The last image appears on the screen.
2. Select the image to which you want to attach the voice memo.
3. Press the shutter button. VOICE RECORDING is displayed on the screen and recording
starts.
4. Press the shutter button to stop recording voice memo at any time.
The
icon is displayed for those images that have been recorded with a voice memo.
Playing Back Voice Memos
Press the SET button to display VOICE PLAYBACK and play back the voice memo. The voice
memo function is only available in the still single image capture mode.
Using the DC E53
11
English
3.5.1 Reviewing Still Images
BenQ DC 5530 User’s Manual
3.5.4 Viewing a Thumbnail Display
English
This function enables you to view nine thumbnail
images on the LCD monitor at the same time, which
helps you to quickly search for the image you want.
1. Slide the mode switch
to display the last
image on the screen.
2. Press the
button to display the images in the
thumbnail display.
3. Press the
/
/ / buttons to scroll
through the images. Selected images are
indicated by a green frame.
4. Press the SET button to display an image at regular size.
3.5.5 Zoom Playback
In playback mode, images can be enlarged with 2 x
and 4 x magnification. This mode allows you to
enlarge selected portions of the image to check for
small details.
1. Slide the mode switch to
. The last image
appears on the screen.
2. Press the
/
buttons to select the image
you want to view, or select the required image
from the thumbnail display.
3. Press the
button to enlarge the image. The
image is enlarged. Two rectangular frames are displayed on the LCD monitor. The outer
frame represents the entire image, while the inner frame shows the location of the
currently enlarged area.
4. Press the
button to resume normal magnification.
3.5.6 Slideshow Display
The slideshow function enables you to display your
still images automatically in order one image at a
time.
1. Slide the mode switch to
.
2. Press the MENU button.
3. Select Slide Show using the
/
buttons, and
press the SET button to start the slideshow.
4. To stop the slide show at any time, press the SET
button.
12
Using the DC E53
Adjust
: Select Page
: Select Item
BenQ DC 5530 User’s Manual
3.5.7 Protecting Images
English
You can protect images from being deleted accidentally as follows:
1.
2.
3.
4.
Slide the mode switch to
. The last image will be displayed on the screen.
Select the image you want to protect with the
/
buttons.
Press the MENU button.
Select one of the following options with the
/
buttons, and press the SET button.
• Single: Protects the selected image or the last
image.
• All: Protects all the images on the SD card.
• Select: Protects the selected images.
Adjust
Select Page
Select Item
5. If you selected Single or All, choose Set with the
/
buttons, and press the SET button. The
required images are protected.
6. If you selected Select, all the images are displayed
in the thumbnail display. Select the images you
want to protect with the
/
/ /
buttons, and press the
button.
The protect icon
is displayed with protected
Select
Enter
images. Selecting a protected image and pressing
the
button again cancels the protection. Repeat this procedure to select multiple
images for protection.
7. Press the SET button to protect the selected images.
Using the DC E53
13
BenQ DC 5530 User’s Manual
3.5.8 Setting DPOF
English
DPOF is the abbreviation for Digital Print Order Format, which allows you to embed printing
information along with the digital images on the memory card. You can select the images to
be printed and how many prints to make with the DPOF menu. Insert the memory card in
the appropriate card compatible printer. When the printer starts printing, it reads the
embedded information on the memory card and print the specified images.
1.
2.
3.
4.
Slide the mode switch to
.
Select the image that you want to set DPOF using the
/
buttons.
Press the MENU button.
Select DPOF with the
/
buttons, and press
the SET button.
5. Choose Single or All with the
/
buttons,
and press the SET button.
Single: Sets DPOF for each individual image.
All: Sets DPOF for all images at once.
6. Select Print Num. with the
/
buttons, and
Select Page
press the SET button.
Select Item
Adjust
7. Set the number of prints with the
/
buttons, and press the SET button. You can set up
to 9 prints for each image.
8. Select Date with the
/
buttons, and press the SET button.
9. Select date to ON or OFF with the
/
buttons, and press the SET button.
• ON: The date of the photograph will also be printed.
• OFF: The date of the photograph will not be printed.
10. Select Print Enable with the
/
buttons, and press the SET button.
11. Select Execute with the
/
buttons, and press the SET button.
This creates a file containing the DPOF information that is used while printing. When the
operation is finished, the screen returns to the playback screen.
14
Using the DC E53
BenQ DC 5530 User’s Manual
3.6 Setup Menus
English
This section covers the OSD menus which enable you to configure the camera settings.
3.6.1 Picture Menu
The picture menu in video and still picture mode enables you to change image properties.
1. Slide the mode switch to
or
.
2. Press the MENU button, and select Picture with the
/
buttons.
Fine
Normal
Standard
Adjust
Adjust
Adjust
Still picture mode
Video mode
3. Select a menu item with the
/
buttons and press the SET button to enter a
submenu or to change a setting.
4. Select the desired setting with the
/
buttons and press the SET button.
To exit from the picture menu, press the MENU button.
3.6.1.1
Size
The size option sets the size of the image that will be photographed.
Icon
3.6.1.2
Size
Description
2560 x 1920
2560 x 1920 pixels (5M)
2048 x 1536
2048 x 1536 pixels (3M)
1280 x 960
1280 x 960 pixels (1.2M)
640 x 480
640 x 480 pixels (VGA)
Quality
The quality menu sets the quality (compression rate) at which the image is captured.
Icon
Quality
Description
Fine
High compression rate
Standard
Normal
Economy
Low compression rate
Using the DC E53
15
BenQ DC 5530 User’s Manual
3.6.1.3
Sharpness
English
The sharpness menu sets the sharpness of the image that will be photographed.
• Hard: High sharpness
• Normal: Normal softness
• Soft: Low sharpness
3.6.1.4
Contrast
The contrast menu sets the difference between the bright and dark portions of the image that
will be photographed.
• Hard: Increases the contrast.
• Normal: Sets the contrast automatically.
• Soft: Decreases the contrast.
3.6.1.5
Color
The color menu sets the color of the image that will be photographed.
• Standard: Standard colors
• Vivid: Bright colors
• Sepia: Sepia tones
• Monochrome: Black-and-white image
3.6.1.6
White Balance
The white balance menu sets the white balance for photographing under a variety of lighting
conditions. This permits photographs to be taken that closely approach the conditions that
are seen by the human eye.
Icon
White Balance
Description
Blank
Auto
Automatic adjustment
Incandescent
Photography under incandescent lighting
1
Fluorescent 1
Photography under a white fluorescent tube with a bluish tint
2
Fluorescent 2
Photography under a white fluorescent tube with a reddish tint
Day Light
Outdoor photography
Cloudy
Photography under a cloudy sky
Manual
Photography with a Manual WB
3.6.1.7
Manual White Balance
This menu manually sets the white balance and saves the setting. Use of this is convenient
when the white balance menu options do not offer a good match to the actual conditions.
Before selecting Execute, focus the camera on the subject (such as a white paper under bright
light) that will be used to set the white balance.
• Cancel: Disables manual white balance.
• Execute: Enables manual white balance.
16
Using the DC E53
BenQ DC 5530 User’s Manual
3.6.1.8
ISO
3.6.1.9
Metering
This option sets the metering method for calculating the exposure.
Icon
Metering
Description
Blank
Multi
The entire area of the screen is measured, and the exposure is calculated for optimum picture quality.
Spot
A very small portion of the center of the screen is measured, and
the exposure is calculated from the light in this area.
3.6.2 Function Menu
The function menu in video and still picture mode enables you to adjust camera settings.
Digital Zoom
Adjust
Adjust
Still picture mode
3.6.2.1
Video mode
Capture Mode
This menu sets the recording method for capturing still images.
Icon
Capture Mode
Description
Blank
Single
Takes one photograph at a time.
Continuous
Enables continuous photography of 3 pictures in succession, at an interval of 0.5 seconds.
Auto Exposure
Records three still images in succession with three 3 levels of exposure –
standard exposure (0), underexposure (-0.67EV) and overexposure
(+0.67EV). This is effective when it is difficult to determine the correct
exposure for continuous photography.
AEB
Using the DC E53
17
English
This item sets the sensitivity for taking pictures. When the sensitivity is increased (and the
ISO figure is increased), photography will become possible even in dark locations, but the
image will appear more pixelated (grainy).
• 50: High-sensitive photography equivalent to ISO50.
• 100: High-sensitive photography equivalent to ISO100.
• 200: High-sensitive photography equivalent to ISO200.
• Auto: Automatic setting in the range of ISO 50 to 200.
BenQ DC 5530 User’s Manual
Note
English
In continuous photography, press and hold the shutter button until 3
images have been captured. If the shutter button is released earlier, the continuous photography will end at that point.
3.6.2.2
Voice Memo
A voice memo can be recorded for up to 30 seconds immediately following still single image
photography. This feature is also available during playback mode. Refer to 3.2.1.6 “Recording
Voice Memos” on page 9 and 3.5.3 “Attaching Voice Memos” on page 11 to learn how to
record voice memos.
• ON: Enables voice memo.
• OFF: Disables voice memo.
3.6.2.3
LCD Brightness
This menu item enables you to adjust the brightness level for the LCD monitor. Increase or
decrease the brightness using the
/
buttons. The adjustment range is from -5 to +5.
3.6.2.4
Digital Zoom
This option enables the digital zoom for capturing still images or movie clips.
• ON: Enables digital zoom.
• OFF: Disables digital zoom.
3.6.2.5
Preview
This option enables display of the photographed image on the screen immediately after the
picture is taken.
• ON: Enables preview.
• OFF: Disables preview.
Notes
•
•
3.6.2.6
A photographed image is displayed on the LCD monitor for 2 seconds.
Pressing the shutter button during preview cancels the save operation.
When preview is set to off, the voice memo setting is also set to off.
Date Print
The date of recording can be printed directly on the still images. This function must be
activated before the image is taken.
• ON: Imprints the date on still images
• OFF: Does not imprint the date
18
Using the DC E53
BenQ DC 5530 User’s Manual
3.6.3 Playback Menu
mode, the OSD menu enables you to configure playback settings.
3.6.3.1
Slide Show
English
In the
This option automatically plays back still images sequentially. Refer to 3.5.6 “Slideshow
Display” on page 12 for further details.
3.6.3.2
DPOF
This menu item lets you set the number of prints and date display in DPOF format for images
that you want to print. (This function is available for still images only.) You can print images
by inserting the SD card in a DPOF-compatible printer. Refer to 3.5.8 “Setting DPOF” on
page 14 for further details.
3.6.3.3
Protect
This menu item enables you to protect images to prevent them from being erased
accidentally. Refer to 3.5.7 “Protecting Images” on page 13 for further details.
3.6.3.4
LCD Bright
This menu enables you to adjust the brightness of the LCD monitor. Refer to • “ON: Enables
voice memo.” on page 18 in Still Image Menu for further details.
3.6.4 Setup Menu
The setup menu in still picture/video and playback mode enables you to change camera
properties.
Adjust
Still picture/video mode
3.6.4.1
Playback mode
Beep
This option enables the camera beep heard at startup and each time a camera button is
pressed.
• ON: Enables the beep tone.
• OFF: Disables the beep tone.
Using the DC E53
19
BenQ DC 5530 User’s Manual
3.6.4.2
Format
English
This function erases all images and reformats the SD card loaded in your camera. Protected
images are also erased. The SD card cannot be formatted if it is write protected. Select this
option and select Execute with the
/
buttons to format the SD card and press SET;
otherwise, select Cancel.
Notes
•
•
3.6.4.3
Format an SD card by this camera before using it.
An SD card having any problem cannot be properly formatted.
Fr. No Reset
This menu creates a new folder, and the images and movie clips are recorded to the newly
created folder from number 0001.
• Cancel: Cancels the operation.
• Execute: Resets the file numbers and creates a new folder.
3.6.4.4
Date/Time
This option sets the date and the time.
1. Select Date/Time with the
/
setting screen will be displayed.
buttons and press the SET button. The Date/Time
2. Select the date or time field with the / buttons and adjust the value for the date and
time with the
/
buttons. The date and time is set in the order: year-month-dayhour-minute. The time is displayed in 24-hour format.
3. Press the SET button.
The setting is stored and the screen returns to the set-up menu.
3.6.4.5
Auto Off
If no operation is performed for a specific period of time, the camera is automatically turned
off. This feature is useful to reduce battery wear.
• 1 Min.: Turns the power off after 1 minute of inactivity
• 2 Min.: Turns the power off after 2 minutes of inactivity
• 3 Min.: Turns the power off after 3 minutes of inactivity
3.6.4.6
Sys. Reset
This returns all basic settings to the camera’s default settings. The time setting is not reset.
• Cancel: Does not return to the default settings.
• Execute: Returns to the default settings.
3.6.4.7
Language
This option lets you specify the language for the menus and messages displayed on the screen.
Select the desired language from the following options with the
/
buttons: English,
French, German, Spanish, Italian, Chinese (Traditional), Chinese (Simplified). Press the SET
button to confirm.
20
Using the DC E53
BenQ DC 5530 User’s Manual
3.6.4.8
Card Info.
3.6.4.9
System Info.
This option displays the firmware version of the camera.
3.6.4.10 Video Output
This sets the video output system of the camera to that of the video equipment to which you
will connect the camera.
• NTSC: NTSC system
• PAL: PAL system
Using the DC E53
21
English
This option displays the capacity of the SD card along with the free space available on it.
BenQ DC 5530 User’s Manual
English
4
PC DEPENDENT FEATURES
To copy files to a PC, you will need to install the camera software and connect the camera to
your PC.
4.1 Installing the Digital Camera Software
•
If your operating system is Windows 98SE, you
will need to first install the DC E53 driver.
• Insert the digital camera CD into the CD-ROM
drive and the software installation menu
appears automatically.
If the menu does not appear, browse the CD for
the “Autorun.exe” file and double-click it.
• Click the Typical Installation button to install
the software and follow the on-screen instructions.
To browse the content of this CD and install other software manually, click the Browse CD
button and install the software needed.
4.2 Transferring Files with your PC
PDIF-OUT
SDIF-OUT
PC Dependent Features
TV OUT
22
LCD
This section explains how to transfer images and movie files to your
PC.
1. Turn on the PC.
2. Switch on the camera.
3. Connect the camera to the PC using the USB cable. Ensure that
the connection is secure. Once the USB cable is connected to
the PC, a hard disk is created in Windows Explorer labeled
“Removable Disk.” Stored images or movies can be found on
the Removable Disk under the \DCIM\100DSCIM folder.
4. Copy, view, delete, and move images and movie files as you
normally would.
BenQ DC 5530 User’s Manual
4.3 Viewing Images on TV
Connect the camera to the TV with the AV cable as shown.
Turn on the TV.
Switch on the camera.
Switch your TV to video mode. Refer to your TV’s user manual.
View images or movies as described in 3.5 “Using Playback
Mode” on page 11.
English
1.
2.
3.
4.
5.
Audio
L
PC Dependent Features
R
23
BenQ DC 5530 User’s Manual
English
5
SERVICE INFORMATION
Technical Support
If you encountered problems using DC E53 and the camera driver program, please visit the
following web address:
http://support.BenQ.com
For free driver program updates, product information and news release, please visit the
following web address:
http://www.BenQ.com
24
Service information