1
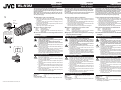
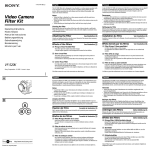
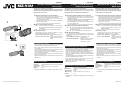
MZ-V3U
ENGLISH
DEUTSCH
FRANÇAIS
STEREO ZOOM MICROPHONE
Instructions
STEREO-ZOOM-MIKROFON
Bedienungsanleitung
MICROPHONE A ZOOM STEREO
Mode d’emploi
Thank you for purchasing a JVC product.
The MZ-V3U is a stereo zoom microphone, which is mounted
on the Info-Shoe and interlocked with the zooming and power
settings of the video camera.
Vielen Dank für den Kauf eines JVC Produkts.
Das MZ-V3U ist ein Stereo-Zoom-Mikrofon, welches beim
Info-Shoe angebracht wird und mit den Zoom- und
Netzeinstellungen der Videokamera verriegelt wird.
Merci d’avoir porté votre choix sur un produit JVC.
Le MZ-V3U est un microphone à zoom stéréo, monté sur l’InfoShoe et interbloqué avec les réglages de cadrage au zoom et
d’alimentation de la caméra vidéo.
1. Attach Zoom Microphone on the Info-Shoe.
1. Anbringung des Zoom-Mikrofons am Info-Shoe
1. Fixation du microphone zoom sur l’Info-Shoe
• Slide the zoom microphone all the way into the Info-shoe and
turn the mounting screw fully clockwise to tighten it.
To remove the zoom microphone, turn the mounting screw
counterclockwise to loosen it.
• Attach the zoom microphone’s sound collector so that it faces
toward the front (object).
The zoom microphone can be panned by 180 degrees.
1
Screw
Schraube
Vis
2. Set the zoom microphone switch.
OFF : The audio from the zoom microphone is not recorded.
Audio is permanently recorded from the camera’s builtin microphone.
ON : The audio from the zoom microphone is recorded.
3. Shooting an object.
The directivity of the zoom microphone changes in an interlocked operation with the camera’s zooming.
Zoom in the Wide-angle mode: The ambient audio will be recorded.
Zoom in the Telescopic mode : The sound of a distant object
(about 8 meters) can be recorded.
Slide-in directions
Einschieberichtungen
Direction d'insertion
• Das Zoom-Mikrofon vollständig in den Info-Shoe schieben
und die Befestigungsschraube für Anziehung ganz im
Uhrzeigersinn drehen.
Für Entfernung des Zoom-Mikrofons, die Befestigungschraube
im Gegenuhrzeigersinn drehen, um sie zu lösen.
• Den Tonauffänger des Zoom-Mikrofons so anbringen, daß er
nach vorne (Objekt) weist.
Das Zoom-Mikrofon kann um 180 Grad geschwenkt werden.
2. Einstellung des Zoom-Mikrofon-Schalters
OFF : Der Ton vom Zoom-Mikrofon wird nicht aufgenommen.
Der Ton wird permanent von eingebauten Mikrofon der
Kamera aufgenommen.
ON : Der Ton vom Zoom-Mikrofon wird aufgenommen.
3. Aufnahme eines Objekts
Die Richtwirkung des Zoom-Mikrofons ändernt sich
entsprechend des Verriegelungsbetriebs mit dem Zoombetrieb
der Kamera.
Zoom bei Weitwinkelbetrieb : Umgebungston wird
aufgenommen.
Zoom bei Teleskopbetrieb : Der Ton von einem entfernten
Objekt (ca. 8 Meter) kann
aufgenommen werden.
OFF
2
ON
Operating Precautions
• Always turn both the video camera and the zoom microphone off
before attaching or removing the zoom microphone.
• Do not apply a strong impact to the zoom microphone by dropping or hitting it.
• If the Info-Shoe is attached to the camera incorrectly, recording
from the zoom microphone may not be possible.
Before shooting, be sure to perform test shooting to ensure that
normal recording is available.
• Do not carry the camera by holding the zoom microphone that is
attached to the Info-Shoe.
• Be careful when carrying the camera with the zoom microphone
attached to it.
Main Specifications
Type
Directivity
Current drain
Dimensions
Weight
:
:
:
:
:
Electret capacitor type microphone
Unidirectional/MS stereo/Continuously variable
75 mW
35 mm (W) x 50 mm (H) x 137 (D) mm
42 ˝
∗ Design and specifications are subject to change without notice.
• Glissez le microphone zoom à fond dans la glissière et tournez
la vis de montage à fond dans le sens horaire pour la serrer.
Pour retirer le microphone zoom, tournez la vis de montage
dans le sens anti-horaire pour la desserrer.
• Fixez le collecteur de son du microphone zoom de sorte qu’il
soit face à l’avant (objet).
Le microphone zoom peut être panoramiqué de 180˚.
2. Réglez le commutateur du microphone zoom.
OFF : Le son du microphone zoom n’est pas enregistré. Il est
enregistré en permanence à partir du microphone
intégré à la caméra.
ON : Le son du microphone zoom est enregistré.
3. Filmez un objet.
La directivité du microphone zoom change de manière
interbloquée au cadrage au zoom de la caméra.
Zoom en mode grand-angle : Le son ambiant sera
enregistré.
Zoom en mode téléobjectif : Le son d’un objet distant
(environ 8 mètres) sera
enregistré.
Précautions de fonctionnement
Vorsichtsmaßnahmen für Betrieb
• Vor Anbringung oder Entfernung des Zoom-Mikrofons, immer die
Videokamera sowie das Zoom-Mikrofon ausschalten.
• Vermeiden, daß das Zoom-Mikrofon herunterfällt oder angestoßen
wird und somit starken Erschütterungen ausgesetzt wird.
• Wenn der Info-Shoe falsch bei der Kamera angebracht
wurde,kann möglicherweise keine Aufnahme vom Zoom-Mikrofon
gemacht werden.
Vor Aufnahmebeginn eine Probeaufnahme machen,um zu prüfen,
daß eine normale Aufnahme möglich ist.
• Nicht die Kamera tragen, indem an dem am Info-Shoe
angebrachten Zoom-Mikrofon angefaßt wird.
• Beim Tragen der Kamera vorsichtig sein, wenn das ZoomMikrofon angebracht ist.
Gundsätzliche technische Daten
Typ
Richtwirkung
: Elektret-Kondensator-Mikrofon
: Einseitig gerichtet/MS-Stereo/Kontinuierlich
regelbar
Stromentnahme : 75 mW
Abmessungen : 35 mm (B) x 50 mm (H) x 137 mm (T)
Gewicht
: 42 ˝
• Mettez toujours à la fois la caméra vidéo et le microphone zoom
hors tension avant de fixer ou de retirer le microphone zoom.
• N’exercez pas un fort impact sur le microphone zoom en le faisant
tomber ou en le cognant.
• Si l’Info-Shoe est mal fixé à la caméra, l’enregistrement avec le
microphone zoom peut être impossible.
Avant la prise de vue, effectuez une prise d’essai pour vérifier
que l’enregistrement normal est possible.
• Ne portez pas la caméra en la tenant par le microphone zoom
fixé à l’Info-Shoe.
• Faites attention en transportant le caméra avec le microphone
zoom fixé.
Principales caractéristiques
Type
Directivité
Consommation
Dimensions
Poids
:
:
:
:
:
Microphone condensateur à électrets
Unidirectionnel/ MS stéréo/variable en continu
75 mW
(LxHxP) 35 mm x 50 mm x 137 mm
42 ˝
∗ La conception et les caractéristiques sont sujettes à modification
sans préavis.
∗ Spezifikationen und Design sind jederzeit ohne Vorankündigung
änderbar.
© 2001 VICTOR COMPANY OF JAPAN, LTD.
KZM0007-010020/0030
VL-F3U
ENGLISH
FRANÇAIS
DEUTSCH
VIDEO FLASH
Instructions
FLASH VIDEO
Mode d'emploi
VIDEOBLITZ
Bedienungsanleitung
Thank you for purchasing the VL-F3U Video Flash.
The VL-F3U Video Flash makes it possible to shoot still video images
of objects under low light conditions by emitting a momentary flash.
Video Flash has been designed to be attached to the Info-Shoe, which
is based on interlocking between the video camera and power supply.
1. Attach Video Flash to the Info-Shoe.
1
s Apply Video Flash onto the Info-Shoe, push Video Flash firmly into
the Info-Shoe and tighten the clamping screw by turning it clockwise.
To remove Video Flash, first loosen the clamping screw by
turning it counterclockwise.
s Attach Video Flash so that the flash-emitting area faces the front
of the video camera.Video Flash can be panned 180 degrees.
Screw
Vis
Schraube
2. Set the switch on Video Flash.
[OFF]
[ ]
: Inhibits flashing.
: Enables flashing for every shot.
3. Adjust the light intensity switch.
If the still image is too bright or dark, adjust the flash light intensity.
s To brighten the image : Set to [+]. (Increases the light intensity by +2.)
s To darken the image : Set to [-]. (Decreases the light intensity by -2.)
Standard : [0]
Slide-in directions
Direction d'insertion
Einschieberichtungen
4. Press the still image button to shoot an image.
Safety Precautions
3
–2 –1 0 +1 +2
BRIG
HT -2
-1 0
+ 1 +2
OFF
2
s Do not emit flash light directly into a person’s eyes at a
close distance.
s Be sure to switch the video camera off before attaching
or removing Video Flash.
s RISK OF ELECTRIC SHOCK – DO NOT OPEN.
Operating Precautions
s Video Flash does not emit light during the recording of
video moving images.
s Video Flash does not emit light when [
] is not displayed in the LCD screen.
s To prevent the whitening of an image due to flash light,
the video camera darkens the image automatically at
the moment Video Flash emits light. As a result, the still
image of any area outside the reach of flashlight becomes
darker than usual.
If you require to shoot an object located at a longer distance than the reach of the flashlight, set the switch on
Video Flash to [OFF].
s The blinking [ ] in the LCD screen indicates that the
Video Flash is being charged. Charging may take up to
about 10 seconds.
s Video Flash does not emit light when “Gain Up” of the
video camera is set to [OFF] or when “Program AE” is
set to “Night View”.
s The Video Flash does not light up when the indicator
blinks due to a low battery.
s After Video Flash is attached onto the Info-Shoe on the camera, do not carry the combination by holding Video Flash.
s Be careful when carrying the video camera on which
Video Flash is attached.
Main Specifications
Dimensions
: 38 mm (W) x 43 mm (H) x 69 mm (D)
Weight
: 45 ˝
Flash reach distance (With the GR-DV2000) :
XGA, VGA : Approx. 5 m
UXGA
: Approx. 2 m
s Design and specifications are subject to change without notice.
© 2000 VICTOR COMPANY OF JAPAN, LTD.
Merci d'avoir porté votre choix sur le flash vidéo VL-F3U.
Le flash vidéo VL-F3U permet de prendre des images vidéo
fixes d'objets sous éclairage ambiant faible par émission d'un
flash momentané.
Le flash vidéo est conçu pour être fixé sur le Info-Shoe, basé
sur le verrouillage entre la caméra et l'alimentation.
1. Fixez le flash vidéo sur l'Info-Shoe.
s Placez le flash vidéo sur l'Info-Shoe, poussez-le fermement dans
l'Info-Shoe et serrez la vis de serrage en la tournant dans le sens
horaire.
Pour retirer le flash vidéo, desserrez d'abord la vis de serrage en la
tournant dans le sens anti-horaire.
s Fixez le flash vidéo de sorte que la zone émettrice du flash soit face
à l'avant de la caméra vidéo.
Le flash vidéo permet un panoramique de 180 degrés.
2. Réglez le commutateur sur le flash vidéo.
[OFF]
[ ]
: Invalide le flash.
: Permet le flash à chaque prise.
3. Ajustez le commutateur d'intensité lumineuse.
Si l'image fixe est trop claire ou trop sombre, ajustez le
commutateur d'intensité lumineuse.
s Pour éclaircir l'image : Réglez à [+]. (Augmente l'intensité
lumineuse de +2.)
s Pour assombrir l'image : Réglez à [-]. (Diminue l'intensité
lumineuse de -2.)
Standard : [0]
4. Appuyez sur la touche d'image fixe pour prendre une image.
Règles de sécurité
s N'émettez pas la lumière du flash directement dans les
yeux d'une personne à proximité.
s Coupez la caméra vidéo avant de fixer ou de détacher
le flash vidéo.
s RISQUE DE DECHARGE ELECTRIQUE - NE PAS OUVRIR.
Précautions pour l'emploi
s Le flash vidéo n'émet pas de lumière pendant
l'enregistrement d'images vidéo.
s Le flash vidéo n'émet pas de lumière quand [ ] n'est
pas affiché sur l'écran LCD.
s Pour éviter le blanchissement de l'image à cause de la
lumière du flash, la caméra vidéo assombrit
automatiquement au moment où le flash vidéo émet
l'éclair. Il en résulte que l'image fixe de toute zone hors
de portée de l'éclair devient plus sombre que nature.
Pour prendre un objet éloigné hors de portée de l'éclair,
réglez le commutateur du flash vidéo sur [OFF].
s Le [ ] clignotant sur l'écran LCD indique la charge du flash
vidéo. La charge peut demander jusqu'à 10 secondes.
s Le flash vidéo n'émet pas de lumière quand "Gain Up"
est réglé sur [OFF] ou quand "Program AE" est réglé à
"Night View" sur la caméra vidéo.
s Le flash vidéo ne s'allume pas quand l'indicateur clignote
parce que les piles sont affaiblies.
s Quand le flash vidéo est fixé sur l'Info-Shoe de la caméra,
ne portez pas l'ensemble en le tenant par le flash vidéo.
s Soyez prudent en portant la caméra vidéo avec le flash
vidéo attaché.
Spécifications principales
Vielen Dank für den Kauf des VL-F3U Videoblitz
Mit dem VL-F3U können Videostandbilder von Objekten, die
schwach beleuchtet sind, aufgenommen werden,indem ein
momentanes Blitzlicht ausgesendet wird.
Der Videoblitz wurde so konstruiert, daß er am Info-Shoe
angebracht werden kann, wodurch eine Verriegelung zwischen
der Videokamera und der Spannungsversorgung erfolgt.
1. Den Videoblitz am Info-Shoe anbringen.
s Den Videoblitz auf den Info-Shoe aufsetzen, fest in den Info-Shoe
einschieben und die Klemmschrauben durch Drehen im
Uhrzeigersinn anziehen.
Für Abnahme des Videoblitz, zuerst die Klemmschrauben durch
Drehen im Gegenuhrzeigersinn lösen.
s Den Videoblitz so anbringen, daß der Aussendebreich für das Blitzlicht
auf die Vorderseite der Videokamera weist.
Der Videoblitz kann um 180 Grad geschwenkt werden.
2. Einstellung des Schalters am Videoblitz
(OFF)
( )
: Blitzlicht gesperrt.
: Blitzlicht bei jeder Aufnahme.
3. Einstellung des Lichtstärkeschalters
Wenn das Standbild zu hell oder dunkel ist, die Blitzlichtstärke
abstimmen.
s Für helleres Bild : Auf (+) einstellen. (Erhöht die Lichtstärke um +2.)
s Für dunkleres Bild : Auf (-) einstellen. (Verringert die Lichtstärke um -2.)
Standard : [0]
4. Für Bildaufnahme die Standbildtaste betätigen.
Sicherheitsmaßnahmen
s Niemals das Blitzlicht in dichten Abstand direkt auf die
Augen einer Person richten.
s Vor Anbringung oder Entfernung des Videoblitz sollte die
Videokamera ausgeschaltet sein.
s GEFAHR ELEKTRISCHER SCHLÄGE – NICHT ÖFFNEN
Vorsichtsmaßnahmen für Bedienung
s Während der Aufnahme bewegter Videobilder sendet der
Videoblitz kein Blitzlicht aus.
s Wenn in der LCD-Anzeige nicht (
) angezeigt wird,
sendet der Videoblitz kein Blitzlicht aus.
s Um eine eine Aufhellung des Bildes aufgrund des
Blitzlichts zu vermeiden, verdunkelt die Videokamera das
Bild automatisch im Moment ,wenn der Videoblitz das
Blitzlicht aussendet. Dadurch ist das Standbild außerhalb
des Blitzlichtbereichs dunkler als gewöhnlich.
Für Aufnahme eines Objekts, das zu weit entfernt ist,
um vom Blitzlicht erreicht zu werden,den Schalter am
Videoblitz auf (OFF) einstellen.
s Wenn ( ) auf dem LCD-Bildschirm blinkt, dann wird der Videoblitz
aufgeladen. Das Aufladen kann bis zu 10 Sekunden dauern.
s Der Videoblitz sendet kein Blitzlicht aus, wenn "Gain Up"
der Videokamera auf (OFF) oder wenn "Program AE"
auf "Night View" eingesteltl ist.
s Der Videoblitz leuchtet nicht auf, wenn die Anzeige
aufgrund niedriger Batteriespannung blinkt.
s Nach Anbringung des Videoblitz am Info-Shoe, niemals für das
Tragen dieser Aufbaukombination den Videoblitz umfassen.
s Beim Tragen einer Videokamera mit angebrachtem
Videoblitz vorsichtig sein.
Hauptspezifikationen
Dimensions
: (LxHxP) 38 mm x 43 mm x 69 mm
Poids
: 45 ˝
Portée du flash (avec le GR-DV2000) :
XGA, VGA : env. 5 m
UXGA
: env. 2 m
Abmessungen
: 38 mm (B) x 43 mm (H) x 69 mm (T)
Gewicht
: 45 ˝
Blitzlichtreichweite (Mit dem GR-DV2000) :
XGA, VGA : Ca. 5 m
UXGA
: Ca. 2 m
s La conception et les spécifications sont sujettes à modification
sans préavis.
s Änderungen des Designs und der technischen Daten ohne
Vorankündigung vorbehalten.
KAJ0283A
VL-V3U
1
Screw
Vis
Schraube
ENGLISH
FRANÇAIS
DEUTSCH
VIDEO LIGHT
Instructions
TORCHE VIDEO
Mode d'emploi
VIDEOLEUCHTE
Bedienungsanleitung
Thank you for purchasing the VL-V3U Video Light.
The VL-V3U Video Light makes it possible to shoot video stills
or moving images of an object under low light by continuouslylighting illumination.
Video Light has been designed to be attached onto the InfoShoe, which is based on interlocking between the video camera and power supply.
Merci d'avoir porté votre choix sur la torche vidéo VL-V3U.
La torche vidéo VL-V3U permet de prendre des images vidéo
fixes ou animées d'un objet sous faible éclairage par illumination continue.
La torche vidéo est conçue pour être fixée sur l'Info-Shoe, basé
sur le verrouillage entre la caméra et l'alimentation.
Vielen Dank für den Kauf des VL-V3U Videoleuchte.
Mittels dem VL-V3U Videoleuchte können Aufnahmen von
Videostandbildern oder sich bewegenden Bildern, die nur schwach
beleuchtet sind, bei Dauerbeleuchtung gemacht werden.
Das Videoleuchte wurde so konstruiert, daß es am Info-Shoe
angebracht werden kann, wodurch eine Verriegelung zwischen der
Videokamera und der Spannungsversorgung erfolgt.
1. Attach Video Light on the Info-Shoe.
1. Fixez la torche vidéo sur l'Info-Shoe.
1. Das Videoleuchte am Info-Shoe anbringen.
s Apply Video Light onto the Info-Shoe, push Video Light firmly
into the Info-Shoe and tighten the clamping screw by turning
it clockwise.
To remove Video Light, first loosen the clamping screw by
turning it counterclockwise.
s Attach Video Light so that the light-emitting area faces the
front of the video camera.
Video Light can be panned 180 degrees.
2. Set the switch on Video Light
[OFF]
: Inhibits lighting.
[ON]
: Permanent lighting.
[AUTO] : Lighting starts when the ambient light drops to a
certain level.
Slide-in directions
Direction d'insertion
Einschieberichtungen
3. Press the record button or still image button to shoot
an image.
AUTO
ON
OFF
s HIGH TEMPERATURE WARNING
Video Light becomes extremely hot during and immediately after lighting.
Do not touch it or let an object go near while it is hot.
s To prevent burns, do not touch the surface of Video
Light during its use.
s Take care that the emitted light does not directly hit the
eyes of a small child.
s Be sure to turn the video camera off before attaching or
removing Video Light.
s To prevent a fire hazard or burns, be sure to replace it
with the same Video Light (Model No. VL-V3U).
Please refer to the instruction manual of the connected
video camera to confirm that this unit belongs to one of
the Video Light models applicable to the camera.
Operating Precautions
s Even when the switch of Video Light is set to [AUTO], it
does not emit light when “Program AE” of the video camera is set to “Night View”.
s The use of Video Light reduces the battery-operating
hours of the video camera.
It is recommended to use the AC adapter during indoor
shooting.
s Video Light does not emit light unless the video camera
is turned on.
s After Video Light is attached onto the Info-Shoe on the
camera, do not carry the scombination by holding Video
Light.
s Be careful when carrying the video camera on which
Video Light is attached.
s When the light bulb of Video Light blows, contact your
local JVC-authorized service agent.
Main Specifications
Dimensions
Weight
Power consumption
2. Réglez le commutateur sur la torche vidéo.
[OFF]
: Invalide l'illumination.
[ON]
: Valide l'illumination.
[AUTO] : L'illumination commence quand la lumière ambiante
descend au-dessous d'un certain niveau.
3. Appuyez sur la touche d'enregistrement ou d'image
fixe pour prendre une image.
Safety Precautions
2
s Placez la torche vidéo sur l'Info-Shoe, poussez-la fermement
dans l'Info-Shoe et serrez la vis de serrage en la tournant
dans le sens horaire.
Pour retirer la torche vidéo, desserrez d'abord la vis de serrage
en la tournant dans le sens anti-horaire.
s Fixez la torche vidéo de sorte que la zone émettrice du flash
soit face à l'avant de la caméra vidéo.
La torche vidéo permet un panoramique de 180 degrés.
: 42 mm (W) x 51 mm (H) x 46 mm (D)
: 34 ˝
: 3W
s Design and specifications are subject to change without notice.
Règles de sécurité
s AVERTISSEMENT HAUTE TEMPERATURE
La torche vidéo est très chaude pendant et
immédiatement après l'illumination. Ne la touchez
pas et éviter le rapprochement de tout objet pendant
qu'elle est chaude.
s Pour éviter les brûlures, ne touchez pas la surface
de la torche vidéo pendant l'utilisation.
s Evitez que la lumière émise frappe directement les yeux
d'un petit enfant.
s Coupez bien la caméra vidéo avant de fixer ou de
détacher la torche vidéo.
s Pour éviter tout risque d'incendie ou de brûlure, remplacez
la lampe pour une lampe identique (modèle VL-V3U).
Consultez le manuel de la caméra vidéo connectée pour
confirmer que cette torche vidéo figure parmi les modèles
utilisables avec la caméra.
Précautions pour l'emploi
s Même si le commutateur de la torche vidéo est sur
[AUTO], la lampe n'émet pas de lumière quand "Program AE" est réglé sur "Night View" sur la caméra vidéo.
s L'emploi de la torche vidéo réduit les heures de
fonctionnement sur pile de la caméra vidéo.
L'emploi d'un adaptateur secteur est recommandé pour
la prise de vues en intérieur.
s La torche vidéo n'émet de lumière que si la caméra vidéo
est sous tension.
s Quand la torche vidéo est fixée sur l'Info-Shoe de la
caméra, ne portez pas l'ensemble en le tenant par la
torche vidéo.
s Soyez prudent en portant la caméra vidéo avec la torche
vidéo attachée.
s Quand l'ampoule de la torche vidéo saute, contactez
votre agent de service local JVC agréé.
2. Einstellung des Schalters am Videoleuchte
(OFF)
: Keine Beleuchtung.
(ON)
: Dauerbeleuchtung
(AUTO) : Beleuchtung startet, wenn das Umgebungslicht auf
einen bestimmten Wert abfällt.
3. Für Bildaufnahme die Aufnahme- oder Standbildtaste
betätigen.
Sicherheitsmaßnahmen
s Das Videoleuchte ist während und nach Beleuchtung
extrem heiß.
s Deshalb niemals berühren oder einen Gegenstand
in dessen Nähe bringen, während es heiß ist.
s Zur Verhinderung von Verbrennungen, niemals die
Oberfläche des Videoleuchtes während Benutzung
berühren
s Vermeiden, daß das ausgesendete Licht direkt auf die
Augen eines Kleinkinds trifft.
s Vor Anbringung oder Entfernung des Videoleuchte die
Videokamera ausschalten.
s Zur Verhinderung von Feuergefahr oder Verbrennungen
unbedingt gegen das gleiche Videoleuchte austauschen
(Modell-Nr. VL-V3U).
Siehe die Bedienungsanleitung der angeschlossenen
Videokamera, ob dieses Gerät einem der Videoleuchtemodelle entspricht, das für diese Kamera anwendbar ist.
Vorsichtsmaßnahmen für Betrieb
s Auch wenn der Schalter des Videoleuchte auf (AUTO)
eingestellt ist, wird kein Licht ausgesendet, wenn "Program
AE" der Videokamera auf "Night View" eingestellt ist.
s Durch die Benutzung des Videoleuchtes wird die
Batteriebetriebszeit der Videokamera reduziert. Es wird
empfohlen während Innenaufnahmen einen Netzadapter
zu verwenden.
s Nur bei eingeschalteter Videokamera sendet das
Videoleuchte Licht aus.
s Nach Anbringung des Videoleuchte am Info-Shoe, beim Tragen
dieser Aufbaukombination nicht das Videoleuchte umfassen.
s Beim Tragen einer Videokamera mit angebrachtem
Videoleuchte vorsichtig sein.
s Sollte die Glühbirne des Videoleuchte durchbrennen, dann
wenden Sich sich bitte an Ihren örtlichen JVCKundendienstvertreter.
Spécifications principales
Dimensions
Poids
Consommation
: (LxHxP) 42 mm x 51 mm x 46 mm
: 34 ˝
: 3W
s La conception et les spécifications sont sujettes à modification
sans préavis.
© 2000 VICTOR COMPANY OF JAPAN, LTD.
s Das Videoleuchte auf den Info-Shoe aufsetzen, fest in den
Info-Shoe einschieben und die Klemmschrauben durch
Drehen im Uhrzeigersinn anziehen.
s Für Abnahme des Videoleuchte zuerst die Klemmschrauben
durch Drehen im Gegenuhrzeigersinn lösen.
s Das Videoleuchte so anbringen, das der Lichtaussendungsbereich
auf die Vorderseite der Videokamera weist.
Das Videoleuchte kann um 180 Grad geschwenkt werden.
Hauptspezifikationen
Abmessungen
: 42 mm (B) x 51 mm (H) x 46 mm (T)
Gewicht
: 34 ˝
Leistungsaufnahme : 3 W
s Änderungen des Designs und der technischen Daten ohne
Vorankündigung vorbehalten.
KAJ0284A