1
Symantec™ Gateway Security
5400 Series
Installation Guide
Supported appliance models:
5420, 5440, 5441, 5460, and 5461
Symantec Gateway Security 5400 Series
Installation Guide
The software described in this book is furnished under a license agreement and may be
used only in accordance with the terms of the agreement.
Documentation version 2.0
PN:10097551
August 20, 2003
Copyright notice
Copyright 1998–2003 Symantec Corporation.
All Rights Reserved.
Any technical documentation that is made available by Symantec Corporation is the
copyrighted work of Symantec Corporation and is owned by Symantec Corporation.
NO WARRANTY. The technical documentation is being delivered to you AS-IS and
Symantec Corporation makes no warranty as to its accuracy or use. Any use of the
technical documentation or the information contained therein is at the risk of the user.
Documentation may include technical or other inaccuracies or typographical errors.
Symantec reserves the right to make changes without prior notice.
No part of this publication may be copied without the express written permission of
Symantec Corporation, 20330 Stevens Creek Blvd., Cupertino, CA 95014.
Trademarks
Symantec, the Symantec logo, and Norton AntiVirus are U.S. registered trademarks of
Symantec Corporation. LiveUpdate, LiveUpdate Administration Utility, Symantec
AntiVirus, and Symantec Security Response are trademarks of Symantec Corporation.
Other brands and product names mentioned in this manual may be trademarks or
registered trademarks of their respective companies and are hereby acknowledged.
Printed in the United States of America.
10 9
8
7
6 5
4
3 2
1
Technical support
As part of Symantec Security Response, the Symantec global Technical Support
group maintains support centers throughout the world. The Technical Support
group’s primary role is to respond to specific questions on product feature/
function, installation, and configuration, as well as to author content for our
Web-accessible Knowledge Base. The Technical Support group works
collaboratively with the other functional areas within Symantec to answer your
questions in a timely fashion. For example, the Technical Support group works
with Product Engineering as well as Symantec Security Response to provide
Alerting Services and Virus Definition Updates for virus outbreaks and security
alerts.
Symantec technical support offerings include:
■
A range of support options that give you the flexibility to select the right
amount of service for any size organization
■
Telephone and Web support components that provide rapid response and
up-to-the-minute information
■
Upgrade insurance that delivers automatic software upgrade protection
■
Content Updates for virus definitions and security signatures that ensure the
highest level of protection
■
Global support from Symantec Security Response experts, which is available
24 hours a day, 7 days a week worldwide in a variety of languages for those
customers enrolled in the Platinum Support program
■
Advanced features, such as the Symantec Alerting Service and Technical
Account Manager role, offer enhanced response and proactive security
support
Please visit our Web site for current information on Support Programs. The
specific features available may vary based on the level of support purchased and
the specific product that you are using.
Licensing and registration
If the product that you are implementing requires registration and/or a license
key, the fastest and easiest way to register your service is to access the Symantec
licensing and registration site at www.symantec.com/techsupp/ent/
enterprise.html, select licensing and Registration, then select the product and
version that you wish to register.
Contacting Technical Support
Customers with a current maintenance agreement may contact the Technical
Support group by phone or online at www.symantec.com/techsupp/.
Customers with Platinum support agreements may contact Platinum Technical
Support by the Platinum Web site at www-secure.symantec.com/platinum/.
When contacting the Technical Support group, please have the following:
■
Product release level
■
Hardware information
■
Available memory, disk space, NIC information
■
Operating system
■
Version and patch level
■
Network topology
■
Router, gateway, and IP address information
■
Problem description
■
Error messages/log files
■
Troubleshooting performed prior to contacting Symantec
■
Recent software configuration changes and/or network changes
Customer Service
To contact Enterprise Customer Service online, go to www.symantec.com/
techsupp/, select the appropriate Global Site for your country, then select the
enterprise Continue link. Customer Service is available to assist with the
following types of issues:
■
Questions regarding product licensing or serialization
■
Product registration updates such as address or name changes
■
General product information (features, language availability, local dealers)
■
Latest information on product updates and upgrades
■
Information on upgrade insurance and maintenance contracts
■
Information on Symantec Value License Program
■
Advice on Symantec’s technical support options
■
Nontechnical presales questions
■
Missing or defective CD-ROMs or manuals
Contents
Chapter 1
Introducing Symantec Gateway Security 5400 Series
About the Symantec Gateway Security 5400 Series ........................................ 6
Intended audience ............................................................................................. 6
Document structure .......................................................................................... 6
About product documentation ........................................................................ 7
Checking the components list .......................................................................... 8
Replacement CD-ROMs ........................................................................... 9
Chapter 2
Installing the appliance
Planning for installation ................................................................................. 12
Installing your free-standing appliance .................................................. 12
Mounting in a rack .................................................................................. 13
About model 5420 .......................................................................................... 14
Connecting model 5420 to the network ................................................. 15
Connecting power cord to model 5420 .................................................. 16
Turning on the power for model 5420 ................................................... 16
About models 5440/41 and 5460/61 .............................................................. 16
Connecting models 5440/41 and 5460/61 to the network .................... 19
Connecting the power cord to models 5440/41 and 5460/61 .............. 20
Turning on the power for the models 5440/41 and 5460/61 ................ 20
Connecting an uninterruptible power supply (UPS) ................................... 21
Chapter 3
Appliance setup and initial system configuration
Before you begin initial setup ......................................................................... 24
Front panel layout ........................................................................................... 25
Front panel controls ................................................................................ 27
Example network diagram ............................................................................. 29
Using the network setup worksheet ............................................................... 30
Network setup worksheet ....................................................................... 30
Changing passwords ................................................................................ 31
Performing the initial appliance network setup ............................................ 31
Displaying system information ...................................................................... 34
Using the system menu ................................................................................... 35
About migrating/restoring your configuration to a new appliance ............. 36
Migration limitations .............................................................................. 37
2 Contents
Migrating to a new appliance ..................................................................38
About the SGMI ..............................................................................................40
Connecting to the appliance and running the System Setup Wizard ..........40
Configuring your Symantec Gateway Security appliance ............................47
Third-party HA/LB product installation and issue resolution ..............47
Locking front LCD panel controls ..........................................................47
Unlocking the front LCD panel controls ................................................47
Restoring the software .....................................................................................48
Appendix A
Developing a pre-installation security plan
About developing a security plan ...................................................................52
Defining your security policy ..........................................................................52
Before writing your security plan ............................................................53
Becoming security-conscious ..................................................................53
Educating users ................................................................................................54
Involving the user community ................................................................54
Filling out worksheets .....................................................................................55
Defining your organization .....................................................................55
Site hardware information ......................................................................58
TCP/IP address ........................................................................................59
Allowed TCP/IP services .........................................................................61
Email notifications ...................................................................................62
Web service information .........................................................................63
Defining your network architecture .......................................................66
Appendix B
Licensing
About license files and licensing .....................................................................70
Getting started with your 30-day grace period ..............................................70
Obtaining and organizing license serial numbers ..................................70
Additional required information for requesting license files ................71
Organizing your license files ...........................................................................72
Using the Symantec License Request & Maintenance Web site ...................74
Activating your license files .....................................................................74
Uploading your license files ....................................................................80
Removing license files ..............................................................................82
Viewing license enabled features .............................................................82
Explanation of Symantec Gateway Security licensing and maintenance .....83
Node licensing (client and server) ..........................................................83
Session licensing for Symantec Client VPN ...........................................84
High Availability and Load Balancing (HA/LB) ....................................84
Obtaining a license file .............................................................................84
Basic license types ....................................................................................84
Contents
Content updates ...................................................................................... 86
Maintenance contracts ............................................................................ 86
Maintenance renewals ............................................................................. 88
Platinum support uplift .......................................................................... 88
About the Symantec Gateway Security 5400 Series licenses ......................... 88
Appendix C
Troubleshooting
About troubleshooting ................................................................................... 98
Accessing troubleshooting information ........................................................ 98
Appendix D
Specifications and safety
About this appendix ..................................................................................... 100
Product specifications ................................................................................... 100
Safeguard instructions .................................................................................. 101
Product certifications ................................................................................... 103
Index
3
4 Contents
Chapter
Introducing Symantec
Gateway Security 5400
Series
This chapter includes the following topics:
■
About the Symantec Gateway Security 5400 Series
■
Intended audience
■
Document structure
■
About product documentation
■
Checking the components list
1
6 Introducing Symantec Gateway Security 5400 Series
About the Symantec Gateway Security 5400 Series
About the Symantec Gateway Security 5400 Series
The Symantec Gateway Security 5400 Series is a comprehensive network security
device that integrates firewall, VPN, antivirus, intrusion detection and
prevention, content filtering, and high availability/load balancing components
into an appliance that protect networks at the gateway to the Internet or subnets
of larger WANs and LANs.
You can use Microsoft Internet Explorer version 6 or later or Netscape Navigator
version 7 or later to manage your Symantec Gateway Security 5400 Series through
the Security Gateway Management Interface. There are different versions of the
Java Runtime Environment (JRE) for specific browsers. Refer to Table 1-1 for the
appropriate JRE version.
Table 1-1
Browser support
Application
Version
Java Runtime Environment (JRE)
Microsoft Windows
Internet Explorer
6 or later
JRE 1.31_04
Windows Netscape
7 or later
JRE 1.31_04
Solaris Netscape
7 or later
JRE 1.42
In addition, you must ensure that your client side workstation has a minimum of
512 MB of RAM.
Intended audience
This manual is intended for system managers or administrators responsible for
administering the Symantec Gateway Security 5400 Series.
Document structure
This manual is structured as follows:
Table 1-2
Document structure
Chapter
Title
Content
Chapter 2
Installing the appliance
Tells you how to do a stand-alone or rack
mount install of the Symantec Gateway
Security 5400 Series.
Introducing Symantec Gateway Security 5400 Series
About product documentation
Table 1-2
Document structure (Continued)
Chapter
Title
Content
Chapter 3
Appliance setup and
initial system
configuration
Tells you how to initially set up the
appliance and run the System Setup
Wizard.
Appendix A
Developing a preinstallation security plan
Lays out basic guidelines for developing an
overall security plan and provides a
checklist for assessing your security issues.
Appendix B
Licensing
Tells you how to obtain license files and lists
all Symantec product licenses.
Appendix C
Specifications and safety
Lists the product specifications and the
certifications obtained for the appliance.
Appendix D
Troubleshooting
Tells you where to find troubleshooting
information.
About product documentation
The Symantec Gateway Security 5400 Series functionality is described in the
following manuals:
■
Symantec™ Gateway Security 5400 Series Installation Guide
The guide you are reading covers the physical installation and initial setup of
the appliance and the Security Gateway Management Interface (SGMI). In
addition, this guide covers the process of joining the appliance to SESA,
which is accomplished locally with the Join SESA Wizard.
■
Symantec™ Gateway Security 5400 Series Administrator’s Guide
The book describes the SGMI. This guide covers topics related to the
Symantec Gateway Security 5400 Series and its related components,
including: base components, access controls, secure tunnels, VPN policies,
remote policies, and monitoring controls. It is provided in PDF format.
■
Symantec™ Gateway Security 5400 Series Reference Guide
This guide provides advanced technical information about network security
and advanced configuration examples.
7
8 Introducing Symantec Gateway Security 5400 Series
Checking the components list
Checking the components list
After carefully unpacking the Symantec Gateway Security 5400 Series appliance,
compare the kit contents with Table 1-3 to ensure that you have received all
ordered components.
Table 1-3
Components list
Part
Description
Appliance
A single device.
Rack-mount brackets
Hardware for rack-mounting the appliance. Screws for
attaching the bracket to the appliance are included;
however, screws for attaching appliance to the rack are not
included.
Symantec Gateway Security
v2.0 Software and
Documentation for 5400
Series (the restore CDROM)
Contains the following items:
■
■
■
■
Remote log for Linux, Windows, and Solaris
(remlog.zip, srl.zip, flatten.zip)
SNMP files including FTP client software
(Passive-mode, Microsoft Windows only)
Appliance restore partition
Adobe Acrobat Reader
The following documentation in PDF format:
■
■
■
■
■
Symantec Client VPN
Version 8.0 CD-ROM
Symantec™ Gateway Security 5400 Series Installation
Guide
Symantec™ Gateway Security 5400 Series
Administrator’s Guide
Symantec™ Gateway Security 5400 Series Reference
Guide
Symantec™ Gateway Security 5400 Series Quick Start
Cards for the 5420, and the 5440 and 5460
Symantec™ Gateway Security 5400 Series Release Notes
Symantec Client VPN
The following documentation in PDF format:
■
■
■
Symantec™ Client VPN User’s Guide
Symantec™ Client VPN Quick Start Card
Symantec™ Client VPN Release Notes
Introducing Symantec Gateway Security 5400 Series
Checking the components list
Table 1-3
Components list (Continued)
Part
Description
Cables
■
■
■
Printed documentation
■
■
■
A power cord appropriate for the country in which
the appliance will operate
Network crossover cable
Null modem serial port cable
Symantec™ Gateway Security 5400 Series Installation
Guide
Symantec™ Gateway Security 5400 Series Quick Start
Cards for the 5420, and the 5440 and 5460
Symantec™ Gateway Security 5400 Series Release Notes
Replacement CD-ROMs
You may need to replace the media due to a defective or lost CD-ROM. If you
need a replacement CD-ROM because it is defective, contact Customer Support.
If you require a new CD-ROM because you have lost it, contact your Sales
Representative to purchase a new media kit.
9
10 Introducing Symantec Gateway Security 5400 Series
Checking the components list
Chapter
2
Installing the appliance
This chapter includes the following topics:
■
Planning for installation
■
About model 5420
■
About models 5440/41 and 5460/61
■
Connecting an uninterruptible power supply (UPS)
Warning: This is an electrically powered device. You must adhere to warnings
and cautions when installing or working with the Symantec Gateway Security
5400 Series.
12 Installing the appliance
Planning for installation
Planning for installation
This chapter contains information about installing the appliance, connecting it to
the network, and turning on the power.
Warning: Read the installation instructions before connecting the system to its
power source.
You can install the Symantec Gateway Security 5400 Series either free-standing or
in a rack.
Installing your free-standing appliance
You can install the Symantec Gateway Security 5400 Series as a free-standing
appliance.
To install the free-standing appliance
1
Ensure that the installation site has a smooth and level surface, such as the
top of a computer table in a minimum access area. In addition, avoid placing
the Symantec Gateway Security 5400 Series appliance in a cluttered or busy
area. Ensure this area is only accessible by authorized security personnel. The
installation site must meet minimum product specifications.
Note: Ensure that location for the front and rear of the appliance is free of
debris to provide sufficient air flow.
2
Ensure that the power source is adequate and that the outlet is located within
reach of the supplied power cord without stretching or putting strain on the
cord.
Warning: Do not use an extension cord to supply power to this unit.
3
After cabling the unit into the network, position the cables away from foot
traffic.
Installing the appliance
Planning for installation
Mounting in a rack
The following rack-mounting instructions apply to all appliance models.
To mount the appliance in a standard 19-inch equipment rack
1
Connect the mounting brackets to the sides of the appliance using the
supplied bracket screws.
Note: Because rack hardware can differ from site to site, rack-mounting screws
are not shipped with the unit. Before installing your appliance, obtain the proper
size screws for mounting the appliance in your specific rack.
Connect the mounting brackets to the sides of the appliance towards the front or
the rear of the case.
2
Secure the mounting brackets to the equipment rack.
13
14 Installing the appliance
About model 5420
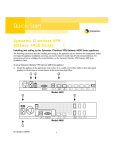
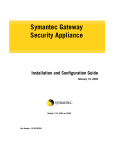
About model 5420
This section describes the back panel features of the Symantec Gateway Security
model 5420. Model 5420 offers six 10/100 FastEthernet ports.
Figure 2-1 shows the location back panel features for model 5420.
Figure 2-1
Model 5420 back panel
Table 2-1 lists and describes the back panel features for model 5420.
Table 2-1
Model 5420 back panel feature
Location
Feature
Description
1
Cooling fans
Maintains proper operating temperature. Ensure
that the ventilation holes in the front and back are
not blocked.
2
Power socket
Connection for AC power cord.
3
Power indicator
Shows if unit is turn on.
Master power
switch
Turns the appliance on or off.
Serial console port
(115200 bps)
Lets you connect a terminal emulator to act as a
system console and lets you log on to the system
console and access the appliance Linux operating
system locally.
(top)
3
(bottom)
4
You can connect by way of a serial cable but making
any changes at the operating system level is not
supported. Any changes made when using the serial
cable should only be done when instructed by
Technical Support.
Installing the appliance
About model 5420
Table 2-1
Model 5420 back panel feature (Continued)
Location
Feature
Description
5
USB ports
■
■
Provides a modem connection for dialing
pager phone numbers for delivering
notifications. Supports (but does not include)
USB modems that use standard AT command
set for notifications and comply with the USB
CDC ACM specification.
Lets you connect a UPS to the USB port for
smart UPS support. See “Connecting an
uninterruptible power supply (UPS)” on
page 21.
Note: Either USB port works for either task.
6 through 11
eth0 through eth5
Accepts a 10/100Base-T network cable, which
enables Ethernet network connection. eth0 is the
(protected) inside interface and eth1 is the
(unprotected) outside interface.
12
Power reset switch
Resets appliance.
Connecting model 5420 to the network
The Symantec Gateway Security 5400 Series model 5420 back panel provides a
total of six FastEthernet connections. Your network connection requirements
may differ depending on your site’s configuration. Use the location numbers
from Figure 2-1 to refer to the back panel features mentioned in each step.
To connect your network
1
Plug the RJ-45 connector from the local area network (LAN) into eth0 the
inside network connection (6). For initial setup, this must be a directly
connected LAN.
2
Plug the RJ-45 connector from the Internet into eth1the outside network
connection (7).
3
Plug the RJ-45 connector from any other service network (if present) into the
eth2 network connection (8).
4
Plug the RJ-45 connector from any other service network (if present) into the
eth3 network connection (9).
5
Plug the RJ-45 connector from any other service network (if present) into the
eth4 network connection (10).
15
16 Installing the appliance
About models 5440/41 and 5460/61
6
Plug the RJ-45 connector from any other service network (if present) into the
eth5 network connection (11).
Connecting power cord to model 5420
Use the location numbers from Figure 2-1 to refer to the back panel features
mentioned in each step.
To connect power to the appliance model 5420
1
Plug the power cord into the power socket on the rear panel (2).
2
Connect the power supply cord from the appliance to an electrical outlet or
UPS supply unit. See “Connecting an uninterruptible power supply (UPS)”
on page 21.
Turning on the power for model 5420
Turn on the power by pressing the master power switch (3) on the back of the
Symantec Gateway Security 5400 Series. See “Connecting model 5420 to the
network” on page 15. The appliance has powered up properly when the following
things happen:
■
The hard disk spins up, the fans turn on, and the LEDs and LCD screen on
the appliance light up.
■
A number of status messages are displayed on the LCD screen as the
appliance completes its start process.
About models 5440/41 and 5460/61
This section describes the back panel features of the Symantec Gateway Security
5400 Series for appliance models 5440/41 and 5460/61. The back panels of the
model 5440/41 and 5460/61 are different from the model 5420 due to the larger
size of the appliance and additional, faster Ethernet ports. Be aware that the first
two ports, which are left of the six ports that are group together, are labeled eth4
and eth5, except on the model 5461. Consult the label on the appliance for the
labeling of the ports. The two ports furthest to the right, eth6 and eth7, shown in
Figure 2-2, are only available on model 5460 and 5461.
Installing the appliance
About models 5440/41 and 5460/61
Model 5441 is almost identical to model 5440 except it offers four (MMF)
interfaces in place of the copper interfaces. See Table 2-2 for the distribution of
copper and fiber interfaces for each model.
Table 2-2
Model interface type and port location
Model
Copper interfaces
5420
eth0, eth1, eth2, eth3, eth4, eth5
5440
eth0, eth1, eth2, eth3, eth4, eth5
5441
eth4, eth5
5460
eth0, eth1, eth2, eth3, eth4, eth5,
eth6, eth7
5461
eth6, eth7
MMF interfaces
eth0, eth1, eth2, eth3
eth0, eth1, eth2, eth3, eth4, eth5
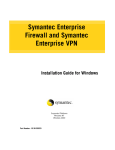
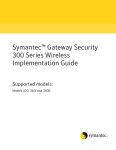
Model 5461 has different port numbering from model 5460. Refer to Figure 2-2
for a view of the 5461 port numbering. On 5461, eth4 and eth5 have swapped
positions with eth6 and eth7 on the 5460.
Figure 2-2
Model 5461 back panel.
17
18 Installing the appliance
About models 5440/41 and 5460/61
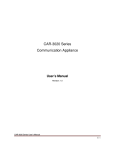
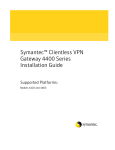
Refer to Figure 2-3 for a back panel view of the 5440/41 and 5460.
Figure 2-3
Models 5440/41 and 5460 back panel
Note: The two right-most ports (labeled #10) are only available on model 5460
and 5461.
Table 2-3 lists the features of the model 5440/41 and 5460/61 back panel.
Table 2-3
Models 5440/41 and 5460/61 back panel features
Location
Feature
Description
1
Master power switch Turns the appliance on or off.
(top)
1
Power socket
Connection for AC power cord.
2
Cooling fan
Maintains proper operating temperature. Ensure
that the ventilation holes in the front and back are
not blocked.
3
Power reset switch
Resets appliance.
(bottom)
Installing the appliance
About models 5440/41 and 5460/61
Table 2-3
Models 5440/41 and 5460/61 back panel features (Continued)
Location
Feature
Description
4
USB ports
■
■
Provides a modem connection for dialing
pager phone numbers for delivering
notifications. Supports (but does not
include) USB modems that use standard AT
command set for notifications and comply
with the USB CDC ACM specification.
Lets you connect a UPS to the USB port for
smart UPS support. See “Connecting an
uninterruptible power supply (UPS)” on
page 21.
Note: Either USB port works for either task.
5
Serial console port
(115200 bps)
Lets you connect a terminal emulator to act as a
system console and log on to the system console
and access the appliance Linux operating system
locally.
Note: You can connect by way of a serial cable
but making any changes at the operating system
level is not supported. Any changes made when
using the serial cable should only be done when
instructed by support.
6 through 10
eth0 through eth7
Accepts a 10/100/1000Base-T network cable,
which enable Ethernet network connection.
Refer to “Model interface type and port location”
on page 17 for MMF port locations for models
5441 and 5461.
Connecting models 5440/41 and 5460/61 to the network
The Symantec Gateway Security model 5440/41 offers six gigabit Ethernet
connections and model 5460/61 offers eight. You must configure the inside and
outside interfaces as eth0 and eth1 respectively.
To connect models 5440/41 and 5460/61 to the network
1
Plug the RJ-45 or MMF connector from the LAN into the inside interface
eth0 network connection (8 top).
2
Plug the RJ-45or MMF connector from the Internet into the outside interface
eth1 network connection (8 bottom).
19
20 Installing the appliance
About models 5440/41 and 5460/61
3
Plug the RJ-45 or MMF connector from any other service network (if
present) into the eth2 network connection (9 top).
4
Plug the RJ-45 or MMF connector from any other service network (if
present) into the eth3 network connection (9 bottom).
5
Plug the RJ-45 connector from any other service network (if present) into the
eth4 network connection (6).
6
Plug the RJ-45 connector from any other service network (if present) into the
eth5 network connection (7).
7
For model 5460 only, plug the RJ-45 or MMF connector from any other
service network (if present) into the eth6 network connection (10 top).
8
For model 5460 only, plug the RJ-45 or MMF connector from any other
service network (if present) into the eth7 network connection (10 bottom).
Connecting the power cord to models 5440/41 and 5460/61
The following procedure describes how to connect the power cord. Use the
location numbers from Figure 2-2 to refer to the back panel features mentioned
in each step.
To connect power to appliance models 5440/41 and 5460/61
1
Plug the power supply cord into the power socket on the rear panel (1
bottom).
2
Connect the power supply cord from the appliance to an electrical outlet or
UPS supply unit. See “Connecting an uninterruptible power supply (UPS)”
on page 21.
Turning on the power for the models 5440/41 and 5460/61
Turn on the power by pressing the master power switch (1 top) on the back of the
Symantec Gateway Security 5400 Series appliance models 5440/41 and 5460/61.
The appliance has powered up properly when the following things happen:
■
The hard disk spins up, the fans turn on, and the LEDs and LCD screen on
the appliance light up.
■
A number of status messages are displayed on the LCD screen as the
appliance completes its start process.
Installing the appliance
Connecting an uninterruptible power supply (UPS)
Connecting an uninterruptible power supply (UPS)
When you configure the Symantec Gateway Security 5400 Series appliance to use
a UPS, the appliance can be turned off in an orderly manner in the event of a
power failure. The appliance communicates directly to the UPS unit through a
USB port.
The recommended supplier for UPS units is American Power Conversion
(www.apcc.com). The UPS unit must support USB ports. Units that support only
serial ports do not work with Symantec Gateway Security 5400 series.
To configure Symantec Gateway Security 5400 Series for UPS support
1
Plug the UPS into the wall socket.
2
Turn on the UPS.
3
Plug the Symantec Gateway Security 5400 Series into the UPS power socket.
4
Connect the UPS USB cable to the UPS unit and the appliance.
Note: To configure UPS support on the Symantec Gateway Security 5400 Series,
access the System Menu. See “Using the system menu” on page 35. You can also
turn on UPS support from the Security Gateway Management Interface by way of
Systems > Advanced tab > Systems Parameters > Enable uninterruptible power
supply check box.
21
22 Installing the appliance
Connecting an uninterruptible power supply (UPS)
Chapter
Appliance setup and
initial system
configuration
This chapter includes the following topics:
■
Before you begin initial setup
■
Front panel layout
■
Example network diagram
■
Using the network setup worksheet
■
Performing the initial appliance network setup
■
Displaying system information
■
Using the system menu
■
About migrating/restoring your configuration to a new appliance
■
About the SGMI
■
Connecting to the appliance and running the System Setup Wizard
■
Configuring your Symantec Gateway Security appliance
■
Restoring the software
3
24 Appliance setup and initial system configuration
Before you begin initial setup
Before you begin initial setup
This chapter describes the initial set up and configuration of the Symantec
Gateway Security 5400 Series, which includes getting the appliance set up and
running. For information on advanced configuration options, see the Symantec
Gateway Security 5400 Series Administrator’s Guide.
There are two steps to take before beginning the initial setup process:
■
Develop a security plan.
See “Developing a pre-installation security plan” on page 51.
■
Complete the appliance installation process described in Chapter 2.
Developing a security plan is the most important piece of your installation
process. Appendix A provides a complete outline for developing your security
policy and a checklist for gathering the information you need to facilitate the
installation process.
During this process, gather the required IP addresses that will make your
installation process a success. Initially, you need the IP address and netmask of
the Symantec Gateway Security 5400 Series network interface through which the
Security Gateway Management Interface (SGMI) will be managed.
You can use the Symantec Gateway Security 5400 Series without a license file for a
30-day grace period. At any point during those 30 days, use the online license file
generator from the Symantec licensing and registration Web site at https://
licensing.symantec.com to obtain a license file. See “Using the Symantec License
Request & Maintenance Web site” on page 74.
Once you have developed your security plan and completed the preliminaries,
you are ready to set up your Symantec Gateway Security 5400 Series. The setup
takes approximately 15 minutes, if you have the IP address information in hand.
Appliance setup and initial system configuration
Front panel layout
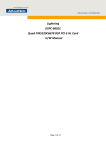
Front panel layout
The Symantec Gateway Security 5400 Series front panel, shown in Figure 3-1,
contains six data entry and navigation buttons, a two-line by 16 character liquid
crystal display (LCD) area, and status indicators. The front panel looks the same
on all models, except the 5420 has a narrower profile. The initial setup of the
Symantec Gateway Security 5400 Series takes place at the appliance’s front panel,
where you enter and modify parameters, such as system and network IP
addresses.
Figure 3-1
Symantec Gateway Security 5400 Series front panel
Table 3-1 describes the elements of the front panel and how they work.
Table 3-1
Front panel descriptions
Location
Feature
Description
1
LCD
Displays the Symantec Gateway Security 5400 Series software version number
and system monitoring information.
You can monitor appliance status, modify configuration parameters, and
reinitialize the appliance. The available LCD screen includes:
■
■
■
2
Front panel
controls
System startup self-tests
Performance monitoring
System menu
See “Using the system menu” on page 35.
Lets you enter network information directly into the appliance. See “Front panel
controls” on page 27.
25
26 Appliance setup and initial system configuration
Front panel layout
Table 3-1
Location
Feature
3
Status indicators:
Front panel descriptions (Continued)
Description
The outside network activity indicator blinks when there is traffic on the outside
network interface.
The inside network activity indicator blinks when there is traffic on the inside
network interface.
The power indicator glows steadily to indicate the power is on.
The disk activity indicator blinks when there is activity on the hard disk drive.
The temperature indicator blinks to indicate temperature status. It blinks slowly
for temperature warnings and quickly for temperature failures. If the appliance is
in danger of overheating, a log message is sent to the appliance log file.
Appliance setup and initial system configuration
Front panel layout
Front panel controls
The front panel controls are the same on all models. Use these instructions to
enter all required setup information into the Symantec Gateway Security 5400
Series. See “Performing the initial appliance network setup” on page 31.
The front panel controls perform dual functions. These functions depend upon
whether the Symantec Gateway Security 5400 Series is in initial setup mode or if
you are using the system menu. Refer to the descriptions below. The front panel
controls consist of four navigation buttons, a select (s) button, and an enter (e)
button. Figure 3-2 shows the front panel controls.
Figure 3-2
Front panel controls
Table 3-2 describes the function of the front panel controls. Use these controls to
input your information. The up, down, left, and right buttons do not physically
have arrows on the buttons. We use these symbols in text to describe how they
work.
Table 3-2
Buttons
Front panel controls and how they function
Function
Up (^) and down (v) buttons Increment and decrement the current number displayed
on the LCD or to move to the previous menu item (up
button) or to the next (down button) menu item.
27
28 Appliance setup and initial system configuration
Front panel layout
Table 3-2
Buttons
Front panel controls and how they function (Continued)
Function
Left (<) and right (>) buttons Move across the LCD panel or to move to the previous
menu item (left button) or to the next (right button)
menu item.
e (Enter)
Launches the System Menu when the appliance is in
monitoring mode. Accepts the current value displayed in
the LCD when entering information.
s (Select)
Cancels the current action.
Appliance setup and initial system configuration
Example network diagram
Example network diagram
Figure 3-3 provides a sample of a typical network. The Symantec Gateway
Security 5400 Series is managed by way of a client computer with a browser.
Supported browsers include Microsoft Internet Explorer version 6 or later or
Netscape version 7 or later. You browse to the specific appliance interface and
then type a user name and password to log onto the SGMI.
Figure 3-3
Browser
Example Symantec Gateway Security 5400 Series protected
network
29
30 Appliance setup and initial system configuration
Using the network setup worksheet
Using the network setup worksheet
During the Symantec Gateway Security 5400 Series setup process, you enter
network address information. Once you enter that information, the appliance’s
LCD screen displays one password that you need to initiate remote management.
This password is used for both the root and administrator password. Use the
worksheet to make note of this information.
Make a copy of this form and store the completed form in a secure location. This
form serves as a permanent record for each Symantec Gateway Security 5400
Series installed at your site.
Network setup worksheet
User input during initial setup
If you are configuring an inside interface, you need the following:
eth0 IP address_______________________________________
Netmask________________________________________________
If you are configuring an outside interface, you need the following:
eth1 IP address_______________________________________
Netmask________________________________________________
Gateway________________________________________________
Symantec Gateway Security 5400 Series output during initial
setup
Administrator password1_________________________________________
1 The password is output during the hardware setup process. This password is also used as the root
password. You can change each of these passwords independently from the SGMI. The root password is used to unlock the front panel controls.
Appliance setup and initial system configuration
Performing the initial appliance network setup
Changing passwords
There are three ways to change a password:
■
Use Security Gateway Management Interface > Console menu > Change
Password or Change Root Password.
■
Use Security Gateway Management Interface > Location Setting > Advanced
tab > Local Administrators > Properties.
■
Run the appliance setup and accept the new setup administrator and root
password by selecting [OK].
For details on changing passwords, see the Symantec Gateway Security 5400 Series
Administrator’s Guide.
Performing the initial appliance network setup
This section covers configuring either the inside or the outside interface of your
appliance. The interface you configure depends on which one you want the SGMI
to initially connect.
Configuring either the inside or outside interface
The following two procedures let you configure either the inside or the outside
interface of the appliance. You can only configure one of these interfaces here.
The default procedure is to configure the inside (management) interface.
See “Connecting to the appliance and running the System Setup Wizard” on
page 40. Whichever interface you select to configure is the only option that you
can configure from the front panel going forward.
Note: To turn off the appliance without beginning setup, press the down arrow
on the front panel until you see “SGS 2.0 Shutdown” on the LCD screen. Press
the e button to confirm shutdown. This ensures the appliance is shut down
properly. Do not turn off the appliance using the power switch. Turn it off by
using the front panel buttons or the SGMI.
When you turn on the appliance you see several messages:
SGS 2.0
Setup system...
To configure the inside interface of the appliance
1
To start the initial setup and to configure the inside interface for
management, on the front panel, press e.
31
32 Appliance setup and initial system configuration
Performing the initial appliance network setup
2
Under eth0 IP Address, enter the inside IP address.
Each octet of the IP address is a separate field in the display. Use the left and
right buttons to move between the fields of the IP address. The selected field
is surrounded by brackets ( [ ] ). Use the up and down buttons to change the
number in the field that is selected.
3
Once the desired IP address displays on the LCD, press e.
4
Under Netmask, enter the netmask address for the IP address you just
entered.
Each octet of the netmask address is a separate field in the display. Use the left
and right buttons to move between the fields of the IP address. The selected
field is surrounded by brackets ( [ ] ). Use the up and down buttons to
change the number in the field that is selected.
5
Press e.
6
Under Save Setup, use the left or right buttons to select one of the following:
[OK]
The configuration will be saved and the new password will display when
you press e.
This is the administrator and root password. A new password is
generated each time you save this setup from the front panel. Use this
password to log in to the SGMI and for the root password. You can also
change the passwords in the SGMI, if you are logged in as the
administrator.
Note: To use the SRL utility provided on the CD ROM, you must first
configure a shared secret in the SGMI. For more information about SRL,
see Symantec Gateway Security 5400 Series Administrator’s Guide.
[Cancel] The configuration is not saved, the system restarts, and all your
information is lost. The default selection is [Cancel]. If you select
[Cancel], you will exit setup when you press e.
7
Press e.
The password displays. Record it and store in a secure location. Passwords are
case-sensitive.
8
Press e.
The following message displays on the LCD:
Setting Password
Press any key to reboot system.
Appliance setup and initial system configuration
Performing the initial appliance network setup
9
Press any button on the front panel to reboot the appliance.
Rebooting takes a few minutes. The following messages display on the LCD
screen:
Rebooting System
Symantec Diagnostics...
Symantec Gateway Starting
Once the system is rebooted, the normal system items display on the LCD screen:
percent CPU usage, percent log, time, and throughput rate. You can now
configure the appliance using the SGMI.
To configure the outside interface of the appliance
1
To start the initial setup and to configure the outside interface for
management, on the front panel, press the down arrow button until you see
SGS 2.0, Setup eth1, and press e.
2
Under eth1 IP address, enter the outside IP address.
Each octet of the IP address is a separate field in the display. Use the left and
right buttons to move between the fields of the IP address. The selected field
is surrounded by brackets ( [ ] ). Use the up and down buttons to change the
number in the field that is selected.
3
Once the desired IP address is displayed on the LCD screen, press e.
4
Under Netmask, enter the netmask address for the IP address you just
entered.
Each octet of the netmask address is a separate field in the display. Use the left
and right buttons to move between the fields of the IP address. The selected
field is surrounded by brackets ( [ ] ). Use the up and down buttons to
change the number in the field that is selected.
5
Press e.
6
Under Gateway, enter the gateway (router) IP address.
Each octet of the netmask address is a separate field in the display. Use the left
and right buttons to move between the fields of the IP address. The selected
field is surrounded by brackets ( [ ] ). Use the up and down buttons to
change the number in the field that is selected.
7
Under Save Setup, use the left or right buttons to select one of the following:
[OK]
The configuration is saved and the new password is displayed.
[Cancel] The configuration is not be saved, the system restarts, and all your
information is lost. The default selection is [Cancel].
33
34 Appliance setup and initial system configuration
Displaying system information
If you selected [Cancel], you exit setup. If you selected [OK], the password
displays. Record it in a secure location. Passwords are case-sensitive.
This is the administrator and root password. A new password is generated
each time you save this setup from the front panel. Use this password to log
in to the SGMI and for the root password. You can also change the passwords
in the SGMI, if you are logged in as the administrator.
8
Press e.
The following message displays on the LCD:
Setting Password
Press any key to reboot system.
9
Press any button on the front panel to reboot the appliance.
Rebooting takes a few minutes. The following messages display on the LCD
screen:
Rebooting System
Symantec Diagnostics...
Symantec Gateway Starting
10 Once the system is rebooted, the normal system items display on the LCD
screen: percent CPU usage, percent log, time, and throughput rate.
You can now configure the appliance using the SGMI.
Displaying system information
Once you complete the initial network appliance setup, and restart the appliance,
the LCD screen enters a monitoring mode that it remains in during normal
system operations. When in monitoring mode, the appliance LCD displays
system information related to the health and status of the appliance. This system
updates approximately every second. You can determine the status of your
system with the LCD screen. Your LCD screen generally looks like this:
cpu
log
xx%
xx%
HH:MM:SS
xxxxMb/s
Each parameter is displayed in one of four individual fields.
field1
field2
field3
field4
Appliance setup and initial system configuration
Using the system menu
Table 3-3 describes the general system fields.
Table 3-3
General system fields description
Field
Description
field1
Shows the percentage of CPU usage.
field2
Displays time of day in HH:MM:SS format (hour:hour, minute:minute,
second:second).
field3
Shows the percentage used of the root file system.
field4
Shows the throughput rate for the security gateway. (Mbps).
Note: When the security gateway is stopped (the gwcontrol daemon is not
running), this field alternates between the throughput rate and the LCD
indicator “(stopped).”
Using the system menu
When your appliance is running, you can access the system menu on the
appliance by pressing any button on the front panel. You can then select the
system menu by pressing the e button. By using the arrow buttons, you can view
the various system menu options. Press the e button to select a menu item. For
descriptions of the buttons on the appliance front panel and the functions they
perform see “Front panel controls” on page 27.
Table 3-4 describes the System Menu options.
Table 3-4
System Menu options
System Menu option
Description
1. Network Setup
The system prompts you to re-enter or change network settings
configured during the initial setup process. To continue to the
next system menu entry, press either the down button or the
right button.
2. Reboot
The system prompts you to select [OK] or [Cancel]. [Cancel] is
selected by default. To reboot, use a button to move the cursor
to [OK] and press e.
3. Shutdown
The system prompts you to confirm system shutdown. Select
[OK] or [Cancel]. Press e again to enter your selection.
35
36 Appliance setup and initial system configuration
About migrating/restoring your configuration to a new appliance
Table 3-4
System Menu options (Continued)
System Menu option
Description
4. Host ID
Displays the system’s Host ID.
Press e to return to the system menu once the Host ID is
displayed on the LCD screen. Press either the down button or
the right button to move to the next menu item.
5. Factory reset
If you select this menu item, you are prompted to confirm with
[OK] or [Cancel].
Note: If you select [OK], the appliance returns to its default
state and loses any software patches that have been applied.
This is the state it was in when you first received the appliance.
All network information and configuration data you have
entered is lost. Only licensing information, if you entered any, is
retained.
6. LCD Lock
If you enabled the front panel controls in system properties,
selecting this item locks the front panel controls. To unlock the
LCD lock, press any button on the front panel and enter the
root password for the appliance.
Note: You can lock the front panel buttons from the SGMI.
This disables the use of the buttons until you enter the proper
password using the buttons. See “Unlocking the front LCD
panel controls” on page 47.
About migrating/restoring your configuration to a new
appliance
Migrating your existing configuration to a new appliance is a special restore
procedure. The restore code detects the backup file format and processes the files
accordingly. This special restore begins the first time you run the System Setup
Wizard. For directions on how to restore a system to a previous configuration at
any point after an initial setup, see the Symantec Gateway Security Administrator’s
Guide.
Appliance setup and initial system configuration
About migrating/restoring your configuration to a new appliance
You can migrate a previous configuration if you are migrating over from a
supported release. Table 3-5 shows a list of supported releases.
Table 3-5
Supported releases
Product
Software version
VelociRaptor
1.5
Symantec Gateway Security
1.0
Migration limitations
Certain functionality has limitations when migrating from a previous release.
These include the following topics:
Licensing
Product licenses from the previous product versions cannot be
upgraded or restored. You must obtain new license files to
activate the new appliance.
Network interfaces
The new appliance must have an equal or greater number of
interfaces as the backup image. The migration cannot continue if
the number of interfaces does not meet this requirement.
Clusters
The cluster configuration cannot be migrated to a new appliance
due to the many differences between the releases. Rainwall
configurations are not backed up.
DES to 3DES/AES
Current DES installations will not be upgraded to 3DES/AES. We
cannot change DES tunnels to 3DES tunnels because we have no
control over the remote endpoint of the tunnel. The remote
gateways or Client VPN users may be upgraded to 3DES at a later
point in time.
SwIPe tunnels
Migration deletes any SwIPe tunnels and VPN policies it finds.
Gopher daemon
Gopher-related configurations are not upgraded.
Crypto-card extended The Crypto-card authentication method is removed by the
authentication
upgrade.
Finjan
Finjan related configurations are not upgraded.
37
38 Appliance setup and initial system configuration
About migrating/restoring your configuration to a new appliance
Migrating to a new appliance
Once you have backed up your old configuration on one of the supported
appliances in Table 3-5, you are ready to migrate that configuration to a new
appliance. Back up your configuration before migration using saveconfig or the
SRMC facility for backing up.
Ensure that you set the password and keep a copy of the configuration on a
remote machine. See the Symantec Gateway Security 5400 Series Administrator’s
Guide from your previous release for complete information regarding backing up
your configuration.
Note: You can only accomplish the following procedure the first time you run
the System Setup Wizard. The Restore from backup image check box does not
display after the first use.
This procedure is similar to the running the System Setup Wizard for the first
time.
After initial setup and reboot, you are ready to configure your appliance. For
optimal screen resolution, set your display settings to a minimum of 1024 x 768.
You must have Java Runtime Environment (JRE) v1.3.1_04 installed on your
client computer before connecting to your appliance. If you do not have this
installed, the System Setup Wizard detects this and the Security Warning screen
appears and installs the Java plug-in on your management system. You cannot
continue without the Java plug-in.
When you connect to the SGMI for the first time, the System Setup Wizard starts
automatically. It prompts you for required Symantec Gateway Security 5400
Series configuration setup information. You must complete this wizard before
you can begin managing your appliance.
Before you begin the wizard, you need the following information:
■
User name (admin) and password you received when you set up the
appliance.
■
List of all the required IP addresses.
Fill out the worksheets in Appendix A to gather your information.
■
If you plan to create clusters, you need your heartbeat network interface
addresses.
The heartbeat network is the cluster management network. It's used as a
private network for cluster configuration information and state. Members of
Appliance setup and initial system configuration
About migrating/restoring your configuration to a new appliance
a cluster communicate using the heartbeat network to provide statistical
information which allows load balancing and availability.
To migrate to a new appliance
1
Browse to the Symantec Gateway Security appliance you want to configure.
The path is:
https://<IP address of the Symantec Gateway Security appliance>:2456/
2
In the Security Alert dialog box, do one of the following:
3
4
■
To accept the certificate, click Yes.
Accepting a certificate when accessing your appliance by way of an
inside (trusted) network does not present any danger. You can trust it.
You should notate the certificate thumbprint and use it to verify the
certificate thumbprint when you access your appliance through an
outside connection.
■
To view the certificate, click View Certificate.
■
To reject the certificate and exit the wizard, click No.
In the Log on dialog box, do the following:
■
In the user name box, type admin.
■
In the password box, type the password you received and wrote down
during the appliance setup.
In the License and Warranty Agreement, read the agreement and then do one
of the following:
■
To accept the license and warranty agreement and to proceed with the
System Setup Wizard, click Accept.
The System Setup Wizard starts automatically.
■
To decline the agreement and return to the log on screen, click Do Not
Accept.
The System Setup Wizard does not run.
5
On the Welcome to the System Setup Wizard dialog box, check Restore from
a backup image.
6
On the Restore Configuration dialog box, browse to the location where you
have stored the backed up configuration.
Once you select a backup file and the conversion has started, the Back button
in the wizard is grayed out. If you want to start over, you need to cancel the
System Setup Wizard.
7
Press Restore.
39
40 Appliance setup and initial system configuration
About the SGMI
From this point forward the System Setup Wizard proceeds as stated in
See “Connecting to the appliance and running the System Setup Wizard” on
page 40.
Caution: On the Network Interfaces dialog box, ensure the mapped interfaces are
correct, so you can log on to your appliance with the SGMI after the reboot.
About the SGMI
You access the Symantec Gateway Management Interface (SGMI) by browsing to
the IP address of your appliance from a client computer. You can manage all
functions, including secure tunnels and hardware system management, such as
reboots or shutdowns. The same interface is available on all appliances. You can
manage many appliances, one-by-one using the SGMI. For a detailed description
of the SGMI, see the Symantec Gateway Security Administrator’s Guide.
Connecting to the appliance and running the System
Setup Wizard
After initial setup and reboot, you are ready to configure your appliance. For
optimal screen resolution, set your display settings to a minimum of 1024 x 768.
You must have Java Runtime Environment (JRE) v1.3.1_04 installed on your
client computer before connecting to your appliance. If you do not have this
installed, the System Setup Wizard detects this and the Security Warning screen
appears and installs the Java plug-in on your management system. You cannot
continue without the Java plug-in.
When you connect to the SGMI for the first time, the System Setup Wizard starts
automatically. It prompts you for required Symantec Gateway Security 5400
Series configuration setup information. You must complete this wizard before
you can begin managing your appliance.
Before you begin the wizard, you need the following information:
■
User name (admin) and password you received when you set up the
appliance.
■
List of all the required IP addresses.
Fill out the worksheets in Appendix A to gather your information.
Appliance setup and initial system configuration
Connecting to the appliance and running the System Setup Wizard
■
If you plan to create clusters, you need your heartbeat network interface
addresses.
The heartbeat network is the cluster management network. It's used as a
private network for cluster configuration information and state. Members of
a cluster communicate using the heartbeat network to provide statistical
information which allows load balancing and availability.
■
If you have your license files, you can upload them using the System Setup
Wizard or you can use the 30-day evaluation (optional). See “Using the
Symantec License Request & Maintenance Web site” on page 74.
Caution: This wizard must run through to completion to manage the appliance.
If you cancel out of this wizard without completing it, you have to run it again.
Once you have completed the System Setup Wizard, you can run it again from
the Action Menu to edit system information at anytime.
If you want to modify settings you set in the System Setup Wizard, rerun the
System Setup Wizard from the Action menu.
To connect to the Symantec Gateway Security 5400 Series
1
Browse to the IP address of the appliance you want to configure. The path is:
https://<IP address of the Symantec Gateway Security 5400 Series>:2456/
2
In the Security Alert dialog box, do one of the following:
3
■
To accept the certificate, click Yes.
Accepting a certificate when accessing your appliance by way of an
inside (trusted) network does not present any danger. You can trust it.
You should notate the certificate thumbprint and use it to verify the
certificate thumbprint when you access your appliance through an
outside connection.
■
To view the certificate, click View Certificate.
■
To reject the certificate and exit the wizard, click No.
In the Log on dialog box, do the following:
■
In the user name box, type admin.
■
In the password box, type the password you received and wrote down
during the appliance setup.
41
42 Appliance setup and initial system configuration
Connecting to the appliance and running the System Setup Wizard
4
In the License and Warranty Agreement dialog box, read the agreement and
then do one of the following:
■
To accept the license and warranty agreement and to proceed with the
System Setup Wizard, click Accept.
■
To decline the agreement and return to the log on screen, click Do Not
Accept.
5
On the Welcome to Symantec Gateway Security System dialog box, click
Next.
6
On the System Information dialog box, do the following:
■
In the Host name text box, type the host name.
■
In the Domain name text box, type the domain name of the appliance.
■
In the Default gateway (router) text box, type the default gateway IP
address.
7
Click Next.
8
To edit the system’s date and time, in the Hardware Settings dialog box, you
must select the time zone before setting the date and time. Next to Time
zone, from the drop-down list select the time zone, and then click the icon to
the right of Date and Time.
Appliance setup and initial system configuration
Connecting to the appliance and running the System Setup Wizard
9
On the Calendar dialog box, do the following:
■
Under Date, select the current month, day, and year.
■
Under Time, use the drop-down list to select current time.
Note: You must set the date and time. Failing to set the date and time could
impact your product license and other product features.
10 Click OK.
11 To lock the front panel control buttons, click Lock LCD Panel.
You can unlock the LCD panel and associated navigation buttons with your
root password, but it relocks again after 60 seconds of inactivity. For
instructions on how to permanently unlock the LCD panel, see “Unlocking
the front LCD panel controls” on page 47.
12 Click Next.
13 In the Install License Files dialog box, do one of the following:
■
To use the 30-day evaluation and upload your license files later, click
Next, and then skip to step 18.
■
To upload your license files now, click License Installation Wizard, and
then click Next.
You must have your license files to select this option. Clicking Next
initiates the License Installation Wizard.
14 On the Welcome to the License Installation Wizard dialog box, click Next.
15 On the Upload License Files dialog box, click Upload File.
43
44 Appliance setup and initial system configuration
Connecting to the appliance and running the System Setup Wizard
16 On the Upload License File dialog box, browse to where you have saved your
license files, and then do the following:
■
Select a license file, then click Upload File.
■
Repeat this process for all license files.
■
Click Close Window.
17 Click Next.
18 On the System Features dialog box, verify that each of the features you want
is enabled.
If there are features that you expected to have enabled that are not, click Back
to ensure that you have properly loaded your license files. You must load a
license file for each of the features you want enabled.
19 Uncheck any features you do not want to use.
Note: If you do not want to configure a heartbeat interface now, uncheck the
check box next to High Availability/Load Balancing. If you do not uncheck
this check box, you are prompted to select the heartbeat interface.
Appliance setup and initial system configuration
Connecting to the appliance and running the System Setup Wizard
You can run the System Setup Wizard at a later time to enable any feature, or
from the SGMI, select System > Features tab to turn features on or off. If you
run the System Setup Wizard, the appliance is rebooted.
20 Click Next.
21 On the Network Interfaces dialog box, select the interfaces that you want to
configure and make any necessary edits.
Name
Type the logical network interface name.
NIC
The physical NIC location is grayed out. You cannot edit this text
box.
IP address
Edit the IP address.
DHCP check box To enable DHCP on the outside interface, check DHCP.
You cannot use DHCP for anything other than eth1.
If HA/LB is enabled, this is not selectable.
If you enable DHCP on the outside interface, there must be a
DHCP server running on the outside network for DHCP to work.
When you enable DHCP, the IP address of eth1 changes to 0.0.0.0.
45
46 Appliance setup and initial system configuration
Connecting to the appliance and running the System Setup Wizard
Netmask
Edit the netmask address.
Interface type
Inside (eth0) and outside (eth1) are grayed out. You cannot edit
this text box for eth0 or eth1. You can designate additional
interfaces as inside or outside as needed.
Heartbeat
interface
If HA/LB is enabled, you must define this. You should have a
dedicated private network for heartbeat communications.
Description
Displays the MAC address. This is an editable field.
Enable external
ping check box
If you want external administrators to issue a ping command on
your security gateway, check Enable external ping.
Note: By default, ping on the external interface is disabled as a
security measure. The security gateway does not respond to PING
commands issued to the outside interface. If you want to enable
the PING command on the external interface, this can be done in
the System Setup Wizard. You can enable or disable the PING
command after the initial configuration on the ping proxy
properties window.
22 Click Next.
23 To configure mail, Web, and FTP services, in the Security Gateway
Configuration dialog box, select the following:
■
SMTP Mail services
■
HTTP & FTP services
Note: This option only displays the first time you run the System Setup
Wizard. If you choose not to configure these options now, you can
configured them later with the Policy Wizard or manually by way of the
SGMI Policy > Rules tab.
If you do not select SMTP and Mail services now and then click Next, you
skip to step 26.
If you choose not to configure both of these options now, then click Next,
you skip to step 26.
24 Click Next.
25 In the Mail Server dialog box, in the Enter IP or Host name text box, type the
IP address or DNS-resolvable host name.
26 Click Next.
27 In the Confirmation dialog box, review the summary of your configuration.
Appliance setup and initial system configuration
Configuring your Symantec Gateway Security appliance
28 Click Finish.
When you complete the System Setup Wizard, the appliance reboots
Once you have completed the System Setup Wizard the first time, you can access
it again from the Action menu and edit any system information.
Configuring your Symantec Gateway Security
appliance
After you have successfully completed the System Setup Wizard, the system
reboots. When complete, if you created rules for SMTP, HTTP, and FTP, this
traffic is now being passed through the security gateway. If you chose not to
configure the SMTP, HTTP, and FTP traffic options, you can either use the Policy
Wizard or configure it manually from the SGMI Policy > Rules tab. For more
detailed instructions about how to configure these policies see the Symantec
Gateway Security 5400 Administrator’s Guide.
Third-party HA/LB product installation and issue resolution
There are third-party clustering solutions that work with Symantec products, but
this documentation only discusses the Symantec product solution integrated
within this release. Symantec cannot provide support for any third-party
clustering product issues. Support issues for third party products should be
addressed directly with the third party vendor.
Locking front LCD panel controls
Locking the appliance front LCD panel controls provides additional security
against personnel who should not have access privileges. You can lock the front
panel controls with the System Setup Wizard. See “Connecting to the appliance
and running the System Setup Wizard” on page 40.
Unlocking the front LCD panel controls
You can unlock the LCD panel and associated navigation buttons with your root
password, but it relocks again after 60 seconds of inactivity. To unlock the front
LCD panel controls for a longer period of time, you must rerun the System Setup
Wizard to uncheck the box you checked to lock the front panel. Running the
System Setup Wizard requires you to reboot your appliance. See “Connecting to
the appliance and running the System Setup Wizard” on page 40.
47
48 Appliance setup and initial system configuration
Restoring the software
Restoring the software
The Symantec Gateway Security 5400 Series CD-ROM ships with the appliance
and contains a Symantec Gateway Security 5400 Series restore program. In the
unlikely event that a complete reinstallation of the software image on the
appliance is required, you can boot this CD-ROM in a computer connected to the
appliance.
Caution: Before you use this procedure, contact Customer Support as this
operation results in the complete overwriting of your existing appliance
configuration. All configuration data is lost. For information on preserving your
configuration settings, see the Administrator Guide for backup and restore
procedures.
The requirements for the computer running the operating system restore
program are as follows:
■
An industry-standard computer with a BIOS that lets you start from a IDE
CD-ROM.
■
An installed 10/100 or 10/100/1000 MB network interface card.
When you receive your restore CD, place it in the computer that you would
use in the event you needed to restore your software. Once the CD boots, it
will tell you whether or not it found the appropriate hardware to continue
the process. If it cannot use your network card, please locate another
computer with a different network interface type.
■
Either a crossover cable (supplied) to connect the appliance directly to the
eth0 network interface on the computer or a connection to a switch or hub to
which the appliance is attached.
During the restore process, the appliance will automatically reboot and perform
other installation tasks. You must allow this process to complete without
interruption for a successful restore of the appliance software to its original
factory condition. This process may take 15 minutes.
To restore the appliance operating system
1
Press any button on the front panel of the appliance until the System Menu
displays on the LCD screen.
2
Press the down button until the Shutdown option appears.
3
Press e.
4
When prompted, turn off the power using the power switch.
Appliance setup and initial system configuration
Restoring the software
5
Ensure that the PC that you use to restore the system is set to boot from the
CD-ROM drive.
6
Insert the appliance IDE CD-ROM into the CD-ROM drive.
7
When the program runs, you are prompted to accept the Symantec Software
License Agreement and directions for the procedure also displays.
8
While pressing and holding down s on the front panel controls, turn on the
power to appliance using the power switch.
9
Continue holding down s until “Network Boot?” appears in the LCD display.
10 Release and press s to begin network booting the Symantec Gateway Security
5400 Series from the Symantec Gateway Security 5400 Series CD-ROM. The
LCD display shows the “Network Boot? Loading …” message.
Other messages you may see consist of the following:
Building System
Copying files
Rebooting system
Symantec v. 103 Diagnostics
Installing software
This step may take 15 minutes, and includes the appliance rebooting itself.
11 Wait until “Please wait for poweroff ” appears on the LCD display. The
restore process is now complete.
If your appliance does not turn off after 30 seconds, then turn the unit off
manually.
12 Remove the CD-ROM and restart your computer to return it to normal
service.
13 Turn on the appliance and perform the initial setup process again. For more
information see “Performing the initial appliance network setup” on
page 31.
49
50 Appliance setup and initial system configuration
Restoring the software
Appendix
Developing a preinstallation security plan
This chapter includes the following topics:
■
About developing a security plan
■
Defining your security policy
■
Educating users
■
Filling out worksheets
A
52 Developing a pre-installation security plan
About developing a security plan
About developing a security plan
Developing a security plan is your first step in your installation process and helps
you collect the information needed to install and configure your Symantec
Security Gateway appliance.
The process of developing a security plan consists of three basic steps:
■
Defining your security policy
■
Educating your users
■
Filling out worksheets
Defining your security policy
Before configuring your security gateway, you must understand exactly what
network resources and services you want to protect. It is crucial to have a
carefully designed network security policy to guard the valuable resources and
information of your organization.
Ideally, your security policy should be captured in a document that describes
your organization’s network security needs and concerns. Creating this
document is the first step in building an effective overall network security system
and should be done prior to installation.
Your security plan details the implementation of your security policy. Based on
the security concerns and trade-offs of your overall policy, your security plan
should contain a set of tasks. One of these tasks consists of establishing
procedures and rules for access to resources located on your network. These
resources include:
■
Host computers and servers
■
Workstations
■
Connection devices (gateways, routers, bridges, and repeaters)
■
Terminal servers and remote access servers
■
Networking and applications software
■
Information in files and databases
Developing a pre-installation security plan
Defining your security policy
The firewall component from your Symantec Gateway Security 5400 Series is the
main tool for enforcing access rules, allowing you to define a set of “authorization
rules” that allows or denies access to specific resources throughout your network.
Before writing your security plan
Before you begin writing rules to implement your plan using the Symantec
Gateway Security Administrator’s Guide, you need to answer the following
questions:
■
How many points of entry exist on your network?
■
A security gateway defends a single point of entry. Every point of entry
should be protected by a security gateway.
■
A Virtual Private Network (VPN) server also defends a single point of
entry. You must decide what access the VPN server is going to provide
for resources that exist behind the firewall.
■
What types of services, such as Web, FTP, and so on, do you want to allow for
internal users?
■
To what hosts, subnets, and users do you want to allow these services?
■
What external users will have access to your network? Where will they come
from and where do you want to allow them to go? During what hours? For
what period of time?
■
Do you intend to implement a service network?
■
Do you intend to implement De-militarized zone (DMZ)?
■
What types of services do you want to allow for external users and hosts?
■
What type of authentication will you require for external users? (Strong
authentication is recommended for any access from public networks.)
■
If you are implementing VPN tunnels between any internal and external
hosts, what types of traffic will be allowed over these tunnels?
■
Will you place your Web server inside or outside of your protected network?
Becoming security-conscious
Developing and implementing a security plan for the security gateway you are
installing should be only one part of your overall security policy. The security
gateway offers the best protection against uninvited entry into your network.
However, the Symantec Gateway Security 5400 Series cannot guard against entry
53
54 Developing a pre-installation security plan
Educating users
by people who obtain valid authentication credentials, any more than a
sophisticated lock can stop a thief in possession of the right key.
Formulate goals
Take the time to formulate the specific goals of your security plan. Identify the
resources you are protecting and all possible threats. Protecting your resources
from unauthorized external users maybe only one of your goals. You may also
need to limit internal access to certain systems to specific users and groups,
within specific time periods. You will need to define these users and groups for
the firewall and how to configure special services to be passed through these
systems. The Symantec Gateway Security Administrator’s Guide explains how to
define users and user groups.
Review issues
You should review your organization’s specific issues in detail before you begin
configuring the server. Your network’s security depends on planning sound
policies, implementing them carefully, and confirming that they work as
intended.
Educating users
Your overall site policy involves a numbers of tasks. Of these, user education is
paramount. Publish your company’s security policy. Make sure your users are
informed of the determination of would-be invaders and the sophistication of
available password guessing programs. Make sure they understand how common
security breaches are and how costly they can be. These facts alone dictate that
users should be encouraged to select passwords that are difficult to crack and to
change passwords regularly.
Involving the user community
When developing the details of your security plan, you should solicit the input of
group managers or leaders on what services they require, for what users, and so
on. Explain to users the need for network security to protect private information,
intellectual property, and your business plans.
Notifying affected users
Before implementing policies, notify the user community of your proposed
policies. Doing so in advance can prevent unnecessary frustration on the part of
your users.
Developing a pre-installation security plan
Filling out worksheets
For instance, if you plan to limit Web services to a single server during specific
hours, let this be known to the affected groups and users. If you plan to pass all
email through a dedicated server, or if external users will be disallowed from
accessing certain systems by Telnet, consider passing these changes along before
implementation. Consulting users prior to implementation may save you the
time needed to fine-tune those policies later.
Taking a pro-active stance
Again, keep in mind that configuring a set of authorization rules on the security
gateway is just one piece of your overall security plan. To be effective, this plan
should also include:
■
Physical security of key systems (especially the security gateway)
■
Security risk training for users
■
Guidelines on passwords
■
Proprietary information policies
■
Network planning
Filling out worksheets
To aid you in the planning process, we have provided a set of policy planning
worksheets. Use these worksheets to help implement the specific tasks of your
security plan and to assist you during the installation process.
Defining your organization
Begin by defining your organization. Here is where you explore your existing
security policy, if any; notate who will be assigned as administrators; types of
authentication; and how your administrators will be contacted.
To define your existing organization
1
Does your organization have a security policy?
_____
Yes
_____
No
If you checked No, refer to the first part of this chapter for information
relating to the development of a security policy.
2
Number of users behind your security gateway:
_____
55
56 Developing a pre-installation security plan
Filling out worksheets
3
Do you plan to establish special groups or users with different levels of access
or control that other groups and users will not have?
_____
4
_____
No
Do you plan to establish subnets, users by subnet, or users by authentication?
_____
5
Yes
Yes
_____
No
What are your network access points?
______________________________________________________________________
______________________________________________________________________
6
Name of the primary administrator:
____________________________________
7
Use Table A-1 to list all persons involved in administering the system.
Table A-1
Administrator names
Name
8
Phone
Pager
Are organization computer resources accessible by remote dial-in?
_____
9
Email
Yes
_____
No
Are organization computer resources accessible by an internal network?
_____
Yes
_____
No
Developing a pre-installation security plan
Filling out worksheets
57
10 What communications servers are used? (such as SMTP, Microsoft
Exchange)
______________________________________________________________________
______________________________________________________________________
11 What form of authentication will be used for remote access to company
resources?
_____ User name/password
_____ LDAP
_____ Defender
_____ RADIUS
_____ Entrust
_____ S/Key
_____ TACACs+
_____ SecurID
_____ Windows based
_____ Other
12 What mechanism will be used for suspicious activity alerts?
_____ Audio notification
_____
email
_____ Pager
_____
Client program
_____ SNMP V1
_____
SNMP V2
13 Do you have other security gateways on your network now?
_____
Yes
14 If Yes, what brand?
_____
No
________________________________
15 Do you have third-party firewalls on your network now?
_____
Yes
16 If Yes, which one and version?
_____
No
________________________________
17 Have you created a network diagram? If so, please print and attach.
_____
Yes
_____
No
58 Developing a pre-installation security plan
Filling out worksheets
Site hardware information
Before you begin the installation process, you must collect some basic hardware
information.
To collect hardware information for your site
1
Record the Host ID of the Symantec Gateway Security 5400 Series.
____________________________________
2
Record the Symantec System ID for the appliance. This is used for licensing.
See “Using the Symantec License Request & Maintenance Web site” on
page 74. The System ID is a decorated Host ID.
____________________________________
Before installation, ensure the host network connections are configured and
tested properly. Verify that you can ping the network interfaces of the server
from clients on the same network.
3
Record the number of host computers of each type that compose your
network.
_____ UNIX
_____
Windows
_____ Other (type) ______
4
What kind of Internet access do you have? What speed?
______________________________________________________________________
5
Record the name of your Internet Service Provider (ISP).
______________________________
Developing a pre-installation security plan
Filling out worksheets
6
Does your site have, or plan to have, more than one Internet access point?
_____
7
Yes
_____
No
Are there any other Internet connections besides the security gateway (such
as modems connected to workstations)? If yes, list.
_____
Yes
_____
No
______________________________________________________________________
______________________________________________________________________
8
Will you be using Symantec Client VPN?
_____
Yes
_____
No
TCP/IP address
It is important to think about the TCP/IP requirements for your site. This
includes information about running Domain Name Services (DNS), types and
names of domains on your network, and making a list of protocols used that need
to pass through your security gateway.
To collect TCP/IP address information
1
Do you currently run Domain Name Services (DNS) on your network?
_____
2
Yes
_____
No
What type of domain structure is in use at your site?
_____ Single domain
_____
Multiple domains
_____ Subdomains
3
What type of name service do you provide?
_____ Primary name services
_____ Internal/private
_____
Secondary name services
59
60 Developing a pre-installation security plan
Filling out worksheets
4
Do you have an internal name server?
_____
5
_____
No
Do you have someone at your site who is knowledgeable about, and
comfortable working with, DNS and how to configure it properly?
_____
6
Yes
Yes
_____
No
If yes, who?
______________________________________________________________________
7
Check the address types being used at your site:
_____ Registered IP address
_____
Private IP address (RFC 1918)
_____ Unregistered IP address
Your connection to the Internet must have at least one public network
address. You should use private, RFC 1918-compliant addresses internally or
publicly registered IP addresses.
8
List the address ranges you currently use in your network:
____________________________________________________________
____________________________________________________________
9
List the protocols you use in your network:
____________________________________________________________
____________________________________________________________
10 Will you be using network news services (NNTP)?
_____
Yes
_____
No
Developing a pre-installation security plan
Filling out worksheets
11 If yes, and you have your own internal NNTP server, record its IP address
and the address of the server that will be supplying you with news feeds.
_____ Internal server: _____________________
_____ External news server: ________________
Note: Only IP can be directly handled by the security gateway. Other protocols
such as IPX cannot be serviced or passed through the security gateway.
Allowed TCP/IP services
Use the following tables to define all the allowed TCP/IP services in your
network.
To define allowed TCP/IP services
1
Use Table A-2 and check the access type (if any) you will allow for the
following services:
Table A-2
Access
group
Telnet SMTP
Allowed TCP/IP access type
HTTPS CIFS
HTTP
NNTP
RealAudio
RTSP
Ping
Other
All users
All internal
users
Selected
group
No access
2
Use Table A-3 to list your TCP/IP services:
Table A-3
TCP/IP services
Group
FTP
Authentication
Access times
61
62 Developing a pre-installation security plan
Filling out worksheets
Table A-3
TCP/IP services (Continued)
Group
Authentication
Access times
Telnet
HTTP
Other
Note: Over time, you will likely refine these permissions. You should make
periodic updates to this list.
3
Do you need transparent inbound access from the Internet (VPN)?
_____
Yes
_____
No
Email notifications
You need to know information about email notifications. Use this section to
collect data such as type of mail server, mail server IP address, mail transport
protocol.
Developing a pre-installation security plan
Filling out worksheets
To collect email information for security gateway notifications
1
Record the name and IP address of your mail server.
Name: __________________________________
Address:____________________________
2
Select the transport protocol being used for email:
_____ Third-party provided
_____
POP3 mail
_____ SMTP mail
3
Does your Internet Service Provider provide a Mail Relay host?
_____ Yes
4
No
_____
If so, list its name and IP address.
_____ Mail relay host: ________________
_____ Address: ______________________
5
List any mail programs you use internal to your network (for example,
CCmail):
___________________________________________________________________
Web service information
Use the following section to define information about your Web services.
To define your Web services
1
Will you be using a Web server?
_____
Yes
_____
No
63
64 Developing a pre-installation security plan
Filling out worksheets
2
If yes, select the location of the Web server:
_____ Internal to the security gateway
_____ External to the security gateway
3
Record the Web server name and IP address:
Name:_________________
4
Address:____________________
Will you be using an external caching/proxy server? If yes, record the server
name and IP address.
_____
Yes
_____
No
Proxy server name:_____________ Address:______________
5
Do you plan to use the WebNOT service for security gateway?
_____
6
_____
No
Do you plan to restrict access to any specific URLs?
_____
7
Yes
Yes
_____
No
If yes, list the URLs to be restricted:
____________________________________________________________________
____________________________________________________________________
8
Use Table A-4 to list the names of any special services you wish to pass
through the security gateway.
Table A-4
Service name
Special services names
Service port #
Service type
(UDP/TCP)
Server name
Developing a pre-installation security plan
Filling out worksheets
Table A-4
Service name
Special services names (Continued)
Service port #
Service type
(UDP/TCP)
Server name
Access lists
List those entities and users to which you plan to write rules to allow access
through the security gateway.
Use Table A-5 to list all entity identifications allowed.
Table A-5
Entity identification
IP address/DNS name
Entity type
Internal/external
Use Table A-6 to list all user identities allowed.
Table A-6
User name
User identification
Account name
Group name
65
66 Developing a pre-installation security plan
Filling out worksheets
Table A-6
User identification (Continued)
User name
Account name
Group name
Defining your network architecture
In the following section, list all of the entities that comprise your network. Show
all routers and computers systems that will be directly affected by, or connected
to, the security gateway and its directly connected networks. Label each network
component with its IP address and network mask.
Use Table A-7 to create a list of all internal servers. Your internal network consists
of at least the security gateway host and a router.
Table A-7
Internal network servers
DNS name services
Mail server
Web server
Other server
Service
Host name
IP address
Subnet mask
Use Table A-8 to list your security gateway host system addresses.
Table A-8
Series host
Security gateway host internal and external IP addresses
Internal/external IP addresses
Developing a pre-installation security plan
Filling out worksheets
Table A-8
Security gateway host internal and external IP addresses
Series host
Internal/external IP addresses
Use Table A-9 to list your router IP addresses.
Table A-9
Router IP addresses
Router
IP addresses
Your external network can also include external servers, such as an external Web
server. Use Table A-10 to list all external network servers.
Table A-10
External network servers
DNS name services
Service
Host name
IP address
Subnet mask
Mail server
Web server
Other server
67
68 Developing a pre-installation security plan
Filling out worksheets
Appendix
B
Licensing
This chapter includes the following topics:
■
About license files and licensing
■
Getting started with your 30-day grace period
■
Using the Symantec License Request & Maintenance Web site
■
Explanation of Symantec Gateway Security licensing and maintenance
■
About the Symantec Gateway Security 5400 Series licenses
■
SYMANTEC GATEWAY SECURITY APPLIANCE LICENSE AND
WARRANTY AGREEMENT
■
GNU General public license
■
GNU library general public license
70 Licensing
About license files and licensing
About license files and licensing
This appendix covers information about how to obtain a license file. In addition,
it covers a general explanation of licensing and maintenance and how it applies to
your product. Lastly, it contains the product End User License Agreement, the
GNU General Public License (GPL), and the Library General Public License
(LGPL) for the Linux operating system.
Getting started with your 30-day grace period
Each appliance requires a license to operate. As a minimum you must purchase a
base license with each appliance you purchase. Once you received the license
certificate you must activate the license and receive a license file. The license file is
loaded onto the appliance to enable applications. To give you time to organize the
licensing process, all the software included with your Symantec Gateway Security
5400 Series is enabled for a 30-day grace period. However, there are no content
updates until a real license is loaded for the related feature.
The licensing process requires several steps and time for you to familiarize
yourself with the process, get organized, obtain license certificates, request
required license files from Symantec, receive the license files, and then to upload
them.
By using the 30-day grace period, you have plenty of time to obtain your licensing
components. When you load and enable your license files, your 30-day license is
disabled.
Obtaining and organizing license serial numbers
The first step in the appliance license process is to obtain a license serial number.
Each serial number is unique and is usually tied to a specific feature (firewall,
content filtering, IDS/IPS, antivirus, and so on) and “size” that applies to that
feature.
For example, the base license purchased with your appliance includes a 50-node
firewall license. Symantec provides evidence of this license by means of an Serial
Number Certificate that is mailed to you. This certificate indicates that you have
licenses for a 50-node firewall, unlimited Gateway-to-Gateway VPN, and a single
Client-to-Gateway VPN. The certificate contains a base serial number and a
maintenance serial number.
The model 5420 is available with a special unlimited base license, which includes
unlimited firewall, Gateway-to-Gateway VPN, and/or Client-to-Gateway VPN.
Licensing
Getting started with your 30-day grace period
You may order additional features at the same time as you order the base license
and the corresponding serial numbers are shipped together. These serial numbers
are shipped directly from Symantec to you and are printed on Serial Number
Certificates. Each Serial Number Certificate may contain several serial numbers,
one for each license or service ordered. You may order additional features for
your appliance at anytime.
Caution: Serial numbers on Serial Number Certificates correspond to a
particular order that you may have placed, not to a particular appliance. If you
have placed orders for other Symantec products (other than the base product)
that also have associated license serial numbers, you may find that the license
serial numbers for your appliance and other Symantec products appear
intermingled on the same Serial Number Certificate. Ensure that you clearly
identify which license serial numbers are used for which appliances before
proceeding to the next step.
Additional required information for requesting license files
In addition to gathering all the serial numbers associated with the features for
your appliances, before proceeding to the next step, you also need to gather the
following information:
■
The Symantec System ID, which you can find by way of the SGMI by
accessing the System folder > Features tab > Installed Licenses > Install
button.
Note: License files are tied to a specific appliance; they cannot be used on
any other appliance. Associate the appropriate license serial numbers with
the correct Symantec System ID for the intended appliance.
■
The appliance serial number (located on a label on the bottom of your unit
and also on your shipping carton).
71
72 Licensing
Organizing your license files
■
■
The email address of the person to whom your license files for this appliance
should be sent.
In addition, you must register for technical support and software update
(maintenance) services at the same time that you request your license files.
Prepare to provide the following information:
■
Full company name
■
Maintenance serial number
Names, phone and FAX numbers, and email addresses of two technical
contacts. This information is the technical contact information and these
persons are allowed to contact Symantec with for technical support.
Note: A company with more than one appliance is limited to two contacts for the
entire company for all appliances.
Organizing your license files
Use Table B-1 to organize your license files for each appliance. Make as many
copies of it as you have appliances. When you apply for your license file, ensure
that you associate the email, and associated attachment, you receive from
Symantec with a specific appliance. You should create a folder structure to collect
and sort the license files you receive with a naming convention that helps you
identify which file goes with which appliance.
Your license file email includes a feature serial number in the subject line. You
should rename your license file attachment to indicate the licenses included as
well as the appliance to which these license are associated. This ensures that the
license file has an ID attached to it that you can later track back to the specified
appliance.
Caution: Once you detached the license file from your email, it is not easy to
determine to which appliance it is associated, unless you rename it.
Fill out the Table B-1 before you begin the license file process. Complete the table
once you receive your license files. Each table you fill out applies to a single
appliance. In addition, you need the appliance serial number and the Symantec
System ID, accessible in the SGMI.
Software serial
number
Table B-1
License file name
FW
AV
IDS/IPS CF
Number of nodes per feature
Appliance serial numbers and node organizer
HA/LB
VPN
IDS/IPS CF
subscrip subscrip subscrip
tion
tion
tion
AV
Appliance Symantec System ID:___________________
Appliance serial number: _______________________
Licensing
Organizing your license files
73
74 Licensing
Using the Symantec License Request & Maintenance Web site
Using the Symantec License Request & Maintenance
Web site
The Symantec Gateway Security 5400 Series software is shipped with a license
that lets the software operate for 30 days. This license begins when you install the
product. You must obtain a license file within the 30-day grace period to
continue using the product.
Activating your license files
To activate your license you must have the base Software Serial Number
Certificate. This is the first level of information you are prompted for from the
licensing Web site.
Note: The license file you generate applies to one appliance only.
If you are also enabling other features for this appliance, have those serial
numbers ready as well. When you apply for your license file, be aware that all the
serial numbers you input apply to a specific appliance. Do not mix serial numbers
that apply to features you want to enable on other appliances.
Licensing
Using the Symantec License Request & Maintenance Web site
To activate your license files
1
Browse to https://licensing.symantec.com.
2
Under Supported Languages, select your language.
3
In the Licensing and Registration page, under Enter Serial Number, in the
Serial Number text box, type your base software serial number.
This is the serial number found on the base Software Serial Number
Certificate for the base (50-node) firewall license.
75
76 Licensing
Using the Symantec License Request & Maintenance Web site
4
Click submit.
5
Under Enter Your Email Address, Symantec System ID, and any additional
Serial Numbers, do the following:
■
In the Email Address text box, type the email address of the person
managing the license files.
The license file is mailed to this address.
■
In the Symantec System ID text box, type your appliance Symantec
System ID.
A valid Symantec System ID is required to activate the product on a
specific machine.You can find the Symantec System ID using the SGMI
by accessing the System folder > Features tab > Installed Licenses >
Install button.
■
In the Serial Number text boxes, type any additional appliance serial
numbers, which you can find on the Serial Number Certificates. Include
your maintenance serial number for this appliance. It does not matter
which order the numbers are typed.
Caution: These are serial numbers that are associated with licenses
purchased for this appliance only.
Licensing
Using the Symantec License Request & Maintenance Web site
6
If you have more than three serial numbers to enter, click add.
Clicking add inserts new fields above the ones you have already filled in. You
can now input any additional serial numbers you may have. You can click
add as many times as you need to add all of your serial numbers.
7
When you are finished, click submit.
8
Under Please enter your Appliance Serial Number, in the Appliance Serial
Number text box, type the appliance serial number.
You can find the appliance serial number on the label on the bottom of the
appliance.
77
78 Licensing
Using the Symantec License Request & Maintenance Web site
9
Press submit.
10 On the technical contact information page, under Contact 1, do the
following:
■
In the First Name text box, type the first name of your technical contact.
■
In the Last Name text box, type the last name of your technical contact.
■
In the Work Phone text box, type the phone number of your technical
contact.
■
In the Email Address text box, type the email address of the technical
contact.
If you have an additional contact, fill in the information under Contact
2.
Licensing
Using the Symantec License Request & Maintenance Web site
11 Click submit.
12 Under Confirm the following information, do the following:
■
Under Serial Numbers, confirm the serial numbers and products you
have registered.
■
Under License Registration, confirm your email address and Symantec
System ID.
■
Under Support Registration, confirm your maintenance serial number,
and the two support contacts for your product.
■
Under Appliance Registration, confirm your hardware serial number,
name, company name, company address, work phone, and email
address for a company contact responsible for this product.
79
80 Licensing
Using the Symantec License Request & Maintenance Web site
13 Click submit.
The person you specified receives an email from Symantec with an attached
license file, which he or she can use to enable all the product features registered.
The subject line of that email contains a serial number for one of the licensed
products contained within the order. Copy your license files to a known
directory, rename them, and move them to a system you use to manage your
appliance.
Caution: Once you receive, rename, and store your license files, keep a back-up
of these files in a safe place.
If you purchase additional licenses for this appliance in the future, you should
follow these same steps for the new licenses and associated serial numbers. Note
that old serial numbers are not reentered. Multiple license files are applied to a
single appliance and licenses are additive.
Uploading your license files
If you have already completed your initial setup and configuration, have been
using your 30-day license key, and are now ready to install your license files, you
can install your licenses by going to the SGMI System folder > Features tab >
Install Licenses window.
Licensing
Using the Symantec License Request & Maintenance Web site
To upload your license files
1
In the left pane of the SGMI, click System.
2
In the right pane, on the Feature tab, click Installed Licenses.
3
Click Install.
4
On the Welcome to the License Installation Wizard dialog box, if you have
the license files ready to upload, click Next.
5
On the Upload License Files dialog box, click Upload File.
81
82 Licensing
Using the Symantec License Request & Maintenance Web site
6
7
Browse to where you have saved your license files, and then do the following:
■
Select a license file, and then click Upload File.
■
Repeat steps 5 and 6 for all license files.
■
When finished, click Close Window.
On the License Error Check dialog box, read the message, and then do the
following:
■
If there were no errors found, click Next.
■
If there were errors found, you must click Close. Please call Technical
Support for assistance.
8
On the Confirm License Installation dialog box, verify that all the features
and node limits you want are uploaded, and to install them on the appliance,
click Next.
Otherwise, click Back and install any missing license files.
9
On the License Installation Complete dialog box, click Close.
Removing license files
If you must remove a license file, contact Symantec Service and Support.
Viewing license enabled features
The security gateway software is covered by the Symantec license included with
the license serial number. You can view your enabled features using the SGMI.
To view licensed and enabled features
1
In the left pane, click Systems.
Licensing
Explanation of Symantec Gateway Security licensing and maintenance
2
In the right pane, on the Features tab, click License Summary.
The licensed feature, status (Enable or Disable), Starting Date, Expiration
Date, and Limit (node count) are displayed in the right pane.
Explanation of Symantec Gateway Security licensing
and maintenance
Symantec Gateway Security usage is controlled by a licensing scheme. A license is
required for each feature that you want to use. Without it, the feature is not
enabled.
Node licensing (client and server)
Licenses for firewall, intrusion detection and prevention, antivirus, and content
filtering are available for the number of nodes in your network that are protected
by the appliance. A node is defined as anything that has its own IP address; for
example: a terminal server, network photocopier, desktops, servers, print server,
and so on. In situations where a node has more than one IP address, you need a
license for each IP address. If you have 125 IP addresses in your network, you
need at least a 125 node license for each feature you have enabled.
Note: The license size for each enabled feature must match.
You are licensed by the number of nodes (IP addresses) behind the firewall. It
does not matter if these are nodes that generate traffic traversing the firewall. If
83
84 Licensing
Explanation of Symantec Gateway Security licensing and maintenance
you have 100 nodes behind the firewall, but only 10 nodes pass traffic, thorough
the firewall, you still need a 100 node license. You can have a license larger than
the number of nodes in your network, but it cannot be smaller.
The security gateway caches IP addresses and counts the number of IP addresses
in the cache. If this number reaches the license limit, no additional IP addresses
are allowed to traverse the appliance and users may be prevented from accessing
resources on different segments of the network or accessing the Internet.
Session licensing for Symantec Client VPN
Symantec Client VPN software is licensed with an appliance. The Symantec
Client VPN software version must match the associated appliance software
version. Client-to-Gateway VPN is licensed by the number of concurrent VPN
sessions. The appliance comes with a license for one Client-to-Gateway VPN
session. You can purchase additional licenses for concurrent VPN sessions. For
example, you may have 100 users who need VPN access as part of their normal
work habits, but at any time, only 10 users are ever connected by way of the VPN.
In this situation, you only need a license for 10 concurrent VPN sessions. The
appliance counts the number of concurrent Client-to-Gateway VPN sessions and
stops creating new sessions when the limit is reached. You are licensed to load the
client software on as many nodes as you like, but these clients are licensed for use
only with the accompanying Symantec Gateway Security appliance.
High Availability and Load Balancing (HA/LB)
HA/LB is licensed on a per-appliance basis. It is either enabled or disabled. It is
not licensed by cluster. For a two-node cluster, you need two HA/LB licenses, one
for each cluster node.
Obtaining a license file
When you purchase a license, Symantec provides you with a software Serial
Number Certificate. See “Obtaining and organizing license serial numbers” on
page 70.
Basic license types
Each appliance needs a base license, which includes a license for 50-node firewall,
unlimited Gateway-to-Gateway VPN, and one concurrent Client-to-Gateway
VPN user. (A special unlimited node base firewall license is available for the
5420.)
Licensing
Explanation of Symantec Gateway Security licensing and maintenance
Feature add-ons
Feature add-ons are available to add intrusion detection and prevention (IDS/
IPS), antivirus, content filtering, and HA/LB. Feature add-ons for IDS/IPS,
antivirus, content filtering, and IDS/IPS+antivirus+content filtering are available
with a 50-node license to match the base 50 node firewall license. HA/LB is
licensed on a per-appliance basis.
Additive licenses
Additive licenses include both additive node and additive VPN session licenses.
Session licenses relate to VPN and node licenses relate to the Firewall, antivirus,
IDS/IPS, and content filtering features.
Additive session licenses
Additive session licenses are available to increase the number of nodes protected
by the appliance. Additive session licenses are available for the following features:
■
Intrusion detection and prevention (IDS/IPS)
■
Antivirus (AV)
■
Content filtering (CF)
■
Firewall+intrusion detection and prevention+antivirus+content filtering
(FW+AV+IDS/IPS+CF)
Additive node licenses are additive. For example, you can buy a 25-node additive
node license for firewall and add it to the base 50-node firewall license to get a
resultant license of 75 nodes. You could then purchase a 100-node firewall
additive node license and add it to the previous 75-node license to get a resultant
175 node license.
Caution: Firewall, antivirus, intrusion detection and prevention, and content
filtering must be licensed for the exact same number of nodes. This means that a
customer cannot have a 75-node license for firewall and a 50-node license for
intrusion detection and prevention. Each feature would have to have a 75-node
license.
Additive session licenses
Additive session licenses are available for Client-to-Gateway VPN. Client-toGateway VPN session licenses are independent of node licenses and the two can
have different values.
85
86 Licensing
Explanation of Symantec Gateway Security licensing and maintenance
License certificates
You must order the appliance with a base appliance license. Symantec sends you
the Serial Number Certificate that contains a software serial number, which,
when combined with the appliance Symantec System ID, can be used to generate
a license file. This license file normally enables a 50-node firewall, unlimited
Gateway-to-Gateway VPN, and one concurrent Client-to-Gateway VPN user.
Separately orderable feature add-ons and additive licenses are enabled by
additional software serial numbers that come on an additional Serial Number
Certificate. Each certificate has space for one or more software serial numbers.
When you order one or more feature add-on and/or additive license at the same
time, one or more Serial Number Certificates are sent to you.
30-day grace period
The appliance runs for 30 days without a license file. This 30-day grace period is
for unlimited nodes for all features (firewall, Gateway-to-Gateway VPN,
antivirus, intrusion detection and prevention, and content filtering) and
unlimited Client-to-Gateway VPN users. However, a license file is necessary to
enable the software on the appliance to run after this 30-day grace period has
expired. You obtain a license file by accessing the Symantec licensing Web site.
The 30-day grace period does not enable LiveUpdates. However, initial sample
content is shipped with the product for antivirus, IDS/IPS, and content filtering.
See “Getting started with your 30-day grace period” on page 70.
Content updates
Antivirus, intrusion detection and prevention, and content filtering are
periodically updated with new virus definitions, intrusion signatures and URL list
updates. These updates are provided as a subscription with your maintenance
agreement. When you purchase a feature add-on, it enables a subscription for
that feature for the duration of your current maintenance agreement. All content
subscription updates expire on the same day as the maintenance contract for the
appliance. Maintenance renewals include content subscription updates for the
length of the renewal contract.
Maintenance contracts
Except for the first year, separate maintenance contracts are available for
appliance functions, Symantec Client VPN, and HA/LB.
Licensing
Explanation of Symantec Gateway Security licensing and maintenance
Appliance
All base licenses include a Gold Maintenance contract. This Gold Maintenance
contract starts from the day the appliance is purchased and lasts for one year. The
Gold Maintenance contracts include:
■
Business-hour telephone support.
■
Upgrade insurance, which includes an entitlement to any new versions of the
appliance software released by Symantec during the term of the contract.
■
Content updates for antivirus, intrusion detection and prevention, and/or
content filtering (if these associated feature licenses have been purchased).
■
Advanced replacement of failed hardware.
If the appliance hardware fails during the term of the contract and this failure
is confirmed by Symantec, Symantec ships a replacement unit within 24hours of this confirmation. Symantec has depots around the world to ensure
timely delivery of the replacement.
Feature add-ons and additive licenses include maintenance for the feature or
increased number of nodes or users if the base appliance is currently covered by a
maintenance agreement. This maintenance is tied to the basic appliance contract
and expires on the same date.
Symantec Client VPN
The Symantec Client VPN is covered by the Client-to-Gateway maintenance
contract. This contract includes:
■
Telephone support
■
Upgrade insurance
■
Updates to the client code delivered by way of LiveUpdate
Gold Maintenance is included in the price of the additive user licenses. Platinum
is an uplift to the Gold maintenance. The contract co-terminates with the base
appliance contract. You must purchase either Gold or Platinum renewals at the
same time and for the same duration as the appliance renewal.
High availability and load balancing (HA/LB)
HA/LB is covered by a separate HA/LB maintenance contract. This contract
includes:
■
Telephone support
■
Upgrade insurance
87
88 Licensing
About the Symantec Gateway Security 5400 Series licenses
Gold maintenance contracts are available and is included in the price of the
feature add-on license. Platinum support is available as an uplift to Gold
maintenance. The contract co-terminates with the base appliance contract. You
must purchase Gold and Platinum renewals at the same time and for the same
duration as the appliance renewal.
Maintenance renewals
One-year maintenance renewal contracts are available for all features, as well as
Client-to-Gateway VPN and HA/LB. Symantec Client VPN and HA/LB
maintenance renewal contracts are separate, but are tied to the expiration of the
basic appliance contract.
Platinum support uplift
You may need continuous availability of telephone support (24 x 7). This is
provided for by a Platinum support uplifts to the Gold contract. For subsequent
years, Platinum support uplift contracts are also available.
About the Symantec Gateway Security 5400 Series
licenses
The appliance software is covered by the Symantec Gateway Security License and
Warranty Agreement. The license agreement grants the licensee the right to use
the software on the associated appliance. The LINUX operating system used in
Symantec Gateway Security 5400 Series is covered by the GNU General Public
License (GPL) and the Library General Public License (LGPL).
SYMANTEC GATEWAY SECURITY APPLIANCE LICENSE AND
WARRANTY AGREEMENT
SYMANTEC CORPORATION AND/OR ITS SUBSIDIARIES
("SYMANTEC") IS WILLING TO LICENSE THE SOFTWARE INCLUDED
WITH THE APPLIANCE YOU HAVE PURCHASED TO YOU AS AN
INDIVIDUAL, THE COMPANY, OR THE LEGAL ENTITY THAT WILL BE
UTILIZING THE SOFTWARE (REFERENCED BELOW AS "YOU OR
YOUR") AND TO PROVIDE WARRANTIES ON THE APPLIANCE ONLY
ON THE CONDITION THAT YOU ACCEPT ALL OF THE TERMS OF
THIS LICENSE AND WARRANTY AGREEMENT. READ THE TERMS
AND CONDITIONS OF THIS LICENSE AND WARRANTY AGREEMENT
CAREFULLY BEFORE USING THE APPLIANCE. THIS IS A LEGAL AND
ENFORCEABLE CONTRACT BETWEEN YOU AND SYMANTEC. BY
OPENING THIS PACKAGE, BREAKING THE SEAL, CLICKING ON THE
"AGREE" OR "YES" BUTTON OR OTHERWISE INDICATING ASSENT
ELECTRONICALLY, REQUESTING A LICENSE KEY OR USING THE
SOFTWARE AND THE APPLIANCE, YOU AGREE TO THE TERMS AND
CONDITIONS OF THIS AGREEMENT. IF YOU DO NOT AGREE TO
THESE TERMS AND CONDITIONS, CLICK ON THE "I DO NOT AGREE"
OR "NO" BUTTON IF APPLICABLE AND DO NOT USE THE SOFTWARE
AND THE APPLIANCE.
C.use, if You received the Software distributed on an Appliance containing
multiple Symantec products, any Symantec software on the Appliance for
which You have not received a permission in a License Module; or
D.use the Software in any manner not authorized by this license.
2. CONTENT UPDATES:
Certain Symantec software products utilize content that is updated from time
to time (e.g., antivirus products utilize updated virus definitions; content
filtering products utilize updated URL lists; some firewall products utilize
updated firewall rules; vulnerability assessment products utilize updated
vulnerability data, etc.; collectively, these are referred to as “Content
Updates”). You may obtain Content Updates for each Software functionality
which You have purchased and activated for use with the Appliance for any
period for which You have (i) purchased a subscription for Content Updates
for such Software functionality; (ii) entered into a support agreement that
includes Content Updates for such Software functionality; or (iii) otherwise
separately acquired the right to obtain Content Updates for such Software
functionality. This license does not otherwise permit You to obtain and use
Content Updates.
1. SOFTWARE LICENSE:
3. LIMITED WARRANTY:
Except for the software, if any, described in the Excluded Software section at
the end of this agreement (the ("Excluded Software"), the software (the
"Software") which accompanies the appliance You have purchased (the
"Appliance") is the property of Symantec or its licensors and is protected by
copyright law. Except for the Excluded Software, You agree and acknowledge
that You must purchase a separate license for each Software functionality
which You intend to use in connection with the Appliance, and activate such
Software functionalities as designated by Symantec, prior to using the
Appliance. While Symantec continues to own the Software, You will have
certain rights to use the Software after Your acceptance of this license. This
license governs any releases, revisions, or enhancements to the Software that
the Licensor may furnish to You as well as the copy of the Software provided
to You on a CD-ROM or other media in connection with the Appliance (the
"Restore Software"). Except as may be modified by a Symantec license
certificate, license coupon, or license key (each a "License Module") which
accompanies, precedes, or follows this license, and as may be further defined
in the user documentation accompanying the Appliance and/or the Software,
Your rights and obligations with respect to the use of this Software are as
follows:
You may:
A.use the Software solely as part of the Appliance for no more than the
number of users as have been licensed to You by Symantec under a License
Module;
B.use the Restore Software solely to restore the Appliance to its original
factory functionality in the event the Software preloaded on the Appliance is
corrupted or becomes unusable;
C.make copies of the printed documentation which accompanies the
Appliance as necessary to support Your authorized use of the Appliance; and
D.after written notice to Symantec and in connection with a transfer of the
Appliance, transfer the Software on a permanent basis to another person or
entity, provided that You retain no copies of the Software, Symantec consents
to the transfer and the transferee agrees in writing to the terms and conditions
of this agreement.
You may not:
A.sublicense, rent or lease any portion of the Software; reverse engineer,
decompile, disassemble, modify, translate, make any attempt to discover the
source code of the Software, or create derivative works from the Software;
B.use the Restore Software for any purpose other than to restore the
Appliance to the original factory functionality;
Symantec warrants that the media on which the Restore Software is
distributed will be free from defects for a period of thirty (30) days from the
date of original purchase of the Appliance. Your sole remedy in the event of a
breach of this warranty will be that Symantec will, at its option, replace any
defective media returned to Symantec within the warranty period or refund
the money You paid for the Restore Software.
Symantec warrants that the Software will perform on the Appliance in
substantial compliance with the written documentation accompanying the
Appliance for a period of thirty (30) days from the date of original purchase
of the Appliance. Your sole remedy in the event of a breach of this warranty
will be that Symantec will, at its option, repair or replace any defective
Software returned to Symantec within the warranty period or refund the
money You paid for the Appliance.
Symantec warrants that the hardware component of the Appliance (the
"Hardware") shall be free from defects in material and workmanship under
normal use and service and substantially conform to the written
documentation accompanying the Appliance for a period of three hundred
sixty-five (365) days from the date of original( purchase of the Appliance.
Your sole remedy in the event of a breach of this warranty will be that
Symantec will, at its option, repair or replace any defective Hardware
returned to Symantec within the warranty period or refund the money You
paid for the Appliance.
The warranties contained in this agreement will not apply to any Software or
Hardware which:
A.has been altered, supplemented, upgraded or modified in any way; or
B.has been repaired except by Symantec or its designee.
Additionally, the warranties contained in this agreement do not apply to
repair or replacement caused or necessitated by: (i) events occurring after
risk of loss passes to You such as loss or damage during shipment; (ii) acts of
God including without limitation natural acts such as fire, flood, wind
earthquake, lightning or similar disaster; (iii) improper use, environment,
installation or electrical supply, improper maintenance, or any other misuse,
abuse or mishandling; (iv) governmental actions or inactions; (v) strikes or
work stoppages; (vi) Your failure to follow applicable use or operations
instructions or manuals; (vii) Your failure to implement, or to allow
Symantec or its designee to implement, any corrections or modifications to
the Appliance made available to You by Symantec; or (viii) such other events
outside Symantec's reasonable control.
Upon discovery of any failure of the Hardware, or component thereof, to
conform to the applicable warranty during the applicable warranty period,
You are required to contact us within ten (10) days after such failure and seek
a return material authorization ("RMA") number. Symantec will promptly
issue the requested RMA as long as we determine that You meet the
conditions for warranty service. The allegedly defective Appliance, or
component thereof, shall be returned to Symantec, securely and
properly packaged, freight and insurance prepaid, with the RMA
number prominently displayed on the exterior of the shipment
packaging and with the Appliance. Symantec will have no obligation to
accept any Appliance which is returned without an RMA number.
Upon completion of repair or if Symantec decides, in accordance with
the warranty, to replace a defective Appliance, Symantec will return
such repaired or replacement Appliance to You, freight and insurance
prepaid. In the event that Symantec, in its sole discretion, determines
that it is unable to replace or repair the Hardware, Symantec will
refund to You the F.O.B. price paid by You for the defective Appliance.
Defective Appliances returned to Symantec will become the property of
Symantec.
Symantec does not warrant that the Appliance will meet Your
requirements or that operation of the Appliance will be uninterrupted
or that the Appliance will be error-free.
In order to exercise any of the warranty rights contained in this
Agreement, You must have available an original sales receipt or bill of
sale demonstrating proof of purchase with Your warranty claim.
THE ABOVE WARRANTIES ARE EXCLUSIVE AND IN LIEU OF
ALL OTHER WARRANTIES, WHETHER EXPRESS OR IMPLIED,
INCLUDING THE IMPLIED WARRANTIES OF
MERCHANTABILITY, FITNESS FOR A PARTICULAR PURPOSE
AND NONINFRINGEMENT OF INTELLECTUAL PROPERTY
RIGHTS. THIS WARRANTY GIVES YOU SPECIFIC LEGAL
RIGHTS. YOU MAY HAVE OTHER RIGHTS, WHICH VARY FROM
STATE TO STATE.
4. DISCLAIMER OF DAMAGES:
SOME STATES AND COUNTRIES, INCLUDING MEMBER
COUNTRIES OF THE EUROPEAN ECONOMIC AREA, DO NOT
ALLOW THE LIMITATION OR EXCLUSION OF LIABILITY FOR
INCIDENTAL OR CONSEQUENTIAL DAMAGES SO THE BELOW
LIMITATION OR EXCLUSION MAY NOT APPLY TO YOU.
TO THE MAXIMUM EXTENT PERMITTED BY APPLICABLE LAW
AND REGARDLESS OF WHETHER ANY REMEDY SET FORTH
HEREIN FAILS OF ITS ESSENTIAL PURPOSE, IN NO EVENT WILL
SYMANTEC OR ITS LICENSORS BE LIABLE TO YOU FOR ANY
SPECIAL, CONSEQUENTIAL, INDIRECT OR SIMILAR DAMAGES,
INCLUDING ANY LOST PROFITS OR LOST DATA ARISING OUT
OF THE USE OR INABILITY TO USE THE SOFTWARE EVEN IF
SYMANTEC HAS BEEN ADVISED OF THE POSSIBILITY OF SUCH
DAMAGES.
IN NO CASE SHALL SYMANTEC'S OR ITS LICENSORS' LIABILITY
EXCEED THE PURCHASE PRICE FOR THE APPLIANCE. The
disclaimers and limitations set forth above will apply regardless of
whether You accept the Software or the Appliance.
5. U.S. GOVERNMENT RESTRICTED RIGHTS:
RESTRICTED RIGHTS LEGEND. All Symantec products and
documentation are commercial in nature. The software and software
documentation are "Commercial Items", as that term is defined in 48
C.F.R. section 2.101, consisting of "Commercial Computer Software"
and "Commercial Computer Software Documentation", as such terms
are defined in 48 C.F.R. section 252.227-7014(a)(5) and 48 C.F.R.
section 252.227-7014(a)(1), and used in 48 C.F.R. section 12.212 and
48 C.F.R. section 227.7202, as applicable. Consistent with 48 C.F.R.
section 12.212, 48 C.F.R. section 252.227-7015, 48 C.F.R. section
227.7202 through 227.7202-4, 48 C.F.R. section 52.227-14, and other
relevant sections of the Code of Federal Regulations, as applicable,
Symantec's computer software and computer software documentation
are licensed to United States Government end users with only those
rights as granted to all other end users, according to the terms and
conditions contained in this license agreement. Manufacturer is
Symantec Corporation, 20330 Stevens Creek Blvd., Cupertino, CA
95014.
6. EXPORT REGULATION:
You agree to comply strictly with all applicable export control laws,
including the US Export Administration Act and its associated
regulations and acknowledge Your responsibility to obtain licenses as
required to export, re-export or import the Appliance. Export or reexport of the Appliance to Cuba, North Korea, Iran, Iraq, Libya, Syria
or Sudan is prohibited.
7. GENERAL:
If You are located in North America or Latin America, this Agreement
will be governed by the laws of the State of California, United States of
America. Otherwise, this Agreement will be governed by the laws of
England. This Agreement and any related License Module is the entire
agreement between You and Symantec relating to the Appliance and:
(i) supersedes all prior or contemporaneous oral or written
communications, proposals and representations with respect to its
subject matter; and (ii) prevails over any conflicting or additional
terms of any quote, order, acknowledgment or similar
communications between the parties. This Agreement may only be
modified by a License Module or by a written document which has
been signed by both You and Symantec. This Agreement shall
terminate upon Your breach of any term contained herein and You
shall cease use of and destroy all copies of the Software and shall return
the Appliance to Symantec. The disclaimers of warranties and damages
and limitations on liability shall survive termination. Should You have
any questions concerning this Agreement, or if You desire to contact
Symantec for any reason, please write: (i) Symantec Customer Service,
555 International Way, Springfield, OR 97477, USA, or (ii) Symantec
Customer Service Center, PO BOX 5689, Dublin 15, Ireland.
8. EXCLUDED SOFTWARE:
The Excluded Software consists of the open source code software
known as Linux included with the Appliance. All Excluded Software is
licensed under the GNU General Public License, Version 2, June 1991,
a copy of which is included with the user documentation for the
Appliance. The license entitles You to receive a copy of the source code
for Linux only upon request at a nominal charge. If You are interested
in obtaining a copy of such source code, please contact Symantec
Customer Service at one of the above addresses for further
information.
GNU GENERAL PUBLIC LICENSE
Version 2, June 1991
Copyright (C) 1989, 1991 Free Software Foundation, Inc. 59 Temple Place Suite 330, Boston, MA 02111-1307, USA
TERMS AND CONDITIONS FOR COPYING, DISTRIBUTION
AND MODIFICATION
1 This License applies to any program or other work which contains a notice
placed by the copyright holder saying it may be distributed under the terms of
this General Public License. The “Program,” below, refers to any such
program or work, and a “work based on the Program” means either the
Program or any derivative work under copyright law: that is to say, a work
containing the Program or a portion of it, either verbatim or with
modifications and/or translated into another language. (Hereinafter,
translation is included without limitation in the term “modification.”) Each
licensee is addressed as “you.”
Activities other than copying, distribution and modification are not covered
by this License; they are outside its scope. The act of running the Program is
not restricted, and the output from the Program is covered only if its contents
constitute a work based on the Program (independent of having been made
by running the Program). Whether that is true depends on what the Program
does.
2 You may copy and distribute verbatim copies of the Program’s source code
as you receive it, in any medium, provided that you conspicuously and
appropriately publish on each copy an appropriate copyright notice and
disclaimer of warranty; keep intact all the notices that refer to this License and
to the absence of any warranty; and give any other recipients of the Program a
copy of this License along with the Program.
You may charge a fee for the physical act of transferring a copy, and you may
at your option offer warranty protection in exchange for a fee.
3 You may modify your copy or copies of the Program or any portion of it,
thus forming a work based on the Program, and copy and distribute such
modifications or work under the terms of Section 1 above, provided that you
also meet all of these conditions:
You must cause the modified files to carry prominent notices stating that you
changed the files and the date of any change.
You must cause any work that you distribute or publish, that in whole or in
part contains or is derived from the Program or any part thereof, to be
licensed as a whole at no charge to all third parties under the terms of this
License.
If the modified program normally reads commands interactively when run,
you must cause it, when started running for such interactive use in the most
ordinary way, to print or display an announcement including an appropriate
copyright notice and a notice that there is no warranty (or else, saying that
you provide a warranty) and that users may redistribute the program under
these conditions, and telling the user how to view a copy of this License.
(Exception: if the Program itself is interactive but does not normally print
such an announcement, your work based on the Program is not required to
print an announcement.)
These requirements apply to the modified work as a whole. If identifiable
sections of that work are not derived from the Program, and can be
reasonably considered independent and separate works in themselves, then
this License, and its terms, do not apply to those sections when you distribute
them as separate works. But when you distribute the same sections as part of a
whole which is a work based on the Program, the distribution of the whole
must be on the terms of this License, whose permissions for other licensees
extend to the entire whole, and thus to each and every part regardless of who
wrote it.
Thus, it is not the intent of this section to claim rights or contest your rights
to work written entirely by you; rather, the intent is to exercise the right to
control the distribution of derivative or collective works based on the
Program.
In addition, mere aggregation of another work not based on the Program
with the Program (or with a work based on the Program) on a volume of a
storage or distribution medium does not bring the other work under the
scope of this License.
4 You may copy and distribute the Program (or a work based on it, under
Section 2) in object code or executable form under the terms of Sections 1
and 2 above, provided that you also do one of the following:
Accompany it with the complete corresponding machine-readable source
code, which must be distributed under the terms of Sections 1 and 2 above on
a medium customarily used for software interchange; or,
Accompany it with a written offer, valid for at least three years, to give any
third party, for a charge no more than your cost of physically performing
source distribution, a complete machine-readable copy of the corresponding
source code, to be distributed under the terms of Sections 1 and 2 above on a
medium customarily used for software interchange; or,
Accompany it with the information you received as to the offer to distribute
corresponding source code. (This alternative is allowed only for
noncommercial distribution and only if you received the program in object
code or executable form with such an offer, in accord with Subsection b
above.)
The source code for a work means the preferred form of the work for making
modifications to it. For an executable work, complete source code means all
the source code for all modules it contains, plus any associated interface
definition files, plus the scripts used to control compilation and installation of
the executable. However, as a special exception, the source code distributed
need not include anything that is normally distributed (in either source or
binary form) with the major components (compiler, kernel, and so on) of the
operating system on which the executable runs, unless that component itself
accompanies the executable.
If distribution of executable or object code is made by offering access to copy
from a designated place, then offering equivalent access to copy the source
code from the same place counts as distribution of the source code, even
though third parties are not compelled to copy the source along with the
object code.
5 You may not copy, modify, sublicense or distribute the Program except as
expressly provided under this License. Any attempt otherwise to copy,
modify, sublicense or distribute the Program is void, and will automatically
terminate your rights under this License. However, parties who have received
copies, or rights, from you under this License will not have their licenses
terminated, so long as such parties remain in full compliance.
6 You are not required to accept this License, since you have not signed it.
However, nothing else grants you permission to modify or distribute the
Program or its derivative works. These actions are prohibited by law if you do
not accept this License. Therefore, by modifying or distributing the Program
(or any work based on the Program), you indicate your acceptance of this
License to do so, and all its terms and conditions for copying, distributing or
modifying the Program or works based on it.
7 Each time you redistribute the Program (or any work based on the
Program), the recipient automatically receives a license from the original
licensor to copy, distribute or modify the Program subject to these terms and
conditions. You may not impose any further restrictions on the recipients’
exercise of the rights granted herein. You are not responsible for enforcing
compliance by third parties to this License.
8 If, as a consequence of a court judgment or allegation of patent
infringement or for any other reason (not limited to patent issues),
conditions are imposed on you (whether by court order, agreement or
otherwise) that contradict the conditions of this License, they do not excuse
you from the conditions of this License. If you cannot distribute so as to
satisfy simultaneously your obligations under this License and any other
pertinent obligations, then as a consequence you may not distribute the
Program at all. For example, if a patent license would not permit royalty-free
redistribution of the Program by all those who receive copies directly or
indirectly through you, then the only way you could satisfy both it and this
License would be to refrain entirely from distribution of the Program.
If any portion of this section is held invalid or unenforceable under any
particular circumstance, the balance of the section is intended to apply and
the section as a whole is intended to apply in other circumstances.
It is not the purpose of this section to induce you to infringe any patents or
other property right claims or to contest validity of any such claims; this
section has the sole purpose of protecting the integrity of the free software
distribution system, which is implemented by public license practices.
Many people have made generous contributions to the wide range of
software distributed through that system in reliance on consistent
application of that system; it is up to the author/donor to decide if he
or she is willing to distribute software through any other system and a
licensee cannot impose that choice.
This section is intended to make thoroughly clear what is believed to be
a consequence of the rest of this License.
9 If the distribution and/or use of the Program is restricted in certain
countries either by patents or by copyrighted interfaces, the original
copyright holder who places the Program under this License may add
an explicit geographical distribution limitation excluding those
countries, so that distribution is permitted only in or among countries
not thus excluded. In such case, this License incorporates the limitation
as if written in the body of this License.
10 The Free Software Foundation may publish revised and/or new
versions of the General Public License from time to time. Such new
versions will be similar in spirit to the present version, but may differ in
detail to address new problems or concerns.
Each version is given a distinguishing version number. If the Program
specifies a version number of this License which applies to it and “any
later version”, you have the option of following the terms and
conditions either of that version or of any later version published by
the Free Software Foundation. If the Program does not specify a
version number of this License, you may choose any version ever
published by the Free Software Foundation.
11 If you wish to incorporate parts of the Program into other free
programs whose distribution conditions are different, write to the
author to ask for permission. For software which is copyrighted by the
Free Software Foundation, write to the Free Software Foundation; we
sometimes make exceptions for this. Our decision will be guided by the
two goals of preserving the free status of all derivatives of our free
software and of promoting the sharing and reuse of software generally.
NO WARRANTY
BECAUSE THE PROGRAM IS LICENSED FREE OF CHARGE,
THERE IS NO WARRANTY FOR THE PROGRAM, TO THE
EXTENT PERMITTED BY APPLICABLE LAW. EXCEPT WHEN
OTHERWISE STATED IN WRITING, THE COPYRIGHT HOLDERS
AND/OR OTHER PARTIES PROVIDE THE PROGRAM “AS IS”
WITHOUT WARRANTY OF ANY KIND, EITHER EXPRESSED OR
IMPLIED, INCLUDING, BUT NOT LIMITED TO, THE IMPLIED
WARRANTIES OF MERCHANTABILITY AND FITNESS FOR A
PARTICULAR PURPOSE. THE ENTIRE RISK AS TO THE QUALITY
AND PERFORMANCE OF THE PROGRAM IS WITH YOU.
SHOULD THE PROGRAM PROVE DEFECTIVE, YOU ASSUME
THE COST OF ALL NECESSARY SERVICING, REPAIR OR
CORRECTION.
IN NO EVENT, UNLESS REQUIRED BY APPLICABLE LAW OR
AGREED TO IN WRITING, WILL ANY COPYRIGHT HOLDER, OR
ANY OTHER PARTY WHO MAY MODIFY AND/OR
REDISTRIBUTE THE PROGRAM AS PERMITTED ABOVE, BE
LIABLE TO YOU FOR DAMAGES, INCLUDING ANY GENERAL,
SPECIAL, INCIDENTAL OR CONSEQUENTIAL DAMAGES
ARISING OUT OF THE USE OR INABILITY TO USE THE
PROGRAM (INCLUDING BUT NOT LIMITED TO LOSS OF DATA
OR DATA BEING RENDERED INACCURATE OR LOSSES
SUSTAINED BY YOU OR THIRD PARTIES OR A FAILURE OF THE
PROGRAM TO OPERATE WITH ANY OTHER PROGRAMS), EVEN
IF SUCH HOLDER OR OTHER PARTY HAS BEEN ADVISED OF
THE POSSIBILITY OF SUCH DAMAGES.
GNU LIBRARY GENERAL PUBLIC LICENSE
Version 2, June 1991
Copyright (C) 1991 Free Software Foundation, Inc. 675 Mass Ave,
Cambridge, MA 02139, USA
Everyone is permitted to copy and distribute verbatim copies of this license
document, but changing it is not allowed.
[This is the first released version of the library GPL. It is numbered 2 because
it goes with version 2 of the ordinary GPL.]
Preamble
The licenses for most software are designed to take away your freedom to
share and change it. By contrast, the GNU General Public Licenses are
intended to guarantee your freedom to share and change free software--to
make sure the software is free for all its users.
This license, the Library General Public License, applies to some specially
designated Free Software Foundation software, and to any other libraries
whose authors decide to use it. You can use it for your libraries, too.
When we speak of free software, we are referring to freedom, not price. Our
General Public Licenses are designed to make sure that you have the freedom
to distribute copies of free software (and charge for this service if you wish),
that you receive source code or can get it if you want it, that you can change
the software or use pieces of it in new free programs; and that you know you
can do these things.
To protect your rights, we need to make restrictions that forbid anyone to
deny you these rights or to ask you to surrender the rights. These restrictions
translate to certain responsibilities for you if you distribute copies of the
library, or if you modify it.
For example, if you distribute copies of the library, whether gratis or for a fee,
you must give the recipients all the rights that we gave you. You must make
sure that they, too, receive or can get the source code. If you link a program
with the library, you must provide complete object files to the recipients so
that they can relink them with the library, after making changes to the library
and recompiling it. And you must show them these terms so they know their
rights.
Our method of protecting your rights has two steps: (1) copyright the library,
and (2) offer you this license which gives you legal permission to copy,
distribute and/or modify the library.
Also, for each distributor's protection, we want to make certain that everyone
understands that there is no warranty for this free library. If the library is
modified by someone else and passed on, we want its recipients to know that
what they have is not the original version, so that any problems introduced by
others will not reflect on the original authors' reputations.
Finally, any free program is threatened constantly by software patents. We
wish to avoid the danger that companies distributing free software will
individually obtain patent licenses, thus in effect transforming the program
into proprietary software. To prevent this, we have made it clear that any
patent must be licensed for everyone's free use or not licensed at all.
Most GNU software, including some libraries, is covered by the ordinary
GNU General Public License, which was designed for utility programs. This
license, the GNU Library General Public License, applies to certain designated
libraries. This license is quite different from the ordinary one; be sure to read
it in full, and don't assume that anything in it is the same as in the ordinary
license.
The reason we have a separate public license for some libraries is that they
blur the distinction we usually make between modifying or adding to a
program and simply using it. Linking a program with a library, without
changing the library, is in some sense simply using the library, and is
analogous to running a utility program or application program. However, in
a textual and legal sense, the linked executable is a combined work, a
derivative of the original library, and the ordinary General Public License
treats it as such.
Because of this blurred distinction, using the ordinary General Public License
for libraries did not effectively promote software sharing, because most
developers did not use the libraries. We concluded that weaker conditions
might promote sharing better. However, unrestricted linking of non-free
programs would deprive the users of those programs of all benefit from the
free status of the libraries themselves. This Library General Public License is
intended to permit developers of non-free programs to use free libraries,
while preserving your freedom as a user of such programs to change the free
libraries that are incorporated in them. (We have not seen how to achieve this
as regards changes in header files, but we have achieved it as regards changes
in the actual functions of the Library.) The hope is that this will lead to faster
development of free libraries.
The precise terms and conditions for copying, distribution and modification
follow. Pay close attention to the difference between a “work based on the
library” and a “work that uses the library”. The former contains code derived
from the library, while the latter only works together with the library.
Note that it is possible for a library to be covered by the ordinary General
Public License rather than by this special one.
GNU LIBRARY GENERAL PUBLIC LICENSE TERMS AND
CONDITIONS FOR COPYING, DISTRIBUTION AND
MODIFICATION
0. This License Agreement applies to any software library which contains a
notice placed by the copyright holder or other authorized party saying it may
be distributed under the terms of this Library General Public License (also
called “this License”). Each licensee is addressed as “you”.
A “library” means a collection of software functions and/or data prepared so
as to be conveniently linked with application programs (which use some of
those functions and data) to form executables.
The “Library”, below, refers to any such software library or work which has
been distributed under these terms. A “work based on the Library” means
either the Library or any derivative work under copyright law: that is to say, a
work containing the Library or a portion of it, either verbatim or with
modifications and/or translated straightforwardly into another language.
(Hereinafter, translation is included without limitation in the term
“modification”.)
“Source code” for a work means the preferred form of the work for making
modifications to it. For a library, complete source code means all the source
code for all modules it contains, plus any associated interface definition files,
plus the scripts used to control compilation and installation of the library.
Activities other than copying, distribution and modification are not covered
by this License; they are outside its scope. The act of running a program using
the Library is not restricted, and output from such a program is covered only
if its contents constitute a work based on the Library (independent of the use
of the Library in a tool for writing it). Whether that is true depends on what
the Library does and what the program that uses the Library does.
1. You may copy and distribute verbatim copies of the Library's complete
source code as you receive it, in any medium, provided that you
conspicuously and appropriately publish on each copy an appropriate
copyright notice and disclaimer of warranty; keep intact all the notices that
refer to this License and to the absence of any warranty; and distribute a copy
of this License along with the Library.
You may charge a fee for the physical act of transferring a copy, and you may
at your option offer warranty
2. You may modify your copy or copies of the Library or any portion of it,
thus forming a work based on the Library, and copy and distribute such
modifications or work under the terms of Section 1 above, provided that you
also meet all of these conditions:
a. The modified work must itself be a software library.
b. You must cause the files modified to carry prominent notices stating that
you changed the files and the date of any change.
c. You must cause the whole of the work to be licensed at no charge to all
third parties under the terms of this License.
d. If a facility in the modified Library refers to a function or a table of data to
be supplied by an application program that uses the facility, other than as an
argument passed when the facility is invoked, then you must make a good
faith effort to ensure that, in the event an application does not supply such
function or table, the facility still operates, and performs whatever part of its
purpose remains meaningful.
(For example, a function in a library to compute square roots has a purpose
that is entirely well-defined independent of the application. Therefore,
Subsection 2d requires that anyapplication-supplied function or tableused
by this function must be optional: if the application does not supply it, the
square root function must still compute square roots.)
These requirements apply to the modified work as a whole. If identifiable
sections of that work are not derived from the Library, and can be reasonably
consideredindependentandseparateworksinthemselves,thenthisLicense,
and its terms, do not apply to those sections when you distribute them as
separate works. But when you distribute the same sections as part of a whole
which is a work based on the Library, the distribution of the whole must be
on the terms of this License, whose permissions for other licensees extend to
the entire whole, and thus to each and every part regardless of who wrote it.
Thus, it is not the intent of this section to claim rights or contest your rights
to work written entirely by you; rather, the intent is to exercise the right to
controlthedistributionofderivativeorcollectiveworksbasedontheLibrary.
In addition, mere aggregation of another work not based on the Library with
the Library (or with a work based on the Library) on a volume of a storage or
distribution medium does not bring the other work under the scope of this
License.
3. You may opt to apply the terms of the ordinary GNU General Public
License instead of this License to a given copy of the Library. To do this, you
must alter all the notices that refer to this License, so that they refer to the
ordinaryGNUGeneralPublicLicense,version2,insteadoftothisLicense.(If
a newer version than version 2 of the ordinary GNU General Public License
has appeared, then you can specify that version instead if you wish.) Do not
make any other change in these notices.
Once this change is made in a given copy, it is irreversible for that copy, so the
ordinary GNU General Public License applies to all subsequent copies and
derivativeworksmadefromthatcopy.Thisoptionisusefulwhenyouwishto
copy part of the code of the Library into a program that is not a library.
4. You may copy and distribute the Library (or a portion or derivative of it,
under Section 2) in object code or executable form under the terms of
Sections 1 and 2 above provided that you accompany it with the complete
corresponding machine-readable source code, which must be distributed
under the terms of Sections 1 and 2 above on a medium customarily used for
software interchange.
If distribution of object code is made by offering access to copy from a
designatedplace,thenofferingequivalentaccesstocopythesourcecodefrom
the same place satisfies the requirement to distribute the source code, even
though third parties are not compelled to copy the source along with the
object code.
5. A program that contains no derivative of any portion of the Library, but is
designed to work with the Library by being compiled or linked with it, is
called a “work that uses the Library”. Such a work, in isolation, is not a
derivative work of the Library, and therefore falls outside the scope of this
License.
However, linking a “work that uses the Library” with the Library creates an
executable that is a derivative of the Library (because it contains portions of
the Library), rather than a “work that uses the library”. The executable is
therefore covered by this License. Section 6 states terms for distribution of
such executables.
When a “work that uses the Library” uses material from a header file that is
part of the Library, the object code for the work may be a derivative work of
the Library even though the source code is not. Whether this is true is
especially significant if the work can be linked without the Library, or if the
work is itself a library. The threshold for this to be true is not precisely defined
by law.
If such an object file uses only numerical parameters, data structure layouts
and accessors, and small macros and small inline functions (ten lines or less
in length), then the use of the object file is unrestricted, regardless of whether
it is legally a derivative work. (Executables containing this object code plus
portions of the Library will still fall under Section 6.)
Otherwise, if the work is a derivative of the Library, you may distribute the
object code for the work under the terms of Section 6. Any executables
containing that work also fall under Section 6, whether or not they are linked
directly with the Library itself.
6. As an exception to the Sections above, you may also compile or link a
“work that uses the Library” with the Library to produce a work containing
portions of the Library, and distribute that work under terms of your choice,
provided that the terms permit modification of the work for the customer's
own use and reverse engineering for debugging such modifications.
You must give prominent notice with each copy of the work that the Library
is used in it and that the Library and its use are covered by this License. You
must supply a copy of this License. If the work during execution displays
copyright notices, you must include the copyright notice for the Library
among them, as well as a reference directing the user to the copy of this
License. Also, you must do one of these things:
a.Accompanytheworkwiththecompletecorrespondingmachine-readable
sourcecodefortheLibraryincludingwhateverchangeswereusedinthework
(which must be distributed under Sections 1 and 2 above); and, if the work is
an executable linked with the Library, with the complete machine-readable
“work that uses the Library”, as object code and/or source code, so that the
usercanmodifytheLibraryandthenrelinktoproduceamodifiedexecutable
containingthemodifiedLibrary.(Itisunderstoodthattheuserwhochanges
the contents of definitions files in the Library will not necessarily be able to
recompile the application to use the modified definitions.)
b. Accompany the work with a written offer, valid for at least three years, to
givethesameuserthematerialsspecifiedinSubsection6a,above,foracharge
no more than the cost of performing this distribution.
c. If distribution of the work is made by offering access to copy from a
designatedplace,offerequivalentaccesstocopytheabovespecifiedmaterials
from the same place.
d. Verify that the user has already received a copy of these materials or that
you have already sent this user a copy.
Foranexecutable,therequiredformofthe“workthatusestheLibrary”must
includeanydataandutilityprogramsneededforreproducingtheexecutable
fromit.However,asaspecialexception,thesourcecodedistributedneednot
include anything that is normally distributed (in either source or binary
form) with the major components (compiler, kernel, and so on) of the
operatingsystemonwhichtheexecutableruns,unlessthatcomponentitself
accompanies the executable.
It may happen that this requirement contradicts the license restrictions of
other proprietary libraries that do not normally accompany the operating
system. Such a contradiction means you cannot use both them and the
Library together in an executable that you distribute.
7. You may place library facilities that are a work based on the Library sideby-side in a single library together with other library facilities not covered by
this License, and distribute such a combined library, provided that the
separatedistributionoftheworkbasedontheLibraryandoftheotherlibrary
facilities is otherwise permitted, and provided that you do these two things:
a. Accompany the combined library with a copy of the same work based on
the Library, uncombined with any other library facilities. This must be
distributed under the terms of the Sections above.
b. Give prominent notice with the combined library of the fact that
part of it is a work based on the Library, and explaining where to find
the accompanying uncombined form of the same work.
8. You may not copy, modify, sublicense, link with, or distribute the
Library except as expressly provided under this License. Any attempt
otherwise to copy, modify, sublicense, link with, or distribute the
Library is void, and will automatically terminate your rights under this
License. However, parties who have received copies, or rights, from
you under this License will not have their licenses terminated so long as
such parties remain in full compliance.
9. You are not required to accept this License, since you have not
signed it. However, nothing else grants you permission to modify or
distribute the Library or its derivative works. These actions are
prohibited by law if you do not accept this License. Therefore, by
modifying or distributing the Library (or any work based on the
Library), you indicate your acceptance of this License to do so, and all
its terms and conditions for copying, distributing or modifying the
Library or works based on it.
10. Each time you redistribute the Library (or any work based on the
Library), the recipient automatically receives a license from the original
licensor to copy, distribute, link with or modify the Library subject to
these terms and conditions. You may not impose any further
restrictions on the recipients' exercise of the rights granted herein. You
are not responsible for enforcing compliance by third parties to this
License.
11. If, as a consequence of a court judgment or allegation of patent
infringement or for any other reason (not limited to patent issues),
conditions are imposed on you (whether by court order, agreement or
otherwise) that contradict the conditions of this License, they do not
excuse you from the conditions of this License. If you cannot distribute
so as to satisfy simultaneously your obligations under this License and
any other pertinent obligations, then as a consequence you may not
distribute the Library at all. For example, if a patent license would not
permit royalty-free redistribution of the Library by all those who
receive copies directly or indirectly through you, then the only way you
could satisfy both it and this License would be to refrain entirely from
distribution of the Library.
If any portion of this section is held invalid or unenforceable under any
particular circumstance, the balance of the section is intended to apply,
and the section as a whole is intended to apply in other circumstances.
It is not the purpose of this section to induce you to infringe any
patents or other property right claims or to contest validity of any such
claims; this section has the sole purpose of protecting the integrity of
the free software distribution system which is implemented by public
license practices. Many people have made generous contributions to
the wide range of software distributed through that system in reliance
on consistent application of that system; it is up to the author/donor to
decide if he or she is willing to distribute software through any other
system and a licensee cannot impose that choice.
This section is intended to make thoroughly clear what is believed to be
a consequence of the rest of this License.
12. If the distribution and/or use of the Library is restricted in certain
countries either by patents or by copyrighted interfaces, the original
copyright holder who places the Library under this License may add an
explicit geographical distribution limitation excluding those countries,
so that distribution is permitted only in or among countries not thus
excluded. In such case, this License incorporates the limitation as if
written in the body of this License.
13. The Free Software Foundation may publish revised and/or new
versions of the Library General Public License from time to time. Such
new versions will be similar in spirit to the present version, but may
differ in detail to address new problems or concerns.
Each version is given a distinguishing version number. If the Library
specifies a version number of this License which applies to it and “any
later version”, you have the option of following the terms and
conditions either of that version or of any later version published by
the Free Software Foundation. If the Library does not specify a license
version number, you may choose any version ever published by the
Free Software Foundation.
13. If you wish to incorporate parts of the Library into other free
programs whose distribution conditions are incompatible with these,
write to the author to ask for permission. For software which is
copyrighted by the Free Software Foundation, write to the Free
Software Foundation; we sometimes make exceptions for this. Our
decision will be guided by the two goals of preserving the free status of
all derivatives of our free software and of promoting the sharing and
reuse of software generally.
NO WARRANTY
16. BECAUSE THE LIBRARY IS LICENSED FREE OF CHARGE,
THERE IS NO WARRANTY FOR THE LIBRARY, TO THE EXTENT
PERMITTED BY APPLICABLE LAW. EXCEPT WHEN OTHERWISE
STATED IN WRITING THE COPYRIGHT HOLDERS AND/OR
OTHER PARTIES PROVIDE THE LIBRARY “AS IS” WITHOUT
WARRANTY OF ANY KIND, EITHER EXPRESSED OR IMPLIED,
INCLUDING, BUT NOT LIMITED TO, THE IMPLIED
WARRANTIES OF MERCHANTABILITY AND FITNESS FOR A
PARTICULAR PURPOSE. THE ENTIRE RISK AS TO THE QUALITY
AND PERFORMANCE OF THE LIBRARY IS WITH YOU. SHOULD
THE LIBRARY PROVE DEFECTIVE, YOU ASSUME THE COST OF
ALL NECESSARY SERVICING, REPAIR OR CORRECTION.
16. IN NO EVENT UNLESS REQUIRED BY APPLICABLE LAW OR
AGREED TO IN WRITING WILL ANY COPYRIGHT HOLDER, OR
ANY OTHER PARTY WHO MAY MODIFY AND/OR
REDISTRIBUTE THE LIBRARY AS PERMITTED ABOVE, BE
LIABLE TO YOU FOR DAMAGES, INCLUDING ANY GENERAL,
SPECIAL, INCIDENTAL OR CONSEQUENTIAL DAMAGES
ARISING OUT OF THE USE OR INABILITY TO USE THE LIBRARY
(INCLUDING BUT NOT LIMITED TO LOSS OF DATA OR DATA
BEING RENDERED INACCURATE OR LOSSES SUSTAINED BY
YOU OR THIRD PARTIES OR A FAILURE OF THE LIBRARY TO
OPERATE WITH ANY OTHER SOFTWARE), EVEN IF SUCH
HOLDER OR OTHER PARTY HAS BEEN ADVISED OF THE
POSSIBILITY OF SUCH DAMAGES.
END OF TERMS AND CONDITIONS
APPENDIX: HOW TO APPLY THESE TERMS TO YOUR
NEW LIBRARIES
If you develop a new library, and you want it to be of the greatest
possible use to the public, we recommend making it free software that
everyone can redistribute and change. You can do so by permitting
redistribution under these terms (or, alternatively, under the terms of
the ordinary General Public License).
To apply these terms, attach the following notices to the library. It is
safest to attach them to the start of each source file to most effectively
convey the exclusion of warranty; and each file should have at least the
“copyright” line and a pointer to where the full notice is found.
<one line to give the library's name and a brief idea of what it does.>
Copyright (C) <year> <name of author>
This library is free software; you can redistribute it and/or modify it
under the terms of the GNU Library General Public License as
published by the Free Software Foundation; either version 2 of the
License, or (at your option) any later version.
This library is distributed in the hope that it will be useful, but
WITHOUT ANY WARRANTY; without even the implied warranty of
MERCHANTABILITY or FITNESS FOR A PARTICULAR PURPOSE.
See the GNU Library General Public License for more details.
You should have received a copy of the GNU Library General Public
License along with this library; if not, write to the FreeSoftware
Foundation, Inc., 675 Mass Ave, Cambridge, MA 02139, USA.
Also add information on how to contact you by electronic and paper
mail.
You should also get your employer (if you work as a programmer) or
your school, if any, to sign a “copyright disclaimer” for the library, if
necessary. Here is a sample; alter the names:
Yoyodyne, Inc., hereby disclaims all copyright interest in the library
`Frob' (a library for tweaking knobs) written by James Random Hacker.
<signature of Ty Coon>, 1 April 1990
Ty Coon, President of Vice
That's all there is to it!
Appendix
Troubleshooting
This chapter includes the following topics:
■
About troubleshooting
■
Accessing troubleshooting information
C
98 Troubleshooting
About troubleshooting
About troubleshooting
You can find up-to-date troubleshooting information for Symantec Gateway
Security 5400 Series (and all Symantec products) on the Symantec Web site,
www.symantec.com.
Accessing troubleshooting information
Use the following procedure to access troubleshooting information from the
Symantec Knowledge Base.
To access Symantec Gateway Security 5400 Series troubleshooting
information
1
Go to www.symantec.com.
2
On the top of the home page, click support.
3
Under Product Support > enterprise, click Continue.
4
On the Support enterprise page, under Technical Support, click knowledge
base.
5
Under select a knowledge base, scroll down and click Symantec Gateway
Security 5400 Series.
6
Click on your specific product name and version.
7
On the knowledge base page for Symantec Gateway Security 5400 Series, do
any of the following:
■
On the Hot Topics tab, click any of the items in the list to view a detailed
list of knowledge base articles on that topic.
■
On the Search tab, in the text box, type a string containing your
question. Use the drop-down list to determine how the search is
performed and click Search.
■
On the Browse tab, expand a heading to see knowledge base articles
related to that topic.
Appendix
Specifications and safety
This chapter includes the following topics:
■
About this appendix
■
Product specifications
■
Safeguard instructions
■
Product certifications
D
100 Specifications and safety
About this appendix
About this appendix
This appendix lists the product specifications and safety certifications.
Product specifications
Each respective model offers increased performance and these different
specifications are listed in Table D-1.
Table D-1
Product specifications
Parameter
Model 5420
Model 5440/5441
5460/5461
Length
43.2 cm (17 in.)
61 cm (24.00 in.)
61 cm (24.00 in.)
Width
43.2 cm (17 in.)
43.2 cm (17 in.)
43.2 cm (17 in.)
Height
4.45 cm (1.75 in.)
8.9 cm (3.50 in.)
8.9 cm (3.50 in.)
Weight
6.17 kg (13.6 lb)
9.66 kg (21.3 lb)
10.3 kg (22.7 lb)
Network
interfaces
6 10/100
6 10/100/1000
8 10/100/1000
User interface
2 line x 16 character LCD
2 line x 16 character LCD
2 line x 16 character LCD
Operating
temperature
range
41° to 91° F (5° to 35° C)
32° to 104° F (0° to 40° C)
32° to 104° F (0° to 40° C)
Storage
temperature
range
32° to 104° F (0° to 40° C)
32° to 104° F (0° to 40° C)
32° to 104° F (0° to 40° C)
Operating
humidity
10-80% non-condensing
10-80% non-condensing
10-80% non-condensing
Non-operating
humidity
95% non-condensing
95% non-condensing
95% non-condensing
AC power
90-264 VAC
90-264 VAC
90-264 VAC
Input frequency 47-63 Hz
47-63 Hz
47-63 Hz
Maximum
power
capability
575 W
575 W
300 W
Specifications and safety
Safeguard instructions
Table D-1
Product specifications (Continued)
Parameter
Model 5420
Model 5440/5441
5460/5461
Typical power
draw
175 W
400 W
400 W
Safeguard instructions
For your protection, please read all these instructions regarding your appliance.
■
Read instructions
Read and understand all the safety and operating instructions before
operating the appliance.
■
Ventilation
Vents on the front and rear and the fan opening on the back panel of the
Symantec Gateway Security 5400 Series provide ventilation for reliable
product operation and to protect it from overheating. These openings must
not be blocked or covered. This product should not be placed in an enclosure
unless proper ventilation is provided.
■
Power cord
Caution: The power-supply cord is used as the main disconnect device.
Ensure that the socket outlet is located or installed near the equipment and is
easily accessible.
Caution: Français: Le cordon d’alimentation sert d’interrupteur général. La
prise de courant doit être située or installée à proximité du matérial et offrir
un accès facile.
Caution: Deutsch: Zur sicheren Trennung des Gerätes vom Netz ist der
Netzstecker zu ziehen. Vergewissern Sie sich, daß die Steckdose leicht
zugänglich ist.
101
102 Specifications and safety
Safeguard instructions
Warning: To reduce the risk of electrical shock, do not disassemble this
product. Return it to Symantec when service or repair work is required.
Opening or removing covers may expose you to dangerous voltage or other
risks. Incorrect reassembly can cause electric shock when this product is
subsequently used.
Note: Opening the cover voids your warranty!
Warning: To prevent a possible electrical shock when installing the device,
ensure that the power cord for the device is unplugged before installing
network cables.
Warning: To prevent a possible electrical shock, when adding the device to a
system, disconnect all power cords, if possible, from the existing system
before connecting the signal cable to that device.
Warning: To prevent a possible electrical shock during an electrical storm,
do not connect or disconnect cables.
Warning: To prevent a possible electrical shock from touching two surfaces
with different electrical grounds, use one hand, when possible, to connect or
disconnect signal cables.
Warning: To avoid a shock hazard, the power cord must be connected to a
properly wired and earthed receptacle.
Warning: To avoid a shock hazard, any equipment to which this product will
be attached must also be connected to properly wired receptacles.
Warning: Electrical current from power, telephone, and network cables is
hazardous.
Specifications and safety
Product certifications
■
Operating the unit in an equipment rack
If you plan to install the Symantec Gateway Security 5400 Series in an
equipment rack, use these precautions:
■
Ensure the ambient temperature around the appliance (which may be
higher than the room temperature) are within the specified limits.
■
Ensure there is sufficient air flow around the unit.
■
Ensure electrical circuits are not overloaded; consider the nameplate
ratings of all the connected equipment and ensure you have overcurrent
protection.
■
Ensure the equipment is properly grounded, particularly any equipment
connected to a power strip.
■
Do not place any objects on top of the appliance.
Product certifications
The Symantec Gateway Security 5400 Series is designed to meet the following
regulatory requirements for public safety:
■
UL and CSA Standard for Safety of Information Technology Equipment
including Electrical Business Equipment (UL 60950, 3rd Edition and CAN/
CSA C22.2 No.60950-00). This Class A digital apparatus complies with
Canadian ICES-003. (Cet appareil numérique de la classe A est conforme à la
norme NMB-003 du Canada.)
■
VCCI
■
CE
■
FCC part 15B, Class A
■
EMC:
■
EN55022 (1998), Class A Emissions (Radiated & Conducted)
■
EN61000-3-2 (2000), Harmonics
■
EN61000-3-3 (1995), Flicker
■
EN61000-4-2 (1995), ESD: 8 kV AD, 4 kV CD
■
EN61000-4-3 (2002), RF Immunity: 10 V/m, 80 MHz - 1 GHz
■
EN61000-4-4 (1995), EFT/Burst: 1 kV Power, .5 kV Signal Cables
■
EN61000-4-5 (1995), Surge: 1 kV (L-L), 2 kV (L-G)
■
EN61000-4-6 (1996), Conducted RF Immunity: 3V, 150 kHz – 80 MHz
103
104 Specifications and safety
Product certifications
■
EN61000-4-11 (1994): >95%/0.5T, 30%/25T, >95%/250T
■
Safety:EN60950-1 (2002)
This device complies with Part 15B of the FCC Rules. Operation is subject to two
conditions:
■
This device may not cause harmful interference.
■
This device must accept any interference received, including
interference that may cause undesired operation.
Index
Numerics
D
30-day grace period 70, 74, 86
DHCP 45
displaying, system information 34
documentation, supplied 7
A
access lists, checklists 64
activating, license files 74
additive licenses 85
additive session licenses 85
address configuration 29
administrator password 30
advanced configurations 47
appliance serial numbers and node organizer 73
appliance setup 31
authentication method, checklist 57
B
back panel features
model 5420 14
models 5440/5460 16
browser support 6, 29
C
CD-ROMs, replacement 9
certifications 103
configuration
setup worksheets 30
System Setup Wizard 41
connecting
model 5420 to network 15
model 5420 uninterupptible power supply
(UPS) 16
models 5440/5460 to network 19
models 5440/5460 uninterruptible power supply
(UPS) 21
SGMI 40
content updates 86
cooling fan 14, 18
E
electric shock 102
enable
DHCP 45
external Ping. 46
F
factory reset 36
front panel
layout 25
front panel controls
description 25
locking 47
G
GNU general public license 91
GNU library general public license 93
Gold Maintenance 87
H
heartbeat interface 44, 46
high availability/load balancing 44
I
inside interface, configuring 31
installing
model 5420 power cord 16
models 5440/5460 power cord 20
rack mount 13
rack-mounting 13
stand-alone SGS 5400 Series appliance 12
third-party product 47
106 Index
interface
inside 31
IP addresses checklist 60
J
Java Runtime Environment, supported version 6
L
LCD display 25
LEDs. See status indicators.
license
GNU general public 91
types 84
license certificates 86
license files
activating 74
installation 43
obtaining 74
organizing 72
removing 80, 82
requesting 71
uploading 80
viewing 82
License Installation Wizard 43
license serial number
obtaining 70
organizing 70
licensing and maintenance 83
licensing, Symantec Client VPN 84
M
MAC address 46
maintenance
contracts 86
Gold 87, 88
Platinum 88
renewals 88
Microsoft Internet Explorer, version 6, 29
model
5420 14
5440/5460 16
monitoring mode 34
N
navigation buttons 25
Netscape, version 6, 29
network
address information 29
architecture checklist 66
configuration 29
connections
model 5420 15
models 5440/5460 19
setup 35
setup worksheet 30
password 30
status indicators 26
news service, checklist 63
node
definition 83
licensing 83
O
obtaining, license file 36, 74
operating system, restoring 48
P
password 36
administrator 30
changing 31
LCD 30, 32, 33
logon 38, 40
root password 30
ping, external interface 46
Platinum maintenance 88
Platinum support 88
power cord installation
model 5420 16
models 5440/5460 20
power reset switch 18
power socket 14, 18
power switch 14, 18
product component list 8
product specifications 100
proxies checklist 61
R
regulatory requirements 103
removing license file 80, 82
replacing, CD-ROMs 9
reset 36
Index
restoring, operating system 48
root password 30
turning on
model 5420 16
models 5440/5460 20
S
safety
electric shock 102
equipment rack 103
Security Gateway Management Interface. See SGMI.
security plan
checklist 52
worksheets 55
serial console port 14, 19
setting up
appliance 31
SGMI 40
SGMI
browser address 39, 41
System Setup Wizard 41
shutdown 35
site hardware information, checklist 58
software serial number certificate 74
status indicators
active connection 26
disk 26
Ethernet connection 26
hard disk drive 26
receive 26
temp 26
traffic 26
transmit 26
Web activity 26
Symantec Software License Agreement 89
Symantec System ID 71, 76
system
information 34
system menu
factory reset 36
network setup 35
shutdown 35
system ID 36
System Setup Wizard 41
T
TCP/IP checklist 59
temperature 26
troubleshooting 98
U
unlocking front panel controls 47
uploading license files 43
UPS, suppliers 21
USB port
connecting UPS power supply 21
modem connection 15, 19
smart UPS support 15
USB port smart UPS support 19
user documentation 7
using locked front panel controls 47
using, system menu 35
V
viewing license file 82
W
WEB service, checklist 63
wizards
License Installation Wizard 43
System Setup Wizard 41
worksheets
network setup 30
security planning 55
107
108 Index