1
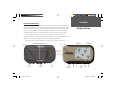
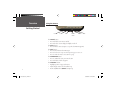
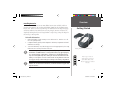
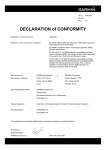
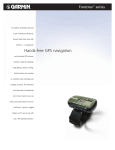
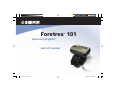
Foretrex 101
™
personal navigator®
owner’s manual
190-00360-00_0A.indd a
3/29/2004, 11:31:06 AM
© Copyright 2004 Garmin Ltd. or its subsidiaries
Garmin International, Inc.
1200 E 151st Street,
Olathe, Kansas 66062 U.S.A.
Tel. 913/397.8200
Fax. 913/397.8282
Garmin (Europe) Ltd.
Unit 5, The Quadrangle,
Abbey Park Industrial Estate,
Romsey, SO51 9AQ U.K.
Tel. 44/1794.519944
Fax. 44/1794.519222
Garmin Corporation
No. 68, Jangshu 2nd Road,
Shijr, Taipei County, Taiwan
Tel. 886/2.2642.9199
Fax. 886/2.2642.9099
All rights reserved. Except as expressly provided herein, no part of this manual may be reproduced, copied, transmitted, disseminated, downloaded, or stored in any storage medium for any purpose without prior written consent of Garmin. Garmin hereby grants permission to download
a single copy of this manual onto a hard drive or other electronic storage medium to be viewed for personal use, provided that such electronic or
printed copy of this manual or revision must contain the complete text of this copyright notice and provided further that any unauthorized commercial distribution of this manual is strictly prohibited.
Information in this manual is subject to change without notice. Garmin reserves the right to change or improve its products and to make changes
in the content without obligation to notify any person or organization of such changes. Visit the Garmin Web site (www.Garmin.com) for current
updates and supplemental information concerning the use and operation of this and other Garmin products.
Garmin®, AutoLocate®, Personal Navigator®, MapSource®, TracBack®, and BlueChart® are registered trademarks and PanTrack™ and Foretrex 101™
are trademarks of Garmin Ltd. or its subsidiaries and may not be used without the express permission of Garmin.
March 2004
190-00360-00_0A.indd b
Part Number 190-00360-00 Rev. A
Printed in Taiwan
3/29/2004, 11:31:33 AM
Thank you for choosing the Garmin Foretrex 101. To get the most from your new
Foretrex 101, read through the Quick Start Guide first, then this Owner’s Manual to understand all of the operating features.
The Quick Start Guide describes the process of navigating the Main Pages and the Option
Menus, along with some basic unit operations to familiarize you with your new Foretrex
101 right out of the box. Read the Quick Start Guide first.
This Owner’s Manual describes the Main Pages of the Foretrex 101 and their options in
detail. While the Owner’s Manual provides some direction on how to select and change
items, its main intention is to describe each Main Page, Option Menu, and feature in detail.
This manual is organized into the following sections:
The Introduction chapter provides care information and the Table of Contents.
The Overview chapter provides basic information about the Foretrex 101.
The Main Pages chapter provides information on each of the six Main Pages, listed in
the same order as viewed on the unit. The section for each page provides an overview that
discusses the page, how it functions, and step-by-step instructions for using the page and its
features.
The Main Menu chapter provides information on each page in the Main Menu:
Waypoints, Tracks, Routes, and Setup. The section for each page provides an overview that
discusses the page, how it functions, and step-by-step instructions for using the page and its
features.
The Appendix includes additional information about the Foretrex 101
The Index provides keywords and the pages on which they appear.
Introduction
About This Manual
Standard Package Contents:
1 Foretrex 101 Unit
1 Strap Extension
1 Wrist Strap
1 Owner’s Manual
1 Quick Start Guide
Check to see that your package includes the items listed above. If any parts
are missing, contact your Garmin dealer
immediately.
i
190-00360-00_0A.indd i
3/29/2004, 11:31:34 AM
Introduction
Care Information
Cleaning the Unit and Wrist Strap
The Foretrex 101 is constructed of high quality materials and does not require user
maintenance other than cleaning. Clean the unit using a cloth dampened with a mild detergent solution and then wipe dry. Avoid chemical cleaners and solvents that may damage
plastic components.
The wrist strap should be hand washed with mild detergent in warm or hot water. Blot
dry then air dry. Do not machine wash.
Storing the Foretrex 101
Do not store the Foretrex 101 where prolonged exposure to temperature extremes may
occur (such as in the trunk of a car) as permanent damage may result. User information,
such as waypoints and routes will be retained in the unit’s memory without the need for
battery power.
Immersing the Unit in Water
The Foretrex 101 is waterproof to IEC Standard 60529 IPX7. It can withstand immersion in 1 meter of water for 30 minutes. Prolonged submersion can cause damage to
the unit. After submersion, be certain to wipe and air dry the unit (including the battery
compartment) before reuse or charging.
To resolve problems that cannot be remedied using this guide, contact Garmin Product
Support in the U.S.A. at 800/800.1020 or Garmin Europe at 44/1794.519944.
ii
190-00360-00_0A.indd ii
3/29/2004, 11:31:34 AM
Introduction.............................i
Care Information .......................................ii
Cleaning the Unit and Wrist Strap........... ii
Storing the Foretrex 101 ......................... ii
Immersing the Unit in Water................... ii
Table of Contents .....................................iii
Overview ................................1
Getting Started .........................................1
Foretrex 101 Overview............................ 1
Using the Buttons.................................... 2
Using the Wrist Strap .............................. 3
Installing Batteries ................................... 5
Turning on the Foretrex 101.................... 6
Using the Main Pages .............................. 7
Switching Between the Main Pages .......... 7
Main Pages .............................8
Satellite Page ............................................8
Using the Satellite Page ........................... 8
Using the Satellite Page Options .............. 8
Adjusting the Backlighting and Contrast . 9
Map Page.................................................10
Using the Map Page............................... 10
Map Page Options ................................. 10
Navigation Page ......................................13
Using the Navigation Page..................... 13
Navigation Page Options ....................... 13
Trip Computer..........................................14
Using the Trip Computer....................... 14
Trip Computer Options......................... 14
Timer Page...............................................15
Displaying the Timer Page..................... 15
Setting the Timer................................... 15
Using the Timer Page ............................ 17
Introduction
Table of Contents
Main Menu Pages .................18
Main Menu Page......................................18
Main Menu Page Basics ......................... 18
Waypoints Menu Page .............................19
Waypoints Menu Page ........................... 19
Marking a Waypoint ............................. 21
Editing a Waypoint................................ 21
Review Waypoint Page .......................... 24
Projecting a Waypoint ........................... 26
Hunting and Fishing Information.......... 27
Sun and Moon Information ................... 28
Tracks Menu Page....................................29
Using the Tracks Menu Page.................. 29
Using the Track Log .............................. 30
Pan Options .......................................... 30
Using the Setup Track Page ................... 31
Using Saved Tracks................................ 31
Track Page Options ............................... 33
iii
190-00360-00_0A.indd iii
3/29/2004, 11:31:34 AM
Introduction
Table of Contents
Routes Menu Page...................................34
Using the Routes Menu Page ................. 34
Creating a Route.................................... 34
Using the Route Page............................. 35
Deleting All Routes................................ 36
Route Setup........................................... 37
Route Setup Options ....................... 37
Editing a Route...................................... 38
Navigating a Route ................................ 40
Setup Menu: Set Timer ............................41
Using the Setup Menu........................... 41
Set Timer Page....................................... 41
Setting the Timer............................. 42
Expired and Interval Timer Tones ... 43
Setup Menu: Set Time..............................44
Set Time Page........................................ 44
Time Zone....................................... 44
Daylight Savings Time..................... 45
Setup Menu: Set Display .........................46
Set Display Page .................................... 46
Light Timeout ................................. 46
Contrast .......................................... 46
Setup Menu: Set Units.............................47
Set Units Page ....................................... 47
Position Format............................... 47
Map Datums.................................... 48
Distance/Speed, Elevation,
and Vertical Speed..................... 49
Defaults........................................... 49
Setup Menu: Set Heading........................50
Set Heading Page................................... 50
North Reference .............................. 50
Setup Menu: Set Interface.......................51
Set Interface Page .................................. 51
Setup Menu: Set System..........................52
Set System Page..................................... 52
GPS Mode ....................................... 53
Owner Info ..................................... 53
Appendix ..............................54
Specifications ..........................................54
Optional Accessories ............................. 54
Physical................................................. 54
Performance .......................................... 54
Power.................................................... 54
Data Field Options...................................55
Compliance, License,
and Warranty Information.................57
FCC Compliance................................... 57
Software License Agreement .................. 58
Product Registration.............................. 58
Limited Warranty .................................. 59
Safety Information ..................................61
Index.....................................62
iv
190-00360-00_0A.indd iv
3/29/2004, 11:31:35 AM
Foretrex 101 Overview
Your small, rugged, and waterproof Foretrex 101 unit is perfect for easily maneuvering
from one waypoint to the next. With handy and convenient wrist-strap design, the powerful Foretrex 101 allows you to store up to 500 waypoints and 20 routes in the unit’s memory, while also providing built-in WAAS capability. In addition, the Foretrex 101 boasts a
customizable trip computer, 10,000 track points, as well as PanTrack ™ and TracBack®.
With an optional PC Interface Cable, you can connect your Foretrex 101 to your
computer to transfer waypoints and routes between MapSource and your unit. Refer to the
MapSource User’s Guide and MapSource Help File for complete information.
The images below describe the buttons and some features of your Foretrex 101.
Back View (without strap)
Strap spring
bars
Overview
Getting Started
Front View
Built-in GPS
Antenna
LCD Display
(with Backlight)
PC Interface
Cable Connector
under
weather cap
Battery Cover
Serial Number
Speaker
POWER GOTO
BACKLIGHT
PAGE
ENTER
MARK
DOWN UP
1
190-00360-00_0A.indd 1
3/29/2004, 11:31:54 AM
Overview
Using the Buttons
Getting Started
POWER
GOTO
PAGE
ENTER/
MARK
DOWN
UP
The POWER button:
• Press and hold to turn unit on and off
• Press and release to turn display backlight on and off
The GOTO button:
• Press to initiate a Goto (navigate to a specific destination/waypoint)
The PAGE button:
• Press to switch between the Main Pages
• Press to back out or escape out of the present page or screen, or
• Press to ‘undo’ the most recent action on a page
The ENTER/MARK button:
• Press to confirm data entry or menu selection
• Press and hold to mark a waypoint
The UP/DOWN buttons:
• Highlight options on pages and menus
• Adjust display contrast on the Satellite Page
• Zoom out (UP) and in (DOWN) on Map Page
2
190-00360-00_0A.indd 2
3/29/2004, 11:32:10 AM
Using the Wrist Strap
The Foretrex 101 has been designed to comfortably fit your wrist. For best performance, wear the Foretrex 101 like a watch, with the top face of the unit oriented towards
the sky. A strap extension provides additional length and easily attaches to the existing
strap.
Overview
Getting Started
To fasten the Foretrex 101 to your wrist:
1. With the strap open, place the Foretrex 101 on your wrist.
2. Slide the end of the strap through the connector.
3. Adjust to fit comfortably and secure the strap using the Velcro®. Do not adjust too
tightly around your wrist as this may restrict blood circulation.
To add the strap extension:
1. Slide the end of the existing strap through the connector on the extension.
2. Place the Foretrex 101 on your wrist or arm.
3. Slide the end of the extension through the existing connector.
4. Adjust to fit comfortably and secure the strap using the Velcro®. Do not adjust too
tightly around your wrist/arm as this may restrict blood circulation.
3
190-00360-00_0A.indd 3
3/29/2004, 11:32:14 AM
Overview
To remove the wrist strap from the Foretrex 101:
1. Place your Foretrex 101 on a cloth or soft surface to avoid scratching the case.
Getting Started
2. While holding the Foretrex 101 steady with one hand, use a jeweler’s band pin
removing tool or a very soft flat head screwdriver. Catch the spring bar’s loaded stem
and pull it back enough for the band to clear the case’s edge.
To replace the wrist strap on the Foretrex 101:
1. To reinstall, insert the spring bar into the wristband and place one side of the spring bar
into one pinhole.
2. Compress the spring bar, and snap it into the other pinhole. Be sure that the spring
bars are secure in the pinholes before using your Foretrex 101.
4
190-00360-00_0A.indd 4
3/29/2004, 11:32:15 AM
Installing Batteries
The Foretrex 101 operates on two AAA alkaline batteries (not included), which are
placed in the back of the unit. Rechargeable alkaline, NiMH, NiCad, or lithium batteries
may be used. Refer to section “Set System Page” for instructions on selecting battery type.
Stored data will not be lost while batteries are being changed. However, if batteries are
completely discharged and are not changed within a couple of days, it may take longer for
the unit to get a GPS signal fix.
Overview
Getting Started
To install the batteries:
1. Remove the battery cover by inserting a coin in the bottom slot. Twist the coin to lift
the cover up and pull away.
2. Compare the battery polarity with the diagram in the battery compartment and install
the batteries accordingly.
3. To re-install the battery cover, slide the top portion into the appropriate slot, then snap
the bottom section securely to the base of the unit.
NOTE: When replacing batteries, use only new or fully charged batteries. Do not
mix Alkaline and NiMH batteries. Rechargeable batteries may typically display
less capacity than disposable batteries. Extensive use of backlighting and key
beep tones will significantly reduce battery life. Remove the batteries from the
unit if you do not plan to use it for several months. Storing batteries in the unit
for long periods may result in leakage and damage to the battery compartment.
NOTE: Follow the manufacturer’s instructions for proper care and disposal of used
batteries. Do not incinerate used batteries, as internal materials may ignite with
explosive violence.
Installing AAA batteries into the Foretrex 101
Battery usage icon shows an
estimate of battery life left. Four
squares with the battery outline
indicates new batteries are installed
in the unit.
5
190-00360-00_0A.indd 5
3/29/2004, 11:32:31 AM
Overview
Getting Started
Turning on the Foretrex 101
After you have placed the batteries in the Foretrex 101, it is ready for use. Allow the
Foretrex 101 time to track satellites and determine your position the first time you use it.
Upon startup, the GPS signal bar appears. As the Foretrex 101 locates more satellites and
the signal strength increases, the bar moves to the right. Estimated GPS accuracy displays
underneath the GPS signal bar. Refer to the previous page for battery installation information.
To turn on the Foretrex 101:
1. Press and hold the POWER button until the Satellite Page is displayed, then release.
Satellite Page
2. Your Foretrex 101 automatically begins acquiring satellites. The GPS signal bar and
accuracy fields are shown on the Satellite Page as well as an image that is acquiring
satellites. The satellite dish icon on the left side of the screen flashes while the Foretrex
101 determines your location.
3. Leave the Foretrex 101 with a clear view of the sky for 15–30 minutes initially. After
the first use, it should only take less than a couple minutes to acquire satellites.
4. When the Foretrex 101 acquires enough satellite signals to determine your location, the
satellite dish icon on the left side of the screen stops flashing.
NOTE: If you have moved over 500 miles from the location you last used your
Foretrex 101 unit, or you have not used your Foretrex 101 in more than one
month, it may take 15 to 30 minutes to determine your location.
6
190-00360-00_0A.indd 6
3/29/2004, 11:32:37 AM
Using the Main Pages
All of the information needed to operate the Foretrex 101 is found on six main ‘pages’
(or display screens). These pages are the Satellite, Map, Navigation, Trip Computer, Timer
(if enabled), and Main Menu.
Overview
Getting Started
Switching Between the Main Pages
Simply press the PAGE button to switch between pages as shown below.
Satellite Page
Map Page
Navigation Page
Main Menu Page
Timer Page (if enabled)
Trip Computer Page
7
190-00360-00_0A.indd 7
3/29/2004, 11:32:38 AM
Main Pages
Satellite Page
Satellite Page
Satellite Page Options
Advanced Skyview
Using the Satellite Page
The Satellite Page shows the Foretrex 101 gathering all the necessary satellite information in order to work. The Satellite Page shows you the satellites being acquired (in animation), satellite signal strength, and the Foretrex 101 unit’s estimated location accuracy.
When the message on the Satellite Page no longer reads “Acquiring...”, the Foretrex 101
has found your location and you are ready to go!
NOTE: If you are using your Foretrex 101 for the first time, have moved over 500
miles from the location you last used your Foretrex 101 unit, or have not used
your Foretrex 101 in more than one month, allow time for the unit to track satellites by leaving it outside with a clear view of the sky for 15 to 30 minutes.
Using the Satellite Page Options
Press the ENTER button to display the Satellite Page Options.
Setup Display: Press ENTER when ‘SETUP DISPLAY’ is highlighted to open the Display
Setup Page. Refer to the next section for information about the Light Timeout and Contrast.
Advanced Sky View: Press ENTER when ‘ADVANCED SKYVIEW’ is highlighted to switch
the animation to the advanced sky view that displays two circles with numbers indicating
the satellites the unit is acquiring. The bars on the right side of the page indicate the signal
strength of each satellite. When the unit is set to display the Advanced Sky View Page,
you can set the orientation of the map by toggling between Orient Sky Ahead and Orient
Sky Northward. Toggle back to the normal sky view by pressing the ENTER button when
‘NORMAL SKYVIEW’ is highlighted.
About Foretrex: Press ENTER to display the software version and copyright information.
8
190-00360-00_0A.indd 8
3/29/2004, 11:32:39 AM
Adjusting the Backlighting and Contrast
If the lighting conditions make it hard for you to see the screen, adjust the contrast or
turn on the backlight. You may also make these adjustments through the Main Menu Page.
Refer to the “Setup Menu: Set Display” section for more information.
Main Pages
Satellite Page
To use the backlight:
1. Press and release the POWER button from any screen to turn on the backlight.
2. The backlight is timed to stay on for 30 seconds. Press the POWER button again if you
wish to turn the backlight off before the automatic light timeout.
To adjust the backlight timeout from the Satellite Page:
Satellite Page Options
1. Press the PAGE button until you see the Satellite Page.
2. Press ENTER to display the Satellite Page Options.
3. Press UP/DOWN to highlight ‘SETUP DISPLAY’ from the options menu. Press ENTER.
3. Press UP/DOWN to highlight the line below ‘LIGHT TIMEOUT’. Press ENTER.
4. Press UP/DOWN to highlight the desired duration for the backlight to remain on before
it automatically turns off. Press ENTER to select the desired time limit.
Display Setup
To adjust the screen contrast from the Satellite Page:
1. Press the PAGE button until you see the Satellite Page.
2. Press ENTER to display the Satellite Page Options.
3. Press UP/DOWN to highlight ‘SETUP DISPLAY’ from the options menu. Press ENTER.
Use the UP/DOWN buttons to highlight the line below ‘CONTRAST’. Press ENTER.
Or Press UP/DOWN on the Satellite Page to automatically bring up the contrast slider.
4. Press the UP button to make the screen darker or the DOWN button to make it lighter.
9
190-00360-00_0A.indd 9
3/29/2004, 11:32:39 AM
Main Pages
Map Page
Map Page
Map Page Options
Using the Map Page
The Map Page shows where you are (the animated figure) and provides a picture of
where you are going. As you travel (the animated figure ‘walks’) and leaves a ‘trail’ (track
log). Waypoint names and symbols are also shown on the map.
To help you better visualize the ‘real world’, Foretrex 101 automatically rotates the
map as you move, so that waypoints that are ahead of you are always displayed above the
animated figure. The Heading Indicator shows the direction you are heading.
To make sure you can see your entire trip, you can change the map scale (from 20 feet to
800 miles) by pressing and holding the UP button to view a larger area (zoom out), or the
DOWN button for viewing a smaller area (zoom in).
Map Page Options
Press ENTER when the Map Page is displayed to access the Map Page Options. The
following options are available:
Clear Track Log: Press ENTER when this is highlighted to clear the track log that is created automatically.
Measure Distance: Press ENTER when this is highlighted to measure the distance between
two waypoints. Refer to the procedure titled “To Measure Distance” for instructions on
measuring distance.
10
190-00360-00_0A.indd 10
3/29/2004, 11:32:40 AM
Map Setup: Press ENTER when this is highlighted to adjust the map settings including:
Orient Map (Ahead or Northward): When ‘AHEAD’ is selected, the top of the map
is oriented in the direction you are currently moving. When ‘NORTHWARD’ is
selected, the map is always oriented to the North.
Auto Zoom (On or Off): When ‘AUTO ZOOM’ is turned on, the map automatically
adjusts its scale to display your entire navigating route until you manually change
the zoom level. When it is turned off, you must press the UP or DOWN button to
select the appropriate map scale.
Waypoints (Show or Hide): Allows you to view the map with or without waypoints.
Goto Line (Bearing or Course): Toggles between Bearing (always directed at destination and follows you as you move) and Course (fixed from your starting location).
Defaults: Press ENTER when this is highlighted to restore the unit to the default Map
Setup settings.
The following option is shown only if you have an active track log:
Pan Track Log: Press ENTER when this is highlighted to move the pointer to any point
along the track. Press ENTER to then start a TRACBACK or a Goto, MARK a waypoint, or
ZOOM In or Out.
The following option is shown only if you are actively navigating to a destination:
Stop Navigation: Press ENTER when this is highlighted to stop any active navigation.
Navigation refers to any time you are using the Foretrex to guide you to a destination.
Main Pages
Map Page
Map Setup Page
Pan Track Log
Map Page Options
11
190-00360-00_0A.indd 11
3/29/2004, 11:32:40 AM
Main Pages
To clear the track log from the Map Page:
1. Press the ENTER button while on the Map Page to display the Map Page Options.
Map Page
2. Press the UP or DOWN button to highlight ‘CLEAR TRACK LOG’ and press the ENTER
button.
3. At the message “DO YOU REALLY WANT TO CLEAR THE TRACK LOG?”, use the DOWN
button to highlight ‘YES’ and press the ENTER button to clear the track log and return
to the Map Page.
To measure distance:
Clearing the Track Log
1. Press the PAGE button until you see the Map Page. Press ENTER to display the Map
Page Options.
2. Press UP/DOWN to highlight ‘MEASURE DISTANCE’ from the options menu. Press
ENTER.
3. Press ENTER when the field to the right of ‘FROM’ is highlighted to select a waypoint
from which to measure. Use the arrow buttons to highlight the desired waypoint from
the waypoint list. Press ENTER to select the waypoint.
Measure Distance Page
4. Press ENTER when the field to the right of ‘TO’ is highlighted to select a waypoint to
end the measurement.
5. Press ENTER when the field to the right of ‘ESTIMATED SPEED’ is highlighted to enter
an estimated speed. The Edit Number Page is displayed to allow you to enter the speed.
6. Use the ENTER button and the UP and DOWN buttons to enter a new speed. Highlight
‘OK’ and press ENTER when finished. The unit returns to the Measure Distance Page.
Edit Number Page
The total distance between the two points and the time needed to travel to the selected
point is displayed at the bottom of the page.
12
190-00360-00_0A.indd 12
3/29/2004, 11:32:41 AM
Using the Navigation Page
The Navigation Page helps guide you to a destination. When you are moving with no
particular destination in mind, the Navigation Page shows you your moving direction and
speed.
When you are moving towards a specific destination (navigating a course), the
Navigation Page displays the name of the location, two data fields (that display distance
to final destination and speed by default), and a direction arrow in the compass ring. To
navigate, simply follow the arrow.
Navigation Page Options
Press ENTER when the Navigation Page is displayed to access the Navigation Page Options. The following options are available:
Change Fields: Press ENTER when this is highlighted to change the data fields that appear
on the right-hand side of the display. For a complete list and description of the data fields
available in the Foretrex, refer to “Data Field Options” found in the “Appendix”.
Restore Defaults: Press ENTER when this is highlighted to restore the unit to the default
Navigation Page settings.
When you are navigating to a destination the following option is also displayed:
Stop Navigation: Stops any active navigation (displays only when navigating).
Main Pages
Navigation Page
Navigation Page
Navigating to Home
To select a Navigation Page option:
1. Press the ENTER button on the Navigation Page. The Options Menu displays.
2. Press the UP or DOWN button, highlight the desired option, and press ENTER to make
the changes and close the Options Menu.
13
190-00360-00_0A.indd 13
3/29/2004, 11:32:42 AM
Main Pages
Trip Computer
Trip Computer:
Four small data fields
Trip Computer Options
Using the Trip Computer
The Trip Computer stores information for your trip from the time it is reset until it is reset again. The Trip Computer displays information about your trip, such as your maximum
speed and trip odometer. You may change the trip computer data fields to suit your needs.
The trip computer displays information (trip data) in three full screens: the first screen
displays four small data fields. As you scroll down you two medium sized data fields are
shown and finally one large data field is displayed. The Foretrex remembers which Trip
Computer Page you previously viewed and displays that same screen when you view the
Trip Computer Page again. For example, if you were monitoring your speed using the one
large data field format, when you return again to the view the trip computer, your speed is
displayed in the large data field format.
Trip Computer Options
Press ENTER to display the following Trip Computer Page Options:
Change Fields: Press ENTER when this is highlighted to change the data fields that appear
on the right-hand side of the display. For a complete list and description of the data fields
available in the Foretrex, refer to “Data Field Options” found in the “Appendix”.
Reset Max Speed: Press ENTER when this is highlighted to reset the Maximum Speed
achieved during a trip.
Reset Trip Data: Press ENTER when this is highlighted to reset the trip time, trip distance
(odometer), and average speed.
Restore Defaults: Press ENTER when this is highlighted to restore the Trip Computer data
fields to the defaults.
14
190-00360-00_0A.indd 14
3/29/2004, 11:32:42 AM
Displaying the Timer Page
By default, the Timer Page is not displayed. You must access the Main Menu and enable
the Timer Page before you can display and use it.
To enable the Timer Page:
Main Pages
Timer Page
1. Press the PAGE button until the Main Menu Page is displayed.
2. Use the UP and DOWN buttons to highlight ‘SETUP’ and press ENTER.
3. Use the UP and DOWN buttons to highlight ‘SET TIMER’ and press ENTER.
4. Use the UP and DOWN buttons to highlight the field below ‘SHOW TIMER PAGE’ and
press ENTER.
5. Use the UP and DOWN buttons to highlight ‘YES’ and press ENTER.
Timer Page:
Timer running
6. Press the PAGE button to exit the menu pages.
Setting the Timer
Before you can use the timer, you must set the timer to count down from a particular
number, such as 10 minutes. You can also program what the timer will do when the time
has expired and what tones will sound at the timer’s expiration and intervals. This section
will simply explain how to set the timer to count down. For more information about setting
up the timer, refer to the “Setup Menu: Set Timer” section of this guide.
Set Timer Page:
Show Timer
15
190-00360-00_0A.indd 15
3/29/2004, 11:32:43 AM
Main Pages
To set the Timer:
1. Press the PAGE button until the Main Menu Page is displayed.
Timer Page
2. Use the UP and DOWN buttons to highlight ‘SETUP’ and press ENTER.
3. Use the UP and DOWN buttons to highlight ‘SET TIMER’ and press ENTER.
4. Use the UP and DOWN buttons to highlight the field below ‘COUNT DOWN FROM’ and
press ENTER.
5. Use the UP and DOWN buttons to highlight the desired time (10, 6, 5, or 4 minutes)
and press ENTER. You can also enter a ‘CUSTOM’ time as described below.
Set Timer Page:
Timer Defaults
To enter a custom time:
1. Press the PAGE button until the Main Menu Page is displayed.
2. Use the UP and DOWN buttons to highlight ‘SETUP’ and press ENTER.
3. Use the UP and DOWN buttons to highlight ‘SET TIMER’ and press ENTER.
4. Use the UP and DOWN buttons to highlight the field below ‘COUNT DOWN FROM’ and
press ENTER. The Edit Time Page is displayed.
Setting the Count Down From field
5. Use the UP and DOWN buttons to highlight the number position you want to change
and press ENTER.
6. Use the UP and DOWN buttons to highlight the desired number and press ENTER.
Repeat this process until the number you would like to count down from is entered.
7. Use the UP and DOWN buttons to highlight ‘OK’ and press ENTER.
Edit Time Page
When you use the timer, it will count down from the time entered in the steps above.
For complete information about the Set Timer Page, refer to the “Setup Menu: Set Timer”
section in this manual.
16
190-00360-00_0A.indd 16
3/29/2004, 11:32:44 AM
Using the Timer Page
After the Timer Page is enabled and a count down time is entered, you can use the timer
for a variety of applications, such as running and sailboat racing. The synchronization and
quick reset capabilities make the Foretrex an extremely handy timer.
Main Pages
Timer Page
To stop and start the timer:
1. Press the PAGE button until the Timer Page is displayed.
2. To start the timer, press the ENTER button when ‘START’ is displayed along the bottom
of the page.
3. To stop the timer, press the ENTER button when ‘STOP’ is displayed along the bottom of
the page.
4. Change the count down time temporarily by skipping ahead or back using the UP and
DOWN arrows. This is especially handy when synchronizing your Foretrex timer to other
timers, such as during a race. The timer can stop or start counting up after the count
down timer expires.
Timer Page:
Counting down from 10.00 minutes
5. Press the UP arrow to reset the timer to the original count down time so it is ready to
use again.
Timer Page:
TIP: When the timer is at 0:00, press the ENTER button to start the timer counting up from 0:00.
Expired timer
17
190-00360-00_0A.indd 17
3/29/2004, 11:32:44 AM
Main Menu Pages
Main Menu Page
Main Menu Page Basics
The Main Menu Page gives you access to the Foretrex 101 unit’s waypoints, tracks,
routes, and setup screens. When the Main Menu Page is displayed, use the UP or DOWN
buttons to highlight the desired sub-page (Waypoints, Tracks, Routes, or Setup), and press
ENTER to open that page.
The Main Menu Page also displays the current date and time along the top of the screen.
To access a Menu Page:
1. From the Main Menu Page, use the UP and DOWN buttons to highlight the desired
Menu Page, such as ‘WAYPOINTS’.
Main Menu Page
2. Press the ENTER button to access that Menu Page.
The following Sub Pages are available: Waypoints, Tracks, Routes, and Setup. The Menu
Pages and their options are described in the following pages.
Waypoints Menu
18
190-00360-00_0A.indd 18
3/29/2004, 11:32:45 AM
Waypoints Menu Page
The Waypoints Menu Page provides access to your waypoints and allows you to delete
and create waypoints.
To open the Waypoints Menu Page:
Main Menu Pages
Waypoints Menu Page
1. From the Main Menu Page, use the UP and DOWN buttons to highlight ‘WAYPOINTS’.
2. Press the ENTER button to access the Waypoints Menu Page.
To create a waypoint:
1. From the Main Menu Page press the UP or DOWN button to highlight ‘WAYPOINTS’,
then press the ENTER button.
Waypoints Menu
2. Select ‘CREATE NEW’ and press ENTER.
3. The Mark Waypoint Page is then displayed. Your current location is entered as the
default location and 001 is entered as the default waypoint name. To edit elements of
a waypoint (such as the symbol, name, or location), refer to the “Editing a Waypoint”
section.
To select a waypoint from the List All Page:
1. From the Main Menu Page press the UP or DOWN button to highlight ‘WAYPOINTS’,
then press the ENTER button.
Mark Waypoint Page
2. Select ‘LIST ALL’ to see an alphabetical listing of all Waypoints.
3. Press the UP or DOWN button to highlight the alphabetical tab containing the desired
waypoint, then press the ENTER button.
4. Press the UP or DOWN button to select the waypoint and press the ENTER button to
display the Review Waypoint Page.
List All Waypoints Page
19
190-00360-00_0A.indd 19
3/29/2004, 11:32:46 AM
Main Menu Pages
Waypoints Menu Page
Main Menu Page
To view the nearest waypoints page:
1. From the Main Menu Page press the UP or DOWN button to highlight ‘WAYPOINTS’,
then press the ENTER button.
2. Select ‘NEAREST’ and press the ENTER button to see a listing of the nine closest
waypoints by name and distance from your location.
Nearest Waypoints Page
3. Press the UP or DOWN button to select the waypoint and press the ENTER button to
display the Review Waypoint Page.
To delete all waypoints:
1. From the Main Menu Page press the UP or DOWN button to highlight ‘WAYPOINTS’,
then press the ENTER button.
Waypoints Menu
2. Select ‘DELETE ALL’ and press the ENTER button.
3. A confirmation message box displays asking if you really want to delete all waypoints.
Press the UP or DOWN button to highlight the correct choice and press the ENTER
button to complete the action.
Delete All Waypoints
20
190-00360-00_0A.indd 20
3/29/2004, 11:32:46 AM
Marking a Waypoint
The Mark Waypoint Page, shown to the right, allows you to define a location as a
waypoint and then change the waypoint symbol, name, elevation, and location (latitude
and longitude). Entering a known location, then saving it as a Waypoint, works well for
geocaching.
Main Menu Pages
Waypoints Menu Page
To mark a waypoint:
You may mark a waypoint one of two ways:
•
Press and hold the ENTER/MARK button.
The Mark Waypoint Page displays.
•
Press PAGE to view the Main Menu.
Select Waypoints and press ENTER.
Select ‘CREATE NEW’.
The Mark Waypoint Page displays.
Mark Waypoint Page
Editing a Waypoint
After you have marked a waypoint using on of the above methods, the Mark Waypoint
Page displays. You can change elements of the waypoint from this page. You can enter a
new name, select a new symbol, and enter a new elevation and latitude/longitude. Highlight OK? and press ENTER to save the waypoint.
You may also edit elements of an existing waypoint using the same methods. The only
difference is that you will be editing from the Waypoint Review Page instead of the Mark
Waypoint Page.
21
190-00360-00_0A.indd 21
3/29/2004, 11:32:47 AM
Main Menu Pages
Waypoints Menu Page
To change the symbol:
1. From the Main Menu Page press the UP or DOWN button to highlight ‘MARK’. Press
the ENTER button to display the Mark Waypoint Page.
2. Press the UP or DOWN button and highlight the symbol in the flag.
3. Press the ENTER button to display the list of waypoint symbols.
4. Use the UP and DOWN buttons to select the desired symbol. The symbol list
automatically scrolls as you use the arrow buttons to display all the symbols available.
5. When the desired symbol is highlighted, press the ENTER button.
Mark Waypoint Page
To change the name:
1. From the Main Menu Page press the UP or DOWN button to highlight ‘MARK’. Press
the ENTER button to display the Mark Waypoint Page.
2. Press the UP or DOWN button and highlight the ‘NAME’ field (001 is the default name
for the first waypoint).
3. Press the ENTER button to display the Edit Waypoint Name Page.
4. Press the ENTER button to display a drop-down list of characters.
Changing the waypoint symbol
5. Using the UP and DOWN buttons, scroll to the desired letter or number and press enter.
Selecting a character for
the waypoint name
6. Repeat this process until all characters of the waypoint name are entered.
Edit Waypoint Name Page
7. Use the UP and DOWN buttons to highlight ‘OK’ and press ENTER.
22
190-00360-00_0A.indd 22
3/29/2004, 11:32:48 AM
To change the elevation:
1. From the Main Menu Page press the UP or DOWN button to highlight ‘MARK’. Press
the ENTER button to display the Mark Waypoint Page.
2. Press the UP or DOWN button and highlight the ‘ELEV’ field and press the ENTER
button to display the Enter Correct Elevation Page.
Main Menu Pages
Waypoints Menu Page
3. Use the UP or DOWN button to highlight the desired digit and press the ENTER button
to display a selection window. Press the UP or DOWN button to select a new number
and press the ENTER button. Repeat until all numbers are changed.
4. Press the UP or DOWN button to highlight ‘OK’ and press ENTER to display the Mark
Waypoint Page with the corrected elevation.
Mark Waypoint Page
To change the location (latitude/longitude):
1. From the Main Menu Page press the UP or DOWN button to highlight ‘MARK’ then
press the ENTER button to display the Mark Waypoint Page.
2. Press the UP or DOWN button and highlight the ‘LAT/LON’ field and press the ENTER
button to display the Edit Location Page.
3. Scroll through the latitude and longitude position places using the UP or DOWN button
(UP button to move right to left, DOWN button to move left to right). When you reach
the position place you want to change, stop and press the ENTER button.
Enter Correct Elevation Page
Using the UP or DOWN button, scroll through the choices and highlight the one you
want. Press the ENTER button and the position place is now changed. Repeat until all
changes are made.
4. Press the UP or DOWN button to highlight ‘OK’ and press ENTER to return to the Mark
Waypoint Page.
Edit Location Page
23
190-00360-00_0A.indd 23
3/29/2004, 11:32:49 AM
Main Menu Pages
Waypoints Menu Page
Review Waypoint Page
The Review Waypoint Page allows you to change the waypoint symbol, name, elevation and location (just as on the Mark Waypoint Page). You can also delete the waypoint,
display the waypoint on the Map Page, start a Goto, and display the Review Waypoint Page
Options.
To delete a waypoint:
1. On the Review Waypoint Page, press the UP or DOWN button to highlight ‘DELETE’.
2. Press the ENTER button.
Review Waypoint Page
A confirmation message box displays asking if you really want to delete the waypoint.
If you do, press the UP or DOWN button, highlight ‘YES’, and press ENTER.
If you do not want to delete the waypoint, press the UP or DOWN button, highlight
‘NO’ and press the ENTER button.
To view the waypoint on the map:
1. On the Review Waypoint Page, press the UP or DOWN button to highlight ‘MAP’.
2. Press the ENTER button.
Delete Waypoint Page
3. The Map Page is displayed with the selected waypoint visible. Use the DOWN and UP
buttons to zoom in and out on the map.
4. Press PAGE to return to the Review Waypoint Page.
Waypoint on Map
24
190-00360-00_0A.indd 24
3/29/2004, 11:32:49 AM
To start a Goto from the Review Waypoint Page:
Main Menu Pages
1. On the Review Waypoint Page, press the UP or DOWN button to highlight ‘GOTO’.
2. Press the ENTER button to activate the ‘GOTO’ with the selected waypoint as the
destination.
Waypoints Menu Page
To start a Goto using the GOTO Button:
1. Press the GOTO button.
2. Press the UP or DOWN button to highlight the alphabetical tab containing the desired
waypoint, then press the ENTER button.
4. Press the UP or DOWN button to select the waypoint and press the ENTER button to
Goto (navigate to) that waypoint.
Review Waypoint Page
The Navigation Page is displayed to navigate you to the waypoint destination. Simply
move in the direction the arrow is pointing to reach your destination.
NOTE: You can directly Goto to a waypoint by pressing the GOTO button any
time a waypoint is selected: Press the GOTO button on the Waypoint Review
Page, the Waypoint List Page when a waypoint is highlighted, or the Route Page
when a waypoint on the route is highlighted.
Goto Waypoint:
Navigation Page displaying
To access the Review Waypoint Page Options:
1. On the Review Waypoint Page, press the UP or DOWN button to highlight ‘OPTIONS’.
2. Press the ENTER button to display the pop-up Options list.
3. Use the UP and DOWN buttons to highlight the desired option and press ENTER. The
desired page will then open.
Review Waypoint Page Options
25
190-00360-00_0A.indd 25
3/29/2004, 11:32:50 AM
Main Menu Pages
Waypoints Menu Page
Projecting a Waypoint
Using the Project waypoint feature, the Foretrex 101 can create a waypoint at a specified
distance and bearing using an existing waypoint as a reference. You can also change the
waypoint name, symbol, and elevation on this page.
To project a waypoint:
1. Select a waypoint from the list on the Waypoints List Page and press the ENTER button
to display the Review Waypoint Page.
2. Use the UP or DOWN button to highlight ‘OPTIONS’ and press ENTER.
Waypoint Options
3. Use the UP or DOWN button to highlight ‘PROJECT’ and press ENTER to display the
Project Waypoint Page, which shows the numeric name assigned to the new waypoint
and with the distance field highlighted.
3. Press the ENTER button to display the Edit Number Page. Select the digit you wish to
change and press the ENTER button to display the drop-down number list.
5. Press the UP or DOWN button to highlight the correct number and press the ENTER
button. When all numbers are entered correctly, highlight ‘OK’ and press the ENTER
button.
Project Waypoint Page
6. Use the DOWN button to highlight the bearing field and press the ENTER button to
display the Edit Angle Page. Use the same method to enter an angle.
The name, symbol, and elevation can be changed on this page as well.
7. When all changes have been made, highlight ‘OK’ and press the ENTER button to save
the waypoint.
Edit Number Page
8. Highlight ‘GOTO’ and press the ENTER button to begin direct navigation to the
waypoint.
26
190-00360-00_0A.indd 26
3/29/2004, 11:32:51 AM
Hunting and Fishing Information
This feature provides you with a listing of best times for hunting and fishing for the
chosen waypoint and date.
To display the hunting and fishing information:
Main Menu Pages
Waypoints Menu Page
1. Press the PAGE button to access the Main Menu. Press the ENTER button when
‘WAYPOINTS’ is highlighted to open the Waypoints Menu Page.
2. Highlight ‘LIST ALL’ and press ENTER to display the Waypoint List Page.
2. Select a waypoint from the list and press the ENTER button to display the Review
Waypoint Page.
2. Use the UP or DOWN button to highlight ‘OPTIONS’ and press ENTER.
Waypoint Options
3. Use the UP or DOWN button to highlight ‘HUNT/FISH’ and press ENTER to display the
Hunting and Fishing Page.
To change the date:
1. Use the UP and DOWN buttons to highlight the date field and then press the ENTER
button to display a list of dates. Select the desired date and press ENTER.
2. Use the UP and DOWN buttons to highlight the month field and then press the ENTER
button to display a list of months. Select the desired date and press ENTER.
Hunt and Fish Page
3. Use the UP and DOWN buttons to highlight the year field and then press the ENTER
button to display a list of years. Select the desired date and press ENTER.
NOTE: The times displayed are the recognized best and good times for hunting
and fishing. But, be certain that they are not in conflict with state and local game
laws which may vary from location to location. It is your responsibility to know
and abide by these laws.
Changing the date
27
190-00360-00_0A.indd 27
3/29/2004, 11:32:51 AM
Main Menu Pages
Waypoints Menu Page
Sun and Moon Information
This feature provides you with a list of sun rise/set and moon rise/set times for the selected waypoint for the current date. A graphic display of the moon phase is also displayed.
You may view Sun and Moon information for any date.
To display the sun and moon information:
1. Press the PAGE button to access the Main Menu. Press the ENTER button when
‘WAYPOINTS’ is highlighted to open the Waypoints Menu Page.
2. Highlight ‘LIST ALL’ and press ENTER to display the Waypoint List Page.
Waypoint Options
2. Select a waypoint from the list and press the ENTER button to display the Review
Waypoint Page.
2. Use the UP or DOWN button to highlight ‘OPTIONS’ and press ENTER.
3. Use the UP or DOWN button to highlight ‘SUN/MOON’ and press ENTER to display the
Sun and Moon Page.
To change the date:
Sun and Moon Page
1. Use the UP and DOWN buttons to highlight the date field and then press the ENTER
button to display a list of dates. Select the desired date and press ENTER.
2. Use the UP and DOWN buttons to highlight the month field and then press the ENTER
button to display a list of months. Select the desired date and press ENTER.
3. Use the UP and DOWN buttons to highlight the year field and then press the ENTER
button to display a list of years. Select the desired date and press ENTER.
Changing the date
28
190-00360-00_0A.indd 28
3/29/2004, 11:32:52 AM
Using the Tracks Menu Page
The Foretrex 101 draws an electronic breadcrumb trail or ‘track log’ on the Map Page as
you travel. The Track Log contains information about points along its path, including time,
and position. The Foretrex 101 uses this information to allow you to navigate using the
saved track.
The track log starts recording as soon as the Foretrex 101 gets a location fix. For the
best results, clear the track log before you start traveling because when the track log is full,
the new track points overwrite the oldest track points. The percentage of memory used
by the current track log displays at the top of the page. After the Track Log is ‘Cleared’, it
displays zero percent. When the display reaches 100%, the most recent track points start
to overwrite the least recent track points (if ‘WRAP WHEN FULL’ is ‘YES’). To avoid losing
track points, save the Track Log when it approaches the 99% mark.
Main Menu Pages
Tracks Menu Page
Main Menu Page
To open the Tracks Menu Page:
1. Press the PAGE button to access the Main Menu.
2. Use the UP and DOWN arrows to highlight ‘TRACKS’ and press ENTER to open the
Tracks Menu Page.
Tracks Menu Page
To clear the Track Log from the Tracks Menu Page:
1. Press the PAGE button to access the Main Menu. Press the ENTER button when
‘TRACKS’ is highlighted to open the Tracks Menu Page.
2. Highlight ‘CLEAR TRACK’ and press ENTER. Use the UP and DOWN arrows to highlight
‘YES’ on the pop-up window and press ENTER to clear the track log.
Clearing the Track Log
29
190-00360-00_0A.indd 29
3/29/2004, 11:32:53 AM
Main Menu Pages
Tracks Menu Page
Using the Track Log
To use the track log, select the ‘PAN TRACK LOG’ option to show a pointer that moves
along the track log when you press the UP or DOWN button.
To Pan the track log:
1. Press the PAGE button to access the Main Menu.
2. Use the UP and DOWN arrows to highlight ‘TRACKS’ and press ENTER to open the
Tracks Menu Page.
3. Use the UP and DOWN arrows to highlight ‘PAN & TRACBACK’ and press ENTER.
Main Menu Page
Tracks Menu Page
Panning the Track Log
4. Use the UP and DOWN arrows to pan the track log. Press ENTER to display the Pan
Options: ‘TRACBACK’, ‘GOTO’, ‘MARK’, and ‘ZOOM’.
Pan Options
After you have panned the track log (using the UP and DOWN buttons), press ENTER
to display the Pan Options.
TracBack guides you to where you started by following the track log that you left behind,
allowing you to return along a traveled path without marking any waypoints. You can
retrace your track in both directions. Tracks are marked BEGIN and END. If you want to
keep a record of a certain track log or use the ‘TracBack’ feature, clear the Track Log before
you start traveling.
Goto creates a waypoint called ‘map’ and guides you to it from your current location.
Mark creates a new waypoint for later use. Refer to the “Waypoints Menu Page” section for
complete information.
Zoom adjusts the level of map detail viewable.
30
190-00360-00_0A.indd 30
3/29/2004, 11:32:54 AM