Transcript
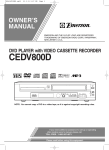
H9450UD(EN).qx33
03.1.22 7:19 PM
Page 8
OPERATING CONTROLS AND FUNCTIONS
1
FRONT PANEL
2
4 5
3
OPEN/CLOSE
POWER/STANDBY
CHANNEL
STOP
PLAY
DVD OUTPUT VCR
TIMER
REC
REC/IRT
REW
LINE 2
F.FWD
VIDEO IN
21
19
20
REMOTE CONTROL
22
54
53
SURROUND
OPEN/CLOSE
AUDIO
SPEED
EJECT
23
SKIP/CH.
1
2
3
4
5
6
7
8
9
0
+ 10
DVD
VCR
52
SKIP/CH.
24
VCR/TV
DISPLAY
25
TV
50
PAUSE/STEP
26
PLAY
28
TV CH
REC
TV POWER
30
35
MENU
VIDEO/TV
SETUP TOP MENU TV CH
34
MODE
36
VOL
ENTER
32
SUBTITLE
TIMER
37
VOL
47
46
STOP
29
33
49
48
27
31
51
SLOW
RETURN
45 44
43
42
CLEAR
ZOOM SEARCH MODE C.RESET
ANGLE
41
REPEAT A-BREPEAT
39
40
38
1. Disc loading tray
2. OPEN/CLOSE Button [page 23]
Press to insert discs into or remove them from the tray.
3. CASSETTE COMPARTMENT
4. POWER Light
Lights up when the power is on.
5. POWER/STANDBY Button [page 17]
Press to turn the power on and off.
6. CHANNEL Buttons [page 19]
In VCR mode, press to change TV channels on the VCR;
press to adjust the tracking during normal or slow motion
playback; press to remove vertical jitter in a Still picture.
7. PLAY Button(VCR) [page 19]
Press to begin playback.
8. STOP/EJECT Button (VCR) [page 19]
EJECT Button
Press to remove the tape from the VCR.
STOP Button
Press to stop the tape motion.
9. AUDIO In Jacks
Connect audio cables coming from the audio out jacks of a
camcorder, another VCR, or an audio source here.
10. VIDEO In Jack
Connect a video cable coming from the video out jack of a
camcorder, another VCR, or a video source (laser disc
player, camcorder, etc.) here.
11. F.FWD Button (VCR) [page 19]
Press to rapidly advance the tape, or view the picture rapidly in forward during playback. (Forward Search).
STOP/EJECT
PLAY
L (mono) AUDIO IN R
17 15 13 11
9
18 16 14 12 10
7
8
6
12. REW Button (VCR) [page 19]
Press to rewind the tape, or to view the picture rapidly in
reverse during the playback mode (Rewind Search).
13. REC/IRT Button
Press once to start a recording. Press repeatedly to start a
Instant Recording Timer.
14. REC Light [page 20]
Lights up during recording.
15. TIMER Light [page 20]
This light glows when the DVD/VCR is in standby mode
or off for a timer recording or during a Instant Recording
Timer. It flashes if TIMER is pressed for a timer recording,
but there is no tape in the DVD/VCR. It flashes when all
timer recordings or Instant Recording Timer are finished.
16 VCR OUTPUT Light (Green) [page 12]
This light appears when the VCR output mode is selected.
You can only watch tapes when the green VCR OUTPUT
light is on. To make the green VCR OUTPUT light come
on, VCR on the remote control or OUTPUT on the front
panel.
17. OUTPUT Button [page 12]
Press to select DVD mode or VCR mode.
● You can switch the output mode either by pressing
OUTPUT on the front panel, or by pressing DVD or
VCR on the remote control. However, if you press
OUTPUT on the front panel first, you need to reselect the corresponding mode by pressing DVD or
VCR on the remote control.
18. DVD OUTPUT Light (Green) [page 12]
This light appears when the DVD output mode is selected.
You can only watch DVDs when the green DVD OUTPUT
Light is on. To make the green DVD OUTPUT light come
on, press DVD on the remote control or OUTPUT on the
front panel.
19. Display, Remote Sensor Window
20. PLAY Button (DVD) [page 23]
Press to begin playback.
21. STOP Button (DVD) [page 23]
Stops operation of the disc.
22. SURROUND Button [page 31]
Press to activate the 3D sound.
SPEED Button [page 20]
Press to select the VCR’s recording speed (SP or SLP)
23. y/I(POWER/STANDBY) Button
Press to turn the power on and off.
(As to the indication of the Operate switch, “I” shows ON
and “y/I” shows electrical power stand-by.)
24. Number Buttons
● DVD mode [page 25]
Press to directly select a Track (Audio CD) for playback.
● VCR mode [page 17]
Press to select TV channels on the VCR.
To select channels, enter channel numbers as a two-digit
number for the quickest results. For example, to select
channel 6, press 0 then 6.
–8–
EN
1L25