1
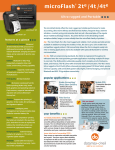
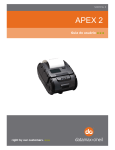
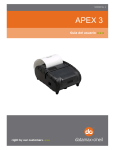
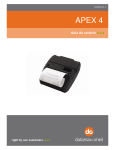
Setting up a Datamax I-Class Printer on an Edimax print
server
The following diagram identifies the parts of the I-Class printer as they will be
referred to in this document.
Access Panel
Ribbon Supply Hub
Ribbon Take-up Hub
Backstop
Rear Fan-Fold Slot
Front Panel
Media Hub
Present Sensor
Bottom Fan-Fold Slot
Front Fascia
Internal Media Rewind
Printhead Assembly
Printhead
Media Sensor
Leveling Cam
Printhead Latch
Platen Roller
Ribbon Idler
Media Idler
Media Guide
1. Configure the print server for use. Please refer to the document on configuring an
Edimax Print server. Do not use the I-Class printer to test the print server. You
must use another type of printer. The printer type in software printer maintenance
should be Datamax.
Loading the Paper
2.Raise the Access cover on the right side of the printer.
3.Rotate the print head latch forward. You should hear a click. Continue to
rotate the latch forward and the print head should begin to move up.
4.Slide the media guide to the right so that it is away from the body of the
printer. Turn it to the down position.
5.Grasp the media hub and pull out firmly.
Access Cover
Backstop
Media Sensor
Media Hub
Printhead assembly
Printhead Latch
Media Guide
6.Place the roll of labels on the media hub. Make sure the end of the labels
is on the to so that the labels can go from the top down. Slide the roll
onto the media hub until it is all the way against the backstop.
7.Route the labels through the printer as shown below. Put them under the
media idler, through the present sensor, then out the front of the printer
between the platen roller and the print head.
8.Return the media guide to the up position and slide it toward the labels so
that is rests lightly against the edge of the label.
Loading the Ribbon
9.Place the ribbon on the ribbon supply hub and push it all the way to the back
stop. Make sure to place the ribbon on the hub with the loose end running down
under the role.( The dull side of the ribbon will be up and there are arrows on the
backstop to show you direction to put them on also.)
10.Feed the ribbon through the ribbon idler and out the front, be sure not to feed
the ribbon though the media sensor. Then wind the ribbon clockwise around the
ribbon take-up hub. (again there are arrows to show you which way to wind the
ribbon)
Ribbon supply hub
Ribbon take-up hub
11.Now Rotate the printhead latch all the way up and then lower the access
cover.
12.You are now ready to power on the unit and attach the Printserver, after
which you should be able to print labels normally.
Troubleshooting the Datamax I-Class
Problem: Printer will not print
Question: What message is displayed on the LED screen.
Answer: position fault
solution: Hold down the feed button until the printer
starts feeding labels. At this point the printer
should say ready.
Answer: top of form fault
solution: Hold down the feed button until the printer
starts feeding labels. At this point the printer
should say ready.
Answer: out of stock
solution: make sure you have labels loaded in the
printer. If the labels are loaded, remove them and load
them again. Make sure they go through the present
sensor.