1
Symantec LiveState™ Recovery
Manager Implementation Guide
2
Symantec LiveState™ Recovery Manager 3.0
Implementation Guide
The software described in this book is furnished under a license agreement and may be
used only in accordance with the terms of the agreement.
Documentation version 1.0
PN: 10356221
Copyright Notice
Copyright © 2005 Symantec Corporation.
All Rights Reserved.
Any technical documentation that is made available by Symantec Corporation is the
copyrighted work of Symantec Corporation and is owned by Symantec Corporation.
NO WARRANTY. The technical documentation is being delivered to you AS-IS, and
Symantec Corporation makes no warranty as to its accuracy or use. Any use of the
technical documentation or the information contained therein is at the risk of the user.
Documentation may include technical or other inaccuracies or typographical errors.
Symantec reserves the right to make changes without prior notice.
No part of this publication may be copied without the express written permission of
Symantec Corporation, 20330 Stevens Creek Blvd., Cupertino, CA 95014.
Trademarks
Symantec, the Symantec logo, Symantec LiveState, LiveUpdate, and Symantec
pcAnywhere are U.S. registered trademarks of Symantec Corporation.
Microsoft, Windows, Windows NT, MS-DOS, and the Windows logo are registered
trademarks or trademarks of Microsoft Corporation in the United States and other
countries.
Other brands and product names mentioned in this manual may be trademarks or
registered trademarks of their respective companies and are hereby acknowledged.
Printed in the United States of America.
10 9 8 7 6 5 4 3 2 1
3
Technical support
As part of Symantec Security Response, the Symantec global Technical Support
group maintains support centers throughout the world. The Technical Support
group’s primary role is to respond to specific questions on product feature/
function, installation, and configuration, as well as to author content for our
Web-accessible Knowledge Base. The Technical Support group works
collaboratively with the other functional areas within Symantec to answer your
questions in a timely fashion. For example, the Technical Support group works
with Product Engineering as well as Symantec Security Response to provide
Alerting Services and Virus Definition Updates for virus outbreaks and security
alerts.
Symantec technical support offerings include:
■
A range of support options that give you the flexibility to select the right
amount of service for any size organization
■
Telephone and Web support components that provide rapid response and
up-to-the-minute information
■
Upgrade insurance that delivers automatic software upgrade protection
■
Content Updates for virus definitions and security signatures that ensure
the highest level of protection
■
Global support from Symantec Security Response experts, which is
available 24 hours a day, 7 days a week worldwide in a variety of languages
for those customers enrolled in the Platinum Support Program
Advanced features, like the Symantec Alerting Service and Technical
Account Manager role, offer enhanced response and proactive security
support
Please visit our Web site for current information on Support Programs. The
specific features available may vary based on the level of support purchased and
the specific product that you are using.
■
Licensing and registration
If the product that you are implementing requires registration and/or a license
key, the fastest and easiest way to register your service is to access the
Symantec licensing and registration site at www.symantec.com/certificate.
Alternatively, you may go to www.symantec.com/techsupp/ent/enterprise.html,
select the product that you wish to register, and from the Product Home Page,
select the Licensing and Registration link.
4
Contacting Technical Support
Customers with a current support agreement may contact the Technical
Support group via phone or online at www.symantec.com/techsupp.
Customers with Platinum support agreements may contact Platinum Technical
Support via the Platinum Web site at www-secure.symantec.com/platinum/.
When contacting the Technical Support group, please have the following:
■
Product release level
■
Hardware information
■
Available memory, disk space, NIC information
■
Operating system
■
Version and patch level
■
Network topology
■
Router, gateway, and IP address information
■
Problem description
■
Error messages/log files
■
Troubleshooting performed prior to contacting Symantec
■
Recent software configuration changes and/or network changes
Customer Service
To contact Enterprise Customer Service online, go to www.symantec.com, select
the appropriate Global Site for your country, then choose Service and Support.
Customer Service is available to assist with the following types of issues:
■
Questions regarding product licensing or serialization
■
Product registration updates like address or name changes
■
General product information (features, language availability, local dealers)
■
Latest information on product updates and upgrades
■
Information on upgrade insurance and maintenance contracts
■
Information on Symantec Value License Program
■
Advice on Symantec's technical support options
■
Nontechnical presales questions
■
Missing or defective CD-ROMs or manuals
Contents
Technical support
Chapter 1
Introducing Symantec LiveState Recovery Manager
About Symantec LiveState Recovery Manager ................................................. 9
Components of Symantec LiveState Recovery Manager ............................... 11
What you can do with Symantec LiveState Recovery Manager ................... 14
Best practices for backup protection ................................................................ 15
Before a backup ............................................................................................ 16
During a backup ........................................................................................... 16
After a backup .............................................................................................. 16
Where to find more information ....................................................................... 17
Chapter 2
Installing Symantec LiveState Recovery Manager
Preparing for installation ................................................................................... 19
System requirements for the product ...................................................... 20
System requirements for installation packages ..................................... 21
Integration with Symantec iCommand 3.0 .............................................. 22
User rights requirements ........................................................................... 23
Installing the product ......................................................................................... 23
Installing the Symantec LiveState Recovery Manager server .............. 23
Installing the Symantec LiveState Recovery Manager console ............ 25
Post-installation tasks ........................................................................................ 26
Starting the console .................................................................................... 26
Keeping current with LiveUpdate ............................................................. 27
Uninstalling the product .................................................................................... 27
Uninstalling the Symantec LiveState Recovery Manager console ...... 28
Uninstalling the Symantec LiveState Recovery Manager server ......... 29
Chapter 3
QuickStart
Using the console ................................................................................................. 31
Starting the console .................................................................................... 31
Logging on to the server through the console ........................................ 32
Changing the agent user account password ............................................ 33
Changing the console password ................................................................ 34
Console views ............................................................................................... 34
6 Contents
Changing server options ............................................................................. 39
Updating Symantec LiveState Recovery Manager ................................. 39
Integrating computers into the console ........................................................... 39
Creating install packages ................................................................................... 40
Discovering computers ....................................................................................... 43
Discovering unmanaged computers ......................................................... 44
Discovering computers with LiveState Recovery components ............ 45
Adding unmanaged computers ......................................................................... 46
Removing managed computers ................................................................. 47
Deploying install packages ................................................................................. 48
Activating Symantec LiveState Recovery on managed computers ..... 49
Uninstalling Symantec LiveState Recovery on managed computers .. 51
Organizing groups of computers ...................................................................... 52
Adding computer groups ............................................................................ 53
Editing computer groups ............................................................................ 53
Deleting computer groups .......................................................................... 54
Adding computers to a group .................................................................... 54
Removing computers from a group .......................................................... 54
Where to go from here ........................................................................................ 55
Chapter 4
Administering backup jobs
About backup jobs ............................................................................................... 57
Tips for creating backup images ............................................................... 58
Backing up dual-boot systems ................................................................... 59
Backing up VSS-aware databases .............................................................. 59
Storage options for backup images ........................................................... 61
Scheduling image options .......................................................................... 63
General options for creating backup images ........................................... 64
Advanced options for creating backup images ....................................... 66
Running command files during backup image creation ........................ 68
About incremental backup jobs ......................................................................... 72
Working with full backups and incrementals ......................................... 73
Event options ................................................................................................ 74
Consolidating incremental backup images .............................................. 75
Creating backup jobs ........................................................................................... 76
Running an existing backup job immediately ......................................... 80
Running a backup once ............................................................................... 81
Editing backup jobs ..................................................................................... 82
Renaming backup jobs ................................................................................ 82
Deleting backup jobs ................................................................................... 83
Assigning backup jobs ......................................................................................... 83
Adding backup jobs to computers ............................................................. 84
Adding backup jobs to computer groups .................................................. 84
Contents
Organizing backup jobs ...................................................................................... 85
Adding backup job categories .................................................................... 85
Adding backup jobs to backup job categories .......................................... 86
Renaming backup job categories ............................................................... 86
Removing backup jobs from backup job categories ............................... 86
Deleting backup job categories .................................................................. 87
Monitoring computers ........................................................................................ 87
Viewing drive details of a computer ......................................................... 88
Viewing backup jobs on a computer ......................................................... 89
Viewing the backup history of a computer .............................................. 89
Viewing events on a computer ................................................................... 90
Viewing the status on a computer ............................................................. 90
Processing pending jobs on computers .................................................... 91
Request updated client information ......................................................... 91
Viewing a computer log .............................................................................. 92
Viewing a server log .................................................................................... 92
Exporting a console table to a file ............................................................. 92
Recovering files or disks ..................................................................................... 93
Starting Symantec pcAnywhere from the console ................................. 94
Appendix A
Troubleshooting
Troubleshooting the product ............................................................................. 95
Ports that must be open in a firewall ........................................................ 95
How results of Backup Now are displayed in the console ..................... 96
Adding the server to the console ............................................................... 96
Adding a remote computer twice from different installations of the
Symantec LiveState Recovery Manager server ............................... 96
Unknown username error when adding a remote computer ................ 97
Discovery of computers gives incorrect status in console .................... 97
Appendix B
Using the Tools view
About the Tools view ........................................................................................... 99
Adding a link to the Tools view ......................................................................... 99
Editing a link ......................................................................................................101
Removing a link from the Tools view .............................................................101
7
8 Contents
Chapter
1
Introducing Symantec
LiveState Recovery
Manager
This chapter includes the following topics:
■
About Symantec LiveState Recovery Manager
■
Components of Symantec LiveState Recovery Manager
■
What you can do with Symantec LiveState Recovery Manager
■
Best practices for backup protection
■
Where to find more information
About Symantec LiveState Recovery Manager
Symantec LiveState Recovery Manager is designed to work with Symantec
LiveState Recovery Advanced Server, Standard Server, and Desktop editions to
provide enterprise-level management tasks for server or desktop protection.
Using the product, you can centrally monitor backup status for thousands of
remote Windows servers and desktops across your organization, all from a
single console. You can view the status of backups on the network and quickly
see which computers are protected and which computers need Symantec
LiveState Recovery for protection.
Note: To get started using the product, see “QuickStart” on page 15.
6 Introducing Symantec LiveState Recovery Manager
About Symantec LiveState Recovery Manager
Symantec LiveState Recovery Manager includes most of the core backup job
features of Symantec LiveState Recovery, and the following enterprise feature:
■
The Create LiveState Recovery Files wizard to create a one-time package of
the Symantec LiveState Recovery agent or the entire Symantec LiveState
Recovery product for storage on the Symantec LiveState Recovery Manager
server. You can later deploy those packages to computers or groups of
computers in your enterprise.
The version of Symantec LiveState Recovery that you may already own
(Advanced Server, Standard Server, or Desktop edition) has the following
components:
■
Symantec LiveState Recovery standard console
■
Symantec LiveState Recovery agent
■
Backup Image Browser
■
Symantec Recovery Environment
For more information about these components, see the product’s
Implementation Guide or User’s Guide.
It is important to note that the Symantec LiveState Recovery Manager console
does not include the standard console, Backup Image Browser, or Symantec
Recovery Environment. (Pre-built install packages of Symantec LiveState
Recovery agent for Advanced Server, Standard Server, and Desktop are included
with Symantec LiveState Recovery Manager.) The product console includes the
same features as the standard console and the additional enterprise features
listed earlier.
You will need access to your Symantec LiveState Recovery Advanced Server,
Standard Server, or Desktop edition installed program or product CD for the
following:
■
Using the Symantec Recovery Environment to perform bare-metal recovery
of an operating system or files and folders.
■
Using the Backup Image Browser to mount backup images or restore
individual files and folders from a backup image.
■
Using the Symantec LiveState Recovery product CD in the Symantec
LiveState Recovery Manager console to create install packages.
Introducing Symantec LiveState Recovery Manager
Components of Symantec LiveState Recovery Manager
Components of Symantec LiveState Recovery
Manager
An installation of Symantec LiveState Recovery Manager consists of several
main components for managing backups on computers, and the ability for you
to create and update install packages of Symantec LiveState Recovery on
computers.
Note: To get started using Symantec LiveState Recovery Manager, see
“QuickStart” on page 15.
Table 1-1 describes these main components.
Table 1-1
Components of Symantec LiveState Recovery Manager
Component
Description
Symantec LiveState
Recovery Manager console
The console, which can be installed on any computer
(Windows 2000 or higher), lets you remotely run and
manage backup tasks on remote computers from a
central location. It serves as the main interface to the
Symantec LiveState Recovery Manager server. From the
console, you can create install packages of Symantec
LiveState Recovery and backup jobs, and deploy them to
target computers.
See “Starting the console” on page 15.
Symantec LiveState
Recovery Manager server
and database
The server and database provide the support files that are
needed to integrate with the console.
The database stores each computer’s backup information
(history, location, file size, consolidation, schedule, disk
layout, events).
See “Starting the console” on page 15.
7
8 Introducing Symantec LiveState Recovery Manager
Components of Symantec LiveState Recovery Manager
Table 1-1
Components of Symantec LiveState Recovery Manager
Component
Description
LiveState Agent
The LiveState Agent is a necessary component for
deploying install packages of Symantec LiveState
Recovery. It also polls the Symantec LiveState Recovery
Manager database for backup jobs that need to be
downloaded and reports status information back to the
console.
When you add computers to the console, the LiveState
Agent is automatically deployed from the Symantec
LiveState Recovery Manager server and installed on the
computers as a “traffic light” tray icon
in the
Windows system tray.
The different colored indicators on the tray icon mean
the following:
■
Red – The agent is currently running an install
package.
■
Yellow – The agent is communicating with the
Symantec LiveState Recovery Manager server to get
job information.
■
Green – The agent is idle.
You can also hover the mouse pointer over the tray icon
to get status information.
See “Adding unmanaged computers” on page 30.
Management Control
Management Control is a component of Symantec
LiveState Recovery Manager that gets installed when you
deploy an install package of Symantec LiveState
Recovery to the computers you added to the console.
After the component is installed, it publishes a variety of
information back to the server regarding the state of the
computer, including the status of backups.
See “Creating install packages” on page 24 and
“Deploying install packages” on page 32.
Introducing Symantec LiveState Recovery Manager
Components of Symantec LiveState Recovery Manager
Table 1-1
Components of Symantec LiveState Recovery Manager
Component
Description
Symantec LiveState
Recovery install packages
Symantec LiveState Recovery Manager lets you create
and update installation packages of Symantec LiveState
Recovery for deploying to one or more Windows NT/
2000/2003 Server/XP computers across your local area
network or wide area network.
Depending on your needs, you can create install packages
of the full Symantec LiveState Recovery product, the
Symantec LiveState Recovery agent only, or both. The
install package, which also contains a Management
Control component, is deployed to target computers you
select in the console.
Note: Symantec LiveState Recovery Manager ships with
three pre-built install packages:
■
Symantec LiveState Recovery 3.02 Advanced Server
- agent only.
■
Symantec LiveState Recovery 3.02 Standard Server agent only.
■
Symantec LiveState Recovery 3.02 Desktop - agent
only.
You can use these existing packages and, if you already
own Symantec LiveState Recovery product, you can
create packages of the full product, if desired.
See “Creating install packages” on page 24 and
“Deploying install packages” on page 32.
LiveUpdate
The Symantec technology that lets any installed
Symantec products connect to a Symantec server
automatically and receive program and virus definition
updates.
This ensures that you have the most current software
updates that are associated with your version of
Symantec LiveState Recovery Manager console.
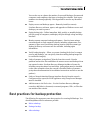
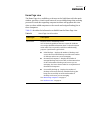
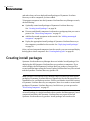
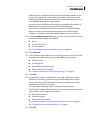
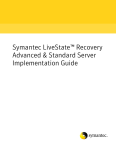
Figure 1-1 illustrates a basic use scenario for Symantec LiveState Recovery
products.
9
10 Introducing Symantec LiveState Recovery Manager
What you can do with Symantec LiveState Recovery Manager
Figure 1-1
A basic use scenario for Symantec LiveState Recovery products
Symantec LiveState Recovery Manager server
Symantec LiveState
Recovery Manager
database
Symantec LiveState Recovery
Manager console
Internet
Symantec LiveState
Recovery Advanced
or Standard server
Symantec LiveState
Recovery Desktop
What you can do with Symantec LiveState Recovery
Manager
Symantec LiveState Recovery Manager lets you protect the data of remote
server, desktop, and laptop computers from a consolidated view.
You can use LiveState Recovery Manager in the following ways:
■
Home Page status screen with resolution options – From a consolidated
view you can monitor the overall status of backups for an entire network.
Introducing Symantec LiveState Recovery Manager
Best practices for backup protection
You can also see at a glance the number of successful backups, disconnected
computers, and computers that have no backup jobs schedule. Total status
numbers are shown graphically. Click hyperlinks to resolve any identified
issues.
■
Deploy servers and desktops agents – Remotely install (or remove)
LiveState Recovery software, agents, and upgrades to Windows servers and
desktops you want to protect.
■
Deploy backup jobs – Define immediate, daily, weekly, or monthly backup
jobs for groups of computers, and deploy the jobs through a drag-and-drop
interface.
■
Monitor remote computer backup performance – Resolve issues using a
centralized path to each computer’s details, including volume name, size,
amount of space used, last backup, backup location, and file system type.
Backup job history and events are also available, including agent
information.
■
Verify backup integrity – When you create a backup job for local or remote
servers and desktops, you can specify that the resulting backup image file
be verified for integrity.
■
Link to Symantec pcAnywhere™ directly from the console - Resolve
problems and recover files and folders on remote servers and desktops from
any remote location. LiveState Recovery Manager includes a license for
installing one pcAnywhere host and client. (pcAnywhere must be installed
on the same computer where the console is installed. Refer to Symantec
pcAnywhere documentation for installation instructions and how to use the
product.)
■
Link to a Network Attached Storage interface directly from the console –
Configure archive space (for SNAP appliances only). Snap Server Manager
must be installed.
■
Add shortcuts to the Tools view – Use the LiveState Recovery Manager
console to add links (or shortcuts) to external programs, URLs, or files that
are outside of the console.
Best practices for backup protection
The following list represents some best practices for creating full backups. You
should implement this list whenever possible.
■
Before a backup
■
During a backup
■
After a backup
11
12 Introducing Symantec LiveState Recovery Manager
Best practices for backup protection
Before a backup
The following strategies can help ensure successful full backups:
■
Simplify recovery and reduce the time it takes to create backup images.
Where possible, separate the boot/operating system from the business data.
Put the boot/operating system and the data on their own respective
volumes. This separation speeds the creation of backup image files and
narrows what needs to be restored.
■
Backing up computers in different time zones.
When you are using the console to back up computers that exist across one
or more time zones, the backup will run on the day and local time where the
computer is physically located.
■
Run Windows Disk Defragmenter and chkdsk utilities before full backups.
During a backup
Symantec LiveState Recovery Manager greatly simplifies the creation of
backups. To take advantage of this, consider the following strategies:
■
Create backup images often and regularly.
Use the Create Backup Job Wizard to schedule the consistent creation of
backup images.
■
Save backup images to the proper location.
This product supports saving backup image files to a network hard disk or
to a local hard disk (including USB, FireWire, REV, Zip, and Jaz drives, and
magneto-optical). It does not support saving backup image files directly to a
tape drive. To save backups to tape, save the backup to another drive, and
then use your existing tape backup strategy to save the backup image file to
tape.
After a backup
The following strategies can help you successfully manage backups once they
are created:
■
Maintain duplicate backup images for safety.
Store backup images elsewhere on the network and create CDs, DVDs, or
tapes of the backup images for storage off-site in a safe and secure place.
■
Verify that the backup image file or set of files is stable and usable.
Document and test your entire restore process by doing regular restores of
backup image files (using the LiveState Recovery console) and single files
Introducing Symantec LiveState Recovery Manager
Where to find more information
(using the Backup Image Browser in LiveState Recovery). Doing so can
uncover potential hardware or software problems.
Use Verify backup image at the time you create a backup image file.
■
Consolidate incremental backup images.
Combine incremental backups to reduce the number of files you have to
maintain. This strategy also uses hard disk space more efficiently.
■
Review the Events tab.
Periodically review the contents found in the Events tab to ensure stability
in the computer system. In the Assets view of the console, click Computers
in the left pane, then select a computer in the right pane. The Events tab is
displayed in the lower-right pane.
■
Review the contents of backup image files.
Ensure that you are backing up essential data by periodically reviewing the
contents of backup image files using Backup Image Browser in LiveState
Recovery.
Where to find more information
This product’s documentation includes online Help, a Readme file, and the
Implementation Guide.
In addition to the product documentation, check the Symantec Web site and the
Knowledge Base for answers to frequently asked questions, troubleshooting
tips, online tutorials, and the latest product information. On the Internet, go to:
www.symantec.com/techsupp/
You should also have one or more of the following documentation resources
already available:
■
Implementation Guide (userguide.pdf) and Readme file (readme.txt) on the
Symantec LiveState Recovery Advanced/Standard Server Edition CD.
■
User’s Guide (userguide.pdf) and Readme file (readme.txt) on the Symantec
LiveState Recovery Desktop Edition CD.
Note: Viewing the online manuals in PDF format requires Acrobat Reader 5.1 or
later.
13
14 Introducing Symantec LiveState Recovery Manager
Where to find more information
Chapter
2
Installing Symantec
LiveState Recovery
Manager
This chapter includes the following topics:
■
Preparing for installation
■
Installing the product
■
Post-installation tasks
■
Uninstalling the product
Preparing for installation
Installation procedures might vary, depending on your work environment and
and how you want to install the Symantec LiveState Recovery Manager console
and server. You can install the Symantec LiveState Recovery Manager console
and server on the same computer, or customize the installation by installing the
console and server on separate computers. (You can have multiple installations
of the console.)
Before you install the product, make sure your computer meets the system
requirements. Review the Readme file on the installation CD for any known
issues.
Note: Installation of the product is not supported on encrypted file systems.
20 Installing Symantec LiveState Recovery Manager
Preparing for installation
System requirements for the product
To install and use this product, your computer must meet the minimum
requirements described in Table 2-1.
Table 2-1
Minimum system requirements
Component
Requirements
Processor
Pentium 3 - 1 GHz or higher (Pentium 4 - 1.8 GHz or higher
recommended)
Operating System
See Table 2-2, “Supported operating systems for console and
server installations,” on page 20.
RAM
■
Server – 1 GB
■
Console – Dependent on the operating system
■
Server – 2 GB (4 GB recommended)
■
Console – 250 MB
■
Microsoft .NET Framework 1.1 – 110 MB of hard disk space
required on the server, 40 MB additional hard disk space
required for installation program (150 MB total), if not
already installed. Requires Internet Explorer 5.5 or greater.
■
Storage space on the network for the backup images
Hard Disk Free
Space
Software
When you install the console, the wizard checks for an
installation of Microsoft .NET Framework 1.1. If .NET Framework
does not exist, it will automatically be installed. The .NET
Framework is a required component to run the product.
Supported operating systems
Table 2-2 describes the Windows operating systems that are supported by the
Symantec LiveState Recovery Manager console and server installations.
Table 2-2
Supported operating systems for console and server installations
Windows operating system
Console
Server
Server 2003
X
X
Small Business Server 2003
X
X
2000 Advanced Server (SP4 or later)
X
X
2000 Server (SP4 or later)
X
X
2000 Small Business Server (SP4 or later)
X
X
Installing Symantec LiveState Recovery Manager
Preparing for installation
Table 2-2
Supported operating systems for console and server installations
Windows operating system
Console
XP Professional (SP1 or later)
X
2000 Professional (SP2 or later)
X
Server
Note: The Symantec LiveState Recovery Manager software and documentation
is in English.
Symantec has verified that you can deploy and remotely configure Symantec
LiveState Recovery on English, French, and German servers and desktops.
There are no known limitations that prevent you from using the product to
deploy and remotely configure servers and desktops in other languages
(excluding double-byte character languages). However, language environment
support is limited to internationalization issues found on English, French, and
German operating systems.
System requirements for installation packages
Installation packages of Symantec LiveState Recovery that you create using the
product can be installed on a variety of Windows operating systems.
The specific hardware requirements for installation packages vary depending
on the package contents (full product or agent only). Refer to Symantec
LiveState Recovery product documentation for complete requirements.
This product supports up to 2,500 installations of Symantec LiveState Recovery.
However, because network performance varies greatly among organizations,
the total number of supported installations of Symantec LiveState Recovery
may be more or less. Network performance should be monitored to ensure that
installations of Symantec LiveState Recovery are not extended beyond the
capacity and capability of your network.
This product ships with three pre-built installation packages for the following
products:
■
Symantec LiveState™ Recovery 3.02 Advanced Server - agent only
■
Symantec LiveState™ Recovery 3.02 Standard Server - agent only
■
Symantec LiveState™ Recovery 3.02 Desktop - agent only
However, if you want to create installation packages of the full product, you
need access to one or more of the above product CDs, depending on the package
you are creating.
21
22 Installing Symantec LiveState Recovery Manager
Preparing for installation
See “Creating install packages” on page 40 for more information.
Symantec LiveState Recovery Advanced/Standard Server
Table 2-3 describes the supported installation packages of Symantec LiveState
Recovery Advanced/Standard Server 3.02 on Windows operating systems.
Table 2-3
Supported installation packages on Windows operation systems
Windows operating system
Full product
Agent only
Server 2003
X
X
Small Business Server 2003
X
X
2000 Advanced Server (SP2 or later)
X
X
2000 Server (SP2 or later)
X
X
2000 Small Business Server
X
X
NT 4 Server (SP6a) with Internet Explorer
5.5 or later
X
Symantec LiveState Recovery Desktop
Table 2-2 describes the supported installation packages of Symantec LiveState
Recovery Desktop 3.02 on Windows operating systems.
Table 2-4
Supported installation packages on Windows operation systems
Windows operating system
Full product
Agent only
XP Professional (SP1 or later)
X
X
XP Home (SP1 or later)
X
X
2000 Professional (SP2 or later)
X
X
Integration with Symantec iCommand 3.0
If you already have Symantec iCommand 3.0 installed, you should install the
Symantec LiveState Recovery Manager server on the same computer. Doing so
will allow you to take advantage of existing iCommand 3.0-based technologies
on the same host server and database structure.
If you do not have iCommand 3.0 installed, you can install the Symantec
LiveState Recovery Manager server on a supported Windows server.
Installing Symantec LiveState Recovery Manager
Installing the product
Compatibility and integration with Symantec LiveState
unified architecture
Table 2-5 identifies the current and future compatibility and integration with
Symantec’s LiveState unified architecture.
Table 2-5
Compatibility and integration
Symantec LiveState LiveState architecture
Recovery Manager version
version
Compatible and integrated?
3.0
iCommand 3.0
Yes
3.0
iCommand 1.x-2.x
No
User rights requirements
Users on Windows NT/2000/2003 Server/XP must have administrator rights to
install and use Symantec LiveState Recovery Manager, or to deploy and install
installation packages of Symantec LiveState Recovery.
Installing the product
The Symantec LiveState Recovery Manager installation program checks for the
required software and hardware resources, lets you select the installation folder,
updates registry settings, and copies the required files to the hard disk. The
console installation program also checks for Windows .NET Framework 1.1. If
.NET 1.1 is not installed, the installation program installs it.
See “Installing the Symantec LiveState Recovery Manager server” on page 23.
See “Installing the Symantec LiveState Recovery Manager console” on page 25.
Note: Because the console uses data it receives from the server to populate the
user interface, it is generally recommended that you install the Symantec
LiveState Recovery Manager server first, and then install instances of the
Symantec LiveState Recovery Manager console where you want in your
enterprise.
Installing the Symantec LiveState Recovery Manager server
Before you begin, make sure you have carefully reviewed the requirements for
installing the Symantec LiveState Recovery Manager server.
See “System requirements for the product” on page 20.
23
24 Installing Symantec LiveState Recovery Manager
Installing the product
Note: This product uses Symantec’s LiveState unified architecture as its
foundation. Therefore, if you have an existing installation of Symantec
iCommand 3.0, you should install the server on the same computer. This will
allow you to share the existing iCommand database structure, agent
architecture, and server architecture.
If you are installing Symantec LiveState Recovery Manager server into a new
environment where Symantec iCommand and Symantec LiveState Recovery do
not exist, this server installation will create a new database structure to store
data about computers and backup tasks.
To install the Symantec LiveState Recovery Manager server
1
Insert the Symantec LiveState Recovery Manager server product CD into
the media drive of the computer.
■
If CD auto-run is enabled, the installation program for the console
launches automatically.
■
If the CD auto-run is not enabled, click Start > Run, and then type
drive:\autorun (where drive is the drive letter of your media drive),
and then click OK.
2
In the Installation Introduction screen, click Next.
3
Read the license agreement, click I accept the terms in the License
Agreement, and then click Next.
4
In the Agent User Account panel, do one of the following (the agent user
account is used when a remote computer downloads agents or install
packages from the Symantec LiveState Recovery Manager server):
■
Click Use Local Account. You can use the default account name
(smeclnt). Type a password and confirmation password in the text
boxes.
The password requires a minimum of three characters and it must meet
the password criteria where the account is being created. There is no
password validation done.
Click Next.
■
Click Use Domain Account. Select a domain from the drop-list where
where an account has already been created. Type the password, and the
confirmation password.
The password requires a minimum of three characters and it must meet
the password criteria of the domain where the account has been
created. There is no password validation done.
Click Next.
Installing Symantec LiveState Recovery Manager
Installing the product
5
In the Server Administrator Account panel, type the password and
confirmation password to the server. The password must contain 3-60
characters using uppercase and lowercase alpha characters, or numerics 09, or a combination of both. No special characters are permitted.
This password is used to access the server when you log on to the console.
Note: You will not be able to access the server via the console if you do not
enter the correct password, or you forget the password. (In such cases, you
must uninstall, then reinstall the software.) Store the password in a secure
place; Symantec has no method for restoring a password to the server.
6
7
In the Select Installation Folder panel, do one of the following:
■
To install Symantec LiveState Recovery Manager server in the default
folder path, click Next.
■
To change the installation folder, click Choose, locate the folder where
you want to install the server, and then click Select. Then, in the Select
Installation Folder panel, click Next.
■
To reinsert the default folder path, click Restore Default Folder, and
then click Next.
In the Ready to Install panel, review the install path, and then click Install
to begin installing the Symantec LiveState Recovery Manager server.
Installing the Symantec LiveState Recovery Manager console
Before you begin, make sure you have carefully reviewed the requirements for
installing the Symantec LiveState Recovery Manager console.
See “System requirements for the product” on page 20.
You can install the console anywhere in your enterprise where you will need
access to the Symantec LiveState Recovery Manager server and database.
To install the Symantec LiveState Recovery Manager console
1
2
Insert the Symantec LiveState Recovery Manager console product CD into
the media drive of the computer.
■
If CD auto-run is enabled, the installation program for the console
launches automatically.
■
If the CD auto-run is not enabled, click Start > Run, then type
drive:\autorun (where drive is the drive letter of your media drive),
and then click OK.
In the Installation Introduction panel, click Next.
25
26 Installing Symantec LiveState Recovery Manager
Post-installation tasks
3
Read the license agreement, click I accept the terms in the License
Agreement, and then click Next.
4
In the Select Installation Folder panel, do one of the following:
■
To install Symantec LiveState Recovery Manager console in the default
folder path, click Next.
■
To change the installation folder, click Choose, locate the folder where
you want to install the console, and then click Select. Then, in the
Select Installation Folder panel, click Next.
■
To reinsert the default folder path, click Restore Default Folder, and
then click Next.
5
In the Select Locations for Program Shortcuts panel, deselect the locations
where you do not want to place a program shortcut (the Desktop and Start
Menu program shortcut locations are selected by default.), and then click
Next.
6
Review the summary information, and then click Install to begin installing
the Symantec LiveState Recovery Manager Console.
7
When the installation is complete, click Done to exit the installation wizard.
Post-installation tasks
After you install the product, you can modify certain installation settings or
perform a task that you might have skipped during the installation process.
You can perform the following post-installation tasks:
■
Starting the console
■
Keeping current with LiveUpdate
Starting the console
If you accepted the default program shortcuts locations at the time of installing
the Symantec LiveState Recovery Manager console, you can start the console
from the Windows taskbar or from the Windows desktop.
To start the console
◆
Do one of the following:
■
On the classic Windows taskbar, click Start > Programs > Symantec >
LiveState Recovery > LiveState Recover Manager.
Installing Symantec LiveState Recovery Manager
Uninstalling the product
■
On the Windows XP taskbar, click Start > All Programs > Symantec >
LiveState Recovery > LiveState Recover Manager.
On the Windows desktop, double-click the Symantec LiveState
Recovery Manager icon.
After the console is started, you need to log on by specifying the computer
name or IP address of the server, and typing the password you specified
during the installation of the Symantec LiveState Recovery Manager server.
■
Keeping current with LiveUpdate
Using your Internet connection, you can receive software updates associated
with your version of the product. When you run LiveUpdate, you connect to the
Symantec LiveUpdate server and select the product updates that you want to
install.
Updating the product
Run LiveUpdate as soon as you have installed the product. Once you know that
your files are up-to-date, run LiveUpdate periodically to obtain program
updates.
To obtain updates using LiveUpdate
1
On the Help menu, click LiveUpdate.
2
In the LiveUpdate window, click Next to locate updates.
3
If updates are available, click Next to download and install them.
4
When the installation is complete, click Finish.
Some program updates may require that you reboot your computer before
the changes will take effect.
Uninstalling the product
You can uninstall Symantec LiveState Recovery Manager console, server, or
both. The uninstallation program removes the files and registry settings that it
copied to the computer’s hard disk during installation.
You uninstall the product using the Add or Remove Programs option in the
Windows Control Panel. Once the removal process begins, you cannot cancel it.
Symantec LiveState Recovery Manager automatically deletes product files,
including program shortcuts on the desktop and Windows Start menu (if you are
uninstalling the console).
27
28 Installing Symantec LiveState Recovery Manager
Uninstalling the product
See “Uninstalling the Symantec LiveState Recovery Manager console” on
page 28.
See “Uninstalling the Symantec LiveState Recovery Manager server” on
page 29.
Note: If you are uninstalling the Symantec LiveState Recovery Manager server,
be aware that it will not uninstall Symantec LiveState Recovery or LiveState
Agent from any computers that you have added to the console. To uninstall
Symantec LiveState Recovery and its associated agents from computers, you
should remove the computers from the console before you uninstall the
Symantec LiveState Recovery Manager server. See “Removing managed
computers” on page 47.
Uninstalling the Symantec LiveState Recovery Manager console
When you uninstall the Symantec LiveState Recovery Manager console, product
files are automatically deleted, including program shortcuts on the desktop and
Windows Start menu.
If you do not uninstall the Symantec LiveState Recovery Manager server, any
computers, computer groups, backup jobs, or backup job categories that you
have added to the console will remain in the Symantec LiveState Recovery
Manager database. If you decide to reinstall the console later, the computers,
groups, and backup jobs in the database will re-populate the console interface.
To uninstall the Symantec LiveState Recovery Manager console
1
On the Windows taskbar, click Start > Settings > Control Panel.
2
In the Control Panel window, double-click Add or Remove Programs.
3
In the Add or Remove Programs window, click Symantec LiveState
Recovery Manager 3.0.
4
Click Change/Remove.
5
In the Uninstall Symantec LiveState Recovery Manager 3.0 window, click
Uninstall.
6
Click Done to exit the wizard.
Restart your computer if prompted to do so. This step is necessary to ensure
that all components are properly removed.
Installing Symantec LiveState Recovery Manager
Uninstalling the product
Uninstalling the Symantec LiveState Recovery Manager server
If you are uninstalling the Symantec LiveState Recovery Manager server, be
aware that it will not uninstall Symantec LiveState Recovery from any
computers that you have added to the console. To uninstall Symantec LiveState
Recovery and its associated agents from computers, you should first remove the
computers from the console before you uninstall the Symantec LiveState
Recovery Manager server.
See “Remove Managed Computers” in Chapter 3, QuickStart.
To uninstall the Symantec LiveState Recovery Manager server
1
On the Windows taskbar, click Start > Settings > Control Panel.
2
In the Control Panel window, double-click Add or Remove Programs.
3
In the Add or Remove Programs window, click Symantec LiveState
Recovery Manager 3.0 Server.
4
Click Change/Remove.
5
In the Uninstall Symantec LiveState Recovery Manager 3.0 Server window,
click Uninstall.
6
Click Done to exit the wizard.
Restart your computer if prompted to do so. This step is necessary to ensure
that all components are properly removed.
29
30 Installing Symantec LiveState Recovery Manager
Uninstalling the product
Chapter
2
QuickStart
This chapter includes the following topics:
■
Using the console
■
Integrating computers into the console
■
Creating install packages
■
Discovering computers
■
Adding unmanaged computers
■
Deploying install packages
■
Organizing groups of computers
■
Where to go from here
Using the console
If you are new to Symantec LiveState Recovery Manager, you may find it helpful
to first review this information before integrating computers into the console
and deploying backup jobs.
The console lets you create and deploy backup jobs from your workstation, and
manage and view the complete status of those backup jobs on all computers.
Using the console, you can connect to the agents on any number of computers in
a network domain or workgroup that already have the agent installed.
Starting the console
You can start the console from the Windows start menu or from the Windows
desktop.
After the console is opened, you need to log on to the console to complete tasks.
16 QuickStart
Using the console
To start the console
◆
Do one of the following:
■
On the classic Windows taskbar, click Start > Programs > Symantec >
LiveState Recovery > LiveState Recover Manager.
■
On the Windows XP taskbar, click Start > All Programs > Symantec >
LiveState Recovery > LiveState Recover Manager.
■
On the Windows desktop, double-click the Symantec LiveState
Recovery Manager 3.0 Console icon.
Logging on to the server through the console
During the installation of the Symantec LiveState Recovery Manager server, you
had to specify a server administrator account password. After you start the
console, you must specify this case-sensitive password to access the server
through the console’s interface.
To log on to the server through the console
1
On the File menu of the Symantec LiveState Recovery Manager console,
click Log on.
2
In the Log on dialog box, type the computer name or IP address of the
server.
3
Type the password to the console.
4
Click OK.
Logging off from the server
When you log off from the console, the starting console view will remain open
until you exit the program or until you log on to the console again. Any backup
jobs you have deployed to computers will continue to function as usual.
You can also log off from the console by exiting the program.
To log off from the server
1
2
On the File menu of the Symantec LiveState Recovery Manager console, do
one of the following:
■
Click Log off to log off from the server and have the console remain
open.
■
Click Exit to log off from the server and close the console.
Click OK.
QuickStart
Using the console
Changing the agent user account password
If policies at your site require that you change all passwords on a regular basis,
you may need to change the password for the agent user account. When you
installed Symantec LiveState Recovery Manager server, the setup program
stored the agent user account name and password in a local account or a domain
account and in the operating system where the server is installed. The password
in both locations must be identical. Therefore, if you change it in one location,
you must also change it at the other location. If the two passwords are not
identical it could result in a distribution error as displayed in the console.
Computers that you are managing with the product have agent user accounts
and passwords automatically assigned to them by the LiveState Agent. When
you change the agent user account password, the LiveState Agent reads the new
password from the server’s smelogin file and automatically assigns it to all the
computers you are managing from the console; you do not need to manually
change the agent user account password on each remote computer.
To change the password in the operating system and the Symantec LiveState
Recovery Manager server, complete the following steps.
To change the agent user account password
1
On the Windows taskbar of the server where Symantec LiveState Recovery
Manager server is installed, click Start > Settings > Control Panel >
Administrative Tools > Computer Management.
2
In the left pane, double-click Local Users and Groups to expand the tree.
3
Click the Users folder to display a list of user accounts in the right pane.
4
Select the agent user account you created when you installed Symantec
LiveState Recovery Manager server.
5
On the Action menu, click Set Password, then follow the on-screen
instructions provided by Windows.
You will now change the password on the Symantec LiveState Recovery
Manager server.
6
On the server where Symantec LiveState Recovery Manager server is
installed, open ccm_pw.exe (default location is
C:\Symantec\LiveState\Config\dbin).
7
In the User drop-down list, select a user.
8
In the Server text box, specify the path to the Symantec LiveState Recovery
Manager server.
9
Type the old password.
10 Retype the new password to confirm it.
17
18 QuickStart
Using the console
11 Click OK.
Changing the console password
You can change the log on password to the console after you have logged on.
Passwords are case-sensitive.
Note: You will not be able to access the server by way of the console if you do not
enter the correct password, or you forget the password. (In such cases, you must
uninstall, then reinstall the software.) Store the password in a secure place;
Symantec has no method for restoring a password to the server.
To change the console password
1
Make sure you are already logged on to the console.
2
On the Tools menu, click Change Password.
3
Type the password you want to change in the Old Password text box.
4
Type the new password in the New Password and Confirm New Password
text boxes.
5
Click OK.
Console views
The console consists of five main views: Quick Start, Home Page, Assets,
Incidents, and Tools.
Quick Start view
The Quick Start view, available as a tab next to the Home Page tab in the main
window, is the default starting view when you first log on to the product. It is the
best place to start if you are new to Symantec LiveState Recovery Manager.
The Quick Start view helps you get started using the console by listing tasks to
complete in a recommended order.
Once you become familiar with using the console and navigating the different
views, you can turn off the opening QuickStart view by clicking Don’t show this
page after log on at the bottom of the page. The next time you log on to the
console, the Home Page becomes the default view.
QuickStart
Using the console
Home Page view
The Home Page view, available as a tab next to the QuickStart tab in the main
window, provides a visual overall status of servers and desktops that are being
protected. Actual data regarding computer incidents will populate this view
when you have added computers to the console and assigned backup jobs to
those computers.
Table 2-1 describes the information available from the Home Page view.
Table 2-1
Home Page view information
Status type
Description
Quick Status
Displays servers and desktops status
You can click a hyperlink in this area to open the Incidents
view and get detailed information about a selected computer
in the table. This is especially useful for troubleshooting
purposes. Quick Status types include:
■
Failed backups – Displays the number of desktops and
servers that have failed backups out of the total number
of desktops and servers you are managing.
■
Disconnected computers – Displays the number of
managed desktops and servers that are disconnected out
of the total number of desktops and servers you are
managing. See Server Status below for an explanation of
disconnected computers.
■
Successfully backing up – Displays the number of
desktops and servers that have scheduled backup jobs
being run successfully out of the total number of
desktops and servers you are managing.
See “Monitoring computers” on page 71.
See “Incidents view” on page 22.
19
20 QuickStart
Using the console
Table 2-1
Home Page view information
Status type
Description
Server Status and
Desktop Status pie
charts
Displays a pie chart showing the proportions of certain status
types for all recovery-enabled servers and desktops. A
computer is considered recovery-enabled if is has Symantec
LiveState Recovery and LiveState Agent installed on it. Status
types include:
■
Successfully Backing Up – Number of recovery-enabled
computers that are successfully being backed up by an
assigned backup job with a schedule.
■
No Backup Jobs Scheduled – Number of managed
computers that have no backup jobs assigned to them.
■
Unlicensed – Number of managed computers that do not
have a Symantec LiveState Recovery license file installed
or have an expired license file.
■
Incidents – Number of managed computers that have
backup failures, distribution errors, disconnected status,
or multiple issues (computers that have one or more
problems).
See “Incidents view” on page 22.
Symantec LiveState
Recovery Errors
Displays the number of computers that have had Symantec
LiveState Recovery events over the past seven days.
You can click a bar to the right of a date to jump to the
Incidents view for a more detailed review of event and status
information.
See “Incidents view” on page 22.
Quick Links
Provides hyperlinks to commonly used tasks like:
■
Getting information about LiveState on the Symantec
Web site.
■
Discovering computers you want to add to the console.
See “Discovering computers” on page 27.
■
Deploying backup jobs to computers you are managing.
See “Assigning backup jobs” on page 67.
■
Running LiveUpdate. See “Updating Symantec LiveState
Recovery Manager” on page 23.
■
Requesting updated information on a remote computer.
See “Request updated client information” on page 75.
■
Logging off from the console/server. See “Logging off
from the server” on page 16.
QuickStart
Using the console
Making the Home Page view the default
You can make the Home Page view the default view when you log on to the
console. The next time you log on to the console, the Home Page replaces the
Quick Start at the default view.
To make the Home Page view the default
1
In the console, click the QuickStart tab.
2
Select Don’t show this page after log on at the bottom of the QuickStart
page.
Assets view
The Assets view, available as a button in the left pane of the console, is used to
display all the computers that are currently being managed or not managed by
the server.
From the Assets view you can:
■
Use the Discover Computers feature to scan a specified network domain or
workgroup. When the scan is complete, the console will list all visible
(turned on) unmanaged computers in an entire network, domain,
workgroup, or IP address range. A computer is considered managed if it has
the LiveState Agent installed on it. If a computer has Symantec LiveState
Recovery and the LiveState Agent installed, it is considered recoveryenabled.
■
Add computers to the console from the Discover Computers list that you
want to manage and protect.
■
View a computer’s drive details (like the drive’s used and free space, last
backup, and last backup location), backup history, or event details to verify
that Symantec LiveState Recovery is functioning properly.
■
Deploy install packages of Symantec LiveState Recovery to computers you
have added to the console.
■
Create a custom group of computers with a specific name for easier
management. This new group is added to the Computer Groups tree.
■
Create backup job categories to organize frequently used backup jobs. For
example, you can create a “Daily” backup job category that can represent
various required or mandatory backup schedules that have been approved
for particular computers in your organization.
■
Install license files to activate deployed installations of Symantec LiveState
Recovery on computers.
21
22 QuickStart
Using the console
Incidents view
You can use the Incidents view to get information on the health of a selected
computer in the network domain or workgroup that you have added to the
console. The Incidents view, available as a button in the left pane of the console,
is used to alternately display:
■
Computers with failed backup jobs – Number of managed server and
desktop computers that have backup failures.
Backup failures can be caused by running out of hard disk space at the
backup storage location, or the backup job is unable to connect to the
specified backup storage location (usually a non-local storage location).
■
Disconnected computers – Number of managed server and desktop
computers that are disconnected from the Symantec LiveState Recovery
Manager server.
A computer is considered disconnected if the remote computer has a backup
job assigned and the server has not heard from the computer at the next
scheduled backup time. This is often caused by network connectivity issues
like the computer or laptop not being connected to the network or simply
being turned off.
■
Computers with distribution errors – Number of managed server and
desktop computers with distribution errors.
Distribution errors include situations where an install package or a backup
job is deployed, but the remote computer is unable to receive the package or
job.
The hyperlinks in the Quick Status area of the Home Page are linked to the
Incidents view to help you with troubleshooting.
Tools view
You can use the Tools view in the Symantec LiveState Recovery Manager
console to add links (or shortcuts) to external programs, URLs, or files that are
outside of the console.
When you install the console, default program shortcut icons for Symantec
pcAnywhere and Snap Server Manager are automatically added to the Tools
view. These program shortcuts are active if you have Symantec pcAnywhere or
Snap Server Manager installed on the same computer as the console.
See “Using the Tools view” on page 83.
QuickStart
Integrating computers into the console
Changing server options
You can customize certain aspects of the Symantec LiveState Recovery Manager
console and server to suit your working environment. Changes to options
remain in effect (even if you exit Symantec LiveState Recovery Manager) until
you change them again.
See “Ports that must be open in a firewall” on page 79.
To change server options
1
On the Tools menu, click Options.
2
In the Options dialog box, specify the following
Secure server port
Used to communicate to Web services by way of https.
Unsecure server port
Used to communicate to Web services by way of http.
Session timeout in minutes
Specifies the number of minutes of inactivity before
the current session prompts you to either log back on
to the server or remain logged off.
Updating Symantec LiveState Recovery Manager
You can receive software updates associated with your version of Symantec
LiveState Recovery Manager console by connecting to the Symantec LiveUpdate
server and selecting the updates that you want to install.
To obtain updates using LiveUpdate
1
On the Help menu in Symantec LiveState Recovery Manager, click
LiveUpdate.
2
In the LiveUpdate window, click Next to locate updates.
3
If updates are available, click Next to download and install them.
4
When the installation is complete, click Finish.
Some program updates may require that you reboot your computer before
the changes will take effect.
Integrating computers into the console
Before you can begin to backup computers on a network, the computers must
first be integrated into the Symantec LiveState Recovery Manager database
through the console. Integrating computers is a multi-step process that begins
before you add computers to the Symantec LiveState Recovery Manager server,
23
24 QuickStart
Creating install packages
and ends when you have deployed install packages of Symantec LiveState
Recovery to those computers you have added.
To integrate computers into the Symantec LiveState Recovery Manager console,
do the following:
■
Optionally create install packages of Symantec LiveState Recovery.
See “Creating install packages” on page 24.
■
Discover and identify computers in a domain or workgroup that you want to
protect. See “Discovering computers” on page 27.
■
Add the discovered computers to the console. See “Adding unmanaged
computers” on page 30.
■
Deploy the appropriate install package of Symantec LiveState Recovery to
the computers you added to the console. See “Deploying install packages”
on page 32.
After you have integrated computers into the console, you can create and deploy
backup jobs to those computers. See “Creating backup jobs” on page 60.
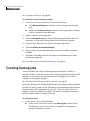
Creating install packages
Symantec LiveState Recovery Manager does not include “install packages” for
deploying the full Symantec LiveState Recovery product to computers. If you
want to deploy the full Symantec LiveState Recovery product, you must first
create install packages using the Create/Update LiveState Recovery Files wizard
and the Symantec LiveState Recovery product CD.
Note: Symantec LiveState Recovery Manager ships with three pre-built install
packages of Symantec LiveState Recovery (agent only) for the Advanced Server,
Standard Server, and Desktop versions. Unless you intend to install full versions
of Symantec LiveState Recovery on computers, there is no need to create install
packages of Symantec LiveState Recovery. In which case, you can proceed to
“Discovering computers” on page 27.
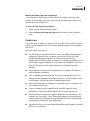
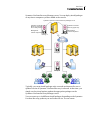
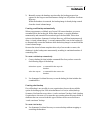
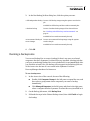
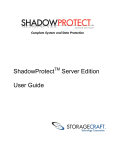
An install package is a single installation that contains the Management Control
component and either the Symantec LiveState Recovery agent or the full
Symantec LiveState Recovery product. Install packages are stored on the
QuickStart
Creating install packages
Symantec LiveState Recovery Manager server. You can deploy install packages
at any time to computers you have added to the console.
Symnatec Symantec LiveState Recovery Manager server
Symantec LiveState
Recovery-Advanced
Server-full product
Symantec LiveState
Recovery-agent only
Management
Control component
Management
Control component
Package B
Package A
Package A
Package B
Typically, you create install packages only once and use them until a new or
updated version of Symantec LiveState Recovery is released. At that time, you
simply run the wizard again to update the appropriate packages on the
Symantec LiveState Recovery Manager server.
You can create up to six different install packages, depending on the Symantec
LiveState Recovery products you are licensed to use. You can create:
25
26 QuickStart
Creating install packages
■
Agent-only install packages for Symantec LiveState Recovery Advanced
Server, Standard Server, and Desktop versions. (This is only necessary if
you need to create agent-only install packages for a newer version of
Symantec LiveState Recovery.)
■
Full product install packages for Symantec LiveState Recovery Advanced
Server, Standard Server, and Desktop versions.
Whether you deploy an install package that includes just the agent or the full
product, either package permits you to manage the computers through the
Symantec LiveState Recovery Manager console.
Table 2-2 describes the two types of files you can copy into an install package.
Table 2-2
Files to copy
Files to copy
Description
Agent
The agent is the unseen engine that does the actual creating and
restoring of backup images on a computer. Because the agent
functions as a service, it does not have a graphical user interface.
The agent does, however, have a tray icon available from the
Windows system tray to provide feedback of current conditions and
to perform common tasks.
For example, using the tray icon on the computer, a user would be
able to view assigned backup jobs, reconnect the agent, or cancel a
task that is currently running.
Full product
If you select to copy the full product, it will include the agent as
described above and the Symantec LiveState Recovery graphical user
interface.
To create install packages
1
Depending on the install package you want to create, make sure you have
one or more of the following products CDs available before you continue.
■
Symantec LiveState Recovery Advanced Server 3.02
■
Symantec LiveState Recovery Standard Server 3.02
■
Symantec LiveState Recovery Desktop 3.02
2
On the Tools menu, click Create/Update LiveState Recovery Files, then
click Next.
3
Select the products whose install packages you want to create (or update)
based on the product CDs you have available, then click Next.
4
Click From product CD.
QuickStart
Discovering computers
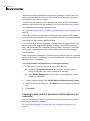
5
Insert the appropriate product CD into the media drive when prompted,
then click Next.
The install browser window may appear after you insert the CD. In such
cases, click Exit to return to the wizard.
6
Select the files you want to copy into the install package, then click Next to
begin copying the files from the product CD and placing the install packages
on the Symantec LiveState Recovery Manager server.
If you selected more than one product near the start of the wizard, you will
be prompted to insert the next product CD.
You are now ready to discover unmanaged computers in preparation for adding
them to the console. See “Discovering computers” on page 27.
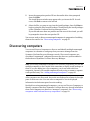
Discovering computers
You can use Discover Computers to discover and identify multiple unmanaged
computers in a domain or workgroup that you want to manage from the
Symantec LiveState Recovery Manager console. Discovered computers are
considered “unmanaged” computers because they have not yet been added to
the database of Symantec LiveState Recovery Manager.
Note: Discovering unmanaged computers is a necessary step before you can add
multiple computers to the console at the same time or deploy install packages to
them. If you are adding just a few computers, you do not need to discover
computers. Instead, you can add computers directly using a comma to separate
each specified entry. See “Adding unmanaged computers” on page 30.
After computers are discovered, the results are displayed in columns in the right
pane of the Assets view. You can select a computer to view its displayed
information in the bottom pane for easier reading.
Besides discovering unmanaged computers, you can use Discover Computers to
identify computers that have Symantec LiveState Recovery already installed on
them. Such computers are known as “managed” computers. See “Discovering
computers with LiveState Recovery components” on page 29.
27
28 QuickStart
Discovering computers
Table 2-3 lists the information that is displayed about discovered computers.
Table 2-3
Discovered computer information
Column heading
Description
Name
View the name of each running (turned on) computer
found in the domain or workgroup.
Domain
View the name of the domain where the computer
resides on the network.
Provider
View the general type of network operating system that
the computer resides on.
Comment
View a computer description if one was added in the
Windows Computer Name tab.
Status
View the state of the computer.
LiveState Recovery Version
View the version of Symantec LiveState Recovery that is
installed on the computer. If you have not added the
computer to the console or installed Symantec LiveState
Recovery, this will appear as “Unknown Version.”
Management Console Version
View the version of the Management Console agent that
is installed on the computer. If you have not added the
computer to the console, this will appear as “Unknown
Version.”
Note: Before you continue, have you created install packages? See “Creating
install packages” on page 24.
Discovering unmanaged computers
Discover Computers lets you select multiple unmanaged computers either by
typing the computer names or IP addresses or by browsing for computers across
domains.
QuickStart
Discovering computers
If you choose to scan for computers across domains, all computers in your
Network Neighborhood appear in the browse list regardless of their operating
systems. Discover Computers supports only Microsoft 32-bit operating systems
(for example, Windows NT/2000/XP). If you select a computer that has another
operating system, deployment to that computer will fail.
Note: If you are adding just one computer, you do not need to discover
computers. Instead, you can add the computer directly. See “Adding unmanaged
computers” on page 30.
To discover unmanaged computers
1
On the View menu, click Assets.
2
On the Computers menu, click Discover Computers.
3
Do one of the following:
4
■
Click Scan entire network.
It may take a few moments for the Select Computers dialog box to
appear.
■
Click Domain to scan for computers, and then select a domain or
workgroup from the drop-down list.
■
Click Scan specific IP address range, and then type the IP address
range you want to scan in the Start and End text boxes.
Click OK. The results are displayed in the right pane of the console.
You are now ready to add computers to the console. See “Adding unmanaged
computers” on page 30.
Discovering computers with LiveState Recovery components
Besides discovering unmanaged computers, you can discover computers that
already have Symantec LiveState Recovery installed on them.
For example, prior to installing Symantec LiveState Recovery Manager you may
already have existing installations of Symantec LiveState Recovery on
computers throughout your enterprise. If so, you can use Symantec LiveState
Recovery Manager to search for those computers and add them to the console
for unified management of backups and backup schedules.
To discover computers with Symantec LiveState Recovery components
1
On the Computers menu, click Discover Computers.
29
30 QuickStart
Adding unmanaged computers
2
Click Domain to scan for computers, then select a domain or workgroup
from the drop-down list.
3
In the Discover Versions group box, select Scan for LiveState Recovery and
Management Control versions.
4
Type the domain administrator user name and password to the domain you
want to scan.
5
Click OK. The results are displayed in the right pane of the console.
Adding unmanaged computers
You can use Add Computers to integrate one computer or multiple discovered
computers into the Symantec LiveState Recovery Manager console.
See “Discovering computers” on page 27 if you need to discover multiple
computers.
When you add one or more computers to the console,
■
It becomes recognized by Symantec LiveState Recovery Manager as a
computer that can accept install packages of Symantec LiveState Recovery.
■
It appears in the Managed Computers tree of the Assets view.
■
You must have an administrator user name and password for the computers
you want to add, and the administrator user name and password must be
the same for all unmanaged computers you are adding at one time.
The easiest way to accomplish this is for all unmanaged computers to be in
the same domain, and for you to use a domain administrator user name and
password for authentication.
■
An administrator share must be enabled on the unmanaged computers you
are adding. The default share is C$.
■
It automatically deploys and installs the Symantec LiveState Agent for
Windows (Windows agent) to the selected computer and reboots.
The LiveState Agent resides on the managed computers. It is used by the
Symantec LiveState Recovery Manager server to poll for backup jobs that need
to be downloaded, and reports status information back to the console.
When the LiveState Agent is deployed to the computers you are adding to the
console, the computers are automatically rebooted. Following reboot, a “traffic
light” icon appears in the Windows system tray of each computer.
See “Components of Symantec LiveState Recovery Manager” on page 7.
QuickStart
Adding unmanaged computers
To add unmanaged computers
1
On the View menu, click Assets.
2
Click Unmanaged Computers in the left pane.
3
In the right pane of the console, select the computers you want to add to the
Managed Computers tree of the Assets view.
No computers appear in the right pane of the console? You may need to first
discover computers. See “Discovering computers” on page 27.
4
On the Computers menu, click Add Computer.
5
6
Do one of the following:
■
If you are adding multiple computers, type the domain administrator
name and password to the domain.
■
If you are adding one computer, you can type either the domain
administrator name or the administrator name, and the password.
Click OK.
Removing managed computers
Use Remove Computers to delete selected computers from the Managed
Computers tree in the Assets view and the Symantec LiveState Recovery
Manager database. When a managed computer is removed, the following
components are uninstalled from the remote computer:
■
Symantec LiveState Agent (optional).
If you choose to leave this agent on the remote computer, only its entry in
the Symantec LiveState Recovery Manager database is removed and,
therefore, will not appear in the Managed Computers list of the console.
However, if you choose to have the agent removed, it will be uninstalled
from the remote computer before its entry is deleted from the Symantec
LiveState Recovery Manager database.
The following component remains on the remote computer:
■
Management Control component (inactive).
■
Microsoft .NET Framework.
■
Symantec LiveState Recovery. To uninstall Symantec LiveState Recovery,
see “Uninstalling Symantec LiveState Recovery on managed computers” on
page 35.
If you are removing multiple computers, they must all reside within the same
domain and you must have a domain administrator user name and password to
that domain. If you are removing one computer from the console, you can do so
by simply using an administrator user name and password.
31
32 QuickStart
Deploying install packages
To remove managed computers
1
2
On the View menu, click Assets.
In the left pane, do one of the following:
■
Double-click Managed Computers to display a list of computers in the
right pane.
■
Double-click Computer Groups to display a list of groups, and then
click a group.
See “Organizing groups of computers” on page 36.
3
In the right pane, select the computer names that you want to remove from
the console.
4
On the Computers menu, click Remove Managed Computer.
5
In the Remove Computer dialog box, select Remove the agent before
deleting the computers to uninstall the LiveState Agent. This option is
selected by default.
6
Do one of the following:
7
■
If you are removing multiple computers, type the domain
administrator name and password to the domain.
■
If you are removing one computer, you can type either the domain
administrator name or a local administrator name, and the password.
Click OK.
Deploying install packages
You can deploy install packages of Symantec LiveState Recovery to computers
that you have added to the Symantec LiveState Recovery Manager database.
Management Control, a component that also gets installed when the install
package of Symantec LiveState Recovery is deployed to the computer,
communicates with the Symantec LiveState Recovery Manager server. This
component publishes event information to the console about such things as the
drives and volumes on the computer, a list of backup images and their storage
locations, and the backup job assigned to it, including the backup and restore
history. The console is also notified if the configuration of the computer
changes.
When the Symantec LiveState Recovery product is deployed, the computers are
automatically rebooted. Following reboot, a Symantec LiveState Recovery tray
icon appears in the Windows system tray of each computer.
QuickStart
Deploying install packages
If Symantec LiveState Recovery already existed on a computer prior to adding it
to the Symantec LiveState Recovery Manager console, any backup jobs
(including command files) created by a user are deleted.
For each install package of Symantec LiveState Recovery that you deploy onto
managed computers, you will also need deploy a license file to activate the
software.
See “Activating Symantec LiveState Recovery on managed computers” on
page 33.
Note: Before you continue, have you created install packages and added
computers to the console? See “Creating install packages” on page 24, or
“Adding unmanaged computers” on page 30.
To deploy install packages
1
2
In the Assets view of the console, do one of the following:
■
Click Managed Computers in the left pane to display a list of
computers in the right pane.
■
Double-click Computer Groups in the left pane to expand the tree.
Do one of the following:
■
In the Managed Computers table in the right pane, select one or more
computers that have Symantec LiveState Recovery installed, then click
Computers > Install/Update LiveState Recovery.
■
In the Computer Groups tree, select a computer group name. In the
Computer Group table in the right pane, select one or more computers
that do not have Symantec LiveState Recovery installed, then click
Computers > Install/Update LiveState Recovery.
■
In the Computers Group tree in the left pane, select a computer group,
then click Computers > Install LiveState Recovery on Computers in
Group.
3
Click Yes to continue.
4
In the LiveState Recovery Type dialog box, click the appropriate install
package you want to deploy and install.
5
Click OK.
Activating Symantec LiveState Recovery on managed computers
Product activation is a technology that protects users from pirated or
counterfeit software by limiting use of a product to those users who have
33
34 QuickStart
Deploying install packages
acquired the product legitimately. Activation of Symantec LiveState Recovery
requires the installation of a license file for each install package of Symantec
LiveState Recovery that you deploy.
You must activate Symantec LiveState Recovery within 30 days of installation;
otherwise the software will stop working. You can activate it after the 30 days
have elapsed without redeploying the software.
See “Checking license status of Symantec LiveState Recovery on computers” on
page 34.
The 30-day evaluation of Symantec LiveState Recovery (agent or full product)
lets you create backup images of system and data volumes. You can also perform
restorations of data volumes and files/folders.
You also have open access to Symantec’s online technical support library. You
can view up-to-date support information, including a searchable knowledge
base, software library files, frequently asked questions, customer-to-customer
news groups, and additional technical information at the Symantec Support
Knowledge Base.
When you purchased Symantec LiveState Recovery (Advanced Server, Standard
Server, or Desktop), you should have received a license file (.slf). You will install
this license file on computers.
To activate Symantec LiveState Recovery on managed computers
1
In the Assets view of the console, do one of the following:
■
Double-click Computer Groups in the left pane, and then select a
group. In the right-pane, select a computer in the table.
■
Click Managed Computers in the left pane. In the right pane, select a
computer in the table.
2
On the Computers menu, click Install/Update LiveState Recovery License.
3
In the Install License dialog box, click Browse to locate and open the license
file.
4
Click Install.
Checking license status of Symantec LiveState Recovery on
computers
You can use the Assets view to check the license status of Symantec LiveState
Recovery on managed computers.
See “Activating Symantec LiveState Recovery on managed computers” on
page 33.
QuickStart
Deploying install packages
To check license status of Symantec LiveState Recovery on computers
1
In the Assets view of the console, click Managed Computers in the left pane
to display a table of computers in the right pane.
2
Check the License Status column for one of three status messages.
None
A Symantec LiveState Recovery license file has
not been installed on the computer.
Product license expires in x days A Symantec LiveState Recovery license file is
installed on the computer and expires in a
specified number of days.
Product license has expired
A Symantec LiveState Recovery license file is
installed on the computer and is more than 30 day
old.
Uninstalling Symantec LiveState Recovery on managed computers
You can uninstall Symantec LiveState Recovery from one or more selected
computers, or from all computers in a computer group that you have created.
When Symantec LiveState Recovery is uninstalled, the remote computer will
automatically be rebooted.
If you want to remove a managed computer from the Symantec LiveState
Recovery Manager database and console only, see “Removing managed
computers” on page 31.
To uninstall Symantec LiveState Recovery on managed computers
1
2
In the Assets view of the console, do one of the following:
■
Click Managed Computers in the left pane to display a list of
computers in the right pane.
■
Double-click Computer Groups in the left pane to expand the tree.
Do one of the following:
■
In the Managed Computers table in the right pane, select one or more
computers that have Symantec LiveState Recovery installed, then click
Computers > Uninstall LiveState Recovery.
■
In the Computer Groups tree, select a computer group name. In the
Computer Group table in the right pane, select one or more computers
that have Symantec LiveState Recovery installed, then click
Computers > Uninstall LiveState Recovery.
■
In the Computers Group tree in the left pane, select a computer group,
then click Computers > Uninstall LiveState Recovery from Computer
Group.
35
36 QuickStart
Organizing groups of computers
3
Click Yes to continue.
4
Do one of the following:
5
■
Click Yes to save backup jobs, backup histories, and command files
associated with the remote computer, or if you intend to upgrade or
reinstall Symantec LiveState Recovery in the future.
■
Click No to delete all backup jobs, backup histories, and command files
associated with the remote computer.
Click OK.
Organizing groups of computers
You can organize computers that you have added to the console by creating
computer groups. Though it is not a necessary step in integrating computers
into the console, grouping computers simplifies the backup management of
large numbers of computers. For example, if there are desktop computers that
you want to backup just once a month, you can create a group for those
computers, regardless of where they reside on the network. You can then assign
a monthly backup job for that group.
You can group computers by department, network location, physical location,
backup schedules, or any other grouping criteria you establish, and then assign
one or more backup jobs to that group. This saves you time by not having to
create a backup job for each computer in the console.
Note: Make sure that any backup jobs you assign to a computer or computer
group do not overlap in time; otherwise a backup error will occur. Also, only one
incremental backup job per volume can be assigned on a remote computer. If
you assign a second incremental backup job to the same volume, a backup error
will occur.
You can create any number of groups for computers that are added to the
console, and you can add computers to one or more groups.
Computer groups cannot be nested within other computer groups.
See “Adding unmanaged computers” on page 30.
You can organize groups of computers in the following ways:
■
Add computer groups to the console.
See “Adding computer groups” on page 37.
■
Edit a computer group name and description.
See “Editing computer groups” on page 37.
QuickStart
Organizing groups of computers
■
Remove computer groups from the console.
See “Deleting computer groups” on page 38.
■
Add computers to computer groups.
See “Adding computers to a group” on page 38.
■
Remove computers from a computer group.
See “Removing computers from a group” on page 38.
Adding computer groups
When you create a group for computers, the name is added to the Computer
Groups tree in the Assets view. You can double-click Computer Groups in the left
pane of the Assets view to display or hide the groups that you have created.
You can add a computer to more than one group, but you can only have one
incremental backup job per volume assigned at a time on the selected computer
(does not apply to full backup jobs).
To add computer groups
1
In the Assets view of the console, on the Computers menu, click Add
Computer Group.
2
In the Group Name text box, type the name that you want to use for the
group.
3
Type a description for the computer group.
4
Click OK.
Editing computer groups
You can change the name or description of an existing computer group in the
console.
To edit computer groups
1
In the Assets view of the console, do one of the following:
■
Click Computer Groups in the left pane, and then select a group in the
right pane.
■
Double-click Computer Groups in the left pane to expand the tree, and
then select a group name.
2
On the Computers menu, click Edit Computer Group.
3
Make the changes you want to the group name and description.
4
Click OK.
37
38 QuickStart
Organizing groups of computers
Deleting computer groups
When you delete a computer group, the group name and any computers under
that group are removed from the tree. The computers inside the group
(including any backup jobs assigned to them) remain in the Managed Computers
tree of the Assets view.
See “Removing managed computers” on page 31.
To delete computer groups
1
In the Assets view of the console, click Computer Groups to display the list
of groups in the right pane of the console.
2
Select the names of the computer groups you want to remove.
3
On the Computers menu, click Delete Computer Groups.
4
Click OK.
Adding computers to a group
After you have created a computer group, you can customize the group by
adding or removing computers that you have added to the LiveState Recover
Manager database.
You use traditional file selection methods in the console to select one or more
computers that you want to add to a computer group.
To add computers to a group
1
On the View menu, click Assets.
2
Click Managed Computers to display a list of computers you can add in the
right pane of the console.
3
Select the computers you want to add to a group.
4
On the Computers menu, click Add Computers to Group.
5
In the Add computer to Group dialog box, select a computer group from the
drop-down list.
6
Click OK.
Removing computers from a group
When you remove a computer from a group, the computer will still appear in the
Managed Computers tree in the Assets view because it is already integrated with
the Symantec LiveState Recovery Manager console and server.
See “Removing managed computers” on page 31.
QuickStart
Where to go from here
To remove computers from a group
1
On the View menu, click Assets.
2
Double-click Computer Groups to display a list of computer groups in the
tree.
3
Select a computer group name that contains the computers you want to
remove from the group.
4
Select the computers you want to remove in the right pane of the console.
5
On the Computers menu, click Remove Computers from Group.
Where to go from here
After you have integrated computers into the console, you can create and deploy
backup jobs to those computers.
See “Creating backup jobs” on page 60 or “Assigning backup jobs” on page 67.
39
40 QuickStart
Where to go from here
Chapter
3
Administering backup jobs
This chapter includes the following topics:
■
About backup jobs
■
About incremental backup jobs
■
Creating backup jobs
■
Assigning backup jobs
■
Organizing backup jobs
■
Monitoring computers
■
Recovering files or disks
About backup jobs
This section contains the following:
■
Information to help you create backup images
See “Tips for creating backup images” on page 42.
See “Backing up dual-boot systems” on page 43.
See “Backing up VSS-aware databases” on page 43.
See “Backing up non-VSS-aware databases” on page 54.
■
Information about storage locations for backup images, and their
advantages and disadvantages
See “Storage options for backup images” on page 45.
■
Information about general options that you can use when creating backup
images
See “General options for creating backup images” on page 48.
42 Administering backup jobs
About backup jobs
■
Information about advanced options that you can use when creating backup
images
See “Advanced options for creating backup images” on page 50.
See “Running command files during backup image creation” on page 52.
You can create backup jobs to automate the creation of backup images using a
daily, weekly, or monthly schedule. This backup method is useful if you want to
create full backup images during off-hours when you are not present, or if you
want to create a baseline with incremental backup images without interrupting
the normal flow of work.
While the managed computer must be turned on to perform a backup at the
scheduled time, the console does not need to be open for the scheduled backup
job to take place, nor does a user have to be logged on to the computer.
You can temporarily override a backup job schedule in Symantec LiveState
Recovery Manager to create a backup image immediately.
See “Running an existing backup job immediately” on page 64.
You can backup databases.
See “Backing up VSS-aware databases” on page 43.
See “Backing up non-VSS-aware databases” on page 54.
To verify that a backup completed as scheduled, you can view the Home Page on
the console and check the status information or select the computer in the
Assets view.
Note: Symantec LiveState Recovery Manager supports saving backup image files
to a network hard disk or to a local hard disk (including USB, Firewire, Zip, Jaz,
and REV drives, and magneto-optical devices). It does not support saving backup
image files directly to tape, CD, or DVD.
Tips for creating backup images
The following information may help when you create backup images:
■
Symantec LiveState Recovery Manager console does not need to be open for
a backup to take place. Therefore, after you create a backup job, you can exit
the console. The remote computer that you are managing, however, must be
running so a backup or backup job can occur. To verify that a backup was
made, check the information in the Backup History tab or the Events tab,
both available in the Assets view when you click Managed Computers, then
select a computer in the table.
Administering backup jobs
About backup jobs
■
To test a backup job, click the Backup Jobs tab (in the Assets view of the
console click Managed Computers, then select a computer in the table), and
then select a backup job listed in the table. Click Backup Jobs > Run Backup
Job Now.
■
All backup jobs (except backup jobs that you created by running Backup
Now) are saved in the Symantec LiveState Recovery Manager database so
that you can edit or run them later. See “Running a backup once” on
page 65.
■
The security remains intact on an NTFS volume when you mount the
volume using Backup Image Browser. (Security is maintained for all
volumes when mounting.) If, however, you are simply viewing folders and
files inside the backup image file using Backup Image Browser tool (that is,
the .v2i, .iv2i, or .pqi file is not mounted), there is no security on the volume,
folders, or files.
■
Do not run a disk defragmentation program on the managed remote
computer while a backup image is being created, or unexpected results may
occur.
■
If you have two or more volumes that are dependent on each other, or they
are used as a group by a program like a database service, you should back up
the volumes together. With Symantec LiveState Recovery Manager, you can
back up multiple volumes simultaneously by selecting two or more volumes
in the Create Backup Job wizard.
Backing up dual-boot systems
You can back up dual-boot systems, or systems that are running more than one
operating system, even if you have volumes that are hidden within the operating
system where you run the product.
Everything on the volume you select is included in the backup, so it will be
bootable later if you restore it. An exception is if you back up a bootstrapped
operating system, you must back up—and then restore—every volume that
includes operating system boot information for your computer to boot the same
from a restored system as it did from the original configuration.
Backing up VSS-aware databases
Symantec LiveState Recovery Manager can co-exist with Microsoft VSS (Volume
Shadow Copy Service) to automate the process of backing up VSS-aware
databases like production Exchange 2003 and SQL 2005 databases, transaction
logs on Windows Server 2003, Active Directory, and the latest versions of
Oracle. VSS-aware databases are auto-enabled and cannot be turned off.
43
44 Administering backup jobs
About backup jobs
Note: Licensing Symantec LiveState Recovery on remote computers does not
give users any right to use VSS. VSS must be licensed separately from Microsoft,
and users must conform to any license agreement or documentation that
accompanies VSS.
For information about backing up non-VSS-aware databases, see “Backing up
non-VSS-aware databases” on page 54.
VSS allows IT administrators to create a shadow copy backup of volumes on a
server. The shadow copy includes all files (including open files).
When a Symantec LiveState Recovery backup job starts, Symantec LiveState
Recovery alerts the VSS that a backup image is about to be created. VSS then
communicates this information to the VSS-aware databases and puts them into
a quiesced (sleep) state. (Symantec LiveState Recovery always attempts to
communicate with VSS if it is installed on a desktop or server and tries to
provide VSS with information to quiesce databases.)
While in this quiesced state, the databases continue to write to transaction logs,
and Symantec LiveState Recovery takes an instantaneous snapshot that also
includes any open files. When the snapshot is complete, VSS is notified, the
databases are activated, and the transaction logs continue writing to the
database. (To verify that there are no errors and that VSS is running, you should
check Microsoft error logs.)
While the backup image is being created from the snapshot, the databases and
applications return to an active state and continue to write data.
This kind of integration means that you can back up business-critical databases
at anytime during the day without affecting productivity.
Additional points for backing up and restoring VSS-aware databases:
■
Symantec LiveState Recovery prevents VSS snapshots from occurring
during the time Symantec LiveState Recovery is creating a backup image.
■
If a full system restore is done from a Symantec LiveState Recovery backup
image file, individual files can be restored from a VSS snapshot. However,
the recommended restore process is to use Symantec LiveState Recovery to
mount the backup image file as a virtual drive (using Backup Image
Browser), and then restore the files you need.
■
After a full system restore from a Symantec LiveState Recovery backup
image, a VSS snapshot that was taken prior to the date and time of the
Symantec LiveState Recovery snapshot can no longer be used to restore the
entire system.
Administering backup jobs
About backup jobs
Warning: Database corruption may occur if the computer is low on hard disk
space when you are rebuilding a database at the same time you are running a
backup image job. To avoid database corruption, you should quiesce the
database before backing it up, and you should not rebuild or restore the database
at the same time you are backing it up. Finally, to avoid possible conflict,
Symantec LiveState Recovery does not allow you to take VSS snapshots and
Symantec LiveState Recovery snapshots at the same time.
Storage options for backup images
You can save backup images to a local hard drive, a network drive, or a local
USB, FireWire, or REV drive.
Table 3-1 shows the advantages and disadvantages of using different locations
for storing backup images.
Table 3-1
Backup image storage locations
Location
Advantages
Hard drive
■
Fast create and restore
■
Uses valuable drive space
■
Can schedule unattended
backups
■
Vulnerable to loss if the
hard drive fails
■
Inexpensive because drive
space can be overwritten
repeatedly
■
Fast create and restore
■
■
Can schedule unattended
backups
Must have supported NIC
drivers to restore from
Symantec Recovery Disk
■
Inexpensive because drive
space can be overwritten
repeatedly
■
■
Protection from local hard
drive failure
Must understand and
assign the appropriate
rights for the users who will
perform backups and
restores
■
Off-site storage (through
existing network backup
strategies)
Network drive
Disadvantages
45
46 Administering backup jobs
About backup jobs
Table 3-1
Backup image storage locations
Location
Advantages
Disadvantages
USB/FireWire/
REV drive
(local)
■
Fast create and restore
■
■
Can schedule unattended
backups
Additional expense for the
drive itself
■
■
Inexpensive because drive
space can be overwritten
repeatedly
■
Off-site storage is possible
■
Reserves hard drive space for
other uses
Must have supported
storage device drivers to
restore from Symantec
Recovery Disk; could
require additional media
along with the Symantec
Recovery Disk CD
Selecting a storage location for backup images
When you create or schedule a backup job, you can choose the location where
the backup image will be stored.
The available backup image storage location options are
■
Network file
■
Local file
Network file
If you select Network file, the backup images are stored on the network. You
need to specify the UNC path (\\server\share) to the folder on the network
where you want the backup images stored. Alternatively, you can click Browse to
navigate to the appropriate network folder.
Because backup image file names are unique and include the name of the
computer, you can use the same network storage location for multiple
computers or for groups of computers that you have created in the console.
When you click Next in the wizard, the Connect As window appears. Type a
domain or computer name, a user name, and password, and then click OK to
continue with the wizard.
The user name you type must have read-write access to the network folders
where the backup image files will be stored. The product uses this login
information to access the network when you create a backup image.
Local file
If you select Local file, the backup images are stored on the hard drive of the
computer that is being backed up. You need to specify the drive and folder (for
example, E:\Data_Backups\) where you want the backup images stored.
Administering backup jobs
About backup jobs
Warning: It is highly recommended that you save backup images to a secondary
hard drive or a network location.
While it is possible to save the backup image to the same partition or volume
that you are backing up, it is not recommended for several reasons. As the
number or size of backups grows, you will have less disk space available for
regular use. Also, the backup image file itself is included in subsequent backups
of the partition or volume, increasing the size of those backups. And finally, if
the computer suffers a catastrophic failure, like a primary hard drive going bad,
you may not be able to recover the backup image you need, even if you save the
image to a different partition or volume on the same hard drive.
Scheduling image options
Table 3-2 describes the backup image schedule options that are available:
Table 3-2
Backup image schedule options
Option
Description
Once
One full backup image is created at the date and time you specify for
the remote computer.
This option applies only to Full Backups.
Weekly
Full Backups: A full backup image is created at the time and days of the
week you specify for the remote computer.
Base with Incrementals: A base backup image is created at the time and
days you specify; incremental backup images are created at the time
and interval you specify.
Monthly
Full Backups: A full backup image is created at the time and days of the
month you specify for the remote computer.
Base with Incrementals: A base backup image is created at the time and
days of the month you specify for the remote computer; incremental
backup images are created at the time and on the days of the week you
specify for the remote computer.
47
48 Administering backup jobs
About backup jobs
Table 3-2
Backup image schedule options
Option
Description
No schedule
(save for later)
Save all of the backup settings except the schedule. You can later run
the backup job at your convenience.
To run the backup job later
1
In the Assets view of the console, do one of the following:
■
Click Backup Jobs in the left pane, and then select a backup job in
the table
■
Click Managed Computers in the left pane, select a computer in
the table, and then click the Backup Jobs tab.
2
Select the backup job in the table.
3
On the Backup Jobs menu, click Run Backup Job Now.
To assign a schedule to the backup job
1
In the Assets view of the console, do one of the following:
■
Click Backup Jobs in the left pane, and then select a backup job in
the table
■
Click Managed Computers in the left pane, select a computer in
the table, and then click the Backup Jobs tab.
2
Select the backup job in the table.
3
On the Backup Jobs menu, click Edit Backup Job, and then
complete the scheduling step in the wizard.
General options for creating backup images
When you schedule a backup job, you can set the following general options for
the backup images:
■
Setting the compression level for backup images
■
Verifying a backup image
■
Dividing a backup image file into smaller files
■
Limiting the number of backup images that are created
Administering backup jobs
About backup jobs
Setting the compression level for backup images
When you create a schedule for a backup job, you can choose the compression
level for the images.
Table 3-3 describes the available compression levels available:
Table 3-3
Compression levels for backup images
Compression level Description
None
Uses no compression. This is most useful if storage space is not an
issue. However, if you are saving the backup image file to a busy
network drive, using high compression may be faster than no
compression because there is less data to write across the
network.
Standard
Uses low compression for a 40% average data compression ratio
on backup image files. This is the default.
Medium
Uses medium compression for a 45% average data compression
ratio on backup image files.
High
Uses high compression for a 50% average data compression ratio
on backup image files. This is usually the slowest method.
When a high compression backup image is created, CPU usage
may be higher than normal. Other processes on the computer may
also be slower.
Verifying a backup image
If this option is selected in the wizard at the time you create a backup, the
backup image file or set of files will be checked to see that all of files are
available, the internal data structures in the backup image match the data that
is available, and the backup image can be uncompressed to create the expected
amount of data (if you selected a compression level at the time of creation).
For steps on how to verify a backup image file after it has been created, refer to
the Symantec LiveState Recovery product documentation.
Note: Be aware that verifying an image doubles the time (approximately)
required to create the backup image.
Dividing a backup image file into smaller files
You can split a backup image file into two or more smaller files. This feature is
useful if you are creating or exporting a backup image file that you want to copy
49
50 Administering backup jobs
About backup jobs
to removable media later for safekeeping. The backup image is split into smaller,
more manageable segments. You can then copy the segments onto separate,
removable media.
Note: If Symantec LiveState Recovery creates an .sv2i file in addition to the .v2i
files, you need to save the .sv2i file on the same media as the first .v2i file.
If you are creating a backup of thousands of files on a computer that has low
memory, splitting the backup image into smaller segments may help speed the
process.
If a backup image is divided into multiple files, the filenames for subsequent
files will be appended with _S01, _S02, and so forth. For example, if the default
filename were C_Drive.v2i, the second filename would be C_Drive_S01.v2i, and
so on.
Limiting the number of backup images that are created
When this limit is reached, each successive backup image (whether full or base)
is first created and stored, and then the oldest, previously created backup image
file is deleted (including all associated incrementals if it is a base image) from
the same storage location.
Be sure you have enough hard disk space to accommodate the number of backup
images you specify, plus one additional backup image.
If you run out of hard disk space before the number of specified backup images
is reached, the recurring backup image process will not complete successfully,
and a current backup image will not be created.
Advanced options for creating backup images
When you create or schedule a backup job, you can set the advanced options for
the backup images.
Administering backup jobs
About backup jobs
Table 3-4 describes the advanced options that are available for backup images.
Table 3-4
Advanced options
Option
Description
Use password
If you select this option, you can specify a password for the
backup image.
A user must type the password before restoring a backup or
opening it in Backup Image Browser.
You can specify specific password criteria if you are encrypting
the backup image.
Use Encryption
See “Encrypting a backup image” on page 51.
Ignore bad sectors
during copy
If you want the ability to create a backup even if there are bad
sectors on the hard drive, select this option. Although most
drives do not have bad sectors, the potential for problems
increases during the lifetime of the hard drive.
Disable SmartSector
Copying
SmartSector technology speeds up the copying process by only
copying clusters and sectors that contain data. However, in some
cases, it may be desirable to copy all clusters and sectors in their
original layout, whether they contain data.
If you want to copy both used and unused clusters and sectors,
select Disable SmartSector Copying.
Note: Selecting this option increases processing time and usually
results in a larger backup image file size.
Encrypting a backup image
You can enhance the security of your data by using AES (Advanced Encryption
Standard) to encrypt backup image files that you create. This is especially useful
if you are storing backup image files on a network and need a high level of
security protection against unauthorized access and use.
You can view the encryption strength of a backup image at any time by viewing
the properties of the file.
51
52 Administering backup jobs
About backup jobs
Encryption strengths are available in 128-bit, 192-bit, or 256-bit. While higher
bit strengths require longer passwords, the result is greater security for your
data. Table 3-5 explains the bit strength and required password length.
Table 3-5
Password length
Bit strength
Password length
128 (Standard)
8 characters or longer
192 (Medium)
16 characters or longer
256 (High)
32 characters or longer
You must enter the correct password before you can access or restore an
encrypted backup image file.
Besides bit strength, the make-up of the password can improve the security of
your data. For greatest security, backup image passwords should use the
following general rules:
■
Avoid using consecutive, repeating characters (for example, BBB or 88).
■
Avoid using common words that you would find in a dictionary.
■
Use at least one number.
■
Use both uppercase and lowercase alpha characters.
■
Use at least one special character like ({}[],.<>;:'"?/|\`~!@#$%^&*()_-+=).
■
Change the password after a set period of time using the Export Backup
Image File feature in Backup Image Browser. See the Symantec LiveState
Recovery product documentation for more information about using Backup
Image Browser.
Note: Passwords are case-sensitive. When you access or restore a password
encrypted backup image file, the product prompts you for the password. If you
do not enter the correct password or you forget the password, you will not be
able to open the backup image. Store the password in a secure place; Symantec
has no method for opening encrypted backup image files.
Running command files during backup image creation
To integrate with any backup routines you may be running on the remote
computer or to integrate with applications that may be using a volume on the
remote computer, you can specify command files (.exe, .cmd, .bat) to run at three
different stages during the creation of a backup image:
Administering backup jobs
About backup jobs
■
Before data capture
■
After data capture
■
After image file creation
You can also specify the amount of time (in seconds) that a command file should
be allowed to run.
The most common use for running command files is to stop and restart nonVSS-aware databases that you want to back up. See “Backing up non-VSS-aware
databases” on page 54 for more information.
Note: Any command files that you specify in the Command Files dialog of the
wizard must first be copied to the Symantec LiveState Recovery Manager server.
(The default path is \Symantec\LiveState\depot\CfgVPro.001 \command.) When
you deploy the backup job to remote computers, any command files you
specified are also deployed with the backup job. Be sure you have the necessary
rights to run each command file.
To use a Visual Basic script file (.VBS) during a backup, you can create a batch
file (.BAT) that will run the script. For example, you could create a batch file
called STOP.BAT that contains the following syntax:
Cscript script_filename.vbs
Make sure that Cscript precedes the Visual Basic script filename.
Warning: The command files you install and use cannot depend on any user
interaction or have a visible user interface while they are running during a
backup. You should test all command files you intend to use outside of the
product before using them in a backup image process.
When the actual backup image creation begins, the command file runs during
the specified stage. If an error occurs while a command file is running, or the
command file does not finish in the time you specified (regardless of the stage),
the entire backup image creation is ended, the command file is stopped (if
necessary), and the error information is logged and displayed.
53
54 Administering backup jobs
About backup jobs
Table 3-6 describes the three stages of backup image creation.
Table 3-6
Backup image file creation stages
Stage
Description
Before data capture
This stage occurs before the virtual volume image is created.
Running a command during this stage lets you prepare for the
backup image creation process by stopping (or notifying) any open
applications that are using the volume, for example.
Note: If you use this stage option, be sure the command file has an
error recovery mechanism built into it. If the computer has one or
more services that must be stopped at this stage, and the
command file does not contain any form of error recovery, one or
more of the stopped services may not be restarted. This will cause
the entire backup image creation process to end immediately; no
other command files will run.
For more information about virtual volume images and how they
are created with Symantec LiveState Recovery, see the Symantec
LiveState Recovery documentation.
After data capture
This stage occurs after the virtual volume image is created.
Running a command during this stage is typically a safe point for
allowing you to resume normal activity on the volume.
After image file
creation
This stage occurs after the actual backup image file is created.
Running a command during this stage lets you act on the backup
image file itself by copying it to an offline location, for example.
Backing up non-VSS-aware databases
With Symantec LiveState Recovery, you can create manual or automatic cold
backups or hot backups of non-VSS-aware databases.
Creating a cold backup manually
A manual cold (or offline) backup ensures that all database transactions are
committed to the hard disk. You can then use Symantec LiveState Recovery to
create the backup, then restart the database.
To create a cold backup manually
1
Stop the database manually.
2
Use Symantec LiveState Recovery Manager to run a backup immediately
using the Backup Now feature. See “Running a backup once” on page 65.
Symantec LiveState Recovery instantaneously snaps a “virtual volume
image” of the database.
Administering backup jobs
About backup jobs
3
Manually restart the database anytime after the backup progress bar
appears in the Progress and Performance dialog box of Symantec LiveState
Recovery.
While the database is restarted, the backup image is already being created
from the virtual volume image.
Creating a cold backup automatically
When you automate a cold back up of a non-VSS-aware database, you run a
command file in the backup job, before data capture, to stop the database
momentarily and commit all transaction logs to the hard disk. This action
quiesces the database. Symantec LiveState Recovery will then instantaneously
snap a “virtual volume image”. A second command file is run in the backup job
to automatically restart the database while the backup image is created from the
virtual volume image.
Because the virtual volume snapshot takes only a few seconds to create, the
database is in the backup state momentarily, resulting in a minimal number of
created log files.
To create a cold backup automatically
1
2
Create a backup job that includes command files that you have create for
the following stages of the backup:
Before data capture
A command file that stops the
database.
After data capture
A command file that restarts the
database.
Use Symantec LiveState Recovery to run the backup job that includes the
command files.
Creating a hot backup
If a cold backup is not possible in your organization, the next best available
option for backing up non-VSS-aware databases is a hot (or online) backup.
Symantec LiveState Recovery takes a “crash consistent” backup. Such a backup
is equivalent to the state of a system that was running when the power failed. A
database that can recover from this type of failure can be recovered from a
“crash consistent” backup.
To create a hot backup
◆
Use Symantec LiveState Recovery to create a backup without stopping or
restarting the database.
55
56 Administering backup jobs
About incremental backup jobs
Symantec LiveState Recovery instantaneously snaps a “virtual volume
image” from which the backup image is created.
About incremental backup jobs
This section contains the following information:
■
Information to help you create incremental backup images
See “Working with full backups and incrementals” on page 57.
■
Information about general options that you can use when creating
incremental backup images
See “Scheduling image options” on page 47.
See “Event options” on page 58.
See “Consolidating incremental backup images” on page 59.
■
Information about advanced options that you can use when creating
incremental backup images
See “Running command files during backup image creation” on page 52.
You can create backup jobs to automate the creation of backup images using a
daily, weekly, or monthly schedule. This backup method is useful if you want to
create full backup images during off-hours when you are not present, or if you
want to create a baseline with incremental backup images without interrupting
your normal workflow.
While the remote computer must be turned on to perform a backup at the
scheduled time, the console does not need to be open for the scheduled backup
job to take place, nor does a user have to be logged onto the computer.
You can back up a database.
See “Backing up VSS-aware databases” on page 43.
To verify that a backup completed as scheduled, you can check the information
in the Backup History tab or the Events tab, both available in the Assets view
when you click Managed Computers, and then select a computer in the table. Or,
you can see backup status results when you click the Home Page tab in the Home
view.
Administering backup jobs
About incremental backup jobs
Working with full backups and incrementals
There are two types of backup images that you can schedule: Full backups and
base with incremental backups.
Full backups
A full backup has the following advantages and disadvantages:
■
A full backup image backs up the entire selected volume or volumes.
■
A full backup image is not associated with incremental backup images in
any way. Full backups stand on their own, so using full backups is a less
complicated backup method than using a base with incrementals.
You can take a full backup image of a drive (using the Run Backup Job Now
feature) even if that drive is currently being tracked using Base with
Incrementals.
See “Running an existing backup job immediately” on page 64.
Incrementals
Note: This feature may not be available on the remote computer in your version
of Symantec LiveState Recovery. To upgrade to a version that supports this
feature, visit sea.symantec.com.
An incremental backup has the following advantages and disadvantages:
■
An incremental backup image saves only the hard disk sectors that have
changed since the baseline image or the previous incremental backup was
created.
■
A baseline image is the same as a full backup image, except that it has
incremental tracking turned on for the selected drive.
■
A baseline image is associated only with its own incremental backup files.
■
Incremental backup images require less time to create than full backups
and make better use of storage media.
■
Event monitors can be used to trigger the automatic creation of incremental
images.
■
When using incremental backup images on a monitored volume, if the
computer loses power or is shut down abnormally, then on reboot an
attempt is made to create an incremental backup image based on the last
incremental backup image. (The reconciliation could take as long as a full
backup.)
57
58 Administering backup jobs
About incremental backup jobs
■
If you use a base with incrementals to back up a hard drive, when you
restore to a given point in time, the baseline image, plus all the
incrementals taken up to that point in time, are used for the restore.
For example, suppose you have a baseline image with eight incremental
backups. You decide to restore to the point in time that the fourth
incremental was taken. When you restore, the baseline image and the first
four incrementals are used to restore the backup.
■
When you create a base with incrementals, if you select a hidden drive
(partition) and a non-hidden partition in the same backup job, the hidden
partition will only be backed up when a base image is specified; no
incremental backup images will be created.
■
Incremental images can be consolidated, thus reducing the restore to the
baseline image and a consolidated incremental image.
See “Consolidating incremental backup images” on page 59.
Note: The baseline image and all associated incremental backups must be kept
together in the same folder. If any image is missing, the backup image set
becomes invalid and you will not be able to restore the data.
Event options
When you create a base with incrementals backup job, you can select which
events will trigger the automatic creation of incremental images. For example,
at the time you log off of a remote computer or install an application, you can
have Symantec LiveState Recovery create an incremental image.
Note: This feature may not be available on the remote computer in your version
of Symantec LiveState Recovery. To upgrade to a version that supports this
feature, visit sea.symantec.com.
Table 3-7 outlines the event options you can enable when you create a base with
incrementals.
Table 3-7
Event options
Event
Description
Any user logs on to the
computer
An incremental backup is created at the time a user logs on to
the computer.
Any user logs off the
computer
An incremental backup is created at the time a user logs off of
the computer.
Administering backup jobs
About incremental backup jobs
Table 3-7
Event options
Event
Description
Any application gets
installed
An incremental backup is created at the time a user installs an
application on the computer.
The changes on a drive
in this job exceed X
number of megabytes
An incremental backup is created when changes to the hard
drive on the computer exceed a specified number of
megabytes.
Consolidating incremental backup images
The baseline image and all of its incrementals taken up to a specific point in
time are required when restoring a backup image to a given point in time.
Depending on the duration of the backup job, there could be a lot of incremental
backup images. You can reduce the amount of storage space for the backup by
consolidating multiple incremental backup images to a single incremental
backup image. (The baseline image is still required for a restore.)
Note: This feature may not be available on the remote computer in your version
of Symantec LiveState Recovery. To upgrade to a version that supports this
feature, visit sea.symantec.com.
Depending on the number of incremental image files that are being
consolidated, additional memory may be required for restoring or browsing a
consolidated incremental image file. Additionally, consolidating backup images
over the network may increase network traffic significantly.
Table 3-8 outlines the consolidation options you can set when you schedule a
base with incrementals or manually consolidate incremental images.
Table 3-8
Consolidation options
Consolidation
Description
None
No consolidation of incremental images is performed.
Every twelve hours
A consolidation of incremental images that are 12 hours old
(or older) is performed every 12 hours. Also, after the first
incremental of the day is taken, all incremental files from two
days previous are consolidated to a single file.
Every four hours
A consolidation of incremental images that are 4 hours old (or
older) is performed every 4 hours. Also, after the first
incremental of the day is taken, all incremental files from the
two days previous are consolidated to a single file.
59
60 Administering backup jobs
Creating backup jobs
See “Creating backup jobs” on page 60.
To consolidate incremental backup images
1
In the Assets view of the console, do one of the following:
■
Click Managed Computers to display a list of computers in the right
pane.
■
Double-click Computer Groups, and then click a group name to display
a list of computers in the right pane.
2
Select a computer in the right pane .
3
Click the Backup History tab, displayed in the right pane below the list of
computers, to view specific backup details for the selected computer.
4
In the list box, right-click on a selected a backup image name.
5
Click Consolidate Incremental Backups.
6
Select a range of incremental backups you want to consolidate, and then
click OK.
7
Click Yes to consolidate the selected range of incrementals into a single
incremental image file.
See “Consolidating incremental backup images” on page 59.
Creating backup jobs
You can automate the creation of backup images using a daily, weekly, or
monthly schedule. If you are creating a base with incrementals (instead of a full
backup), you can also specify that certain events, like logging on or off of a
computer, or installing a program.
See “Working with full backups and incrementals” on page 57.
By default, filenames for scheduled full backup or base images will be appended
with 001.v2i, 002.v2i, and so forth. Filenames for incremental backups based on
the base image will be appended with _i001.iv2i, _i002.iv2i, and so forth. For
example, if your base image were called C_Drive001.v2i, the first incremental
backup would be called C_Drive001_i001.iv2i.
To create backup jobs
1
In the console, do one of the following:
■
In the Assets view of the console, click Backup Jobs in the left pane.
The backup job you create can later be assigned to the computer or
groups of computers you want.
Administering backup jobs
Creating backup jobs
■
Double-click Computer Groups in the left pane, and then select a group
name. The backup job you create will automatically be assigned to all
computers in the group.
2
On the Backup Jobs menu, click Create Backup Job, and then click Next.
3
In the Backup Type dialog box, click one of the following, and then click
Next:
■
Base with Incrementals
Full Backups
See “Working with full backups and incrementals” on page 57.
■
4
Do one of the following, and then click Next:
■
Click All Mounted Volumes on Targeted Computer to back up all
volumes that exist on the remote computer (excluding hidden and
unmounted volumes).
Click By Drive Letter, and then select the drive letter you want to back
up on the remote computer.
If you are creating a backup job for a single computer, you will also be
able to select any hidden and unmounted volumes. A separate backup
image file will be created for each volume you select.
If a volume is selected but it is not available for backing up on a particular
computer (usually because the volume has been deleted or the entire hard
disk has been removed from the computer since Symantec LiveState
Recovery was installed), when the backup image is created, it will not
include the volume. However, if the program is not aware that the volume is
missing, the backup job will result in a backup error.
■
5
Select the location where you want the backup images stored by doing one
of the following:
■
Select Network file, and then click Next. In the Connect As dialog box,
specify the domain name, user name, and password to access the
location with create/read/write privileges.
Select Local file, and then click Next.
If there is not be enough available space at the specified location where
the backup image is being stored, the backup will fail and an error will
be reported in the Incidents view and the Home Page view of the
Symantec LiveState Recovery Manager console.
See “Storage options for backup images” on page 45.
See “Selecting a storage location for backup images” on page 46.
■
6
Specify the frequency and time of the backup images, and then click Next.
Your options are:
■
Once (applies to full backups only)
61
62 Administering backup jobs
Creating backup jobs
■
Weekly
■
Monthly
No schedule (save for later)
See “Scheduling image options” on page 47.
■
7
If you are creating a base with incrementals, select the events that will
automatically create an incremental backup. Your options are:
■
Any user logs on to the computer
■
Any user logs off of the computer
■
Any application gets installed
The changes on a volume in this job exceed “x” number of megabytes
See “Event options” on page 58.
■
8
In the Options dialog box, from the Compression drop-down list, select the
compression level for the backup image.
■
None
■
Standard
■
Medium
High
See “Setting the compression level for backup images” on page 49.
Results may vary depending on the types of files saved in the volume you
are backing up.
■
9
To determine whether a backup image file or set of files is valid or corrupt
immediately following its creation, select Verify backup image after
creation.
10 To break the backup image file into small segments, select Divide the
backup image into smaller files to simplify archiving, and then type the
maximum size (in MB) for each file.
For example, if you plan to copy a backup image to CDs, specify a file size of
700 MB or less.
See “Dividing a backup image file into smaller files” on page 49.
11 To limit the number of full or baseline backup images saved for each drive,
select Limit the number of backups saved for each drive, and then type a
number in the text field.
Administering backup jobs
Creating backup jobs
When this limit is reached, each successive backup image (whether full or
base) is first created and stored, and then the oldest, previously created
backup image file is deleted (including all associated incrementals if it is a
base image) from the same storage location.
Be sure you have enough hard disk space to accommodate the number of
backup images you specify, plus one additional backup image.
If you run out of hard disk space before the number of specified backup
images is reached, the recurring backup image process will no longer
complete successfully and a current backup image will not be created.
12 In the Consolidate incrementals drop-down list, select how often you want
incremental backup images consolidated.
■
Never
■
Every twelve hours
Every four hours
See “Consolidating incremental backup images” on page 59.
■
13 Click Advanced.
14 In the Advanced Options dialog box, select the options you want to use like
encrypting the backup image, and then click OK. Your options are:
■
Use password
■
Use Encryption
■
Ignore bad sectors during copy
Disable SmartSector Copying
See “Advanced options for creating backup images” on page 50.
■
15 Click Next.
16 If appropriate, specify a command file (.exe, .cmd, .bat) from each dropdown list to run during a particular stage in the backup image creation
process, and then specify the amount of time (in seconds) you want the
command to run before it is stopped.
If you just added command files to \Symantec\LiveState\depot
\CfgVPro.001\command (default path), you may need to restart the wizard
to see the files in each stage’s drop-down list.
■
Before data capture
■
After data capture
After backup file creation
See “Running command files during backup image creation” on page 52.
See “Creating a cold backup automatically” on page 55.
■
17 Click Next.
63
64 Administering backup jobs
Creating backup jobs
18 In the Job Name and Description dialog box, type a name and description for
the backup job, then click Next.
19 In the Completing the Backup Job Wizard dialog box, review the backup
options you have selected.
20 Click Finish to add the backup job to the Backup Jobs tree in the Assets
view.
You can now assign the backup job to a computer, a computer group, or you
can add it to a backup job category.
See “Assigning backup jobs” on page 67.
See “Organizing backup jobs” on page 69.
Running an existing backup job immediately
After you assign a backup job to computers, you can use Run Backup Job Now to
create–on demand–a full backup image, a baseline backup image, or an
incremental backup image of the drive’s most recent changes.
For example, you can take a full backup image of a drive even when that drive is
currently being tracked using a base with incrementals job.
Note: To use the Run Backup Job Now feature, you must have already created a
backup job and assigned it to at least one computer.
See “About incremental backup jobs” on page 56.
See “Running a backup once” on page 65.
To run an existing backup job immediately
1
2
In the Assets view of the console, do one of the following:
■
Double-click Backup Jobs in the left pane, and then select a backup job
name.
■
Double-click Computer Groups in the left pane, and then select a
group. Click the Backup Jobs tab in the lower-right pane, and then
select a backup job name.
■
Click Managed Computers in the left pane, and then select a computer.
Click the Backup Jobs tab in the lower-right pane, and then select a
backup job name.
On the Backup Jobs menu, click Run Backup Job Now.
Administering backup jobs
Creating backup jobs
3
In the Run Backup Job Now dialog box, click the option you want.
A full independent backup Creates a full backup image using the options saved in the
job.
Available for full backup and base with incremental jobs.
A baseline backup
Creates a baseline backup image of the selected drives.
See “Working with full backups and incrementals” on
page 57.
Available for base with incremental jobs only.
An incremental backup of Creates an incremental backup image using the options
recent changes
saved in the job.
Available for base with incremental jobs only.
4
Click OK.
Running a backup once
You can use Backup Now to create a backup job that is run once on selected
computers that have Symantec LiveState Recovery installed. A backup job that
you have created using Backup Now is not scheduled (it is run immediately after
you finish the wizard). Also, the backup will not appear in the Backup Jobs tree
of the Assets view because it is not saved in the Symantec LiveState
RecoveryManager database for future use.
To run a backup once
1
In the Assets view of the console, do one of the following:
■
Double-click Computer Groups in the left pane to expand the tree, and
then select a group name whose computers you want to backup
immediately.
■
Click Managed Computers in the left pane, and then in the right pane,
select a computer that has Symantec LiveState Recovery installed on it.
2
On the Backup Jobs menu, click Backup Now.
3
Followed the steps in the Volume Backup wizard, then click Finish to begin
the backup.
65
66 Administering backup jobs
Creating backup jobs
Editing backup jobs
You can edit any of the schedule properties for a backup job, except the selected
drives. The resulting backup job schedule will be updated on any computers that
it is assigned to.
To edit backup jobs
1
2
In the Assets view of the console, do one of the following:
■
Double-click Backup Jobs in the left pane, and then select a backup job
name.
■
Double-click Computer Groups in the left pane, and then select a
group. Click the Backup Jobs tab in the lower-right pane, and then
select a backup job name.
■
Click Managed Computers in the left pane, and then select a computer.
Click the Backup Jobs tab in the lower-right pane, and then select a
backup job name.
On the Backup Jobs menu, click Edit Backup Job to open the selected job in
the Backup Job wizard and change its properties.
Renaming backup jobs
You can change the name of any backup job you have created.
To rename backup jobs
1
In the Assets view of the console, do one of the following:
■
Double-click Backup Jobs in the left pane, and then select a backup job
name.
■
Double-click Computer Groups in the left pane, and then select a
group. Click the Backup Jobs tab in the lower-right pane, and then
select a backup job name.
■
Click Managed Computers in the left pane, and then select a computer.
Click the Backup Jobs tab in the lower-right pane, and then select a
backup job name.
2
On the Backup Jobs menu, click Rename Backup Job.
3
Type a new name for the backup job.
4
Click OK.
Administering backup jobs
Assigning backup jobs
Deleting backup jobs
Deleting a backup job removes it from the console and any remote computers
that you have assigned it to.
To delete backup jobs
1
In the Assets view of the console, do one of the following:
■
Double-click Backup Jobs in the left pane, and then select a backup job
name.
■
Double-click Computer Groups in the left pane, and then select a
group. Click the Backup Jobs tab in the lower-right pane, and then
select a backup job name.
■
Click Managed Computers in the left pane, and then select a computer.
Click the Backup Jobs tab in the lower-right pane, and then select a
backup job name.
2
On the Backup Jobs menu, click Delete Backup Job.
3
Click Yes.
Assigning backup jobs
You can assign a backup job to multiple computers, or you can assign multiple
backup jobs (excluding incremental backup jobs) to a single computer or to
computer groups.
Note: Make sure that any backup jobs you assign to a computer or computer
group do not overlap in time; otherwise a backup error will occur. Also, only one
incremental backup job per volume can be assigned on a remote computer. If
you assign a second incremental backup job to the same volume, a backup error
will occur.
After a backup job is assigned, the computers will create backup images
according to the schedule in the job.
After you have created a backup job, you can assign it in the following ways:
■
Assign backup jobs to computers.
See “Adding backup jobs to computers” on page 68.
■
Assign backup jobs to computer groups.
See “Adding backup jobs to computer groups” on page 68.
67
68 Administering backup jobs
Assigning backup jobs
Adding backup jobs to computers
You can assign backup jobs to computers that have the Symantec LiveState
Recovery agent or full product installed.
Note: Make sure that any backup jobs you assign to a computer or computer
group do not overlap in time; otherwise a backup error will occur. Also, only one
incremental backup job per volume can be assigned on a remote computer. If
you assign a second incremental backup job to the same volume, a backup error
will occur.
See “Deploying install packages” on page 32.
See “Creating backup jobs” on page 60.
To add backup jobs to computers
1
In the Assets view of the console, double-click Backup Jobs in the left pane.
2
In the Backup Jobs tree, select a backup job.
3
Do one of the following:
4
■
On the Backup Jobs menu, click Add Job to Computer, and then select a
computer name from the drop-down list.
■
Drag the backup job from the Backup Jobs tree onto a computer in the
Managed Computers tree or the Computer Groups tree.
Click OK.
Adding backup jobs to computer groups
When you assign backup jobs to a computer group, all computers within that
group will have the same backup schedule.
Note: Make sure that any backup jobs you assign to a computer or computer
group do not overlap in time; otherwise a backup error will occur. Also, only one
incremental backup job per volume can be assigned on a remote computer. If
you assign a second incremental backup job to the same volume, a backup error
will occur.
To add backup jobs to computer groups
1
In the Assets view of the console, double-click Backup Jobs in the left pane.
2
In the Backup Jobs tree, select a backup job.
Administering backup jobs
Organizing backup jobs
3
4
Do one of the following:
■
On the Backup Jobs menu, click Add Job to Group, then select a
computer group name from the drop-down list.
■
Drag the backup job from the Backup Jobs tree onto a computer group
in the Computer Groups tree.
Click OK.
Organizing backup jobs
You can organize your backup jobs in the Symantec LiveState Recovery Manager
console in the following ways:
■
Add backup job categories to the Backup Job tree in the Assets view of the
console.
See “Adding backup job categories” on page 69.
■
Assign a backup job to a backup job category.
See “Adding backup jobs to backup job categories” on page 70.
■
Change the name of an existing backup job category.
See “Renaming backup job categories” on page 70.
■
Remove backup jobs from a backup job category.
See “Removing backup jobs from backup job categories” on page 70.
■
Delete existing backup job categories, even if they contain backup jobs.
See “Deleting backup job categories” on page 71.
Adding backup job categories
You can add any number of backup job categories to the console to help you
organize multiple backup job schedules that you use frequently. For example,
you could create categories for daily, weekly, or monthly backup jobs, or
categories for computer brands or departments in an organization.
To add backup job categories
1
In the Assets view of the console, on the Backup Jobs menu, click Add
Backup Job Category.
2
In the Category name text box, type the name of the category that will
contain backup jobs.
3
In the Category description text box, type a description of the category and
the types of backup jobs it will hold.
4
Click OK.
69
70 Administering backup jobs
Organizing backup jobs
Adding backup jobs to backup job categories
You can assign a backup job to one or more backup job categories that you have
already created.
To add backup jobs to backup job categories
1
In the Assets view of the console, do one of the following:
■
Click Backup Jobs in the left pane, and then select one or more backup
job names in the table.
■
Double-click Backup Jobs in the left pane to expand the tree, and then
select a backup job.
2
On the Backup Jobs menu, click Add Backup Jobs to Category.
3
Select a backup job category from the category drop-down list.
4
Click OK.
Renaming backup job categories
You can change the name of an existing backup job category. Any backup jobs
that are assigned to the renamed category are not affected.
To rename backup job categories
1
In the Assets view of the console, do one of the following:
■
Double-click Backup Jobs in the left pane to expand the tree, and then
select a category name.
■
Click Backup Jobs in the left pane, and then select a category name in
the Name column of the right pane.
2
On the Backup Jobs menu, click Edit Backup Job Category.
3
Make the changes you want to the category name or description.
4
Click OK.
Removing backup jobs from backup job categories
You can remove (or unassign) one or more backup jobs at once from a backup job
category. The backup job becomes reassigned to the root of the Backup Job tree;
it is not deleted from the console or unassigned from any computer.
To remove backup jobs from backup job categories
1
In the Assets view of the console, double-click Backup Jobs in the left pane
to expand the tree.
Administering backup jobs
Monitoring computers
2
Do one of the following:
■
In the Backup Jobs tree, double-click a backup job category that
contains backup jobs, and then select a backup job you want to remove.
■
In the Backup Jobs tree, select a backup job category, and then in the
right pane, select one or more backup jobs you want to remove.
3
On the Backup Jobs menu, click Remove Backup Jobs from Category.
4
Click OK.
Deleting backup job categories
When you delete a backup job category from the console, you have the choice of
deleting all the backup jobs that are assigned to that category, or to have the
backup jobs automatically moved to the root of the Backup Jobs tree.
To delete backup job categories
1
In the Assets view of the console, double-click Backup Jobs in the left pane
to expand the tree.
2
In the Backup Jobs tree, select a category name you want to delete.
3
On the Backup Jobs menu, click Delete Backup Job Category.
4
Select Delete any backup jobs that are associated with the category to
erase all backup jobs that appear under the category name.
If you do not select this option, all the backup jobs within that category are
moved to the root of the Backup Jobs tree.
5
Click Yes.
Monitoring computers
You can use Symantec LiveState Recovery Manager console to do any of the
following:
■
Review information about a selected computer’s drive.
See “Viewing drive details of a computer” on page 72.
■
Review backup jobs assigned to a computer.
See “Viewing backup jobs on a computer” on page 73.
■
Review information about a selected computer’s backup history.
See “Viewing the backup history of a computer” on page 73.
■
Review information about a selected computer’s events like errors or
warnings.
71
72 Administering backup jobs
Monitoring computers
See “Viewing events on a computer” on page 74.
■
Cancelling a failed backup job or retrying a failed backup job or install
package.
See “Viewing the status on a computer” on page 74.
■
Have the LiveState Agent on the remote computer check the Symantec
LiveState Recovery Manager server for any jobs that are waiting.
See “Processing pending jobs on computers” on page 75.
■
Update information that is displayed in the console about a remote
computer.
See “Request updated client information” on page 75.
■
Review remote computer and Symantec LiveState Recovery Manager server
log files.
See “Viewing a computer log” on page 76 or “Viewing a server log” on
page 76.
■
Export the computer information listed in the table that appears in the
upper-right pane of the console, to a comma separated value (.csv) file.
See “Exporting a console table to a file” on page 76.
Viewing drive details of a computer
You can use the Details tab to review specific information about the computer’s
hard drive (like the file system used and storage capacity), the storage location
for backup images, and when the last backup occurred.
You will also notice in the Details tab window that any unprotected drives (that
is, computers that have not yet had a backup job run on them) are blank in the
Last Backup column.
To view drive details of a computer
1
In the Assets view of the console, do one of the following:
■
Click Managed Computers to display a list of computers in the right
pane.
■
Double-click Computer Groups, and then click a group name to display
a list of computers in the right pane.
2
Select a computer in the upper-right pane whose drive details you want to
view.
3
Click the Details tab in the lower-right pane to view specific drive details
for the selected computer.
Administering backup jobs
Monitoring computers
Viewing backup jobs on a computer
You can use the Backup Job tab to see what backup jobs are assigned to a
selected computer or computer group.
See “Viewing the status on a computer” on page 74.
To view backup jobs on a computer
1
In the Assets view of the console, do one of the following:
■
Click Managed Computers to display a list of computers in the right
pane.
■
Double-click Computer Groups, and then click a group name to display
a list of computers in the right pane.
2
Select a computer in the upper-right pane whose assigned backup jobs you
want to view.
3
Click the Backup Job tab in the lower-right pane to view backup jobs that
are currently assigned to the computer.
4
Click the Details tab within the Backup Job tab to view detailed information
about what is included in the backup job.
5
Click the Status tab within the Backup Job tab to view status of the backup
job on the selected computer.
Viewing the backup history of a computer
You can view the backup image history of a computer and general status
information, like the backup and compression type, and where the image is
stored.
You can also view a chronological history of all the backup images taken of
selected drives (even if the backup image has been deleted from the storage
location), including the original location of each backup image file.
The picture icon next to each drive letter gives you a quick visual indication
about the type of backup that is being created (full, baseline, or incremental).
See “Viewing events on a computer” on page 74.
See “Consolidating incremental backup images” on page 59.
To view the backup history of a computer
1
In the Assets view of the console, do one of the following:
■
Click Managed Computers to display a list of computers in the right
pane.
73
74 Administering backup jobs
Monitoring computers
■
Double-click Computer Groups, and then click a group name to display
a list of computers in the right pane.
2
Select a computer in the upper-right pane whose backup history you want
to view.
3
Click the Backup History tab in the lower-right pane to view historical
backup details for the selected computer.
Viewing events on a computer
You can use the Events tab to display information, errors, or warnings that have
occurred on a computer that has Symantec LiveState Recovery.
You can also use the Windows Event Viewer on the remote computer to view
events from the application logs.
To view events on a computer
1
In the Assets view of the console, do one of the following:
■
Click Managed Computers to display a list of computers in the right
pane.
■
Double-click Computer Groups, and then click a group name to display
a list of computers in the right pane.
2
Select a computer in the upper-right pane whose events you want to view.
3
Click the Events tab in the lower-right pane to view.
4
Select an event in the Type column to display specific information about it
in the bottom of the right pane.
Viewing the status on a computer
You can use the Status tab to view status information about such things as
Symantec LiveState Recovery, the Symantec LiveState Recovery license,
scheduled backup jobs, and client information. You can also cancel a failed
backup job or retry a failed backup job or install package from the Status tab.
Computer names with a white X inside a red circle indicate an error such as a
failed backup job.
To view the status on a computer
1
In the Assets view of the console, do one of the following:
■
Click Backup Jobs, then click a backup job in the right pane. In the
lower-right pane, click the Status tab.
Administering backup jobs
Monitoring computers
2
■
Double-click Computer Groups, and then click a group name to display
a list of computers in the right pane. Select a computer name in the
table whose status you want to view, and then click the Status tab in
the lower-right pane to view.
■
Click Managed Computers to display a list of computers in the right
pane. Select a computer name in the table whose status you want to
view, and then click the Status tab in the lower-right pane to view.
Select a row in the Status table to display specific information about it in
the bottom of the right pane.
Depending on the status type you have selected (for example, a failed
backup job), you can click Cancel or Retry in the lower-right corner of the
Status tab window to cancel the failed operation or try again.
Processing pending jobs on computers
You can use Process Pending Jobs to have the LiveState Agent on the remote
computer check the Symantec LiveState Recovery Manager server for any jobs
that are waiting. If jobs are found, they are processed at once.
To process pending jobs on computers
1
2
In the Assets view of the console, do one of the following:
■
Double-click Computer Groups in the left pane to expand the tree, and
then select a group. In the right pane, select one or more computers.
■
Click Managed Computers in the left pane, and then in the right pane,
select one or more computers.
Right-click on the selected computers, and then click Process Pending Jobs.
Request updated client information
When you use the Request updated client information option, the Management
Control component on the remote computer resends information back to the
Symantec LiveState Recovery Manager server regarding the state of the
computer, backup status, hard drive information, and so forth.
As the remote computer responds to the request, any information that needs to
be updated will appear within a brief period of time in the console interface.
Symantec LiveState Recovery must already be installed on the managed
computer to use this feature.
To request updated client information
1
In the Assets view of the console, do one of the following:
75
76 Administering backup jobs
Monitoring computers
■
Double-click Computer Groups in the left pane to expand the tree, and
then select a group. In the right pane, select a computer that already
has Symantec LiveState Recovery installed.
■
Click Managed Computers in the left pane, then in the right pane,
select a computer that already has Symantec LiveState Recovery
installed.
2
On the Computers menu, click Request Updated Client Information.
You may need to press F5 to refresh the information that is displayed in the
console.
3
Click OK.
Viewing a computer log
You can use View Computer Log to open a selected computer’s LiveState Agent
install log in the default installed browser window.
To view a computer log
1
2
In the Assets view of the console, do one of the following:
■
Double-click Computer Groups in the left pane to expand the tree, and
then select a group. In the right pane, select a computer.
■
Click Managed Computers in the left pane, and then in the right pane,
select a computer.
On the View menu, click View Computer Log.
Viewing a server log
You can use View Server Log to open the Symantec LiveState Recovery Manager
server log in the default installed browser window.
To view a server log
◆
In the console, on the View menu, click View Server Log.
Exporting a console table to a file
You can export the computer information listed in the table that appears in the
upper-right pane of the console to a comma-separated value (.csv) file. You can
then open the file in a spreadsheet or database application.
To export a console table to a file
1
In the Assets view of the console, do one of the following:
Administering backup jobs
Recovering files or disks
■
Click Backup Jobs in the left pane, and then select any backup job in
the right pane to place focus on the table.
■
Double-click Computer Groups in the left pane to expand the tree, and
then select a group. In the right pane, select any computer to place
focus on the table.
■
Click Managed Computers in the left pane, and then select any
computer in the right pane to place focus on the table.
■
Click Unmanaged Computers in the left pane, and then select any
computer in the right pane to place focus on the table.
2
On the File menu, click Export.
3
In the Save As dialog box, specify the name and location of the file.
4
Click OK.
A message is displayed, telling you how many rows were exported.
Recovering files or disks
You can use Recover Files or Disks from inside the console to start Symantec
pcAnywhere and connect to a remote computer that you are managing. This
connection allows you to restore files on a remote computer using Backup Image
Browser or restore an entire volume using Symantec LiveState Recovery.
Table 3-9 describes the software that should be installed so you can use the
Recover Files or Disks feature in the Symantec LiveState Recovery Manager
console:
Table 3-9
Recovery on remote computer
Location
Software that should be installed
Symantec LiveState
Recovery Manager
console
■
Symantec pcAnywhere 11.5 (ships on a separate CD with
Symantec LiveState Recovery Manager).
Remote computer
■
Symantec pcAnywhere host.
■
Symantec LiveState Recovery - full product.
Note: The remote computer cannot be a pcAnywhere host if it is
currently under XP Remote Desktop (or Terminal Services)
control.
If you connect to a remote computer that only has the Symantec LiveState
Recovery agent installed (as opposed to the Symantec LiveState Recovery full
product), you must use the Symantec Recovery Environment to recovery files or
77
78 Administering backup jobs
Recovering files or disks
disks. See the Symantec LiveState Recovery product documentation for more
information about Symantec Recovery Environment.
After pcAnywhere is installed, you can launch the program directly from the
console to deploy pcAnywhere hosts to all managed computers you will want to
connect to for recovery tasks using Symantec LiveState Recovery. For more
information about using pcAnywhere and deploying hosts, see the Symantec
pcAnywhere product documentation.
Starting Symantec pcAnywhere from the console
To start Symantec pcAnywhere from the console, make sure you have installed
the product on the same computer on which you are running the Symantec
LiveState Recovery Manager console.
Note: The pcAnywhere host needs to be installed and running on the remote
computer before you can remotely recover files or disks.
After you connect to the remote computer through pcAnywhere, you can either
open Backup Image Browser to recover files or folders, or you can open
Symantec LiveState Recovery to recover disks.
To start Symantec pcAnywhere from the console
1
2
In the Symantec LiveState Recovery Manager console, do one of the
following:
■
Click Tools in the left pane, and then click the Symantec pcAnywhere
icon in the right pane.
■
Click Managed Computers in the left pane, and then in the right pane,
select a computer that has the Symantec LiveState Recovery full
product installed on it.
On the Computers menu, click Recover Files and Folders.
Appendix
A
Troubleshooting
This chapter includes the following topics:
■
Troubleshooting the product
Troubleshooting the product
Use the troubleshooting information to find solutions to problems that might
occur when using Symantec LiveState Recovery Manager.
For additional troubleshooting information, see the Readme.txt file on the
product CD, or refer to the Symantec website.
This appendix includes the following information:
■
Ports that must be open in a firewall
■
How results of Backup Now are displayed in the console
■
Adding the server to the console
■
Adding a remote computer twice from different installations of the
Symantec LiveState Recovery Manager server
■
Unknown username error when adding a remote computer
■
Discovery of computers gives incorrect status in console
Ports that must be open in a firewall
If you are running the Symantec LiveState Recovery Manager console with
remote computers behind a local firewall or using Windows XP Service Pack 2,
you must manually configure certain ports so that Symantec LiveState Recovery
Manager can communicate with the remote computers.
See “Changing server options” on page 23.
80 Troubleshooting
Troubleshooting the product
You will need to configure the following ports on each remote computer that is
behind a firewall or running Windows XP SP2:
■
Port 453–Used by the Symantec LiveState Agent.
■
Port 8443–Used by the Symantec LiveState Recovery Manager console for
communicating with the Symantec LiveState Recovery Manager server.
■
Ports 138 and 139–Used by the File and Printer Sharing service located in
the Exceptions tab of Windows Firewall (Windows XP SP2 only).
You cannot configure these ports remotely from Symantec LiveState Recovery
Manager because the ports must be open in order for the console and server to
communicate with the remote computer.
How results of Backup Now are displayed in the console
When you use the Backup Now feature on a managed computer (a desktop
computer, for example) that does not have a backup job assigned to it, the
backup status in the Events tab of the computer will indicate that it was
successful. However, in the Home Page view, the Desktop pie chart will
categorized the computer as “No Backup Jobs Scheduled” instead of
“Successfully Backing Up”. This status is accurate.
For a computer to appear in the Successfully Backing Up category of the pie
chart, it must have a backup job assigned to it.
Adding the server to the console
If you are adding the computer where the Symantec LiveState Recovery
Manager server is installed to the Symantec LiveState Recovery Manager
console, you must reboot the server manually after adding the computer.
Following the manual reboot of the server, the computer will appear in the
Managed Computers tree of the console.
See “Adding unmanaged computers” on page 30.
Adding a remote computer twice from different installations of the
Symantec LiveState Recovery Manager server
Scenario: You have an installation of the Symantec LiveState Recovery Manager
server on two different Windows servers and Symantec LiveState Recovery
Manager console on two different Windows workstations.
You add a remote computer to the first console through the first server, then
shut down the server.
Troubleshooting
Troubleshooting the product
Now, you add the remote computer again but this time to the second console
through the second server. The remote computer should be added to the
Managed Computers tree view in the second console, but instead, the remote
computer appears in the Unmanaged Computers tree view with an error status.
As a result, you will not be able to manage the remote computer on the second
server. This is because you are attempting to install the LiveState Agent twice
from two different server installations. The second installation of the agent is
unable to update the database and configure the agent to communicate with the
second server.
There are two solutions:
1
You can perform a “move workstation” to transfer the database into the
second server and configure the LiveState Agent to communicate with that
server.
2
Or, you can perform an update of the LiveState Agent by removing the
computer from the server, then re-adding it through the second server,
thereby changing its configuration to communicate with the second server.
Unknown username error when adding a remote computer
When a remote computer is running Windows XP in a workgroup, the default
local security policy on the computer forces any connection to the share (usually
C$) by using the Guest account. Therefore, when you try to add the computer to
the Symantec LiveState Recovery Manager console, you will get an “unknown
username or bad password” error.
You can avoid this error if the remote computer is in a network domain. For
more information on how to accomplish this so you can add the remote
computer to the Managed Computers tree in the console, see the following Web
link:
http://www.windowsnetworking.com/pages/article_p.asp?id=266
Discovery of computers gives incorrect status in console
When a computer account is disabled in Active Directory Services the change is
not immediately apparent or updated in the Symantec LiveState Recovery
Manager console during discovery of computers in a domain or entire network.
The change is propagated only after you reboot the remote computer and then
you run Discover Computers from the console again.
81
82 Troubleshooting
Troubleshooting the product
Appendix
B
Using the Tools view
This chapter includes the following topics:
■
About the Tools view
■
Adding a link to the Tools view
■
Editing a link
■
Removing a link from the Tools view
About the Tools view
You can use the Tools view in the Symantec LiveState Recovery Manager
console to add links (or shortcuts) to external programs, URLs, or files that are
outside of the console. You double-click the link to launch the program or open
the associated file.
When you install the console, default program shortcut icons for Symantec
pcAnywhere, Snap Server™ Manager, and LiveUpdate are automatically added
to the Tools view. These program shortcuts are active if you have pcAnywhere
or Snap Server Manager installed on the same computer as the console. You
cannot edit or remove the default program shortcuts.
In addition, if you have any Symantec LiveState Delivery 6.0 products installed
(such as Command Center, Enterprise Manager, or Package Manager), program
shortcuts will automatically be added to the Tools view.
Links are displayed in the order that you add them to the Tools view.
Adding a link to the Tools view
You can add links to external program, URLs, or files and launch the link from
the Tools view in the console. In the Tools view, you can display links with a
84 Using the Tools view
Adding a link to the Tools view
graphical icon of your choice and the link’s name below the icon. When you
hover the mouse pointer on a link, the name, link location, and description are
displayed in a pop-up.
To add a link to the Tools view
1
In the Symantec LiveState Recovery Manager console, on the Tools menu,
click Add link.
2
In the Location text box of the Add Tools dialog box, complete the following
options:
Location
Do one of the following:
■
Specify the full path to a program file that exists on the
computer. (For example, an .exe file.) If necessary, click
Browse to locate the file.
■
Specify the full path to a file that exists on the computer. (For
example, a .txt or .doc file). If necessary, click Browse to
locate the file.
■
Specify the full path to a Web link. The Web link path must
begin with http://, https://, or www so that it can open
correctly using the browser that is installed on the computer.
Description
Type a description for the link. The text will appear in a pop-up
when you hover on the link. A description is optional.
Display name
Type the name that you want displayed below the link’s graphical
icon. A display name is optional.
Display image
Specify the path to a graphic image file that you want to represent
the link.
Valid graphic image file formats include .jpg, .gif, or .png. Icon files
(.ico) are not supported.
If you do not specify an image file (or if the file you chose is invalid
or not available), Symantec LiveState Recovery Manager will
supply one of three default images based on the type of link you are
creating (an executable, URL, or file).
Start in
Specify a folder path that contains files that the program may need
to use.
If this box is left empty, the default install directory path for the
program is used.
3
Click OK.
Using the Tools view
Editing a link
Editing a link
You can edit links that you have created. Default links that were installed with
Symantec LiveState Recovery Manager cannot be edited.
To edit a link
1
In the Tools view of the console, select a link that you have created.
2
On the Tools menu, click Edit link.
3
In the Edit Tools dialog box, make the changes you want.
4
Click OK.
Removing a link from the Tools view
You can use Remove link to delete one link at a time from the Tools view.
To remove a link from the Tools view
1
In the Tools view of the console, select a link that you have created.
2
On the Tools menu, click Remove link.
85
86 Using the Tools view
Removing a link from the Tools view
Index
Symbols
.csv file, creating 92
.sV2i files 66
A
activating LiveState Recovery 49
advanced options for backup images 66
agent
uninstalling 47
agent user account, password 33
Assets view 37
B
backing up dual-boot systems 59
backup history 89
backup images
advanced options 66
consolidate 75
encrypting 67
filenames 76
full 73
history 89
incremental 73
running command files 68
see also backups
backup job categories
adding backup jobs to 86
adding to console 85
deleting 87
removing backup jobs from 86
renaming 86
backup jobs
assigning to computer groups 84
assigning to computers 84
assigning to computers, about 83
cancel 90
existing, run now 80
organizing, about 85
retry 90
scheduling incremental, about 72
scheduling options 63
scheduling, about 57
viewing assigned 89
Backup Now 81
backups
checking integrity of 78
compressing 65
consolidating 75
create with no schedule 81
database, non-VSS-aware 70
database, VSS-aware 59
deciding where to save 61
delete scheduled 83
dual-boot systems 59
editing scheduled 82
history 89
limiting the number of backups for a drive 78
passwords 67
renaming scheduled 82
benefits of different storage options 61
best practices 15
C
cancelling failed backup job 90
categories, backup jobs, adding 85
CD
see also removable media
client information, update 91
command files, running during backup 68
components of LiveState Recovery Manager 11
compression level 65
compression, setting for backups 65
computer groups
adding 53
adding computers to 54
assigning backup jobs to 84
deleting 54
editing 53
organizing 52
removing computers from 54
computer log, viewing 92
104 Index
computer protection best practices 15
computers
adding to a computer group 54
assigning backup jobs to 84
integrating with console 39
remove from groups 54
unmanaged, adding 46
update information about 91
viewing backup jobs on 89
viewing drive details 88
console
computers, integrating 39
install 25
password, changing 34
starting 26, 31
uninstalling 28
console view 34
consolidating incremental backup images 75
consolidating incrementals 79
creating backup images
deciding best place to save backups 61
options 78
tips 58
D
databases
backing up non-VSS-aware 70
backing up VSS-aware 59
default path for backups
choosing the best location 61
default view, setting 37
delete
backup jobs 83
computer groups 54
deploy, install packages 48
details, viewing remote computer 88
discover computers
about 43
LiveState Recovery already installed 45
unmanaged 44
distribution error 33
dividing a backup image into smaller files 78
dual-boot systems, backing up 59
DVD
see removable media
E
editing backup jobs 82
encrypting backup images 67
error
distribution 33
errors, viewing 90
events, viewing 90
exporting data from tables 92
F
failed backup job or install package, retrying 90
filenames
base and incremental backups 76
spanned backup images 66
find computers, about 43
firewalls, troubleshooting 95
FireWire drive
advantages and disadvantages for storing
backups 62
full backups, creating 73
G
gent
LiveState 12
groups of computers
adding 53, 54
deleting 54
editing 53
H
hard drive, advantages and disadvantages for
storing backups locally 61
history, backup 89
Home Page view 35
I
iCommand, integration with 22
Incidents view 38
incremental backup jobs, about 72
incremental backups
consolidate 75
creating 73
install
console 25
server 23
install packages
creating 40
LiveState Recovery, deploy 48
retry sending 90
Index
integrating computers with console 39
integration with iCommand 22
integrity of backup, checking 78
IP address, scan range 44
J
jobs, backup
run existing now 80
L
license status, LiveState Recovery 50
limiting the number of backups for a drive 78
LiveState Agent 12
LiveState Recovery
activating on remote computers 49
discover computers with 45
install packages, creating 40
install packages, deploying 48
license status, checking 50
system requirements 21
uninstalling 51
LiveState Recovery Manager
components 11
console, install 25
console, uninstalling 28
overview 9, 14
server, install 23
server, uninstall 29
system requirements 20
LiveUpdate 39
LiveUpdate, using 27
log
viewing remote computer 92
viewing server 92
logging on 27
M
managed computers, how to add 46
management control component 12
N
network drive, advantages and disadvantages for
storing backups 61
no schedule backups 81
non-VSS-aware databases, backing up 70
O
operating systems, backing up computers with
multiple 59
options 39
options, creating backup 78
organize
computer groups 52
organizing backup jobs, about 85
overview of LiveState Recovery Manager 9, 14
P
packages, creating 40
password
adding to backup image 67
agent user account, changing 33
console, changing 34
server, changing 33
pcAnywhere
starting from console 94
using to recover 93
port
138 95
139 95
453 95
8443 95
port, secure or unsecure setting 39
process pending jobs 91
pros and cons of different storage options 61
Q
quality of backup, checking 78
Quick Start view 34
R
recovery, remote 93
removable media
creating backups for copying to removable
media later 66
rename backup jobs 82
rename, computer group 53
request updated client information 91
retrying failed backup job or install package 90
S
scan for unmanaged computers 44
scheduling options for backup jobs 63
105
106 Index
scripts, running during back up 68
sectors, ignore bad 66
security, setting in backups 67
server
install 23
password, changing 33
uninstall 29
server log, viewing 92
server options 39
server port
secure or unsecure, setting 39
session timeout, setting 39
SmartSector, disabling copying of 66, 67
Snap Server Manager 38, 99
spanned backups 66
status, viewing 90
storage options, pros and cons of different 61
Symantec pcAnywhere
starting from console 94
using to recover 93
system requirements
LiveState Recovery 21
LiveState Recovery Manager 20
T
table data, exporting 92
timeout, session setting 39
tips and pointers for backup protection 15
tips for creating backups 58
Tools view 38
troubleshooting
backups are consuming all the space on my
hard drive 63
firewalls 95
ports 95
product expired 49
U
uninstalling
agents 47
console 28
LiveState Recovery 51
server 29
unmanaged computers
adding 46
discovering 44
updating
automatically with LiveUpdate 27
USB
advantages and disadvantages for storing
backups 62
V
verify backup image after creation 78
verifying backup images 78
view
Assets 37
console 34
default, setting 37
Home Page 35
Incidents 38
Quick Start 34
Tools 38
viewing
assigned backup jobs on remote computers 89
backup history on remote computers
computer log 92
events, errors, warnings 90
remote computer details 88
server log 92
status of computer 90
VSS, backing up databases 59
W
warnings, viewing 90