1
P,oneer
MULTI-COMPACT
DISC PLAYER
sound vision. soul
COMPACT DISC POUR
MULTI-LECTURE
CDX-P1280
CDX-P680
Owner's Manual
Mode d'emploi
<KFJFF/OOHOOOOO>
<CRD3728-A/N> UC
This product conforms to CEMA cord colors.
Le code de couleur des cables utilise pour ce produit est conforme
CEMA.
a
Precautions/Precautions
---------
Information to User
Alteration or modifications carried out without appropriate
authorization may invalidate the user's right to operate the
equipment.
__. _ .
..._ ,
----J
CAUTION:
USE OF CONTROL OR ADJUSTMENT OR PERFORMANCE OF
PROCEDURES OTHER THAN THOSE SPECIFIED HEREIN MAY
RESULT IN HAZARDOUS RADIATION EXPOSURE.
CAUTION:
THE USE OF OPTICAL INSTRUIV1ENTS WITH THIS PRODUCT
WILL INCREASE EYE HAZARD.
• When driving on an uneven road, the player may not reproduce every
sound properly.
o During winter the inside of the vehicle may be very cold. If the heater
is turned on and the player is used soon after, the disc or optical parts
(prism, lens, etc.) may become misted up, and the player will not operate correctly. If the disc is misted up, wipe it with a soft cloth. If the
optical parts are misted up, wait for about an hour for them to warm
up. They will return to their normal condition.
---_._--_ ... _--------_ ..
-_.,_... _ - - - - - - - - -
After-sales service for Pioneer products
Please contact the dealer or distributor from where you purchased
the product for its aftersales service (including warranty conditions)
or any other information. In case the necessary information is not
available, please contact the companies listed below:
Please do not ship your product to the companies at the addresses
listed below for repair without advance contact.
USA
CANADA
Pioneer Electronics (USA), Inc.
CUSTOMER SUPPORT DIVI
SION
P.O. Box 1760,
Long Beach, CA 90801-1760,
(BOO) 421·1404
Pioneer Electronics of
Canada, Inc.
CUSTOMER SATISFACTION
DEPARTMENT
300 Allstate Parkway
Markham, Ontario L3R OP2
(90S) 479-4411
'I -877-283-5901
For wan'anty information plea:;e see ihe Limited Warranty sheet
included with your product.
CAUTION:
With this player, you can use the ITS functions to store up to 99
tracks per disc.
Even if the Head unit's manual indicates ITS memory is up to 24
tracks per disc, this player can store up to 99 tracks per disc.
When playing a CD TEXT disc on this product, display of Title
indications in the head unit's display is possible. For details concerning CD TEXT discs, refer to the head unit's owner's manual.
This product conforms to the track skip function of the CD-R disc.
The tracks containing the irack skip information are skipped over
automatically.
Important
The serial number of this device is locClted on the rear of the unit.
For youl own security and conveniell(8, be Slife to record this nUIllbel' on the enclosed warranty card
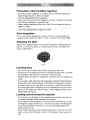
Precautions when handling magazines
• Do not put the magazine in a place where it will be exposed to
high temperatures or direct sunlight
• Do not disassemble the magazine.
• Take care not to drop the magazine or knock it against anything.
• Do not use cracked or warped trays.
• Never insert anything other than discs. Do not attach a label or
tape to a disc.
• The use of benzine, thinner, insecticide, or other volatile chemicals may damage the magazine surface.
Extra magazines
If you need more magazines, please ask your nearest dealer for
magazine JD-1212S. (for CDX-P1280) or JD-612V (for CDX-P680)
Attaching the label
Attach the supplied label in the specified position. Attaching the
label in an incorrect place or attaching more than one label will
cause malfunction.
Inserting discs
• Be sure to remove the disc before changing a disc tray.
• If the tray is not aligned with the right and left grooves, it cannot
be pushed to the end. Do not bend or force the tray.
• Always load 12 trays in a magazine to prevent loss or warping of
trays.
• If you load a disc with the label generally printed in black facing
down, not only will the player not be able to recognize whether
the disc is set or not, but also, if you have a multi-CD controller,
the controller will not display an error message to let you know
about it So make sure all the discs in each magazine have their
label sides facing up.
Loading and removing the magazine
• Do not put your fingers in the magazine tray as this may lead to
incorrect operation and damage to the player.
~ If the label on the magazine is coming off or wrinkled up, it may
damage the eject mechanism, and in some cases, the magazine
may not be ejected. Therefore, remove a damaged label completely before use.
o Never leave the door open while playing discs. The entry of dirt,
dust, or any other foreign matter into the player may cause it to
fail.
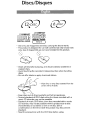
Discs/Disques
:
~: :.
r!lCOMPACT
r!lCOMPACT
l.QjO~(]5
DIGITAL AUDIO
I
l.Qj0~ (]5
DIGITAL AUDIO
TEXT
I
• Use only use magazines and discs carrying the above marks.
• This product is designed for use with conventional, fully circular CDs
only. Use of shaped CDs are not recommended for this product.
<9
~
• Check all CDs before playing, and discard cracked, scratched or
warped discs.
• Avoid touching the recorded (iridescent) surface when handling
discs.
• Do not affix labels or apply chemicals to discs.
• Wipe dirty or damp discs outward from the
center with a soft cloth.
• Keep discs out of direct sunlight and high temperatures.
• Normal playback of CD-R discs other than those recorded with a
music CD recorder may not be possible.
• Playback of music CD-R discs, even those recorded with a music
CD recorder, may not be possible with this product due to disc
characteristics or scratches or dirt on the disc. Dirt or
condensation on the lens inside this product may also prevent
playback.
• Read the precautions with the CD-R discs before using.
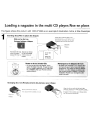
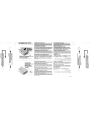
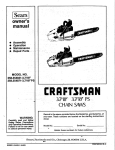
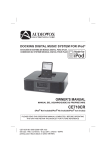
Loading a magazine in the multi CD player/Mise en place
The figure shows this product with CDX-P1280 as an example.lL'illustration montre,
1
a titre d'exemple
Inserting discs/Mise en place des disques
Jnsert,discs wjth the laO\'llside up,
Slide out the disc tray
Extr
lateau it disque
Introduisez les disques de fayon que
I'etiquette soit toumee vers Ie haul.
~
"""=---
(,..!"'.;
Hold down the magazine lock button
and pull the tray out.
Appuyez sur Ie bouton de verrouillage
et tirez vous un
plateau.
~
Plateau
I
l
~
a
6
1st to 12th
discs
7
8
9
10
IJ
12
~.8.,m,~
. . :,.
Disc tray
Ordre des
12 disques
Notes on 8-em (3-inchl CDs
• Do not use an 8-em CD adapter. If it is
used, the player may fail. To load an 8-em
CD, you need a special 8-em CD tray (Part
No. CXB5931). Ask your Pioneer service
station about it.
Rell)arque surJes diSques de 8cm:
• N'utilisez pas d'ad~ptafeurpo4rpisqu~ de'8 .
em, faute de quoile lebfeur p6urri:litpep.8$ ?'Q;
fonetionner. Pourrnettre~l1pla'Ce:undi$que 'S
de 8 cm, vousdeyez,utili~erun pl&teau'spg->
cial(numero depieee CXB59B1 ),L,ese'i"\liceg',
d'ehtretien Pioneervol,ls renseigmlra'utile-,;
'
•menta ee sujet.
'p'
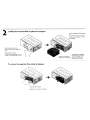
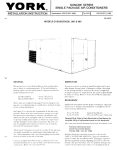
Changing disc trays/Remplacement des plateaux pour disque
Gently PIJ]J the disc tray out.
Align the disc tray with the left and right
grooves,
and.pushit in until
you hear it..-.._
click.
......._..,;.._ _
.,. _,
_•
,.~""'·.;.;';~"'m.'"'"""'".'
Tirez doucement Ie plateau
Disc tray
Plateau
a vous.
~
Engagez a fond Ie plateau pour disque dans
les rainures droite et gauche.
2
Loading the magazine/Mise en place d'un chargeur
Load the magazine and close the
door.
Slide and open the door.
Open it fully until it locks with a
click.
Faites glisser Ie volet.
Ouvrez-Ie completement; il se verrouille et vous entendez un dedic.
Insert the magazine
with the arrow upward.
.'..-
To remove the magazine/Pour retirer Ie chargeur
Press the eject hutton
Appuyez sur Ie bouton d'ejection.
_..,.;
~
Introduisez Ie chargeur
de maniere que la face
portant la fleche soit
1 tournee
vers Ie haul.
I
i
,
'w_,..•_.,_. .-,.~""""--~ ~
_..;.
~~
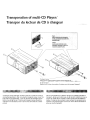
Transportation of multi-CD Player/
Transport du lecteur de CD
a chargeur
"0
~
Transport screw
~~~lM~1~? ~~~ .~~~Jr."k!g~illi~t.~~~j\l;r.~:.!.':::~~<:~It~~~Ii£E1ii!1L_Jl!11L.
__
Vis de transport
Replacez ces vis dans leur position d'origine avant de transporter I'appareil.
A transport screw has been attached to the set in order to protect it
during transportation. After removing the transport screw, cover the
hole with the supplied seal. Be sure to remove the transport screw
before mounting the set. The removed transport screw should be
retained in the accessory bag for use the next time the set is transported.
Des vis sont fixees sur Ie lecteur de fa~on a Ie proteger pendant Ie
transport. Aprils avoir retire une vis de transport, bouchez Ie trou au
moyen du cache fourni. Veillez retirer ces vis avant d'installer Ie
lecteur. Conservez les vis dans Ie sac contenant les accessoires de
maniere a ne pas les egarer et a etre en mesure de les remettre en
place en cas de transport.
a
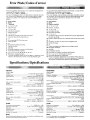
Error Mode/Codes d'erreur
If there is a problem with CD play, error codes will be displayed on
connected CD controller's display
(ex. E-ll, Err-ll, ERR-ll, ERROR-ll).
If an error is displayed, refer to the table below to identify the problem. If the error is displayed even after corrective action is taken,
contact your dealer or the nearest authorized PIONEER Service
Station.
En cas d'anomalie pendant la lecture d'un disque, un code d'erreur
est affiche par Ie controleur relie au lecteur
(par exemple, E-l1, Err-ll, ERR-ll, ERROR-11).
En ce cas, reportez-vous au tableau suivant pour connaitre la cause
de I'anomalie. Si Ie code d'erreur demeure affiche apres que vous
avez pris les mesures correctives, adressez-vous 8 un centre
d'entretien Pioneer.
E: Error number
C: Cause
T: Treatment
N: Code d'erreur
C: Cause
M: Mesure corrective
E: 11,12,14,17,30
C: The disc is dirty.
T: Clean the disc.
N: 11,12,14,17,30
C: Le disque est sale.
M: Nettoyez Ie disque.
E: 11,12,17,30
C: The disc is scratched.
T: Replace the disc.
N: 11,12,17,30
C: Le disque est raye.
M: Remplacez Ie disque.
E: 11,12,14,17
C: The disc is inserted with the label side down.
T: Insert the disc with the label side up.
N: 11, 12, 14, 17
C: Le disque a ete mis en place de telle maniere que I'etiquette est
tournee vers Ie bas.
M: Placez Ie disque de fa(:on que I'etiquette soit tournee vers Ie hant.
E: 14
C: An unrecorded CD-R is being used.
T: Check the disc.
N: 14
C: Le disque, un CD-R, ne porte aucun enregistrement.
M: Verifiez Ie disque.
E: 44
C: All tracks are setting track skip.
T: Replace the disc.
N: 44
C: Toutes les plages sont reg lees comme plage 8 sauter.
M: Remplacez Ie disque.
E: NO DISC
C: An empty magazine is in the multi CD player.
T: Insert discs into the magazine.
E: 10,11,12,14,17,19,30,50,60,70, AO, Al
C: Electrical or mechanical fault.
T: Turn the car ignition switch off and on again, or press the source
switch on the multi-CD controller to set CD playback again.
N: NO DISC
C: Le chargeur est vide.
M: Introduisez un chargeur contenant des disques.
N: 10,11,12,14,17,19,30,50,60,70, AO, Al
C: Anomalie electrique ou mecanique.
M: Placez Ie contacteur d'allumage sur la position Arret puis 8 nouveau sur la position Marche, ou encore appuyez sur Ie selecteur
de source du controleur pour lecteur de CD 8 chargeur.
Specifications/Specifications
General
(CDX-P1280)
System
Usable discs
Signal format
Power source
Max. current consumption
Weight
Dimensions
(CDX-P680)
System
Usable discs
Signal format
Power sou rce
Max. current consumption
Weight
Dimensions
Generalites
Compact disc audio system
Compact Disc
Sampling frequency: 44.1 kHz
Number of quantization bits: 16; linear
14.4 V DC
(10.8 - 15.1 V allowable)
1.0 A
2.2 kg (4.9 Ibs.)
257 (W) x 94 (H) x 170 (D) mm
[10-1/8 (W) x 3-3/4 (H) x 6-3/4 (D) in.]
Compact disc audio system
Compact Disc
Sampling frequency: 44.1 kHz
Number of quantization bits: 16; linear
14.4 V DC
(10.8 - 15.1 V allowable)
1.0 A
1.9 kg (4.2 Ibs.)
248 (W) x 66 (H) x 168 (D) mm
[9-3/4 (W) x 2-5/8 (H) x 6-5/8 (D) in.l
Audio
Frequency characteristics
Signal-to-noise ratio
Distortion
Dynamic range
Output level
Number of channels
(CDX-P1280)
Systeme
Disques utilisables
Format du signal
Compact Disc Digital Audio
Compact Disc
Frequence d'echantillonnage: 44,1 kHz
Nombre de bits de quantification: 16;
(quantification lineaire)
Alimentation
14,4 V CC
(toute tension comprise entre 10,8 et 15,1 Vest admissible)
Consommation maximale
1,0 A
Poids
2,2 kg
Dimensions
257 (L) x 94 (H) x 170 (P) mm
(CDX-P680)
Systeme
Disques utilisables
Format du signal
Compact Disc Digital Audio
Compact Disc
Frequence d'echantillonnage: 44,1 kHz
Nombre de bits de quantification: 16;
(quantification Iineaire)
Alimentation
14,4 V CC
(to ute tension comprise entre 10,8 et 15,1 Vest admissible)
Consommation maximale
1,0 A
Poids
1,9 kg
Dimensions
248 (l) x 66 (H) x 168 (P) mm
Audio
5 - 20,000 Hz (± 1 dB)
92 dB (1 kHz) (IHF-A Network)
0.006 %
90 dB (1 kHz)
1,000 mV (1 kHz, dB)
..
2 (stereo)
°
Reponse en frequence
Rapport signal/bruit
Distorsion
Dynamique
Niveau de sortie
Nombre de voies
5 Hz 8 20 kHz (± 1 dB)
92 dB (81kHz) (reseau IHF-A)
0,006%
90 dB (81kHz)
1.000 mV (81kHz, dB)
2 (stereo)
°
Note:
Note:
Specifications and design are subject to possible modification without prior notice due to improvements.
A fin d'amelioration, les caracteristiques et la presentation peuvent
etre modifiees sans avis prealable.
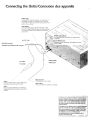
Connecting the {lnits/Connexion des appareils
IP-BUS cable
To pl'event incorrect connection, the input side of
the IP-BUS connector is colored in blue, and the
output side in black. Connect the connectors of the
same colors GOrrectly,
Cable Ip·BUS
Pour eviter toute erreur de branchement, Ie cote
entree du cable IP-BUS est bleu et Ie cote sortie est
noir, Tenez compte de ces couleurs 101'5 des raccordements.
6m (1ft. 12in.l
Multi·CD controller
Controleur pour lecteur de CD it chargeur
~
lP'8US, (black)
Fuse holder
IP-BUS (nair)
Porte·fusible
Yellow
To the terminal always supplied with power
regardless of ignition switch position.
Black (ground)
_______ To the vehicle (metal) nady.
Nair (masse)
Vers la carrosserie (masse) du vehicule.
Jaune
Vers une borne alimentee en permanence,
independamment de la position de la cle de
contact.
(._»...•".".i
~•• __ .~."." ••.",;.;__ '_~..__ ~"~~'~.* ~"'___
'I Cords for th is prQd. Q
. ·. ct.:a.n.•.d
... :.th.OS.J~. •
may be different colorseveniH
function. When cOllnectlpg,
product, refer to th!'\~\.IppJi,eq
of both products ariel cq~he¢tc()r
, same function.
.
".
'
I
'I Les cables de cetappatE111 et¢e,LI>( /
peuvent fort bien ne pasetredelll'
I bien que rempli$sant larneme:fol'lc
I
I
a
cetappareil \.In C!utreC!Pp~re.jI,!J '
d'installation dediacurieteffe
.....
raccordements en ne tenant compt'e:gue'Q
fonction de chaq\.le dible. .
'. '. .:
,',/\;.
\Jnk@ljft1\IflillJtM1LMi\t~n:fWC~T.w4illiJj;Bl1IIltL1L,_J.It!l£ttt@t§f M~t~~
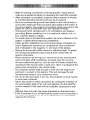
• Before mounting, connect the units temporarily. Check that the
units are connected correctly by operating the multi-CD controller.
• After connection is complete, press the clear buttons on the player and the multi-CD controller with the tip of a pencil.
• Be sure to connect the ground lead (black) to the vehicle body or
some other metal part that is properly grounded to the chassis. If
the ground lead is not properly connected, noise may occur or the
player or multi-CD controller may not operate correctly.
• This product is for vehicles with a 12-volt battery and negative
grounding. Before installing it in a recreational vehicle, truck, or
bus, check the battery voltage.
• To avoid shorts in the electrical system, be sure to disconnect the
battery (-) cable before beginning installation.
• Check whether installation and wiring have been completed correctly. Replace the removed car components, then connect the
end of the cable to the negative (-) terminal of the battery.
• Secure the wiring with cable clamps or adhesive tape. To protect
the wiring, wrap adhesive tape around them where they lie
against metal parts.
• Route and secure all wiring so it cannot touch any moving parts,
such as the gear shift, handbrake, and seat rails. Do not route
wiring in places that get hot, such as near the heater outlet. If the
insulation of the wiring melts or gets torn, there is a danger of the
wiring short-circuiting to the vehicle body.
• Don't pass the yellow lead through a hole into the engine compartment to connect to the battery. This will damage the lead
insulation and cause a very dangerous short.
• Do not shorten any leads. If you do, the protection circuit may fail
to work when it should.
• Never feed power to other equipment by cutting the insulation of
the power supply lead of the unit and tapping into the lead. The
current capacity of the lead will be exceeded, causing over heatmg.
• Replace fuses only with the types stipulated on the fuse holder.
• Even if the power is cut off because the power cord is removed or
the battery is replaced, the CD title display and ITS memory are
retained for 24 hours.
o
o
o
o
Consult with your nearest dealer if installation requires the drilling of
holes or other modifications of the vehicle.
Before finally installing the unit, connect the wiring temporarily and
make sure it is all connected up properly and the unit and the system
work properly.
Use only the parts included with the unit to ensure proper installation. The use of unauthorized parts can cause malfunctions.
When mounting the player, make sure none of the leads are trapped
between the player and the sun ounding metalwork or fittings,
location
"
~nstall
the unit where it does not get in the driver's way and cannot injure the passenger if there is a sudden stop, like an enlergency stop.
Be sure to mount the player on a rigid surface which is firm
enough to hold the player in the proper position under all circurn
stances. Failu re to do so rllay affect the optimum performance of
the player.
" Before drilling a hole into the trunk, confirm that there is nothing
behind the hole. Never drill a hole in the fuel tank or any other
important part.
o Do not Illount the player near the heater outlet, where it would be
affected by heat, or near the doors, vvhere rainwater might splash
onto it.
o
Do not Illount the player on the spare ti re board or any other
unstable place.
Mount the player in a place where it does not prevent the spare
tire, jack, or tools from being easily ,-emoved.
o Do not mount the player in areas of direct sun light, and so
becomes hot, like on the dashboard or the rear shelf.
o Mount the player on a flat surface.
e)
D
Suspending the player from the parcel shelf with hex
screws
c
., Ideally, when the player is being Illounted under the parcel shelt
two persons should work togpthet, One person should hold the
player, and the other should tighten the hex-nuts. If you do this
job on your own, take great care not to drop or knock the player.
• When suspending the player under the parcel shelf, be sure that it
is firmly installed on a solid surface. If the unit is not firmly
installed, skipping will occur.
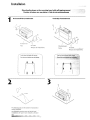
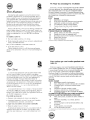
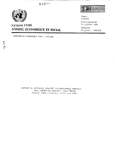
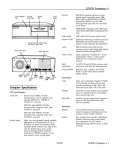
Installation
Mounting the player on the mounting board with self-tapping screwsl
Fixation du lecteur sur une platine I'aide de vis autotaraudeuses
a
1
HorizontallyIHorizontalement
Vertically/Verticalement
Put marks,
Platine
Marquez ces emplacements,
Platine
Marquez ces emplacements.
Use the holes indicated with arrows
Percez les trous indiques par les fiElphes.
®
0
0
0
0
t
t
2
3
<jJ
4 - 4,5 mm
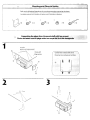
The following steps are the same for horizontal or
vertical installation,
Les operations suivantes sont les memes, que
I'installation de I'appareil soit verticale ou horizontale.
Mounting parts/Pj~cesdefiX~ltil>~
Les pieces servant
a la fixation
@
©
@
x2
du lecteur sont illustrees ci-dessous.
~X4
X4
®?'X4
Suspen~~~$J,)~b~,~lv~rf'~ITI~heparcelst(.
FixationduleetluJI'$Q(l$l.iplagearriere au·move,
1
Putmarks.
Marquez ces emplacements.
I
2
•Use, the
PI age arriere
3
<P
6.5 -7 mm
hol¢SiildiciltedWith~tr~\tY~::: . .'
Percez les trousindiques piules f1e.c~e$.
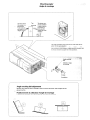
Mounting anglel
Angle de montage
Use any angle in
this range (up to
90 degrees).
Tout angle compris entre 0 et 90 .....
degres convient.
Top
Sammet
v
The player can·
notbeinstalled
inthis direction.
Le lecteur ne
1i1;lIi&illpeut pas etre
installe de cette
nianiere.
The angle switching dial must be set on both sides of the
pt~yer
Les boutons de commutation d'angle places de chaque cote
du lecteur doivent occuper les memes positions.
/
;~~:.::;tQl'
~~,~\~
....
?
5 steps
5 positions
Angle switching dial adjustment
Set the dial so that its slot is closest to the horizontal direction with respect to the
ground surface.
Positionnement du selecteur d'angle de montage
Positionnez Ie selecteur de maniere que la fente soit horizontale.
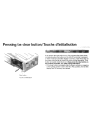
Pressing the clear button/Touche d'initialisation
If the power does not switch on or if the compact disc player does
not operate when the button on the multi-CD controller is pressed,
or if the multi-CD controller display is incorrect, press this button on
the player with the tip of a pencil to restore normal operation. (This
button is located inside the dooL) Always press the clear button on
the multi-CD controller, too, after pressing this button.
• If the clear button is pressed when the player contains a magazine
or the ignition switch is set to the ON or ACC position, the CD title
display and ITS memory are cleared.
Clear b1l1ton
Touche d'initialisation
Bag for keeping transportation
screws
The transportation screws
removed during installation will need to be
reinstalled if you transport the unit later, so
keep the screws in this bag.
(DEALERS: Put the removed screws in
this bag and give the bag to the customer.)
Etui pour conserver les vis pour
Ie transport
Les vis pour Ie transport deposees durant
Ie montage devront etre reinstallees si
vous desirez transporter I'unite a une date
ulterieure.
Nous vous recommandons par consequent
de conserver cas vis danscet etuL
(A LATTENTION DES FOURNISSEURS:
Placez las vis deposees dans cet etui at
presentez celui-ci aux cliects)
<CRP1090-AlN> A
NOTE I REMARQUE I NOTA I H1NWEIS
NOTA/OPUERKlNGINOTA/~
lilio.:I-
~~~--
~,.,...,..,..
~.N:,.,~tfII~~~1het'lOle'friltllhe
dlf'lritls:llSla. DopolMlttil'llossolll.pariftr'asp(n:).QOPIh iftctoc:ol
:awolcCniaoindotaziotle.Primtd~i1IeU1:1te.Ia.deYeS«l'lQO'e
$l4lPIied$lNl.8eanlO~the:rar:sporz~_ll«cnlllOUl'4inglhe
set. Ther~~kJewS!'lOuldberetalnedinth&aor::8S$Cl"/bag
JorusellWnextlimehesetis:tar'lS9O"'.ed.
.. Yltidl~
.....1oftl8.s:.aac:Ql:la~ .... ditraspoo1Ooausar.~11l'aS;lOr1l)
AtTan$pOItSO'ew lias be«! mac:I'IeOlO:tlesetinon*'lO pro:eeti:<ll.lM!j
Y'8'ireIOl:LConsetYar!apoinellesaa:acleifliacees.sonintrlOdOdl:l)Otetla
_ uA.-edirlUO\lOincasodi1nlSloco.
\botzotg«'l . . . betNftdll"'
....._........
~
..."~~M
..M"
P'NcauricnOClnCll'T*ll"'¥iII"~pClft
Oesvissontli:aln_lelectklrdll"'i:ie~P'"dantllttl'~T.~\QnhetlOeU8l~~I:see'ldlWM~
Apres8YCWre':iteIa.oell'ar\Sl)Ort./XlUCl'oeZletl'Ou~moyetl(i;jcad'le
scMlevengeplaalst.Be<lekhelgatnahel~vande~
ioutni..Veillezaretitete-svis~crlflSQlecleledeur.COnsen<oulMvis etwoefrnelW~ ..'<ictlIirI!;.V8l'\llijderdezt'llChroel"'\oQrenShll!toe--
dans)e53Cc:ontenanI:les~de~"nepasle$~e:a stel.~ee..urC»$lC:l'lr:oelinOeuJtmct:oebet1clter\.Uhee!:de
~enmesuredelesremettreenplaoeet'lcasde~.
~
sd\I'OeIl'I&I'l'l8lijkWMfnodigWlll'll'>Rrubij\lOcrbeeldYeltluist.
respec;tO. lo$tl:In\lUOI; de transpoRt
E1~~oelll':CmilIoOlttransporlec;uesiNvpa.-e.plO".egMo
du~.e eI
tran5PO'te. LuegO de ze:irar eI axnillo de traI'l$porl4:. CI.bta aI 0I"iliei0
con eI selIo
~ini$.'rado.
Aseg(lrese de t;ut:ar el tornillo de \ml$potle antes
~C()f'nO$~defran$pOl1e
H8p3l'311.:sosde:ranspotte!hadosaoaparelhoparapto1~dura.'l:eO
eansporte. De;>oiS ~ retiratos parafuso$ de ~e. Oba eada oritieio
coma~fomecida.~derewarospara~detranspOCe
det'l'\Ol'ltllreJaparato,EJlOmillodetranspot:equi:adodeb&tltguarclarseer.ia
~deaa::esoric:l5par.1UfiliZaJ1oIapr6Jtima
... e;zquece~.Melapara-
antes (Ie morrta.r 0 aparehl. Os pamlusos de traMpOl".e removidos develTI
ser gt.:ardadl>S I'\a 1)01$8 a<:ess6ria pat3. selem tJtiliUdos num evenn:al trarl$-
Votsic:htsma6f"egeln IClrTrallSpOrt$ieherungssehrauben
lII"lillltl!J"'itI!Il""
po<WdQ aparelho.
~
Transport SCrews IVis pour Ie transport
TomirJos de tTan$pOlte ITransportskherunguchrauben
Viti di trasporto JTransport5chroef
Parafusosdetransporte/lJWifJ.iSi
IJS:o!l...,v,I ....
DasGet$1islmil(linerTral'\SpOrt$iCl'le~rat;beversehen.diednu
diet'll:. wat\renddes Tran$POl".seineBe~desGe~:Sll,lvermeider'l,
Nach Entfemen d&r TranspMSChrauoo 6ie Oifrn.Jig mil <:\em mitgeliefe!1«l
~~raooe<:kCn. VOf<W Montage des (>eta-oS muJ3 diese SClral,lbe Ul'l!le.
0""
~-~"!'fJTE~t:r.t:::2n::':!l:~'::l;.(~'!£.i£,tQ:;'!J!;ef:;;t;f"rn
• '3,;1i~~iRlW?'.i~EfJ!71;:'f~ritr.·
~~~~~~~~~~~~~~~~~~~~~~~m·
entlem:werden. D;e/'lerausgec:frell'.G Sd'Ir3:,lbeislinderZllbehO/taSCtle
aWzlbeWahrer.. I,ll':'l Sie!)ei einem eVOOlOOllcn Transport des Gefa.::s
einsettenr.. kOmen.
~
Precau'tion$ coneeming angle of installation
. rtti;,nU'I(
$)/& • ~m#li¥J~·;'1tt.~Nfi'N*
.;".,,;:..)aio ......
I~I... .::I;.I_,.....I . .::\ ... _J>-t~c:::~~~
¥~·..;.l"".:;.'O;"'iI_
.....;·-.r;J.>¥..,;I~I,,~~!.,...Ii~.;..;.,;.;.Wl:.&..'.o<
..i...,;.1.,..;.:.""""""....,. .... ;,,;..,::,..1~,.,...;.:.w.:1:...-.);;,.:.1
~_delnstall~
~=c:~~~d~~·l~~~e:~~e.. de~v<ll'ldeHoejc-ir.sle~wl;zige::.(6ijhet~va:'lde
Al$udi::~
!':Onwn".a"}.F«de".ailS.rr.er':O:heaea<:he<!I:".s:t'~
T
~eoneemantl"angted"i~~
S'YOtlS~zeetappareia:::reme:ttQUehor'.zcr'l'.a\emel'l'
.. \IOl.lSOeYcl
mod;f,er13 ~ dl.:comml.":a".e-..:l"C'ao;:e. {Qvand r~eilCl'JOtf\lS<l'l8.1e
eomrnu".ate:.:r e51 $\If ~ j)O$l:iOn eol'l"es~a"'l! a l"Ilorizon:a:e.} Pour c!e:;llus
-
~dr.a:.'$(;Ot'Qmv¢ee::e~ ~el-'O'Q;.:$...,modeC'em;l'O
~ 11 resp«todel ingulode instalaci6n
Si se IfIS".ala Ia....-.c!ad en un ~lo. eI b;arde ta !'o".zon:aI. sedebeeam·
~elaju~delo.:ad:&
.. :edeea.~dek:g.1Io.(c..arr;lola .."l"IiCedsalede
Ja la.:mc:a. el a;VSU! es hori%onta!.) Para 10$ de".ztes. re:illrase 11 las i'ls::'uc.
eiorlcsirldulda.s.
~lnt:lOZUtl1el'ldesEinbavwinkels
Fallsdieses Ger:r.noehl wa8gered'!t sonoem ~~wi""mu3dlO
vrLI1kelsct'. ..~~gei.'"Idenwerdcn.(OieWer'k$eN:t::utl{;lSl
"'waagerrelr.)E'rIze~el'll'liel'ZlJfirlder'I$.ieindcn~~lsungcn,
Prccauzioolriguardoraf"l9Olod'lnsblluiorle
Se s: l!'\S:ana 1';,,:"Ii'.a eoo Uri angolo nspe:to aJror',zzorY.a:e. camb:ar$ la rego·
!allone <leila manopol" (:i lI~iO~. Quando I'unita:asda La labOrica:, c;ues·
ta coma.'"Ido e ~to sttla posOziOl'lI! oriuOl'ltale. Perde~lOli. cons:"lt,re Ie
OStrutiOl'li i~ dotallOl'le.
......
o:"lder eenhoel( in;:l<aa:S van I'lor'.zon:aal gaa:mon:~t:'I. moet
~1Sdeuophcnl(l(ltU!~eld.}z:.ede~lfl$:1'~\IQCC
Preeau96es com 0
ingulo de
ins:al~
Sevoc:t:rs:a:ar~ea;.'la:e:.""lonl.tm~..£Oao~~de~horizon".aI
ml'!":'.e.voetIlSeverr..odarOa.~ODealdemuc:a.'"l¥1doAn;ulo.(Oua."ldoo
~e-~t\el:Qil:8:lroea.oa:u:s:ee:'lOrilor":'.aL)?a.'ltI!'.&lOl'eSoe:a:hes.c::on
s:tx-asin$:l\ol;Ot'$rtx::uieas.
Smit~lllnl~~A.=:i
~~~~~~~~mr-'~$~~~~~~~M~~~Rn
(&IIl1i:B.i£:~_~.~nu.~·-;'·)
• .J)~ "J}(~\iH!"j~:.li..Y.lJrm-:.:!tr.J"'!
S~~~,:.n
...,ll':"~.l::o~l
-.........) ':".Jj'¥~""';"""""""'''-'''''Y~J-;.-~· ... :'''I",")l;'';'''''j~,;JJj;1
.;.;.i.:.;'il ..; ' t":! ..,.1.-..0;;\;,,0 ..; (.";;'ii~;·';" :",.-. ~~,::-lj;.;o .i*",;~;...
:.u;:
We Want You Listening For A Lifetime
Selecting fine audio equipment sut:h as the unit you've just
purchased is only the start of your musical enjoyment. Now it's
time to consider how you can maximize the fun and excitement
your equipment offers. This manufacturer and the Electronic
Industries Association's Consumer Electronics Group want you to
get the most out of your equipment by playing it at a safe level.
One that lets the sound come through loud and clear without
annoying blaring or distortion-and. most importantly, without
affecting your sensitive hearing.
Sound can be deceiving. Over lime your hearing "comfort lever'
adapts to higher volumes of sound. So what sounds "normal" can
actually be loud and harmful to your hearing. Guard against this by
setting your equipment at a safe level BEFORE your hearing
adapts.
To establish a safe level:
• Start your volume control at a low setting.
• Slowly increase the sound until you can hear it comfortably and
clearly, and without distortion.
Used wisely, your new sound equipment will provide a lifetime
of fun and enjoyment. Since hearing damage from loud noise is
often undetectable until it is too late, this manufacturer and the
Electronic Industries Association's Consumer Electronics Group
recommend you avoid prolonged exposure to excessive noise. This
list of sound levels is included for your protection.
Decible
Example
Level
30
Quiet library, soft whispers
40
Living room, refrigerator, bedroom away from traffic
Light traffic, normal conversation, quiet office
50
Air conditioner at 20 feet, sewing machine
60
70
Vacuum cleaner, hair dryer, noisy restaurant
Average city traffic, garbage disposals, alarm clock at two
80
feet.
THE FOLLOWING NOISES CAN BE DANGEROUS
UNDER CONSTANT EXPOSURE
90
100
120
140
180
Subway, motorcycle, truck traffic, lawn mower
Garbage truck, chain saw, pneumatic drill
Rock band concert in front of speakers, thunderclap
Gunshot blast, jet plane
Rocket launching pad
Information courtesy of the Deafness Research Foundation.
Once you have established a comfortable sound level:
/4iij~
g
-
• Set the dial and leave it there.
Taking a minute to do this now will help to prevent hearing
damage ~r loss in the future. After all. we want you listening for a
Ii fet ime.
I
\
o
~
Nous voulons que vous ecoutiez pendant toute
votre vie
Cher Cuent:
La selection d'un equipement audio de qualite comme l'unite
que vous venez d'acheter n'est que Ie debut de votre plaisir
musical. Maintenant, il est temps de penseI' 1\ la maniere de profiter
au maximum des plaisirs que vous offre votre equipement. Ce
fabricant et Ie Groupe "Consumer Electronics Group" de
I' Association des Industries Electroniques veut que vous profitiez
au maximum de votre equipement en I'utilisation it un niveau sur.
Un niveau qui permet au son (I" etre fort et clair. sans beuglement
ennuyant ou distorsion - et. cc qui est plus important, sans
affecter votre ou·le sensible.
Le son peut etre decevant. Avet: Ie temps, Ie "niveau de contort'"
de votre ou"le s'adapte aux volumes sonores plus eleves. Ainsi. les
sons "normaux" peuvent en fait etre forts et affecter votre ou·le.
Protegez-vous contre cela en reglant votre equipement it un niveau
sur AVANT l'adaptation de votre ou"le.
Pour etablir un niveau sur:
Utilise avec sagesse, votre nouvel equipement sonore sera une
source de plaisir pendant toute votre vie. Comme les dommages de
l'ou"le provenant d'un bruit fort ne sont souvent detectables que
lorsqu'il est trop tard, ce fabricant et Ie Groupe "Consumer
Electronics Group" de I' Association des Industries Electroniques
vous recommandent d'eviter toute exposition prolongee it un bruit
excessif. Cette liste de ni veaux sonores est incJuse pour votre
protection.
Niveau de
Decibels Exemple
30
Bibliotheque tranquille, chuchotement
40
Salon, refrigerateur, chambre it distance de la circulation
50
Circulation legere, conversation normaIe, bureau
tranquille
60
Climatiseur it 20 pieds, machine it coudre
70
Aspirateur, seche-cheveux, restaurant bruyant
80
Circulation moyenne en ville, evacuateurs de dechets,
reveils it deux pieds.
LES BRUITS SUIVANTS PEUVENT ETRE DANGEREUX
DANS LE CAS D'UNE EXPOSITION CONSTANTE
90
• Demarrer votre commande de volume it un reglage bas.
• Augmentez lentement Je son jusLlu' a ce que vous I' entendiez
confortablement et c1airement. sans distorsion.
Lorsque vous avez etabli un niveau sonore confortable:
• Reglez Ie cadran el laissez-Ie tel que!.
En prenant une minute pour faire cela, vous pourrez eviter des
dommages ou des pertes de sensibilites d'ecoute dans Ie futur.
Apres tout, nous voulons que vous ecoutiez pendant toute votre
vie.
100
120
140
180
Metro, motocycJetre. circulation de camion, tondeuse it
gazon
Collecteurs de poubelle, scie it chaIne, perceuse
pneumatique
Concert de groupe rock devant les haut-parleurs, coup
de tonnerre
Coup de pistolet, avion 1\ reaction
Aire de lancement d'une fusee
Ces informations ont ete gracieusemenl fOUl'nies par la Fondation de la Recherche
pour les Sourds.
.
(i
-..../~
(
~~
0
~
i
PIONEER CORPORATION
4-1, MEGURO 1-CHOME, MEGURO-KU, TOKYO 153-8654, JAPAN
PIONEER ELECTRONICS (USA) INC.
P.O. Box 1540, Long Beach, California 90801-1540, U.S.A.
TEL: (800) 421-1404
PIONEER EUROPE NV
Haven 1087, Keetberglaan 1, B-9120 Melsele, Belgium
TEL: (0) 3/570.05.11
PIONEER ELECTRONICS ASIACENTRE PTE. LTD.
253 Alexandra Road, #04-01, Singapore 159936
TEL: 65-6472-1111
PIONEER ELECTRONICS AUSTRALIA PTY. LTD.
178-184 Boundary Road, Braeside, Victoria 3195, Australia
TEL: (03) 9586-6300
PIONEER ELECTRONICS OF CANADA, INC.
300 Allstate Parkway, Markham, Ontario l3R OP2, Canada
TEL: (905) 479-4411
PIONEER ELECTRONICS DE MEXICO, S.A. de C.V.
San Lorenzo 1009 3er. Piso Desp. 302
Col. Del Valle Mexico, D.F. C.P. 03100
TEL: 55-5688-52-90
Register your product at
Ellregistrez \'ol,.e pmduit au
~
http://www.pioneerelectronics.com
~
See "Producl registration" page
Voir fa page "Enregistrement du produit"
Published by Pioneer Corporation.
Copyright © 2002 by Pioneer Corporation.
All rights reserved.
Publication de Pioneer Corporation.
Copyright © 2002 Pioneer Corporation.
Taus droits de reproduction et de traduction reserves.
Printed in Thailand
Imprime en Tha'ilande
PIONEER ELECTRONICS (USA) INC. - PIONEER ELECTRONICS OF CANADA, INC.
(PA)
(POC)
LIMITED WARRANTY
WARRANTY VALID ONLY IN COUNTRY OF PRODUCT PURCHASE
WARRANTY PERIOD
For the period specified below from date of original retail purchase (the warranty period) from an authorized Pioneer dealer, Pioneer Electronics (USA) Inc. (PA), and Pioneer
Electronics Of Canada, Inc. (POC), warrant that products distributed by PA in the U.S.A., and by POC in Canada that fail to function properly under normal use due to a
manufacturing defect when installed and operated according to the owner's manual enclosed with the unit will be repaired or replaced with a unit of comparable value, at the
option of PA or POC, without charge to you for parts or actual repair work. Parts supplied under this warranty may be new or rebuilt at the option of PA or POCo
The warranty period for retail customers who rent the product commences upon the date product is first put into use (a) during the rental period or (b) retail sale, whichever
occurs first.
The warranty does not cover any product which is used in any trade or business. or in an industrial or commercial application.
WARRANTY PERIOD
PARTS
LABOR
PRODUCT
Car Stereo Products
ONE YEAR
ONE YEAR
This warranty covers the product during the warranty period whether in the possession of the original owner or any subsequent owner. In the event service is required, the
product must be delivered within the warranty period, transportation prepaid, from within the country of purchase as explained in this document. You will be responsible for
removal and installation of the prOduct. PA or POC, as appropriate, will pay for the cost of returning the repaired or replacement product to you within the country of purchase.
WHAT'S NOT COVERED
This warranty does not apply to any speaker that has been subjected to power in excess of its published power rating.
This warranty does not cover the cabinet or any appearance item, user attached antennas, any damage to recordings or recording tapes or discs, any damage to the product
resulting from alterations, modifications not authorized in writing by PA or POC, accident, misuse or abuse, damage due to lightning or to power surges, subsequent damage
from leaking, damaged or inoperative batteries or the use of batteries not conforming to those specified in the owner's manual.
This warranty does not cover the cost of parts or labor which would be otherwise provided without charge under this warranty. obtained from any source other than a PA or
POC Authorized Service Company or other designated location. This warranty does not cover defects or damage caused by the use of unauthorized parts or labor. or from
improper maintenance.
ALTERED, DEFACED OR REMOVED SERIAL NUMBERS VOID THIS WARRANTY.
YOUR RIGHTS
PA and POC exclude any obligation on their part for incidental or consequential damages related to the failure of products each distributes to function properly under the
conditions set forth above.
IN THE U.S.A. - PA LIMITS ITS OBLIGATIONS UNDER ANY IMPLIED WARRANTIES INCLUDING, BUT NOT LIMITED TO, THE IMPLIED WARRANTIES OF
MERCHANTABILITY AND FITNESS FOR A PARTICULAR PURPOSE TO A PERIOD NOT TO EXCEED THE WARRANTY PERIOD. NO WARRANTIES SHALL APPLY
AFTER THE WARRANTY PERIOD. SOME STATES DO NOT ALLOW LIMITATIONS ON HOW LONG AN IMPLIED WARRANTY LASTS, AND SOME STATES DO NOT
ALLOW THE EXCLUSION OR LIMITATION OF INCIDENTAL OR CONSEQUENTIAL DAMAGES, SO THE ABOVE LIMITATIONS OR EXCLUSIONS MAY NOT APPLY TO
YOU. THIS WARRANTY GIVES YOU SPECIFIC LEGAL RIGHTS, AND YOU MAY HAVE OTHER RIGHTS WHICH MAY VARY FROM STATE TO STATE.
IN CANADA - EXCEPT AS EXPRESSLY PROVIDED HEREIN, THERE ARE NO REPRESENTATIONS, WARRANTIES, OBLIGATIONS OR CONDITIONS, IMPLIED,
STATUTORY OR OTHERWISE, APPLICABLE TO THIS PRODUCT.
TO OBTAIN SERVICE
CAR STEREO PRODUCTS (EXCEPT CAR SPEAKERS SOLD IN THE U.S.A. ONLY)
PA and POC have appointed a number of Authorized Service Companies throughout the U.S.A. and Canada should your product ever require service. To receive warranty
service you will need to present your sales receipt or, if rented, your rental contract showing place and date of original owner's transaction.
Should it become necessary to ship the unit you will need to package the product carefully and send it, transportation prepaid by a traceable, pre-insured method, to an Authorized
Service Company. Carefully package the product using adequate padding material to prevent damage in transit. The original container is ideal for this purpose. Include in
the package your name, address, telephone number where you can be reached during business hours, a copy of your sales receipt and a detailed description of the problem.
TO OBTAIN SERVICE
CAR SPEAKERS SOLD IN THE U.S.A. ONLY
Should your car speaker require service, return defective car speaker to your retail dealer for exchange. To receive warranty service you will need to present your sales receipt
showing place and date of original owner's retail purchase. If, for any reason, you cannot exchange the speakers at the selling dealer, call the Customer Service Department
as given below.
- ADDITIONAL INFORMATION IN THE U.S,A.
For additional information on this warranty, please call or write:
CUSTOMER SERVICE DEPARTMENT
PIONEER ELECTRONICS SERVICE, INC.
P.O. BOX 1760
LONG BEACH, CALIFORNIA 90801
1-800-421-1404
INCANADA
Please contact a Pioneer authorized Dealer to find the nearest Pioneer authorized
service location. For additional information on this warranty, please call or write:
CUSTOMER SERVICE DEPARTMENT
PIONEER ELECTRONICS OF CANADA, INC.
300 ALLSTATE PARKWAY
MARKHAM, ON L3R OP2
(905)479-4411
IN THE U.S.A. DO NOT RETURN ANY PRODUCT TO THE
ABOVE ADDRESS. IT IS NOT A SERVICE LOCATION.
IN THE U.S.A.
RECORD THE PLACE AND DATE OF PURCHASE FOR FUTURE REFERENCE
FOR PRODUCT INFORMATION, TO PURCHASE
REPLACEMENT PARTS OR TO LOCATE
AN AUTHORIZED SERVICE COMPANY
CALL: 1-800-421-1404
Model No.
Purchased From
Serial No. _ _ _ _ _ _ _ _ _ _ _ Purchase Date
----------------------------------
KEEP THIS INFORMATION AND YOUR SALES RECEIPT IN A SAFE PLACE
< ARY1048-D/N >
Printed in Thailand