1
Symantec Enterprise Security Manager™
User’s Guide
Version 6.0
Symantec Enterprise Security Manager
User’s Guide
The software described in this book is furnished under a license agreement and may be
used only in accordance with the terms of the agreement.
Documentation version 6.0
PN: 10132732
Copyright notice
Copyright © 1998-2003 Symantec Corporation.
All Rights Reserved.
Any technical documentation that is made available by Symantec Corporation is the
copyrighted work of Symantec Corporation and is owned by Symantec Corporation.
NO WARRANTY. The technical documentation is being delivered to you AS-IS and
Symantec Corporation makes no warranty as to its accuracy or use. Any use of the
technical documentation or the information contained therein is at the risk of the user.
Documentation may include technical or other inaccuracies or typographical errors.
Symantec reserves the right to make changes without prior notice.
No part of this publication may be copied without the express written permission of
Symantec Corporation, 20330 Stevens Creek Blvd., Cupertino, CA 95014.
Trademarks
Symantec, the Symantec logo, and LiveUpdate are U.S. registered trademarks of Symantec
Corporation. Symantec Enterprise Security Architecture, Symantec Enterprise Security
Manager, Symantec Incident Manager, Symantec Security Response, and Symantec
Vulnerability Assessment are trademarks of Symantec Corporation.
Other brands and product names that are mentioned in this manual may be trademarks or
registered trademarks of their respective companies and are hereby acknowledged.
Printed in the United States of America.
10 9 8 7 6 5 4 3 2 1
Technical support
As part of Symantec Security Response, the Symantec Global Technical Support
group maintains support centers throughout the world. The Technical Support
group’s primary role is to respond to specific questions on product feature/
function, installation, and configuration, as well as to author content for our
Web-accessible Knowledge Base. The Technical Support group works
collaboratively with the other functional areas within Symantec to answer your
questions in a timely fashion. For example, the Technical Support group works
with Product Engineering as well as Symantec Security Response to provide
Alerting Services and Virus Definition Updates for virus outbreaks and security
alerts.
Symantec technical support offerings include:
■
A range of support options that gives you the flexibility to select the right
amount of service for any size organization
■
Telephone and Web support components that provide rapid response and
up-to-the-minute information
■
Upgrade insurance that delivers automatic software upgrade protection
■
Content Updates for virus definitions and security signatures that ensure
the highest level of protection
■
Global support from Symantec Security Response experts, which is
available 24 hours a day, 7 days a week worldwide in a variety of languages
Advanced features, such as the Symantec Alerting Service and Technical
Account Manager role, that offer enhanced response and proactive security
support
Please visit our Web site for current information on Support Programs. The
specific features that are available may vary based on the level of support
purchased and the specific product that you are using.
■
Licensing and registration
If the product that you are implementing requires registration and/or a license
key, the fastest and easiest way to register your service is to access the
Symantec licensing and registration site at www.symantec.com/certificate.
Alternatively, you may go to www.symantec.com/techsupp/ent/enterprise.htm,
select the product that you wish to register, and from the Product Home Page,
select the Licensing and Registration link.
Contacting Technical Support
Customers with a current support agreement may contact the Technical
Support group by phone or online at www.symantec.com/techsupp.
Customers with Platinum support agreements may contact Platinum Technical
Support by the Platinum Web site at www-secure.symantec.com/platinum/.
When contacting the Technical Support group, please have the following:
■
Product release level
■
Hardware information
■
Available memory, disk space, NIC information
■
Operating system
■
Version and patch level
■
Network topology
■
Router, gateway, and IP address information
■
Problem description
■
Error messages/log files
■
Troubleshooting performed prior to contacting Symantec
■
Recent software configuration changes and/or network changes
Customer Service
To contact Enterprise Customer Service online, go to www.symantec.com, select
the appropriate Global Site for your country, then choose Service and Support.
Customer Service is available to assist with the following types of issues:
■
Questions regarding product licensing or serialization
■
Product registration updates such as address or name changes
■
General product information (features, language availability, local dealers)
■
Latest information on product updates and upgrades
■
Information on upgrade insurance and maintenance contracts
■
Information on Symantec Value License Program
■
Advice on Symantec's technical support options
■
Nontechnical presales questions
■
Missing or defective CD-ROMs or manuals
SYMANTEC SOFTWARE LICENSE AGREEMENT
Symantec Enterprise Security Manager
SYMANTEC CORPORATION AND/OR ITS
SUBSIDIARIES ("SYMANTEC") IS WILLING TO
LICENSE THE SOFTWARE TO YOU AS AN
INDIVIDUAL, THE COMPANY, OR THE LEGAL ENTITY
THAT WILL BE UTILIZING THE SOFTWARE
(REFERENCED BELOW AS "YOU" OR "YOUR") ONLY
ON THE CONDITION THAT YOU ACCEPT ALL OF THE
TERMS OF THIS LICENSE AGREEMENT. READ THE
TERMS AND CONDITIONS OF THIS LICENSE
AGREEMENT CAREFULLY BEFORE USING THE
SOFTWARE. THIS IS A LEGAL AND ENFORCEABLE
CONTRACT BETWEEN YOU AND THE LICENSOR. BY
OPENING THIS PACKAGE, BREAKING THE SEAL,
CLICKING THE "AGREE" OR "YES" BUTTON OR
OTHERWISE INDICATING ASSENT
ELECTRONICALLY, OR LOADING THE SOFTWARE,
YOU AGREE TO THE TERMS AND CONDITIONS OF
THIS AGREEMENT. IF YOU DO NOT AGREE TO
THESE TERMS AND CONDITIONS, CLICK THE "I DO
NOT AGREE" OR "NO" BUTTON OR OTHERWISE
INDICATE REFUSAL AND MAKE NO FURTHER USE
OF THE SOFTWARE.
1. License:
The software and documentation that accompanies
this license (collectively the "Software") is the
proprietary property of Symantec or its licensors and
is protected by copyright law. While Symantec
continues to own the Software, You will have certain
rights to use the Software after Your acceptance of this
license. This license governs any releases, revisions, or
enhancements to the Software that the Licensor may
furnish to You. Except as may be modified by an
applicable Symantec license certificate, license
coupon, or license key (each a "License Module") that
accompanies, precedes, or follows this license, and as
may be further defined in the user documentation
accompanying the Software, Your rights and
obligations with respect to the use of this Software are
as follows.
You may:
A. use that number of copies of the Software as have
been licensed to You by Symantec under a License
Module. Permission to use the software to assess
Desktop, Server or Network machines does not
constitute permission to make additional copies of the
Software. If no License Module accompanies, precedes,
or follows this license, You may make one copy of the
Software you are authorized to use on a single
machine.
B. make one copy of the Software for archival
purposes, or copy the Software onto the hard disk of
Your computer and retain the original for archival
purposes;
C. use the Software to assess no more than the number
of Desktop machines set forth under a License Module.
"Desktop" means a desktop central processing unit for
a single end user;
D. use the Software to assess no more than the number
of Server machines set forth under a License Module.
"Server" means a central processing unit that acts as a
server for other central processing units;
E. use the Software to assess no more than the number
of Network machines set forth under a License Module.
"Network" means a system comprised of multiple
machines, each of which can be assessed over the same
network;
F. use the Software in accordance with any written
agreement between You and Symantec; and
G. after written consent from Symantec, transfer the
Software on a permanent basis to another person or
entity, provided that You retain no copies of the
Software and the transferee agrees to the terms of this
license.
You may not:
A. copy the printed documentation which
accompanies the Software;
B. use the Software to assess a Desktop, Server or
Network machine for which You have not been granted
permission under a License Module;
C. sublicense, rent or lease any portion of the
Software; reverse engineer, decompile, disassemble,
modify, translate, make any attempt to discover the
source code of the Software, or create derivative works
from the Software;
D. use the Software as part of a facility management,
timesharing, service provider, or service bureau
arrangement;
E. continue to use a previously issued license key if
You have received a new license key for such license,
such as with a disk replacement set or an upgraded
version of the Software, or in any other instance;
F. continue to use a previous version or copy of the
Software after You have installed a disk replacement
set, an upgraded version, or other authorized
replacement. Upon such replacement, all copies of the
prior version must be destroyed;
G. use a later version of the Software than is provided
herewith unless you have purchased corresponding
maintenance and/or upgrade insurance or have
otherwise separately acquired the right to use such
later version;
H. use, if You received the software distributed on
media containing multiple Symantec products, any
Symantec software on the media for which You have
not received a permission in a License Module; nor
I. use the Software in any manner not authorized by
this license.
2. Content Updates:
Certain Software utilize content that is updated from
time to time (including but not limited to the following
Software: antivirus software utilize updated virus
definitions; content filtering software utilize updated
URL lists; some firewall software utilize updated
firewall rules; and vulnerability assessment products
utilize updated vulnerability data; these updates are
collectively referred to as "Content Updates"). You
shall have the right to obtain Content Updates for any
period for which You have purchased maintenance,
except for those Content Updates that Symantec elects
to make available by separate paid subscription, or for
any period for which You have otherwise separately
acquired the right to obtain Content Updates.
Symantec reserves the right to designate specified
Content Updates as requiring purchase of a separate
subscription at any time and without notice to You;
provided, however, that if You purchase maintenance
hereunder that includes particular Content Updates on
the date of purchase, You will not have to pay an
additional fee to continue receiving such Content
Updates through the term of such maintenance even if
Symantec designates such Content Updates as
requiring separate purchase. This License does not
otherwise permit the licensee to obtain and use
Content Updates.
3. Limited Warranty:
Symantec warrants that the media on which the
Software is distributed will be free from defects for a
period of sixty (60) days from the date of delivery of the
Software to You. Your sole remedy in the event of a
breach of this warranty will be that Symantec will, at
its option, replace any defective media returned to
Symantec within the warranty period or refund the
money You paid for the Software. Symantec does not
warrant that the Software will meet Your requirements
or that operation of the Software will be uninterrupted
or that the Software will be error-free.
TO THE MAXIMUM EXTENT PERMITTED BY
APPLICABLE LAW, THE ABOVE WARRANTY IS
EXCLUSIVE AND IN LIEU OF ALL OTHER
WARRANTIES, WHETHER EXPRESS OR IMPLIED,
INCLUDING THE IMPLIED WARRANTIES OF
MERCHANTABILITY, FITNESS FOR A PARTICULAR
PURPOSE, AND NONINFRINGEMENT OF
INTELLECTUAL PROPERTY RIGHTS. THIS
WARRANTY GIVES YOU SPECIFIC LEGAL RIGHTS.
YOU MAY HAVE OTHER RIGHTS, WHICH VARY FROM
STATE TO STATE AND COUNTRY TO COUNTRY.
4. Disclaimer of Damages:
SOME STATES AND COUNTRIES, INCLUDING
MEMBER COUNTRIES OF THE EUROPEAN ECONOMIC
AREA, DO NOT ALLOW THE LIMITATION OR
EXCLUSION OF LIABILITY FOR INCIDENTAL OR
CONSEQUENTIAL DAMAGES, SO THE BELOW
LIMITATION OR EXCLUSION MAY NOT APPLY TO
YOU.
TO THE MAXIMUM EXTENT PERMITTED BY
APPLICABLE LAW AND REGARDLESS OF WHETHER
ANY REMEDY SET FORTH HEREIN FAILS OF ITS
ESSENTIAL PURPOSE, IN NO EVENT WILL
SYMANTEC BE LIABLE TO YOU FOR ANY SPECIAL,
CONSEQUENTIAL, INDIRECT, OR SIMILAR
DAMAGES, INCLUDING ANY LOST PROFITS OR LOST
DATA ARISING OUT OF THE USE OR INABILITY TO
USE THE SOFTWARE EVEN IF SYMANTEC HAS BEEN
ADVISED OF THE POSSIBILITY OF SUCH DAMAGES.
IN NO CASE SHALL SYMANTEC'S LIABILITY EXCEED
THE PURCHASE PRICE FOR THE SOFTWARE. The
disclaimers and limitations set forth above will apply
regardless of whether or not You accept the Software.
5. U.S. Government Restricted Rights:
RESTRICTED RIGHTS LEGEND. All Symantec products
and documentation are commercial in nature. The
software and software documentation are "Commercial
Items," as that term is defined in 48 C.F.R. section
2.101, consisting of "Commercial Computer Software"
and "Commercial Computer Software Documentation,"
as such terms are defined in 48 C.F.R. section 252.2277014(a)(5) and 48 C.F.R. section 252.227-7014(a)(1),
and used in 48 C.F.R. section 12.212 and 48 C.F.R.
section 227.7202, as applicable. Consistent with 48
C.F.R. section 12.212, 48 C.F.R. section 252.227-7015,
48 C.F.R. section 227.7202 through 227.7202-4, 48
C.F.R. section 52.227-14, and other relevant sections of
the Code of Federal Regulations, as applicable,
Symantec's computer software and computer software
documentation are licensed to United States
Government end users with only those rights as
granted to all other end users, according to the terms
and conditions contained in this license agreement.
Manufacturer is Symantec Corporation, 20330 Stevens
Creek Blvd., Cupertino, CA 95014, United States of
America.
6. Export Regulation:
Export or re-export of this Software is governed by the
laws and regulations of the United States and import
laws and regulations of certain other countries.
Export or re-export of the Software to any entity not
authorized by, or that is specified by, the United States
Federal Government is strictly prohibited.
7. General:
If You are located in North America or Latin America,
this Agreement will be governed by the laws of the
State of California, United States of America.
Otherwise, this Agreement will be governed by the
laws of England and Wales. This Agreement and any
related License Module is the entire agreement
between You and Symantec relating to the Software
and: (i) supersedes all prior or contemporaneous oral
or written communications, proposals, and
representations with respect to its subject matter; and
(ii) prevails over any conflicting or additional terms of
any quote, order, acknowledgment, or similar
communications between the parties. This Agreement
shall terminate upon Your breach of any term
contained herein and You shall cease use of and
destroy all copies of the Software. The disclaimers of
warranties and damages and limitations on liability
shall survive termination. Software and
documentation is delivered Ex Works California,
U.S.A. or Dublin, Ireland respectively (ICC INCOTERMS
2000). This Agreement may only be modified by a
License Module that accompanies this license or by a
written document that has been signed by both You
and Symantec. Should You have any questions
concerning this Agreement, or if You desire to contact
Symantec for any reason, please write to: (i) Symantec
Customer Service, 555 International Way, Springfield,
OR 97477, U.S.A., (ii) Symantec Authorized Service
Center, Postbus 1029, 3600 BA Maarssen, The
Netherlands, or (iii) Symantec Customer Service, 1
Julius Ave, North Ryde, NSW 2113, Australia.
Contents
Technical support
Chapter 1
Managing enterprise security
Solving security needs with Symantec ESM .................................................... 17
Symantec ESM agent/manager architecture .................................................. 18
Symantec ESM agents ................................................................................. 19
Symantec ESM managers ........................................................................... 23
Symantec ESM console ............................................................................... 24
Client server protocol .................................................................................. 26
Extending Symantec ESM capabilities ............................................................. 26
Chapter 2
Touring the Symantec ESM console
Starting the console ............................................................................................ 29
Accessing the console ......................................................................................... 30
Locating the console controls ............................................................................ 31
Connecting to a manager .................................................................................... 36
Using the Account wizard .................................................................................. 37
Gathering security information ........................................................................ 38
Running security checks .................................................................................... 38
Using the Policy Run wizard ...................................................................... 40
Determining a security level and rating .................................................. 40
Filtering report contents .................................................................................... 42
Viewing reports .................................................................................................... 42
Bringing computers into conformance ............................................................ 43
Chapter 3
Administering Symantec ESM
Licensing managers ............................................................................................. 47
Finding the manager name ........................................................................ 48
Number of agents ......................................................................................... 48
Installing a permanent license .................................................................. 48
Moving an installed manager .................................................................... 49
Organizing managers and regions .................................................................... 51
Adding a manager to a region .................................................................... 51
Deleting a manager from a region ............................................................ 52
Deleting a manager from the console ....................................................... 53
10 Contents
Deleting a region from the console ........................................................... 53
Organizing agents and domains ........................................................................ 53
Creating a new domain ............................................................................... 54
Renaming a domain ..................................................................................... 55
Deleting a domain ........................................................................................ 55
Adding an agent to a domain ..................................................................... 55
Deleting an agent from a domain .............................................................. 56
Upgrading a remote agent .......................................................................... 57
Viewing agent properties ........................................................................... 57
Deleting an agent from the manager ........................................................ 57
Separating security administration duties ...................................................... 58
Understanding account types and separation of duties ........................ 58
Administering manager user accounts ............................................................ 65
Adding new accounts .................................................................................. 66
Deleting a manager account ...................................................................... 67
Modifying a manager account ................................................................... 68
Setting the manager password configuration ................................................. 75
Changing Symantec ESM Enterprise console passwords .............................. 76
Understanding the summary databases .......................................................... 77
Manager sumfinal database ....................................................................... 77
Local summary database ............................................................................ 77
Creating local summary database queries ............................................... 88
Managing the manager sumfinal database .............................................. 89
Managing the local summary database .................................................... 90
Auditing Symantec ESM events ........................................................................ 92
Using LiveUpdate ................................................................................................ 93
Enabling and disabling LiveUpdate on agents ........................................ 95
Upgrading agents ........................................................................................ 96
Checking remote agent upgrade status .................................................... 97
Updating agents ........................................................................................... 97
Exporting an agent list ................................................................................ 97
Reregister agents to a manager ................................................................. 97
Chapter 4
Using policies, templates, snapshots, and modules
About policies ....................................................................................................... 99
About sample policies ............................................................................... 100
About best practice policies ..................................................................... 101
Administering policies ...................................................................................... 106
Creating policies ........................................................................................ 106
Copying and moving policies ................................................................... 107
Validating security checks ....................................................................... 107
Administering policy runs ............................................................................... 108
Running policies ........................................................................................ 108
Contents
Running modules .......................................................................................108
Specifying multiple modules to run ........................................................109
Limiting the number of messages ...........................................................110
Scheduling a policy run ............................................................................110
Sending completion notices .....................................................................111
Viewing the status of a policy run ...........................................................113
Viewing scheduled policy run information ...........................................114
Selecting agents randomly for a policy run ...........................................115
Stopping a policy run ................................................................................115
Stopping policy runs at user-defined intervals .....................................116
Deleting policy runs ..................................................................................117
About snapshots ................................................................................................117
About templates .................................................................................................118
Administering templates ..................................................................................118
Creating and editing templates ...............................................................118
About modules ...................................................................................................121
Administering security checks ........................................................................121
Enabling and disabling security checks .................................................121
Specifying options .....................................................................................122
Editing name lists ......................................................................................122
Chapter 5
Viewing security data
Viewing summary and detailed data ..............................................................127
Understanding the grid and chart ..................................................................128
Drill-down mode ........................................................................................129
Summary mode ..........................................................................................131
Trend mode .................................................................................................132
Security level ..............................................................................................134
Security rating ............................................................................................134
Filtering security data .......................................................................................135
Selecting grid options .......................................................................................136
Copying grid messages ..............................................................................136
Finding text in the grid .............................................................................137
Customizing chart appearance ........................................................................137
Showing or hiding the chart legend ........................................................137
Showing or hiding series labels ...............................................................138
Selecting pie or bar chart graphics .........................................................138
Configuring the console on Windows .............................................................139
Chapter 6
Generating and viewing reports
About Symantec ESM reports ..........................................................................141
Generating standard reports ...........................................................................142
11
12 Contents
Generating a Security report ................................................................... 143
Generating a Domain report .................................................................... 145
Generating a Policy report ....................................................................... 145
Generating a Policy Run report ............................................................... 146
Generating a Template report ................................................................. 146
Generating an Executive report .............................................................. 147
Generating reports using third-party applications .............................. 147
Saving a report ................................................................................................... 148
Opening a report ................................................................................................ 149
Printing a report ................................................................................................ 149
Emailing a report ............................................................................................... 149
Deleting a report ................................................................................................ 150
Customizing a report ........................................................................................ 150
Converting a report to Microsoft Word format .................................... 150
Using the Reports tool ...................................................................................... 151
Usage prerequisites ................................................................................... 153
Opening the reports interface ................................................................. 154
Using the interface .................................................................................... 154
Using the toolbar ....................................................................................... 155
Using the menu .......................................................................................... 155
Using the Reports tool .............................................................................. 157
Report Previewer export options ............................................................ 157
Changing default parameter values ........................................................ 160
Parameters, values, and descriptions ..................................................... 161
Chapter 7
Bringing computers into conformance
Hardening the network ..................................................................................... 169
Suppressing a Security report item ................................................................ 170
Unsuppressing a Security report item ........................................................... 173
Correcting a Security report item ................................................................... 174
Uncorrecting a Security report item ...................................................... 176
Applying security check updates .................................................................... 176
Updating templates ................................................................................... 176
Updating snapshots ................................................................................... 177
Chapter 8
Using the command line interface
Understanding command line interface conventions ................................. 179
Case sensitive ............................................................................................. 179
Quotation marks ........................................................................................ 180
Short module names ................................................................................. 180
Brackets ....................................................................................................... 181
Running batch files with the CLI ..................................................................... 182
Contents
Format .........................................................................................................182
Options ........................................................................................................182
Example 1 ....................................................................................................183
Example 2 ....................................................................................................184
Example 3 ....................................................................................................186
Running the CLI interactively .........................................................................187
Connecting the CLI to a manager ............................................................187
Navigating the CLI .....................................................................................188
Using CLI help ....................................................................................................188
Using the CLI command reference index .......................................................189
Create command ................................................................................................191
Create access ...............................................................................................191
Create agent ................................................................................................192
Create domain ............................................................................................194
Create policy ............................................................................................... 194
Delete command ........................................................................................194
Delete access ...............................................................................................195
Delete agent ................................................................................................195
Delete domain .............................................................................................196
Delete module .............................................................................................197
Delete policy ...............................................................................................197
Insert command .................................................................................................198
Insert agent .................................................................................................198
Insert module .............................................................................................199
Insert name .................................................................................................199
Login command ..................................................................................................201
Logout command ...............................................................................................202
Ping command ....................................................................................................202
Query command .................................................................................................203
Quit command ....................................................................................................204
Remove command .............................................................................................204
Remove agent .............................................................................................204
Remove module ..........................................................................................204
Remove name .............................................................................................205
Run command ....................................................................................................205
Set command ......................................................................................................207
Set config .....................................................................................................207
Set license ...................................................................................................208
Set variable .................................................................................................208
Show command ..................................................................................................209
Show access ................................................................................................209
Show agent ..................................................................................................211
Show config ................................................................................................212
13
14 Contents
Show domain .............................................................................................. 212
Show job ...................................................................................................... 215
Show license ............................................................................................... 216
Show module .............................................................................................. 216
Show policy ................................................................................................. 218
Show sumfinal ............................................................................................ 219
Show summary ........................................................................................... 220
Show variable ............................................................................................. 220
Shutdown (UNIX only) ...................................................................................... 221
Sleep command .................................................................................................. 221
Status command ................................................................................................ 222
Stop command ................................................................................................... 223
Version command .............................................................................................. 224
View command ................................................................................................... 224
View agent .................................................................................................. 226
View audit ................................................................................................... 227
View checks ................................................................................................ 228
View custom ............................................................................................... 229
View differences ........................................................................................ 231
View domain ............................................................................................... 233
View policy .................................................................................................. 234
View report ................................................................................................. 235
View summary ............................................................................................ 237
Chapter 9
Using the Symantec ESM utilities
Understanding Symantec ESM utilities conventions .................................. 239
Case sensitive entries ................................................................................ 239
Quotation marks ........................................................................................ 240
Brackets ....................................................................................................... 240
Using the Policy tool ......................................................................................... 240
Usage prerequisites ................................................................................... 241
Access .......................................................................................................... 242
Format ......................................................................................................... 242
Values .......................................................................................................... 243
Options ........................................................................................................ 244
Examples ..................................................................................................... 244
Using the Database Conversion tool ............................................................... 247
Accessing the external database ............................................................. 247
Understanding the database file structure ............................................ 248
Usage prerequisites ................................................................................... 257
Access .......................................................................................................... 258
Format ......................................................................................................... 258
Options ........................................................................................................ 258
Contents
Property files ..............................................................................................259
Parameters ..................................................................................................260
Examples .....................................................................................................262
Using the Reports tool ......................................................................................266
Prerequisites ...............................................................................................267
Setup ............................................................................................................268
Format .........................................................................................................268
Options ........................................................................................................269
Format options ...........................................................................................270
Destination options ...................................................................................272
ODBC options ..............................................................................................274
HTML options .............................................................................................275
Print options ...............................................................................................276
Source database arguments .....................................................................276
Report descriptions ...................................................................................277
Parameters ..................................................................................................279
Examples .....................................................................................................280
Appendix A
Symantec ESM communications
About Symantec ESM communications security ..........................................285
Symantec ESM communication ports ............................................................286
Appendix B
Symantec ESM file structure
Directory & File Descriptions ..........................................................................289
Appendix C
Finalizer log file
Understanding the finalizer log file ...............................................................305
Understanding Agent records .........................................................................305
Understanding Module records .......................................................................305
Appendix D
Format file syntax
Syntax rules ........................................................................................................307
Symantec ESM keywords ..........................................................................308
Format file structure .................................................................................309
General directives ......................................................................................309
Header definition .......................................................................................310
Record definition .......................................................................................311
Footer definition ........................................................................................311
Sample format file .....................................................................................312
Appendix E
Symantec ESM environment variables
15
16 Contents
Environment variables ..................................................................................... 313
Index
Chapter
1
Managing enterprise
security
This chapter includes the following topics:
■
Solving security needs with Symantec ESM
■
Symantec ESM agent/manager architecture
■
Extending Symantec ESM capabilities
Solving security needs with Symantec ESM
Corporations handle vast amounts of information in complex computer
environments with multiple platforms and integrated networks. The client/
server system solves the challenge of accessing this information quickly and
easily. However, client/server computers can leave sensitive data vulnerable to
unauthorized access, modification, or tampering.
Organizations need to secure this data against unauthorized use while still
providing easy access to authorized users on multiple platforms. They need a
way to apply security policies, then monitor and enforce compliance throughout
the enterprise network. Symantec provides the solution to security policy
management with the Symantec Enterprise Security Manager (ESM).
Symantec ESM is a software tool that manages sensitive data and enforces
security policies across a full range of client/server platforms including:
■
Windows NT/2000/XP and Windows Server 2003
■
Several types of UNIX operating systems
■
Novell NetWare/NDS
■
OpenVMS
18 Managing enterprise security
Symantec ESM agent/manager architecture
Symantec ESM works much like a security firm that is hired to guard physical
facilities. The security firm enforces the policies and procedures that are
established by the organization to control access to restricted or secured areas.
The firm also makes recommendations regarding potential breaches in security.
Once the potential breaches are closed, the security firm regularly checks and
reports on problem areas.
Symantec ESM provides similar services by fulfilling the basic goals for secured
information: confidentiality, integrity, and availability.
Major Symantec ESM functions include:
■
Managing security policies
■
Detecting changes to security settings or files
■
Evaluating and reporting computer conformance with security policies
Note: Before you use Symantec ESM to evaluate the security of your enterprise,
ensure that you have configured the Symantec ESM environment to match the
needs of your organization. See the Symantec ESM Installation Guide. Changing
conditions in the network can also cause changes to the environment.
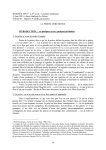
Symantec ESM agent/manager architecture
Symantec ESM uses the agent/manager architecture that is shown in Figure 1-1
to scale the product over the enterprise. This architecture is flexible, efficient,
and designed for growth. It lets Symantec ESM adapt to changes in network
structure by adding new operating systems and platforms as agents.
Managing enterprise security
Symantec ESM agent/manager architecture
Figure 1-1
Enterprise Security Manager architecture
The basic Symantec ESM structure consists of three main components: the
agent, manager, and console (GUI). In addition, Symantec ESM provides the
command line interface (CLI) as an alternate way to run security functions.
Symantec ESM also provides utilities to copy security information from the
managers to a database and to produce standard or custom reports from the
information in the database.
Note: All references to managers, agents, consoles, and CLIs refer to Symantec
ESM managers, agents, consoles and CLIs unless otherwise specified.
Symantec ESM agents
Symantec ESM agents consist of a module server and a communications
component that is attached to the server.
The agent is the workhorse of the Symantec ESM system. It gathers and
interprets the data that pertains to the security of the host computer. It does
this in response to a policy run request from a manager. Security modules in the
policy analyze the configuration of the workstation, server, or machine node
where the agent resides, or the computer where the agent acts as a proxy. The
19
20 Managing enterprise security
Symantec ESM agent/manager architecture
agent server gathers the resulting data and returns it to the manager that
initiated the request. The manager responds by updating the appropriate files in
its database.
Agents perform several other important functions:
■
They store snapshot files of computer-specific and user-account
information.
■
They make user-requested corrections to the files.
■
They update the snapshot files when corrections occur.
NetWare/NDS functionality
NetWare/NDS agents have unique functionality. An agent on a NetWare/NDS
server can potentially run security checks on the entire NDS tree, or a portion of
the tree. The agent can do this in addition to running security checks on the
server where it resides.
Symantec ESM divides the security modules that perform these checks into NDS
modules and server modules. An agent only runs NDS security modules if it is
assigned to check the tree, or a portion of the tree.
When you install an agent on a NetWare/NDS server, Symantec ESM prompts
you for a decision whether to run the NDS security checks.
■
If you click No, the agent runs only server security modules.
■
If you click Yes, Symantec ESM prompts you for the agent context lists in
which to run the NDS modules. The context identifies the part of the tree
that the agent checks.
Small trees may only require one agent to check the entire tree from [Root]
down. Large trees may require more than one agent.
The agent must have access to each context in its agent context list. To ensure
this access, esmsetup creates a secure pseudo-user object in the tree that only
Symantec ESM can use. Symantec ESM modules log on as this user.
Managing enterprise security
Symantec ESM agent/manager architecture
Symantec ESM 5.0 NetWare/NDS mini-agents
The ESMMODS.NLM update program that installs modules from Security
Update 3 or later on Symantec ESM 5.0 NetWare/NDS agents includes two
installation options that let you create mini-agents:
■
The create an NDS context mini-agent for this agent option lets you identify
a subset of the agent’s context list to be checked by policy runs on the miniagent.
■
The create a server only mini-agent for this agent option lets you identify
the updated agent as a local server on specific managers. This option lets
you run NDS server modules on the server mini-agent.
Mini-agents display in the NDS Contexts node of the domains branch on the
enterprise tree in the Symantec ESM 5.5 console.
Note: Any NetWare/NDS context-driven module that runs on a NetWare/NDS
agent also runs on a NetWare/NDS context mini-agent. These modules include:
Account Information, Account Integrity, Computer Auditing, Login Parameters,
Object Integrity, Password Strength, and User Files.
Symantec ESM modules
Modules are common to all agents. They are the most important part of an agent
configuration. They contain the executables, or security checks, that do the
actual checking at the server or workstation level.
Symantec provides frequent updates to the modules to protect network
environments from unauthorized access, data corruption, and denial-of-service
attacks.
For information about editing modules and applying security checks, see the
Symantec ESM Security Update User’s Guides for your specific operating system.
Download the latest version at http://securityresponse.symantec.com.
The guides explain why Symantec ESM does each check, show how to
demonstrate each check’s function, and tell how to solve the security
vulnerability that the check reports. The guides also describe how to edit the
name lists and messages that are in the checks, and the templates that the
checks use.
21
22 Managing enterprise security
Symantec ESM agent/manager architecture
Agents have a mix of security, query, and dynamic assessment modules.
■
Security
Networked computers are vulnerable to unauthorized access, tampering,
and denial of service attacks in three critical areas.Security modules
evaluate each of the critical vulnerability areas. Modules have checks that
assess the control settings of the operating system in a systematic way.
Each check assesses one area of potential vulnerabilities.
■
User accounts and authorization
■
Network and server settings
File systems and directories
Symantec ESM divides the security modules for NetWare/NDS servers into
two types: NDS modules and server modules. NDS security modules run on
the part of the NDS directory tree that is assigned to the agent context.
Server modules run only on their own server.
■
■
Query
These modules report general information that does not necessarily relate
to security policies. Use this information to aid in computer administration.
For example, a query module may list all of the users in a particular group
or all of the users with administrator privileges.
■
Dynamic assessment
These modules provide an easy way to extend dynamic security assessment
and reporting capabilities for Symantec ESM. Add new functions to perform
queries, security checks, or other tasks not currently available within
Symantec ESM. Use these capabilities to protect network resources from
new forms of unauthorized access, data corruption, or denial of service
attacks.
Symantec ESM policies
Symantec ESM groups its security checks into modules, and its modules into
policies. When a policy runs on an agent, the enabled checks in the modules
examine the agent host computer and report detected vulnerabilities.
Managing enterprise security
Symantec ESM agent/manager architecture
Symantec ESM organizes its default policies so that each successive policy
increases the security of a computer, a group of computers, an organization, a
group of organizations, or the entire enterprise.
■
The Phase 1 policy identifies the most significant and potentially
problematic security problems with network resources. Problems in these
areas are important and easy to solve.
■
The Phase 2 policy contains all of the available modules, but only the key
security checks in each module are enabled. These checks identify the
remaining critical security problems in a network.
■
The Phase 3 policy consists of three distinct categories that provide
progressively elevated levels of security to the network.
Map the contents of your company’s security policy to the Symantec ESM
security policies. Then run the Symantec ESM policies on the network domains.
Symantec ESM reports the resulting vulnerabilities, providing the information
that you need to bring network resources into conformance with your policy.
Symantec ESM domains
A domain involves a select group of agents. Symantec ESM provides default
domains that group the agents by operating systems. These domains include all
supported Windows, UNIX, NetWare/NDS, and OpenVMS Operating Systems.
Because a manager may need to assess groups of agents separately, you can
create additional domains to facilitate queries of those groups. Create domains
to reflect organizational divisions, such as accounting computers, production
computers, or marketing computers; and geographic divisions, such as Building
C computers or Denver computers. Because Symantec ESM has a scalable
architecture, you can locate these computers in one room or spread them across
the wide geographic distances. Managers can connect to all of the agent
computers in the enterprise.
Symantec ESM managers
A manager performs two major functions:
■
It controls and stores policy data, passing the data to agents or consoles as
needed.
■
It gathers and stores security data from agents, passing the data to
consoles.
The manager uses the CIF server to communicate with agents and consoles.
Several data files that are accessed by the CIF server are stored in a proprietary
format on the manager workstation or server.
23
24 Managing enterprise security
Symantec ESM agent/manager architecture
CIF server
The control information files (CIF) server is the primary component of the
manager and an important part of the Symantec ESM information exchange
process. The manager stores data about manager access, domains, agents,
policies, policy runs, templates, suppressions, and the messages that are output
by the security modules in CIF files.
The CIF server provides access to the CIF files. When the console or command
line interface (CLI) needs information from the CIF files, it communicates with
the CIF server. The CIF server accesses the CIF files and relays the information
back to the console or CLI.
The CIF server also relays requests to other components of the manager. For
example, when a client such as the console or CLI sends a request for a policy
run, it is the CIF server that starts the job starter (another manager component)
and tells it to start a policy run.
The console or CLI establishes communications with the CIF server by logging
on with the manager name, manager account name, password, and protocol.
The net server is another component of the manager. It provides CIF server,
local file, and agent server access to remote clients. The net server uses the
Symantec ESM client server protocol (CSP) to provide communication between
processes on different computers. See “Client server protocol” on page 26.
While the manager component is initially small and the CIFs remain small, raw
reports can consume at least 2 MB per agent.
Command line interface (CLI)
The Symantec ESM command line interface (CLI), which is integrated into each
manager, provides an alternate way to execute commands. The CLI supports
most of the commands that are available in the Symantec ESM Enterprise
console. The CLI lets you remove modules from policies and execute batch files
containing CLI commands. Symantec ESM supports the CLI on Windows and
UNIX platforms.
Symantec ESM console
The console is one of the primary components of Symantec ESM. The console
receives input and sends requests to the other Symantec ESM components. As
data returns, the console formats the information for display, creating
spreadsheet reports, pie charts, bar charts, and other visual objects.
The console can connect cross-platform to any manager on the network.
Consoles connect to other components by means of CSP connections. See “Client
server protocol” on page 26.
Managing enterprise security
Symantec ESM agent/manager architecture
Regions
The console lets you connect to multiple managers. Regions help you organize
managers and access them from a single area on the enterprise tree. Symantec
ESM provides the All Managers region. You can create other regions as needed.
Local summary database
The local summary database is a component of the console that contains
security data about managers and agents. When the console creates a user
account, it also creates a local summary database file for the account. You can
query the database for summary data and module message details from policy
runs. This query capability provides great flexibility in analyzing and reporting
network vulnerabilities.
The local summary database is a Microsoft Access relational database in .mdb
native file format. You can access this database with Microsoft Access, or use it
as an ODBC data source. If you have compatible third-party software, use the
local summary database to produce custom reports.
Use the discretionary Access Control List (ACL) in Windows to secure the local
summary database file. Only the user that is logged on to the console account
should have full control over the file.
Scheduler
Symantec ESM can automate some tasks that are related to security
management; for example, conformance checking. You can use it to start a
policy run immediately or you can access the Scheduler to schedule a new policy
run each hour, day, week, month, or year. When a run completes, the Scheduler
can notify designated company officers and other employees via email. The
email contains a summary of the security status.
Policy runs
you can view the status of policies that you run on agents including when they
started, what modules have run, and which modules remain in the queue. The
Symantec ESM console queries each agent to provide up-to-the-minute
information. The console lets you stop or delete policy runs, and show any
scheduled policy runs.
Reports
You can view and print reports with the console if you have an HTML browser
on the computer. The reports show the details of security problems and help you
bring the computer into compliance with the policy.
25
26 Managing enterprise security
Extending Symantec ESM capabilities
You can also use reports that are found in Symantec ESM utilities. Symantec
ESM utilities let you copy security information from managers to a database,
then print new types of reports from the database.See “Using the Symantec ESM
utilities” on page 239.
Suppression maintenance
Some Symantec ESM messages may report known policy exceptions that are
allowed by your organization’s security policy. You can temporarily or
permanently suppress these messages instead of adjusting the policy any
possibly excluding important areas of the computer from a check.
Suppressions do not correct security problems. They only prevent the problems
from appearing in future security reports.
Template editor
Some modules use templates. to define aspects of security checks such as file
attributes, files to be monitored, registry keys and values, and so forth.
The Template Editor offers a simple way to change template fields and
attributes in the templates and disable or enable snapshot checks.
Client server protocol
The Client Server Protocol (CSP) is an integral part of Symantec ESM
communications. The CSP packages and sends the necessary data from
component to component, using the various transports that Symantec ESM
supports.
To protect confidentiality, Symantec ESM encrypts the data it transfers over the
network between consoles, managers, and agents.
Extending Symantec ESM capabilities
Certain applications that are running on the computers and servers in your
network may not fall within the scope of Symantec ESM. You can extend
dynamic security assessment and reporting capabilities to these network
resources using the Integrated Command Engine (ICE) module and ICE template
and the Software Development Kit (SDK). Use these capabilities to protect
network resources from new forms of unauthorized access, data corruption, or
denial of service attacks.
The SDK provides a set of library routines, referred to collectively as the
Symantec ESM application programming interface (API), that third-party
developers can use to develop new modules for Symantec ESM.
Managing enterprise security
Extending Symantec ESM capabilities
The API routines are limited to those that are necessary to implement new
modules in today’s environment. Symantec may expand the library routines in
the future to facilitate enlarging the scope and capabilities of Symantec ESM to
address an even wider range of security issues.
Third-party installations provide the option of installing these modules via the
standard Symantec ESM program.
The Symantec ESM Module Software Developer’s Guide describes the Symantec
ESM SDK in detail.
27
28 Managing enterprise security
Extending Symantec ESM capabilities
Chapter
2
Touring the Symantec ESM
console
This chapter includes the following topics:
■
Starting the console
■
Accessing the console
■
Locating the console controls
■
Connecting to a manager
■
Gathering security information
■
Running security checks
■
Viewing reports
■
Bringing computers into conformance
Starting the console
The Symantec ESM console lets you connect with local and remote managers.
Use the console to perform tasks within managers such as configuring and
administering security policies, performing security checks, processing and
viewing security reports, and performing computer corrections.
The console is supported only on Windows operating systems, and runs only on
the computer where it is installed.
30 Touring the Symantec ESM console
Accessing the console
To start the console on Windows
◆
Do one of the following:
■
Double-click the ESM Enterprise Console icon on the desktop.
■
Click Start > Programs > Symantec > ESM > ESM Enterprise Console
from the Windows start menu.
Accessing the console
Consoles and managers use separate password-protected accounts.
You cannot access Symantec ESM security information until you connect the
console to a manager.
The console can connect with multiple managers simultaneously. Specify
connections to network managers to make the console function throughout the
enterprise. Limit the number of manager connections to set up an environment
for your specific area of responsibility.
The console creates a separate account and user environment for each user. If
you are a new console user, you can type an unused name and set up your own
password-protected Symantec ESM Enterprise console account.
The console prompts for a manager connection when it stores a new user
environment. To connect with a manager, you must type the name of the
manager computer, together with an account on the manager and the
communication protocol.
Each manager has a super-user account that Symantec ESM sets up during the
manager software installation. This account has complete privileges for the
product. Use the super-user account to set up additional user accounts on the
manager. These new accounts can have restricted privileges that limit access to
policies, domains, and templates. Disable or delete any unused accounts on the
manager. See “Administering manager user accounts” on page 65.
The console protects the credentials of each manager connection by encrypting
them with the console password. You can select an option in the console to
cache the credentials. This restores the manager connections automatically
when you log on.
Due to new features and changes in the communication protocol, the Symantec
ESM 6.0 console on Windows can only connect to Symantec ESM 6.0 managers.
Earlier versions of managers are incompatible with the Symantec ESM 6.0
console.
Touring the Symantec ESM console
Locating the console controls
To log on the console
1
Double-click the ESM Enterprise Console icon on the Windows desktop.
2
Type a user name.
Choose a password with at least six characters including at least one nonalphabetical character. Console account passwords can have up to 20
characters.
3
Type a password.
If you confirm the password, Symantec ESM creates a new user
environment and local summary database for the current user session.
If the input name does not match an existing account, the console prompts
you for a decision to create a new account. If you click yes, the console
prompts to confirm the password.
Note: After completing the current console session, secure the local
summary database object. Do this by editing the object’s discretionary
access control list (ACL).
If the name and password entries match an existing user environment, the
console uses the environment and local summary database for the current
user session.
If the local summary database does not have any manager information, the
console prompts you to add a manager. If you decide not to add any
managers, the console cannot display any security information.
See “Connecting to a manager” on page 36.
Locating the console controls
You access controls in the console on the menu bar, the toolbar, and the
enterprise tree display. Additional controls are available when you right-click
the enterprise tree and grid displays.
The console retains your preferences for the chart display. These preferences
include showing a legend, 2D or 3D graphics, summary or object views, and pie
or bar chart displays.
31
32 Touring the Symantec ESM console
Locating the console controls
Figure 2-1
Console controls
Menu bar
Toolbar
Enterprise
tree
Chart
Grid
Status bar
Console controls include the following:
■
Menu bar
Pull-down menus provide options to connect the console to a new manager,
establish a new region for the managers, manage your local summary
database, change display options, and request reports, among other
functions.
■
Toolbar
The following table displays the available toolbar icons that are in
Symantec ESM.
Table 2-1
Icon
Toolbar icons
Title
Open a report
Drill-down mode
Summary mode
Touring the Symantec ESM console
Locating the console controls
Table 2-1
Icon
Toolbar icons
Title
Trend mode
View/edit summary filter settings
Policy run wizard
Synchronize enterprise
LiveUpdate
About Symantec ESM
These icons let you do the following:
■
■
Open and save report files
■
Switch the chart and grid displays to drill-down, summary, or trend
modes
The Drill-down and summary modes display data from recent policy
runs. The Trend mode shows the changes over time.
■
View or edit summary filter settings
■
Access the Policy Run wizard
■
Download summary data from the managers
■
Perform a LiveUpdate
■
Access help
Enterprise tree
The enterprise tree occupies the upper left pane of the main window. At the
top of the tree, the node that is entitled My ESM Enterprise consists of
regions that contain managers. Each manager has four types of objects:
domains, policies, policy runs, and templates. The names of the regions,
managers, domains, agents, policies, and modules will be specific to your
network.
Expand the summary branch to display the agents in each manager domain.
Agents with a colored icon can accept a LiveUpdate from a manager. Agents
with a gray icon cannot accept a LiveUpdate.
33
34 Touring the Symantec ESM console
Locating the console controls
Further expansion of the summary branch displays security level
information for policies, modules, and policy runs.
Expand the Policies branch to see the modules in each policy. Further
expansion shows the operating systems that are checked by the modules
and also provides access to message suppressions.
Figure 2-2
The enterprise tree
Summary branch
Policies branch
Policy Runs branch
Templates branch
Note: Red, yellow and green spots on the icons in the summary branch
indicate the security level of each object. Grey or black spots indicate no
data.
Double-click a policy name in the Policies branch to access the policy editor.
Use the policy editor to select the modules that comprise the policy. Doubleclick a module name and operating system within a policy to expand the
Policies branch and enable or disable module security checks, edit name
lists, or select other options that are related to module checks.
Click an object in the Policy Runs branch to view and take action regarding a
policy run.
Click an object in the Templates branch to edit the templates that are used
by specific security modules.
■
Chart
Information in the chart pertains to the level immediately below the object
that is selected in the summary branch of the enterprise tree. For example,
clicking the summary chart on the toolbar and then clicking an agent object
in the Summary branch causes the chart and grid to display security level
information about the most recent policy runs on the agent.
Touring the Symantec ESM console
Locating the console controls
If your environment supports connections to all of the network managers,
the chart and grid can display enterprise-wide level and average rating
information when you select the Symantec ESM enterprise object.
Note: The chart cannot display information about objects that are selected
in the Policies branch, Policy Runs branch, or Templates branch.
Toolbar settings determine whether the chart and grid display trend or
summary data.
When you select summary or drill-down mode on the toolbar, the chart
displays results from the most recent policy runs.
■
If you select the summary chart for an object in the Summary branch
from My ESM Enterprise to a module, the chart displays a count of the
red, yellow, and green objects for the level that is immediately below
the selected object.
When you select the drill-down chart for an object in the summary
branch, the chart displays level and rating information for the objects
in the level immediately below the selected object.
You can click on the chart to expand the summary branch to the next
level and show the chart for that level.
If you select trend mode, the chart displays the cumulative results of policy
runs over a period of time.
Summary filter settings can limit the information that is displayed in the
chart and grid.
■
■
Grid
Information in the grid applies to the level immediately below the object
that is selected in the summary branch of the enterprise tree.
On the summary branch, the grid displays average agent level and rating
information for each node from My ESM Enterprise to domains. When you
select a domain, the grid displays level and rating information for each
agent. If you select an agent, the grid displays level and rating information
for each policy. When you select a policy, the grid displays level and rating
information for each module.
On the policies branch, the grid displays the status of the modules and
security checks in a policy. Double-click a policy name, or right-click a
policy name and then click properties, to access an editor where you can
enable or disable a module check or change the contents of a name list.
On the policy runs branch, the grid displays policy run status. A context
menu provides options to stop, delete, or view the properties of policy runs.
On the templates branch, the grid provides access to an editor that can
change the contents of template files.
35
36 Touring the Symantec ESM console
Connecting to a manager
■
Status bar
The Status bar displays messages pertaining to Symantec ESM operations
and describes the available options in the context and pull-down menus.
If the console connects to a manager that has a large number of registered
agents, it may take some time to update the local summary database. While
the console is doing this, it displays an estimate of the time remaining and
the completion percentage for the operation on the Status bar.
If you enable the summary data filters, three boxes on the right side of the
Status bar show which filters are active.
Connecting to a manager
You cannot access Symantec ESM security information until you connect the
console to a manager.
Due to new features and changes in the communication protocol, the Symantec
ESM 6.0 console on Windows can only connect to Symantec ESM 6.0 managers.
Each manager has a super-user account that Symantec ESM sets up during the
manager software installation. This account has all of the privileges for the
application. Use the super-user account to set up additional user accounts on
the manager. These new accounts facilitate the separation of duties between
security officers and system administrators. Each account gives users only the
necessary access rights that they need to perform specific tasks. This
arrangement helps reduce the use of fully privileged accounts and follows the
security practice of least privilege. See “Understanding account types and
separation of duties” on page 58.
The default user types are Read only, ESM administrator, System administrator,
Security officer, and Register only. These user types provide only those access
rights that are necessary to perform specific duties.
The console prompts for at least one manager connection when it creates a new
user environment. You can add all of the other manager connections at this time
or you can select new manager from the file menu to add them later. Specify
connections to all of the network managers to make the console display
information for the entire enterprise. Limit the number of manager connections
to set up an environment that is fitted to your area of responsibility.
The console can optionally cache the credentials of each manager connection to
eliminate the logon prompt each time that you connect with a manager.
Touring the Symantec ESM console
Using the Account wizard
To connect with a manager
1
Do one of the following to display the New Manager window:
■
On the File menu, click New manager.
■
Right-click My ESM Enterprise on the enterprise tree, and then click
New manager.
■
Right-click All managers on the enterprise tree, and then click Add
manager.
2
Type the name of the manager computer in the Manager text box.
3
In the Manager account information pane, type the user name and
password of a manager account with the necessary privileges.
4
Check the Save this name and password check box to automatically
reconnect the console and manager without having to reenter the user name
and password.
5
In the Protocol pane, select the appropriate protocol and port number. The
default values are TCP/IP and port 5600.
Using the Account wizard
Use the Account wizard to easily set up various user accounts on the manager in
Symantec ESM. These accounts are available so that you can implement proper
separation of duties for users within your organization. For information
regarding the privileges that are associated with each of these account types, see
“Separating security administration duties” on page 58.
Symantec ESM lets you administer manager accounts from the console. If you
have the required access rights, you can use the Account wizard from the
console to set up new manager accounts or to edit, modify, disable, or delete
these accounts.
Use the Account wizard to assign new passwords to users or to require password
changes at specified intervals. You can also control which users can manage or
have access to specific domains, policies, or templates.
The Account wizard acts as a guide to help you through the process of creating
and maintaining user accounts on managers.
To use the Account wizard
1
On the enterprise tree, right-click the manager with the account that you
want to create or edit.
2
Click Properties.
3
Click the Access records tab.
37
38 Touring the Symantec ESM console
Gathering security information
4
Click Add to create a new account.
5
Select an account name from the User accounts on the manager window.
6
Click Modify or Delete to edit the account. See “Adding new accounts” on
page 66.
Gathering security information
The console obtains information about the security of the computers and
servers in the enterprise from the managers on the network. The managers
gather this information from their registered agents during policy runs.
The console can connect to multiple managers. If the connections in your
environment involve all of the managers in the enterprise, the console can
gather level and average rating information for the entire enterprise. The
console gathers this information in three ways:
■
When the console initially connects with a manager during a session, it
retrieves domain, agent, and summary data from the manager.
■
When you use the console to start a policy run, the participating agents run
security checks on the agent computers and update the manager with the
results. The manager updates the console. In this instance, you can decide
whether you want the console to auto-navigate the enterprise tree and view
the report data.
■
When changes to managers and agents occur while you are logged on to the
console, do the following to ensure that the console displays current
information:
■
Right-click a node at the domains level and select Update to update
summary information.
■
Right-click a node at the regions level and select Retrieve Summaries
to retrieve summary information from all of the managers in a region.
Running security checks
Policies contain the checks that evaluate the security of network resources. The
console lists the default policies in the Policies branch of the enterprise tree. The
Phase 1, Phase 2, Phase 3:a Relaxed, Phase 3:b Cautious, and Phase 3:c Strict
policies each provide increasing levels of security.
You can edit the modules in these policies and enable or disable specific security
checks to conform to your company’s security policy.
Touring the Symantec ESM console
Running security checks
Periodically, Symantec provides security updates, best practice policies, and
agent software improvements through LiveUpdate technology. Use LiveUpdate
monthly to ensure that you have the best possible security assessment tools.
Evaluating your network security
The Phase 1 policy is the best place to begin evaluating your network security.
This policy identifies the most significant and potentially problematic security
problems with network resources. Problems in these areas are important and
easy to solve.
Move on to the Phase 2 policy only after you correct all of the red level problems
on all of the network resources that were reported by the Phase 1 policy. The
Phase 2 policy contains all of the available modules, but enables only the key
security checks in each module. These checks identify the remaining critical
security problems in the network.
After you correct all of the red level problems on all of the network resources
that were reported by the Phase 2 policy, move on to the Phase 3 policy. This
policy provides three distinct levels of security, either relaxed, cautious, or
strict-level network security as required by the company’s security policy.
Perform an immediate run of security checks on a single agent computer, or on
all the agent computers in a manager domain, by clicking the Policy Run wizard
icon on the toolbar or by dragging the policy that contains the checks from the
policies branch and dropping it on the agent computer or manager domain in
the summary branch. To run a specific security check, drag and drop a single
module instead of running the whole policy.
Scheduling routine security checks
Use the Schedule window to schedule and routinely run key security checks. To
access the Schedule window, click the Policy Run wizard icon on the toolbar, or
right-click and drag the policy that contains the checks from the policies branch
and drop it on the agent computer or manager domain in the summary branch.
Then type the required information.
This feature automatically initiates policy runs on agents at predetermined
intervals and provides a security-status report. Symantec ESM can notify
security officers and system administrators by sending an email message when
a policy run completes. The message includes the security level and average
rating from the run.
39
40 Touring the Symantec ESM console
Running security checks
Using the Policy Run wizard
The Policy Run wizard acts as a guide to help you through the process of
creating a policy run.
To use the Policy Run wizard
1
On the toolbar click the Policy Run wizard icon.
2
Select the manager that you want to use in the policy run.
3
Select the policy that you want to run on the agent computers.
4
Select the modules that you want to include in the policy run.
5
Select the domain where you want to run the policy.
6
Select the agent computers that you want to run the policy.
7
Select the message count for the policy run.
8
Review your selections for the policy run.
9
Do one of the following:
■
Run the policy immediately
■
Schedule the policy run for a later time.
If you decide to run the policy later, the Schedule dialog box prompts
for a start time. Use this dialog to set up a recurrence pattern and run
the policy hourly, daily, weekly, monthly, or yearly. Also, set up email
notification of policy run, agent summary, or module summary results.
Determining a security level and rating
During a policy run, Symantec ESM compares the current state of the agent
computer to the security checks that are enabled in the policy. It reports
exceptions and other information as Symantec ESM messages including:
■
Noncompliant, policy-based conditions
■
Differences between the snapshot file taken earlier and the state of the
computer at the time of the run
■
Differences between the module template and the state of the computer at
the time of the run
■
Information for review by system administrators
Symantec ESM assigns each message a security level and rating to classify the
severity of the problem. For example, messages with a green security level have
a rating of 0. This means that the message is informative, but does not require
corrective action. A message with a yellow security level has a rating of 1. This
Touring the Symantec ESM console
Running security checks
identifies a problem that needs attention. A message with a red security level
has a rating of 10 and flags the problem for prompt attention. This table defines
the numeric weight that is assigned to each security level.
Table 2-2
Security level and rating
Level
Rating
Description
Green
0
Green messages do not contribute to the rating.
Yellow
1
Yellow messages indicate moderate security
vulnerabilities. Each yellow message contributes 1 point to
an object’s overall rating.
Red
10
Red messages indicate a severe security vulnerabilities.
Each red message contributes 10 points to an object’s
overall rating.
Symantec ESM assigns a security level and calculates a rating for each module
in the policy run.
■
Symantec ESM compares the security levels of the messages that are
reported by a module and assigns the most severe security level to the
module. For example, in a situation where the Password Strength module
reports 50 green messages and 20 yellow messages, but no red messages,
Symantec ESM assigns a yellow security level to the module.
■
Symantec ESM sums the ratings of the messages that are reported by a
module to calculate a rating for the module. In the above example, the 50
green messages that are reported by the Password Strength module have a
rating of zero and the 20 yellow messages have a rating of 20. Symantec
ESM calculates a rating of 20 for the Password Strength module.
Symantec ESM compares the security levels of all the modules in the policy run
and assigns the most severe security level to the policy. Symantec ESM sums the
ratings of all the modules and assigns this total to the policy. Symantec ESM
repeats this process, rolling level and rating information up from policy to agent
and agent to domain.
At the domains level, Symantec ESM compares the security levels of all the
agents and assigns the most severe security level to the agent level for domains.
Symantec ESM also calculates an average agent rating for domains. Symantec
ESM repeats this process, rolling average agent level and rating information up
the remainder of the enterprise tree.
41
42 Touring the Symantec ESM console
Filtering report contents
Filtering report contents
The information that Symantec ESM returns can be more useful when you select
options in the Filter dialog boxes to selectively exclude information from
summary displays of the enterprise tree, chart, grid, and the Symantec ESM
reports. Filter options include:
■
Policy
■
Use the most recently run policy
■
Select the latest Phase 1, Phase 2, Phase 3:a Relaxed, Phase 3:b
Cautious, or Phase 3:c Strict policy.
■
Modules
You can include all of the modules in the policy run or select specific
modules.
■
Operating Systems
You can select the operating systems of all the agents that are registered to
the manager or you can exclude specific operating systems.
■
Messages
You can show long message text, suppressed messages, or policy run
message differences.
If you choose to show differences, pick new messages only in the newer
policy run, old messages only in the older policy run, or unchanged
messages in both runs. In addition, you can choose to compare the current
policy run with the previous numbered run or a run from a specified
number of days in the past.
Viewing reports
You can view and print the following reports from the console with an HTML
browser.
■
Security
This report contains information about the object that is currently selected
in the summary branch. The report lists the results of the most recent
policy runs in spreadsheet format. The report identifies which policy run
provides the information for each module. For example, if the most recent
run involves a single module, the report lists the most recent run number
for that module and the most recent prior run numbers for each of the other
modules.
Touring the Symantec ESM console
Bringing computers into conformance
■
Policy
This report contains information about the modules in a policy and the
activated checks in the modules.
■
Policy Run
This report lists the policy runs for each of the connected managers.
Information in the report includes current status, start time, finish time (if
the policy run has completed), policy name, and domain name.
■
Template
This report lists the objects in the template.
■
Domain
This report lists the properties for each agent in the selected domain. These
properties include the agent’s operating system, version number, network
protocol, network port number, and computer type.
■
Executive
The Executive Report is a one-page summary that displays the enterprise’s
conformity to each security module.
To create a report
1
Select an object in the related branch of the enterprise tree.
2
From Reports on the menu bar, choose the type of report.
For example, to produce an agent security report, select the agent in the
summary branch, then click Security in the Report pull-down menu. The
Report Options dialog box lets you configure the report.
When you select Report Options in the Report pull-down menu, you must
designate a location for the resulting report files. Because these files contain
sensitive data, specify a secure location for them on a network drive.
Each report folder has a date/time stamp with the name of the node that was
used to create the report.
Before you email a report, zip the entire report directory. Notify recipients that
they must load the frames.html file to view the report.
See “Generating and viewing reports” on page 141 for a complete discussion of
report creation.
Bringing computers into conformance
The final step in the process of bringing network resources into compliance with
the company’s security policy involves correcting the vulnerabilities that are
identified by the policy runs.
43
44 Touring the Symantec ESM console
Bringing computers into conformance
The console reports the corresponding messages in the grid. Each message has
an assigned security level. Start by selecting messages with a red security level.
When all of these vulnerabilities have been solved, move on to the next
computer that reports red level security messages, continuing this process until
all the red level messages have been solved in the network. Then start on the
yellow level security messages. Continue this process until all the computers in
the enterprise reach the low, medium, or high-level security environment that is
required by the company’s security policy.
To view messages in the grid, select policy runs in the summary branch.
The console provides functions to help you solve these problems. Some of the
functions modify the security checks in the modules so that they can no longer
detect a problem. However, the scope of these adjustments sometimes excludes
areas of a computer that should be checked. In these instances, apply a different
function to fine-tune the adjustment.
Access these functions from a context menu in the grid. The functions include:
■
Correct
Use this option to correct ownerships, permissions, and user privileges of
certain files on an agent computer. Because the change modifies the
computer where the agent resides, the console prompts for an account with
sufficient privileges. If the module on the agent computer can make the
change, the module also synchronizes the file snapshot and confirms the
change to the console.
■
Remote Install
The Discovery module searches the TCP/IP ports in the network for
computers that do not have installed and running Symantec ESM and
Symantec Intruder Alert components. If the computer appears to have
found a Windows or UNIX operating system, and Symantec ESM or
Symantec Intruder Alert are not installed and running, the module reports
the computer as a possible candidate.
If the selected grid message shows the computer is installable, use this
option to access a simple interface and do a remote agent installation.
Touring the Symantec ESM console
Bringing computers into conformance
■
Suppress
As Symantec ESM performs its security checks, it may regularly report
policy violations that you consider to be allowable policy exceptions. Rather
than adjusting the policy, which may exclude important areas of the
computer from a check, either temporarily or permanently suppress the
messages. Do this on a case-by-case basis. Suppressions do not correct
security problems; they only prevent the messages from appearing in future
Security reports.
View, edit, and delete message suppressions by expanding the policies
branch of the enterprise tree.
■
Update snapshot
Symantec ESM uses snapshot files to identify computer changes. Snapshots
differ from templates in that a template is a list of files or objects to be
checked, while a snapshot is a picture of files or objects that have been
checked. Snapshot files provide computer-specific information about the
properties of files. Symantec ESM initializes a snapshot file during the first
run of a security module. Later policy runs compare the current state of the
computer to the state that is recorded in the snapshot and report any
changes.
When a grid message prompts you to perform a snapshot update, use this
option to update the related record in the snapshot file.
■
Update template
Template files contain module control directives or definitions of objects
(such as files) and their expected states. Some modules use template files to
determine non-compliance with policy. These modules include: File
Attributes, File Watch, Integrated Command Engine, OS Patches, and
Registry.
When a grid message prompts you to perform a template update, use this
option to adjust the settings in the template file so that they match the
attributes currently in the agent computer.
■
Uncorrect
Use this option to reverse a correction made on an agent computer. This
action restores the agent settings to the values prior to the correction.
45
46 Touring the Symantec ESM console
Bringing computers into conformance
Chapter
3
Administering Symantec
ESM
This chapter includes the following topics:
■
Licensing managers
■
Organizing managers and regions
■
Organizing agents and domains
■
Separating security administration duties
■
Administering manager user accounts
■
Setting the manager password configuration
■
Changing Symantec ESM Enterprise console passwords
■
Understanding the summary databases
■
Auditing Symantec ESM events
■
Using LiveUpdate
Licensing managers
To obtain a permanent license for the manager, contact the licensing
administrator at Symantec. Provide the manager name and the number of
agents that you plan to register.
Table 3-1
Licensing contact information
Contact method
Contact information
Telephone
(888) 584-3925
Fax
(781) 487-9818
48 Administering Symantec ESM
Licensing managers
Table 3-1
Licensing contact information
Contact method
Contact information
Email
[email protected]
Web page
www.symantec.com
Finding the manager name
To display the manager name from the console
1
On the enterprise tree, right-click the manager.
2
Click Properties.
3
Click the License tab.
To display the manager name without using the console
◆
Do one of the following:
■
For Windows 2000 operating systems, click Start > Settings > Control
Panel > System from the Start menu, and then click the Network
Identification tab. The procedure for other Windows operating
systems may vary. Consult the Windows help for detailed instructions.
■
For UNIX operating systems, use the Hostname command.
Number of agents
Each manager must be licensed to register a specific number of agents.
Each supported network resource should have an installed and running agent.
See “Planning and Implementing Enterprise Security” in the Symantec ESM
Installation Guide for information about organizing agents into manager
domains.
Installing a permanent license
The licensing administrator issues a permanent license to each manager. Agents
and consoles do not require licenses. Managers can register agents up to the
number that is specified at the time of licensing. Later, if you want to register
additional agents to the manager, you must obtain a new permanent license that
includes the increased number of agents. Contact the Symantec account
manager for details.
Administering Symantec ESM
Licensing managers
When you are ready to install a permanent license, you must connect the
console to the manager using an account that has the Modify ESM Options
access right enabled.
To install a permanent license
1
On the enterprise tree, right-click the manager.
2
Click Properties.
3
Click the License tab.
4
Click the New license button.
5
Type the permanent license key. This 19-character key consists of four
groups of four characters, separated by hyphens. For example:
ABCD-FGHI-KLMN-PQRS
6
Type the number of agents that are licensed for the manager.
Note: The 19-character license key and the maximum number of agents are
listed on the permanent license certificate.
Moving an installed manager
The permanent license that Symantec provides for each manager lets the
manager run on a specific host computer. If you change the host computer ID or
move the manager software to another host computer, you must take
appropriate steps to restore manager operations. Some actions are required
even when moving the manager to a host with the same computer ID.
To move the manager to a computer with a different name
1
Obtain a transfer license from the Symantec licensing administrator.
See Table 3-1, “Licensing contact information,” on page 47.
2
List the agent computers that are currently registered to the manager. One
good method is to make a print screen copy of the All Agents domain.
3
Copy the manager .dat files to a temporary folder.
■
On Windows operating systems, copy the files from the
symantec\esm\<computer>\<computer_name>\db folder.
On UNIX operating systems, copy the files from the
symantec/esm/<computer>/<computer_name>/db directory.
Then delete the license.dat file from the temporary folder.
■
4
Uninstall the manager software from the current host computer.
49
50 Administering Symantec ESM
Licensing managers
5
Install the manager software on the target computer using the transfer
license that is obtained from the Symantec licensing administrator.
6
Stop the manager and agent processes.
7
8
■
On computers with Windows operating systems, stop the Symantec
ESM services.
■
On computers with UNIX operating systems, stop the Symantec ESM
daemons.
Copy the .dat files from the temporary directory.
■
On computers with Windows operating systems, copy the files to the
symantec\esm\<computer>\<computer_name>\db folder.
■
On computers with UNIX operating systems, copy the files to the
symantec/esm/<computer>\<computer_name>\db directory.
Restart the manager and agent processes.
Register all of the previously registered agents to the manager.
Warning: Do not register an agent to an earlier version of a manager. This
causes database errors on the manager. Instead, upgrade all of the
managers on the network to the latest Symantec ESM version before
registering the agent.See “Upgrading agents” on page 96.
To move the manager to a computer with the same name
1
Back up the volume containing the Symantec directory.
2
Change the computer hardware.
3
Assign the original computer ID to the new computer.
4
Copy the backup containing the Symantec directory to the same volume on
the new computer.
5
Reinstall the manager software on the new computer using the original
license from the Symantec licensing administrator. This restores necessary
computer settings such as those in the registry on computers with Windows
operating systems.
6
Register all of the previously registered agents to the manager.
Administering Symantec ESM
Organizing managers and regions
To change a manager name
1
Before you change the manager name, obtain a transfer license from the
Symantec licensing administrator.
2
List the agent computers that are currently registered to the manager. Make
a print screen copy of the All Agents domain, or use the Export Agent List
option.See “Exporting an agent list” on page 97.
3
After the computer name changes and the computer reboots, reinstall the
manager software on the computer using the transfer license from the
Symantec licensing administrator. This restores necessary computer
settings such as those in the registry on computers with Windows operating
systems.
4
Register all of the previously registered agents to the manager.
Organizing managers and regions
The console organizes managers into regions. The console automatically lists all
connected managers in the All managers region.
Create new regions to help organize the managers on the network. Assign these
managers to regions based on organizational structures or geographical
locations. Add or delete regions as needed; however, you cannot delete the
default All managers region.
To add a new region
1
2
Do one of the following:
■
Right-click My ESM Enterprise on the enterprise tree, and then click
New region.
■
On the File menu, click New region.
Type the name of the new region.
Adding a manager to a region
Add managers to a region by copying or moving the managers.
Because regions are simply a convenient way to group managers on the console,
move a manager from one region to another as your needs change.
To add a manager to a region by copying
◆
Drag and drop the manager onto the region.
51
52 Administering Symantec ESM
Organizing managers and regions
To add a manager to a region by moving
1
On the enterprise tree, right-click the region.
2
Click Add manager.
3
Select the managers on the Available managers list that you want to add to
the region, and then click the left arrow to move the managers.
■
The Available managers list displays managers that are not part of the
region.
■
The Included managers list displays managers that are in the region or
just added to the region.
To add a manager that is not on the Available managers list, you must first
connect the console to the manager. See “Connecting to a manager” on page 36..
Deleting a manager from a region
Because regions are simply a convenient way to group managers on the console,
remove a manager if you no longer want to include it in the region’s summary
display.
Remove managers from a region by deleting or moving the managers.
To remove a manager from a region by deleting
1
On the enterprise tree, right-click the region.
2
Click Delete.
3
Click the From region option.
Note: Click the From local setup option only when you want to disconnect
the console from the manager.
To remove a manager from a region by moving
1
On the enterprise tree, right-click the region.
2
Click Add manager.
3
Select the managers on the Included managers list that you want to remove
from the region, and then click the right arrow to move the managers.
■
The Available managers list displays managers that are not part of the
region.
■
The Included managers list displays managers that are in the region or
just added to the region.
Administering Symantec ESM
Organizing agents and domains
Deleting a manager from the console
Delete a manager from the Symantec ESM Enterprise console if you no longer
want to include it in any displays.
To remove a manager from the console
1
On the enterprise tree, right-click the manager.
2
Click Delete.
3
Click the From Local Setup option.
Symantec ESM removes the manager and all locally cached summary data
that is associated with the manager from the console.
Note: Symantec ESM stores summary data in the manager sumfinal
database. If you reconnect the console to the manager, Symantec ESM
restores the summary data that is associated with the manager to the
console.
Deleting a region from the console
Delete a region from the Symantec ESM Enterprise console if you no longer
want to include it in any displays.
To remove a region from the console
1
On the enterprise tree, right-click the region.
2
Click Delete.
Organizing agents and domains
A domain consists of an agent or several agents that are grouped together for
the purpose of running policies.
53
54 Administering Symantec ESM
Organizing agents and domains
Managers create the following domains by default:
■
The All Agents domain includes all of the agents that are registered to the
manager. Symantec ESM automatically adds any new agents that you
register with the manager to the All Agents domain.
■
Operating system domains include agents with the same operating system
that register with the manager. For example, the UNIX domain includes
agents that run on computers with UNIX operating systems that register
with the manager. Symantec ESM supports agents on Windows 2000/NT/
XP/2003 Server, UNIX, NetWare, NetWare/NDS, and OpenVMS operating
systems.
Managers automatically create the correct operating system domain when
the first agent running on the operating system registers with the manager.
Symantec ESM adds other agents with the same operating system to the
domain as they register with the manager.
In addition to the default domains, you can create custom domains and add
agents as necessary to support the needs of the organization. Symantec ESM
lets you duplicate, rename, or delete these user-created domains.
Symantec ESM removes an agent from the All Agents domain, the related
operating system domain, and any other existing domains when you remove
(unregister) the agent from the manager.
Creating a new domain
In addition to the default domains, Symantec ESM lets you create new domains.
These domains can group agents by function; location; organizational structure
such as finance, development, sales, and so forth; or according to any other
classification that you specify. See the Symantec ESM Installation Guide for
information about grouping agents into domains.
To create a new domain, the account that is used to connect the console to the
manager must have the Create New Domains access right enabled.
Only the super-user account and accounts that have unrestricted domain access
can give access to user accounts that are restricted by domain on the manager.
Use the Access to Domains dialog box. See “Modifying a manager account” on
page 68.
To create a new domain
1
On the enterprise tree, right-click domains.
2
Click New domain.
3
Type the name of the new domain. Domain names can have up to 61
characters.
Administering Symantec ESM
Organizing agents and domains
Renaming a domain
You can rename any existing domain except the All Agents domain. When you
rename a domain, the account that you use to connect the console to the
manager must have the Create New Domains access right enabled.
To rename a domain
1
On the enterprise tree, right-click the domain.
2
Click Rename.
3
Type the name of the new domain. Domain names can have up to 61
characters.
Deleting a domain
You can delete any existing domain except the All Agents domain.
To delete a domain, the account that you use to connect the console to the
manager must have the Create New Domains access right enabled.
To delete a domain
1
On the enterprise tree, right-click the domain.
2
Click Delete.
Adding an agent to a domain
Symantec ESM lets you organize the agent computers in the enterprise into
domains on the manager. You may add an agent to more than one domain on
more than one manager. Adding agents to domains involves dragging and
dropping individual agents in the console, or when several agents are involved,
by using the Add Agent dialog box.
To add an agent to an established domain, the agent must belong to the All
Agents domain. The account that you use to connect the console to the manager
must have both the Modify and Create New Domains access rights enabled.
To add an agent to a domain by copying
◆
Drag and drop the agent onto the domain.
Note: Symantec ESM copies the agent to the domain. It does not remove the
agent from the original domain.
55
56 Administering Symantec ESM
Organizing agents and domains
To add an agent to a domain by moving
1
On the enterprise tree, right-click the domain.
2
Click Add agent.
3
Select the agents on the Available list that you want to add to the domain,
and then click the left arrow to move the agents.
■
The Available agents list displays agents that are not part of the
domain.
■
The Included agents list displays agents that are in the domain.
To add an agent that is not on the Available agents list, you must first register
the agent with the manager. For information about registering an agent to a
manager, see the Symantec ESM Installation Guide.
Deleting an agent from a domain
You can eliminate agents from an existing domain by deleting or removing the
agents.
When removing an agent from a domain, the account that is used to connect the
console to the manager must have the Modify access rights enabled.
To remove an agent from a domain by deleting
1
On the enterprise tree, in the domain right-click the agent to be deleted.
2
Click Delete.
3
Click From domain.
Note: Do not click the From manager (Unregister) option unless you want to
stop using the manager to run policies on the agent.
Administering Symantec ESM
Organizing agents and domains
To eliminate an agent from a domain by removing
1
On the enterprise tree, right-click the domain.
2
Click Add agent.
3
Select agents on the Included agents list that you want to remove from the
domain, and then click the right arrow to move the agents.
■
The Available agents list displays agents that are not part of the
existing domain.
■
The Included agents list displays agents that are in the domain or have
just been added to the domain.
Note: Deleting the agent from the manager removes the connection
between the agent and manager. It does not remove the agent software
from the agent computer.
Upgrading a remote agent
See the Symantec ESM Installation Guide for information about upgrading a
remote agent.
Viewing agent properties
Symantec ESM lets you view information about each agent that is registered to a
manager. The Agent Properties dialog box shows the agent name, operating
system, the Symantec ESM version running on the computer, and the network
protocol. If the agent is using a proxy agent to run security checks, Symantec
ESM displays the proxy agent’s name.
To view agent information
1
On the enterprise tree, right-click the agent.
2
Click Properties.
Deleting an agent from the manager
Delete an agent from the manager to prevent the manager from reporting any
summary data about the agent. Deleting the agent only removes the connection
between the agent and manager. It does not remove the agent software from the
agent computer.
To restore a deleted agent, you must reregister the agent with the manager. See
the Symantec ESM Installation Guide for information about registering an agent
to a manager.
57
58 Administering Symantec ESM
Separating security administration duties
To delete an agent from the manager
1
On the enterprise tree, right-click the agent.
2
Click Delete from the context menu.
3
Click From manager (unregister).
Separating security administration duties
Separating the duties of system administrators and security officers contributes
to effective computer security.
When a single individual, usually a system administrator, has both network and
security administration tasks, two common problems result:
■
One person may not have time to do both jobs.
■
This arrangement places a great deal of trust in one person.
Assigning network administration and security administration tasks to
different individuals creates a system of checks and balances. For example, if
system administrators can change computer configurations, they should not set
security policy. Security officers should not change computer configurations,
but they should set security policy and monitor computers for compliance.
System administrators and the security officers perform complementary task.
Table 3-2
Separating administrative and security tasks
System Administrator
Security Officer
Performs day-to-day network operations Determines security policy for dayto-day operation
Installs and maintains computer systems Monitors compliance to security
policy
Configures computers to conform to
company security policy
Makes recommendations
Understanding account types and separation of duties
Symantec ESM supports the separation of security tasks by providing different
types of manager accounts for Symantec ESM users. Specify the user type with
the Account wizard when you add a new account to the manager. User accounts
exist only on the manager, not on the agent computers that are registered to the
manager.
Administering Symantec ESM
Separating security administration duties
Managers support five types of accounts: Read only, ESM administrator, System
administrator, Security officer, and Register only. Use these account types to
separate security and administration duties. Each account gives users only the
access rights that they need to perform their assigned duties. See Table 3-3,
“Accounts and access rights,” on page 59.
After an agent registers to a manager, any user that is logged on to the manager
with the appropriate access rights can run policies on the agents. This
arrangement helps reduce the number of fully privileged accounts on a manager
and follows the security philosophy of least rights.
Further separate the duties of security officers by limiting the access rights of
manager accounts to specific domains, policies, or domain and policy
combinations. See “Assigning access rights to manager accounts” on page 71.
Table 3-3
Account Types
READ ONLY
Accounts and access rights
Access Rights
Read Rights. These accounts have rights
No other rights. Read only accounts to view assigned domains, policies, and/
or templates. They also have rights to
are useful for creating specialized
modify their own passwords.
accounts, starting with minimal
rights.
59
60 Administering Symantec ESM
Separating security administration duties
Table 3-3
Accounts and access rights
Account Types
Access Rights
ESM ADMINISTRATOR
All User Rights. These rights give a user
full access to Symantec ESM functions
for all domains, policies, reports, and
templates.
These accounts have the same
permissions as the super-user
account. These accounts can be
deleted. The super-user account
cannot be deleted.
All accounts that have these rights can
limit user functions to assigned domains,
policies, and templates. These rights
include:
■
View domains, policies, templates,
and reports.
■
Modify domains, policies, and
templates.
■
Run policies and domains.
■
Create new domains, policies, and
templates.
■
Update domain snapshots.
■
Manage User Rights and password
configuration requirements.
■
Modify Own Password.
■
Modify ESM Options including
audit log configuration and
manager sumfinal database
options.
■
Perform Remote Installs/Upgrades
of agents.
■
Register agents with manager.
SYSTEM ADMINISTRATOR
Specific Rights. These rights include:
These accounts provide computer
owners with the security tools that
they need to maintain the
computers.
■
View domains, policies, templates,
and reports.
■
Modify domains and templates.
■
Run policies and domains.
■
Create new domains and templates.
■
Update domain snapshots.
■
Modify Own Password.
Administering Symantec ESM
Separating security administration duties
Table 3-3
Accounts and access rights
Account Types
Access Rights
SECURITY OFFICER
Specific Rights. These rights include:
These accounts let security officers
set security policy and monitor day
to day operations.
■
View domains, policies, templates,
and reports.
■
Modify domains, policies, and
templates.
■
Run policies and domains.
■
Create new domains, policies, and
templates.
■
Modify Own Password.
REGISTER ONLY
These accounts let users distribute
Symantec ESM across the
Enterprise.
Register Rights. No other rights. Users
cannot log on to managers with these
accounts. Users can register agents with
the Symantec ESM setup program. Users
can also register agents by running the
Symantec ESM register program from
the command prompt. The register
command requires an account with
rights to register agents even though no
logon is actually performed.
Tables 3-4 through 3-7 show the default access rights that Symantec ESM sets
for each account. These access rights pertain to the manager and the nodes
beneath it on the enterprise tree.
Note: Users can add or remove any regions and managers in their own console
user environments.
61
62 Administering Symantec ESM
Separating security administration duties
Table 3-4
Domain access rights
CREATE NEW DOMAINS
APPLY TO ALL DOMAINS
SNAPSHOT UPDATES
RUN POLICIES
MODIFY
VIEW
Domain Access Rights
Symantec ESM Accounts
READ ONLY
Yes
ESM ADMINISTRATOR
Yes
Yes
Yes
Yes
Yes
Yes
SYSTEM ADMINISTRATOR
Yes
Yes
Yes
Yes
Yes
Yes
SECURITY OFFICER
Yes
Yes
Yes
Yes
Yes
REGISTER ONLY
Yes
Yes
Administering Symantec ESM
Separating security administration duties
Table 3-5
Policy access rights
CREATE NEW POLICIES
ASSIGN TO ALL CURRENT AND FUTURE POLICIES
RUN
MODIFY
VIEW
Policy Access Rights
Symantec ESM Accounts
READ ONLY
Yes
ESM ADMINISTRATOR
Yes
SYSTEM ADMINISTRATOR
Yes
SECURITY OFFICER
Yes
REGISTER ONLY
Yes
Yes
Yes
Yes
Yes
Yes
Yes
Yes
Yes
Yes
Yes
Yes
Yes
Yes
63
64 Administering Symantec ESM
Separating security administration duties
Table 3-6
Template access rights
CREATE NEW TEMPLATES
APPLY TO ALL TEMPLATES
MODIFY
VIEW
Template Access Rights
Symantec ESM Accounts
READ ONLY
Yes
ESM ADMINISTRATOR
Yes
Yes
Yes
Yes
SYSTEM ADMINISTRATOR
Yes
Yes
Yes
Yes
SECURITY OFFICER
Yes
Yes
Yes
Yes
Yes
Yes
Yes
REGISTER ONLY
Yes
Administering Symantec ESM
Administering manager user accounts
Table 3-7
Advanced Manager Rights
MODIFY ESM OPTIONS
PERFORM REMOTE INSTALLS/UPGRADES
REGISTER AGENTS WITH MANAGER
MODIFY OWN PASSWORD
MANAGE USER RIGHTS
Advanced manager Rights
Yes
Yes
Yes
Symantec ESM Accounts
READ ONLY
ESM ADMINISTRATOR
Yes
Yes
Yes
SYSTEM ADMINISTRATOR
Yes
SECURITY OFFICER
Yes
REGISTER ONLY
Yes
Although the Register only account contains all access rights, you cannot use
this account to connect to a manager from the console. Users can register agents
only with the setup program or the register program. See the on-line Help for
more information.
Administering manager user accounts
Symantec ESM gives you the ability to administer manager user accounts from
the Symantec ESM Enterprise console. Use this feature to control user access
and permissions to manage specific domains, policies, or policy runs.
Administrative functions include:
■
Adding new accounts
■
Deleting accounts
65
66 Administering Symantec ESM
Administering manager user accounts
■
Disabling accounts
■
Changing the password on accounts
■
Modifying account access rights
Adding new accounts
The Account wizard can help you create five default types of accounts: Read
only, ESM administrator, System administrator, Security officer, and Register
only.
When you create an account and select a user type, the Account wizard
automatically assigns the appropriate access rights to the account. It also lets
you choose the domains and policies that the new account can access. This
feature helps you create accounts for those who manage single domains or
policies. See “Understanding account types and separation of duties” on
page 58.
You can also modify existing accounts by assigning access rights that support
specific job responsibilities. See “Assigning access rights to manager accounts”
on page 71.
When you create a new domain, policy, or template, Symantec ESM gives the
following accounts access:
■
The super-user account that Symantec ESM created during manager
installation
■
The account that was used to create the domain, policy, or template
■
Accounts on the manager that apply to all domains, policies, or templates
Other accounts can be modified to grant access to the new domain, policy, or
template.
To add a new account to a manager
1
On the enterprise tree, right-click the manager.
2
Click Properties.
3
Click the Access records tab.
Administering Symantec ESM
Administering manager user accounts
4
Click Add.
5
The Account wizard takes you through several dialogs to configure the new
account. In these dialogs, you can specify the user name and password,
together with the type of account.
■
Manager account user names can have up to 32 characters.
■
Manager account passwords can have up to eight characters.
Passwords should have at least six characters including at least one
non-alphabetical character.
Note: Do not use any of the following special characters in a manager
password:
pipe
|
ampersand
&
semi-colon
;
left-parenthesis
(
right-parenthesis
)
less-than
<
greater-than
>
space
tab
The system shells interpret these special characters as commands.
You can also select the domains, policies, and templates that you want the
account to manage. You can give account access to every domain and policy
on the manager, or to any combination of domains and policies. This is the
preferred method of creating an account to manage a single domain or
policy.
Deleting a manager account
If the manager account that you are using has Manage User Rights enabled, you
can delete any user account except the super-user account that Symantec ESM
created during manager installation and the account that you are currently
using.
67
68 Administering Symantec ESM
Administering manager user accounts
To delete an account from a manager
1
On the enterprise tree, right-click the manager.
2
Click Properties.
3
Click the Access Records tab.
4
Select the account that you want to delete.
5
Click Delete.
Modifying a manager account
If the manager account that you are using has Manage User Rights enabled, you
can modify an existing manager account to accommodate changing
circumstances. These modifications include:
■
Disabling or activating an account
■
Changing an account’s password or password settings
■
Viewing or modifying an account’s access rights to domains, policies, or
templates
Disabling a manager account
Disable inactive accounts so that they cannot be used to obtain unauthorized
access to the manager.
To disable a manager account
1
On the enterprise tree, right-click the manager.
2
Click Properties.
3
Click the Access Records tab.
4
Select the account that you want to disable.
5
Click Modify.
6
Click Disabled.
You have disabled the account. Attempts to connect the console to the
manager using this account cause Symantec ESM to display a disabled
account error message.
Changing the password on a manager account
Changing the passwords periodically on accounts increases computer security.
System Administrators may assign new passwords at intervals, or they may
Administering Symantec ESM
Administering manager user accounts
require passwords to change at intervals and give users the right to change their
own passwords.
System Administrators can set a password expiration date or select the
Password Never Expires option.
To change a password on a manager account
1
On the enterprise tree, right-click the manager.
2
Click Properties.
3
Click the Access Records tab.
4
Select the account that you want to change.
5
Click Modify.
6
Click Change password.
7
Type the current password in the Old password box.
Note: The super-user account has the necessary rights to change a user’s
password without first entering the old password.
69
70 Administering Symantec ESM
Administering manager user accounts
8
Type the new password in the Password box.
■
Manager account passwords can have up to eight characters.
■
Passwords should have at least six characters including at least one
non-alphabetical character.
Note: Do not use any of the following special characters in a manager
password:
pipe
|
ampersand
&
semi-colon
;
left-parenthesis
(
right-parenthesis
)
less-than
<
greater-than
>
space
tab
The system shells interpret these special characters as commands.
9
Type the new password again in the Confirm password dialog box.
To set a password expiration date
1
On the enterprise tree, right-click the manager.
2
Click Properties.
3
Click the Access records tab.
4
Select the account that you want to change.
5
Click Modify.
6
In the Password expiration box, type or select the date when you want the
password to expire, or use the calendar to quickly change settings.
To set the password to never expire
1
On the enterprise tree, right-click the manager.
2
Click Properties.
3
Click the Access Records tab.
Administering Symantec ESM
Administering manager user accounts
4
Select the account that you want to change.
5
Click Modify.
6
Check the Password never expires check box.
Assigning access rights to manager accounts
When you create or modify a manager user account, you give the account
specific access rights to domains, policies, and templates. Users can perform
only the functions that are allowed by these access rights.
The Account wizard automatically assigns access rights when you create a new
account on the manager. You can modify existing accounts by assigning access
rights specific to job responsibilities.
Assign manager accounts only the minimum rights that users need to perform
their assigned tasks. For example, by setting up an account with rights to
manage a single domain or policy, you can keep Symantec ESM from displaying
other domains or policies.
Before you can assign access rights to a manager account, you must log on to the
manager using an account that already has those rights. Symantec ESM does not
let you exceed the access rights of the account in use.
Access rights apply only to the manager and the nodes directly beneath it on the
enterprise tree.
Note: Due to the security that is provided by manager logon requirements,
console users can freely add or remove regions and managers in their own user
environments.
Symantec ESM applies the access rights for a manager account when a user
connects the console to the manager. If you change the accounts’ access rights,
active account users do not see the change until they terminate their current
manager sessions and reconnect to the manager.
Symantec ESM provides four different privilege categories: domains, policies,
templates, and advanced manager rights. Tables 3-8 through 3-11 describe the
access rights available in each category.
71
72 Administering Symantec ESM
Administering manager user accounts
Symantec ESM provides these access rights for domains.
Table 3-8
Privilege categories and assignable domain rights
Privilege category
Assignable rights
Domains
View. This right lets you see the domain and the policy
run summaries on the agents in the domain. Symantec
ESM displays the domain only if the account has View
access.
Modify. This right lets you remove an existing domain
from domains, or an agent from the domain. You can
also create a new domain, copy a current domain,
rename an existing domain, delete an existing domain,
or add an agent to an existing domain if the account has
both this right and the Create New Domains access right
enabled. However, you cannot change the default
system domains: All Agents, NT Agents, and so on.
Run policies. This right lets you run policies on agent
computers in the domain if you also have the Run access
right enabled in policies. The Policy Run wizard can lead
you through the process of starting or scheduling policy
runs.
Snapshot updates. This right lets you update
snapshots, templates, and name lists.
Apply to all domains. This right lets you apply changes
to all current and future domains.
Create new domains. This right lets you create new
domains.
Note: Anyone with View access rights to domains can correct Policy report items
from the console if, during the correction process, they log on to the agent
computer using an account with administrative, supervisory, or root privileges.
Administering Symantec ESM
Administering manager user accounts
Symantec ESM provides these access rights for policies.
Table 3-9
Privilege categories and assignable policy rights
Privilege category
Assignable rights
Policies
View. This right lets you see the policy. Symantec
ESM displays the policy only if the account has
View access.
Modify. This right lets you add or remove modules
in policies, enable or disable security checks in
modules, edit name lists and templates that are
associated with checks, and delete policies if the
account has both this right and the Create New
Policies access right enabled.
Run. This right lets you run policies on agent
computers in the domain if you also have the Run
Policies access right enabled in domains. The Policy
Run wizard can lead you through the process of
starting or scheduling policy runs.
Assign to all current and future policies. This
right lets you apply changes to all current and
future policies.
Create new policies. This right lets you create new
policies.
Symantec ESM provides these access rights for templates.
Table 3-10
Privilege categories and assignable template rights
Privilege category
Assignable rights
Template
View. This right lets you see the template.
Symantec ESM displays the template only if the
account has View access.
Modify. This right lets you add, change, or remove
templates, directories, files, registry keys, or their
related sublists if the account also has the Create
New Templates access right enabled.
Assign to all templates. This right lets you apply
changes to all current and future templates.
Create new templates. This right lets you create
new templates.
73
74 Administering Symantec ESM
Administering manager user accounts
Symantec ESM provides these access rights for administering Symantec ESM.
Table 3-11
Privilege categories and advanced manager rights
Privilege category
Assignable rights
Advanced manager
Rights
Manage User Rights. This right lets you change the
access rights of any account on the manager except
the default super-user account. You can also change
password configuration requirements.
Modify Own Password. This right lets you change
account passwords. New passwords must comply
with password configuration requirements.
Modify ESM Options. This right lets you change
audit log configuration and manager sumfinal
database options. You can also install permanent
manager licenses.
Perform Remote Installs/Upgrades. This right lets
you remotely install agent software on another
computer, or upgrade agent software on remote
computers.
Register agents with manager. This right lets you
use the setup program or the register program to
register an agent to the manager. User accounts
with this right should have no other access rights.
To modify manager user account access rights
1
On the enterprise tree, right-click the manager.
2
Click Properties.
3
Click the Access Records tab.
4
Select the account that you want to change.
5
Click Modify.
6
In the Access rights list, select a privilege category, and then click View/
Modify.
For example, if you select domains, Symantec ESM displays the Access to
Domains dialog box.
7
Check the Create new domains check box to give the manager account the
right to create new domains.
Administering Symantec ESM
Setting the manager password configuration
8
Check the Apply to all domains check box if you want any domain rights
that are assigned to the manager account to be applied to all domains,
including those that are created in the future by other accounts.
9
Uncheck the Apply to all domains check box if you want to limit manager
account access rights to any domains.
■
Select the desired domain in the list.
■
For each selected domain, check the check boxes to assign access
rights. You must start with View. Then you can select from among the
other domain rights.
Setting the manager password configuration
Symantec ESM lets you set the configuration requirements for the passwords on
manager accounts. This feature helps secure Symantec ESM by ensuring that
the passwords that are used to access managers meet the proper security
requirements.
To modify the password configuration requirements on a manager, you must
connect to the manager using an account with rights to Manage User Rights and
Modify ESM Options.
Any changes to password settings apply only to subsequent user accounts.
Existing user accounts are not automatically updated.
To set the password configuration
1
On the enterprise tree, right-click the manager.
2
Click Properties.
3
Click the Password Configuration tab.
4
Select the desired settings:
■
Minimum length. This option requires the password to contain a userdetermined minimum number of characters.
The password should have at least six characters. Manager account
passwords can contain up to eight characters. The longer the password,
the harder it is for attackers to crack.
■
History length. This option determines the number of passwords
Symantec ESM stores before letting you reuse old ones.
■
Require non-alphabetical character. This option requires the
password to contain at least one non-alphabetical character. Adding a
non-alphabetical character to a password makes it more secure.
75
76 Administering Symantec ESM
Changing Symantec ESM Enterprise console passwords
■
Check against word lists. This option directs Symantec ESM to check
the password against its word lists to ensure that it cannot be easily
guessed.
■
Maximum password age. This option determines how long a user can
keep the same password. Passwords that do not change frequently are
more likely to be discovered or guessed.
■
Number of invalid login attempts before lockout. This option
determines how many times a user can attempt to log on and fail before
Symantec ESM locks the account. Repeated log on failures may indicate
an attempted break-in.
■
Reset lockout counter-reset counter after. This option specifies the
time span within which the required number of invalid logon attempts
must occur. For example, if the number of invalid log on attempts is set
to 3 and the reset counter is set to 30 minutes, then three invalid log on
attempts within 30 minutes will lock out the account. However, three
invalid attempts in a two-hour period will not lock out the account.
■
Reset lockout counter-duration. This value lets you decide how long
Symantec ESM waits before unlocking a locked account. Symantec ESM
starts the lockout duration from the time of the last failed logon.
Changing Symantec ESM Enterprise console
passwords
You must type a password when you first create a new account, and use that
password each time that you log on to the Console. Periodically changing the
password on the account increases computer security.
To change the password on a console account
1
On the Edit menu, click Change password.
2
In the Current password box, type the current password.
Note: The super-user account has the necessary rights to change a user’s
password without first entering the old password.
3
In the New password box, type the new password.
■
Console account passwords can have up to 32 characters.
■
Passwords should have at least six characters including at least one
non-alphabetical character.
■
Manager account passwords can have up to eight characters.
Passwords should have at least six characters including at least one
Administering Symantec ESM
Understanding the summary databases
non-alphabetical character. You must not use any of the following
special characters in a manager password:
pipe
|
ampersand
&
semi-colon
;
left-parenthesis
(
right-parenthesis
)
less-than
<
greater-than
>
space
tab
4
In the Confirm new password box, type the new password again.
Understanding the summary databases
Symantec ESM stores policy run summary data and module message details in
two databases: the manager sumfinal database on the manager computer and
the local summary database on the console computer.
Manager sumfinal database
The manager sumfinal database contains the summary data and module
message details that are reported by the agents during policy runs.
This database is a component of the manager. It is a cross-platform proprietary
database. By default, Symantec ESM keeps the policy run data in the manager
sumfinal database for 90 days. You can change the retention period by clicking
the Options tab in the Manager Properties dialog box.
You cannot directly access the data in a manager sumfinal database. Instead,
you must upload the information to your local summary database in the console.
Local summary database
The local summary database exists to provide query capability on the managers,
agents, and policies; reporting how they relate to the summary data and module
message details in the policy runs. This query capability provides great
flexibility in analyzing and reporting network vulnerabilities.
77
78 Administering Symantec ESM
Understanding the summary databases
If you combine this query function with the dynamic reporting capabilities
available in the Integrated Command Engine (ICE) module, you can direct the
necessary efforts toward resolving new vulnerabilities. For example, if you
receive an advisory describing a workaround for a critical vulnerability in a
network resource, you can quickly edit the scripts and templates in the ICE
module to search for occurrences of the new vulnerability. The ICE module can
report a wide range of issues. You can narrow the search to a few critical items
by running a query on the local summary database.
The local summary database is a component of the console. When the console
creates a user account, it also creates a local summary database file for the
account. Use the Discretionary Access Control List (ACL) in Windows to secure
this local summary database file. See the Windows help for information on
accessing the ACL. Only the user who is logged on to the console account should
have full control over the file.
The local summary database is a Microsoft Access relational database in .mdb
native file format. You can access this database with Microsoft Access or use it
as an ODBC data source. If you have compatible third-party software, you can
also use the local summary database to produce custom reports.
To ensure that the local summary database contains current summary
information for reporting or analysis, you must manually synchronize the local
summary database with the manager sumfinal databases in the network. Using
the enterprise tree, you can choose to upload manager sumfinal database
information from a single manager, all of the managers in a region, or all of the
managers that are connected to the console. See “Synchronizing the local
summary database” on page 91.
When analysis or reporting requires module message details, you can choose a
separate function in the console to upload this information from a single
manager, from all of the managers in a region, or from all of the managers that
are connected to the console.
Note: Managers with a large number of registered agents can take a significant
period of time to complete a module message details upload.
Local summary database file structure
The ID fields define the relationships in the database tables. For example,
managerID defines a relationship with a manager. This field contains a value in
the ID field that corresponds to a specific manager record in the managers table.
The tables and keys in the database are set up for logical relationship queries.
Administering Symantec ESM
Understanding the summary databases
The database schema depicts the relationships among the tables.
Figure 3-1
Local database schema
Note: In the following tables, field data types are enclosed in <angle brackets>.
The local summary database has the following tables:
Table 3-12
Local summary database tables
Table Name
Summary of Stored Data
Agents
Agents for which summary data has been
received
AgentTrend
Agent level and rating data points
DatabaseInfo
Microsoft Access .mdb file identity
DomainAgent
Relation table for the Domain/Agent
many-to-many relationship
Domains
Domains for which summary data has
been received
79
80 Administering Symantec ESM
Understanding the summary databases
Table 3-12
Local summary database tables
Table Name
Summary of Stored Data
DomainTrend
Domain level and rating data points
LatestAgentPolicyRuns
Relation table for the policy runs to agents
relationship
Managers
Managers for which summary data has
been received
ManagerTrend
Manager level and rating data points
MessageInstance
Each specific instance of a message
Messages
Messages from the policy runs
Modules
Module list for each manager
Policies
Policies for which summary data has been
received
PolicyModule
Relation table for the Policy/Domain many
to many relationship
PolicyRuns
Policy run data
PolicyTrend
Policy level and rating data points
RegionManager
Relation table for the Region/Manager
many-t- many relationship
Regions
Regions for which summary data has been
received
RegionTrend
Region level and rating data points
Agents table
The agents table stores the agents for which summary data has been received.
The managerID field associates each agent with its manager.
Table 3-13
Agents table
Field Name
Type
Description
ID
<auto-number>
Record ID
ManagerID
<number>
Manager ID from managers ID
table
Agent
<text>
Agent Name
Administering Symantec ESM
Understanding the summary databases
Table 3-13
Agents table
Field Name
Type
Description
OSVerSubType
<text>
The operating system running
on the agent computer
Note: Agent names cannot be longer than 61 characters.
AgentTrend table
The AgentTrend table stores agent level and rating data points for policy runs.
The AgentID field associates each AgentTrend record with its agent.
Table 3-14
AgentTrend table
Field Name
Type
Description
Lvl
<number>
0 Green, 1 Yellow, 2 Red
Rating
<number>
10 times the number of Red
messages, plus the number of
Yellow messages
AgentID
<number>
Agent ID from agents ID table
DatapointDate
<date>
Date of the level and rating
DatabaseInfo table
The DatabaseInfo table identifies the .mdb Microsoft Access file as a console
database.
Table 3-15
DatabaseInfo table
Field Name
Type
Description
Name
<text>
The internal name of the
database
Version
<number>
The version of the database
81
82 Administering Symantec ESM
Understanding the summary databases
DomainAgent table
The DomainAgent table relates entries in the agents table to entries in the
Domains table. This relationship allows a single agent record to be associated
with many domain records.
Table 3-16
DomainAgent table
Field Name
Type
Description
DomainID
<number>
Domain ID from Domains ID
table
AgentID
<number>
Agent ID from agents ID table
Domains table
The Domains table stores the domains for which summary data has been
received. The managerID field associates each Domain record with its manager.
Table 3-17
Domains table
Field Name
Type
Description
ID
<auto-number>
Record ID
ManagerID
<number>
Manager ID from managers ID
table
Domain
<text>
Domain Name
DomainTrend table
The DomainTrend table stores Domain level and rating data points for policy
runs. The DomainID field associates each DomainTrend record with its Domain.
Table 3-18
DomainTrend table
Field Name
Type
Description
Lvl
<number>
0 Green, 1 Yellow, 2 Red
Rating
<number>
10 times the number of Red
messages, plus the number of
Yellow messages
DomainID
<number>
Domain ID from Domains ID
table
DatapointDate
<date>
Date of the level and rating
Administering Symantec ESM
Understanding the summary databases
LatestAgentPolicyRuns table
The LatestAgentPolicyRuns table stores the most recent policy run ID for each
agent.
Table 3-19
LatestAgentPolicyRuns table
Field Name
Type
Description
ID
<number>
Record ID
AgentID
<number>
Agent ID from agents ID table
PolicyRunID
<number>
PolicyRun ID from PolicyRuns
ID table
Managers table
The managers table stores the managers for which summary data has been
received. The ID field associates each manager with its Region.
Table 3-20
Managers table
Field Name
Type
Description
LastRun
<number>
The date of the last policy run
ID
<auto-number>
Record ID
Manager
<text>
Manager Name
Protocol
<text>
The protocol that is used for
communication between the
manager and its agents
Port
<number>
The port that is used to
communicate with the manager
ManagerTrend table
The ManagerTrend table stores manager level and rating data points for policy
runs. The ManagerID field associates each ManagerTrend record with its
manager.
Table 3-21
ManagerTrend table
Field Name
Type
Description
Lvl
<number>
0 Green, 1 Yellow, 2 Red
83
84 Administering Symantec ESM
Understanding the summary databases
Table 3-21
ManagerTrend table
Field Name
Type
Description
Rating
<number>
10 times the number of Red
messages, plus the number of
Yellow messages
ManagerID
<number>
Manager ID from managers ID
table
DatapointDate
<date>
Date of the level and rating
MessageInstance table
The MessageInstance table stores each specific instance of the messages that
are reported during policy runs. Any message can occur more than once.
Table 3-22
MessageInstance table
Field Name
Type
Description
ID
<number>
Record ID
MessageID
<number>
Message ID from Messages ID
table
Name
<text>
The names of agent computers,
groups, or users that are
contained in a message (displays
in the Name column of the
console grid)
Info
<text>
The information that is related
to a reported security
vulnerability (displays in the
Information column of the
console grid)
PolicyRunID
<number>
Policy Run ID from PolicyRuns
ID table
Mtype
<text>
The Symantec ESM internal
message type
LastUpdate
<date>
Date of the message instance
Administering Symantec ESM
Understanding the summary databases
Messages table
The Messages table stores the unique messages that are reported during policy
runs.
Table 3-23
Messages table
Field Name
Type
Description
ID
<number>
Record ID
Title
<text>
The title of the message
Mtext
<text>
The message text that displays
in a pop-up window of the
console grid
Mlevel
<number>
0 Green, 1 Yellow, 2 Red
Format
<text>
* The format string used for the
message
Version
<text>
* The version of the message
Namehead
<text>
* The name header for a
message
Infohead
<text>
* The information header for a
message
Flags
<text>
* The internal flags for a
message
Note: Fields with descriptions
that contain asterisks are not
useful to end users. Symantec
ESM uses this information
differently in several situations.
Modules table
The Modules table lists the modules on the managers.
Table 3-24
Modules table
Field Name
Type
Description
ID
<auto-number>
Record ID
Module
<text>
Module Name (long name)
ShortName
<text>
Module (short name)
85
86 Administering Symantec ESM
Understanding the summary databases
Policies table
The Policies table stores the policies for which summary data has been received.
The managerID field associates each Policy with its manager.
Table 3-25
Policies table
Field Name
Type
Description
ID
<auto-number>
Record ID
ManagerID
<number>
Manager ID from managers ID
table
Policy
<text>
Policy Name
PolicyModule table
The PolicyModule table relates entries in the Modules table to entries in the
Policies table. This relationship allows a single Module record to be associated
with many policy records.
Table 3-26
PolicyModule table
Field Name
Type
Description
ModuleID
<number>
Module ID from Modules ID
table
PolicyID
<number>
Policy ID from Policies ID table
PolicyRuns table
The PolicyRuns table stores the policy run data that is received from the agents.
Table 3-27
PolicyRuns table
Field Name
Type
Description
Lvl
<number>
The last calculated security level
for the Policy Run
Rating
<number>
The last calculated rating for the
Policy Run
ID
<auto-number>
Record ID
JobNo
<number>
Job ID that is stored on the
manager
PolicyID
<number>
Policy ID from Policies ID table
Administering Symantec ESM
Understanding the summary databases
Table 3-27
PolicyRuns table
Field Name
Type
Description
ModuleID
<number>
Module ID from Modules ID
table
AgentID
<number>
Agent ID from agents ID table
FinishTime
<number>
Jobs finish time
Zero
<number>
Count of green messages that
are in class 0
One
<number>
Count of yellow messages that
are in class 1
Two
<number>
Count of red messages that are
in class 2
PolicyTrend table
The PolicyTrend table stores Policy level and rating data points for policy runs.
The PolicyID field associates each PolicyTrend record with its Policy.
Table 3-28
PolicyTrend table
Field Name
Type
Description
Lvl
<number>
0 Green, 1 Yellow, 2 Red
Rating
<number>
10 times the number of Red
messages, plus the number of
Yellow messages
PolicyID
<number>
Policy ID from Policies ID table
DatapointDate
<date>
Date of the policy run
RegionManager table
The RegionManager table relates entries in the managers table to entries in the
Regions table. This relationship allows a single manager record to be associated
with many region records.
Table 3-29
RegionManager table
Field Name
Type
Description
ManagerID
<number>
Manager ID from managers ID
table
87
88 Administering Symantec ESM
Understanding the summary databases
Table 3-29
RegionManager table
Field Name
Type
Description
RegionID
<number>
Region ID from Regions ID table
Regions table
The managers table stores the managers for which summary data has been
received. The ID field associates each manager with its Region.
Table 3-30
Regions table
Field Name
Type
Description
ID
<auto-number>
Record ID
Region
<text>
Region Name
RegionTrend table
The RegionTrend table stores Region level and rating data points for policy
runs. The RegionID field associates each RegionTrend record with its Region.
Table 3-31
RegionTrend table
Field Name
Type
Description
Lvl
<number>
0 Green, 1 Yellow, 2 Red
Rating
<number>
10 times the number of Red
messages, plus the number of
Yellow messages
RegionID
<number>
Region ID from Regions ID table
DatapointDate
<date>
Date of the level and rating
Creating local summary database queries
You can create queries on your local summary database using Microsoft Access
or some other compatible third-party software. For example, you can create a
query using Microsoft Access that reports Windows NT agents in a domain that
has users with the privilege to act as part of the operating system. The following
procedure shows you how to create the query.
Administering Symantec ESM
Understanding the summary databases
To create the query
1
Disable all of the checks in the Account Integrity module of a Windows 2000
demonstration policy except the Act as Part of the Operating System check.
2
If you have not already done so, add a test user to an agent computer.
3
Give the test user permission to act as part of the operating system.
4
Edit the Act as Part of the Operating System check:
■
Delete all of the entries in the Users and Groups name lists.
■
Exclude the Users and Groups name lists from the check.
5
Run the demonstration policy on the agent computer.
6
Right-click the manager that is associated with the agent computer, and
then click Store manager module messages.
This causes the console to download the module messages to the local
summary database.
7
Exit the console. This closes the local summary database.
8
Use Windows Explorer to access the local summary database .mdb file in the
Symantec\ESM Enterprise console\Database directory.
9
Use the Windows Access Query wizard to create a query. Specify the fields
that you want displayed in the query and the related selection criteria. For
this example, select Name in the MessageInstance table, Title in the
Messages table, and Info in the MessageInstance table. Specify [Message
Title] in the Title column for the selection criteria.
10 Run the query on the local summary database. At the Message Title prompt,
type Act as Part of the Operating System.
11 Verify that the query displays the test user on the agent computer as having
permission to Act as Part of the Operating System.
Managing the manager sumfinal database
By default, managers limit the policy run summary data and the module
message details that are retained in the manager sumfinal databases. You can
change these settings with the console.
89
90 Administering Symantec ESM
Understanding the summary databases
To set the policy run message count (per-user setting)
1
2
On the Edit menu, click Modify GUI options.
Do one of the following:
■
Type a new value to change the Maximum policy run message count.
Reports that reach this limit contain a red message.
■
Check the No message count limit check box to let the console report
all messages.
To set manager database purge values
1
On the enterprise tree, right-click the manager.
2
Click Properties.
3
Click the Options tab.
■
In the Days to keep summary data box, type the number of days that
you want the manager to keep sumfinal.dat records.
Symantec ESM removes sumfinal.dat records from the manager that
have an elapsed time exceeding this value.
■
In the Days to keep detailed reports box, type the number of days that
you want the manager to keep detailed reports.
Symantec ESM removes detail reports from the manager that have an
elapsed time exceeding this value.
■
In the Days to keep policy runs box, type the number of days that you
want the manager to keep policy runs.
Symantec ESM removes policy runs from the manager that have an
elapsed time exceeding this value.
■
In the Number of summary data items to keep box, type the number of
summary data items that you want the manager to keep.
In most instances, set this value equal to the Number of policy runs to
keep. Symantec ESM removes the oldest sumfinal.dat records when the
record count exceeds this value.
■
In the Number of policy runs to keep box, type the number of job.dat
records that you want the manager to keep.
In most instances, make this value equal to the Number of summary
data items to keep. Symantec ESM removes the oldest job.dat records
when the record count exceeds this value.
Managing the local summary database
To ensure that custom reports contain accurate information, you must
manually synchronize the local summary database with the manager sumfinal
Administering Symantec ESM
Understanding the summary databases
databases in the network. When the synchronizing process finishes, the local
summary database contains the information in the manager sumfinal databases.
Synchronizing the local summary database
You can selectively synchronize the local summary database with all of the
managers that are connected to the console, the managers in a specific region,
or a single manager.
To synchronize with all connected managers
◆
Do one of the following:
■
On the toolbar, click Download all managers’ summary data.
■
On the File menu, click Synchronize local database.
■
On the enterprise tree, right-click My ESM Enterprise, and then click
Synchronize local database.
To synchronize with the managers in a region
1
Right-click the region.
2
Click Synchronize with local database.
To synchronize with a single manager
1
Right-click the manager.
2
Click Synchronize with local database.
Storing module message details
You can update the module message details in the local summary database for
all of the managers that are connected to the console, the managers in a specific
region, or a single manager.
To store message details from all managers
◆
Do one of the following:
■
On the File menu, click Store all module messages.
■
On the enterprise tree, right-click My ESM Enterprise, and then click
Store all module messages.
To store message details from managers in a region
1
Right-click the region.
2
Click Store region module messages.
91
92 Administering Symantec ESM
Auditing Symantec ESM events
To store message details from a single manager
1
Right-click the manager.
2
Click Store manager module messages.
Purging the local summary database
You can purge the local summary database to increase the available disk space
on the host computer. This action retains the current settings in the user
environment.
Synchronizing the local summary database or storing module messages restores
the information for custom reporting or analysis.
To purge the local summary database
◆
On the File menu, click Purge local database.
Auditing Symantec ESM events
Symantec ESM lets you keep and view audit logs of events. Security officers can
use these logs to determine if users are making unauthorized changes.
Symantec Intruder Alert users can monitor the audit log file using that
application.
Audit logs record the following events:
■
Start and finish of policy runs
■
Template file modifications
■
Suppression database modifications
■
Options changes
■
License changes
■
Access record modifications
■
Remote installations, tune-ups, or upgrades
■
Policy modifications
■
Agent records modifications
■
Report updates or corrections
■
Manager connections (success or failure)
■
Audit log (enable or disable)
Administering Symantec ESM
Using LiveUpdate
Each manager that is connected to the Symantec ESM Enterprise console can
maintain an audit log. Before you can keep or view an audit log on a manager,
you must enable it for that manager. The audit log is enabled by default at
installation.
To enable audit logging
1
Right-click the manager, and then click Properties.
2
Click the Audit log configuration tab.
3
Check the Audit log enabled check box.
4
In the Max. log size box, type the maximum file size.
Symantec ESM automatically starts a new log file when the current log file
reaches the size that you designate.
To disable audit logging
1
Right-click the manager, and then click Properties.
2
Click the Audit log configuration tab.
3
Uncheck the Audit log enabled check box.
To view an audit log
1
Right-click the manager, and then click View audit log.
2
In the Account name box, select an option:
3
■
Click All to view internal events for all user accounts.
■
Select a specific user account to view internal events for the account.
In the Server box, select an option:
■
Click All to view internal events for all connection identifiers.
Click a specific connection identifier to view internal events for the
connection.
The unique connection identifier lets you follow a connection to the
manager. The type of connection identifier depends on the manager
computer’s platform. For example, an NT thread or a UNIX process.
■
4
Select a time period to view in the After date/time and Before date/time
boxes.
Using LiveUpdate
Periodically, Symantec provides security updates, best practice policies, and
agent software improvements available through LiveUpdate technology. Use
93
94 Administering Symantec ESM
Using LiveUpdate
LiveUpdates monthly to ensure that you are using the best possible security
assessment tools.
Performing a LiveUpdate
The console uses Symantec LiveUpdate technology to install new releases of
Symantec ESM security updates or agent software upgrades from the Internet, a
CD-ROM, or network drive.
LiveUpdate checks for new Symantec ESM security updates. If an update is
available, LiveUpdate downloads the security files to the console. The console
distributes the security files to the managers. The managers make the updates
available to the agents.
■
If the update contains an agent software upgrade, the upgrade must be
initiated manually to ensure security.
■
If the update includes a Symantec ESM security update, the managers
transfer the new modules to updateable participating Symantec ESM agents
only during the next policy run.
Symantec ESM authenticates the LiveUpdate files on the manager and agent
before it installs the update.
To access updates and upgrades via LiveUpdate
1
Connect the console to managers that have registered the agents that you
want to update or upgrade. Use an account with the rights to modify all
domains, policies, and templates.
2
Right-click the All Agents domain then click Change update properties.
■
Select agents in the Non-updateable column that you intend to upgrade
and click the left arrow to make them updateable.
■
Select agents in the Updateable column that you do not want to
upgrade and click the right arrow to make them non-updateable.
3
Click LiveUpdate on the toolbar to run the LiveUpdate wizard. The wizard
can use the Internet, a CD-ROM, or Network Drive to get the latest updates.
4
Select Symantec Liveupdate (Internet) and follow the instructions that are
displayed in the Welcome screen.
Administering Symantec ESM
Using LiveUpdate
5
Click Next to download the available upgrades and updates to the console.
6
Select the managers that you want to update.
If the update includes an agent software upgrade, you must perform the
upgrade manually, for security purposes. To upgrade agents, do one of the
following:
■
Right-click a domain and then click Remote upgrade to upgrade the
updateable agents in the domain. Selecting the All Agents domain
upgrades all upgradeable agents.
■
Right-click an agent and then click Remote upgrade to upgrade an
updateable agent.
Note: If the agents that you upgrade are connected to multiple managers,
you must manually reregister each upgraded agent to all of its former
managers except the manager that performs the upgrade.
If the update includes a Symantec ESM security update, the managers
transfer the new modules to updateable participating Symantec ESM agents
during the next policy run. Agents prior to version 5.5 are not updateable.
To include managers after a LiveUpdate
1
Connect the console to managers that have registered the agents that you
want to upgrade. Use an account with rights to modify all domains, policies,
and templates.
2
Click LiveUpdate on the toolbar to run the LiveUpdate wizard. The wizard
can use the Internet, a CD-ROM, or Network Drive to get the latest updates.
3
Make sure that the console has the latest LiveUpdate. Select Symantec
Liveupdate (Internet) and follow the instructions that are displayed in the
Welcome screen.
4
Click Next to verify that the console has the latest update.
5
Click LiveUpdate on the toolbar to run the LiveUpdate wizard again.
6
Select CD or Network Drive and select the path to the LiveUpdate files.
7
Click Next and then select the managers that you want to update.
Enabling and disabling LiveUpdate on agents
Managers can only make security updates, best practice policies, and agent
software improvements available to updateable agents. You can change the
LiveUpdate status of agents by making them updateable or non-updateable.
95
96 Administering Symantec ESM
Using LiveUpdate
If you expand the summary branch in the enterprise tree, Symantec ESM
displays the agents in each manager domain. If you expand the All Agents
domain, you can display all of the agents that are registered to the manager.
Agents with colored LiveUpdate icons are updateable. Agents with gray
LiveUpdate icons are not updateable.
To make agents updateable in a domain
1
Right-click a domain, and then click Change update properties.
2
Do the following:
■
Select agents in the Non-updateable column and click the right arrow
to make them updateable.
■
Select agents in the Updateable column and click the left arrow to make
them Non-updateable.
Upgrading agents
If you run LiveUpdate and the update includes an agent software upgrade,
LiveUpdate displays a status message directing you to perform the agent
software upgrade manually, for security purposes.
To upgrade agents in a domain
1
2
Right-click a domain, or an agent in a domain, and then click Remote
upgrade.
■
Agents that have not yet started to upgrade display with a white status.
■
Agents that are running the upgrade change to a gray status.
■
Agents that successfully upgrade change to a green status.
■
Agents that fail to upgrade change to a red status.
Double-click an agent’s name to display additional information about the
agent’s upgrade status.
Note: Correct the problems that prevent an agent from upgrading. Then try
again to upgrade the agent using Remote upgrade. If the agent fails to upgrade,
use the Remote Install option in the Symantec ESM console or manually install
the new agent software. See the Symantec ESM Installation Guide for
information about installing agent software.
Administering Symantec ESM
Using LiveUpdate
Checking remote agent upgrade status
You can disconnect the console from a manager during a remote agent upgrade
without affecting the upgrade process. Like policy runs, agent software
upgrades are controlled by the manager. If you reconnect the console, you can
monitor the progress of an agent upgrade.
To check the status of an agent upgrade
1
Right-click a manager, and then click Check remote upgrade status.
2
Double-click an agent’s name to display additional information about the
agent’s upgrade status.
Updating agents
If you run LiveUpdate and the update includes a security update or best
practices policy, LiveUpdate displays a status message that informs you that any
new modules, templates, or name lists are updated on the agent during the next
policy run. This process occurs automatically for updateable agents.
Exporting an agent list
When you have finished configuring your agents and domains, you should
export an agent list to a secure location as a backup against manager hardware
failures or other problems that may require you to reconstruct your manager.
You also need to export the agent list if you intend to move, upgrade, or rename
a manager. Symantec ESM lets you export an agents list to a location that you
select. You need this list to use the Symantec ESM reregister feature, which can
automate the reregistration process. See the Symantec ESM Installation Guide
for a complete explanation and complete procedures for exporting the agents
list.
To export an agent list
1
In the Enterprise console tree, right-click a manager name.
2
Click Export Agent List.
3
Use the operating system save feature to select the location where you want
to save the agent list.
Reregister agents to a manager
Symantec ESM lets you reregister agents to a manager that has encountered
problems, been renamed, upgraded or moved. See the Symantec ESM Installation
Guide for procedures to reregister agents to a manager.
97
98 Administering Symantec ESM
Using LiveUpdate
Chapter
4
Using policies, templates,
snapshots, and modules
This chapter includes the following topics:
■
About policies
■
Administering policies
■
Administering policy runs
■
About snapshots
■
About templates
■
Administering templates
■
About modules
■
Administering security checks
About policies
Symantec ESM uses policies, templates, and modules to identify and evaluate
the vulnerabilities of network resources. Policies form the standard by which
Symantec ESM measures the security of agent computers. Templates and
snapshots serve as baselines to determine what conditions should exist on agent
computers. Modules perform the actual security checks.
Policies specify the settings, authorizations, or permissions that network
resources must have to comply with your company policy. Symantec ESM
compares the current state of each assessed computer to standards that are
defined in the policy, and reports each discrepancy with its severity rating
(class).
100 Using policies, templates, snapshots, and modules
About policies
Policies contain the modules that evaluate the security of network resources.
Modules, in turn, contain the security checks that assess specific aspects of
computer security.
You can run policies on a single agent or on all agents in a manager domain.
There are several types of policies:
■
The standard seven sample policies
■
User created policies that are based on sample policies or are created from
scratch
■
Best practice policies that can be downloaded through LiveUpdate or from
the Internet
■
Response policies for specific security incidents such as Code Red 2, Nimda,
and Blaster that customers with maintenance accounts can download
without charge at the Symantec Security Response Web site:
http://securityresponse.symantec.com
■
Policies for application products that are sold separately
About sample policies
The sample policies that are included with Symantec ESM are already
configured to assess a wide range of potential network vulnerabilities. You can
use them with a minimum amount of setup time to discover and fix the most
serious and most easily corrected problems first, then move on to progressively
more sophisticated problems and resolutions.
However, sample policies are not intended for long term use. Every time you
download a security update, sample policies are overwritten and you lose
important template and snapshot data and settings.
Warning: Duplicate sample policies and save them with new names before you
download a security update from the Symantec Web site. Security updates
update sample policy files causing a loss of snapshot and other data
information. See “Creating policies” on page 106.
Using policies, templates, snapshots, and modules
About policies
Six of the seven sample policies run on all supported operating systems. The
Dynamic Assessment policy runs only on Windows or UNIX operating systems.
The sample policies include:
■
Phase 1 policy modules report the most important and easy to solve security
problems on a computer.
■
Phase 2 policy includes checks from all available modules, but only the key
checks in each module are enabled.
■
The Phase 3 policy includes:
■
A relaxed version, which is identical to the Phase 2 policy.
■
A cautious version, which has enabled additional checks.
■
A strict version, which has enabled the remaining critical security
checks in all modules.
■
The Queries policy modules report information about users, accounts, and
computers with installed Symantec ESM and Symantec Intruder Alert
components.
■
The Dynamic Assessment policy runs only on computers that run UNIX and
Windows operating systems. It has one module, the Integrated Command
Engine (ICE) module, which reports vulnerabilities that are detected by any
executables, scripts, or templates that you provide.
Secure your network resources by bringing the computer into conformance with
Phase 1 and Phase 2 policies. When Symantec ESM reports green security
evaluations at these levels, continue with the Phase 3 policies on computers that
require top-level security.
Starting with sample policy settings lets you begin running security checks on
selected domains right away. You can also base your own policies on sample
policies.
About best practice policies
Several best practice policies are included with Symantec ESM 6.0. Symantec
ESM best practice policies are configured by the Symantec Security Response
team to detect vulnerabilities that could compromise the confidentiality,
integrity, and availability of data that is stored and transmitted on your
computer.
Some best practice policies are designed for operating system versions. Others
are designed for specific application and operating system combinations. Some
best practice policies require the installation of additional modules.
101
102 Using policies, templates, snapshots, and modules
About policies
How best practice and default policies differ
The Phase 1, 2, and 3 policies that install with the Symantec ESM core product
and Security Update releases are intended to enforce relaxed, cautious, and
strict security policies. You can copy and modify these policies for your needs.
Best practice policies install only through LiveUpdate, not as part of the
Symantec ESM core product or Security Update releases.
Best practice policies are preconfigured by the security team at Symantec to
target specific application and OS platform combinations. These policies use
preconfigured values, name lists, templates, and word files that directly apply to
the targeted applications and platforms.
Best practice policies use the modules and templates from Symantec ESM
Security Update releases to check OS patches, password settings, and other
vulnerabilities that are on the targeted operating system. These policies may
also introduce new, application-specific modules and templates to check
conditions that are related specifically to the targeted application.
The best practice policies represent the collective wisdom of security experts.
Users should not modify them.
High-level policies incorporate checks for additional best practices that are
prescribed by the ISO 17799 standard and recommended for specific application
and OS platform combinations by trusted information security experts.
How base and high-level policies differ
Every set of best practice policies includes a base policy and a high-level policy.
Security Experts configure the base policies using the 80-20 rule: 80 percent of
successful compromise attempts come from 20 percent of a computer’s
vulnerabilities.
To detect critical computer vulnerabilities, security experts have configured
base policies to:
■
Identify unneeded services
■
Identify missing OS patches
■
Enforce password strength rules
■
Check for application-specific vulnerabilities that are deemed most critical
by security experts
ISO/IEC standard
ISO-based best practice policies assess compliance with common best practices
as described in the ISO/IEC 17799 international standard, “Information
Using policies, templates, snapshots, and modules
About policies
technology - Code of practice for information security management,” and
defined by trusted security experts and clearing houses.
Note: Symantec ESM best practice policies are based on sections of the ISO
17799 standard that address logical access controls and other security issues
pertaining to electronic information systems. You should review the ISO 17799
standard in its entirety to identify all issues that you need to address in your
organization’s information policy.
Other standards and regulations
The information in this guide also applies to Symantec ESM best practice
policies to assess compliance with the following standards and regulations:
■
Health Insurance Portability and Accountability Act (HIPAA)
■
Center for Internet Security (CIS) Benchmarks
■
SANS Top Twenty
Industry research sources
As you develop your organization’s information security policy, you may want
to consult some of the following organizations that serve as security
information clearing houses, publishing security advisories on the Internet.
Acknowledgement of these organizations does not imply their endorsement of
Symantec ESM best practice policies.
For more information about creating a security policy and Internet links to
standards and regulations that many enterprise customers and government
agencies are required to adhere to, see the article, “Importance of Corporate
Security Policy” at: http://securityresponse.symantec.com/avcenter/security/
Content/security.articles/corp.security.policy.html.
International Organization for Standardization (ISO/IEC) 17799
ISO/IEC 17799 is an international standard for electronic information systems
that was released in 2000.
The predecessor of the ISO/IEC standard is the British Standard 7799 (BS 7799).
See http://emea.bsi-global.com/InformationSecurity/Overview/
WhatisBS7799.xalter.
Australian and New Zealand 4444 standards (AS 4444 and NZS 4444) have also
been replaced by ISO/IEC 17799.
A helpful Internet address for ISO/IEC 17799 is http://www.iso-17799.com.
103
104 Using policies, templates, snapshots, and modules
About policies
Center for Internet Security (CIS)
CIS is a worldwide consortium of companies, educational organizations,
government and law enforcement agencies, professional associations, and
individuals that are concerned about electronic information security.
The center operates by consensus. Members “identify security threats of
greatest concern, then participate in development of practical methods to
reduce the threats.”
The center’s foundational standards are:
■
ISO 17799
■
BS 7799 of the British Standards Institute (BSI)
■
Internet Engineering Task Force (IETF)
■
COBIT of the Information Systems Audit and Control Association (ISACA)
■
Federal Information System Controls Audit Manual (FISCAM)
■
Generally Accepted System Security Principles (GASSP) sponsored by the
International Information Security Foundation
■
National Institute of Standards and Technology (NIST)
■
SysTrust Principles and Criteria for Systems Reliability (AICPA)
Members of the center have agreed on “security configuration specifications”
called benchmarks “that represent a prudent level of due care.” You can
download benchmarks and scoring tools from the Internet. The center is now
working on best-practice configurations for computers that are connected to the
Internet.
The Internet address of CIS Benchmarks and Scoring Tools is:
http://www.cisecurity.org.
CERT Coordination Center (CERT/CC)
CERT/CC is a center of Internet security expertise at the Software Engineering
Institute, which is a federally-funded research and development center that is
operated by Carnegie Mellon University.
“We study Internet security vulnerabilities, handle computer security incidents,
publish security alerts, research long-term changes in networked systems, and
develop information and training to help you improve security at your site.”
The Internet address of CERT/CC is http://www.cert.org/nav/index_main.html.
Health Insurance Portability and Accountability Act (HIPAA)
The HIPAA standard was established by United States federal law in 1996 for
the U. S. health care industry. Developed by the Department of Health and
Using policies, templates, snapshots, and modules
About policies
Human Services, HIPAA defines security and electronic signature standards to
protect the confidentiality, integrity, and availability of individual health
information.
Health care providers, health care clearing houses, and health plans that
electronically maintain or transmit health information will have to comply with
this security standard.
A helpful Internet address for HIPAA regulations is:
http://www.hipaadvisory.com/regs/securityandelectronicsign/subpartc.htm.
The U.S. Department of Health and Human Services also has a Security and
Privacy Web site with a section devoted to HIPAA at:
http://aspe.hhs.gov/admnsimp/bannerps.htm#security.
Gramm-Leach-Bliley Act (GLB)
The Gramm-Leach-Bliley Act of 1999, also known as the Financial Services
Modernization Act, requires financial institutions to employ measures designed
to detect any actual or attempted attacks or intrusions on customer information
systems.
For information about the Gramm-Leach-Bliley Act, go to http://rr.sans.org/
legal/gramm.php.
System Administration, Networking and Security (SANS)
The SANS Institute is a cooperative research and education organization on
behalf of security practitioners in government agencies, corporations, and
universities. It publishes news digests, research summaries, security alerts and
papers on the Internet.
The SANS Institute and the National Infrastructure Protection Center (NIPC)
publish the SANS/FBI Top Twenty list of critical internet security
vulnerabilities. The list includes steps to remedy weaknesses.
SANS also includes Incidents.org, a virtual organization of intrusion detection
analysts, forensics experts, and incident handlers. The Storm Center of
Incidents analyzes data from thousands of firewalls and intrusion detection
systems, then issues alerts and postings.
The Internet address of the SANS Top Twenty list is http://www.sans.org/
top20.htm.
The Storm Center is at http://www.incidents.org.
Responding to incidents
Maintenance-paying Symantec ESM customers can download Response policies
for specific security incidents such as Code Red 2, Nimda, and Blaster without
105
106 Using policies, templates, snapshots, and modules
Administering policies
charge at the Symantec Security Response Web site,
http://securityresponse.symantec.com.
Administering policies
Symantec ESM lets you create, edit, and delete policies.
Creating policies
You can create your own policies based on sample policies or from scratch.
To create a policy based on a sample policy
1
In the Symantec ESM console, open the directory tree structure in the left
pane until you can see the sample policies.
2
Right-click a sample policy, then click Duplicate.
3
Specify a new name for the duplicate policy.
4
Click OK.
5
Open the new policy.
6
Do the following:
■
Enable checks that you want to include in the policy run.
■
Disable checks that you do not want to include.
To create an original policy
1
In the Symantec ESM console, open each node of the directory tree structure
in the left pane to see the Domains, Policies, Policy Runs, and Templates
nodes.
2
Right-click the Policies node, then click New Policy.
3
Specify a new name for the duplicate policy.
4
Click OK.
5
Click the Policies node.
6
Click the new policy.
7
In the right pane, select a module that you want to run in the policy.
Click the left-arrow button to move the module from the Available Modules
column to the Current Modules column.
Repeat this step until all modules that you want to include in the policy are
in the Current Modules column.
Using policies, templates, snapshots, and modules
Administering policies
8
Click OK.
9
Do the following:
■
Enable checks that you want to include in the policy run.
■
Disable checks that you do not want to include.
Note: See the Symantec ESM Security Update User’s Guides for information
about modules and their security checks. You can download security updates at
http://securityresponse.symantec.com.
Copying and moving policies
Copying policies ensures that policies are identical on multiple managers.
Moving policies removes a policy from one manager and adds it to another,
overwriting any policy-related information on the destination manager.
Copying and moving policies requires the Create New Policies access right.
See “Understanding account types and separation of duties” on page 58.
To copy a policy to another manager
◆
In the enterprise tree, drag and drop a policy on a destination manager.
You can also right-click a policy, drag and drop it on a destination manager,
then click Copy.
To move a policy
1
In the enterprise tree, drag the source manager policy and drop it on the
destination manager.
2
Click Move.
Validating security checks
Before you apply a new security check to your systems, create a demo policy and
add the check to it. Then verify the check on a representative computer. By
using a demo policy, you can obtain results without disturbing the settings of
policies that are created and named by the Symantec Security Response team.
Delete the demo policy after you complete your demonstrations.
107
108 Using policies, templates, snapshots, and modules
Administering policy runs
Administering policy runs
You can refine policy runs by specifying multiple modules within a policy and
limiting the number of messages that are reported by each run. You can also
schedule multiple module or policy runs, view the status of a policy run, stop a
policy run, and delete a policy run.
Running policies
You can run policies on agents or on manager domains. Symantec ESM
compares the current state of the host computers to the policy’s security
standards. When the policy run completes, you can view the resulting security
data in the chart and grid views of the console. You can also display or print
security reports, or export the security data to a database for custom reporting.
To run a policy, you must have the Run Policies access right enabled for domains
and the Run access right enabled for policies in the manager account.
To run a policy
◆
Do one of the following:
■
Drag and drop a policy on an agent or domain.
To run only one module, drag and drop the module on the agent or
domain.
■
Drag and drop the selected agent or domain on the policy.
■
Use the Policy Run wizard. See “Specifying multiple modules to run” on
page 109.
Running modules
You can run an individual module. This is helpful when you want to assess a
single aspect of computer security. For example, you might want to ensure that
each password on an agent computer contains at least eight characters. Rather
than run an entire policy, you can run the Password Strength module with only
the Minimum password length check enabled.
Using policies, templates, snapshots, and modules
Administering policy runs
To run a single module
1
On the enterprise tree, expand the policy that contains the module that you
want to run.
2
Enable the security checks in the module that you want to run on the agent
or domain.
Symantec ESM Security Update User’s Guides provide detailed information
for each security check on supported operating systems. You can download
security updates at: http://securityresponse.symantec.com.
3
On the enterprise tree, drag and drop the module on the agent or domain.
For information about running multiple modules, see “To specify more than one
module to run in a policy” on page 109.
Specifying multiple modules to run
If you want to run some but not all modules in a policy, use the Policy Run
wizard to specify which modules to run.
To specify more than one module to run in a policy
1
Do one of the following:
■
On the toolbar, click Policy Run Wizard.
■
On the enterprise tree, right-click the Policy Runs node, then click
New.
2
Select a manager, then click Next.
3
Select a policy, then click Next.
4
Select the modules to include in the policy run, then click Next.
By default, all modules are selected. To select a range of modules, click the
first item in the range, then hold down Shift while you click the last item. To
select non-sequential modules, hold down Ctrl as you click.
5
Select a domain, then click Next.
6
Select one or more agents, then click Next.
7
Do one of the following:
■
To save the setting and run the policy with the default maximum
number of messages, click Next > Finish.
■
To change the maximum number of messages allowed, see step 2 in the
procedure under “Limiting the number of messages” on page 110.
■
To schedule the policy run for a later time, see step 2 in the procedure
under “Scheduling a policy run” on page 110.
109
110 Using policies, templates, snapshots, and modules
Administering policy runs
Limiting the number of messages
Depending on which modules and security checks you enable, and the state of
your network, a policy can generate a large number of messages. You can use the
Policy Run wizard to specify a maximum number of messages that can be
reported in a policy run.
To limit the number of messages reported in a policy run
1
Complete the first six steps in the procedure under “Specifying multiple
modules to run” on page 109.
2
Do one of the following:
■
Type a new value to change the Maximum policy run message count,
then click Next. The default value is 3000 messages.
■
Check the No message count limit check box, then click Next.
Note: If Symantec ESM reaches the message limit, the last message has a
red severity rating and informs you that the maximum number has been
reached and that other messages have not been reported.
3
Do one of the following:
■
Click Finish to start the policy run immediately.
■
Click Schedule to start the policy run at another time.
Scheduling a policy run
You can specify the time of one-time or recurring policy runs. Scheduled policy
runs can include all or only some modules in the policy.
Recurring policy runs automatically start and report results at specific
intervals. You can specify email addresses of persons to notify when the policy
run is complete and the type of report to send.
To schedule a policy run
1
Complete the steps of “To specify more than one module to run in a policy”
on page 109 or “To limit the number of messages reported in a policy run”
on page 110, clicking Schedule on the last step.
2
Specify a date for the policy run.
On the calendar, click a date. You can also click the right or left-arrow to
change the month.
In Start time field, you can also click a day of the week, date, month, or year
to select it, then click the up- or down-arrow at the end of the field. You can
also click the large down-arrow to display another calendar.
Using policies, templates, snapshots, and modules
Administering policy runs
3
In Start time field, click the hour, minutes, or AM/PM to select it, then click
the up- or down-arrow at the end of the field to adjust the time.
4
Do one of the following:
■
To save the date and time for a one-time policy run without email
notification, click OK > Finish.
■
To save the date and time as the first instance of recurring policy runs,
skip to step 2 below.
■
To specify email notices when the policy run is complete, click Email
Notification.
To schedule recurring policy runs
1
Complete the steps of “To schedule a policy run” on page 110.
2
Specify a recurring interval by clicking Hourly, Daily, Weekly, Monthly, or
Yearly.
3
Specify options that are displayed for the interval.
4
Do one of the following:
■
To save the recurring schedule without specifying email notices, click
OK > Finish.
■
To end email notices when are complete, Email Notification and skip to
step 2 of “To specify email notification” on page 113.
Sending completion notices
Managers can designate users to receive email notices when policy runs are
complete. This helps ensure that security and system administrators receive
timely security reports.
Email configuration
On Windows operating systems, specify an SMTP server and port number in the
esm\config\mail.dat file.
■
Symantec ESM uses port 25 if you do not specify an alternate port number.
■
Symantec ESM uses the domain of the recipient’s email address if you do not
specify a server name.
On UNIX operating systems, configure the manager before attempting to send
notices. See the UNIX man pages for sendmail information.
111
112 Using policies, templates, snapshots, and modules
Administering policy runs
Table 4-1 lists supported UNIX-based mail utilities.
Table 4-1
Supported UNIX-based utilities
Operating system
Utility
AIX
mailx
HP-UX
mailx
SGI IRIX
mail
TRU 64/OSF1
mailx
Red Hat Linux
mailx
Solaris
mailx
To configure the manager on UNIX operating systems
1
Edit the sendmail.cf file to designate a valid relay host.
For example, if the relay host computer name is mail.company.com, change
the relay host entry to:
# “Smart” relay host (may be null)
DSmail.company.com
2
Create the /esm/config/mail.dat file and add the appropriate code to specify
the name and port number of the SMTP server. For example, if the SMTP
server is mail.mycompany.com, add the following lines of code to the file:
SMTP_SERVER=mail.mycompany.com
SMTP_PORT=25 (the default port number)
3
Do one of the following:
■
On the manager’s UNIX computer, restart the sendmail process.
■
Use an option to force the sendmail process to read the revised
sendmail.cf file.
Notification messages
Table 4-2 lists the notification messages.
Table 4-2
Notification messages
Message
Description
Policy Run Status
Start and finish time of the policy run and its completion
status.
Agent Summary
Agent security level and rating. See “Security level” on
page 134 and “Security rating” on page 134.
Using policies, templates, snapshots, and modules
Administering policy runs
Table 4-2
Notification messages
Message
Description
Module Summary
Agent security level and rating, and security level and rating
of each module in the policy. See “Security level” on page 134
and “Security rating” on page 134.
To specify email notification
1
Use the Policy Run wizard to create a new policy run. See “Administering
policy runs” on page 108.
2
When you create a policy run, on the last screen click Email Notification.
3
Type an email address in the Address field.
4
Check one or more messages to send to the recipient.
5
Do one of the following:
■
Click OK.
■
To add another recipient, click Insert Row, then repeat steps 3 and 4.
When you are finished adding recipients, click OK.
6
Click OK.
7
Click Finish.
Viewing the status of a policy run
You can check the current status of a policy run.
To view the status of a policy run
1
On the Policy Runs branch of the enterprise tree, do one of the following:
■
Double-click the policy run ID.
■
Right-click the policy run ID, then click Properties.
2
Select an agent.
3
Click View modules.
Table 4-3 lists the status types that can be reported.
Table 4-3
Policy run status
Policy run status
Description
SCHEDULED
The manager has scheduled the policy run to start at a specific
date and time.
113
114 Using policies, templates, snapshots, and modules
Administering policy runs
Table 4-3
Policy run status
Policy run status
Description
STARTING
The manager is contacting agents to start the policy run.
SUBMITTED
The manager has submitted the policy run to the agent.
QUEUED
The agent has not yet started processing the module in the policy
run.
RUNNING
The agent is currently running the module in the policy.
STOP PENDING
The manager has told the agent to stop running the policy but the
agent is waiting for the module to reach a safe stopping point.
STOPPED
The policy run has stopped.
FINALIZING
The manager is analyzing the raw reports and applying
suppressions, calculating a level and rating for each module, and
writing a record to the sumfinal database.
COMPLETE
The policy run is complete without errors.
ERROR
The policy run either stopped or contains errors.
Viewing scheduled policy run information
Scheduled policy run information includes:
■
Policy run number
■
Policy name and the number of modules included
■
Domain name and the number of agents included
■
Date and time of the initial policy run
■
Recurrence pattern
■
Date and time of the next policy run
To view scheduled policy run information
1
On the enterprise tree, right-click Policy Runs, then click View scheduled
runs.
2
In the Schedule Viewer, double-click the policy run.
Using policies, templates, snapshots, and modules
Administering policy runs
Selecting agents randomly for a policy run
You can use a feature on the ESM console to randomly select agents for policy
runs. This feature lets you run policies on fewer agents in a particular domain.
You can save time and resources while evaluating network security.
The feature uses a property file to provide necessary information. The file lists
the manager names, user names, passwords, port numbers, domains, policies,
module lists, and numbers of agents to randomly select.
You can use any text editor to create the property file. You must name the file,
randpol.dat. Save the property file in the same folder with the randpol.exe
program.
The property file is a plain text, tab delimited file. The module lists are comma
delimited lists. You can use “all” instead of listing the modules in a policy. The
property file has the following format:
manager_name<tab>username<tab>password<tab>port<tab>domain<tab>
policy<tab>module_list<tab>number_of_agents.
For example:
manager1 esmuser my1pass+ 5600 All Agents Phase 1 account,network 50
manager2 esmuser2 my2pass+ 5600 Windows 2000 Agents Phase 1 all 20
.
manager5 esmuser5 my5pass+ 5600 Windows XP Agents Phase 2 all 40
To randomly select the agents for a policy run
1
Create a property file, name it randpol.dat, and save it in the same folder
with the randpol.exe file.
2
Change to the Program Files\ Symantec\ ESM\ bin\ <operating system>
folder.
3
Type randpol.exe randpol.dat
Stopping a policy run
You can force a policy run in process to stop, finalize, and exit with an error
status.
The Stop option terminates security modules that are running on Windows,
UNIX, and OpenVMS agents. On NetWare/NDS agents, the run completes the
module checks that are already underway but does not initiate any checks for
the remaining modules.
The Stop option tells the manager that is controlling the policy run to finalize
the results of all completed policy runs. It returns the results from the modules
that have already finished.
115
116 Using policies, templates, snapshots, and modules
Administering policy runs
The Stop option also contacts each agent and tries to stop any security checks or
policy runs that are underway. If the agent can be reached, the run stops when
the currently running module reaches a safe stopping point and the manager
finalizes the report. If the agent cannot be reached, the portion of the report
that is already complete is force-finalized.
To stop a policy run
◆
Do one of the following on the Policy Runs branch of the enterprise tree:
■
Double-click the policy run ID, then click Stop job.
■
Right-click the policy run ID, then click Stop.
Stopping policy runs at user-defined intervals
You can use a feature on the ESM console to stop policy runs at user-defined
intervals. This feature runs in the background until you stop it. The feature has
two options:
■
Use the -e option to specify the time interval that must elapse before
Symantec ESM stops a policy run.
■
Use the -t option to specify the time of day when all policy runs stop.
For example, –e 20:00:00 stops all policy runs that have been running for longer
than 20 hours and -t 09:00:00 stops all policy runs at 9:00 am.
The feature uses a property file to provide necessary information. The file lists
the manager names, user names, passwords, and port numbers that the feature
needs to connect to the managers. You can use any text editor to create the
property file. You must name the file, jwatch.dat. Save the property file in the
same folder with the jwatch program file.
The property file is a plain text, tab delimited file. The property file has the
following format:
manager_name<tab>username<tab>password<tab>port
For example:
Manager1 esmuser1 my1pass+ 5600
Manager2 esmuser2 my2pass+ 5600
.
.
Manager5 esmuser5 my5pass+ 5600
Using policies, templates, snapshots, and modules
About snapshots
To stop policy runs at user-defined intervals
1
Create a property file, name it jwatch.dat, and save it in the same folder with
the jwatch.exe file.
2
Change to the Program Files\Symantec\ESM\bin\<operating system> folder.
3
Do one of the following:
■
Type jwatch.exe -t hh:mm:ss
Type jwatch.exe -e hh:mm:ss
Where:
-t is the time of day in hours:minutes:seconds
-e is the elapsed time in hours:minutes:seconds
For example: jwatch.exe -e 12:00:00 or jwatch.exe -t 09:00:00
■
Note: Use 24 hour format. For example, use 23:00:00 for 11:00 PM.
Deleting policy runs
When you create a scheduled policy run, the policy run number is displayed in
the enterprise tree under Policy Runs regardless of whether the policy has run
or not. You can delete these policy runs as you would any completed policy run.
You cannot delete a policy run that has already started until you stop it or it
completes.
To delete a policy run
1
On the Policy Runs branch of the enterprise tree, right-click the policy run
ID, then click Delete.
2
Do one of the following:
■
To delete the policy run and the related summary information, click
Yes.
■
To delete the policy run but retain the summary information, uncheck
Delete associated summary data, then click Yes.
About snapshots
Several modules establish security baselines by creating snapshot files of agent
and object settings the first time that they run. Subsequent module or policy
runs report changes to security-related settings.
117
118 Using policies, templates, snapshots, and modules
About templates
You can accept a change by updating the snapshot, or fix the problem, then
rerun the module or policy. See “Updating templates” on page 176, “Updating
snapshots” on page 177, and “Correcting a Security report item” on page 174.
Snapshot files for users, groups, devices, and file configurations exist for each
agent. User snapshots contain user account information such as permissions
and privileges. Group snapshots contain group permissions, privileges, and
membership information. Device snapshots contain device ownership,
permissions, and attributes. The file snapshot compares current settings to a
template, helping you locate unauthorized file modifications, viruses, and
Trojan horses. The UNIX version has an additional snapshot file that monitors
new setuid and setgid files for the File Find module. Application modules define
and use their own snapshot files.
About templates
Several modules use templates to store authorized agent and object settings.
Differences between current agent/object settings and the template are reported
when the module is run.
For example, the File Attributes module uses templates to validate current file
settings. The OS Patches module uses templates to verify the presence of
operating system patches. The Registry module uses templates to confirm
registry key values.
You can accept a new agent setting by updating the template, or you can fix the
problem, then rerun the module or policy. See “Updating templates” on
page 176, “Updating snapshots” on page 177, and “Correcting a Security report
item” on page 174.
Template files reside on the managers.
Administering templates
Symantec ESM lets you create, edit and delete templates.
Creating and editing templates
A template is a file that contains module control directives and definitions of
objects with their expected states.
Changes to sample templates are overwritten when you download the next
Security Update. To avoid this problem, create and edit your own templates.
Using policies, templates, snapshots, and modules
Administering templates
Creating a template
To create a template
1
In the enterprise tree, right-click Templates, then click New.
2
Select an available template type.
3
Type a name for the template without a file extension. Symantec ESM
provides the extension based on the template type that you select.
4
Click OK to list your new template in the Templates branch of the console
with other template files that use the same file extension.
Editing template rows
Symantec ESM overwrites all of the templates that ship with the program, with
each next Security Update. Consequently, you loose any changes that you have
made to these templates. To avoid this problem, create and edit your own
templates, or copy and edit the default templates.
To edit a template, open it in the Template Editor, add and delete rows, and
specify the contents of row fields.
To open a template in the Template Editor
1
In the enterprise tree, expand the Templates branch.
2
Double-click the template to open the template editor.
The Template Editor organizes templates into rows and columns. Each row
describes a single file, patch, or other item. Columns contain the information
that Symantec ESM matches with agent settings.
To add a template row
1
In the Template Editor open a template, then click Add Row.
2
Specify row information, including any sublist information needed.
3
Click OK to save the row.
4
Click Close to exit the Template Editor.
119
120 Using policies, templates, snapshots, and modules
Administering templates
To remove one or more rows
1
In the Template Editor or Sublist Editor, click the left-most, numbered
button of the row that you want to remove.
■
For a range of rows, hold down the Shift key while you click the first
and last row numbers.
■
For multiple non-sequential rows, hold down the Ctrl key while you
click each row number.
2
Click Remove Rows.
3
Click Save.
4
Click Close to exit the editor.
Editing template fields
In the Template Editor, you can:
■
Edit the contents of a string or numeric field.
String fields can store free-form text such as string fields in the Agent
Name, File Name, and File Signature fields of the File Watch template.
Numeric fields can store positive or negative integers or real (floating point)
numbers. The Severity field in the Patch template is an example of a
numeric field.
■
Check or uncheck a check box.
Some fields have check boxes that you can check to direct the module to
examine specified items, such as the New and Removed check boxes in the
File Watch template.
■
Select a context menu item.
Some fields have context menus that are displayed when you click a field,
such as Signature fields in File and File Watch templates and Signature
Type fields in File Signatures templates.
■
Edit a sublist.
Some fields contain sublists. Sublist fields display the number of items in
the sublist (initially, 0). Examples include the OS/Rev columns in File
templates and ICE templates.
Click a numbered sublist button (not a row button) to access the Template
Sublist Editor.
Clicking a sublist button opens the Template Sublist Editor.
Edit sublist rows in the Template Sublist Editor the same way that you edit
template rows in the Template Editor.
Using policies, templates, snapshots, and modules
About modules
The Symantec ESM Security Update User’s Guides describe how the modules use
the specific templates to perform security assessments.
About modules
Networked computers are vulnerable to unauthorized access, tampering, and
denial of service attacks in several key areas. Modules contain checks that
evaluate and report on the security of these vulnerable areas. The checks assess
the settings of the security controls in a systematic way. Each check assesses
one area of potential problems.
Modules fall into one of the following categories:
■
User accounts and authorizations
■
Network and server settings
■
File systems and directories
■
Dynamic assessment
For a detailed explanation of each module, all checks that are associated with
the module, information about editing modules, and information about applying
security checks, see the Symantec ESM Security Update User’s Guides. Download
the latest version at http://securityresponse.symantec.com.
The guides explain why Symantec ESM does each check, show how to
demonstrate the check’s function, and tell how to solve the security
vulnerability that is reported by the check. The guides also describe how to edit
the name lists and messages in the checks, as well as the templates that the
checks use.
Administering security checks
Symantec ESM lets you enable, edit, and disable security checks.
Enabling and disabling security checks
Only enabled security checks provide information when you run a module.
To enable and disable security checks
1
In the enterprise tree, expand the Policies tree.
2
Expand a module branch.
121
122 Using policies, templates, snapshots, and modules
Administering security checks
3
4
Do one of the following:
■
Double-click a Windows icon.
■
Right-click a Windows icon, then click Properties.
Do one of the following:
■
Check to enable.
■
Uncheck to disable.
Specifying options
You can control the behavior of security checks with options. Some options
contain text fields, where you can specify parameters such as the minimum
number of non-alphabetic characters that is required in a password.
Other options are used to specify entities that you want to examine as name
lists. For example, in the Users to Check option of the Password Strength
module, you specify which users and security groups you want all module
security checks to examine or skip. This option is permanently enabled, as
indicated by the circle in the box.
Modules and their associated checks can vary by operating system. Some
modules have versions that run on all supported computers, though the checks
differ by operating system, while others are limited to specific computers. For
example, different versions of the Account Integrity module run on all
computers, while versions of the File Find module run only on computers that
run NetWare/NDS and UNIX operating systems.
Editing name lists
To display name lists, click an option or security check in the left pane. The right
pane contains name lists where you can specify items that are to be included or
excluded when you run all or some of the security checks in the module.
Use name lists to specify items that are included or excluded by all or some
security checks in a module.
Table 4-4
Name list types
Type
Contents
Users
User account name such as user1 and user2
Groups
User account groups such as system operators and
administrators (Windows 2000/XP)
Files/Folders
Files or folders such as C:\Program Files\Symantec\
ESM\bin
Using policies, templates, snapshots, and modules
Administering security checks
Table 4-4
Name list types
Type
Contents
Enabled/Disabled word files
Word files containing word lists
Enabled/Disabled files
Template files
Key (word)
Sets of keys or keywords
Generic strings
Sets of generic character strings
Some name lists contain:
■
New, Delete, Move Up, and Move Down icon buttons
■
List area
■
Include and Exclude icon buttons
To add an item to a name list
1
Click New.
2
Type the item name.
You can use the asterisk (*) character as a wildcard character to represent a
set of items. For example, \myapp\* specifies all files in the \myapp folder.
To add another item, click Enter, then repeat steps 1–2.
3
Click Include or Exclude to indicate whether to examine or skip the listed
items.
4
Click OK.
To remove an item from a name list
1
Click the item.
2
Click Delete.
3
Click OK.
To move an item up or down in a name list
1
Click the item.
2
Click Move Up or Move Down.
3
Click OK.
123
124 Using policies, templates, snapshots, and modules
Administering security checks
Users and Groups name list precedence
When a module or security check contains User and Group name lists, the
names in the Group list are processed first. Then, within each selected group,
names in the User list are processed.
The following table summarizes the results that you receive from name lists
that include or exclude User or Group entries:
Table 4-5
Single Users and Groups name list results
When the check
And the
users list
And the
groups list
Then the check reports
Includes a user or
group name list
contains
user entries
is blank
Data for all reported users
Includes a user or
group name list
is blank
contains group
entries
Data for all reported groups and
users that are in the checks
Excludes a user or
group name list
contains
user entries
is blank
Data for all groups and users
except the reported users
Excludes a user or
group name list
is blank
contains group
entries
Data for all groups except the
reported groups and users that
are in the checks
Includes or excludes
blank name lists
is blank
is blank
Data for all groups and users
Some modules include Users to Check options with name lists that are used by
more than one security check. Some of the security checks that use the Users to
Check name lists also use their own name lists.
When a security check uses two Users and Groups name lists, the combined
contents of the name lists are processed as follows:
Table 4-6
Multiple Users and Groups name lists
If Users to Check
option
And check name lists
Then the check reports
Includes Users/
Groups entries
Include Users/Groups
entries
Data about all groups and their users,
and all users, in both user lists
Includes Users/
Groups entries
Excludes Users/Groups
entries that are included
by Users to Check
Nothing about groups and users in the
check name lists (exclude entries
override include entries)
Using policies, templates, snapshots, and modules
Administering security checks
Table 4-6
Multiple Users and Groups name lists
If Users to Check
option
And check name lists
Then the check reports
Excludes Users/
Groups entries
Include Users/Groups
entries that are excluded
by Users to Check
Nothing about groups and users in
Users to check name lists (exclude
entries override include entries).
Excludes Users/
Groups entries
Exclude Users/Groups
entries
Nothing about groups and users that
are in the name lists
Includes or excludes
blank name lists
Include or Exclude blank
name lists
Data for all groups and users
System administrators use reports that are produced from the policy runs to
take effective action and prevent security problems from becoming serious
security breaches.
In addition to the security modules, you can use the Integrated Command
Engine (ICE) module to extend Symantec ESM dynamic security assessment and
reporting capabilities to other network resources.
125
126 Using policies, templates, snapshots, and modules
Administering security checks
Chapter
5
Viewing security data
This chapter includes the following topics:
■
Viewing summary and detailed data
■
Understanding the grid and chart
■
Filtering security data
■
Selecting grid options
■
Customizing chart appearance
■
Configuring the console on Windows
Viewing summary and detailed data
Policy runs report noncompliant security issues for analysis and correction.
Symantec ESM presents its findings in either a summary or detailed format.
Summary data provides an overall picture of the organization’s security.
Detailed information provides information on specific security violations.
Symantec ESM helps focus your efforts on critical security issues through
identification and presentation of noncompliant issues in multiple useful
formats.
Summary data provides an overall look at the security issues in an enterprise.
You can access this data in the summary branch of the enterprise tree. Figure 51 illustrates the nodes in the summary branch.
128 Viewing security data
Understanding the grid and chart
Figure 5-1
Summary branch nodes
Summary branch
The detailed data describes the specific security issues in a host computer. You
can access this data by expanding a module in the summary branch and clicking
a policy run node. The information displays in the grid. This information
includes:
■
Title or name of the security message
■
Security level of the message (red, yellow, or green)
■
Item updates or corrections when available
■
Name of the noncompliant computer
■
Information reported by the check
In short, summary data reports the seriousness of an object’s security problems
while detailed data describes the exact noncompliant issues that you need
address.
Understanding the grid and chart
To effectively use Symantec ESM, you must be able to understand and interpret
the information in the console grid and chart. The console offers three different
modes for viewing security data: drill-down, summary, and trend. Each mode
has its own chart.
You can select these modes with the View menu or by clicking the associated
icons on the toolbar. You can also select settings to filter summary information.
These settings determine the information that the chart and grid display. See
“Filtering security data” on page 135.
Viewing security data
Understanding the grid and chart
The following table displays the differences among the three chart modes:
Table 5-1
Comparison of chart mode and contents
Chart option
Chart contents
Drill-down mode
The chart shows the current security level and
rating of objects that are immediately below the
object that you selected in the summary branch.
Summary mode
The chart shows a count by security level of
objects that are immediately below the object
that you selected in the summary branch.
Trend mode
The chart shows how the security level and
rating of the object that you selected in the
summary branch has changed over time.
The following sections describe these chart options in greater detail.
Drill-down mode
The drill-down chart displays the current level and rating of objects that are
directly beneath the selected object in the summary branch of the enterprise
tree. For example, if you select a policy in the summary branch, the drill-down
chart displays the security level and rating of the modules that are in that
policy.
You can expand the tree and access successively lower levels of information by
clicking the node buttons that are next to the objects in the summary branch, or
by clicking the colored portions of the chart or chart legend.
Figure 5-2 illustrates a drill-down chart. In this instance, the chart displays the
results of running a Phase 1 policy on an agent.
129
130 Viewing security data
Understanding the grid and chart
Figure 5-2
Drill-down chart
The drill-down chart helps you see which objects need the most attention. Red
objects pose the greatest threat and should be addressed first. Yellow objects
should be addressed next. Green objects generally require no action.
In addition to displaying red, yellow, and green security levels, the chart may
contain black bars that indicate, “No Data.” This means that the related object
has no summary data to contribute to the chart.
The drill-down chart graphs the contents of the Level and Rating columns in the
grid.
Figure 5-3
Components of the drill-down chart
Viewing security data
Understanding the grid and chart
Use ratings to rank each object’s conformity to policy. See “Security rating” on
page 134.
To view object data
1
2
Do one of the following:
■
On the toolbar, click Drill-down mode.
■
On the View menu, click Drill-down mode.
Click the node buttons next to the objects in the summary branch, or click
the colored portions of the chart or chart legend to expand the tree and
access the desired object in the summary branch.
Summary mode
The summary chart shows a count by security level of the objects that are
immediately below the object that is selected in the summary branch. For
example, if you select a policy in the summary branch, the summary chart
displays a count by security level of the modules in that policy.
The summary chart displays in pie chart format by default. You can select the
toolbar icon, click the chart or legend, and change the display to drill-down
mode.
The following graphic illustrates a summary chart. In this instance, the chart
displays the results of running a Phase 1 policy on an agent.
131
132 Viewing security data
Understanding the grid and chart
Figure 5-4
Phase 1 policy summary chart
To view summary data
1
2
Do one of the following:
■
On the toolbar, click Summary mode.
■
On the View menu, click Summary mode.
Click the node buttons next to objects in the summary branch, or click the
chart or chart legend to expand the tree and access objects in the summary
branch.
Trend mode
The trend chart portrays changes in a selected object’s security level and rating
over time. For example, if you select a policy in the summary branch, the trend
chart displays the changes to the security level and rating of the policy over a
specified period of time.
You can view changes in security level and rating on a daily or weekly basis.
■
When you select daily, Symantec ESM displays the security level and rating
of the last run that occurred before 11:59 PM each day.
■
When you select weekly, Symantec ESM displays the security level and
rating of the latest run that occurred before 11:59 PM each Saturday.
Viewing security data
Understanding the grid and chart
The grid and chart depict the data starting with the most recently available
policy run.
If the number of data points exceeds the available data, Symantec ESM depicts
what is available and repeats the oldest data point for each of the earlier periods.
The following graphic illustrates a trend chart. In this instance, the chart
displays the results of enabling the account lockout feature on the host
computer.
Figure 5-5
Trend chart
To view trend data
1
2
Do one of the following:
■
On the toolbar, click Trend mode.
■
On the View menu, click Trend mode.
Click the node buttons next to objects that are in the summary branch to
expand the tree and access the desired object in the summary branch.
To configure the number of trend data points
1
In the View menu, click Trend datapoints.
2
Click Daily or Weekly to specify the datapoint interval.
3
Type a number in the Number of datapoints text box or use the up or down
arrows to change the number of datapoints.
133
134 Viewing security data
Understanding the grid and chart
Security level
Symantec ESM has three security levels: red, yellow, and green. The following
table defines each level.
Table 5-2
Security levels
Level
Threat
Description
Red
Serious concern
Red indicates a serious security
vulnerability that requires immediate
attention.
Yellow
Moderate concern
Yellow indicates a moderate security
vulnerability.
Green
For information
Green indicates that no corrective
action is required.
Security levels give you an overall sense of each object’s conformity to policy in
the summary branch of the enterprise tree. Symantec ESM depicts each object at
its highest level. For example, if one agent in a domain is red, then the entire
domain is red. Similarly, if the highest module in a policy is yellow, then the
entire policy is yellow.
Security rating
The security rating gives you a numeric value to rank each object’s conformity
to policy in the summary branch of the enterprise tree. Objects with a higher
rating are considered a greater security risk.
Security ratings come from the security messages that are reported by modules
during policy runs on agent systems. Red level messages are critical and receive
a significantly higher rating than yellow messages. The following table defines
the numeric weight assigned to each security level.
Table 5-3
Security rating
Level
Numeric
Weight
Description
Red
10
A red message indicates a severe security
vulnerability. Each red message contributes 10
points to an object’s overall rating.
Yellow
1
Yellow messages indicate a moderate security
vulnerability. Each yellow message contributes 1
point to an object’s overall rating.
Viewing security data
Filtering security data
Table 5-3
Security rating
Level
Numeric
Weight
Description
Green
0
Green messages do not contribute to the rating.
An object’s rating is derived from the following formula:
The number of red messages times the weight of red messages
+ The number of yellow messages times the weight of yellow messages
= The overall rating of the object
When interpreting the rating, you must understand that the rating stems from
the number of messages multiplied by the value of the rating. An object having a
high yellow rating may not pose the same threat as an object having a low red
rating. As a rule of thumb, address red messages first.
Although security level and rating are related, they should be considered
separately. See “Determining a security level and rating” on page 40.
Filtering security data
Summary data filters let you choose the policies, modules, operating systems, or
messages that Symantec ESM includes in the grid, chart, or security reports.
The filters do not affect the reports that are produced by the Reports tool.
You can use filters to remove policies, modules, operating systems, or messages
that you do not want to display.
Filters apply to the summary data in the enterprise tree from My ESM
Enterprise to a selected manager, and down through the manager’s domains to
the modules in the summary branch. As a result, you can filter summary data at
any level that is reported by Symantec ESM.
135
136 Viewing security data
Selecting grid options
You can select filter properties using the Summary Data Filter dialog box.
■
The Policy tab lets you select a single policy. You can choose to always use
the most recently run policy or select a different policy run.
■
The Modules and Operating Systems tab lets you select specific modules and
operating systems; for example, Windows, UNIX, NetWare, or OpenVMS.
■
The Messages tab lets you select whether to show long message text and
suppressed messages, and lets you see the message differences between the
most recent policy run and a previous policy run that you can select.
If you choose to show suppressed messages, the level column in the grid
indicates which messages are suppressed.
If you choose to view policy run differences, the grid displays new,
unchanged, and old messages in differing typefaces. New messages appear
in bold type, unchanged messages appear in normal type, and old messages
appear in italics. You can select whether to show new, unchanged and old
messages.
You must select either drill-down mode or summary mode to use the
differences filter.
Three small boxes on the right side of the status bar indicate the type of active
filter activity.
■
The Differences box indicates that policy run differences are shown.
■
The Suppressed box indicates that suppressed messages are shown.
■
The Filter Applied box indicates that operating system, module, or policy
filters are active.
To create or edit a filter
1
On the toolbar, click the View/edit summary filter settings icon.
2
Configure the filter by selecting the policy, modules, operating systems, and
messages on the corresponding tabs of the dialog box.
For help, select the tab, and then click the Help button.
Selecting grid options
The grid lets you copy grid messages and find text in the grid.
Copying grid messages
This option lets you copy text from the grid to the clipboard on the Windowsbased computer.
Viewing security data
Customizing chart appearance
To copy text from the grid
1
Select the text in the grid that you want to copy.
2
Right-click the selected text and in the Grid options, then click Copy.
3
Use a text editor to open a document to the place where you want to insert
the selected text.
4
On the Edit menu of the text editor, click Paste.
Finding text in the grid
This option lets you conduct a sequential search of a column in the grid for
occurrences of specific text. For example, you can search a list of security
messages resulting from a policy run for a specific user, computer, or other
criteria.
To find text in a column of the grid
1
On the grid, right-click the column containing the text that you want to find,
then click Find text in column.
2
Type the text to search for in the Find what text box.
3
Click the Up or Down radio button to select a search direction.
4
Check the Match case check box to match the case of the input text to the
text in the grid.
Customizing chart appearance
The console retains the chart settings that you select when displaying graphical
information. These settings are stored in your user environment.
This enables each console user to customize the appearance of the chart for
personal use.
Showing or hiding the chart legend
You can increase the size of the chart when viewing a large volume of chart data,
such as charts containing more than 100 items, by hiding the chart legend.
137
138 Viewing security data
Customizing chart appearance
To show or hide the chart legend
1
On the View menu, click Chart options.
2
Click Show chart legend:
■
To hide a displayed legend.
■
To display a hidden legend.
Showing or hiding series labels
The console uses series labels to display rating information in charts.
You can hide series labels in bar charts and trend charts when viewing a large
volume of chart data, if the rating numbers on the charts are difficult to read.
To show or hide chart series labels
1
On the View menu, click Chart options.
2
Click Show series labels:
■
To hide displayed series labels.
■
To display hidden series labels.
Selecting 2D or 3D chart graphics
The console displays three-dimensional chart graphics by default, but optionally
can show two-dimensional information.
To select 2D or 3D chart graphics
1
On the View menu, click Chart options.
2
Do one of the following:
■
Click 2D chart graphics to view charts in two dimensions.
This option displays a large volume of chart data more clearly.
■
Click 3D chart graphics to view charts in three dimensions.
This option displays more attractive graphics when viewing smaller
amounts of chart data.
Selecting pie or bar chart graphics
In summary mode only, the console can display information in pie or bar chart
graphics.
If you are viewing a large volume of information, the chart may not have enough
resolution to display all of the information.
Viewing security data
Configuring the console on Windows
To select pie or bar chart graphics
1
On the View menu, click Chart options.
2
Do one of the following:
■
Click Display as bar chart to view summary information as a bar chart.
■
Click Display as pie chart to display summary information as a pie
chart.
Configuring the console on Windows
Console controls are easily accessed and the graphics in printed reports look
best if you set the Windows display to at least 256 colors and 800 by 600 pixels.
To verify the display settings
1
Click Start > Settings > Control panel > Display from the taskbar, and then
click the Settings tab.
2
Verify the following:
■
Color Palette. Set this option to at least 256 colors, although the
console can run in 16 colors.
■
Desktop Area. Set this option to at least 800 by 600 pixels, although the
console can run in 640 by 480 pixels.
139
140 Viewing security data
Configuring the console on Windows
Chapter
6
Generating and viewing
reports
This chapter includes the following topics:
■
About Symantec ESM reports
■
Generating standard reports
■
Saving a report
■
Opening a report
■
Printing a report
■
Emailing a report
■
Deleting a report
■
Customizing a report
■
Using the Reports tool
About Symantec ESM reports
Symantec ESM offers six standard reports and a powerful Report tool that offers
12 additional reports that can be configured for content and audience.
The six standard reports produce output in HTML format. These reports contain
charts, tables, and hyperlinks that must be viewed in an HTML browser.
The 12 additional reports are part of the Reports tool that you can run from
either the Start menu or the console. They are created using Crystal Reports
templates and can generate reports in several different formats such as
Microsoft Word documents, Lotus Notes, HTML, ASCII, and printed reports to
name just a few, or they can even be integrated into databases of your choice.
They have the capability to report on any or all managers, agents, domains,
142 Generating and viewing reports
Generating standard reports
polices, policy runs, and messages, so you can pinpoint exactly what
information you want to emphasize in the report.
In addition to the Symantec ESM reports, you can use information that is
contained in the console summary database with third-party applications like
Crystal Reports or Microsoft Access to create custom reports.
Generating standard reports
A Symantec ESM report is an online or printed account of the information
contained in the grid and chart. Symantec ESM offers security administrators
the following standard report types:
■
Security report
The Security report presents noncompliant security-related information in
summary and detailed formats.
■
Domain report
The Domain report lists all agents in the domain and important information
about each agent, including the agent’s operating system, version, network
protocol, network port, and computer type.
■
Executive report
The Executive report is a one-page summary that displays the enterprise’s
conformity to each security module.
■
Policy report
The Policy report provides information about individual policies, including
the number of policies, modules, and security checks.
■
Policy run report
The Policy Run report contains the start and completion time, policy name,
and domain name for all jobs run on the manager.
■
Template report
The Template report lists the objects in the template.
Symantec ESM reports contain the following sections:
■
Title page
■
Table of contents
■
Introduction
■
Report body
You can customize a report by adding the organization’s name and logo to the
report’s title page.
Generating and viewing reports
Generating standard reports
Generating a Security report
This report can list security related data about objects in the enterprise tree
from the summary branch through My ESM Enterprise.
Different policy runs can include different mixes of modules, enabled security
checks, and template settings. The Security report identifies the policy run that
provides the summary information for each security module.
The report portrays policy run results in the same tabular and graphical formats
as the grid and chart.
In Symantec ESM, you can generate a report based on specific policies, modules,
operating systems, and messages. You can also select which levels in the
Symantec ESM tree to include or exclude from the report.
Any filters that are employed filter information in reports as well as reports as
the information that is displayed in the chart and grid. Therefore, you should
interpret filtered reports in the context of the applied filter. See “Filtering
security data” on page 135.
You can create a Security report from the Report menu or from specific nodes in
the enterprise tree. The nodes are the My ESM Enterprise node, the All
Managers node and any node that is subordinate to the All Managers node.
The body of the Security report has a section for the selected node and each
node beneath it down to and including the policy run summary nodes. For
example, if you generate the Security report from an agent node, then the body
of the report has a section for the agent, policy or policies, modules, and Policy
Run summary nodes.
Symantec ESM may take a long time to produce a report if you run a policy on a
large number of agents. Turning off graphic generation can significantly reduce
the time required to create the report. Also, the browser may have problems
loading the file if the report.html file grows to many megabytes.
After generating the report, the console launches the computer’s default
browser that displays the report in standard HTML format. The console saves
the report file automatically. You can print it for analysis and future reference.
143
144 Generating and viewing reports
Generating standard reports
To generate a Security report
1
2
Do one of the following:
■
Right-click a specific node from My ESM Enterprise down through the
summary branch, and click Security report.
■
Click a specific node from My ESM Enterprise down through the
summary branch. Then on the Report menu, click Security.
Use the report options tabs to view or change the default report settings:
■
Click the summary tab, and then click the check boxes to select the
levels from the summary branch that you want to include in the report.
Each option represents a level in the summary branch. (Dimmed
options are not available because the report was created at a node
below these levels.) The text box at the top of the window shows the
node from which the security report was initiated.
■
Click the format tab, and then click the check boxes to change the
default settings.
Disable the Show title page option when you want a report without a
title page.
Disable the Show table of contents option if the Web browser does not
support frames. The change causes the browser to open the report.html
version of the report.
Note: Disabling this option increases the time required for the browser to
load a report because the browser must load the entire report.
The default setting allows the browser to initially load only the report’s title
page and table of contents.
Disable the Show introduction option when you want a report without
an introduction.
For more information, click the Help button on the tab.
■
Click the General tab, and then click the check boxes to change the
default settings.
Disable the Show summary chart option when you want a report
without summary charts.
Disable the Show drill-down chart option when you want a report
without object charts.
■
Click the Policy tab, and then click the check boxes to change the
default settings.
You can check boxes to show policy checks and suppression records
from this screen.
Generating and viewing reports
Generating standard reports
■
Click the Messages tab, and then click the check boxes to change the
default settings.
You can check boxes to show long message text and suppressed
messages, and you can show policy run message differences.
When Symantec ESM finishes, it launches the computer’s default Web browser
and displays the report in standard HTML format.
Generating a Domain report
The Domain report lists the agents in the selected domain. With this report, you
can learn each agent’s operating system, Symantec ESM version, network
protocol, and proxy agent names.
You can create a Domain report by right-clicking any named domain node.
To generate the Domain report
1
2
Do one of the following:
■
Right-click a domain on the summary branch, and click Domain report.
■
Click a domain on the summary branch. Then on the Report menu, click
Domain.
Click the check boxes to eliminate a title page, a table of contents, or an
introduction page from the report.
Generating a Policy report
The Policy report provides information about individual policies, including the
number of policies, modules, and enabled checks. You can generate a Policy
report from the Policies node or any node that is subordinate to the Policy node.
Like the Security report, the Policy report lists information for the selected node
plus the branches beneath the selected node.
145
146 Generating and viewing reports
Generating standard reports
To generate a Policy report
1
2
Do one of the following:
■
Right-click a specific node on the policies branch, and choose Policy
report.
■
Click a specific node on the policies branch. Then on the Report menu,
click Policy.
Use the report options tabs to view or change the default report settings:
■
Click the Format tab, and then click the check boxes to eliminate a title
page, a table of contents, or an introduction page from the report.
■
You can Click the Policy report tab, and then click the check box to
show disabled checks, policy suppressions, namelists for each check,
and long descriptions for each check.
Generating a Policy Run report
The Policy Run report lists all the jobs that have run on the manager and
important information about each run, including the status, start and finish
time, policy name, and domain name. You can generate a Policy Run report from
the Policy Runs node.
To generate a Policy Run report
1
2
Do one of the following:
■
Right-click a specific node on the policy runs branch, and choose Policy
run report.
■
Click a specific node on the policy runs branch. Then on the Report
menu, click Policy run.
Click the check boxes to eliminate a title page, a table of contents, or an
introduction page from the report.
Generating a Template report
Templates define the baseline status of objects. The Template report contains a
list of these objects and each object’s security setting.
Warning: Some template files contain so much information that opening a
Template report can cause the computer to run out of virtual memory.
You can create a Template report by right-clicking any named template node.
Generating and viewing reports
Generating standard reports
To generate a Template report
1
2
Do one of the following:
■
Right-click a specific node on the templates branch, and choose
Template report.
■
Click a specific node on the templates branch. Then on the Report
menu, click Template.
Use the report options tabs to view or change the default report settings:
■
Click the Format tab, and then click the check boxes to eliminate a title
page, a table of contents, or an introduction page from the report.
■
Click the Template tab, and then click the check box to show template
sublists.
Generating an Executive report
The Executive report lists the selected object’s conformity to each security
module. You can create an executive report from specific nodes in the enterprise
tree. The nodes are the My ESM Enterprise node, the All Managers node and any
node that is subordinate to the All Managers node.
To generate an Executive report
◆
Do one of the following:
■
Right-click the desired node in the summary branch, and choose
Executive report.
■
Click the desired node in the summary branch. Then on the Report
menu, click Executive.
Generating reports using third-party applications
The local summary database provides query capability on the managers, agents,
and policies; reporting how they relate to the summary data and module
message details in the policy runs. This query capability provides great
flexibility in analyzing and reporting network vulnerabilities.
You can use the local summary database with any third-party reporting
application that is capable of reading Microsoft Access (.mdb) native file format,
such as Crystal Reports, Microsoft Access, or SQL Server, to produce custom
reports that are tailored to the organization’s reporting needs.
By default, the name of the local summary database in the console database
directory is the same as the name that is used to create the user account on the
console. For example, if a user named John creates a new console account and
147
148 Generating and viewing reports
Saving a report
enters John as the username, then the console creates a new database file:
john.mdb.
To ensure that the local summary database contains current summary
information for reporting or analysis, you must manually synchronize the local
summary database with the manager sumfinal databases in the network. Using
the Enterprise tree, you can choose to upload manager sumfinal database
information from a single manager, all of the managers in a region, or all of the
managers connected to the console.
When analysis or reporting requires module message details, you can choose a
separate function in the console to upload this information from a single
manager, all of the managers in a region, or all of the managers that are
connected to the console.
To generate a third-party custom report
1
Determine the information that the custom report must contain.
2
Locate the information that the query must retrieve in the local summary
database. See “Understanding the summary databases” on page 77.
3
Use the browse feature in Microsoft Access or another software tool to select
the user database for the query.
4
Use the information and instructions in the third-party software
documentation to create the query.
Note: Do not use third-party software applications to add, edit, or delete the
information that is in the local summary database.
Saving a report
Reports capture important information at key points in time. The console
automatically saves reports as you generate them. The Console names the
report according to the node on which the report was generated, the date that
the report was generated, and the time that the report was generated.
(The reports use 24-hour time, 00:00 - 23:59.)
The console stores the saved reports in a folder on the computer where the
Symantec ESM Enterprise console is installed. Use the report options dialog to
choose a report repository location. See “Customizing a report” on page 150.
The reports folder contains a separate folder for each type of report.
Generating and viewing reports
Opening a report
Opening a report
Symantec ESM lets you open saved reports.
To open a report
1
Click Open from the Report menu.
2
Choose the folder that contains the report.
3
Choose frames.html or report.html. The frames version uses a table of
contents.
4
Click Open.
Printing a report
After you generate a report with the console, you can print it for further
reference or analysis. Because Symantec ESM displays its Security reports in
HTML format, you must have a Web browser on the computer to view or print a
report. Refer to your browser’s documentation for instructions on how to print a
file. You may find that reports with complex tables print better in landscape
mode.
To print a single page from a report
1
Select the desired page in the Table of Contents.
2
Click the frame that displays the desired page.
3
Click the print icon in the browser’s toolbar.
To print a complete report
1
Change the URL location from:
file:///.../Frames.html
to:
file:///.../Report.html
then press return.
2
Click the print icon on the browser’s toolbar.
Emailing a report
You can email a report; but first, make sure to zip the entire report directory.
Recipients should load Frames.html to view the report.
149
150 Generating and viewing reports
Deleting a report
Deleting a report
Symantec ESM lets you delete saved reports when you no longer need them.
To delete a saved report
1
Select Delete from the Report menu.
2
Click the corresponding radio button to select a report type.
Saved reports of that type display in the Created reports list box.
3
Click the desired report.
4
Click Delete.
Customizing a report
You can customize a report title page by adding the organization’s name and
logo. You can also specify a different location to save report files.
To customize a report
1
2
Choose Report Options from the reports menu.
■
Type the name of the organization in the company name box.
■
Select the organization’s logo by clicking Open and selecting the path
and filename. The organization logo must be in a graphic format that
can be displayed in an HTML file such as a .gif or .jpeg file.
■
Specify a different location for the report files.
Click OK to save and apply the specified changes to every report that
Symantec ESM generates.
Converting a report to Microsoft Word format
You can use the following procedure to convert reports from HTML to Microsoft
Word format. The resulting Word documents contain all of the graphics that are
found in the original report.
To convert a report
1
Create the desired report using the console.
2
Start Microsoft Word.
3
On the Microsoft Word File Menu, click Open and browse for the report in
the related subdirectory of the \Symantec\ ESM Enterprise Console\Reports
folder.
Generating and viewing reports
Using the Reports tool
4
Click Report.html to open the report in Microsoft Word.
5
Save the report file as a Word Document (*.doc) type.
6
On the Microsoft Word Edit Menu, click Links.
7
Select all of the graphic files that are listed in the Links dialog box.
8
Click the Save picture in document check box and then click OK.
9
Save the report file again.
Using the Reports tool
Symantec ESM features another versatile report generator. This generator uses
a graphical user interface along with Crystal Reports templates and .xml files to
create 12 different report types for executives, security officers, and system
administrators. Many of these reports include parameters that you can alter to
customize reports for specific purposes or audiences.
This tool lets you generate reports from Symantec ESM that can be tailored to
your specific requirements using software and databases external to Symantec
ESM. This allows for additional reporting functionality quickly and easily
without requiring additions to the current functionality of Symantec ESM. The
Reports tool can create reports that include information pertaining to any or all
managers, agents, domains, policies, policy runs, and messages within
Symantec ESM. These reports show the statuses of all agents and can be used to
identify and show vulnerabilities in the network quickly and easily.
A brief description of each report that the Reports tool can generate follows:
■
Agent List by Manager Report
This report lists all agents that are registered to the specified managers. It
also displays each agent’s operating system and domain membership.
■
Agent List Report
This report lists each agent with its associated operating system, domains
and managers.
■
Agent Status Report
This report gives the statuses of specified managers and agents; red, yellow,
or green. The report includes agent rating, agent name, associated policy
names, and message count numbers, each with red, yellow, or green ratings.
■
Domain List Report
This report lists the domains that are associated with the specified
managers. It also lists the agents that are in each domain and the operating
system of each agent.
151
152 Generating and viewing reports
Using the Reports tool
■
Job Status Report
This report shows results for the most recent policy run for each agent that
is associated each of the selected managers. The information in the report
includes the policy name, completion date, the job rating, and the job run
result for the most recent policy run for each agent. The report also
includes the modules that were assessed and a level and message count for
each check that was enabled in the policy run.
■
Message Detail Report
This report shows details for any message that was reported on and agent,
including the level and the message information for each message. This
report can be sorted by agents or managers. You can include or exclude
messages, domains, agents, and color levels in this report.
■
Message List Report
This report lists each message with its identification number, as well as an
explanation of the message, whether it represents a problem or is simply
informative. This report is an exhaustive list of all possible messages for a
policy run.
■
Module Status Report
This report displays module names, message colors, module titles, and
message counts for each module. It can show information for any or all
specified managers, domains, and agents. It can hide or show suppressed
messages. It also shows ratings for agents.
■
Policy and Module Report
This report lists all policies, the managers that own the policies, and the
enabled modules for each policy.
■
Policy Configuration Report
For specified managers and policies, this report shows each module with its
current enabled check names. The reports are sorted by operating system
for each module name.
■
Policy List Report
This report shows the policy names associated with each manager.
■
Policy Status Report
This report can be sorted by managers, domains, and agents. It shows
module ratings and names as well as message colors and counts.
Generating and viewing reports
Using the Reports tool
Certain reports that contain information on managers, agents, policies,
messages, domains, or modules have parameters that let you select and exclude
specific policies, managers, agents or other criteria. Of the reports available, the
following, organized under ‘custom reports’ in the interface, have parameters:
■
Agent Status Report
■
Job Status Report
■
Message Detail Report
■
Module Summary Report
■
Policy Configuration Report
■
Policy Status Report
Usage prerequisites
Complete the following prerequisites before using the Reports tool:
■
Database Conversion tool
You must run the Database Conversion tool at least once to transfer
security data from the managers to the source database from which the
Reports tool retrieves its information. You can use the database that you
may have created during the install. It is called ESMSchema.mdb. An ODBC
data source name for this database is also configured during the install. The
data source name is ‘ESMReports’. To use the Database Conversion tool,
either you need to use this database and data source name, or you will need
to assign a data source name to your own database using the ODBC Data
Source Administrator. If you don’t run the Database conversion tool, all the
reports will be blank. See “Using the Database Conversion tool” on
page 247.
When you run the Database Conversion tool, the transfer includes
information about agents, domains, managers, policy runs, policy run
messages, message suppressions, and policy run reports. The Database
Conversion tool should be run frequently to keep the source database
current, otherwise your reports may not contain recently changed
information. You can use batch files to automate the Database Conversion
tool and automatically update the Reports tool’s source database.
■
ODBC Data Source
Verify that the Microsoft ODBC Data Source Administrator is configured
properly and that a data source name has been assigned to the source
database from which the Report Viewer retrieves its information. A
Microsoft Access database with a data source name of ESMReports is
optionally created during install.
153
154 Generating and viewing reports
Using the Reports tool
Opening the reports interface
After installing Symantec ESM utilities using the default settings, you can
access the Reports tool using one of the following two methods.
■
In the console, from the menu select Report > ESM Reports.
■
Open the Reports GUI from the Windows Start menu and select
Programs > Symantec > ESM Utilities > ReportGUI.
Using the interface
At start up, the Reports tool requests the data source name that corresponds to
the database from which it draws its information. To connect to this database,
you may need to type a user name and password. An authentication box appears
in which you type this information. The box has a pull-down menu from which
you must select the data source name. You may also need to provide the user
name and password to attain access to the database. Some databases, such as
Microsoft Access, may not require user names or passwords.
To select a data source name and type the user name and password
1
In the Datasource Connection box from the pull-down menu, select the data
source name.
2
Type the associated user name if necessary.
3
Type the associated password if necessary.
If you have not configured the database that you plan to use and given it a data
source name, you must configure the database using the ODBC Data Source
Administrator tool that is found in Windows operating systems. You can also
use the MS Access database and data source name that was optionally
configured during installation. The data source name is ESMReports.
When the Report Viewer window opens, you see two panes. On the left is the
pane with the available reports. These reports are grouped into two categories,
custom and common reports. You will see two expandable entries, one entitled
Common Reports, and the other entitled Custom Reports. Custom reports have
parameters that you can modify to select specific information, while the
common reports do not. Expand the entries to reveal the report names.
On the right are the report parameters with their values and descriptions. When
you open the custom reports, at the top of the window you see tabs that group
parameters by type. Common reports do not have tabs.
The Reports tool uses two .xml files from which it extracts information. The
names of these .xml files are ESMReports-Custom.xml and
ESMReports-Common.xml. These .xml files contain report definitions for each
Generating and viewing reports
Using the Reports tool
available report and all the default parameters for each report. If .xml files are
added to the source directory, additional entries appear for each .xml file.
When you make changes in the Reports GUI, you may save them using the pulldown menu by selecting File > Save As. This saves parameter changes by
altering the .xml file. If you save your report configuration using the original
name, you will overwrite the .xml file. If you save the report configuration using
a new name, the program will create a new .xml file in the source directory and
you will see new entries for each .xml file.
Using the toolbar
A toolbar is available in the Reports tool for your convenience. You can choose
to either show or hide the toolbar by selecting or deselecting it under View in the
pull-down menu.
Table 6-1
Icon
Toolbar icons
Description
Open a report definition.
Save a report definition.
Save all report definitions.
Open the report previewer.
Print a report.
Using the menu
The menu at the top of the screen has a great deal of functionality.
Choose these options under the File selection:
■
Open
Use this option to find and use report definitions in .xml files that are not in
the source directory.
155
156 Generating and viewing reports
Using the Reports tool
■
Save
This option saves your report configurations. When you use this option, you
overwrite values in the .xml files that contain the report definitions.
■
Save as
This option saves your report configuration by creating a new .xml file in
the source directory. Using this option creates new entries in the Reports
tool.
■
Save all
This option saves report configuration changes for all reports.
■
Print
This sends the current report to the default printer.
■
Preview report
This brings up the report preview screen. This screen lets you preview and
export the reports. See “Report Previewer export options” on page 157.
■
Connect Database
This option opens the ODBC Data Source Connection dialog box. Use this
box to connect to a different source database for your reports. This is the
same dialog box that opens when you start the Reports tool. Select an ODBC
Data Source that you have configured using the ODBC Data Source
Administrator, and type the user name and password if applicable.
See “Opening the reports interface” on page 154.
■
Exit
This option closes the Reports tool.
Choose these options under the View menu:
■
Toolbar
Check this to show the toolbar buttons. Uncheck it to hide the toolbar.
■
Status bar
Check this to show the status bar at the bottom of the window. Uncheck it to
hide the status bar.
A Help menu is also available:
■
Search topics...
This provides online help.
■
About
This shows information about the Reports tool.
Generating and viewing reports
Using the Reports tool
Using the Reports tool
The following procedure outlines the use of the GUI version of the Reports tool.
To use the Reports GUI tool
1
Expand an entry in the Reports tool.
2
Select the report that you want to use.
3
If applicable, select a parameters grouping tab to modify the parameters.
4
Select the parameter to modify. Because some parameters are interrelated,
changing the value of one parameter may necessitate modification of a
second parameter. Interrelated parameters are all located under a single
parameter grouping tab.
5
The parameter names, default values, and descriptions appear in the far
right pane. Some parameters allow free text while others have drop-down
menus from which you may select an option. Either type a value for a
parameter or select a value from the drop-down menu. Table 6-2 on page
161 describes and explains each parameter, shows which reports that each
parameter is used in, gives all of the valid values for each parameter, and
explains interrelations among parameters.
6
Click Preview Report from the File menu, or click the Preview Report button
from the tool bar at the top of the screen to view the report.
7
Within the report previewer is an export button. Use this button to export
the report in several formats to one of several destinations. See “Report
Previewer export options” on page 157 for more information on exporting
reports.
Right next to the Preview Report button is the Print button. Use the print
button to send the report directly to the default printer. You can also select
Print from the File menu or select the Print button within the Report
Previewer.
Report Previewer export options
When the Report Previewer opens, you can navigate through the report and
then print it using the Print button. You may also export the report to a file,
email, database, or one of several other options. Click the Export button next to
the Print button to use the export options.
When you select the Export button, the Report Viewer uses Crystal Reports
templates to export the file. See “Using the Reports tool” on page 266.
The Export dialog box includes two drop down menus. From the Format menu,
you select a format option and from the Destination menu, you select a
157
158 Generating and viewing reports
Using the Reports tool
destination option. Usually, you need both a format and destination option
selected.
The format options allow you to select the type of format into which you want to
put the information. For example, you may select to turn the information into
Microsoft Word format, Lotus 1-2-3 format, text format, HTML, or one of
several other options.
Among the formatting options is the ODBC option. One ODBC option is available
for each data source name that is configured in the ODBC Data Source
Administrator. Using these options, you may choose to export the information
to a database that has been named and configured in the Microsoft ODBC Data
Source Administrator. If you choose an ODBC option, a destination option is not
needed. The Reports tool uses the information that was configured in the ODBC
Data Source Administrator to export the information to the associated database.
When using this option, be sure that you use a unique data source name, because
the Reports tool cannot overwrite existing data in a database. Reusing the same
database results in errors. This destination database must not be confused with
the source database from which the Reports tool gets its information.
A complete list of all formatting possibilities follows:
■
Character-separated values
■
Comma-separated values (CSV)
■
Crystal Reports (RPT)
■
Crystal Reports 7.0 (RPT)
■
Data Interchange Format (DIF)
■
Excel 5.0 (XLS)
■
Excel 5.0 (XLS) (Extended)
■
Excel 7.0 (XLS)
■
Excel 7.0 (XLS) (Extended)
■
Excel 8.0 (XLS)
■
Excel 8.0 (XLS) (Extended)
■
HTML 3.2
■
HTML 4.0 (DHTML)
■
Lotus 1-2-3 (WK1)
■
Lotus 1-2-3 (WK3)
■
Lotus 1-2-3 (WKS)
Generating and viewing reports
Using the Reports tool
■
ODBC - <data source name>
(One entry for each configured data source name)
■
Paginated Text
■
Record style (columns of values)
■
Report Definition
■
Rich Text Format
■
Tab-separated text
■
Tab-separated values
■
Text
■
Word for Windows document
Once you select a format option, you usually need to select a destination option.
Five possibilities exist as destination options. Use these options to send the
formatted report information to the destination that you select. For example, if
you chose Disk file as your destination, and Word for Windows document as
your format option, the Reports tool saves a file in Word format on your hard
drive at the destination that you select. If you pick Application as your
destination, then the Reports tool calls the Microsoft Word application, opens it,
and places the report in it. When naming a file, be sure to include a file
extension.
A list of destination options follows:
■
Application
■
Disk file
■
Exchange Folder
■
Lotus Domino Database
■
Microsoft Mail (MAPI)
After selecting OK, the export tool prompts you for any needed information
depending on the formatting and destination options that you select. For
example, when you select Character-separated values for a format and Disk file
for the destination, the export tool prompts you for the character you want to
use to separate the values, and then it prompts you for a file name and the
directory where you want to save the file.
If you choose an ODBC option from the format options, a destination option is
not necessary or available.
The Crystal Reports templates that come bundled with the Reports tool may be
examined for further insight.
159
160 Generating and viewing reports
Using the Reports tool
Changing default parameter values
When you first open the ESMReports tool, the report name entries that are
associated with .xml files appear in the far left pane. Expanding these names
reveals all available reports. Expand the ‘Custom Reports’ entry to reveal the
reports that contain parameters that can be configured to your specifications.
Parameters may be changed according to the information you need in a report.
Often you will not need a report containing all available information, so you may
want to change a parameter to specify only a certain manager or agent. When a
report contains information concerning managers, agents, policies, modules,
messages, or domains, it contains parameters you may use to specify any or all
available information.
Table 6-2 on page 161 describes and explains each parameter, shows which
reports each parameter is used in, gives all valid values for each parameter, and
explains interrelations among parameters.
To change parameters
1
In the left pane, select and expand a report definitions entry and select a
report that contains parameters.
2
Select a parameter grouping tab from the top of the Report Viewer.
3
Select each parameter you want to change.
4
Type in the value of the parameter in the dialog box, or if available, use the
drop-down menu. When you change a parameter, an asterisk appears in the
left pane next to the report definitions name.
5
The report now has the new values for the parameters. Under the File menu,
select Save to modify the .xml file and save your changes.
Note: Some reports have interrelated parameters and changing one
parameter requires modification of a second parameter. Interrelated
parameters are all contained under a single parameter grouping tab.
See “Parameters, values, and descriptions” on page 161.
Some of the parameters require you to separate multiple values with
commas. The description appearing with the parameter on the Reports tool
tells you if this is necessary. See “Parameters, values, and descriptions” on
page 161. for more information on parameter values.
Generating and viewing reports
Using the Reports tool
Parameters, values, and descriptions
The following chart gives the names of all possible parameters, the name of any
report in which they are used, the valid values for each parameter, and a
description of each parameter.
Table 6-2
Report parameters
Parameter name
Valid values
Description
-AgentFilter
All agents,
By agent
When you set this parameter to ‘By
agent’, you must specify the agent
that you would like to include in the
report with the -AgentName
parameter. Set this parameter to ‘All
agents’ to get information for every
agent.
All agents,
Included agent(s),
Excluded agent(s)
In this report, when this parameter
is set to ‘Included agent(s)’ or
‘Excluded agent(s)’ you must use the
-AgentName parameter to specify
the names of the agents to include
or exclude. When this parameter is
set to ‘All agents’, it reports on all
agents.
<All agent names>
This parameter specifies the agent
name to be included in this report.
This parameter is required when
using the -AgentFilter parameter in
this report with a value of ‘By
agent’.
<All agent names>
This parameter specifies names of
the agents, separated by commas if
more than one agent is reported.
This parameter is required when the
-AgentFilter parameter is set to
‘included agent(s)’ or ‘excluded’
agent(s).
Used in reports:
■
Agent Status Report
■
Module Status
Report
-AgentFilter
Used in report:
■
Message Detail
Report
-AgentName
Used in report:
■
Agent Status Report
■
Module Status
Report
-AgentName(s)
Used in report:
■
Message Detail
Report
161
162 Generating and viewing reports
Using the Reports tool
Table 6-2
Report parameters
Parameter name
Valid values
Description
-AgentStatusFilter
All agents,
By level
Set this parameter to ‘All levels’ to
report information for all red,
yellow, and green agents. When this
parameter is set to ‘By level’, you
must set the -AgentStatusLevel
parameter to Red, Yellow, or Green
to see only agents with that status
level.
Green,
Red,
Yellow
When the -AgentStatusFilter
parameter is set to ‘By level’, this
parameter specifies whether to view
the red, yellow, or green agents.
All domains,
By domain
Set this parameter to ‘All domains’
to get information for every domain.
Set it to ‘By domain’ to get
information from the domain that
you must specify in the
-DomainName parameter.
<All domain names>
This parameter specifies the domain
name that is used to select data for
the report. It is mandatory when the
-DomainFilter parameter is set to
‘By domain’.
Used in report:
■
Agent Status Report
-AgentStatusLevel
Used in report:
■
Agent Status Report
-DomainFilter
Used in report:
■
Policy Status Report
■
Module Status
Report
-DomainName
Used in reports:
■
Policy Status Report
■
Module Status
Report
Generating and viewing reports
Using the Reports tool
Table 6-2
Report parameters
Parameter name
Valid values
Description
-JobRunFilter
By job run,
By policy name (last
run on agent),
By policy name (last
run on manager),
Last policy run on
agents,
Last policy run on
managers
When you set this parameter to ‘By
job run’, you must specify the job
run number in the -JobRunNumber
parameter. When you set this
parameter to ‘By policy name (last
run on agent)’ or ‘By policy name
(last run on manager)’ you must
specify a policy name in the
-PolicyName parameter to get
reports by policy name for either the
agent or managers. When you set
this parameter to ‘Last policy run on
agents’ or ‘Last policy run on
managers’, you get information for
only the last policy run. Note that
when you use the ‘By job run’
setting, multiple managers can have
identical job run numbers. Use the
-ManagerName and -ManagerFilter
parameters to specify a single
manager.
<All job run
numbers>
When you set the -JobRunFilter
parameter to ‘By job run’, you must
use this parameter to specify the job
run number. Note that when you use
the ‘By job run’ setting, multiple
managers can have identical job run
numbers. Use the -ManagerName
and -ManagerFilter parameters to
specify a single manager.
All managers,
By manager
When this parameter is set to ‘All
managers’, the report contains
information for each available
manager. When it is set to ‘By
manager’, you must use the
-ManagerName parameter to specify
a specific manager.
Used in report:
■
Job Status Report
-JobRunNumber
Used in report:
■
Job Status Report
-ManagerFilter
Used in reports:
■
Agent Status Report
■
Module Status
Report
■
Policy Configuration
Report
163
164 Generating and viewing reports
Using the Reports tool
Table 6-2
Report parameters
Parameter name
Valid values
Description
-ManagerFilter
All managers,
By manager
When this parameter is set to ‘All
managers’, the report contains
information for each available
manager. When it is set to ‘By
manager’, use the -ManagerName
parameter to specify a specific
manager. Note that because
managers can have identical job run
numbers, when you set the
-JobRunFilter parameter to “By job
run’, you must use this parameter in
conjunction with the
-ManagerFilter parameter to specify
a specific manager.
-ManagerFilter
By manager
Used in report:
Enterprise
Set this parameter to ‘Enterprise’ to
get information on all managers, or
to get information for a specific
manager, set this parameter to ‘By
manager’, then you must specify the
manager name in the
-ManagerName parameter.
Used in report:
■
■
Job Status Report
Policy Status Report
-ManagerName
Used in reports:
■
Agent Status Report
■
Module Status
Report
■
Policy Configuration
Report
-ManagerName
Used in report:
■
Job Status Report
<All manager names> This parameter is required when the
-ManagerFilter parameter is set to
‘By manager’ in these reports. It
specifies the name of the manager
to use in the reports.
<All manager names> When the -ManagerFilter parameter
is set to ‘By manager’, use this
parameter to specify a specific
manager. Note that because
managers can have identical job run
numbers, when you set the
-JobRunFilter parameter to ‘By job
run’, you must use this parameter in
conjunction with the
-ManagerFilter parameter to specify
a specific manager.
Generating and viewing reports
Using the Reports tool
Table 6-2
Report parameters
Parameter name
Valid values
-ManagerName
<All manager names> This parameter specifies the
manager name when the
-ManagerFilter parameter is set to
‘By manager’. This parameter is
required if the -ManagerFilter
parameter is not set to ‘Enterprise’.
Used in report:
■
Policy Status Report
-MessageID(s)
<All message IDs>
Used in report:
■
Message Detail
Report
Description
This parameter is used in
conjunction with the -MessageFilter
Parameter. If you set the value of
that parameter to ‘Include
message(s)’ or ‘Exclude message(s)’,
then this parameter must specify
the message IDs to be included or
excluded. Separate plural message
IDs with commas.
Note: Use the Message List Report to
find message ID numbers.
-MessageFilter
Used in report:
■
Message Detail
Report
-ModuleFilter
Used in report:
■
Module Status
Report
-ModuleName(s)
Used in report:
■
Module Status
Report
All messages,
Include message(s),
Exclude message(s)
Set this parameter to ‘All messages’
to get all message information. Set it
to ‘Include message(s)’ or ‘Exclude
message(s)’ to include or exclude
messages. You must provide the
included or excluded in the message
IDs in the -MessageID(s) parameter.
All modules,
By module(s), Exclude
module(s)
When this parameter is set to ‘All
modules’, the report includes
information for all modules. When
you set it to ‘By module(s)’, you must
use the -ModuleName(s) parameter
to specify which modules to include.
When you set this parameter to
‘Exclude module(s), you must use
the -ModuleName(s) parameter to
specify which modules to exclude.
<All module names>
This parameter specifies module
name information. It is mandatory
when the -ModuleFilter parameter
in this report is set to ‘By module(s)’
or ‘Exclude module(s)’. Separate
multiple modules with commas.
165
166 Generating and viewing reports
Using the Reports tool
Table 6-2
Report parameters
Parameter name
Valid values
Description
-OSFilter
All OS types,
Netware,
UNIX,
VMS,
Windows
This parameter selects the agents
based on the OS type that you
provide, and reports information for
agents that run the operating
system that you select.
Last policy runs by
agents,
Last policy run by
manager
This parameter specifies whether to
use the agents’ last policy runs or
the manager’s last policy run.
By policy,
Last policy run
When you set this parameter to
‘Last policy run’, you get policy
information that was used for the
most recent policy run. When you
set this parameter to ‘By policy’, you
must type the name of the policy
that you want in the -PolicyName
parameter.
By name,
Last policy run
When you set this parameter to
‘Last policy run’, you get policy
information that was used for the
most recent policy run. When you
set this parameter to ‘By name’, you
must type the name of the policy
that you want in the -PolicyName
parameter.
By policy,
All policies
Set this parameter to ‘All policies’ to
get information on all policies. If
you want information on a specific
policy, you must set this parameter
to ‘By policy’ and place the name of
the policy that you want in the
-PolicyName parameter.
no,
yes
This report parameter lets you
choose whether to include or
exclude suppressed messages. The
parameter is set to ‘no’ by default. If
you choose ‘yes’, suppressed
messages are included in the report.
Used in report:
■
Module Status
Report
-PolicyCompletion
Used in reports:
■
Message Detail
Report
■
Agent Status Report
-PolicyFilter
Used in report:
■
Module Status
Report
-PolicyFilter
Used in report:
■
Policy Status Report
-PolicyFilter
Used in report:
■
Policy Configuration
Report
-ViewSuppressed
Used in report:
■
Module Status
Report
Generating and viewing reports
Using the Reports tool
Table 6-2
Report parameters
Parameter name
Valid values
Description
-PolicyFilter
By policy name’
Last policy run
This parameter returns policies by
name, or retrieves information for
the last policy run. Depending on
the setting on the
-PolicyCompletion parameter in this
report, it may get information for
agent policies or manager policies.
Set the -PolicyCompletion
parameter to get either agent or
manager policies, then set this
parameter to retrieve either
information on the last policy run,
or information on a policy by name.
If you set this parameter to ‘By
policy name’, use the -PolicyName
parameter to specify the policy
name.
<All policy names>
This parameter specifies the name
of the policy that is reported when
the
-JobRunFilter parameter is set to ‘By
policy name (last run on agent)’ or
‘By policy name (last run on
manager)’.
<All policy names>
When the -PolicyFilter parameter is
set to ‘By policy’, the -PolicyName
parameter is required and must
contain the name of the policy that
is reported.
<All policy names>
When you set the
-PolicyFilter parameter to ‘By
name’, you must use the PolicyName parameter to specify
the name of the policy that is used
in the report.
Used in report:
■
Agent Status Report
-PolicyName
Used in report:
■
Job Status Report
-PolicyName
Used in reports:
■
Module Status
Report
■
Policy Configuration
Report
-PolicyName
Used in report:
■
Policy Status Report
167
168 Generating and viewing reports
Using the Reports tool
Table 6-2
Report parameters
Parameter name
Valid values
Description
-PolicyName
<All policy names>
When you set the -JobRunFilter
parameter to ‘By policy name (last
run on agent)’ or ‘By policy name
(last run on manager)’, use this
parameter to specify a particular
policy name for either manager
policies or agent policies.
<All policy names>
When the parameter -PolicyFilter is
set to ‘By policy name’, then the
-PolicyName parameter contains the
name of the policy to be reported.
Used in report:
■
Job Status Report
-PolicyName
Used in report:
■
Agent Status Report
Chapter
7
Bringing computers into
conformance
This chapter includes the following topics:
■
Hardening the network
■
Suppressing a Security report item
■
Unsuppressing a Security report item
■
Correcting a Security report item
■
Applying security check updates
Hardening the network
The final step in the process of bringing computers into conformance with your
organization’s security policy involves solving the security problems that are
identified by the policy runs. Bringing computers into conformance is an
incremental process.
Symantec ESM installs with a set of default policies. Start by running the Phase
1 security policy on your network resources. This policy consists of modules
that check the most significant and potentially problematic security areas of a
computer.
When you solve the problems identified by the Phase 1 policy, you can move on
to the Phase 2 policy. This policy includes all of the available modules but only
the key security checks in each module are enabled.
After solving the problems identified by the Phase 2 policy, continue with the
Phase 3 policy. This policy has three levels. You can choose the level that raises
your network resources to the relaxed, moderate, or strict-level security
environment that is required by your organization’s security policy.
170 Bringing computers into conformance
Suppressing a Security report item
The console provides functions to help you solve the security problems that are
reported by the policy run. It has other functions that adjust the security checks
in the modules so they no longer report specific problems. The scope of these
adjustments may exclude areas of the computer that should be reported. In
these instances, you can apply a different function to fine-tune the adjustment.
To bring computers into conformance
1
Run an initial policy on agents in your network.
2
Select an agent computer that reports red level security problems. Consider
beginning with computers that contain high-value information or are more
susceptible to attack.
The console lists the reported security problems in the grid. Each problem
has an assigned security level and rating. Red messages indicate severe
security problems. Yellow messages indicate moderate security problems.
3
When you solve the red level problems on one computer, move on to another
computer that is reporting red level problems.
4
Continue this process until you solve all of the red level security problems
on the network.
5
Select an agent reporting yellow level security problems.
6
After solving the yellow level problems on one agent computer, move on to
another computer that is reporting yellow level problems.
7
Continue this process until you solve all of the yellow level security
problems on the network.
8
Proceed to a stronger security policy and repeat the process.
Suppressing a Security report item
Symantec ESM security checks may report computers with conditions that are
tolerated within an organization’s security policy. Rather than adjusting the
Symantec ESM policy, which can exclude important areas of the computer from
a check, you can either temporarily or permanently suppress the messages. You
can do this on a case-by-case basis. All messages are suppressible.
Suppressions do not correct security problems. They only prevent the messages
that the agents report from appearing in future Security reports. Messages can
be suppressed by Title, Name, Information (text located in the Information
column of the grid), and agent. You can suppress specific messages or use wild
cards to suppress all messages of a certain type.
Bringing computers into conformance
Suppressing a Security report item
Warning: Exercise caution when using suppressions, especially if you use wild
cards to create suppressions. Suppressions can give you a false sense of security
if they prevent you from learning about serious security problems that they can
inadvertently mask.
You can view, edit, and delete message suppressions in the Policy branch of the
enterprise tree. By default, suppressions expire after six months.
Newly created suppressions become attributes of a policy. You can view
suppressed items in the grid by expanding the policies branch and choosing the
Suppressions node. You can also include them in the Security report by choosing
them as part of the filter. See “Filtering security data” on page 135.
For each suppression, the grid displays the agent, policy, module, and operating
system for which the message is suppressed. The grid also displays the message
title, the suppression’s creator, the creation date, the expiration date, the last
date the suppression was used, and the state of the suppression (enabled or
disabled).
Some suppressions do not work after you upgrade agents. This limitation
applies only to module upgrades that change the message text. Symantec ESM
cannot suppress a message if the text in the message does not match the text
that is used to create the suppression. In these instances, you can create a new
suppression based on the new message.
To suppress a Security report item
1
Expand an agent from the summary branch, and select a policy run.
2
Select the desired messages in the grid.
To select adjacent rows, drag across the row numbers, or select the first row
number, and hold down shift while you select the last row.
To select nonadjacent rows, hold down Ctrl and select the desired row
numbers.
Note: You can only select multiple rows using the column with the row
numbers.
171
172 Bringing computers into conformance
Suppressing a Security report item
3
Right-click a highlighted row, and then click Suppress.
The Create a Suppression dialog box provides several fields that you can use
to set suppression options. The resulting suppression uses all of the criteria
when matching messages from policy runs.
■
Use the asterisk (*) wildcard operator in place of multiple missing
characters in the Wildcard Name, Wildcard Information, or Wildcard
Agent Name fields. For example, an asterisk in the Wildcard Agent
Name field applies the suppression to each agent in the domain. You
can also use the question mark (?) wildcard operator in place of a single
missing character.
Note: Agent names cannot be longer than 61 characters.
■
If you check the Wildcard Name, Wildcard Information, or Wildcard
Agent Name fields but do not use wildcard characters in the text
entries, the suppression must explicitly match the value in the related
field to suppress the message.
For example, to suppress all of the messages that have the title,
Inactive Account, from the GS1001 agent computer, type the following:
Ignore Title
Inactive Account
Wildcard Name
*
Wildcard Information
*
Wildcard Agent Name
GS100
Only the Wildcard Name and Wildcard Information check boxes are
selected in this example.
■
Ignore Title
This field displays the title of the message that is selected in the
console grid.
If you select the check box, the suppression can match any message
title.
If you clear the check box, the suppression must explicitly match the
message title.
■
Wildcard Name
This field lets you specify the name of the user, account, or computer
that the suppression must match. A Security report may list more than
one user or account with the security violation. You can use a wildcard
character to suppress the message for all user, account, or computer
names.
Bringing computers into conformance
Unsuppressing a Security report item
■
Wildcard Information
This field lets you indicate the message text that the suppression must
match. A Security report may list more than one occurrence of a
security violation. You can use a wildcard character to suppress the
message for all occurrences of the message text.
■
Wildcard Agent
This field lets you indicate the agent that will have the suppression
applied to it. A Security report may list more than one agent with the
security violation. You can use a wildcard character to suppress the
message for all agents.
Note: If you select the Wildcard Name, Wildcard Information, or Wildcard
Agent Name check box, but do not type a wildcard character in the related
text box, the suppression must explicitly match the value in the related field
to suppress the message.
Also, keep in mind that when using wildcards to create suppressions,
Symantec ESM lets you create multiple suppressions of the same item using
different options or wildcard characters.
Unsuppressing a Security report item
A suppression is an attribute of a security policy. Therefore, to remove a
suppression, you must access the suppression from the policies node and delete
it.
Unsuppressing a Security report message does not cause Symantec ESM to
automatically reevaluate a computer’s security. To have Symantec ESM
reevaluate a computer’s security status, repeat the policy run.
173
174 Bringing computers into conformance
Correcting a Security report item
To unsuppress a Security report item
1
On the Enterprise tree, expand
policies > <policy name> > <module name> > <operating system name>
and select the suppressions node. Suppression records are visible in the
grid.
2
Select the desired suppression messages in the grid.
To select adjacent rows, drag across the row numbers, or select the first row
number, hold down Shift, and select the last row number.
To select nonadjacent rows, hold down Ctrl and select the desired row
numbers.
Note: You can only select multiple rows using the column with the row
numbers.
3
Right-click on a highlighted row, and click Delete.
Correcting a Security report item
The correction tool lets you correct certain security items directly from the
console. Not all report messages can be corrected from the console. Corrections
are made on a module and operating system basis, meaning that checks on a
UNIX platform may be correctable while the corresponding checks on a
Windows NT platform may not.
Evaluate each message in the Security report, considering the current computer
configuration and how the computer may change. The current settings may be
more appropriate than the setting defined in the security policy. If the current
settings are more appropriate for the situation, update the policy or suppress
the item from the report. See “Applying security check updates” on page 176
and “Suppressing a Security report item” on page 170.
Symantec ESM corrections modify the computer where the agent resides. To
correct a reported item, you must have access to an account with privileges on
the agent computer. These privileges include Administrator on computers with
Windows operating systems, Root on computers with UNIX operating systems,
Supervisor on NetWare/NDS servers, and System on computers that run
OpenVMS operating systems. Before you can make the correction, Symantec
ESM displays the Agent Credentials dialog box. This box prompts you for the
privileged account information on the agent computer.
Bringing computers into conformance
Correcting a Security report item
Note: Use the following accounts when making corrections to computers in a
domain or trusted domain:
■
A domain account in the domain administrators group if entered in the
form: domain_name\user name
■
A domain account in the local administrators or supervisors group if entered
in the form: user name
■
A local account with administrator privileges on the local computer if
entered in the form: user name
A “C” in the Updateable/Correctable column of the grid indicates that an item is
correctable.
To correct a Security report item
1
Expand the summary branch and select a policy run. Security messages
should be visible in the grid.
2
Select correctable messages in the grid.
To select adjacent rows, drag across the row numbers, or select the first row
number, hold down Shift, and select the last row number.
To select nonadjacent rows, hold down Ctrl and select the desired row
numbers.
Note: You can only select multiple rows using the column with the row
numbers.
3
Right-click on a highlighted row, and click Correct.
4
Type the user name and password of an account with privileges on the
Agent computer, and click OK.
Symantec ESM logs on to the computer as the privileged user and attempts
to perform the correction. If Symantec ESM successfully makes the
correction, the Correctable/Updateable value in the grid changes from
Correctable to Corrected. If the correction is not successful, Symantec ESM
reports an error message.
175
176 Bringing computers into conformance
Applying security check updates
Uncorrecting a Security report item
The Uncorrect command changes the computer back to its original
configuration prior to the correction. In effect, the Uncorrect function works
much like an undo command.
Warning: After a report has been explicitly deleted or purged by later policy
runs, you can no longer be reverse corrections from the console.
To uncorrect a Security report item
1
Select the security message or messages in the grid.
To select adjacent rows, drag across the row numbers, or select the first row
number, and hold down shift while you select the last row.
To select nonadjacent rows, hold down Ctrl and select the desired row
numbers.
Note: You can only select multiple rows using the column with the row
numbers.
2
Right-click on a highlighted row, and click Uncorrect.
3
Type the user name and password of an account with privileges on the
Agent computer, and click OK.
Symantec ESM logs on to the computer as the privileged user and reverses
the correction.
Applying security check updates
Updateable messages let you change templates or snapshots to match the
current values that are on agent computers. The type of update depends on the
nature of the security check that is reporting the message. These messages
display the letters “SU” in the Updateable/Correctable column of the grid.
Updating templates
Templates define the baseline state of computer entities (for example, files and
OS patches). Each template is specific to an operating system and module.
Symantec ESM stores the template files on the manager’s computer because
they are part of security policies that are applied to multiple agents in a domain.
When you update a template, Symantec ESM changes the template to reflect the
computer’s current configuration. For more information about templates, see
Bringing computers into conformance
Applying security check updates
the most recent Symantec ESM Security Update User’s Guide for the operating
system that uses the template that you plan to update.
To update a template
1
Expand the summary branch and select an agent. Expand the agent, then
expand a module name. Select a policy run from beneath a module name.
Security messages display in the grid.
2
Select the desired messages in the grid.
To select adjacent rows, drag across the row numbers, or select the first row
number, and hold down shift while you select the last row.
To select nonadjacent rows, hold down Ctrl and select the desired row
numbers.
Note: You can only select multiple rows using the column with the row
numbers.
3
Right-click a highlighted row, and click Update template.
Symantec ESM updates the template to reflect the current properties of the
template entities.
Updating snapshots
Snapshot files store information about the state of the computer. Essentially,
snapshots are a picture of the computer at a point in time. During a policy run,
Symantec ESM compares the current state of the computer to the one recorded
in the snapshot and reports any changes as potential security problems. For
more information about snapshots, see “About snapshots” on page 117.
177
178 Bringing computers into conformance
Applying security check updates
To update a snapshot
1
Expand the summary branch and select a policy run. Security messages are
visible in the grid.
2
Select the desired messages in the grid.
To select adjacent rows, drag across the row numbers, or select the first row
number, and hold down shift while you select the last row.
To select nonadjacent rows, hold down Ctrl and select the desired row
numbers.
Note: You can only select multiple rows using the column with the row
numbers.
3
Right-click a highlighted row, and click Update snapshot.
Symantec ESM updates the snapshot list to reflect the current computer
state.
Chapter
8
Using the command line
interface
This chapter includes the following topics:
■
Understanding command line interface conventions
■
Running batch files with the CLI
■
Running the CLI interactively
■
Using CLI help
■
Using the CLI command reference index
Understanding command line interface conventions
The command line interface (CLI) lets you execute commands without using the
Symantec ESM Enterprise console (GUI). In addition to supporting most of the
commands that are available in the console, the CLI lets you remove modules or
execute batch files that contain CLI commands.
This section contains important guidelines regarding the syntax and
conventions that apply to CLI commands.
Case sensitive
Agent, policy, module, and domain names are case sensitive. You must type
them to match the case of the corresponding values that are stored on the
manager. “Phase 1” is not the same as “phase 1” or “PHASE 1”.
180 Using the command line interface
Understanding command line interface conventions
Quotation marks
Command arguments that contain two or more words require quotation marks.
For example, you must type the domain name, All Agents, as “All Agents”.
Short module names
Many commands in the CLI require short module names. See Table 8-1 for a list
of these names.
Future security updates may include additional modules. For a current listing of
short module names, see the Symantec ESM Security Update User’s Guides for
your specific operating system. Download the latest version from Symantec at
http://securityresponse.symantec.com/.
CLI command formats use the term [short_module_name] to indicate this
requirement. For example, the Insert module command has the format:
insert module [policy_name] [short_module_name]
As an example, to insert the File Attributes module into a user-created policy
named Demo, type insert module Demo fileatt at the CLI prompt:
Table 8-1
Module names
Module name
Short module name
Account Information
acctinfo
Account Integrity
account
Active Directory
ads
Backup Integrity
backup
Discovery
discover
Disk Quota
quota
Encrypted File System
efs
File Access
fileacc
File Attributes
fileatt
File Find
filefind
File Information
fileinfo
File Watch
fwatch
Integrated Command Engine
ice
Login Parameters
log
Using the command line interface
Understanding command line interface conventions
Table 8-1
Module names
Module name
Short module name
Network Integrity
network
Object Integrity
object
OS Patches
patch
Password Strength
password
Registry
registry
Response
response
Startup Files
startup
Symantec Product Info
sympinfo
System Auditing
audit
System Mail
mailsys
System Queues
queues
User Files
usrfiles
Brackets
Command Line Interface formats use two types of brackets to indicate usersupplied data.
Note: Do not type the brackets. Type only the data inside the brackets.
■
Square brackets. These brackets [ ] indicate user-specified command
options. You must precede command options with a dash (-). Information in
square brackets is not required, but may be typed to use the options.
For example, the Show policy command has the format: show policy [-sl]
<policy_name>. To list the modules but not the checks in the Phase 1 policy,
type show policy -s “Phase 1” at the CLI prompt:
■
Angle brackets. These brackets < > indicate user-supplied data such as
policy, agent, or domain names that are specific to your network.
For example, the Show policy command has the format: show policy [-sl]
<policy_name>. To list all of the module checks in the Phase 1 policy, type
show policy -l “Phase 1” at the CLI prompt:
181
182 Using the command line interface
Running batch files with the CLI
Running batch files with the CLI
You can run batch files with the CLI to semi-automate some Symantec ESM
processes.
Batch files must contain each CLI command that is needed to accomplish a task.
For example, a batch file can contain the CLI commands that are needed to run a
policy on specific agents in a selected manager domain and write the required
reports. See the “Using the CLI command reference index” on page 189 for an
explanation of each CLI command.
Batch files consist of ASCII text. You can create and edit them with any text
editor. Name them with an .esm extension (for example, phase1.esm) and save
them in the directory that contains the esmc executable.
Note: You cannot run batch files interactively with the command line interface.
To run a batch file, you must invoke the CLI from the operating system prompt.
Format
esmc [-ti] [-p <port>] [-m <manager>] [-U <users>] [-P <password>]
[-b <batch_file>]
Options
-t
Use TCP as the network transport layer.
-i
Use IPX as the network transport layer.
-p
Specify the manager port number (the default is 5600).
-m
Specify the name of the manager (the default name is the computer
that is running the CLI).
-U
Select the manager account (the default is “ESM”).
-P
Specify the manager account password.
-b
Specify the name of the batch file.
Using the command line interface
Running batch files with the CLI
Example 1
This example shows how to create a batch file that runs the Phase 1 policy on
agents in the NT Agents domain. The batch file produces a Summary Security
report.
The example assumes the following computer specifications:
Table 8-2
Computer specifications, example 1
Variable
Value
Platform
Windows NT
Manager name
GS100
Domain
NT Agents
Agent name
GS101
Network transport layer
TCP
Port
5600
User name
ESM
Password
pass+24
Batch file name
phase1.esm
Policy name
Phase 1
To create the batch file
1
Use a text editor to create the phase1.esm batch file. This file contains the
following commands:
run job “Phase 1” “NT Agents”
sleep -j 0
view report “Phase 1” GS101 account 0
Repeat the view report command for each of the other modules in the policy.
See Table 8-1, “Module names,” on page 180.
Note: The Run command initiates a policy run on the specified domain.
See “Run command” on page 205.
The Sleep command makes the CLI wait for each policy run to complete
before continuing. See “Show command” on page 209.
The View report command displays the resulting security information.
See “View command” on page 224.
183
184 Using the command line interface
Running batch files with the CLI
2
Save the phase1.esm batch file in the directory containing the esmc
executable.
To run the batch file
1
Access the operating system command prompt.
2
Change to the directory that contains the esmc executable and batch file.
3
Type esmc -t -p 5600 -m GS100 -U ESM -P pass+24 -b phase1.esm to run the
batch file:
Note: The command line interface logs on to the GS100 manager and runs
the specified batch file.
Phase 1 batch file execution log
C:\>cd “program files”\symantec\esm\bin\nt-ix86
C:\Program Files\Symantec\ESM\bin\nt-ix86>esmc -t -p 5600 -m GS100 U ESM -P pass+24 -b phase1.esm
run job “Phase 1” “NT Agents”
Job 47 submitted
sleep -j 0
view report “Phase 1” GS101 account 0
The CLI displays a Summary Security report for each module that is listed in the
batch file.
Example 2
This example shows how to create a batch file that adds user names to the Users
to Check name list in the Password Strength module for UNIX agents.
The example assumes the following computer specifications:
Table 8-3
Computer specifications, example 2
Variable
Value
Platform
UNIX
Manager name
GS200
Network transport layer
TCP
Port
5600
User name
ESM
Using the command line interface
Running batch files with the CLI
Table 8-3
Computer specifications, example 2
Variable
Value
Password
pass+75
Batch file name
namelst1.esm
Policy name
Phase 1
User-names to be added
Jack, Rob E, Don C, Justin
short_module_name
password
Module option (security check)
Users to Check
To create the batch file
1
Use a text editor to create the namelst1.esm batch file. This file contains the
following command:
insert name -t U “Phase 1” password UNIX “Users to Check” Jack
“Rob E” “Don C” Justin
Note: The Insert name command lets you add names to user or group name
lists for security checks in the modules of a policy. You must type a space
between each name you wish to add. See “Insert command” on page 198.
2
Save the namelst1.esm batch file in the directory containing the esmc
executable.
To run the batch file
1
Access the operating system command prompt.
2
Change to the directory containing the esmc executable and batch file.
3
Type ./esmc -t -p 5600 -m GS200 -U ESM -P pass+75 -b namelst1.esm to run
the batch file:
Namelst1 batch file execution log
bash# cd esm/bin/aix-rs6k
bash# ./esmc -t -p 5600 -m GS200 -U ESM -P pass+75 -b namelst1.esm
insert name -t U “Phase 1” password UNIX “Users to Check” Jack “Rob
E” “Don C” Justin
The CLI inserts the names in the name list.
185
186 Using the command line interface
Running batch files with the CLI
Example 3
This example shows how to create a batch file that writes an auditor’s summary
report to file.
The example assumes the following computer specifications:
Table 8-4
Computer specifications, example 3
Variable
Value
Platform
Windows NT
Manager name
GS100
Domain
NT Agents
Network transport layer
TCP
Port
5600
User name
ESM
Password
pass+24
Batch file name
audit1.esm
Policy name
Phase 1
Output file name
audit1.rpt
To create the batch file
1
Use a text editor to create the audit1.esm batch file. This file contains the
following command:
view audit -o audit1.rpt “Phase 1” “NT Agents”
Note: The View Audit command lets you create a security audit report for
selected computers on your network. The -o option specifies the name of
the output report file. The report includes information about the security
policy selected for the computers and indicates their level of compliance.
See “View command” on page 224.
2
Save the audit1.esm batch file in the directory containing the esmc
executable.
Using the command line interface
Running the CLI interactively
To run the batch file
1
Access the operating system command prompt.
2
Change to the directory containing the esmc executable and batch file.
3
Type the following CLI command to run the batch file:
esmc -t -p 5600 -m GS100 -U ESM -P pass+24 -b audit1.esm
Audit1 batch file execution log
C:\>cd “program files”\symantec\esm\bin\nt-ix86
C:\Program Files\Symantec\ESM\bin\nt-ix86>esmc -t -p 5600 -m GS100 U ESM -P pass+24 -b audit1.esm
view audit -o audit1.rpt “Phase 1” “NT Agents”
The CLI writes the audit report file to the directory containing the esmc
executable and batch file.
Running the CLI interactively
The esmc command runs the command line interface. From the command line
access the \ESM\bin\<platform> directory on computers with Windows
operating systems or the /esm/bin/<platform> directory on computers with
UNIX operating systems and type: esmc. Symantec ESM displays esm>, the CLI
prompt.
To run the CLI from the Windows command prompt, add the following to the
path:
<drive letter >:\Program Files\Symantec\ESM\bin\<platform>
Connecting the CLI to a manager
CLI commands do not work until you connect the command line interface to a
manager.
Description
The Login command connects the CLI to a manager.
Format
login [-ti] [-p <port>] [-U <user_name>] [-P <password>]
[-m <manager>]
187
188 Using the command line interface
Using CLI help
Options
-t
Use TCP as the network transport layer.
-i
Use IPX as the network transport layer.
-p
Specify the manager port number (the default is 5600).
-U
Select the manager account (the default is “ESM”).
-P
Specify the manager account password.
-m
Specify the name of the manager (the default is the computer running
the CLI).
Example
To log on the GS100 manager using the super-user account with a password of
pass+24 and TCP as the network transport layer, type:
login -t -p 5600 -U ESM -P pass+24 -m GS100
Navigating the CLI
The CLI features command line recall and line editing. This table lists the keys
that are used with these functions.
Table 8-5
CLI keys and their functions
Keys
Function
Up arrow key
Scrolls up through previous commands
Down arrow key
Scrolls back down to the esm> prompt
Left arrow
Moves cursor to the left
Right arrow
Moves cursor to the right
Backspace key
Deletes character to the left of the cursor
Delete key
Deletes characters under the cursor
Using CLI help
The CLI displays three levels of help:
■
The first level of the help menu is accessed by typing help at the esm>
prompt. This menu contains the help topics available with this feature. It
lists the commands that you can run from the CLI.
Using the command line interface
Using the CLI command reference index
■
The second level of the help menu is accessed by typing help [topic] at the
esm> prompt. This menu states the purpose of the command and lists the
arguments that you can use with the command.
■
The third level of the help menu is accessed by typing help [topic] [subtopic]
at the esm> prompt. This menu states the purpose of the command and its
argument. It also lists the options that you can use with the argument.
Using the CLI command reference index
Each CLI command explanation is divided into easy-to-read sections. These
sections describe the function of the command, its arguments, format, and
options. Examples show typical applications of the command.
The index references the titles and page numbers of the CLI commands that are
described in this chapter.
“Create command” on page 191
“Create access” on page 191
“Create agent” on page 192
“Create domain” on page 194
“Create policy” on page 194
“Delete command” on page 194
“Delete access” on page 195
“Delete agent” on page 195
“Delete domain” on page 196
“Delete job” on page 196
“Delete module” on page 197
“Delete policy” on page 197
“Insert command” on page 198
“Insert agent” on page 198
“Insert module” on page 199
“Insert name” on page 199
“Login command” on page 201
“Logout command” on page 202
“Ping command” on page 202
“Query command” on page 203
“Quit command” on page 204
“Remove command” on page 204
“Remove agent” on page 204
189
190 Using the command line interface
Using the CLI command reference index
“Remove module” on page 204
“Remove name” on page 205
“Run command” on page 205
“Set command” on page 207
“Set config” on page 207
“Set license” on page 208
“Set variable” on page 208
“Show command” on page 209
“Show access” on page 209
“Show agent” on page 211
“Show config” on page 212
“Show domain” on page 212
“Show job” on page 215
“Show license” on page 216
“Show module” on page 216
“Show policy” on page 218
“Show sumfinal” on page 219
“Show summary” on page 220
“Show variable” on page 220
“Shutdown (UNIX only)” on page 221
“Status command” on page 222
“Stop command” on page 223
“Version command” on page 224
“View command” on page 224
“View agent” on page 226
“View audit” on page 227
“View checks” on page 228
“View custom” on page 229
“View differences” on page 231
“View domain” on page 233
“View policy” on page 234
“View report” on page 235
“View summary” on page 237
Using the command line interface
Create command
Create command
The Create command lets you add new specified domains, agents, user-access
records, and policies.
Arguments that you can use with the Create command include:
■
Access
■
Agent
■
Domain
■
Policy
These arguments are described in the following sections.
Create access
The Create access command lets you set up an access record for a user. If you
specify a password for the user account, Symantec ESM can use the Batch
command to run the CLI non interactively.
Format
create access [-p] [-P <password>] <user_name>
Options
-p
Give the account super-user privileges.
-P
Specify the user account password.
Symantec ESM passwords should have at least six characters including at least
one nonalphabetical character. Manager account passwords can contain up to
eight characters. Longer passwords are harder for intruders to crack.
Example1
To create a shell account on the manager with no privileges for user MikeM and
assign the account a password of my1pass, type:
create access -P my1pass MikeM
191
192 Using the command line interface
Create command
Example2
To create a super-user account on the manager with all Symantec ESM
privileges for user FredJ and assign the account a password of super+1, type:
create access -p -P super+1 FredJ
Create agent
The Create agent command lets you create an agent record in the manager
database. You can also use this feature to add a proxy agent record.
Format
create agent [-o <operating_system>] [-t <computer_type>]
[-P <platform>] [-p <protocol>] [-v value>] [-e <esmver>]
[-a <proxy_agent_name>] [-b <directory_for_the_proxy_binaries>]
[<agent_name>]
Options
-o
Specify the operating system of the agent (for example, UNIX).
-t
Specify the computer type (for example, Solaris).
-P
Specify the platform (for example, solaris-sparc).
-p
Specify the network transport layer used to contact the agent.
-v
Specify the agent port number.
-e
Specify the Symantec ESM version running on the agent (the default is
the Symantec ESM version on the current server).
-a
Specify the proxy agent running the security checks.
-b
Specify the directories for the proxy binaries.
This table lists the values you can use with the Create agent options.
Table 8-6
Values for the create agent options
Computer
Description
Operating
System
Computer
Type
Platform
Protocol Port
Version
Windows 2003
WIN2003
WIN2003
w3s-ix86
TCP
5601
6.0
Windows XP
WINXP
WINXP
wxp-ix86
TCP
5601
6.0, 5.5
Windows XP
WINXP
WINXP
wxp-ix86
SPX
34917
6.0, 5.5
Using the command line interface
Create command
Table 8-6
Values for the create agent options
Computer
Description
Operating
System
Computer
Type
Platform
Protocol Port
Version
Windows 2000
WIN2000
WIN2000
w2k-ix86
TCP
5601
6.0, 5.5
Windows 2000
WIN2000
WIN2000
w2k-ix86
SPX
34917
6.0, 5.5
Windows NT
(x86)
NT
NT
nt-ix86
TCP
5601
6.0, 5.5
Windows NT
(x86)
NT
NT
nt-ix86
SPX
34917
6.0, 5.5
AIX
UNIX
UNIX
aix-rs6k
TCP
5600
6.0, 5.5
Digital UNIX/
Tru64
UNIX
UNIX
osf1-axp
TCP
5600
6.0, 5.5
HP-UX
UNIX
UNIX
hpux-hppa
TCP
5600
6.0, 5.5
Irix
UNIX
UNIX
irix-mips
TCP
5600
6.0, 5.5
Red Hat Linux
UNIX
UNIX
ix86
TCP
5600
6.0, 5.5
Sequent
UNIX
UNIX
sequentx86
TCP
5600
6.0, 5.5
Solaris
UNIX
UNIX
solarissparc or
solaris-x86
TCP
5600
6.0, 5.5
NetWare 4.x
and 5.x
NetWare/
NDS
NetWare/
NDS
nw4-ix86
TCP
5601
5.0
NetWare 4.x
and 5.x
NetWare/
NDS
NetWare/
NDS
nw4-ix86
SPX
34917
5.0
OpenVMS
OpenVMS
OpenVMS
vms-axp
TCP
5601
5.1
OpenVMS
OpenVMS
OpenVMS
vms-vax
TCP
5601
5.1
iSeries
OS/400
AS400
OS/400
TCP
5601
6.0
Example
To create a GS101 agent on a Windows NT computer using Symantec ESM
version 6.0, type:
create agent -o NT -t NT -P nt-ix86 -p TCP -v 5601 -e 5.5“GS101”
193
194 Using the command line interface
Create command
Create domain
Description
The Create domain command creates an empty domain. Use the Insert agent
command to add agents to the domain after it has been created.
Format
create domain <domain_name>
Example
To create a new sales domain, type:
create domain sales
Create policy
The Create policy command creates an empty policy. Use the Insert module
command to add modules to the policy after it has been created.
Format
create policy <policy_name>
Example
To create a new demo policy, type:
create policy “demo”
Delete command
The Delete command lets you delete specified domains, agents, access records,
policy runs, policies, or modules.
Arguments that you can use with the Delete command include:
■
Access
■
Agent
■
Domain
■
Job
■
Module
■
Policy
Using the command line interface
Create command
These arguments are described in the following sections.
Delete access
The Delete access command deletes specified user access records from the
access database.
Format
delete access [-f] <user_name>
Options
-f
Suppress error messages.
Example
To delete the user, MikeM, type:
delete access MikeM
Delete agent
The Delete agent command deletes a specified agent from the agent database.
Format
delete agent [-f] <agent_name>
Options
-f
Suppress error messages.
Example
To delete the GS101 agent, type:
delete agent GS101
Warning: This command should be used only if the agent computer is no longer
in the network. If you accidentally delete an agent from the database, you can
run setup.exe to reregister the agent with the manager.
195
196 Using the command line interface
Create command
Delete domain
The Delete domain command lets you delete a specified domain.
Format
delete domain [-f] <domain_name>
Options
-f
Suppress error messages.
Example
To delete the NT Agents domain, type:
delete domain “NT Agents”
Delete job
The Delete job command lets you delete specified policy runs. (Inside the
command line interface, policy runs are referred to as jobs.)
Format
delete job [-f] <job_id or %variable%>
Options
-f
Suppress error messages.
If you specify a variable for a policy run during the current CLI session, you can
use the variable or the job ID number.
Example 1
To delete policy run 10, type:
delete job 10
Example 2
A job ID of 0 specifies the last policy run. To delete the last policy run, type:
delete job 0
Using the command line interface
Create command
Example 3
To delete a policy run using a variable, type the variable name instead of the job
ID. You must enclose the variable name in % characters. For instance, if you
want to delete job ID the value of the variable acctint equals the job ID you want
to delete, type:
delete job %acctint%
Delete module
The Delete module command lets you delete specified modules from the module
database.
If you delete a module from the module database, you will need to reregister it if
you want to use it in a policy. To remove a module from a policy, use the Remove
module command.
Format
delete module [-f] <short_module_ name>
Options
-f
Suppress error messages.
Note: Each module has a short module name. See Table 8-1, “Module names,” on
page 180.
Example
To delete the User Files module, type:
delete module “usrfiles”
Delete policy
The Delete policy command lets you delete a specified policy.
Format
delete policy [-f] <policy_name>
197
198 Using the command line interface
Insert command
Options
-f
Suppress error messages.
Example
To delete the Phase 1 policy, type:
delete policy “Phase 1”
Insert command
The Insert command lets you add specified agents into a domain and also lets
you insert modules or names into a policy.
Arguments that you can use with the Insert command include:
■
Agent
■
Module
■
Name
These arguments are described in the following sections.
Insert agent
The Insert agent command lets you insert agents in the specified domain.
Format
insert agent <domain_name> <agent_name>
Example
To insert an agent called GS101 into the domain called sales, type:
insert agent sales GS101
Using the command line interface
Insert command
Insert module
The Insert module command lets you insert modules into the specified policy.
Format
insert module <policy_name> <short_module_name>
Note: Each module has a short module name. See Table 8-1, “Module names,” on
page 180.
Example
To include the File Attributes module in the Phase 1 policy, type:
insert module “Phase 1” fileatt
Insert name
The Insert name command lets you insert names into the name lists for
individual security checks of a policy module.
Format
insert name [-t] <name_list_letter> [-f] <name_flag> <policy_name>
<short_module_name> <osver_name> <security_check_name> <list name>
199
200 Using the command line interface
Insert command
Options
-t
Followed by one of these letters specifies the type of name list for the
name:
S
Generic string
U
User
G
Group
F
File or directory
W
Dictionary word list file (for example, compu_d.wrd)
T
Template file
K
Restricted keyword
A
Audit keywords (VMS only)
a
Audit keywords with file access flags (VMS only)
p
File with associated permissions (UNIX only)
-f
Followed by one of these numbers determines whether the check
includes or excludes the name:
0
Include the name
1
Exclude the name
Note: Security checks do not currently use name flags. You can use this option to
extend Symantec ESM assessment and reporting capabilities in custom modules
provided by third-party developers.
Each module has a short module name. See Table 8-1, “Module names,” on
page 180.
This table lists the supported osver names.
Table 8-7
OS version values
OS version
Names
WINXP
WIN2000
Using the command line interface
Login command
Table 8-7
OS version values
OS version
Names
NT
UNIX
NetWare/NDS
OpenVMS
Example
To add the user name Smith to the Users To Check option in the User Files
module of the Phase 3:c Strict policy running on a Windows NT computer, type:
insert name -t U “Phase 3:c Strict” usrfiles NT “Users To Check”
Smith
Login command
The Login command lets you open a connection to a manager.
Format
login [-ti] [-p <port>] [-U <user_name>] [-P <password>]
[-m <manager>]
Options
-t
Use TCP as the network transport layer.
-i
Use IPX as the network transport layer.
-p
The manager port number (the default is 5600).
-U
The manager account user name (the default is “ESM”).
-P
The manager account password.
-m
The name of the manager (the default is the computer running the
CLI).
Example
To log on the GS100 manager, type:
login -t -p 5600 -U ESM -P pass+24 -m GS100
201
202 Using the command line interface
Logout command
Logout command
The Logout command lets you close the connection to a manager.
Format
logout
Example
To log off a manager, type:
logout
Ping command
The Ping command lets you see whether a Windows or UNIX computer is
running Symantec ESM. If the computer is only running Symantec ESM agent
software, connection information is displayed from the agent record.
Format
ping [-ti] [-p <port>] [<computer_name>]
Options
Use these options to designate the correct transport layer:
-t
Use TCP as the transport layer (default).
-i
Use IPX as the network transport layer.
-p
Specify the port number (TCP only).
Example 1
To ping the GS0100 Windows-based computer using the defaults, type:
ping GS0100
If the target computer is running Symantec ESM manager software, the CLI
displays:
GS0100
Enterprise Security Manager 5.5 (2001/08/09) SU 8 (NT)
Using the command line interface
Query command
Example 2
To ping the GS0300 UNIX computer using TCP port 5600, type:
ping -t -p 5600 GS0300
If the computer you ping is running Symantec ESM manager software, the CLI
displays:
GS102
Enterprise Security Manager 5.5 (2000/08/30) (UNIX)
SunOS 5.4 sun4m
Query command
The Query command lets you query a policy run by job ID. The Query command
gives the current status of a specified policy run.
Format
query job [<job_id or %variable%>]
Options
If you specify a variable for a policy run during the current CLI session, you can
use either the variable or the job ID in the Query command.
Example 1
To query a policy run designated as policy run 12, type:
query job 12
Example 2
A job ID of 0 specifies the last policy run that was started. To query the last
policy run started, type:
query job 0
Example 3
To query a policy run using a variable, type the variable name instead of the job
ID. You must enclose the variable with % characters. Also, the value of the
variable must equal the job ID. For example, to use the acctint variable, type:
query job %acctint%
203
204 Using the command line interface
Quit command
Quit command
The Quit command lets you exit the command line interface and return to the
computer’s prompt.
Format
quit
Example
To quit the command line interface and return to the command prompt, type:
quit
Remove command
The Remove command lets you remove specified agents from a domain, modules
from a policy, or names from a name list in the module check of a policy.
Arguments that you can use with the Remove command include:
■
Agent
■
Module
■
Name
These arguments are described in the following sections.
Remove agent
The Remove agent command lets you remove a specified agent from a domain.
Format
remove agent <domain_name> <agent_name>
Example
To remove the Sales agent from the NT Agents domain, type:
remove agent “NT Agents” Sales
Remove module
The Remove module command lets you remove modules from the specified
policy.
Using the command line interface
Run command
Format
remove module <policy_name> <short_module_name>
Note: Each module has a short module name. See Table 8-1, “Module names,” on
page 180.
Example
To remove the File Attributes module from the Phase 1 policy, type:
remove module “Phase 1” fileatt
Remove name
The Remove name command lets you remove names from a name list in the
module check of a specified policy.
Format
remove name <policy_name> <short_module_name> <osver_name>
<option_name> <list_name>
Note: Each module has a short module name. See Table 8-1, “Module names,” on
page 180.
Symantec ESM supports certain operating system names. See Table 8-7, “OS
version values,” on page 200.
Example
To remove Smith from the Users to Check name list in the File Attributes
module of the Phase 1 policy, type:
remove name “Phase 1” fileatt NT “Users To Check” Smith
Run command
The Run command lets you run the modules in a policy on the agents in a
domain.
Format
run job [<-v <variable>] [<-a <agent_name1>, <agent_name2>, ...]
[-m <short_module_name_1>, <short_module_name_2>, ...]
<policy_name> <domain_name>
205
206 Using the command line interface
Run command
Options
The following options are available:
-v
Sets up a variable to store the job ID for later use with other CLI
commands. This simple process ensures that Symantec ESM uses the
correct job ID when generating Security reports.
-a
Specifies a subset of agents within the domain.
-m
Specifies a subset of modules within the policy.
Note: Each module has a short module name. See Table 8-1, “Module names,” on
page 180.
Example 1
To run the Phase 1 policy on the Sales domain, type:
run job “Phase 1” Sales
The CLI displays:
Job # submitted
Example 2
To run the Phase 1 policy on agents GS100 and GS101 in the Sales domain, type:
run job -a GS100,GS101 “Phase 1” Sales
Example 3
To run only the File Attributes module from the Phase 1 policy on the Sales
domain, type:
run job -m fileatt “Phase 1” Sales
Example 4
The -a and -m options can be used in the same command. For example, to run the
File Attributes module from the Phase 1 policy on agents GS100 and GS101 in
the Sales domain, type:
run job -a GS100,GS101 -m fileatt “Phase 1” Sales
Using the command line interface
Set command
Example 5
To run the Phase 1 policy on the Sales domain using the acctint variable to store
the job ID, type:
run job -v acctint “Phase 1” Sales
Set command
The Set command lets you specify manager licensing information, certain
manager sumfinal database parameters, and the values of variables used in the
current CLI session.
Arguments that you can use with the Set command include:
■
Config
■
License
■
Variable
These arguments are described in the following sections.
Set config
The Set config command lets you set the number of days that Symantec ESM
retains policy runs, detail reports, and summary data in the manager Sumfinal
database.
Format
set config <option_name> <value>
Options
Use these options to configure the purge values for the manager Sumfinal
database:
job_days
Number of days that the manager keeps policy runs (default 7
days)
report_days
Number of days that the manager keeps detailed reports
(default 1 day)
207
208 Using the command line interface
Set command
sumfinal_days
Number of days that the manager keeps summary data
(default 7 days)
Example
To configure the manager Sumfinal database to retain policy runs for 14 days,
type:
set config job_days 14
Set license
The Set license command lets you set temporary or permanent licensing
information for a manager.
Format
set license <license_key> <num_agents>
Example
To set the permanent license key for a manager to ABCD-EFGH-IJKL-MNOP and
the number of licensed agents to 10, type:
set license ABCD-EFGH-IJKL-MNOP 10
Set variable
The Set variable command lets you create temporary variables for use in the
command line interface and set their initial values. You can also use this
command to change the values of CLI variables created earlier in the CLI session.
CLI variables are not environment variables. You can use them only during the
current CLI session.
Format
set variable <variable> <value>
Example
You can use this command to change the value of an existing CLI variable or set
the value of a new variable. For example, to change the value of the useracct
variable to 17, type:
set variable useracct 17
Using the command line interface
Show command
Note: You can set up a CLI variable in the Run command to store the job ID. This
simple process ensures that Symantec ESM uses the correct job ID when
generating Security reports. See “Run command” on page 205.
Show command
The Show command lets you list specified agents, access, configuration,
domains, policy runs, license, policies, summary, sumfinal, or configuration
records.
Arguments that you can use with the Show command include:
■
Access
■
Agent
■
Config
■
Domain
■
Job
■
License
■
Module
■
Policy
■
Sumfinal
■
Summary
■
Variable
These arguments are described in the following sections.
Show access
The Show access command lets you list the access records on the manager. You
can also specify a user account and show the state of that account.
Format
show access [-sla] <user_name>
209
210 Using the command line interface
Show command
Options
-s
For a short listing (default if no list is specified)
-l
For a long listing (default if a list is specified)
-a
To show hidden access records (used internally by Symantec ESM)
Note: You must type manager account names in capital letters. For example, to
display the state of the Register account, you must type REGISTER as the user
name.
Example 1
To display the list of accounts on the manager, type:
show access
The CLI displays the account names:
ESM
REGISTER
SECURITY OFFICER
SYSTEM ADMINISTRATOR
Example 2
To display the state of a specific account on the manager, type:
show access -l REGISTER
Using the command line interface
Show command
The screen displays the following account information:
User REGISTER
Account State 0. (active = 0, locked out = 1, disabled = 2, ESM =
3)
Last Login: Fri Aug 10 11:24:15 2000.
Last Bad Login: No bad logins.
Number of Bad Logins: 0.
Password Expiration Time: 24175 seconds.
Password History Length: 10
Number of Bad
Logins
The Number of Bad Logins specifies the number of times a
bad log on has been attempted.
Password
History Length
The Password History Length determines the number of
password changes that users must provide for a manager
account before they can reuse an old password. This helps
prevent unauthorized users from using an old password to
access the manager. Symantec ESM sets the Password
History Length to 10 by default.
Show agent
The Show agent command lets you list the agents registered to the manager.
You can list information for each agent registered to the manager or for a
specific agent. It lists the agent’s name, operating system, Symantec ESM
version, network protocol, computer type, and platform.
Format
show agent [-sl] <agent_name>
Options
-s
To list agent names only (default if no agent is specified)
-l
To list complete agent information (default if a list is specified)
Note: Agent names cannot be longer than 61 characters.
211
212 Using the command line interface
Show command
Example
To display a short list of the agents registered to the manager, type:
show agent
The CLI displays the agents registered to the manager:
Agent GS100
Agent GS101
Agent GS102
Show config
The Show config command lets you display configuration records for the
current manager.
Format
show [-sl] config
Options
-s
for a short list (default if no list is specified)
-l
for a long list (default if a list is specified)
Example
To display the user configurations for the current manager, type:
show config
The program displays user-option information.
User ___ ESM ___ (15 options)
Show domain
The Show domain command lets you list the domains in the manager.
Format
show domain [-sl] <domain_name>
Using the command line interface
Show command
Options
-s
for a short list (default if no list is specified)
-l
for a long list (default if a list is specified)
Example 1
To display a list of the domains on the current manager, type:
show domain
The CLI displays a list of domains. The number of agents in the domain displays
next to the domain name.
DOMAIN NAME # AGENTS
===================================================================
“All Agents”200
“NT Agents” 150
“UNIX Agents”50
Example 2
To display a list of the domains with the names of their agents, add the option -l
to the format, type:
show domain -l
The screen displays a list of domains with the names of the domain’s agents
listed underneath.
DOMAIN NAME
# AGENTS
===================================================================
“All Agents” 200
AGENTS
======
GS100
GS101
.
.
.
GS874
“NT Agents”
AGENTS
150
213
214 Using the command line interface
Show command
======
GS100
GS101
.
.
.
GS317
“UNIX Agents”50
AGENTS
======
GS500
GS501
.
.
.
GS874
Example 3
To show the NT Agents domain, type:
show domain “NT Agents”
Because -l is the default when a single domain is specified, the screen will
display the domain and the names of its agents.
DOMAIN NAME # AGENTS
===========================================================
“NT Agents” 150
AGENTS
======
GS100
GS101
.
.
.
GS317
Example 4
To display a short list of a single domain with only the domain name and
number of agents listed, use the option -s:
Using the command line interface
Show command
show domain -s “NT Agents”
The CLI displays the domain and number of agents in the domain.
DOMAIN NAME# AGENTS
===================================================================
“NT Agents”150
Show job
The Show job command lets you display the status of a specified policy run.
Format
show job [-sl] <job_id or %variable%>
Options
The following options are available:
-s
for a short list (default if no list is specified)
-l
for a long list (default if a list is specified)
If you specify a variable for a policy run during the current CLI session, you can
use either the variable or the job ID in the Show job command.
Example 1
To display a list of all policy runs on the current manager, type:
show job
Example 2
To get information on policy run 24, type:
show job 24
The program will display the specifics of the policy run.
JOB#POLICY NAMEDOMAIN NAMESTATUSDATE/TIME
===================================================================
24
“Demo”“All Agents”COMPLETE2000/06/...
Example 3
To show the status of a policy run using a variable, type the variable name
instead of the job ID. You must enclose the variable with % characters. Also, the
215
216 Using the command line interface
Show command
value of the variable must equal the job ID. For example, to display the long list
status of a policy run and use the acctint variable, type:
show job -l %acctint%
Show license
The Show license command displays license information for the manager. It
displays the type of license the manager is using, the number of agents the
manager is licensed to manage, the system ID, and the license key.
Format
show license
Example
To display license information for the manager, type:
show license
The CLI displays the license information:
License Type:Permanent
System ID:GS100
Agents:25
License Key:ABCD-EFGH-IJKL-MNOP
Show module
The Show module command lets you display the modules available on the
manager.
Format
show module [-sl] <short_module_name>
Options
The following options are available:
-s
for a short list (default if no list is specified)
-l
for a long list (default if a list is specified)
Using the command line interface
Show command
Note: Each module has a short module name. See Table 8-1, “Module names,” on
page 180.
Example 1
To see a list of the available modules, type:
show module
The CLI displays a list of available modules on the manager.
LONG MODULE NAMEMODULE ABBREV# OSs
============================================================
“Account Integrity”account1
“Account Information”acctinfo1
“System Auditing”audit1
.
.
.
“Startup Files”startup1
“User Files”usrfiles1
Example 2
To display a list of available options in a specific module, type:
show module account
The CLI displays the available options, their default settings, and default name
list entries in the module.
LONG MODULE NAMEMODULE ABBREV# OSs
============================================================
“Account Integrity” account1
sorting order “cmni”
NT -- Edit level 1306
Users to Check (U)
List of names may be specified ...
List can be exclusions or inclusions
.
.
.
Report Changed Groups (Z)
217
218 Using the command line interface
Show command
Option is checkable (enabled by default)
Show policy
The Show policy command lets you list specified policies.
Format
show policy [-sl] <policy_name>
Options
-s
for a short list (default if no list is specified)
-l
for a long list (default if a list is specified)
Example 1
To display all the policies in the current manager, type:
show policy
The screen displays the policies and lists the modules they contain.
POLICY NAME # MODULES
==========================================================
“Demo”
1
LONG MODULE NAMEMODULE ABBREV
=====================================================
“Account Integrity”account
“Dynamic Assessment”1
LONG MODULE NAMEMODULE ABBREV
=====================================================
“Integrated Command Engine”ice
Press RETURN to continue
Example 2
To display only a specific policy in the current manager, you must add the policy
name to the format. For example, to display the Phase 1 policy, type:
show policy “Phase 1”
Using the command line interface
Show command
Because the default for a single policy is a short list, the screen displays the
policy and the modules in the policy.
POLICY NAME# MODULES
==========================================================
“Phase 1” 6
LONG MODULE NAMEMODULE ABBREV
=====================================================
“Account Integrity”account
“Login Parameters”log
“Network Integrity”network
“Password Strength”password
“Startup Files”startup
“System Auditing”audit
Show sumfinal
The Show Sumfinal command lets you display the sumfinal record for the
specified policy.
Format
show sumfinal [-sl] [days]
Options
-s
for a short list (default if no list is specified)
-l
for a long list (default if a list is specified)
The days value specifies the number of days to show the records. The default is
seven days.
Example
To show the sumfinal records for one day, type:
show sumfinal 1
The program displays sumfinal records for the day:
Policy Phase 1, domain All Agents, job 3, finished 2000/06.
219
220 Using the command line interface
Show command
Show summary
The Show summary command lets you display a report summary of the
specified policy
Format
show summary [-sl] <policy_name>
Options
-s
for a short list (default if no list is specified)
-l
for a long list (default if a list is specified)
Example
To show a report summary of the Demo policy, type:
show summary “Demo”
The program displays information on policy runs with the Demo policy:
POLICY NAME # REPORTS
==========================================================
Summary for Demo
GS100
finish time:2000/06/1808:39:56
status:
COMPLETE
level:
1
rating:
1
“Account Integrity”
job 20
.
.
count:
2
Show variable
The Show variable command lets you display the variables and their values.
Because these variables are not environment variables, they are available only
during the current CLI session.
Using the command line interface
Shutdown (UNIX only)
Format
show variable
Example
To display the variables and their values, type:
show variable
Shutdown (UNIX only)
The Shutdown command lets you shut down Symantec ESM servers and remove
the Symantec ESM semaphores on computers with UNIX operating systems.
You must have access to an account with root privileges to run the Shutdown
command.
Format
esmc shutdown
Note: You cannot run the Shutdown command interactively with the command
line interface. To run the Shutdown command, you must invoke the CLI from the
UNIX operating system prompt.
Sleep command
The Sleep command lets you tell the CLI program to wait for a specified number
of seconds. You can also use the command to make the CLI wait until the policy
run finishes. This command is useful when running Symantec ESM batch files.
Format
sleep [-j <job_id or %variable%>] <num_seconds>
221
222 Using the command line interface
Status command
Options
-j
Makes the CLI wait for each policy run to complete before continuing
You can specify the number of seconds in the interval between each check of the
policy run database. This value is set to five seconds by default.
You can also use a job ID of 0 (zero) to specify the last policy run that the CLI
started.
If you use a variable to store a job ID during the current CLI session, you can use
either the variable or the job ID number in the Sleep command.
Example 1
To make the program wait 10 seconds before accepting another command, type:
sleep 10
Example 2
To make the CLI program wait for the last policy run to finish, type:
sleep -j 0
Example 3
To make the CLI program wait for a specific policy run to finish, you can use the
job ID or the related variable name. You must enclose the variable name with %
characters. Also, the value of the variable must equal the job ID.
sleep -j %acctint%
Note: You can set up a CLI variable in the Run command to store the job ID. This
simple process ensures that Symantec ESM uses the correct job ID when
generating Security reports. See “Run command” on page 205.
Status command
The Status command lets you check the status of the agent’s connection to the
manager.
Format
status
Using the command line interface
Stop command
Example
To check the status of the connection, type:
status
The screen displays the following message if you are connected:
connected to [manager name] using [TCP etc], user ESM
If you are not connected, the screen displays the following message:
no connection established
Stop command
The Stop command lets you stop a policy run.
Format
stop job <job_id or %variable%>
Options
If you specify a variable for a policy run during the current CLI session, you can
use either the variable or the job ID in the Stop command.
Example 1
To stop policy run 10, type:
stop job 10
Example 2
To stop the last policy run started, type:
stop job 0
A job ID of zero specifies the last policy run that was started.
Example 3
To stop a policy initiated with a variable, type the variable name instead of the
job ID:
stop job %acctint%
You must enclose the variable with % characters. Also, the value of the variable
must equal the job ID.
223
224 Using the command line interface
Version command
Version command
The Version command lets you display the version of Symantec ESM.
Format
version
Example
To display the version of Symantec ESM on the current manager and interface,
type:
version
The screen displays the version shown below:
Interface is running Symantec ESM 6.0 (2000/08/15....
Manager is running Symantec ESM 6.0 (2000/08/15...)
View command
The View command lets you view Security reports, auditor’s summaries,
custom, difference, domain, Policy reports, or summary reports.
Arguments that you can use with the View command include:
■
Agent
■
Audit
■
Checks
■
Custom
■
Differences
■
Domain
■
Policy
■
Report
■
Summary
These arguments are described in the following sections.
Using the command line interface
View command
Options
The following options are available to all view command arguments:
-h
Do not output page headers.
-f
Do not output page footers.
-t
Do not output a title page.
-i
Do not output an introduction.
-c
Do not output a table of contents.
-P
Do not paginate report.
-w Specify the width of the page.
-n
Specify the length of the page.
-o
Specify the output file (the default writes to standard output).
-F
Select a different format file for a report. The .fmt file specifies the title,
header, and footer sections of the report.
Symantec ESM stores the default .fmt files in these locations:
Table 8-8
Default .fmt file locations
Operating system
Directory
Windows
Program Files\Symantec\ESM\
format\[argument].fmt
UNIX
Symantec ESM creates a symbolic link:
/esm/format/[argument].fmt
You can relocate these files on computers that run Windows and UNIX
operating systems.
You may customize the text of a .fmt file, but do not remove or reorder the
sections of the file. You can modify sections of the report using the options
available to all view command arguments.
Additional options for specific arguments are listed with the applicable
argument.
225
226 Using the command line interface
View command
View agent
The View agent command lets you view security information from all the
modules included in a policy run on the specified agent. The report contains
detailed information that you can use to correct deviations from the security
policy. The View agent command is equivalent to a series of View report
commands for each available module.
Display settings
Due to the volume of information in a report, temporarily change the command
line display buffer to at least 2000 lines. To view or change this setting in
Windows NT, do the following: Right-click the Title bar at the top of the
command line display | select Properties | Layout | Screen Buffer Size, change
Height to 2000. This will add a vertical scroll bar and let you view the entire
report.
Set the -w <width> and -n <length> options to match the width and length of the
display window. To view or change the size of the display window in Windows
NT, do the following: Right-click the Title bar at the top of the command line
display | select Properties | Layout | Window Size, change Height to 56. This will
increase the height of the display and let you view an entire page of the report at
a time.
Format
view agent [-sdTlhfticPX] [-w <width>] [-n <length>] [-o <output>]
[-F <format>][<policy_ name>][<agent_ name>]
Options
Note: In addition to these options, the View command has options that are
available to all View command arguments. See “View command” on page 224.
You can use the following additional options with the View agent command:
-s
Do not show report summary.
-d
Do not show report details.
-T
Do not show long descriptive text for each message.
-l
Use long report format. (The default is a shorter, speedier format.)
Using the command line interface
View command
-X
Output to Rich Text Format. (This option functions only with
managers on computers with Windows operating systems. The option
is not available for managers on computers with UNIX operating
systems.)
Example 1
To view Phase 1 security information about the Sales agent, type:
view agent “Phase 1” sales
The program displays the agent report on the screen.
Example 2
To create a file containing this information in rich text format, type:
view agent -X “Phase 1” sales
Managers on computers with Windows operating systems write this
information to the agent.rtf file in the \Symantec\ESM\reports directory.
View audit
The View audit command lets you view a security audit report for selected
computers on the network. The report contains information about the specified
security policy and indicates each computer’s level of compliance.
Format
view audit [-ladpDSLArshfticPX] [-w <width>] [-n <length>]
[-o <output>][-F <format>][<policy_name>][<domain_name>]
Options
Note: In addition to these options, the View command has options that are
available to all View command arguments. See “View command” on page 224.
You can use the following additional options with the View audit command:
-l
Do not show level summary.
-a
Do not show agent summary.
-d
Do not show domain summary.
-p
Do not show policy information for each module.
227
228 Using the command line interface
View command
-D
Do not show disabled options in the policy information.
-S
Do not show suppress records for each module.
-L
Do not show level summary for each module.
-A
Do not show agent summary for each module.
-r
Do not show report summary for each module and agent.
-s
Do not show suppress records for the policy/domain.
-X
Output to Rich Text Format. (This option functions only with
managers on computers with Windows operating systems. The option
is not available for managers on computers with UNIX operating
systems.)
Example 1
To view auditor’s security information for the Phase 1 policy and the NT Agents
domain, type:
view audit “Phase 1” “NT Agents”
The program displays the report on the screen.
Example 2
To create a file containing this information in rich text format, type:
view audit -X “Phase 1” “NT Agents”
Managers on computers with Windows operating systems write this
information to the audit.rtf file in the \Symantec\ESM\reports directory.
View checks
The View checks command lets you view the available security checks for a
specific operating system and version. It also lists the security messages
associated with each check. To show checks for an operating system, an agent of
the same operating system type must be registered to the manager.
Format
view checks [-OmshfticP] [-w <width>] [-n <length>] [-o <output>]
[-F <format>] <osver_name>
Using the command line interface
View command
Options
Note: In addition to these options, the View command has options that are
available to all View command arguments. See “View command” on page 224.
You can use the following additional options with the View checks command:
-O
Do not output security options.
-m
Do not output security messages.
-h
Do not output page headers.
-f
Do not output page footers.
-t
Do not output a title page.
-i
Do not output an introduction.
-c
Do not output a table of contents.
-P
Do not paginate report.
Example
To view the available checks for a Windows NT computer, type:
view checks NT
Symantec ESM lists the available checks for the Windows NT computer.
View custom
The View custom command lets you send an agent’s policy run data to a
specially formatted file instead of a Security report. The file can then be
exported to other report generators. You need to create a format file before
using the View custom command. The format file has syntax rules, keywords,
and directives. See “Format file syntax” on page 307.
Note: Do not use the .fmt files in the esm\format\<platform> directory or esm/
format/<platform> directory. They are not compatible with the View custom
command. Create your own format files and label them with a .vc file extension.
Format
view custom [-o <output_file_name>] <policy_name> <agent_name>
<short_module_name> <job_id or %variable%> <format_file_name>
229
230 Using the command line interface
View command
Options
Note: In addition to these options, the View command has options that are
available to all View command arguments. See “View command” on page 224.
You can use the following additional options with the View custom command:
-o
Specify an output file (the default writes to standard output).
Selecting ‘all’ instead of a module name causes Symantec ESM to output data for
all of the modules in the policy run. Specifying a module such as ‘password’
results in data produced only by that module.
Note: Each module has a short module name. See Table 8-1, “Module names,” on
page 180.
The format argument used with the View custom command specifies the format
file to use when formatting the output data file. Symantec ESM looks for this file
in the current directory first, then in the esm\format\<platform> directory. You
may also specify the complete path name for the file.
A job ID of 0 (zero) specifies the latest policy run.
If you specify a variable in a policy run during the current CLI session, you can
use either the variable or the job ID in the View custom command. To use the
variable, type the variable name instead of the job ID. You must enclose the
variable with % characters. Also, the value of the variable must equal the job ID.
Example 1
To output the password data from the most recent “Phase 1” policy run on agent
GS100 using the custom.vc format file, type:
view custom -o GS100.rpt “Phase 1” GS100 password 0 custom.vc
Example 2
To output the data from all of the modules in the most recent “Phase 1” policy
run on agent GS100 using the custom.vc format file, type:
view custom -o GS100.rpt “Phase 1” GS100 all 0 custom.vc
Using the command line interface
View command
Example 3
To use a variable that identifies a policy run in the current CLI session, type the
variable name instead of the job ID. You must enclose the variable name with %
characters. Also, the value of the variable must equal the job ID. For example, to
output the data from all of the modules using the %second% variable to denote a
specific “Phase 1” policy run in the current CLI session on agent GS100 using
the custom.vc format file, type:
view custom -o GS100.rpt “Phase 1” GS100 all %second% custom.vc
View differences
The View differences command lets you view the differences between two
Security reports.
Format
view differences [-sdThfticPNOX][-w <width>] [-n <length>]
[-o <output>][-F <format>][-j <job_id or %variable%>
[-j <job_id or %variable%>]] [-D <days> [-D <days>]] <policy_name>
<agent_name> <short_module_name>
Options
Note: See the View command overview for descriptions of the options available
to all View command arguments.
231
232 Using the command line interface
View command
You can use the following additional options with the View differences
command:
-s
Do not show report summary.
-d
Do not show report details.
-T
Do not show long descriptive text for each message.
-N
New information - show items that occur in the newer policy run only.
-O
Old information - show items that occur in the older policy run only
(the default is to show both old and new differences).
-j
Job ID to use in comparison.
■
0 Means the most current policy run
■
-1 Means the first previous policy run
If only one job ID is specified, Symantec ESM compares that policy run
with the most current policy run.
If you specify a variable for a policy run during the current CLI session,
you can use either the variable or the job ID in the View differences
command.
-X
Output to Rich Text Format. (This option functions only with
managers on computers with Windows operating systems. The option
is not available for managers on computers with UNIX operating
systems.)
-D
Compare the specified policy run with a policy run at least ‘number of
days’ ago.
Note: Policy runs may be specified with either the -D or -j options or a
combination of both.
Each module has a short module name. See Table 8-1, “Module names,” on
page 180.
Using a module name of ‘all’ means that the CLI uses all of the modules for the
policy/Agent combination.
Example 1
Assume that you run a weekly Policy report on the GS100 agent using the Phase
1 policy. To view a report comparing the differences between the most current
report (this week’s) to last week’s Policy report, type:
Using the command line interface
View command
view differences -j 0 -j -1 “Phase 1” GS100 all
Example 2
In the case where the security run is done weekly and you want to output the
information in Rich Text Format, you can type:
view differences -X -j 0 -D 7 “Phase 1” GS100 all
Managers on computers with Windows operating systems write this
information to the diff.rtf file in the \Symantec\ESM\reports directory.
Example 3
To use variables, type each variable instead of the job ID. You must enclose the
variables with % characters. Also, the value of each variable must equal a job ID.
For example, to view the report comparing the differences between two reports
run during the current CLI session, type:
view differences -j %before% -j %after% “Phase 1” GS100 all
For example, run the policy, Phase 1, remove the Password Strength module
from the policy, run the policy again, and then run View differences. The View
differences report will compare the matching modules, report any differences
found, and give the following message:
No jobs matching the job selection criteria were found in module
Password Strength.
View domain
The View domain command lets you view specified domain information.
Format
View domain [-hfticPX][-w <width>][-n <length>][-o <output>]
[-F <format>] [<domain_name>]
Options
Note: In addition to these options, the View command has options that are
available to all View command arguments. See “View command” on page 224.
233
234 Using the command line interface
View command
You can use the following additional option with the View domain command:
-X
Output to Rich Text Format. (This option functions only with
managers on computers with Windows operating systems. The option
is not available for managers on computers with UNIX operating
systems.)
Example 1
To view the NT Agents domain, type:
view domain “NT Agents”
The program then displays the Domain report on the screen.
Example 2
In the case where you want to output the information in Rich Text Format, you
can type:
view domain -X “NT Agents”
Managers on computers with Windows operating systems write this
information to the domain.rtf file in the \Symantec\ESM\reports directory.
View policy
The View policy command lets you view a Policy report on the specified policy,
its modules, and their security checks.
Format
view policy [-DSshfticPX] [-w <width>] [-n <length>] [-o <output>]
[-F <format>] <policy_name>
Options
Note: In addition to these options, the View command has options that are
available to all View command arguments. See “View command” on page 224.
Using the command line interface
View command
You can use the following additional options with the View policy command:
-D
Don't show disabled options in the policy information.
-S
Don't show suppress records for each module.
-s
Don't show suppress records for the policy/domain.
-X
Output to Rich Text Format. (This option functions only with managers on
computers with Windows operating systems. The option is not available for
managers on computers with UNIX operating systems.)
Example 1
To view the Phase 1 policy, type:
view policy “Phase 1”
The program displays the Policy report on the screen.
Example 2
In the case where you want to output the information in Rich Text Format, you
can type:
view policy -X “Phase 1”
Managers on computers with Windows operating systems write this
information to the policy.rtf file in the \Symantec\ESM\reports directory.
View report
The View report command lets you view a Security report. This report contains
detailed information for a single security module run on a single agent. The
report can be used to correct deviations from the security policy.
Format
view report [-sdTlhfticPX] [-x <file>] [-q <file>] [-w <width>]
[-n <length>] [-o <output>] [-F <format>] <policy_name> <agent_name>
<short_module_name> <job_id or %variable%>
Options
Note: In addition to these options, the View command has options that are
available to all View command arguments. See “View command” on page 224.
235
236 Using the command line interface
View command
You can use the following additional options with the View report command:
-x
Output to a file in tab/double_quote format (suitable for reading by
Microsoft Excel.
-q
Output to a file in comma/double_quote format (suitable for reading
by Borland Quattro Pro using the import function).
-s
Do not show the report summary.
-d
Do not show the report details.
-T
Do not show the long descriptive text for each message.
-l
Show the long descriptive text for each message.
-X
Output in Rich Text Format. (This option functions only with
managers on computers with Windows operating systems. The option
is not available for managers on computers with UNIX operating
systems.)
Note: Each module has a short module name. See Table 8-1, “Module names,” on
page 180. If you specify a variable for a policy run during the current CLI
session, you can use either the variable or the job ID in the View report
command.
Example 1
To view the Security report that results from running the Account Integrity
module in the Phase 1 policy on the GS100 agent, type:
view report “Phase 1” GS100 account 81
Example 2
To view a report using a variable, type the variable name instead of the job ID.
You must enclose the variable with % characters. Also, the value of the variable
must equal the job ID. For example, to view a report using the acctint variable,
type:
view report “Phase 1” GS100 account %acctint%
Using the command line interface
View command
Example 3
If you want to output the information in Rich Text Format, you can type:
view report -X “Phase 1” GS100 account 81
Managers on computers with Windows operating systems write this
information to the security.rtf file in the \Symantec\ESM\reports directory.
Example 4
If you want to output the security report to a file containing information from
the last complete policy run for the specified policy_name, agent_name, and
short_module_name, type the -x option and type a job ID of “0”.
view report -x “Phase 1” GS100 account 0
View summary
The View summary command lets you view policy run summary information for
the specified policy and domain. It shows the security level and rating for each
module in the policy.
Format
view summary [-mIhfticPX] [-w <width>] [-n <length>] [-o <output>]
[-F <format>] <policy_name> <domain_name>
Options
Note: In addition to these options, the View command has options that are
available to all View command arguments. See “View command” on page 224.
You can use the following additional options with the View summary command:
-m
Do not show module information.
-I
Do not show information from old policy runs.
-X
Output to Rich Text Format. (This option functions only with
managers on computers with Windows operating systems. The option
is not available for managers on computers with UNIX operating
systems.)
237
238 Using the command line interface
View command
Example 1
To view summary information for policy Phase 1 on the All Agents domain, type:
view summary “Phase 1” “All Agents”
The program displays the summary information.
Example 2
In the case where you want to output the information in Rich Text Format, you
can type:
view summary -X “Phase 1” “All Agents”
Managers on computers with Windows operating systems write this
information to the summary.rtf file in the \Symantec\ESM\reports directory.
Chapter
9
Using the Symantec ESM
utilities
This chapter includes the following topics:
■
Understanding Symantec ESM utilities conventions
■
Using the Policy tool
■
Using the Database Conversion tool
■
Using the Reports tool
Understanding Symantec ESM utilities conventions
Symantec ESM utilities let you copy policies between managers, transfer
security information from managers to an external database, and produce a
wide range of reports from the external database.
These utilities run only from the Windows or UNIX command line.
This section contains important guidelines regarding the syntax and command
conventions that apply to the Symantec ESM utilities.
Case sensitive entries
Some input data is case sensitive. You must type this data to match the case of
the corresponding values that are stored on a manager or an external relational
database. For example, Phase 1 is not the same as phase 1 or PHASE 1.
240 Using the Symantec ESM utilities
Using the Policy tool
Quotation marks
Command arguments require quotation marks if they contain two or more
words that are separated by spaces. For example, type the policy name, Phase 1,
as “Phase 1”. For consistency, you may enclose all command arguments,
including single word arguments, in quotation marks.
Brackets
Command formats use two types of brackets. These brackets indicate usersupplied command options or data. Do not type the brackets. Type only the data
inside the brackets.
■
Square brackets
These brackets [ ] indicate that the user-supplied command option is not
required. Precede these command options with a dash (-).
For example, the Policy tool command options can include: [-gui], [-n], [-p],
[-y], or [-z].
■
Angle brackets
These brackets < > indicate user-supplied data that is network specific.
For example, Policy tool command data can include: <manager_name>,
<user_name>, or <password>.
Using the Policy tool
On large networks with many systems, the Policy tool provides an efficient way
to standardize the settings of enabled security checks, templates, and word lists.
The Policy tool does this by exporting policies from a selected manager, then
importing the policies to the other managers on the network. The policies that
are imported to each new manager enable the same security checks and contain
the same template and word list settings as the policies that are on the source
manager.
The Policy tool exports policies as XML formatted files. Use a standard text
editor to view the contents. Each element is tagged for identification. The file
structure separates the modules in the policy and the checks in each module.
The state of each check is clearly identified. Policy version and edit level,
enabled template entries, and name list types and values are also listed.
The policy file that is exported by the Policy tool contains all of the security
checks that are in the policy, whether enabled or disabled. However, it contains
only templates and word lists that are enabled in the source policy.
The policy file that is imported by the Policy tool overwrites the policy on the
importing manager.
Using the Symantec ESM utilities
Using the Policy tool
Usage prerequisites
Complete the following prerequisites:
■
■
Access rights
■
To export a policy, obtain access to an account on the manager that has
View access rights enabled for all policies and all templates.
■
To import a policy, obtain access to an account on the manager that has
the Create new policies and Create new templates access rights
enabled.
Operating system domains
■
All of the operating system domains of the manager that is importing a
policy must also be on the manager that is exporting the policy.
For example, if the manager that is importing a policy has Windows
2000 and HP-UX UNIX agent domains, then the manager that is
exporting the policy must also have Windows 2000 and HP-UX agent
domains.
■
The Policy tool reports an error and terminates the import process if
the manager that is importing the policy does not have the operating
system domain of the manager that is exporting the policy.
For example, the Policy tool reports an error if the manager that is
importing the policy has only the Windows 2000 agent domain while
the manager that is exporting the policy has only the HP-UX UNIX
agent domain.
■
The Policy tool disables the templates for a UNIX agent domain on the
importing manager if the manager that is exporting the policy does not
have the matching UNIX agent domain. You can enable the templates
again with the template editor.
For example, if the manager that is importing a policy has only the
Solaris UNIX agent domain and the manager that is exporting the
policy has only the HP-UX and AIX UNIX agent domains, the Policy tool
disables the Solaris templates on the importing manager.
241
242 Using the Symantec ESM utilities
Using the Policy tool
■
Directory permissions
To export a policy, obtain access to an account on the host computer with
the Write permission enabled for the destination directory. By default, the
Policy tool exports policies to the current directory.
■
Exported policies
Before you export a policy, verify that at least one agent of each operating
system type that is registered to the manager has installed the latest
security update. This ensures that the exported policy contains current
security checks, templates, and word lists. Then verify that all of the
security checks in each module of the policy are set to match your
company’s security policy. Also, verify that all of the templates and word
lists that are required by the policy are enabled.
■
Imported policies
Before you import a policy, verify that the latest security update has been
installed on the agents that are registered to the importing manager. This
ensures that the agents can run all of the enabled security checks in the
policy.
Access
Use the following procedure to access the Policy tool.
To access the Policy tool
◆
Do one of the following:
■
Windows:
At the command prompt, change to the directory that contains the
Policy tool. The tool installs in the C:\Program Files\Symantec\ESM
Utilities directory by default.
■
UNIX:
At the command prompt, change to the directory that contains the
Policy tool. The Policy tool installs in the esm/bin directory by default.
Format
Apply these formatting rules when entering a Policy tool command:
■
Capitalize policy names to match the case of the corresponding values that
are stored on a manager.
■
Type policytool as one word.
■
Type Policy tool options last in the command.
Using the Symantec ESM utilities
Using the Policy tool
■
To export a policy from a manager, use this format:
policytool export <manager_name> <user_name> <password>
<file_name> <policy_name> [-gui] [-n] [-p] [-y] [-z]
■
To import a policy to a manager, use this format:
policytool import <manager_name> <user_name> <password>
<file_name> [-gui] [-n] [-p] [-y] [-z]
Values
The following are the definitions for values used with the Symantec ESM
utilities.
manager_name
Name of the manager computer.
user_name
User account name on the manager.
password
User account password on the manager.
file_name
File or archive containing the exported policy. You can
specify a path to make the Policy tool export or import a
policy to a directory other than the current directory.
policy_name
Policy exported by the Policy tool. Policy names are
always case sensitive.
243
244 Using the Symantec ESM utilities
Using the Policy tool
Options
The following options are associated with the Symantec ESM utilities.
-gui
Use GUI components when reporting detected conflicts.
-n
Do not report any detected conflicts and never overwrite
the policy.
-p
Specify the TCP port number that is used to contact the
manager (default 5600).
-y
Do not report any detected conflicts but always overwrite
the policy.
-z
Specify zip file format. This option lets the Policy tool
export or import a policy, its enabled templates, and
enabled word files as a set of packed files in an archive.
Note: The -gui, -n, and -y options are mutually exclusive.
Examples
Example 1 - Displaying help
To display help for the Policy tool, type a Policy tool command without any
options at the command prompt:
policytool
Example 2 - Exporting a policy
To export a policy, use the export format and type the required values and
options in a Policy tool command.
For example, to export the Phase 1 policy on the GS0100 manager, type the
Security Officer account, its my1pass+ password, and the export file name at the
command prompt by typing:
policytool export gs0100 “Security Officer” my1pass+ phase1.xml
“Phase 1”
Warning: Do not edit exported policy files. Importing edited policy files can
cause a manager to report conflicts such as non-existent or invalid modules,
checks, templates, or word lists.
Using the Symantec ESM utilities
Using the Policy tool
Example 3 - Importing a policy
To import a policy, use the import format and type the required values and
options in a Policy tool command.
For example, to import the Phase 1 policy on the GS0200 manager, type the
Security Officer account, its my2pass+ password, and the import file name at
the command prompt:
policytool import gs0200 “Security Officer” my2pass+ phase1.xml
When importing a policy to a manager, the Policy tool checks for the policy
name on the destination manager.
■
If the Policy tool finds the policy name, the Policy tool prompts for a
decision to overwrite the policy. If you type Yes, the Policy tool overwrites
the policy on the manager.
■
If you include the -y option in an import command, the Policy tool writes the
policy on the destination manager without prompting for a decision.
Symantec ESM does not keep multiple copies of policies with the same name on
a single manager. If different users import the same policy on the same
manager, the last version of the policy overwrites all previous versions.
Example 4 - Using GUI components
To display conflicts using GUI components while exporting or importing
policies, use the -gui option with an export or import Policy tool command.
For example, to have GUI components report detected conflicts while exporting
the policy in Example 2, type:
policytool export gs0100 “Security Officer” my1pass+ phase1.xml
“Phase 1” -gui
To import the policy in Example 3 using GUI components to display detected
conflicts, type:
policytool import gs0200 “Security Officer” my2pass+ phase1.xml -gui
Example 5 - Suppressing conflicts
To suppress conflict reporting while exporting or importing policies, use the -y
option in the Policy tool.
For example, to suppress detected conflicts while exporting the Phase 1 policy in
Example 2, add the following command to a batch file:
policytool export gs0100 “Security Officer” my1pass+ phase1.xml
“Phase 1” -y
245
246 Using the Symantec ESM utilities
Using the Policy tool
To import the policy in Example 3 while suppressing detected conflicts in the
GS0200 manager, type:
policytool import gs0200 “Security Officer” my2pass+ phase1.xml -y
Example 6 - Using another directory
The Policy tool exports policy files to the current directory by default. To export
policy files to another directory on the computer, specify the full path of the
directory.
For example, to export the policy in Example 2 to the C:\Export directory on the
GS0100 manager, type:
policytool export gs0100 “Security Officer” my1pass+
“c:\export\phase1.xml” “Phase 1”
To import the policy exported in this example to the C:\Import directory on the
GS0200 manager, type:
policytool import gs0200 “Security Officer” my2pass+
“c:\import\phase1.xml”
Example 7 - Using an archive
To minimize the demands on network resources and the size of the exported
policy files that are stored on the computer, use the -z option with the export or
import command. This option compresses the .xml file into a .zip file.
For example, to export the policy in Example 2 as a zip file, type:
policytool export gs0100 “Security Officer” my1pass+ phase1.zip
“Phase 1” -z
To import the policy that is exported in this example to the GS0200 manager as
a zip file, type:
policytool import gs0200 “Security Officer” my2pass+ phase1.zip -z
Example 8 - Using a different TCP port
To connect with a manager that is running on a Windows operating system
through a different TCP port, use the -p option followed by the TCP port
number.
For example, to export the policy in Example 2 using TCP port 3812, type:
policytool export gs0100 “Security Officer” my1pass+ phase1.xml
“Phase 1” -p 3812
Using the Symantec ESM utilities
Using the Database Conversion tool
To import the policy that is exported in this example to the GS0200 manager
using TCP port 3812, type:
policytool import gs0200 “Security Officer” my2pass+ phase1.xml -p
3812
Using the Database Conversion tool
The Database Conversion tool lets you transfer security data from the
proprietary database of one or more managers, running on supported Windows
or UNIX operating systems, to an external database such as Microsoft Access,
MSSQL, or ORACLE. The transfer includes information about agents, domains,
managers, policy runs, policy run messages, message suppressions, and Policy
Run reports.
To ensure that the external relational database contains current information,
you can automate the data transfer process by scheduling the Database
Conversion tool to run periodically.
Accessing the external database
Provide the Database Conversion tool with access to the external relational
database by doing one of the following:
■
While installing the Symantec ESM utilities on a Windows operating
system, choose the setup options that install the default database and
related ODBC drivers. This installs a default .mdb native file format and an
ODBC data source named ESMReports.
■
After installing the Symantec ESM utilities on a Windows operating system
that has an ORACLE client, provide access to the ORACLE database by doing
the following:
■
Use the ODBC Data Source Administrator to set up a data source name
(DSN) for the ORACLE database.
Note: For ORACLE database connectivity, Symantec supports only the
ODBC JDBC driver from SUN Microsystems.
■
Change to the \ESM Utilities\ORACLE directory and use an SQL tool to
run the create.sql script. This script creates the required database
schema tables and procedures for the ORACLE database.
247
248 Using the Symantec ESM utilities
Using the Database Conversion tool
■
■
After installing the Symantec ESM utilities on a Windows operating system
that has an MSSQL client, you can set up access to the MSSQL database by
doing the following:
■
Use the ODBC Data Source Administrator to set up a DSN for the
MSSQL database.
■
Change to the \ESM Utilities\MSSQL directory and use an SQL tool to
run the create.sql script. This script creates the required database
schema tables and procedures for the MSSQL database.
After installing the Symantec ESM utilities on a UNIX operating system that
has an ORACLE client, you can set up access to the ORACLE database by
doing the following:
■
Get an ORACLE JDBC driver from ORACLE by accessing their Web site
at http://www.oracle.com. Use the conversion tool arguments,
jdbc.driver and jdbc.url instead of the jdbc.datasource argument. See
the ORACLE JDBC driver documentation for information about the
driver and URL.
■
Change to the /ESM Utilities/ORACLE directory and run the use an SQL
tool to create.sql script. This script creates the required database
schema tables and procedures for the ORACLE database.
Note: When communicating with a database on another host computer,
configure the external relational database driver to encrypt communications to
protect user names and passwords.
Understanding the database file structure
This schema depicts the relationships among the tables in the external
relational database.
Using the Symantec ESM utilities
Using the Database Conversion tool
Figure 9-1
External relational database schema
The ID fields define the relationships in the database tables. For example, the
value in the managerID field corresponds to a specific manager record in the
manager table.
The tables and keys in the database are set up to enable logical relationship
queries.
The external relational database has the following tables:
Table 9-1
External relational database tables
Table name
Summary of stored data
ESMAgent
Agent properties including name and
operating system
ESMCheck
Security check properties including name,
name list type, and description
ESMCheckNameValue
Relation table for the PolicyCheckStateID/
NameValue one to many relationship
249
250 Using the Symantec ESM utilities
Using the Database Conversion tool
Table 9-1
External relational database tables
Table name
Summary of stored data
ESMCheckValue
Relation table for the PolicyCheckStateID/
ValueTitle one to one relationship
ESMDomain
Domain properties including name and
manager
ESMDomainAgent
Relation table for the Domain/Agent many to
many relationship
ESMJobRun
Policy run properties including start time,
finish time, status, and maximum errors
ESMJobRunCheckResult
Policy run results for each enabled check
ESMManager
Manager name
ESMMessage
Module message properties including title,
level, update, and message text
ESMOSVer
Operating system description
ESMPolicy
Policy name
ESMPolicyCheck
Policy check properties including module name
and operating system
ESMPolicyCheckState
Policy check enabled or disabled
ESMSuppression
Suppression properties including creator name
and date, expiration date, enabled or disabled,
and last used date
ESMAgent table
The ESMAgent table lists the properties of the agents. The OSVerID field relates
the agents to their host operating systems.
Table 9-2
ESMAgent table
Field name
Type
Description
RecID
<auto-number>
Record ID
AgentName
<text>
Agent host computer name
OSInfo
<text>
Agent host operating system
OSVerID
<number>
RecID in ESMOSVer table
Using the Symantec ESM utilities
Using the Database Conversion tool
ESMCheck table
The ESMCheck table lists the properties of the Symantec ESM security checks.
Table 9-3
ESMCheck table
Field name
Type
Description
RecID
<auto-number>
Record ID
CheckName
<text>
Check name
NameListType
<text>
Type of name list that is used by the
check including user, file, key, string,
template, word, or none
Description
<text>
Text describing the purpose of the
check
ESMCheckNameValue table
The ESMCheckNameValue table lists the name list values that are used by the
Symantec ESM security checks.
Table 9-4
ESMCheckNameValue table
Field name
Type
Description
PolicyCheck-StateID
<auto-number>
Record ID
NameValue
<text>
Name list values
Enabled
<number>
Enabled values including: 0 Disabled
or 1 Enabled
Included
<number>
Included values including:
0 Excluded or 1 Included
ESMCheckValue table
The ESMCheckValue table lists the variable values that are used by the
Symantec ESM security checks.
Table 9-5
ESMCheckValue table
Field name
Type
Description
PolicyCheck-StateID
<auto-number>
Record ID
ValueTitle
<text>
Title of the variable in the check
251
252 Using the Symantec ESM utilities
Using the Database Conversion tool
Table 9-5
ESMCheckValue table
Field name
Type
Description
CheckValue
<number>
Current setting of the variable that is
in the check
ESMDomain table
The ESMDomain table lists the Symantec ESM domain names. The managerID
field relates the domains to their managers.
Table 9-6
ESMDomain table
Field name
Type
Description
RecID
<auto-number>
Record ID
DomainName
<text>
Domain Name
ManagerID
<number>
RecID in ESMManager table
ESMDomainAgent table
The ESMDomainAgent table relates entries in the ESMAgent table to entries in
the ESMDomain table. This relationship allows a single agent record to be
associated with many domain records.
Table 9-7
ESMDomainAgent table
Field name
Type
Description
AgentID
<number>
RecID from ESMAgent table
DomainID
<number>
RecID from ESMDomain table
ESMID table
The ESMID table lists the database tables and the last record ID that is in each
table.
Table 9-8
ESMID table
Field name
Type
Description
TableName
<text>
The database table name
LastID
<number>
Last record ID from the table
Using the Symantec ESM utilities
Using the Database Conversion tool
ESMJobRun table
The ESMJobRun table lists the properties of the policy runs.
Table 9-9
ESMJobRun table
Field name
Type
Description
RecID
<auto-number>
Record ID
StartTime
<number>
Start date and time of policy run
FinishTime
<number>
Finish date and time of policy run
Status
<text>
Status of policy run including error,
running, complete, or partial
MaxErrors
<number>
Maximum number of error messages
that a policy run can report
ResultMessage
<text>
Policy run message text
JobID
<number>
JobRunID from
ESMJobRunCheckResult table
DomainID
<number>
RecID from ESMDomain table
PolicyID
<number>
RecID from ESMPolicy table
ESMJobRunCheckResults table
The ESMJobRunCheckResults table lists the messages from the policy runs on
the agents.
Table 9-10
ESMJobRunCheckResults table
Field name
Type
Description
AgentID
<number>
RecID from ESMAgent table
JobRunID
<number>
RecID from ESMJobRun table
PolicyCheckID
<number>
RecID from ESMPolicyCheck table
MessageID
<number>
RecID from ESMMessage table
ResultState
<text>
Status of the policy run; either
scheduled, error, running, or
complete
NameValue
<text>
Source of the policy run message;
either agent, module, or check name
253
254 Using the Symantec ESM utilities
Using the Database Conversion tool
Table 9-10
ESMJobRunCheckResults table
Field name
Type
Description
Information
<text>
Policy run date and time, or the
message text describing the problem
or policy infraction
ESMManager table
The ESMManager table lists the names of the manager host systems.
Table 9-11
ESMManager table
Field name
Type
Description
RecID
<auto-number>
Record ID
ManagerName
<text>
Manager host computer name
ESMMessage table
The ESMMessage table lists the properties of the Symantec ESM messages.
Table 9-12
ESMMessage table
Field name
Type
Description
RecID
<number>
Number based on the message
sequence in the .m file
Title
<text>
Message title
MsgLevel
<number>
Message level; either 0 Green, 1
Yellow, or 2 Red
UpdateCorrect
<text>
Actions in messages that change
host systems, snapshots, or
templates; either correctable,
updateable, or none
FullText
<text>
Explains the problem or policy
infraction, why the infraction is a
security risk, and the actions that
are required to implement a remedy
Using the Symantec ESM utilities
Using the Database Conversion tool
ESMOSVer table
The ESMOSVer table lists the type of operating system running the agent.
Table 9-13
ESMOSVer table
Field name
Type
Description
RecID
<auto-number>
Record ID
Description
<text>
Operating system type
ESMPolicy table
The ESMPolicy table lists the properties of the policies.
Table 9-14
ESMPolicy table
Field name
Type
Description
RecID
<auto-number>
Record ID
PolicyName
<text>
Policy title
ManagerID
<number>
RecID in ESMManager table
ESMPolicyCheck table
The ESMPolicyCheck table lists the properties of the modules in the policies.
Table 9-15
ESMPolicyCheck table
Field name
Type
Description
RecID
<auto-number>
Record ID
PolicyID
<number>
RecID from ESMPolicy table
ModuleShort-Name
<text>
Abbreviated module name
ModuleName
<text>
Module name
OSVerID
<number>
RecID in ESMOSVer table
255
256 Using the Symantec ESM utilities
Using the Database Conversion tool
ESMPolicyCheckState table
The ESMPolicyCheckState table relates entries in the ESMCheck table to entries
in the ESMPolicyCheck table. The CheckID field relates the security checks to
their modules and policies.
Table 9-16
ESMDomainAgent table
Field name
Type
Description
RecID
<auto-number>
Record ID
CheckID
<number>
RecID from ESMCheck table
PolicyCheckID
<number>
RecID from ESMPolicyCheck table
Enabled
<number>
Check states; either 0 Disabled or 1
Enabled
ESMSuppression table
The ESMSuppression table stores the properties of the Symantec ESM
suppressions. The PolicyCheckID and Message ID fields relate the suppressions
to their policies and messages.
Table 9-17
ESMSuppressions table
Field name
Type
Description
PolicyCheckID
<number>
RecID from ESMPolicy-Check table
MessageID
<number>
RecID from ESMMessage table
IgnoreMessage
<number>
Suppression must explicitly match
wildcard states: 0 Disabled or 1
Enabled
Agent-Expression
<text>
Suppression matches wildcard agent
name
Name-Expression
<text>
Suppression matches wildcard agent
name and module name
CreatorName
<text>
Manager account used to create a
suppression
ExpirationDate
<number>
Date and time of suppression
expiration
CreationDate
<number>
Date and time of suppression
creation
Using the Symantec ESM utilities
Using the Database Conversion tool
Table 9-17
ESMSuppressions table
Field name
Type
Description
LastUsed
<number>
Date and time of last suppression
use
Enabled
<number>
Suppression states; either 0 Disabled
or 1Enabled
InfoExpression
<text>
Text of security message reported by
an agent.
Annotation
<text>
Suppression comments
Usage prerequisites
Complete the following prerequisites:
■
Access rights
To convert a Symantec ESM manager database:
■
Obtain access to an account on the manager that has the View access
rights enabled for all domains, all policies, and all templates.
■
Obtain access to an account with privileges to modify the external
relational database.
■
JDBC driver classes
If you are using JDBC to connect to an ORACLE database, verify that the
JDBC driver classes are in the classpath.
■
Vendor information
If you are using an external relational database other than ODBC, get the
JDBC driver, driver class name, and URL convention information from the
vendor of the destination database.
For more information, see the documentation provided by the JDBC driver
vendor, together with the information about the jdbc.driver and jdbc.url.
See Table 9-18, “Database Conversion tool parameters and values,” on
page 260.
■
Windows ODBC data source administrator
If you are using an ODBC compliant external relational database, use the
ODBC Data Source Administrator to choose the ODBC driver and the
ESMSchema.mdb database during the installation of the Symantec ESM
utilities. See the Symantec ESM Installation Guide for more information.
257
258 Using the Symantec ESM utilities
Using the Database Conversion tool
Access
Use the following procedure to access the Database Conversion tool
To access the Database Conversion tool
Do one of the following:
◆
■
Windows
At the command prompt, change to the directory that contains the
Database Conversion tool. The tool installs in the C:\Program
Files\Symantec\ESM Utilities directory by default.
■
UNIX
At the command prompt, change to the directory that contains the
Database Conversion tool. The tool installs in the esm/bin directory by
default.
Format
Apply these formatting rules when entering a Database Conversion tool
command:
■
Use the same formats on Windows or UNIX systems.
■
Type dbconvert as one word.
■
To convert a Symantec ESM manager database, use this format:
dbconvert [-propfile=<file_name>] [-D<property>= <value>]
A -D option must precede each property entry. See “Example 2 - Converting
to an ODBC database” on page 262.
To access help for a Database Conversion tool command, use this format:
■
dbconvert [-help]
Options
The following options are associated with the database conversion tool.
-propfile
Specifies a property file that contains the required
parameters and values.
-D
Specifies a single parameter and value.
See “Parameters” on page 260.
-help
List formats and other information.
Using the Symantec ESM utilities
Using the Database Conversion tool
Property files
Property files let you type Database Conversion tool commands with a minimum
of time and effort.
You can create several property files. However, you can include only one
property file in each Database Conversion tool command. To override a value in
a property file, include a -D option specifying the appropriate parameter and
value in the Database Conversion tool command.
If you restrict access to a property file, no one else can use the file.
Note: Do not use quotes in property file entries. For example, if you type
esm.managers=“gs0100 gs0200”, the Database Conversion tool does not connect
with managers gs0100 and gs0200. Instead, it attempts to connect with manager
“gs0100 gs0200”. Also, do not use quotes when specifying user names and
passwords.
■
ODBC compliant database
This sample property file contains the parameters and values that are
needed to export data from managers GS0100 and GS0200 to the
ESMReports ODBC database:
esm.managers=gs0100 gs0200
gs0100.user=security officer
gs0100.password=my1pass+
gs0200.user=security officer
gs0200.password=my2pass+
jdbc.datasource=esmreports
■
ORACLE
This sample property file contains the parameters and values needed to
export data from managers GS0300 and GS0400 to an ORACLE database.
esm.managers=gs0300 gs0400
gs0300.user=security officer
gs0300.password=my3pass+
gs0400.user=security officer
gs0400.password=my4pass+
jdbc.driver=oracle.jdbc.driver.OracleDriver
jdbc.url=jdbc:oracle:thin:@GS0500:1521:REPORTS
jdbc.user=user1453
jdbc.password=secret7
259
260 Using the Symantec ESM utilities
Using the Database Conversion tool
To create a Database Conversion tool property file
1
Use any text editor to create the ASCII plain-text property file.
2
Type one parameter and its value per line in the file.
3
Save the property file in the directory that contains the Database
Conversion tool.
4
Use any text file extension (for example, property.txt).
Parameters
The Database Conversion tool uses specific parameters and values to access
managers, extract their information, and convert the results for an external
relational database.
Type all parameters, both mandatory and optional, and their related values on
the same line at the command prompt.
This table lists the Database Conversion tool parameters and their related
values:
Table 9-18
Database Conversion tool parameters and values
Parameter names
Parameter Values
esm.managers
This value specifies the name of a manager. To
include more than one manager, separate the
manager names with spaces.
(mandatory entry, one per Database
Conversion tool command)
<manager_name>.user
(mandatory entry, one per manager)
<manager name>. password
(mandatory entry, one per manager)
jdbc.datasource
This value specifies a user account with rights to
read information on the manager. If you include
more than one manager, you must type a
separate user account entry for each manager.
This value specifies the password of the user
account on a specified manager. If you include
more than one manager, you must type a user
account entry for each manager.
This value specifies the data source name. For
(mandatory when using the Windows example, if you use the Windows ODBC Data
Source Administrator to select the ESMReports
ODBC Data Source Administrator; one
database, type ESMReports.
entry per Database Conversion tool
command)
Using the Symantec ESM utilities
Using the Database Conversion tool
Table 9-18
Database Conversion tool parameters and values
Parameter names
Parameter Values
jdbc.driver
If you do not use the Windows ODBC Data
Source Administrator to select the Reports
(mandatory when not using the
database, download the JDBC driver for the
Windows ODBC Data Source
destination database from the vendor’s Web site.
Administrator; one entry per Database
For example, if you are using ORACLE, access
Conversion tool command)
www.oracle.com, find the JDBC driver, and
download it to the host computer. Save the
driver in the same directory with the
dbconvert.jar file. In the vendor documentation,
find the class name for the downloaded driver.
This is the case-sensitive value of this
parameter.
jdbc.url
This parameter specifies the location of the
destination database for the Database
(mandatory when not using the
Conversion tool. If you are not using the
Windows ODBC Data Source
Windows ODBC Data Source Administrator, see
Administrator; one entry per Database
the database vendor’s Web site documentation.
Conversion tool command)
For example, when using ORACLE, go to
www.oracle.com. In the documentation for the
JDBC driver, find the URL convention that
locates the database. Follow the convention
exactly. This is the case-sensitive value of this
parameter.
jdbc.user
(mandatory for a password enabled
database; one entry per Database
Conversion tool command)
jdbc.password
(mandatory for a password enabled
database; one entry per Database
Conversion tool command.)
This value specifies the name of the user
account with rights to modify the destination
database.
This value specifies the password of the user
account on the destination database.
dbconvert.rawreports
This value is set to true by default.
(optional entry; one per Database
Conversion tool command.)
If true, the Database Conversion tool exports the
raw report details for each policy run including
the file and associated properties, permissions,
and other miscellaneous data.
If false, the Database Conversion tool disables
raw report functionality.
261
262 Using the Symantec ESM utilities
Using the Database Conversion tool
Table 9-18
Database Conversion tool parameters and values
Parameter names
Parameter Values
dbconvert.jobsummary count
This value specifies the number of summary
jobs for the Database Conversion tool to export.
(optional entry;
Type a positive integer to select that number of
dbconvert.jobsummary,
current summary jobs. For example, type 10 to
dbconvert.jobnumber, and
dbconvert.allrecent- jobs are mutually export the 10 most recent summary jobs.
exclusive)
The Database Conversion tool can export a
single policy run. Type 0 for the most current
(optional entry;
policy run. Type -1 for the first previous policy
dbconvert.jobsummary,
run, -2 for the second previous policy run, and so
dbconvert.jobnumber, and
forth. Type a positive integer to select a specific
dbconvert.allrecent- jobs are mutually
policy run. For example, type 81 to specify policy
exclusive)
run number 81.
dbconvert.jobnumber
dbconvert.allrecentjobs
This value is set to false by default.
If true, the Database Conversion tool exports all
(optional entry;
policy runs that occurred subsequent to the last
dbconvert.jobsummary,
database conversion.
dbconvert.jobnumber, and
dbconvert.allrecent- jobs are mutually
exclusive)
<manager name>.port
(optional entry; one per Database
Conversion tool command - the
default is 5600.)
This value specifies the TCP port number that is
used to contact the manager. If you select more
than one manager, and the managers use
different port numbers, you must specify the
TCP port number for each manager. Separate
TCP port numbers with spaces.
Examples
Example 1 - Displaying help
To display help for the Database Conversion tool, type the following Database
Conversion tool command at the command prompt:
dbconvert -help
Example 2 - Converting to an ODBC database
To convert the data in a manager database to an ODBC compliant database using
-D options, type the options, properties, and values using a Database Conversion
tool command.
Using the Symantec ESM utilities
Using the Database Conversion tool
For example, to convert the data in the GS0100 manager database, type the
Security Officer account, its my1pass+ password, and the ESMReports user data
source using a dbconvert command:
dbconvert -Desm.managers=gs0100 -Dgs0100.user=“Security Officer”
-Dgs0100.password=my1pass+ -Djdbc.datasource=esmreports
Example 3 - Converting to an ORACLE database
To convert the data in a manager database to an ORACLE database using -D
options, type the options, properties, and values using a Database Conversion
tool command.
For example, to convert the data in the GS0100 manager database, type the
Security Officer account, its my1pass+ password, the native ORACLE JDBC
database driver, JDBC URL, user1453 JDBC account, and secret7 JDBC password
at the command prompt using a dbconvert command:
dbconvert -Desm.managers=gs0100 -Dgs0100.user=”Security Officer”
-Dgs0100.password=my1pass+
-Djdbc.driver=oracle.jdbc.driver.OracleDriver
-Djdbc.url=jdbc:oracle:thin:@GS0500:1521:REPORTS
-Djdbc.user=user1453 -Djdbc.password=secret7
Example 4 - Converting two manager databases
To convert the data in two manager databases to an ORACLE database using a
single Database Conversion tool command, type the options, properties, and
values for each manager using a Database Conversion tool command.
For example, to convert the data in the GS0100 and GS0200 manager databases,
type the Security Officer accounts, their my1pass+ and my2pass+ passwords,
the native ORACLE JDBC database driver, JDBC URL, user1453 JDBC account,
and secret7 JDBC password at the command prompt using a dbconvert
command:
dbconvert -Desm.managers=”gs0100 gs0200”
-Dgs0100.user=“Security Officer” -Dgs0100.password=my1pass+
-Dgs0200.user=“Security Officer” -Dgs0200.password=my2pass+
-Djdbc.driver=oracle.jdbc.driver.OracleDriver
-Djdbc.url=jdbc:oracle:thin:@GS0500:1521:REPORTS
-Djdbc.user=user1453 -Djdbc.password=secret7
263
264 Using the Symantec ESM utilities
Using the Database Conversion tool
Example 5 - Using a property file
To convert the data in two manager databases to an ORACLE database using a
property file:
1
Create the property file using any ASCII text processor. Type the options,
properties, and values for each manager in the file.
2
Type a -propfile option to identify the property file in a Database Conversion
tool command at the command prompt.
For example, to create a property file containing the data that is required to
convert the GS0300 and GS0400 manager databases to an ORACLE database,
type the Security Officer accounts, their my3pass+ and my4pass+ passwords,
the native ORACLE JDBC database driver, JDBC URL, user1453 JDBC account,
and secret7 JDBC password in the text file as follows:
esm.managers=gs0300 gs0400
gs0300.user=security officer
gs0300.password=my3pass+
gs0400.user=security officer
gs0400.password=my4pass+
jdbc.driver=oracle.jdbc.driver.OracleDriver
jdbc.url=jdbc:oracle:thin:@GS0500:1521:REPORTS
jdbc.user=user1453
jdbc.password=secret7
Save the property file as property1.txt in the
C:\Program Files\Symantec\ESM Utilities directory.
Then convert the data in the GS0300 and GS0400 manager databases by typing
the following at the command prompt:
dbconvert -propfile=property1.txt
Example 6 - Overriding a property file
To convert the data in only one of the manager databases that is specified in a
property file, type a Database Conversion tool command containing a -propfile
option together with an overriding -D option.
Using the Symantec ESM utilities
Using the Database Conversion tool
For example, to create a property file containing the values that are required to
convert the GS0300 and GS0400 manager databases to an ODBC compliant
database, type the Security Officer accounts, their my3pass+ and my4pass+
passwords, and the ESMReports user data source using a properties text file as
follows:
esm.managers=gs0300 gs0400
gs0300.user=security officer
gs0300.password=my3pass+
gs0400.user=security officer
gs0400.password=my4pass+
jdbc.datasource=esmreports
Save the property file as property2.txt in the
C:\Program Files\Symantec\ESM Utilities directory.
You can convert only the data in the GS0300 manager database by typing the
following at the command prompt:
dbconvert -propfile=property2.txt -Desm.managers=gs0300
Example 7 - Limiting policy runs
You can reduce the workload of the ORACLE database by converting only policy
runs that occurred subsequent to the last manager database conversion.
For example, if the ORACLE database has not been updated with the last three
policy runs on manager GS0300 and the last five policy runs on manager
GS0400, you can convert just these policy runs by adding the following property
to the property file that is in Example 5:
dbconvert.allrecentjobs=true
Save the revised property file as property3.txt in the
C:\Program Files\Symantec\ESM Utilities directory.
Then convert the eight policy runs in the GS0300 and GS0400 manager
databases without checking all of the other policy runs by typing:
dbconvert -propfile=property3.txt
265
266 Using the Symantec ESM utilities
Using the Reports tool
Example 8 - Scheduling periodic updates
To ensure that the external relational database contains current information
from the managers, automate the data conversion process by scheduling the
Database Conversion tool to run periodically.
■
UNIX
For example, to run the Database Conversion tool at 2:00 a.m. each day
using the property file in Example 5, create the myscript crontab file by
typing:
#Run at 2 AM every morning
02***/esm/myscript
02***/esm/bin/dbconvert -propfile /esm/property1.txt 2>&1 >
/esm/dbconvert.log
Cron runs the crontab file automatically at the specified time.
■
Windows
To run the Database Conversion tool at 12:00 a.m. each day using the
property file in Example 6, create a batch file and run it with the Windows
AT command.
Like Example 6, the batch file only updates the database for the gs0300
manager. To create the batch file, type:
SET PATH=%PATH%;“c:\program files\symantec
\esm utilities”;”C:\Program Files\JavaSoft\JRE\ 1.3.0_02\bin”
c:
cd “\program files\symantec\esm utilities”
dbconvert -propfile=property2.txt -Desm.managers=gs0300
Save the batch file as dbconvt1.bat in the ESM Utilities directory.
To run the batch file, type this AT command at the command prompt:
at 00:00 /every: M, T, W, Th, F, S, Su,
“c:\program files\ symantec\esm utilities\dbconvt1”
Using the Reports tool
The Reports tool converts predefined reports from agents and managers to
several different output formats. The Reports tool uses both .xml files and
Crystal Reports templates for the default values that are contained in the
reports. You may modify both the .xml files and the Crystal Reports templates to
customize the reports. Install Crystal Reports to modify the Crystal Reports
templates. However, certain modifications will render the .xml files or the
Crystal Reports templates unusable. For example, if you change the parameter
value names in the .xml files, the Reports tool will not be able to draw
information from the database correctly, and you get blank reports.
Using the Symantec ESM utilities
Using the Reports tool
This section outlines the command line interface of the Reports tool.
Prerequisites
Before using the Reports tool, complete the following prerequisites.
■
Operating systems
The Reports tool is supported on the following operating systems:
■
Windows 2000
■
Windows NT
■
Output applications
The Reports tool exports Symantec ESM data to several report formats.
However, you cannot use the formatted output unless you install the
application that opens the associated file type. For example, if you export
the report to a .doc file format, you must install Microsoft Word for
Windows on your computer to open the file.
■
Source database authorization
To access the source database for any report, you must have a user name
and password with read rights to the database. You must also configure the
database in the Microsoft ODBC Data Source Administrator and assign it a
data source name.
During installation, an MS Access database is created and configured with
an ODBC data source name of ESMReports. This database is created for your
convenience. However, when working with large amounts of data, consider
using an ORACLE or MSSQL database for efficiency.
■
XML File
The Reports tool comes bundled with two XML files. These files have default
names of ESMReports-Common.xml and ESMReports-Custom.xml. You
must know the name of the .xml file that you plan to use. If for any reason
you have moved or changed these files, you must know the path and file
name in order to use the -x option. This option specifies the .xml file.
See “Options” on page 269.
■
Report Name
Make sure you know the name of the report you intend to generate.
See Table 9-19, “Report parameters and descriptions,” on page 277.
You may also use the following command to list report names:
ReportCLI -x <xml_File_Name>.xml -l
You must supply the path to the .xml file if it is not in the same folder as the
ReportCLI.exe file.
267
268 Using the Symantec ESM utilities
Using the Reports tool
■
Report Parameters
Make sure you know which parameters are available for the report that you
choose. See Table 6-2, “Report parameters,” on page 161.
Use the following command to list parameters for a specific report:
ReportCLI -x <xml_File_Name>.xml <Report_Name> -?
■
Know the valid values for the parameters you plan to use. See Table 62, “Report parameters,” on page 161.
■
Use the following command to list valid parameter values:
ReportCLI -x <xml_File_Name>.xml <Report_Name> -?
<Parameter_Name>
Setup
To start the Reports tool, using the Windows command prompt, navigate to the
tool’s default location at:
C:\Program Files\Symantec\ESM Utilities\reportviewer\ReportCLI.exe
The ReportCLI.exe file is an executable file. However, if you run ReportCLI.exe
without any options, the Reports tool displays the main help menu.
Format
Use the following command line format to run the Reports tool with selected
options and parameters:
ReportCLI -x <xml_File_Name>.xml [-d <Report_dir_path>]
[<format_option> <destination_option> | <odbc_option> |
<html_option> | <print_options>] -dsn <data_source_name>
[-user <user_name>] [-pwd <password>] report_name
[-<parameter1> <parameter1_value>]
[-<parameter2> <paramater2_value>] ...
[-<parameterN> <parameterN_value>]
Using the Symantec ESM utilities
Using the Reports tool
Options
The Reports tool has several powerful options. Each option is explained here.
■
-x
This option specifies the path and name of the .xml file that the Reports tool
needs for many of its default values. Two xml files come bundled with the
Reports tool. They are ESMReports-Common.xml and
ESMReports-Custom.xml. These files are located by default in one of two
places:
■
If you install the console prior to installing the Utilities program then
they are located at:
C:\Program Files\Symantec\
ESM Enterprise Console\reportviewer\<XML_File_Name>.xml
If you install the Symantec ESM Utilities program first, then they are
installed by default at:
C:\Program Files\Symantec\ESM Utilities\reportviewer
\<XML_File_Name>.xml
The -x option specifies the .xml file that you plan to use.
ESMReports-Custom.xml contains reports with parameters that may be
modified, while ESMReports-Common.xml contains reports that do not
have parameters. See Table 9-19, “Report parameters and descriptions,” on
page 277.
Following the -x option, type the name of the .xml file that you plan to use.
If you want to use an .xml file that is in a location other than the source
location, put the entire path and file name in quotes and place it after the -x
option. See “Example 1” on page 280.
■
■
-d
This option specifies the path to the Crystal Reports templates that are
associated with each report. This option is needed only when these
templates have been moved from their default location at:
C:\Program Files\Symantec\ESM Utilities\crystalrpts\
Correct syntax for this option is:
reportcli -x <xml_File_Name> [-d <Report_dir_path>]
<Source Database Arguments> <Report_Name>
See “Example 1” on page 280.
■
-l
Use this option to list the report names that are available to the Reports
tool. Correct syntax for this option is:
reportcli -x <xml_File_Name>.xml -l
See “Example 2” on page 280.
269
270 Using the Symantec ESM utilities
Using the Reports tool
■
-help
This option displays a help screen. You can use this option in conjunction
with help topics for specific information. You can use ‘format’,
‘destination’, ‘html’, ‘odbc’, or ‘print_options’ to get specific help on each of
these topics. The syntax is:
ReportCLI -help [<help_topic>]
See “Example 3” on page 280.
■
-?
This option lists the valid parameters that you can change using the
Reports tool, and their current default values. See “Parameters” on
page 279. The correct syntax is as follows for listing report parameters:
ReportCLI -x <xml_File_Name>.xml <Report_Name> -?
You can also use this parameter to show the current value of any parameter
and a brief description of its usage. When used in conjunction with the -?
option, dashes preceding parameters should be omitted. Correct syntax is as
follows:
ReportCLI -x <xml_File_Name>.xml <Report_Name> -?
<Parameter_Name>
See “Example 4” on page 281.
Format options
Use format options to change the default format type. If format options are not
used, the Reports tool uses its default output format, which is a printable Crystal
Reports format. Formats must have associated destination options. Formats are
mutually exclusive unless noted below.
■
-Echr
Used to output the report in character format. You may delimit or separate
the report with strings or characters of your choice using the -field and -str
options. See “Example 5” on page 281.
■
-field <fieldDelimiter>
Used to specify the string that is used as the field delimiter or
separator.
■
-str <stringDelimiter>
Used to specify the character that is used as the string delimiter or
separator. This parameter is optional.
Using the Symantec ESM utilities
Using the Reports tool
■
■
■
■
■
■
-date
Used to ensure that dates are saved in the same format (MDY, DMY,
etc.) that is specified in the original template. This parameter is
optional.
■
-num
Used to ensure that numbers are saved in the same format (decimal
places, negatives, etc.) that is specified in the original template.
-Ecsv
Creates comma-separated output. See “Example 6” on page 281.
■
-date
See “-date” on page 271.
■
-num
See “-num” on page 271.
-Edif
Creates output in data interchange format. See “Example 6” on page 281.
■
-date
See “-date” on page 271.
■
-num
See “-num” on page 271.
-Erec
Creates record formatted output. See “Example 6” on page 281.
■
-date
See “-date” on page 271.
■
-num
See “-num” on page 271.
-Etsv
Creates tab-separated output. See “Example 6” on page 281.
■
-date
See “-date” on page 271.
■
-num
See “-num” on page 271.
-Edoc
Creates a Microsoft Word formatted document. See “Example 7” on
page 281.
271
272 Using the Symantec ESM utilities
Using the Reports tool
■
-Elotus
Creates a Lotus spreadsheet. See “Example 8” on page 282.
■
-wk1
Formats output in Lotus version WK1.
■
-wk3
Formats output in Lotus version WK3.
■
-wks
Formats output in Lotus version WKS.
■
-Erdef
Used to get the Crystal Reports definitions for each report name in text
form. See “Example 9” on page 282.
■
-Erpt
Creates a Crystal Reports template, version 8. See “Example 10” on
page 282.
■
■
■
-v7
Creates a Version 7 Crystal Reports template rather than version 8.
■
-Ertf
Creates rich text-formatted output. See “Example 11” on page 282.
-Etxt
Creates text formatted output with a default setting of 60 lines per page.
See “Example 11” on page 282.
■
-lines <number_of_lines>
Specifies the number of lines that are printed before a page break.
■
-tab
Generates tab-separated output.
-Exls
Creates Microsoft Excel formatted output, version 8. See “Example 12” on
page 282.
■
-v<version_number>[x]
Specifies which Microsoft Excel version number is used to create the
output. Follow the version number with an x to format output in the
extended version. Valid version numbers are 5, 7, and 8.
Destination options
When using the Reports tool, if you use a format option, a destination option is
necessary. The Reports tool uses the format options to determine what format
to use to create the output, while it uses destination options to determine what
to do with the formatted output.
Using the Symantec ESM utilities
Using the Reports tool
■
-app
Used to open the application that is associated with the format option
without creating a file. This does not work if the application is not installed.
See “Example 7” on page 281.
Note: The -app option creates temporary files at the file path: C:\Documents
and Settings\<user_name>\Local Settings\ Temp\<File_name>. All
temporary files begin with the string symantec_reports. The temporary
files are the same type of file that is specified in the format option when the
report is created. If disk space is an issue, you may delete these temporary
files.
■
■
-email
Creates an email with an attached file that is in the specified format. This
option requires at least one addressee using one or more of the -to, -cc, or bcc options. It also requires that you specify the name of the SMTP server
with the -smtp option that is explained below. See “Example 13” on
page 282.
■
-to <to_list>
Creates a list of primary addresses. Separate multiple addresses with
commas.
■
-cc <cc_list>
Creates a list of courtesy copy addresses. Separate multiple addresses
with commas.
■
-bcc <bcc_list>
Creates a list of blind courtesy copy addresses. Separate multiple
addresses with commas.
■
-sub <subject>
Creates a value for the email subject. Multiple words must be in quotes.
■
-msg <message>
Creates an email message. Multiple words must be in quotes.
■
-smtp <smtp_server_name>
Specifies the local SMTP server name.
-f <file_name>
Outputs the format to a file. Include the file extension in the file name.
Include a destination file path if you would like to save the file in a location
other than the folder where the ReportCLI.exe file is located. See “Example
14” on page 283.
273
274 Using the Symantec ESM utilities
Using the Reports tool
■
■
-notes
Used to insert the report into a Lotus Domino Database in the format that is
specified with the format option. The destination database must already
exist on the local machine for the -notes parameter to function. Information
cannot be exported to databases on external systems. The -db option is
necessary when using the -notes option. See “Example 15” on page 283.
■
-db <database_name>
This gives the computer the information on the location and name of
the database .nsf file. A file pathway to the database is required unless
the database is in the same folder as the ReportCLI.exe file.
■
-cmt <comment>
Used to place comments in the notes database along with the report.
Multiple words must be in quotes.
-post
Inserts the report output into a Microsoft Exchange folder in the specified
output. The -prof, -pwd, and -path options are all mandatory when using the
-post option. See “Example 15” on page 283.
■
-prof <profile_name>
Used to indicate the name of the Microsoft Exchange profile.
Note: Before using this command, go into Microsoft Outlook, into the Tools
menu and select Options. In the General tab, look at the setting of Always
use this profile. This setting is your profile name.
■
-pwd <password>
Specifies the password for the Microsoft Exchange folder.
■
-path <folder_path>
The absolute Exchange folder path. Use the following case sensitive
format. Deviations in case, spelling, or folder path, result in MAPI
object not found errors.
Personal Folders@Inbox@Security Reports
ODBC options
The ODBC options can be used to create a table in an ODBC data source. A table
can be created in any ODBC compliant database such as ORACLE, MSSQL, or MS
Access, just to name a few. To use this option, you must configure and name the
ODBC data source using the Microsoft ODBC Data Source Administrator tool
Using the Symantec ESM utilities
Using the Reports tool
that is found in your Windows operating system. Use the following options to
export the report to an ODBC data source.
Note: The -Eodbc option does not overwrite existing table names. A unique table
name is necessary when using -Eodbc.
■
-Eodbc
Tells the Reports tool to output the report to an ODBC data source. This
option requires the -dsn, -user, -pwd, and -table options. See “Example 16”
on page 283.
■
-dsn <data_source_name>
Indicates the data source name that was previously configured in the
Windows ODBC Data Source Administrator tool. This name will
correlate to a destination database and should not be confused with the
-dsn source database argument that is mandatory in most cases.
■
-user <user_name>
Specifies the user name or user ID that is associated with the
destination ODBC database.
■
-pwd <password>
Specifies the password that is associated with the destination ODBC
database.
■
-table <destination_table>
Specifies the table name of the table that was created in the ODBC
database. The table name should be unique.
HTML options
■
-Ehtml
Used with the -f option to output the report in HTML format. See “Example
17” on page 284.
■
-v3_2
Used to format the report in HTML version 3.2.
■
-v3_2x
Used to format the report in HTML version 3.2x.
■
-v4
Used to format the report in HTML version 4 or DHTML.
■
-nav
Used to place navigation links between HTML report pages.
275
276 Using the Symantec ESM utilities
Using the Reports tool
■
-multi
Creates a separate html file for each page of the report.
■
-f <HTML_file_name>
Used to designate the file path and file name of the output HTML file.
Be sure to use an .html file extension.
Print options
■
-print
Sends output to the default printer. By default, the -print option prints one
complete copy to the default printer unless other options are used.
See “Example 18” on page 284.
■
-page <page_number>
Specifies a single page to be printed. This option cannot be used with
the -pages option.
■
-pages <start_page> <end_page>
Specifies a range of pages to print. The start page number must be less
than the end page number. This option cannot be used with the -page
option.
■
-copies <copy_count>
Specifies the number of copies of the report to send to the printer.
■
-collated
Collates the print output.
Source database arguments
The Reports tool must connect to a source database to obtain data for reports.
Use the Microsoft ODBC Data Source Administrator to define a data source
name (DSN) for the source database. Then use the values that you defined in
that dialog box as command line arguments in the Reports tool:
■
-dsn <data_source_name>
Specifies the data source name that is assigned in the ODBC Data Source
Administrator.
■
-pwd <password>
Specifies the password for the source database.
■
-user <user_name>
Specifies the user name for the source database.
Using the Symantec ESM utilities
Using the Reports tool
Report descriptions
The .xml files that come with the Reports tool contain links to the report
templates. See Table 9-19, “Report parameters and descriptions,” on page 277.
Each report name denotes a Crystal Reports template. Each .xml file can have a
unique set of report templates.
Each report has its own specific set of parameters. See Table 6-2, “Report
parameters,” on page 161. Some of the report names have parameters that,
when set to a certain value, require the use of other parameters. See Table 6-2,
“Report parameters,” on page 161.
The following table lists the available parameters and gives descriptions for
each report:
Table 9-19
Report parameters and descriptions
Report name
Parameters
Description
Agent List by
Manager Report
None
This report shows operating systems,
and domains sorted by agents for
specified managers.
Agent List Report
None
This report gives you the operating
system, domains, and managers of
each specified agent.
Agent Status Report
AgentStatusFilter
This report gives the current status of
specified managers and agents; either
red, yellow, or green. The report
includes agent rating, agent name,
associated policy names, and message
numbers, each with red, yellow, or
green ratings.
AgentStatusLevel
AgentName
AgentFilter
ManagerName
ManagerFilter
PolicyCompletion
PolicyFilter
PolicyName
Domain List Report
None
This report shows agents and
operating systems sorted by domains
for specified managers.
277
278 Using the Symantec ESM utilities
Using the Reports tool
Table 9-19
Report parameters and descriptions
Report name
Parameters
Description
Job Status Report
JobRunFilter
This report shows results for each
policy run to include modules, titles or
reported messages, and message
counts.
JobRun Number
ManagerFilter
ManagerName
PolicyName
Message Detail Report AgentNames(s)
AgentFilter
MessageID(s)
This report shows all agents that any
messages were reported on. You can
include or exclude messages in this
report.
MessageFilter
PolicyCompletion
Message List Report
None
This report shows each message with
its number, as well as an explanation
of the message, whether it represents
a problem or is simply informative.
Module Status Report
AgentName
This report displays module names,
message colors, module titles, and
messages counts for each module. It
can show information for any or all
specified managers, domains, and
agents. It will also show ratings for
agents.
AgentFilter
DomainName
DomainFilter
ManagerName
ManagerFilter
ModuleName
ModuleFilter
OSFilter
PolicyName
PolicyFilter
Policy and Module
Report
None
This report shows all policies, the
managers that own the policies, and
the enabled modules for each policy.
Policy Configuration
Report
ManagerName
For specified managers and policies,
this report shows each module with its
current enabled check names. The
reports are sorted by operating system
for each module name.
ManagerFilter
PolicyName
PolicyFilter
Using the Symantec ESM utilities
Using the Reports tool
Table 9-19
Report parameters and descriptions
Report name
Parameters
Description
Policy List Report
None
This report shows the policy names
associated with each manager.
Policy Status Report
DomainName
This report can be sorted by
managers, domains, and agents. It
shows module ratings and names as
well as message colors and counts.
DomainFilter
ManagerName
ManagerFilter
PolicyName
PolicyFilter
Parameters
Parameters are used to overwrite the default information in the .xml files, or in
the Crystal Reports template. For example, the following command overwrites
the default parameter values for the reported managers in the Policy
Configuration Report. The default values in the .xml file that the report draws
on for its values are overwritten in the report, but it is not a permanent change.
Without a supplied parameter value, the Reports tool will simply use the default
value in the .xml file.
ReportCLI -x <.xml_File_Name>.xml -dsn <data source name>
-user <user name> -pwd <password> “Policy Configuration Report”
-ManagerFilter “By manager” -ManagerName “<manager_name>”
Change parameter values within reports by using parameters in the Reports
tool. See “Example 19” on page 284.
Parameters are also used to specify the type of information the report is to
contain or to get only information from certain agents, managers, or other
selection criteria.
A list of parameters along with a description of each parameter as well as the
valid values for each parameter is available. See Table 6-2, “Report parameters,”
on page 161. Some parameters of the same name have varying valid values
when used in different reports.
Each parameter is listed with the default report names for which it is a valid
parameter. To find the valid parameters used with each report name, use the -?
option. See “Options” on page 269.
279
280 Using the Symantec ESM utilities
Using the Reports tool
Examples
Example 1
Use the -x option to select your .xml file. See “-x” on page 269.
Reports with parameters are contained in the ESMReports-Custom.xml file,
while reports without parameters are in the ESMReports-Common.xml file.
ESMReports -x ESMReports-Custom.xml -dsn <data_source_name>
[-user <user_name>] [-pwd <password>] “Agent Status Report”
-ManagerFilter “By manager” -ManagerName “<Manger Name>”
ESMReports -x ESMReports-Common.xml -dsn <Data source name>
[-user <user name>] [-pwd <password>] "Agent Location Report”
Use the -x and -d options to locate .xml files and Crystal Reports template files
that are not in the default locations. See“-x” on page 269 and “-d” on page 269.
In the example below, the ESMReports-Common.xml file is in a folder on drive C:
called xml_files, and the reports are in a folder on drive C: called rpt_files. The
name of the Crystal Reports template file is not needed.
ReportCLI -x \xml_files\ESMReports-Common.xml -d \rpt_files
-dsn <data_source_name> [-user <user_name>] [-pwd <password>]
"Agent Location Report"
Example 2
This example lists the report names that are associated with an .xml file, using
the -l option. See “-l” on page 269.
When the .xml file is in the same folder as the ReportCLI.exe file, use the
following command:
ReportCLI -x ESMReports-Common.xml -l
Example 3
Use the -help option for general help or to get specific help on certain options.
See “-help” on page 270.
The following command gives you general help:
ReportCLI -help
The following command gives you help on destination options:
ReportCLI -help destination
You may get help with the following options: format, destination, html, odbc,
and print_options.
Using the Symantec ESM utilities
Using the Reports tool
Example 4
The following example uses the -? option to specify all the parameters that are
available in the Agent Status Report. See “-?” on page 270.
ReportCLI -x ESMReports-Custom.xml “Agent Status Report” -?
You can also use the -? option to find valid parameter values:
ReportCLI -x ESMReports-Custom.xml “Agent Status Report”
-? “ManagerFilter”
Example 5
Use the -Echr option in conjunction with the -field and -str options to delimit a
report with lines or strings. See “-Echr” on page 270. The following command
delimits the Agent Status Report with a set of characters, for example, [space].
When the report finishes processing, the -app option prompts Windows to ask
you which program you want to use to view the output.
ReportCLI -x ESMReports-Custom.xml -Echr -field "[space]" -app
-dsn ORACLEdb [-user user1] [-pwd my1pass] "Agent Status Report"
The next example delimits the report with the character $.
ReportCLI -x ESMReports-Custom.xml -Echr -str "$" -app -dsn ORACLEdb
[-user user1] [-pwd my1pass] "Agent Status Report"
In the following example, both -str and -field are used with -Echr.
ReportCLI-x ESMReports-Custom.xml -Echr -str "$" -field "[space]"
-app -dsn ORACLEdb [-user user1] [-pwd my1pass]
"Agent Status Report"
The -date and -num options can also be used with -Echr.
Example 6
You can use -Ecsv, -Edif, -Erec, and -Etsv similarly to -Echr. See“-Ecsv” on
page 271, “-Edif” on page 271,“-Erec” on page 271, and “-Etsv” on page 271. An
example of correct syntax using the -Etsv option is as follows. This example also
uses -date and -num.
ReportCLI -x ESMReports-Custom.xml -Etsv -date -num -app
-dsn ORACLEdb [-user user1] [-pwd my1pass] "Agent Status Report"
Example 7
Use the -Edoc option to create output in Microsoft Word document format.
See “-Edoc” on page 271. The following example creates the document, and the
-app option starts Microsoft Word and displays the document.
ReportCLI -x ESMReports-Custom.xml -Edoc -app -dsn ORACLEdb
[-user user1] [-pwd my1pass] “Agent Status Report”
281
282 Using the Symantec ESM utilities
Using the Reports tool
Example 8
Use the -Elotus option to create output in Lotus spreadsheet format.
See “-Elotus” on page 272. In the example below, the -wk3 option is used so the
output is in .wk3 format rather than in the default .wks format.
ReportCLI -x ESMReports-Custom.xml -Elotus -wk3 -app
-dsn ORACLEdb [-user user1] [-pwd my1pass] “Agent Status Report”
Example 9
Use the -Erdef option to view the report’s Crystal Reports definitions in a text
format. See “-Erdef” on page 272. This is helpful if you do not have Crystal
Reports installed on your computer.
ReportCLI -x ESMReports-Custom.xml -Erdef -app -dsn ORACLEdb
[-user user1] [-pwd my1pass] “Agent Status Report”
Example 10
Use the -Erpt option to create report output formatted as a Crystal Reports
template. See “-Erpt” on page 272. The following example uses the -v7 option to
create version 7 output rather than the default version 8.
ReportCLI -x ESMReports-Custom.xml -Erpt -v7 -app -dsn ORACLEdb
[-user user1] [-pwd my1pass] “Agent Status Report”
Example 11
Use the -Etxt or -Ertf options to create either ASCII or rich text output
respectively. See “-Etxt” on page 272. In this example, the -lines option is used
to change the default number of lines per page for the text file from the default
of 60 to 45.
ReportCLI -x ESMReports-Custom.xml -Etxt -lines 45 -app
-dsn ORACLEdb [-user user1] [-pwd my1pass] “Agent Status Report”
Example 12
Use the -Exls option to create output as a Microsoft Excel spreadsheet.
See “-Exls” on page 272. In this example, the default version 8 value is changed
to version 8 extended.
ReportCLI -x ESMReports-Custom.xml -Exls -v8x -app
-dsn ORACLEdb [-user user1] [-pwd my1pass] “Agent Status Report”
Example 13
In this example, the -email option is used to send an email directly from the
Reports tool. See “-email” on page 273. This email goes to the email address
Using the Symantec ESM utilities
Using the Reports tool
[email protected] with a cc to [email protected]. This
example assumes your SMTP server is named Mailserver. Replace that word
with the name of your SMTP server. The report itself comes as an attachment, in
this case as a Microsoft Word document. The message reads, “Here is the report
you requested.” Addresses and the SMTP server name must be in quotes.
reportcli -x ESMReports-Custom.xml -Edoc -email
-to “[email protected]” -cc “[email protected]”
-msg “Here is the report you requested.” -smtp “Mailserver”
-dsn ORACLEdb [-user user1] [-pwd my1pass] “Agent Status Report”
Example 14
The -f option creates a file in the location you indicate. See “-f <file_name>” on
page 273. In this example, it creates a Microsoft Word document on drive D: at
the path D:\Network\Nework Security\Security Status
\ESM Reports\Summary.doc. You must put the entire path in quotes.
ReportCLI -x ESMReports-Custom.xml -Edoc -f "D:\Network
\Network Security\Security Status\ESM Reports\Summary.doc"
-dsn ORACLEdb [-user user1] [-pwd my1pass] “Agent Status Report”
Example 15
Use the -notes and -post options to insert the reports into Lotus Notes databases
and Microsoft Exchange folders respectively. See “-notes” on page 274. An
example of correct syntax for inserting report information into a Lotus notes
database follows, where the name of the Notes database is reports.nsf and the
path is c:\Notes\Data.
ReportCLI -x ESMReports-Custom.xml -Etxt -notes
-db “c:\Notes\Data\reprots.nsf” -dsn ORACLEdb [-user user1]
[-pwd my1pass] “Agent Status Report”
Example 16
Use the -Eodbc option to export a report to a database. See “-Eodbc” on page 275.
You must have defined an ODBC data source name in the Microsoft ODBC Data
Source manager for the database where you want to export the report. In the
example below, the ODBC data source name is ORACLEdb with a user name of
adminone and a password of adminpass. The table name is table1.
ReportCLI -x ESMReports-Custom.xml -Eodbc -dsn ORACLEdb
-user adminone -pwd adminpass -table table1
-dsn ORACLEdb [-user user1] [-pwd my1pass] "Agent Status Report"
283
284 Using the Symantec ESM utilities
Using the Reports tool
Example 17
To create the report as an HTML file, use the -Ehtml option. See “-Ehtml” on
page 275. In this example, the HTML file is created in version 3.2 extended and
has a separate HTML file for each page of the report. It also has navigation links
for each page, is named htmlfile11.html, and is placed at the path c:\reports.
ReportCLI -x ESMReports-Custom.xml -Ehtml -v3_2x -nav -multi
-f “c:\reports\htmlfile11.html” -dsn ORACLEdb [-user user1]
[-pwd my1pass] "Agent Status Report"
Example 18
You may print directly from the Reports tool using the -print option. See “Print
options” on page 276. This example prints four copies of the report, pages 3
through 5.
ReportCLI -x ESMReports-Custom.xml -print -pages 3 5 -copies 4
-dsn ORACLEdb [-user user1] [-pwd my1pass] “Agent Status Report”
Example 19
Change parameter values within reports by using parameters in the Reports
tool. See “Parameters” on page 279. Values consisting of multiple words must be
in quotes. This is an example of correct syntax:
ReportCLI -x ESMReports-Custom.xml -Edoc -app -dsn ORACLEdb
[-user user1] [-pwd my1pass] "Agent Status Report"
-AgentStatusFilter "By Level" -AgentStatusLevel “Red”
-PolicyCompletion "Last policy run by agents"
Appendix
A
Symantec ESM
communications
This appendix includes the following topics:
■
About Symantec ESM communications security
■
Symantec ESM communication ports
About Symantec ESM communications security
Symantec ESM protects the security information that it gathers from the
computers on your network as follows:
■
Symantec ESM encrypts the account names, passwords, and other data that
it stores on your computers and transfers over your network.
■
Symantec ESM authenticates each incoming and outgoing connection to
ensure that both connections involve valid Symantec ESM software. To
initiate the authentication process, Symantec ESM uses the Diffie-Helman
algorithm to exchange secure keys between Symantec ESM components.
Symantec ESM uses the secure key to initialize the DESX encryption engine.
After that, Symantec ESM encrypts all communication between the
components using the industry standard DESX algorithm. The originator
verifies the transformed key. Unauthorized users cannot easily spoof
Symantec ESM connections because Diffie-Helman exchanges a different
key each time.
■
Every process involving Symantec ESM agents, the Symantec ESM console,
or the installation program that connects to a Symantec ESM manager must
have an authorized Symantec ESM access record. These access records
consist of a name and a password.
286 Symantec ESM communications
Symantec ESM communication ports
ESM encrypts the password using an algorithm that is similar to the
encryption algorithm that most UNIX operating systems use in the
/etc/passwd or /etc/shadow files. Symantec ESM stores the encrypted
password in a Symantec ESM data file. Only privileged users such as root,
supervisor, system, or administrator can access the file.
If a Symantec ESM manager rejects an access record password, Symantec
ESM delays for a second before returning an acknowledgment. This delay
can defeat brute force attacks against passwords.
■
Symantec ESM protects agents from unauthorized access through the
manager registration process. Agents accept network connections only
from Symantec ESM managers with whom they have previously registered.
Symantec ESM maintains a list of authorized managers on each agent in the
/esm/config/manager.dat file. The agent checks this file each time a
manager attempts a connection. The file stores the Symantec ESM manager
name for the TCP/IP or IPX/SPX communication protocols.
■
Before Symantec ESM can make a change to a system file using a correction
from the Symantec ESM console, it requires the user to log on to the system.
Only a valid privileged system account can authorize the agent to perform
the correction.
Symantec ESM communication ports
Symantec ESM uses the ports in Table A-1 to communicate between managers
and agents.
Table A-1
Symantec ESM communication ports
Operating
system
Symantec ESM
version
Port
monitored by
Protocol
Port
Windows Server
2003
6.0
ESM manager
TCP
5600
6.0
ESM agent
TCP
5601
6.0
ESM manager
SPX
34918
6.0
ESM agent
SPX
34917
6.0, 5.5
ESM agent
TCP
5601
6.0, 5.5
ESM agent
SPX
34917
Windows XP
Symantec ESM communications
Symantec ESM communication ports
Table A-1
Symantec ESM communication ports
Operating
system
Symantec ESM
version
Port
monitored by
Protocol
Port
Windows 2000
6.0, 5.5
ESM manager
TCP
5600
6.0, 5.5
ESM agent
TCP
5601
6.0, 5.5
ESM manager
SPX
34918
6.0, 5.5
ESM agent
SPX
34917
6.0, 5.5
ESM manager
TCP
5600
6.0, 5.5
ESM agent
TCP
5601
6.0, 5.5
ESM manager
SPX
34918
6.0, 5.5
ESM agent
SPX
34917
6.0, 5.5
ESM manager
TCP
5600
6.0, 5.5
ESM agent
TCP
5600
OS/400
6.0
ESM agent
TCP
5601
NetWare/NDS
5.0
ESM agent
TCP
5601
5.0
ESM agent
SPX
34917
5.1
ESM agent
TCP
5601
Windows NT
UNIX
OpenVMS
Symantec ESM also use the following ports:
■
Symantec ESM managers use port 5599 for connections to perform remote
installations or remote upgrades of systems that connect using the TCP
protocol.
■
Symantec ESM managers use ports in the range from 1024 to 5000 that TCP
dynamically allocates for servers to use when making connections to clients.
■
The Symantec ESM console uses the appropriate manager port number to
initiate a connection with a Symantec ESM manager. After the Symantec
ESM console establishes a connection, it can transmit instructions and
receive security data. The Symantec ESM console does not require a port
number because Symantec ESM managers do not initiate connections to the
Symantec ESM console.
■
You must open any firewalls that separate Symantec ESM components to
the ports in Table A-1, port 5599, and ports ranging from 1024 to 5000. In
some situations, you may have to modify or create a firewall proxy or tunnel
to enable Symantec ESM component connections through a firewall.
287
288 Symantec ESM communications
Symantec ESM communication ports
■
Virtually all TCP applications require the opening of ports 1024 to 5000 as a
standard practice. Servers making connections back to clients reserve the
ports in this range. You must open these ports in both directions. This is a
secure practice, as long as the TCP servers do not listen within this port
range.
Appendix
B
Symantec ESM file
structure
This appendix includes the following topics:
■
Directory & File Descriptions
Directory & File Descriptions
The following are the directory structures and associated files in Symantec ESM.
Note: Some of the file names are different on managers that are installed on
Windows hosts.
Also, some agent files that are listed in the directories only apply if the agent
that is running on the host system is registered to the manager.
/bin/esm
This file is a symbolic link in the /bin directory. It points to the real location of
the Symantec ESM program executable link: /esm/esm.
/esm/
This file is a symbolic link in the root directory. It points to the real location of
Symantec ESM. This linked directory allows the Symantec ESM programs to
have a PATH that can then be hard coded to any Symantec ESM file. It is also a
convenience for the user: changing to the /esm directory places you in the first
level directory of Symantec ESM.
290 Symantec ESM file structure
Directory & File Descriptions
/esm/bin/
This directory is the home for the debug program and the Ostype directory. The
Ostype directory contains most of the Symantec ESM executables and has the
name of the Operating System type that is derived by running the /esm/
platform program. The debug program is a script to collect information for the
Symantec Technical Support Group of skilled Technical Engineers to help
resolve Symantec ESM bugs.
/esm/bin/OStype/
This directory contains most of the Symantec ESM executables. Executables not
found in the /esm/bin directory are:
■
/esm/esmdeinstall
■
/esm/esmrc (UNIX only)
■
/esm/esmsetup
■
/esm/platform
The executables in the directory are displayed in the following table
Table B-1
Directory executables
Executable
name
Description
acctinfo
This program runs the Account Information module.
account
This program runs the Account Integrity module.
afterthird
This program runs after the installation of third-party modules to do
cleanup.
audit
This program runs the System Auditing module.
backup
This program runs the Backup Integrity module.
beforethird
This program enables the installation of third-party modules into
Symantec ESM.
ciffix
This program is used to fix problems in the Control Information Files
database files (/esm/system/hostname/db/).
decode
This program converts the raw reports into the Symantec ESM report
format.
discover
This program runs the Discovery module.
Symantec ESM file structure
Directory & File Descriptions
Table B-1
Directory executables
Executable
name
Description
esmagtd
This program runs the agent daemon. It provides write access to the
snapshot files on the agent systems for the update function. It provides
write access to system files for the correct function. It provides file and
directory information to a remote user interface for the template editor
when adding files and/or directories to a template file. Esmagtd runs only
on the agent.
Esmc
This program runs the command line interface (CLI).
esmcifd
This program runs the Symantec ESM Control Information File daemon.
It serves the control information files to the user interface and the agents
and schedules and starts jobs. Esmcifd runs only on the manager.
esmd
This program runs the Symantec ESM program daemon. It listens for
incoming connections, authenticates the connection, and starts other
Symantec ESM daemons. Esmd works in a similar manner to inetd,
starting daemons when an incoming request is received. It adds
additional access control through the file /esm/config/manager.dat Esmd
starts esmnetd, esmmodd, esmagtd, and esmupdd. Esmd runs on both
managers and agents.
esmdeinstall
This program deinstalls Symantec ESM and must be run from outside the
/esm directory.
esmmodd
This program runs the Symantec ESM module daemon. It runs the
modules on the agent and creates raw reports. It transfers reports back to
the manager using esmnetd. Esmmodd runs only on the agent.
esmnetd
This program provides access to esmcifd for remote user interfaces and
agents. It performs remote file handling operations for remote user
interfaces and agents. Esmd runs only on the manager.
esmsetup
This program runs esmsetup.
esmupdd
This program runs the Symantec ESM update daemon. It performs remote
upgrades of the agent software from a manager. Esmupdd runs only on
the agent.
fileacc
This program runs the File Access module.
fileatt
This program runs the File Attributes module.
filefind
This program runs the File Find module.
fileinfo
This program runs the File Information module.
fwatch
This program runs the File Watch module.
291
292 Symantec ESM file structure
Directory & File Descriptions
Table B-1
Directory executables
Executable
name
Description
ice
This program runs the Integrated Command Engine (ice) module.
jobid
This program enables job ID support greater than 999.
log
This program runs the Login Parameters module.
mailsys
This program runs the System Mail module.
modinput
This program controls input to the various modules.
network
This program runs the Network Integrity module.
object
This program runs the Object Integrity module.
password
This program runs the Password Strength module.
patch
This program runs the OS Patches module.
queues
This program runs the System Queues module.
register
This program runs the register program. It registers the .m files in the /
esm/register directory with the CIF.
registry
This program runs the Registry module.
resmsetup
This program runs the remote installation procedure.
startup
This program runs the Startup Files module.
tuneup.dat
This file contains the date of the last tuneup pack.
usrfiles
This program runs the User Files module.
version.dat
This file contains the version information of Symantec ESM.
/esm/config/
This directory contains the Symantec ESM configuration files.
Symantec ESM file structure
Directory & File Descriptions
/esm/config/manager.dat & manager.org
This file controls which remote systems (Managers) can access the Symantec
ESM agent servers. This file is modified by the installation procedure when the
agent registers with a manager. You may exclude a manager from running
modules on this agent by removing it from this file. Remote access to esmmodd,
esmagtd, and esmupdd is controlled by the file /esm/config/manager.dat.
host/address
192.86.28.21
# skipper
/esm/config/server.dat & server.org
This file contains the settings for the various Symantec ESM daemons. You may
use this file and the file /esm/esmrc to change the arguments that are passed to
the various Symantec ESM daemons. All daemons support the following options:
■
-s
Log messages to syslog
■
-f Log messages to /esm/system/<hostname>/esmxxxd.log
■
-a Append log file each time daemon is started (default is truncate)
■
-v Log informational messages (default is to log only errors)
The default settings for the Symantec ESM daemons are:
■
esmmodd -fv
■
esmnetd -fv
■
esmagtd -fv
■
esmupdd -fv
/esm/config/tcp_port.dat & tcp_port.org
This file specifies the TCP port numbers used by the Symantec ESM network
daemons. Do not change the port numbers in this file unless they are already
used on your system by another application. The default settings are:
■
ESM_PORT_MANAGER=5600
■
ESM_PORT_INSTALL=5610
■
ESM_PORT_AGENT_UNIX=5600
■
ESM_PORT_AGENT_VMS=5601
■
ESM_PORT_AGENT_NETWARE=5601
293
294 Symantec ESM file structure
Directory & File Descriptions
The ESM_PORT_MANAGER port number controls the port number used by the
manager when listening for incoming connections from agents and user
interfaces. It also is used by agents and user interfaces when making
connections to a manager. This number must be the same on all systems
running Symantec ESM, whether managers, agents, or user interfaces.
The ESM_PORT_INSTALL port number is used for remote installations. This
number does not need to be the same on all systems. It must, however, be a
different value than the ESM_PORT_MANAGER and ESM_PORT_AGENT
numbers.
The ESM_PORT_AGENT_* port numbers control the port number used by
agents when listening for incoming connections from manager and user
interfaces. The manager stores this number on a per-agent basis in the agent
control information file and looks it up whenever it needs to contact an agent.
This number can be different for each agent. However, use the same number for
all agents running on the same operating system.
The ESM_PORT_AGENT_UNIX port number controls the port number used by
UNIX agents. Note that on a UNIX manager, ESM_PORT_MANAGER and
ESM_PORT_AGENT_UNIX must be the same.
The ESM_PORT_AGENT_VMS port number controls the port number used by
VMS agents.
The ESM_PORT_AGENT_NETWARE port number controls the port number
used by NetWare/NDS agents.
/esm/esm
This file points all Symantec ESM program calls to /esm/bin/OStype/esm.
/esm/esmdeinstall
This file is an executable. It is used to de-install the Symantec ESM program and
all its files from a system. This file must be called from outside the Symantec
ESM file structure.
/esm/esmrc
This file is an executable. It is used by the system startup files to initialize the
Symantec ESM environment. Calling this file restarts all of the Symantec ESM
daemons. The arguments to esmd and esmcifd may be set in /esm/esmrc.
Symantec ESM file structure
Directory & File Descriptions
/esm/esmsetup
This file is an executable. It is used to perform various maintenance actions
within esm. This file can be used to start and stop the Symantec ESM daemons,
register an agent with a manager, remotely install an agent (remote installs can
also be done via the GUI), and reset any of the operations performed during the
initial installation.
/esm/format/
This directory contains all the format files used by Symantec ESM to format
reports. These files can be edited to customize the reports. The files in this
directory are displayed in the following table.
Table B-2
Format Files
Format file
Description
agent.fmt
The agent.fmt file contains the format for the Print Agents report.
audit.fmt
The audit.fmt file contains the format for the Print Auditor’s Summary
report.
checks.fmt
The checks.fmt file contains the format for the Print Security Checks
report.
diff.fmt
The diff.fmt file contains the format for the Print Differences report.
domain.fmt
The domain.fmt file contains the format for the Print Domain report.
exec.fmt
The exec.fmt file contains the format for the Print Executive Summary
report.
header.ps
The header.ps file contains the header format for the reports.
policy.fmt
The policy.fmt file contains the format for the Print Policy report.
security.fmt
The security.fmt file contains the format for the Print Security report.
summary.fmt
The summary.fmt file contains the format for the Print Summary report.
template.fmt
The template.fmt file contains the format for the Print Template report.
/esm/man/
This directory contains the man pages for Symantec ESM, esm1. If you want to
be able to call these man pages, the MANPATH environmental variable must be
updated to include this directory.
295
296 Symantec ESM file structure
Directory & File Descriptions
/esm/output/
This directory is initially blank. The directory is used as the default PATH for
any reports printed to files. Files printed to this directory are named by default
formatfiletype.rpt, for example security.rpt.
/esm/platform
This file is an executable. It is used by Symantec ESM to determine the OS type
of the system, for example hpux-hppa.
/esm/register/
This directory contains all the message files for the operating system. These
files are on each agent and are uploaded to the manager during the registration
process. On the manager, you will find the agent’s .m files in this directory and
the remote agent’s .m files in a sub-directory, named after the host type, i.e.
UNIX, vms, nt, and netware.
■
/esm/register/unix - message files
■
/esm/register/vms - message files
■
/esm/register/nt - message files
■
/esm/register/netware - message files
The .m files are described in the following table.
Table B-3
.m files
.m file
Description
acctinfo.m
The acctinfo.m file contains all the error and informational messages for
the Account Information module report.
account.m
The account.m file contains all the error and informational messages for
the Account Integrity module report.
audit.m
The audit.m file contains all the error and informational messages for the
System Auditing module report.
backup.m
The backup.m file contains all the error and informational messages for
the Backup Integrity module report.
common.m
The common.m file contains all the error and informational messages
that are common to all modules. It also contains the definition of the
levels, value of the levels, and the thresholds for each level.
discover.m
The discover.m file contains all the error and informational messages for
the Discovery module report.
Symantec ESM file structure
Directory & File Descriptions
Table B-3
.m files
.m file
Description
fileacc.m
The fileacc.m file contains all the error and informational messages for
the File Access module report.
fileatt.m
The fileatt.m file contains all the error and informational messages for
the File Attributes module report.
filefind.m
The filefind.m file contains all the error and informational messages for
the File Find module report.
fileinfo.m
The fileinfo.m file contains all the error and informational messages for
the File Information module report.
fwatch.m
The filewat.m file contains all the error and informational messages for
the File Watch module report.
ice.m
The ice.m file contains all the error and informational messages for the
Integrated Command Engine module report.
log.m
The log.m file contains all the error and informational messages for the
Login Parameters module report.
mailsys.m
The mailsys.m file contains all the error and informational messages for
the System Mail module report.
network.m
The network.m file contains all the error and informational messages for
the Network Integrity module report.
object.m
The object.m file contains all the error and informational messages for
the Object Integrity module report.
password.m
The password.m file contains all the error and informational messages for
the Password Strength module report.
patch.m
The patch.m file contains all the error and informational messages for the
OS Patches module report.
queues.m
The queues.m file contains all the error and informational messages for
the System Queues module report.
registry.m
The registry.m file contains all the error and informational messages for
the Registry module report.
startup.m
The startup.m file contains all the error and informational messages for
the Startup Files module report.
usrfiles.m
The usrfiles.m file contains all the error and informational messages for
the User Files module report.
297
298 Symantec ESM file structure
Directory & File Descriptions
/esm/system/hostname/
This directory holds the various log files for Symantec ESM and three
directories. The directories are db, reports, and temp.
The log files are described in the following table.
Table B-4
Log files
Log file
Description
esmagtd.err
The esmagtd.err log contains errors messages reported by the
esmagtd daemon.
esmcifd.err
The esmcifd.err log contains errors messages reported by the
esmcifd daemon.
esmcifd.log
The esmcifd.err log contains informational messages reported by the
esmagtd daemon.
esmd.err
The esmd.err log contains errors messages reported by the esmd
daemon.
esmd.log
The esmd.err log contains informational messages reported by the
esmd daemon.
esmmodd.err
The esmmodd.err log contains errors messages reported by the
esmmodd daemon.
esmnetd.err
The esmnetd.err log contains informational messages reported by
the esmnetd daemon.
esmupdd.err
The esmupdd.err log contains errors messages reported by the
esmupdd daemon.
esmupdd.log
The esmupdd.err log contains informational messages reported by
the esmupdd daemon.
/esm/system/hostname/db/
This directory is used to hold the various databases used by the Symantec ESM
CIF server. For any changes not accomplished through the Symantec ESM
Symantec ESM file structure
Directory & File Descriptions
program, either through the GUI or CLI, to take effect, the esmcifd must be
restarted. The database files are described in the following table.
Table B-5
Database files
Database file
Description
access.dat
This database contains information about all the users authorized to
access Symantec ESM. This includes their passwords. For the
Register only user, this also includes the privilege level. Erasing this
database erases all users except the super-user from Symantec ESM.
Symantec ESM will have a blank password. This database is found
only on the manager.
agent.dat
The database contains the agent information on all registered
agents. This database is found only on the manager.
dbq_client.dat
This database contains the security information needed to make a
TCP/IP connection to a Symantec ESM server. The client software is
the part that requests information; for example the host that
initiates the connection.
dbq_server.dat
This database contains the security information needed to complete
a TCP/IP connection from a Symantec ESM client. The client
software is the part that requests information; for example the host
that initiates the connection.
domain.dat
This database contains the current domain names and a list of the
agents in each domain that are valid for this manager. This database
is found only on the manager.
filefind.dir
This database contains information on all the suid and sgid files.
This database is not created until the first run of the agent.
filefind.pag
This database contains information on all the suid and sgid files.
This database is not created until the first run of the agent.
job.dat
This database contains the current jobs that are valid on this
manager. This database is found only on the manager.
keyring.dat
This database contains the user account permissions of all the users
authorized to access Symantec ESM. This includes the Register only
user. This database is found only on the manager.
license.dat
This database contains the current licensing information for the
manager. This database is found only on the manager.
lock.dat
This database keeps track of the database locks. This database is
found only on the manager.
299
300 Symantec ESM file structure
Directory & File Descriptions
Table B-5
Database files
Database file
Description
message.dat
This database contains the message information that has been
uploaded from all of the registered agents. If you change a rating or
message in one of the .m files, you must run the register program to
update this database. This database is found only on the manager.
module.dat
This database contains all the module security checks and the host
type, for example UNIX, that are available for each agent that
Symantec ESM will query during a run. This information is updated
during the update process.
policy.dat
This database contains the policy information for all the policies
defined on the manager. The database contains the policy names, the
modules associated with each policy, and the security checks for each
module. This database is found only on the manager.
sifdev.dat
This file contains the device file snapshot. Comparisons made by
Symantec ESM during a job run between the device files found on
the system and those in the device file snapshot determine whether
a device file is new, changed, or deleted. This file is not created until
the first Object Integrity module is run on that agent. The file is
found on all agents.
siffile.dat
This file contains the file attributes snapshot. Comparisons made by
Symantec ESM during a job run between the file attributes found on
the system and those in the file attributes snapshot determine
whether a file has changed its m-time, c-time, file size, or CRC value.
There is a listing of only the files contained in the template files.
This file is not created until the first File Attributes module is run on
that agent. This file is found on all agents.
sifgroup.dat
This file contains the group snapshot. Comparisons made by
Symantec ESM during a job run between the groups found on the
system and those in the group snapshot determine whether a group
is new, changed, or deleted. There is a listing of all the groups
contained in the /etc/group file. This file is not created until the first
Account Integrity module is run on the agent. This file is found on all
agents.
sifuser.dat
This file contains the users snapshot. Comparisons made by
Symantec ESM during a job run between the users found on the
system and those in the users snapshot determine whether a user is
new, changed, or deleted. There is a listing of all the users contained
in the /etc/passwd file. This file is not created until the first Account
Integrity module is run on the agent. The file is found on all agents.
Symantec ESM file structure
Directory & File Descriptions
Table B-5
Database files
Database file
Description
status.dat
This database contains a list of all the current jobs still available to
the Symantec ESM report writer and the current status of those jobs.
sticky.dat
This database contains all the changes from the default values for
any information displayed in the GUI. This database allows
Symantec ESM to reflect a change to all values when the window is
redisplayed. This file is found only on the manager.
summary.dat
The manager uses information in the sumfinal.dat database to
update the console. Summary.dat records are no longer used because
they constrain scalability.
suppress.dat
This database contains information on all the suppressions that are
currently valid for policy runs on this manager. This file is found
only on the manager.
sumfinal.dat
This database contains the finalizer summary records, one record for
each policy run. The console Summary database looks at the subfinal records when it updates the summary tree.
tmpllay.dat
This file contains the format information for templates, for example
columns sizes and headings, types of data, and acceptable field
values.
tmplsubt.dat
This file contains matches the template names and template types to
the operating systems.
/esm/system/hostname/reports/
This directory holds the raw reports from each of the agents. The report
subdirectory structure is:
<Policy name>/<Host name>/<Report file name.run number>.
/esm/system/hostname/temp/
This is a temporary directory used by Symantec ESM while it writes reports.
301
302 Symantec ESM file structure
Directory & File Descriptions
/esm/template
This directory contains the templates for the various types of hosts running
agents registered to the manager. The template name is followed by an
extension that determines the host type. The template extensions include:
■
ai – IBM AIX UNIX
■
fw – all – file watch
■
h1 – HP-UX 10-11 UNIX
■
hp – HP-UX 9.04 UNIX
■
hpx – HP-UX 10-11 UNIX
■
ice – all – integrated command engine (ice)
■
ir – Silicon Graphics IRIX UNIX
■
li – Linux – fileatt
■
mfw – all – malicious file watch
■
ngr – all – netgroup info
■
nw4 – Novell NetWare/NDS – all
■
of – Digital UNIX
■
os – OSF/1 UNIX
■
ps6 – Sun Microsystems Solaris 2.6 UNIX – patch
■
ps4 – Microsoft Windows NT – patch
■
ps5 – Microsoft Windows 2000 – patch
■
pw4 – Microsoft Windows NT – patch
■
pw5 – Microsoft Windows 2000 – patch
■
rs4 – Microsoft Windows NT – registry
■
rs5 – Microsoft Windows 2000 – registry
■
rw4 – Microsoft Windows NT – registry
■
rw5 – Microsoft Windows 2000 – registry
■
s40 – Microsoft Windows NT – fileatt
■
s50 – Microsoft Windows 2000 – fileatt
■
s6 – Sun Microsystems Solaris 2.6 UNIX – fileatt
■
sch – all – shells
■
sg – Irix UNIX – fileatt
Symantec ESM file structure
Directory & File Descriptions
■
so – Sun Microsystems Solaris UNIX
■
sol – Sun Microsystems Solaris 2.6 UNIX – all new
■
ss6 – Sun Microsystems Solaris 2.6 UNIX – services
■
su – Sun Microsystems SunOS UNIX
■
sv – Motorola SVR4 UNIX
■
vm – OpenVMS – all
■
w40 – Microsoft Windows NT – fileatt
■
w50 – Microsoft Windows 2000 – fileatt
/esm/utility
This directory contains the c code for the following utilities:
■
esmsetup.c
■
resmsetup.c
/esm/words
This directory is the repository for all word lists used by Symantec ESM.
Additional word lists can be added by placing ASCII files of words (one word per
line) in this directory. These files have a .wrd extension. The default word lists
are:
■
computer.wrd – 143 words
■
english.wrd – 3489 words
■
firstnam.wrd – 648 words
■
lastnam.wrd – 2957 words
■
lenglish.wrd – 34886 words
■
synopsis.wrd – 253 words
■
wormlist.wrd – 432 words
■
yiddish.wrd – 639 words
Symantec ESM 5.5 also includes word lists in these foreign languages:
■
Spanish
■
German
■
Dutch (Netherlands)
■
Portuguese
303
304 Symantec ESM file structure
Directory & File Descriptions
■
French
■
Italian
Appendix
C
Finalizer log file
This appendix includes the following topics:
■
Understanding the finalizer log file
■
Understanding Agent records
■
Understanding Module records
Understanding the finalizer log file
The finalizer log file provides summary information about policy runs. Thirdparty developers can use the log file as a source of agent, module, and policy
information for integration into other frameworks.
The manager creates and updates the finalizer log file each time a policy run
completes. Two record types are contained in the log file: agent records and
module records.
Understanding Agent records
Agent records contain policy name, agent name, security rating, and security
level information.
Understanding Module records
Each agent record is followed by one or more module records. Module records
contain the policy name, agent name, long module name, short module name,
rating, level, and the job ID.
306 Finalizer log file
Understanding Module records
The following lines are examples of log file records:
■
AGENT~Phase 1~spiff~380~2
■
MODULE~Phase 1~spiff~Account Integrity~100~1~6
■
MODULE~Phase 1~spiff~Object Intergrity~100~1~6
Appendix
D
Format file syntax
This appendix includes the following topics:
■
Syntax rules
Syntax rules
The following Syntax rules are used with Symantec ESM.
■
# - Indicates the remainder of the line is a comment
■
. - In the first column indicates a directive
■
Blank lines are ignored.
■
Keywords are enclosed by leading and trailing % characters.
A width control may be optionally specified using a “:”. The sign following the
width control character indicates the type of truncation. If the string is longer
than the specified width, a positive truncates the end of the field and a negative
truncates the beginning of the field.
Note: If you intend to use the files with the View Custom command in the
command line interface (CLI), label them with a .vc file extension and store them
in the esm\format\<platform> folder or esm/format/<platform> directory.
308 Format file syntax
Syntax rules
Symantec ESM keywords
You can use these keywords in a format file.
Table D-1
Format file keywords
Keyword
Description
adjusted_code
Code minus user-specified code base
agent
Agent that ran the policy
am_pm
AM/PM indicator
century
Two digits representing the current century (19-20)
class
One digit representing the message severity (0-4)
code
Symantec ESM message code
description
Long description of the message
esm_version
Version of Symantec ESM supplying the report
hour
Two digits representing the hour (00-23)
info
Symantec ESM informational field
minute
Two digits representing the minute (00-59)
module
Module related to the message
month
Two digits representing the month (01-12)
monthday
Two digits representing the day of the month (01-31)
name
Symantec ESM name field
os
Operating system of agent
platform
Platform that ran the policy
policy
Policy related to the message
record_count
Count of processed message records
title
Symantec ESM message title
weekday
One digit representing the day of week, starting with
Sunday (1-7)
year
Two digits representing the year (00-99)
Format file syntax
Syntax rules
Format file structure
Format files consist of ASCII text. You can create and edit the contents of a
format file using a text editor. Limit individual lines of text to no more than 128
characters.
Some lines of text start with directives; for example, words that are preceded by
a period. Directives are case sensitive. They must be lower case. In most
instances, directives are state significant; that is, they require other directives to
precede and follow them.
Directives are usually followed by data fields. You can separate these data fields
with an arbitrary amount of white space. As a result, always enclose fields that
contain spaces in quotation marks.
Format files have a structure consisting of four main sections: General
Directives, Header Definition, Record Definition, and Footer Definition. Each
section uses specific directives.
General directives
The following lists general directives with descriptions and examples:
■
.fill <ASCII decimal value>
This directive specifies the padding character used in a field that has a
specified length. For example, to pad a field with spaces, use the following:
.fill 32
■
.equate <identifier> <value>
This directive sets an identifier to a specific value. The identifier in the
directive can be used with the keyword indicator “%”. The value in this
directive may include other keywords. Examples of this directive include:
.equate time “%hour%:%minute%”
.equate date “%month%/%monthday%/%year%”
■
.translate < keyword> <Symantec ESM value> <target value>
This directive converts a Symantec ESM keyword value to a new value in
the target format. Examples of this directive include:
.translate class 0 “Green”
.translate class 1 “Yellow”
■
.code_base <module> <value>
This directive specifies the operating system base value for the format file.
You can obtain this value from the .base directive in the <module>.m file.
This file is in the platform specific Symantec ESM register directory. Note
that <module> is any short module name.
309
310 Format file syntax
Syntax rules
If you need to use a message code that is four digits or smaller, define a
code_base and subtract it from the code. You can assign the result using the
adjusted_code keyword.
You can set the default value for all unspecified modules by substituting the
word “default” for the <module>. Examples of this directive include:
.code_base default 20000
.code_base patch 45000
Header definition
The following lists Symantec ESM header definitions:
■
.header [length]
This directive starts the header definition. If a length is specified and
positive, it is a fixed length header. Otherwise, the header is assumed to be a
variable length. If the header is defined, it will be the first thing written to
the output file.
■
.field delimiter <delimiter(s)>
A field delimiter is required for variable length headers. It is optional for
fixed length headers. Field delimiters are concatenated to the end of each
field in the header. A field delimiter can be a single number representing
the decimal value of an ASCII character, or a space separated list of no more
than eight numbers. For example, to limit a header to nine characters
followed by a comment, use the following:
.field delimiter 9# Tab
■
field [length] <string>
Field length is only required in a fixed length header. Fields can be defined
only between .header, .record, or .footer directives. If the string includes
spaces, it must be enclosed in double quotes. Keywords and their length
specifiers may be included as explained above. An unprintable character
may be included in a field’s value by entering its ASCII decimal value after a
‘\’.
For example, to limit a field to six characters, add the prefix “EM”, and
truncate the contents to the first four characters, use the following:
.field 6 “EM%adjusted_code:4%”
■
.endheader [delimiter(s)]
This directive ends the header definition. The optional delimiter list is
concatenated to the end of the header.
Format file syntax
Syntax rules
Record definition
The following lists Symantec ESM record definitions:
■
.record [length]
This directive starts the record definition. The record definition section
specifies how Symantec ESM message records are translated and written to
the output file. The syntax is the same as the .header directive.
■
.field delimiter <delimiter(s)>
See the rules for this directive in the header definition.
■
.field [length] <string>
See the rules for this directive in the header definition.
■
.endrecord [delimiter(s)]
This directive ends the record definition. The optional delimiter list is
concatenated to the end of the record.
Footer definition
The following lists Symantec ESM footer definitions
■
.footer [length]
This directive starts the footer definition. The syntax is the same as the
.header directive. If the footer is defined, it will be the last thing written to
the output file.
■
.field delimiter <delimiter(s)>
See the rules for this directive in the header definition.
■
.field [length] <string>
See the rules for this directive in the header definition.
■
.endfooter [delimiter(s)]
This directive ends the footer definition. The optional delimiter list is
concatenated to the end of the footer.
311
312 Format file syntax
Syntax rules
Sample format file
#
#
#
#
#
#
#
#
You can use this custom.vc file with the View Custom
command in the command line interface to send an
agent's run data to a specially formatted file.
Label any modified copies of the file with
a .vc file extension and store them
in the esm\format\<platform> folder
or esm/format/<platform> directory.
# Last modified: Wed Jul 28 21:04:31 1999
.fill 32
.code_base
.translate
.translate
.translate
.translate
.translate
default
class 0
class 1
class 2
class 3
class 4
20000
“Green”
“Yellow”
“Yellow”
“Yellow”
“Red”
# define the header format
.header
.field “%agent:16% “
.field “%year:2%%month:2%%monthday:2%%hour:2%%minute:2% %os:2% “
.endheader 10 # Terminate with LF
# Define the format of messages
.record
.field delimiter 10 # delimited fields
.field “Agent: %agent%”
Appendix
E
Symantec ESM
environment variables
This appendix includes the following topics:
■
Environment variables
Environment variables
The following table lists the environment variables you can set for Symantec
ESM. The list describes each environment variable, its default value, and
purpose:
Table E-1
Environment variable settings
Environment variable
Default value
Purpose
ESMAGENTTRIES
5
Sets the number of times an agent
attempts to connect to a manager.
ESMAGENTWAIT
60
Specifies the time in seconds between
agent attempts to connect to a
manager. This interval allows time for
network congestion to clear.
ESMRUNNINGEXPIRE
20
Specifies the running time in hours
before Symantec ESM can terminate a
policy run.
ESMSUBMITEXPIRE
4
Sets the submit time in hours before
Symantec ESM can terminate a policy
run.
314 Symantec ESM environment variables
Environment variables
Glossary
Agent
The system or server running the Symantec ESM agent software. Install an agent on each
workstation, server, and machine node in the network. For AS200 systems, assign an agent
to function as a proxy. Also, for NetWare/NDS, designate an agent to run security checks on
the entire NDS tree.
When a manager requests data related to a system’s security, the resident agent or
designated agent responds by gathering and interpreting the system configuration data,
then returning the results to the manager. Agents also perform the following functions:
■
Store snapshot files of system-specific and user-account information.
■
Make user-requested corrections to files.
■
Update the snapshots to match the corrected files.
Control Information File (CIF) Server
The primary component of the manager and an important part of the Symantec ESM
information exchange process. The manager stores data in several files called Control
Information Files (CIF). These files contain information about Symantec ESM access,
policy runs, messages that can be output by the security modules, agents, and policy
information‘. The CIF Server provides access to these CIF files. When the GUI or the
Command Line Interface (CLI) needs information from a CIF file, it communicates with the
CIF server. The CIF server accesses the CIF files and relays the information back to the GUI
or CLI.
Client Server Protocol (CSP)
An integral part of Symantec ESM that packages and sends the necessary data from
component to component, using the various transports that Symantec ESM supports.
Much like the warehouse in any business, CSP bundles the data and puts it on the network
in whatever way is appropriate for the transport mechanism.
Command Line Interface (CLI)
An alternate way to execute Symantec ESM commands in OpenVMS, UNIX, and Windows
NT environments. The Command Line Interface (CLI) supports most of the Symantec ESM
commands available in the console. It also lets users create agent records or remove
modules and execute batch files containing CLI commands.
domain
A group of one or more agents on a manager. Users assign agents to domains so a manager
can look at groups of agents separately. Users may create domains to reflect technological
divisions, such as all UNIX systems or all VMS systems; organizational divisions, such as
accounting systems, production systems, or the marketing group; or geographic divisions,
such as Building C systems or Denver systems.
316 Glossary
Symantec Enterprise Security Manager (ESM)
A software tool that is designed to manage security data and enforce security policies
across a range of client/server platforms. Some of the major functions include:
■
Manage security policies.
■
Evaluate system conformance with security policies.
■
Check systems for vulnerabilities or unauthorized privileges.
■
Provide integrity checks.
■
Detect changes to security settings or files.
Console
A graphical user interface for Symantec ESM. To run the console, users must specify the
connecting manager and the correct Symantec ESM password for the manager. The
console receives user input and sends requests to the manager. As data returns, the console
formats the information for display; creating spreadsheet reports, pie charts, bar charts,
and other visual objects.
Manager
The system or server running the Symantec ESM manager software. The manager
performs the following functions:
■
It controls and stores policy data and passes this data to the agents or console as
needed.
■
It stores information from the agents in designated files. The console formats this
information for security administrators.
Module
The executable that does the actual checking at the server or workstation level. Each
module contains checks that relate to different areas of security and may have templates,
files, and name lists associated with it.
Region
That part of a network administered by a console user. A region can contain managers,
domains, agents, security policies and a summary database containing the results of policy
runs.
Security policy
A set of security modules, such as the rules for constructing passwords or the ownership of
system startup procedures. Policies establish which users can access what information,
and point to the standards and guidelines that describe the necessary security checks.
Users can customize policies by adding and deleting specific modules to meet their
hardware and software needs. Agents can apply security modules to a system, a group of
systems, an organization, a group of organizations, or the entire enterprise.
Index
A
about snapshots 117
about templates 118
accessing the ESM console 30
Account wizard
using 37, 66
ACLs
manager account 62
adding
company name to a report 150
logo to a report 150
modules to policies (CLI) 199
adding to a domain
agent 55
administering policy runs 106, 108
agent
adding to a domain 55
connection status (CLI) 222
creating (CLI) 192
defined 315
deleting (CLI) 195
deleting from a domain 56
deleting from a manager 57
remote upgrade status 97
removing (CLI) 204
upgrading or tuning-up 57
viewing properties 57
agent list
exporting 97
agent/manager
Symantec ESM architecture 18
agents 19
agents and domains
organizing 53
audit log viewer 92
C
chart options 137
check boxes in templates 120
checking remote agent
upgrade status 97
checks See security checks
CIF (Control Information File)
defined 315
CIF server 24
data files access 23
CLI
command line interface 24
defined 315
running batch files 182
running interactively 187
understanding conventions 179
client/server architecture
advantages of 17
drawbacks to 17
client/server protocol
connection 24
defined 315
command line interface 198
CLI 24
command reference 189
create access command 191
create agent command 192
create domain command 194
create policy command 194
defined 315
delete access command 195
delete agent command 195
delete domain command 196
delete job command 196
delete module command 197
functionality of 179
help 188
insert command 198
insert module command 199
insert name command 199
login command 201
logout command 202
navigating 188
ping command 202
query command 203
quit command 204
remove agent command 204
318 Index
command line interface continued
remove command 204
remove module command 204
remove name command 205
run command 205
running batch files 182
running interactively 187
show config command 212
show domain command 212
show job command 215
show policy command 218
show sumfinal command 219
show summary command 220
show variable command 220
status command 222
stop command 223
understanding conventions 179
version command 224
view agent command 226
view audit command 227
view custom command 229
view differences command 231
view policy command 234
view report command 235
view summary command 237
configuration record
listing (CLI) 212
configuring Symantec ESM console
on Windows 139
conformance
bringing systems into 43
connecting
consoles to managers 36
console 24
console reports 25
console to manager connections 36
context menus in templates 120
control information file
defined 315
control information files (CIF) server 24
converting reports
from HTML to Word format 150
corrections
undoing a correction 176
create
access command (CLI) 191
agent options, values (CLI) 192
domain command (CLI) 194
policy command (CLI) 194
create a new
domain 54
CSP (Client Server Protocol)
defined 315
customizing reports 150
D
data point
defined 132
setting in view options 133
database
local summary 25
Database Conversion tool 247
options 258
parameters 260
property files 259
delete
access command (CLI) 195
agent command (CLI) 195
domain command (CLI) 196
job command (CLI) 196
module command (CLI) 197
delete an existing
domain 55
deleting
job (CLI) 196
manager account 67
reports 150
deleting agent
from a domain 56
from a manager 57
demo policy 107
destination options
Symantec ESM Reports tool 272
device snapshot 118
domain
create a new 54
creating (CLI) 194
defined 315
delete an existing 55
deleting (CLI) 196
listing (CLI) 212
rename an existing 55
domain report
defined 145
generating 145
domains 23
drill-down chart
using 129
Index
E
editor
template 26
e-mail
policy run notices 111
email
policy run notices 111
supported utilities 111
email configuration 111
e-mailing
reports 149
Enabled/Disabled files 122
Enabled/Disabled word files 122
enabling/disabling LiveUpdate 95
entering commands
Symantec ESM Policy tool 242
Enterprise Security Manager
defined 316
ESM console
accessing on UNIX 30
accessing on Windows 30
locating the controls 31
log on to 31
exceptions
to security policy 40
executive report
defined 147
generating 147
export options
Symantec ESM Reports tool 157
extending Symantec ESM capabilities 26
external database access
Symantec ESM Database Conversion tool 247
F
File Find module
snapshot 118
file snapshot 118
Files/Folders name lists 122
filter options 42
filters
creating a filter 136
defining 136
editing a filter 136
filter indication boxes 136
security data 135
suppressed message 136
finalizer log file
defined 305, 307, 313
finding the manager
system name 48
format file
syntax 307, 313
functionality
NetWare/NDS 20
G
gathering security information 38
Generic strings name lists 122
grid options 136
group snapshot 118
H
help
accessing in CLI 188
accessing in ESM console 33
HTML options
Symantec ESM Reports tool 275
I
insert agent command 198
insert agent command (CLI) 198
insert command (CLI) 198
insert module command (CLI) 199
insert name command (CLI) 199
installation
third-party 27
installing
permanent license 48
interface
Symantec ESM Database Conversion tool 258
Symantec ESM Policy tool 242
Symantec ESM Reports tool 268
J
job
deleting (CLI) 196
query (CLI) 203
K
Key (word) name lists 122
Key name list 122
319
320 Index
L
least rights
security philosophy 36
security philosophy rights 59
LiveUpdate
enabling/disabling on agents 95
updating Symantec ESM agents 93
upgrading agents 96
local summary database 25
local summary database queries 88
locating ESM console controls 31
login command (CLI) 201
logout command (CLI) 202
M
mail utilities
supported 111
manager
adding to region 51
close connection (CLI) 202
connecting to command line interface 187
copying to another region 51, 52, 53, 55, 56
defined 316
deleting from a region 52
deleting from the console 53
listing domains (CLI) 212
summary database
configuration options 89
manager account
ACLs 62
adding a new account 66
changing password on 68
deleting 67
disabling 68
modifying 68
manager database
configuration options 90
managers 23
multiple, connecting to 38
managers and regions
organizing 51
menu
Symantec ESM Reports tool 155
message suppression
filter 136
module
abbreviated names 180
defined 316
deleting (CLI) 197
editing 121
inserting in policy (CLI) 199
listing (CLI) 216
removing (CLI) 204
understanding 121
module options 122
modules 21
running 109
moving
Symantec ESM manager 49
N
name list
inserting names (CLI) 199
name lists
editing 122
multiple users/groups 124
precedence 124
Net Server
functions 24
NetWare/NDS
functionality 20
mini-agents 21
Symantec ESM mini-agents 21
NetWare/NDS agents 20
notification on completion 111
number of agents
permanent license 48
O
object chart
using 131
ODBC options
Symantec ESM Reports tool 274
opening
saved reports 149
opening the interface
Symantec ESM Reports tool 154
options
chart 137
grid 136
permanently enabled 122
specifying 122
Index
organizing
agents and domains 53
managers and regions 51
P
parameter values
Symantec ESM Reports tool 160, 279
parameters
Database Conversion tool 260
password 70
changing on manager account 68
changing the Symantec ESM console 76
configuration setting 75
password standards 68
permanent license
installing 48
number of agents 48
Symantec ESM managers 47
ping command (CLI) 202
policies 22
copy between managers 105, 107
move between managers 107
Response 105
policy
creating (CLI) 194
defined 316
exceptions to 40
removing names (CLI) 205
running (CLI) 205
system conformance to 43
policy report
defined 145
generating 146
policy run report
defined 146
generating 146
Policy Run wizard 109
using 40
policy runs 25
administering 106, 108
completion notices 111
completion notification 111
deleting 117
force-finalized 116
information 114
maximum number of messages 109
recurring 111
running a module 109
running a random policy 115
policy runs continued
scheduling 110
specify multiple modules 109
status 113
stopping 115
stopping after a specified time interval 116
stopping at a scheduled time 116
viewing schedule information 114
Policy tool 240
prerequisites
Symantec ESM Database Conversion tool 257
Symantec ESM Policy tool 241
Symantec ESM Reports tool 153, 267
print options
Symantec ESM Reports tool 276
printing
reports 149
properties
viewing agent 57
property files
Database Conversion tool 259
Q
queries
local summary database 88
query command (CLI) 203
quit command (CLI) 204
R
rating
security 134
recurring policy runs
scheduling 111
region
adding managers 51
defined 316
deleting a manager 52
deleting from the console 53
regions 25
remove
agent command (CLI) 204
command (CLI) 204
module command (CLI) 204
name command (CLI) 205
rename an existing domain 55
report
domain (CLI) 233
setting format options 145
321
322 Index
report descriptions
Symantec ESM Reports tool 277
report files
specifying a location 150
report filters
chart and grid filters 42
report item
suppressing 170
unsuppressing 173
reports 25
adding a company name 150
adding a logo 150
converting a report format 150
customizing 150
deleting 150
domain
defined 145
generating 145
e-mailing 149
executive
defined 147
generating 147
filtering 135
opening a saved report 149
policy
defined 145
generating 146
policy run
defined 146
generating 146
printing 149
saving a report 148
security
defined 143
generating 144
standard sections 142
template
defined 146
generating 147
point of access 146
third-party
defined 147
types of 142
using Symantec ESM Reports tool 151
using the Reports tool 266
viewing 42
Reports tool 157, 266
Response policies 105
run command (CLI) 205
running batch files
command line interface 182
running security checks 38
running Symantec ESM policies 104
S
saving
reports 148
scheduler
automating policy runs 25
functions 25
scheduling policy runs 110
recurring 111
SDK
functions 26
security
threats to 17
security administration duties
separating 58
security checks 107
editing name lists 122
enable/disable 121
running 38
validating 107
view checks command (CLI) 228
security data
viewing 127
security information
gathering 38
security level
how ESM determines 40
Symantec ESM security levels defined 134
security module, defined 316
security policy
defined 316
security rating
defined 134
how ESM determines 40
rating value of Symantec ESM messages 134
security report
defined 143
generating 144
security updates 107
server
CIF 24
setting expiration 70
setuid and setgid snapshot 118
Index
show
command (CLI) 209
configuration (CLI) 212
domain command (CLI) 212
job command (CLI) 215
module command (CLI) 216
policy command (CLI) 218
sumfinal command (CLI) 219
summary command (CLI) 220
variable command (CLI) 220
sleep command (CLI) 209
SMTP
specify in mail.dat file 111
snapshot files
updating 177
snapshots
about 117
source database arguments
Symantec ESM Reports tool 276
status command (CLI) 222
stop command (CLI) 223
stopping policy runs
after a specified time interval 116
at a scheduled time 116
immediately 115
sublist editing 120
summary chart
using 131
summary database 25
suppression maintenance 26
suppressions
creating 171
editing 172
explained 170
report item 170
unsuppressing 173
Symantec ESM
agent defined 315
API 26
audit log 92
disabling 93
enabling 93
viewing 93
client/server protocol
defined 315
command line interface
defined 315
control information file
defined 315
Symantec ESM continued
domain defined 315
Enterprise Security Manager
defined 316
environment variables 313
exiting (CLI) 204
extending capabilities 26
file structure 289, 305, 307, 313
mail utilities supported 112
major functions 18
manager defined 316
module defined 316
password configuration setting 75
purpose 18
Region defined 316
security policy defined 316
UNIX mail-utility supported 112
Symantec ESM (Enterprise Security Manager)
defined 316
Symantec ESM agents 19
Symantec ESM architecture
agent/manager 18
Symantec ESM chart and grid
understanding 128
Symantec ESM console 24
changing the password 76
chart
selecting 2D/3D graphics 138
selecting pie/bar chart 138
showing chart legend 137
showing series labels 138
deleting a manager 53
deleting a region 53
filter indication boxes 136
Symantec ESM Database Conversion tool
accessing the interface 258
external database access 247
prerequisites 257
understanding options 258
understanding parameters 260
understanding property files 259
usage examples 262
Symantec ESM domains 23
Symantec ESM manager
moving 49
Symantec ESM managers 23
permanent license 47
Symantec ESM mini-agents
NetWare/NDS 21
323
324 Index
Symantec ESM modules 21
Symantec ESM policies 22
running 104
Symantec ESM Policy tool
accessing the interface 242
entering commands 242
prerequisites 241
understanding options 244
understanding values 243
usage examples 244
Symantec ESM regions 25
Symantec ESM Reports tool
changing parameter values 160, 279
destination options 272
export options 157
HTML options 275
ODBC options 274
opening the interface 154, 268
parameters, values, descriptions 161
prerequisites 153, 267
print options 276
report descriptions 277
reports 151
source database arguments 276
usage examples 280
using 157, 270
using menu 155
using the interface 154, 268
using the toolbar 155
Symantec ESM utilities
understanding conventions 239
using the Database Conversion tool 247
using the Policy tool 240
system conformance
correcting report items 174
undoing corrections 176
system name
finding the manager 48
T
Template Editor 119
template editor 26
template report
defined 146
generating 147
point of access 146
Template Sublist Editor 120
templates
about 118
and modules 118
check box fields 120
context menus 120
creating 119
editing fields 120
editing rows 119
understanding 118
updating 176
third-party installations 27
third-party report
defined 147
toolbar
Symantec ESM Reports tool 155
trend mode
defined 132
toolbar icon 128
Trojan horses 118
tuning-up
agent 57
U
understanding
command line interface conventions 179
Symantec ESM grid and chart 128
Symantec ESM utilities conventions 239
templates 118
understanding options
Symantec ESM Database Conversion tool
Symantec ESM Policy tool 244
understanding parameters
Symantec ESM Database Conversion tool
understanding property files
Symantec ESM Database Conversion tool
understanding values
Symantec ESM Policy tool 243
updates
updating a template 176
updating snapshot files 177
upgrade status
checking agent 97
upgrading
agent 57, 93
usage examples
Symantec ESM Database Conversion tool
Symantec ESM Policy tool 244
Symantec ESM Reports tool 280
user snapshot 118
258
260
259
262
Index
Users and Groups name list precedence 124
Users name lists, editing 122
using
Account wizard 37
LiveUpdate 93
Policy Run wizard 40
Symantec ESM Reports tool 270
using LiveUpdate
to upgrade agents 96
using the Database Conversion tool
Symantec ESM utilities 247
using the Policy tool
Symantec ESM utilities 240
utilities conventions 239
V
version command (CLI) 224
view
agent command (CLI) 226
audit command (CLI) 227
checks command (CLI) 228
custom command (CLI) 229
differences command (CLI) 231
domain command (CLI) 233
policy command (CLI) 234
report command (CLI) 235
summary command (CLI) 237
viewing
agent properties 57
reports 42
security data 127
viewing information
scheduled policy runs 114
W
wizard
Account 37
Policy Run 109
325
326 Index