1
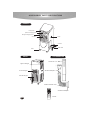
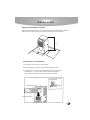
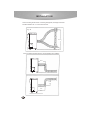
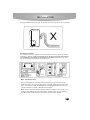
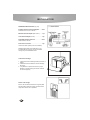
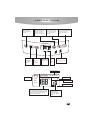
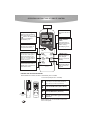
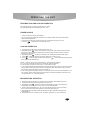
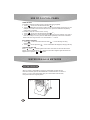
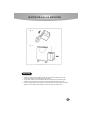
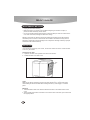
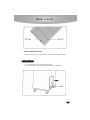
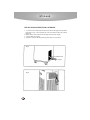
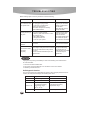
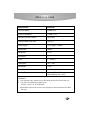
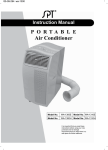
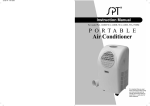
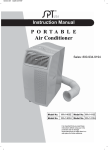
Instruction Manual
Portable Air Conditioner
Model: WA-9010E
It is important that you read these instructions before using your
portable air conditioner and we strongly recommend that you keep
them in a safe place for future reference.
Sales Inquiries - 800-934-9194
TABLE OF CONTENTS
Thank you and energy saving tips
Introduction................................................. 1
Parts and accessories.................................. 2
Installation................................................... 3
Control panel functions................................. 7
Remote control functions.............................. 8
Operating the unit........................................ 9
Drainage...................................................... 10
Maintenance................................................ 12
Storage....................................................... 14
Cautions...................................................... 15
Troubleshooting........................................... 16
Specification................................................ 17
Defective notice........................................... 18
Your Guarantee
THANK YOU!
Thank you for choosing the portable air conditioner from SPTusa, a
leading brand in indoor air treatment. We would like you to enjoy the
many benefits this unit offers, so please take the time to read this
manual carefully and take full advantage of the many advanced
features that your SPTusa Air Conditioner offers you.
SPTusa has specialized in complete indoor environment control,
manufacturing world-class air conditioners, dehumidifiers and air
purifiers with innovative technology.
In designing these advanced products, we have listened carefully to
our customers and have passed their views on to our research and
development laboratories. We wish you many years of enjoyable use.
After reading this manual, please keep it in a safe place for future
reference.
Energy Saving Tips
· Please use the unit in the recommended room size.
· Do not locate the air conditioner where furniture or other objects
can obstruct the airflow.
· Keep blinds/curtains closed during the sunniest part of the day.
· Close the fireplace damper and floor or wall grills so that cool air
does not escape through the chimney or ductwork.
· Keep the filters clean.
Set the unit to maximum cooling and high speed fan initially, then
adjust the unit to a comfortable setting.
NOTE: It is recommended to turn on the air conditioner when the
room temperature is around 75ºF. Do not wait until the room is
excessively hot.
INTRODUCTION
SPT USA Portable Air Conditioner
This Portable Air Conditioner is a small size appliance, which can
adjust the temperature and humidity in a room. Its flexibility
characteristics make it easily used on different occasions in
different rooms. It also has multiple functions, including cooling,
dehumidifying and fan ventilation. This unit is designed to be used
in a family house, office, etc. It has a compact design compared to
others with the same cooling capacity. Power consumption is low
and the noise especially low.
ATTENTION
Before you use your PORTABLE AIR CONDITIONER,
please read this instruction manual carefully so that you get
the best from the unit.
This instruction manual is used for guidance and does not
form part of a contract. We reserve the right to make technical
changes without prior notice.
1
ACCESSORIES, PARTS AND FUNCTIONS
FRONT
control panel
up/down air swinging louvers
left/right air swinging louvers
air outlet
handle
water tank
power cable
caster
BACK
ACCESSORIES
window kit x 2
upper air inlet grill
hot air outlet grill
AC/hose adapter x 2
lower air inlet grill
flexible exhaust hose
F
o
COOL DRY FAN
AM
PM
window kit adapter
ON
OFF
H
ON/OFF
*
*
FAN SPE
ED
TIME R
2
HOU R
HOLD
MOD E
SWI NG
MIN
remote
INSTALLATION
Selection of installation location
Place the portable air conditioner on a flat surface where the air outlets are not blocked.
Place the unit with at least 20 inches of clearing from a wall or other obstacles.
20
inc
h
32.7 inch
inc
h
.3
in
ch
20
17
12.
8 in
ch
20
inc
h
Installing the air exhaust duct
1) Fix adaptors onto hose by turning clock-wise
2) Fix the square end of the duct to the exhaust terminal of the unit
3) Lead the other end to the nearest window. Note: the length of the hose
is between 23.7 ~ 70 inches. Do not extend beyond the supplied
length. Keep hose length as short and as straight as possible.
hot air terminal
heat exhaust air duct
window
exhaust air opening
3
INSTALLATION
Correct mounting shown below. If mounting through wall, the height of the hole
should be between 16 ~ 51 inches from the floor.
fig. 23
51 inch
16 inch
If the air exhaust requires bending, use the following as a guideline:
20 inch
24 inch
20 inch
4
INSTALLATION
Example WRONG mounting diagram (Air exhaust bend is too large, will cause overheating.)
Window Kit Installation
Your window kit has been designed to fit most standard "vertical" and "horizontal" window
applications. However, it may be necessary for you to improvise/modify some aspects
of the installation procedures for certain types of windows. Please refer to Fig. 24 &
Fig. 24a for minimum and maximum window openings.
Fig.24a
inches
inches
Fig.24
inches
inches
Water Tank Safety Feature
This unit is equipped with a fail-safe switch mechanism which prevents the unit from
condensing water in the event the water tank is accidentally displaced and/or FULL with
water. If this situation occurs, the WATER FULL indicator light will flash red continuously
until the water tank is correctly positioned and/or emptied
NOTE: The fan motor will continue to operate under this condition. This is normal, but no
cooling or dehumidifying will occur until the tank is emptied and/or correctly installed. (It
may take several minutes before the compressor resumes normal operation
5
INSTALLATION
Installation Accessories (Fig. 25)
Fig. 25
Flexible exhaust hose with adapters........3/set
stretches from 19 1/2" to 78 3/4"
Window exhaust adapter (flat mouth ).........1pc
Unit exhaust adapter (round) .....................1pc
Adjustable window slider kit.....................2/set
from 26 5/8" to 48 3/8"
Drain hose connector..................................1pc
continuous drain option (hose not included)
NOTE: Exterior drain hose extension is not
included with this unit but can be purchased
through any local Hardware Store.
Continuous Drainage
1. Remove the seal of drainage tube (as shown in
image).
2. Extend the tube outside the unit for drainage,
as shown.
3. Pay attention to place the tube in a proper
situation to avoid causing the electric controls
to not work properly.
Power cord storage
Fix the roll wire at the back of the air guide plate
with the clasp. Wrap the power cord around the
clasp when unit is not in operation.
6
I
CONTROL PANEL FUNCTIONS
TIMER Button
SWING Button
Press this button to
switch-on, switch-off or
delete timer.
MODE
-
TIMER
+
TIME
FAN SPEED Button
FAN SPEED
COOL
TIME Button
MODE
HIGH MED LOW
0
DRY
SWING
F
ON
FAN SP
FAN
TEMP
SET FAULT
COMP
Sets remaining
time for timer
operation.
MODE Button
Press this button will select
among the modes of
cooling, dehumidify or
fan.
Press this button will
choose high, medium
or low speed of air
delivery.
Selection of this button
will determine the air
delivery in swinging
or fixed direction mode.
TEMP Button
Sets the
room
temperature
SWING
OFF
EED
MODE
WATER FULL
WATER
FULL
indication
light
COMPRESSOR
Indication Light
ON/OFF Button
To turn unit ON or OFF
Fan speed indicator
MODE
Operation mode
FAN SPEED
COOL
HIGH MED LOW
0
DRY
SWING
F
ON
Louver indicator
Timer set to turn ON
FAN
SET FAULT
Display of preset temperature and failure
code. When SET is displayed, the displayed
digits indicate the preset temperature. When
FAULT is displayed, the displayed digits
indicate the code of failures.
OFF
Timer set to turn OFF
Display of Time Setting
The displayed digits
indicate the remaining
time for timer ON/OFF
operation
7
OPERATION AND FUNCTIONS OF REMOTE CONTROL
Display screen
ON/OFF Button
Turns the unit ON or
OFF.
Temperature setting button
Sets the room temperature.
Each press of the "
" or
" " button, the temperature
setting is increased or
0
decreased by 1 F.
F
*
o
COOL DRY FAN
*
AM
PM
ON
OFF
H
FAN SPEED Button
Choose high, medium or
low speed air delivery.
ON/OFF
*
MODE selection
button
Press this button to
select the among the
modes: cooling,
dehumidifying or fan.
*
TIMER Button
Sets the switch-on or switch-off
time for Timer. Used together
with the HOUR button. Time
setting can be made within the
range of 1 ~ 12 hours, with an
interval of one hour.
FAN S
PEE
T IM E R
Time Setting buttons
These buttons are used to
set the clock or the time for
timer switch-on/off.
HOUR
D
MODE
HOLD
S W IN G
M IN
SWING button
Press this button to
select left/right
swinging or fixed air
delivery.
HOLD button
Press this button to
lock or unlock the
keypad.
PRESENT TIME SETTING PROCEDURE
When batteries are inserted, the time is automatically set to 12:00AM.
To set clock (example: set to 10:30AM)
CLK
ACL
o
F
1
Open the back cover, push the CLK button with the
tip of a ball pen. The time indicator will start to
flicker. You may now set the present time.
2
Press the HOUR button. (Set to AM 10:)
3
Press the MIN button. (Set to 30)
4
Press the CLK button again and close the
back cover.
COOL DRY FAN
AM
PM
ON
OFF
H
ON/OFF
*
*
FA N SP
EE
TIM ER
Slide battery
cover downward
to open
HO UR
D
MO DE
HOLD
SW ING
MIN
remote
8
NOTE: Clock is only on the remote and not on the
unit's control panel.
OPERATING THE UNIT
DEHUMIDIFYING AND COOLING OPERATION
O
O
The operating range for cooling is between 63 F ~ 88 F
The operating range for dehumidifying is 68 F ~ 88 F
O
O
POWER SOURCE
* The AC socket must be firm and reliable.
* Do not connect the portable air conditioner to a multiple socket outlet that is shared with
other electrical appliances.
* Insert the AC power plug securely into the AC socket before turning on the unit.
* Press the "
" button and the unit will begin to run.
COOLING OPERATION
1. Ensure that the drain tank is properly placed in the unit.
2. Repeatedly press "
" button to choose the cooling mode. LCD window will show COOL.
(During the cooling operation, always place the duct through an open window to exhaust
warm air from the room.)
3. Repeatedly press "
" button to set desired room temperature (between 63F ~ 88 F).
4. Press "
" button to choose a proper fan speed: high, medium or low.
5. Press "
" button to adjust the air delivery direction. "
" symbol indicates swinging mode.
Press again to set fixed direction.
MODE
O
O
-
+
NOTE: In order to improve the cooling efficiency, please note the following:
a) If your room is directly exposed to sun, draw the curtains and blinds.
b) Do not place unit near any heat source or under direct sunlight.
c) The compressor will start approximately 3 minutes after the unit is turned on and set to COOL
function (this will help prolong the life of the compressor). After switching the unit off, please
wait at least 3 minutes before turning the unit back on.
d) The cooling system will switch off if the room temperature is lower than set temperature. The
fan, however, keeps working at the set level. When the ambient temperature rises above the
set temperature + 2 F, cooling will resume.
O
DEHUMIDIFYING OPERATION
1. Keep the windows and the doors closed to aid in effectively dehumidifying the room.
2. Ensure that the drain tank is properly placed in the unit.
3. Repeatedly press "
" button to choose the dehumidifying mode, LCD window will
indicate DRY. The fan speed is set on LOW and cannot be adjusted.
4. When used as dehumidifier only, do not use the air exhaust duct. (If the air exhaust
duct is used, air exchange effect will reduce dehumidify performance.)
5. Dehumidify will work when ambient temperature is higher than 68F and higher than
set temperature.
6. Dehumidify works in 10 minute cycles: 6 minutes compressor on and 4 minutes off.
MODE
O
9
USE OF CONTROL PANEL
TIMER SETTING
To set time to start the unit when power is off (but with power supplied):
ON ".
1. Press "
" button, the LCD window will show "
2. Press the TIME button and set the number of hours you wish to start running the unit. For
example, if you wish to have the unit start in 8 hours, press the TIME button repeatedly
until 8 hours is indicated.
To set time to stop the unit when unit is running:
OFF ".
1. Press "
" button, the LCD window will show "
2. Press the TIME button to set the desired time to stop the unit. For example, if you wish to
have the unit stop in 5 hours, press the TIME button repeatedly until 5 hours is indicated.
NOTE: The time range for timer on or off is between 1 ~ 12 hours.
AUTO SWING FUNCTION
1. Press "
" button and LCD window will show "
". Louver will begin to swing
automatically.
2. Press "
" button again and "
" in the LCD window will disappear, swinging will stop.
LOCKING THE KEY PAD
Press " + " and "
" buttons together and hold for more than two seconds will lock the
keypad. LCD window will show "
". Press the two buttons together again will unlock the
keypad and the symbol "
" will disappear.
-
WATER DRAINAGE METHODS
WATER DRAINAGE
When in cooling or dehumidifying mode, the condensation will drain into the
tank. When the tank gets full, the WATER FULL indicator will flicker. As shown in
the Fig. 1, 2 and 3, pull out the water tank, pour out the water inside the tank,
then push it back to its original position.
fig. 1
10
WATER DRAINAGE METHODS
fig. 2
fig. 3
CAUTION
1. When in cooling or dehumidifying mode, do not remove the water tank, or the
compressor will stop and mode will change to FAN.
2. If you want to take out the tank before the water becomes full, please stop the
machine first and wait for 3 minutes, to prevent the water spilling into the unit
3. There is a plastic pipe inside where the tank is placed. Do not remove the stopper
while the unit is working as the water is used for cooling the copper duct.
11
MAINTENANCE
MAINTENANCE METHODS
* Unplug the unit before cleaning
* Make sure there is no power to the unit before beginning to maintain or repair, to
prevent accident caused by electric shock.
* Do not use chemical solvent (like benzene or alcohol glazer) to clean the surface of the
unit, which will scratch, damage or deform the casing.
NOTE: it is important to clean the exhaust air intake area (located on the side and back,
near bottom) with a vacuum to remove dust accumulation. Excessive dust may cause a
decrease in performance and/or damage to the compressor. Damage caused by improper
maintenance will void the warranty.
AIR FILTER
If the air filter is blocked by a lot of dust, the air flow volume will reduce. Clean the filter
once every two weeks.
Opening the air filter
1. Open the air filter cover upwards and remove the air filter.
2. Takethe air filter out of filter cover.
grip
Clean
0
0
Wash the air filter by immersing it gently into warm (about 40 C or 104 F) water with a
neutral detergent. Rinse the filter clean of detergent and dry it thoroughly in a shaded
place.
Mounting
1. Attach the filter to filter cover with the attachment hooks on the inside surface of the
cover.
2. Match hooks at the bottom of the filter cover into the holes of the case, push it back into
its original position.
12
MAINTENANCE
KEEP SURFACE CLEAN
Clean the surface of the unit with a damp cloth, then dry with duster or similar.
WATER TANK
1. Hold the handle in water tank and draw out slowly.
2. Pour out the water. Clean with neutral detergent, rinse clean and dry.
13
STORAGE
END OF SEASON OPERATION & STORAGE
1. To remove drain water from the drain tank, take out the plug from the plastic
pipe shown in Fig. 4. Then operate the unit in fan mode for half a day until the
pipe is dry.
2. Switch off the unit and disconnect the plug from the power supply.
3. Tie the cable with a string.
4. Wrap the machine with the plastic bag and store in a dry location.
fig. 4
plastic duct
stopper
fig. 5
14
SAFETY CAUTIONS
* Do not use the unit in a very narrow room with obstacles to avoid breakdown.
* Do not use the unit under direct sunlight to avoid surface color change.
* Do not use the unit in or near water to avoid possible shock of electricity.
* Do not use near gas appliances, fire or the vicinity of flammable liquids.
* Do not use with a damaged or improper A/C socket.
* When unplugging the unit, hold the power plug securely and pull carefully.
* Keep the unit one meter away from TV sets or radios to avoid electromagnetic
interference.
* Keep a distance between the air outlet and wall or furniture to avoid overheating.
* Do not spray with insecticide or other chemicals as the plastic case may discolor
or become deformed.
15
TROUBLESHOOTING
Before seeking repair or service, please first check the following.
Trouble
Check
Air conditioner does
not operate at all
Cooling efficiency is
not good
Is power out?
Is it unplugged or plug loose?
Is power fuse or switched off?
If drain tank indicator lit?
If the water tank placed correctly?
If SET TIME suitable?
It is normal.
Plug firmly into wall socket.
Change or reset the fuse.
Pour out water.
Place water tank correctly
Change SET TIME
Is air inlet or outlet blocked?
Is there any other heat source in room?
Are air filters dirty?
Is SET TEMP suitable?
Is fan speed set at low?
Is unit in an open space?
Clear the inlet or outlet
Move the heat source
Clean the air filter
Set suitable temperature
Set suitable fan speed.
Close windows and doors
Is it level?
Place on a level surface
Too noisy or
vibration
The machine starts
and stops
frequently
Action
Is the voltage of the power source normal?
Does the air exhaust have many bends
or curves?
Is the air exhaust extended beyond the
supplied hose?
Keep power within rating.
Keep exhaust hose as
straight and short as possible
Do not extend beyond
supplied hose.
CAUTION
Unplug and stop running immediately in case of the following and contact SPTUSA
at 1-800-330-0388:
1. The fuse and switch breaks often.
2. The power cord get excessively hot or the sleeve of the cord is broken.
3. Something seems abnormal.
Self diagnosis function
This unit is equipped with a Self-Diagnosis system. When irregular performances are
sensed, the LCD panel will display the following fault codes:
16
Action
Check code
Diagnosis of malfunction
FAULT E8
Overheating protection
Wait until unit cools off
FAULT E3
Faulty coils
Service required
FAULT E2
Ambient temperature is
not within the working
temperature range
o
o
(50 F ~ 95 F)
Wait for ambient temperature
to fall within the working
temperature range
FAULT E4
Unit faults
Service required
SPECIFICATIONS
Model Number
WA-9010E
Cooling Capacity
9,000BTU/hr
Power Consumption
1,120W / 9.7A
Humidity Removal Capacity
50 pts./day
Recommended Room Size*
250 sq. ft.
Power Supply
115V / 60HZ / 1 Phase
Compressor
Rotary
Refrigerant
R - 22
Fan Speed
3
Timer
1 ~ 12 hours
Thermostat
62oF ~ 88oF
Net Weight
77 lbs.
Dimensions
14.76"W x 18"D x 32.68"H
Working Temperature
Cooling: 50oF ~ 95oF
Dehumidifying: 68oF ~ 95oF
REMARKS:
1. The data may vary, please refer to the rating label on the back of the unit.
2. The above conditions are measures at:
Cooling - Indoor: RT 81oF, RH 60%
* Uninsulated rooms such as sun rooms, garages or attics should be less than
250 sq.ft.
17
DEFECTIVE NOTICE
If this product is defective or not working properly
Please DO NOT return to your retail store
Please contact us directly with any Service or Technical
Assistance
Contact us toll free at:
1-800-330-0388
Sales Inquiries - 800-934-9194
18
YOUR GUARANTEE
Portable Air Conditioner
If this product is found to be faulty as a result of faulty materials or workmanship
within one year from date of purchase, it will be repaired or replaced free of
charge.
This guarantee is subject to the following terms:
SPTUSA, must be notified of the fault.
Proof of purchase must be presented to SPTUSA's nominated representative.
The warranty will be void if the product is modified, misused or repaired by an
unauthorized person.
The guarantee after repair or replacement will not be extended beyond the
original one year period.
All replacement parts or units will be new or reconditioned.
Parts or units, which are replaced, become the property of SPTUSA.
The warranty applies to the use of this product in the United States.
Warranty does not include freight charges.
Note : For service, please call:
800-330-0388 or visit www.spt-usa.com
SUNPENTOWN INT'L INC.
This GUARANTEE is in addition to your Statutory Rights.
Dear Customer: Please keep this warranty for your record. DO NOT return it.
Sales Inquiries - 800-934-9194