1
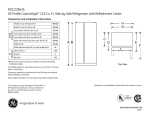
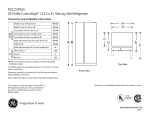
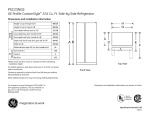
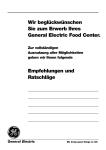
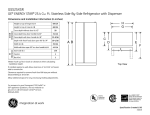
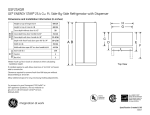
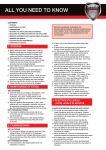
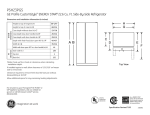
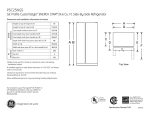
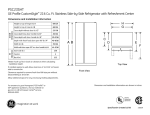
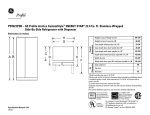
"94 SxS Refer
PSI23NCR
GE Profile CustomStyle™ 22.6 Cu. Ft. Side-By-Side Refrigerator
Air
Clearances
Overall
Dimensions
Dimensions and Installation Information (in inches)
Height to top of hinge (in.) A
69-1/4*
Height to top of case (in.) B
68-3/4
Case depth without door (in.) C†
23-7/8
Case depth less door handle (in.) D†
26-3/4
Case depth with door handle (in.) E†
28-1/3
Depth with fresh food door open 90° (in.) F†
45-4/7
Width (in.) G
35-3/4
Width with door open 90° inc. door handle (in.) H
40
Each side (in.)
1/8
Top (in.)
1
Back (in.)
1/2
H
G
C
AB
D
E
F
*Height to top of door trim (in.): 70-1/4
Top View
†Water hook-up fits in back air clearance when calculating
installation depth.
If installed against a wall, allow clearance of 13-15/16" on
freezer side to remove bin.
Front View
Clearance required to remove fresh food full-size pan without
disassembling is 18-5/8".
Allow additional space for any necessary leveling adjustments.
For answers to your Monogram,® GE Profile™ or
GE® appliance questions, visit our website at
ge.com or call GE Answer Center® service,
800.626.2000.
R
Listed by
Underwriters
Laboratories
Specification Revised 7/05
R
210273
PSI23NCR
GE Profile CustomStyle 22.6 Cu. Ft. Side-By-Side Refrigerator
™
FOR 21 CUBIC FOOT MODELS
Rough-In Dimensions and Installation Information (in inches)
Installation Tips to Maximize the Built-In Look
Electrical
Electrical
8' Ceiling
Water
12"
Soffit
• All wall/floor molding should be removed prior to installation.
• Water recess on rear wall recommended to prevent water
line damage. 48" minimum length, 1/4" diameter water
line tubing recommended.
• When possible, recess both copper water line and electrical
outlet. (See local codes)
Water
24"
Cabinet
3/4" Airspace
(1/2" Gap + 1/4"
Wall Plates)
25"
Counter
Top
3/4" Airspace
(1/2" Gap + 1/4"
13" to 14"
Wall Plates)
Cabinet 25"
Counter
Top
24"
Cabinet
• Front and rear leveling legs are adjustable for the built-in look.
(See owner’s manual)
• If optional collar trim kit is to be used or anticipated, see collar
trim installation for different rough-in dimensions
Trim
**The rough-in dimensions of 70-1/4"/72-1/4" are minimum and
measured from the finished floor to top of opening (or the
underside of the overhead cabinets). For Models with Trim Kit:
If frameless style cabinets are planned for above the refrigerator,
you may need to consider adding a maximum of 1/4" (70-1/2")
to height of opening for 23 cu. ft. models and 1/8" (72-3/8") for
25 cu. ft. models to allow for additional clearance between the
cabinet doors and the top of refrigerator trim when the cabinet
doors are in open position.
70-1/4"*
23 cu. ft. models
72-1/4"*
25 cu. ft. models
24-1/2"
FOR 24 CUBIC FOOT MODELS
36-1/8"
Water
For answers to your Monogram,® GE Profile™ or
GE® appliance questions, visit our website at
ge.com or call GE Answer Center® service,
800.626.2000.
24"
Cabinet
3/4" Airspace
(1/2" Gap + 1/4"
Wall Plates)
Electrical
minimum and measured
from
Electrical*The rough-in dimensions of 70-1/4"/72-1/4" areWater
the finished floor to top of opening (or the underside of the overhead cabinets).
For Models with Trim Kit: If frameless style cabinets are planned for above the
refrigerator, you may need to consider adding a maximum of 1/4" (70-1/2") to
height of opening for 23 cu. ft. models and 1/8" (72-3/8") for 25 cu. ft. models
3/4" and
Airspace
to allow additional clearance between cabinet doors
top of refrigerator trim
(1/2" Gap + 1/4"
when cabinet doors are in open position.
25"
Counter
Top
Wall Plates)
24"
Cabinet
25"
Counter
Top
R
Listed by
Underwriters
Laboratories
R
Trim
Fig 2A eps
Specification Revised 7/05
Collar Trim In. w/ceiling
210273
PSI23NCR
GE Profile CustomStyle™ 22.6 Cu. Ft. Side-By-Side Refrigerator
Rough-In Dimensions and Installation Information (in inches)
Collar Trim Installation
Typical Installation
An enclosure is required to match up to the
trim, see Typical Installation. To obtain the
most integrated look, the cabinet or soffit
above the refrigerator should extend out
to the same depth as the side panels. The
refrigerator opening must have minimum
dimensions of 70-1/4" high x 36-1/8" wide
x 24-1/2" deep as shown at right. If there is
an overhead cabinet, allow 1" for cabinet
door clearance with the top trim piece so
the cabinet doors can be opened without
hitting the top trim. If 1/2" side panels are
used, then side trim and panel will be even.
If 3/4" side panels are used, then some of
the side panel will extend beyond the trim
and must be finished.
Shaded areas represent front surfaces of side panels and
overhead cabinet or soffit that contacts trim.
IMPORTANT: Before finalizing specifications
for your GE Profile CustomStyle Refrigerator,
please NOTE:
• A minimum of 36-1/8" is required for
refrigerator installation with collar
• Be sure to allow for 1/2" or 3/4" side
panels in addition to the 36-1/8"
minimum.
1/2" minimum
70-1/4"*
Refrigerator
Case
3/4" Cabinet
Side Panel
1/2" Cabinet
Side Panel
Cabinet
Door
1"
Magnetic
Tape
Door Gasket
Overhead
Cabinet
Case
Refer collar trim install
Side Trim
Side trim must be installed
flush with the gasket contact
surface on the case.
Top Trim
24-1/2"*
36-1/8"
*The rough-in dimension of 70-1/4" is minimum and is measured from the
finished floor to top of opening (or the underside of the overhead cabinets).
For Models with Trim Kit: If frameless style cabinets are planned for above the
refrigerator, you may need to consider adding a maximum of 1/4" (70-1/2") to
height of opening to allow additional clearance between cabinet doors and
top of refrigerator trim when cabinet doors are in open position.
For answers to your Monogram,® GE Profile™ or
GE® appliance questions, visit our website at
ge.com or call GE Answer Center® service,
800.626.2000.
R
Listed by
Underwriters
Laboratories
Specification
Collar Trim Installation
Art Revised 7/05
R
210273
PSI23NCR
GE Profile CustomStyle™ 22.6 Cu. Ft. Side-By-Side Refrigerator
Door Panel Dimensions and Installation Information (in inches)
Order your own custom wood panels to match cabinetry
or other decor.
Panels up to 1/4" thick will fit door frame with no special
preparation. Add filler behind material thinner than 1/4"
for proper fit.
Cut
out
Cut
out
NOTE: Panels up to 3/4” will require special routing area
around handles. Dimensions may vary depending on
depth of panel.
• A minimum of 36-1/8" is required for refrigerator
installation with collar
1/2"
1/8
1/8
Alternate
water
5/16
line location 1/2"
14-15/32
through floor
Alternate
17-7/8
water
line hook-up
location
Water
floor
onthrough
the refrigerator
5/16
Installation of Water Outlets
Fresh Food
Freezer Panel
Fresh Food
Dispenser Panel Panel
Withwith
Dispenser
1/8
Weight Limits: Total weight of panels (i.e., both freezer
panels)—Fresh Food = 38 lbs., Freezer = 28 lbs.
IMPORTANT: Before finalizing specifications for your
GE Profile CustomStyle Refrigerator, please NOTE:
Freezer Panel
Freezer Panel
Freezer Panel
withoutDispenser
Dispenser
Without
Cut
out
1/2"
Alternate
water
1/2"location
line
through floor
Alternate
water
line location
Top View
through floor
5/16
67-9/32
67-9/32
Top View
Top View
Water hook-up
on the refrigerator
Water hook-up
Top View
FRONT on the refrigerator
FRONT
FRONT
Recommended
single loop of 1/4" copper water line
14-15/32
14-15/32
19-15/32
Water hook-up
on the refrigerator33-5/8
Recommended
Allow 48" minimum water
single loop
1/4"
water line
24" ofline
to copper
enable refrigerator
to be pulled forward
• Be sure to allow for 1/2" or 3/4" side panels in addition
to the 36-1/8" minimum.
Detail C
18"
Panels 1/4" thick
or less
1/8"
5/16"
Allow 48" minimum water
24" line to enable refrigerator
to be pulled forward
Recommended
water line
location using recess
in rear wall
Recommended single loop
of 1/4" copper water line
Recommended
single loop
Allow 48" minimum
water
of 1/4" copper
24" water line
line to enable refrigerator
to be pulled forward
Water hook-up
on the refrigerator
Allow 48" minimum water
line to enable refrigerator 24" 18"
to be pulled water
forward
Recommended
line
location using recess
in rear wall
Rear Wall
18" View
1/4" Max.
Water hook-up
on the refrigerator
Rear Wall View
18"
Recommended water line
location using recess
in rear wall
Recommended water line
location using recess
in rear wall
Rear Wall View
Rear Wall View
(Fresh Food panel shown)
Notch required at top
corner as noted.
For answers to your Monogram,® GE Profile™ or
GE® appliance questions, visit our website at
ge.com or call GE Answer Center® service,
800.626.2000.
In.of water & Electric Ot. Art
R
Listed by
Underwriters
Laboratories
Specification Revised 7/05
In.of water & Electric Ot. Art
Dr. Panel Dim. Panel 1/4 Thick
R
210273
PSI23NCR
GE Profile CustomStyle™ 22.6 Cu. Ft. Side-By-Side Refrigerator
Features and Benefits
• CustomStyleTM Configuration - Offers a built-in look without the built-in expense
• CustomCoolTM Technology With Full Extension Slides - Chills in minutes thaws in hours and keeps
foods fresher, longer
• ClimateKeeperTM System - Best Temperature Management System You Can Buy!
• Upfront, Electronic Touch Temperature Controls with Digital Temperature Display Precise and easy to use, taking the guesswork out of setting accurate temperatures
• Slide ‘n StoreTM Full-Extension Freezer Baskets - Extends 12" to 16" beyond the cabinet, providing
easy loading and unloading
• FrostGuardTM Technology - Protects frozen items from freezer burn by monitoring door openings and
defrosting only when needed
• Integrated Shelf Support System - Provides strong, yet flexible support
• Adjustable Slide-Out, Spillproof Glass Shelves - Shelves slide out, spills stay put
• TurboCoolTM Setting - “Revs up” the refrigerator, cooling it quickly after frequent door openings
• In-the-Door Beverage Rack - Conveniently located inside the refrigerator door to increase flexibility
and to free up valuable shelf space
• ClearLookTM Adjustable Gallon Door Bin - Store gallon containers with ease
• Model PSI23NCRWV - White on white
• Model PSI23NCRBV - Black on black
PSI23NCP
Specification Revised 7/05
210273