1
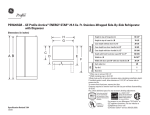
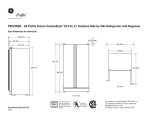
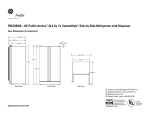
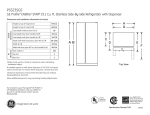
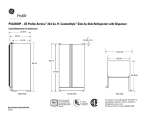
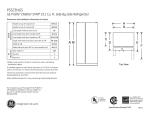
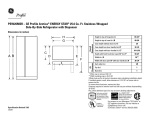
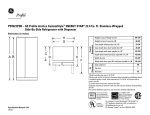
TM
PSW26SGP – GE Profile Arctica™ 25.5 Cu. Ft. Side-By-Side Refrigerator with Dispenser
Dimensions (in inches)
H
G
Height to top of hinge (in.) A
69-1/4
Height to top of case (in.) B
70-1/2
Case depth without door (in.) C
28-1/2
Overall
Dimensions
†
C
AB
D
E
Air
Clearances
F
Top View
Case depth less door handle (in.) D†
32-3/4
Case depth with door handle (in.) E
35-3/16
Depth with fresh food doors open 90° (in.) F†
50-9/16
Width (in.) G
35-7/8*
Width with door open 90° less door handle (in.) H
36-3/16
†
Each side (in.)
Top (in.)
1
Back (in.)
1
*Width including top caps is 36-3/16".
†Water hook-up fits in back air clearance when calculating installation depth.
If installed against a wall, allow clearance of 14-3/16" on freezer side to
remove ice bin.
To remove fresh food pans, remove door bins.
Clearance required to remove fresh food full-size pan without disassembling:
18-15/16".
Plus, allow additional space for any necessary leveling adjustments.
Total volume and shelf
area are calculated by
the Association of Home
Appliance Manufacturers’
standards.
R
Specification Created 2/03
1/8
R
Listed by
Underwriters
Laboratories
As an ENERGY STAR® Partner,
GE has determined that this product
meets the ENERGY STAR®
guidelines for energy efficiency.
For answers to your Monogram,® GE Profile™ or
GE appliance questions, visit our website at
GEAppliances.com or call
GE Answer Center® service, 800.626.2000.
TM
PSW26SGP – GE Profile Arctica™ 25.5 Cu. Ft. Side-By-Side Refrigerator with Dispenser
To Remove Top Cap and Doors on PSW26SGP
1.
Step 1: Locate and remove two Phillips head screws on the top of
the refrigerator. Remove two screws, one on each side at
the rear of the top cap. Lift off and remove top cap.
Step 2: Open both doors. Remove one screw on each side of the
toekick. Pull forward to remove toekick.
Step 3: On the freezer door, disconnect water line coupler by pushing
against the collar on the left side. Disconnect wire harness.
Step 4: Use a Torx T-20 screwdriver to remove 2 screws holding
the top hinge. Carefully remove hinge while supporting
door. Lift door up and off bottom hinge. Remove fresh food
door in the same manner. Note: Do not remove bottom
hinges! Door alignment will be difficult if bottom hinges
»are removed.
Hinge Screws
Step 5: Place refrigerator onto a hand truck, upright and against
one side. Move refrigerator to the installation location.
4.
Reinstall Doors, Top Cap
Step 6: Carefully lower doors onto bottom hinges. Be sure to route
the tubing and electrical connector through the bottom
hinge. Reinstall top hinges.
Step 7: Place cap over the top of the refrigerator. Reinstall the
original screws in the top and back of the cap.
3.
Step 8: Reconnect the wiring harness and waterline.
2.
Total volume and shelf
area are calculated by
the Association of Home
Appliance Manufacturers’
standards.
Toekick Screw
Wire Harness
Water Line Coupler
Specification Created 2/03
R
R
Listed by
Underwriters
Laboratories
As an ENERGY STAR® Partner,
GE has determined that this product
meets the ENERGY STAR®
guidelines for energy efficiency.
For answers to your Monogram,® GE Profile™ or
GE appliance questions, visit our website at
GEAppliances.com or call
GE Answer Center® service, 800.626.2000.
TM
PSW26SGP – GE Profile Arctica™ 25.5 Cu. Ft. Side-By-Side Refrigerator with Dispenser
Features and Benefits
• Stainless-Wrapped – Provides stainless steel doors, side panels and top for a truly
dramatic look.
• CustomCool™ Technology With Full Extension Slides – Chills in minutes, thaws in hours and
keeps foods fresher, longer.
• ClimateKeeper™ Temperature Management System – Best temperature management system
you can buy!
WATER
LOCK CONTROL
CRUSHED
DOOR ALARM
CUBED
LIGHT
QUICK ICE
RESET WATER FILTER
• Upfront Electronic Digital Display – Clearly displays exact temperatures for the fresh food
and freezer compartments.
• Integrated Ice™ System – Frees up valuable freezer space. It tilts down, providing easy
access to bulk ice.
• Contoured Exterior – Create a high-fashion look with gently rounded doors and edges.
• In-the-Door Beverage Rack – Conveniently located to increase flexibility and free up
valuable shelf space.
• Model PSW26SGPSS – Stainless steel
Specification Created 2/03