1
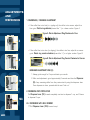
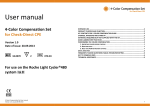
MOKA
GRINDER
USE & MAINTENANCE:
1
1
2
2
6
3
3
7
4
8
9
5
10
12
11
1.
2.
3.
4.
18
H opper Lid
Bean H opper
Adjustm ent Icon
Locking Pin
13
5.
6.
7.
Adjustm ent Guide
D ispenser Lid
D ispenser
Adjustm ent Knob
11
14
8. D ispenser
9. D ispensing Star
10. Tam per
11. Porta-Filter Guide
13
12. D ispenser Lever
13. On-Off Sw itch
14. ????
MOKA
GRINDER
(CONT.)
TO ACHIEVE A PERFECT GRIND FROM YOUR MACHINE, SEVERAL “TRIAL RUNS” MAY
BE NECESSARY.
For a truly “Italian Style” espresso or cappuccino: Once the proper setting on the grinder
has been determ ined, it should take a PASQ U IN I LIVIA 15 - 18 seconds to dispense a
1 1/ 2-2oz. cup of “Italian Style” espresso. It should appear to have the flow consistency of
syrup as it pours into the cup. Adjust the grinder, courser or finer until you achieve the
desired result.
START - UP
“TRIAL RUN”
2
1. Load beans into Bean Hopper (2).
4
3
D o not exceed 2 - 3 day supply.
2. Turn grinder On. Grind enough coffee to fill a double-cup porta-filter.
U sing m easuring spoon (“B” see page 5) supplied w ith m achine, use 2 spoonfuls.
Test by m aking espresso coffee. Watch for the flow consistency.
(See “adjustm ents”, page 20).
3. Set the desired degree of coarseness / fineness of ground coffee by pushing dow n on
the Locking Pin (4) to free the Adjustment Ring (3). Turn clockw ise (tow ard the “-”) for
finer grind, and counter-clockw ise ( tow ard the “+”) for coarser grind. Turn tow ards
desired setting and release the Locking Pin (4), allow ing adjustm ent ring to m ove into
the next notch. This w ill lock it into the desired setting.
NOTE: The higher num bers represent a courser grind. The low er num bers represents a
finer grind.
19
ADJUSTMENTS
AND
DISPENSING
1. COARSENESS / FINENESS ADJUSTMENT
•
If the coffee flow is too fast (i. e. rippling out), the coffee is too coarse; adjust for a
finer grind. Rotate ring clockwise (tow ard the “-”) or a low er num ber. Figure A.
Figure A: Rotate Adjustment Ring Clockwise for Finer
3
•
8
If the coffee flow is too slow (i. e. dripping), the coffee is too fine; adjust for a coarser
grind. Rotate ring counter-clockwise (tow ard the “+”) or a higher num ber. Figure B.
Figure B: Rotate Adjustment Ring Counter-Clockwise for Coarser
NOTES ABOUT ADJUSTMENT RING (3):
1. Alw ays grind enough for 2 cups and taste your results.
12
12A
2. After each adjustm ent, grind approxim ately 2 seconds and clear the Dispenser
(8) of any rem aining coffee from the previous test by using the dispenser lever.
Once dispenser is clean, proceed w ith the next “trial run”.
2. DISPENSING INTO PORTA-FILTER
Pull Dispenser Lever (12) forw ard com pletely one tim e to dispense 1 cup, and 2 tim es
to dispense 2 cups.
2A. DISPENSING WITH SELF GRINDER
???Pull Dispenser Lever (12A) forw ard com pl
20
ADJUSTMENTS
3. AMOUNT OF GROUND COFFEE TO BE DISPENSED
(CONT.)
7
Adjust the am ount of ground coffee that is dispensed into the porta-filter by rotating the
Dispenser Adjustment Knob (7) inside the dispensing cham ber:
• Clockwise to Decrease the am ount dispensed,
and
• Counter-clockwise to Increase the am ount dispensed.
The Dispensing Star (9) should be com pletely covered to a level of approxim ately 1”
above the star as m easured from the side of the cham ber.
9
Note: This adjustm ent should be necessary only one tim e.
4. DISPENSING
W hen dispensing, the proper am ount in the porta-filter after tam ping should leave
approxim ately 1/ 4” of rim visible. Too m uch ground coffee in the porta-filter w ill prevent
it from engaging into the group head of the espresso m achine.
Note: 1. D o not dispense a single-cup dose in a double-cup porta-filter.
2. Be sure to pack coffee w ith tam per before installing in m achine.
5. MORE TIPS
1. Other factors w hich m ay necessitate an adjustm ent are the degree of hum idity in the
air and the type of coffee used. Som e coffees have m ore oil content than others. Your
flow results and your taste buds should tell you w hen an adjustm ent is appropriate.
2. N ever put ground coffee into the bean hopper.
The m anufacturer reserves the right to m odify the appliances presented in this publication
w ithout notice.
21