1
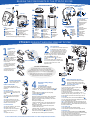
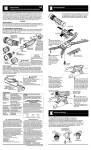
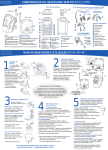
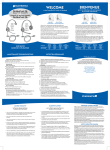
CORDLESS HEADSET
TELEPHONE
CT11/12
WELCOME
Thank you for selecting the Cordless Headset Telephone
from Plantronics. You have made the right choice for
comfort and versatility.
This is a 2.4 GHz DSS cordless telephone system with Caller ID.
It offers hands-free convenience and long-range workspace
mobility.
CT11
This side of the guide has the Important Safety Instructions,
please read them first before setting up your system. The
other side of this guide will identify the supplied components
and has five steps to get you quickly set up and using your
system.
The Product Information Booklet, which includes Phonebook
operation, Caller ID and other technical features, details of the
customizing features and troubleshooting is available at our
website.
CT12
IMPORTANT SAFETY
INSTRUCTION
www.plantronics.com/documentation/
Choose your preferred language and your model to get
complete access to user guide documentation.
QUICK START USER GUIDE
When using your telephone equipment, these
basic safety precautions should be followed to reduce
the risk of fire, electric shock, and injury to persons.
1. Read and understand all instructions.
2. Follow all warnings and instructions marked on the product.
The symbol
identifies and alerts the user to the presence
of important operating and service instructions.
3. Unplug this product from the wall outlet before cleaning.
Do not use liquid cleaners or aerosol cleaners. Use a
damp cloth for cleaning.
4. Do not locate this product near water, for example,
near a bathtub, kitchen sink, or laundry tub, in a wet
basement or near a swimming pool.
5. This product should never be placed near or over a
radiator or heat register. It should not be placed in a
built-in installation unless proper ventilation is provided.
6. This product should be operated only from the type of
power source indicated on the marking label. If you are
not sure of the type of power supply to your home,
consult your dealer or local power company.
7. Do not allow anything to rest on the power cord. Do
not locate this product where persons walking on it will
damage the cord.
BATTERY PRECAUTIONS
Printed in USA. 64004-01 (9-04)
FCC Requirements—Part 15
This device complies with Part 15 of the FCC Rules. Operation is subject to the
following two conditions:
1. This device may not cause harmful interference, and
2. This device must accept any interference received, including interference that
may cause undesired operation.
This equipment has been tested and found to comply with the limits for a Class B
digital device, pursuant to Part 15 of the FCC Rules. These limits are designed to
provide reasonable protection against harmful interference in a residential
installation. This equipment generates, uses, and can radiate radio frequency
energy and, if not installed and used in accordance with the instructions, may
cause harmful interference to radio communications.
However, there is no guarantee that interference will not occur in a particular
installation. If this equipment does cause harmful interference to radio or television
reception which can be determined by turning the radio or television off and on,
the user is encouraged to try to correct interference by one or more of the following
measures:
1. Reorient or relocate the receiving antenna.
2. Increase the separation between the equipment and receiver.
3. Connect the equipment into an outlet on another circuit.
4. Consult the dealer or an experienced radio/TV technician for help.
The FCC Want You To Know
Changes or modifications to this product not expressly approved by Plantronics, or
operation of this product in any way other than as detailed by the owner’s manual,
could void your authority to operate this product.
FCC Requirements—Part 68
This equipment complies with Part 68 of the FCC Rules. The FCC Part 68 Label is
located on the bottom of the unit. This label contains the FCC Registration Number
and Ringer Equivalence Number (REN) for this equipment. If requested this
information must be provided to your telephone company.
The REN is useful to determine the quantity of devices you may connect to your
telephone line and still have all of those devices ring when your telephone number is
called. In most, but not all areas, the sum of the RENs of all devices connected to
one line should not exceed five (5.0). To be certain of the number of devices you
may connect to your line, as determined by the REN, you should contact your local
3.
4.
5.
6.
345 Encinal Street
Santa Cruz, California 95060
(800) 544-4660
FCC REGISTRATION INFORMATION
1.
2.
To reduce the risk of fire or injury to persons,
read and follow these instructions.
Use only the battery pack supplied with this product.
Do not dispose of battery pack in a fire. The cells may
explode. Check with local codes for possible disposal
instructions.
Do not open or mutilate battery pack. Released electrolyte
is corrosive and may cause damage to eyes or skin and
may be toxic if swallowed.
Exercise care in handling the battery pack in order not to
short the battery contacts with conducting materials such
as rings, bracelets, and keys. The battery or conductor
may overheat and cause burns.
Charge the battery pack in accordance with instructions
supplied with this unit.
Observe proper orientation between battery pack and
charger contacts.
www.plantronics.com
8. Do not overload outlets and extension cords as this can
result in risk of fire or electric shock.
9. Never push objects of any kind into this product as they
may touch dangerous voltage points or short out parts
that could result in a risk of fire or electric shock. Never
spill liquid of any kind on the product.
10. To reduce the risk of electric shock, do not disassemble.
11. Use caution when installing or modifying telephone lines.
12. This product is intended to be supplied by a Listed Class 2
Direct Plug-In Power Unit rated 9VDC 350mA. Plantronics
Part No. 63539-01, rated at an input voltage of 120 VAC,
60Hz and 6 W.
13. This product requires AC power in order to operate. In
order to have phone service during a power outage, have
another telephone available that is powered only by the
telephone line.
14. Keep all product cords and cables away from operating
machinery.
15. Avoid using a telephone (other than a cordless type)
during an electrical storm. There may be a remote risk
of electric shock from lightning.
16. Do not use the telephone to report a gas leak in the vicinity
of the leak.
© 2003 Plantronics, Inc. All rights reserved. Plantronics, the logo design,
Plantronics and the logo design combined, FlexGrip, and Firefly are trademarks
or registered trademarks of Plantronics, Inc.
CONTINUED
Patents U.S. 5,210,791; 6,449,374; D394,437; D403,327; D475,694 and D480,072;
China ZL 02331856.2; European Community 43393-0001; Finland 20183; 20184 and
23426; France 680 853 - 680 872; Germany M 98 02 622.4 and 40205487.3; GB
Regd.Des.No. 2,073,246; 2,073,247 and 3,004,998; Korea 323662; Spain 154568;
Sweden 64 176 and 64 177; Taiwan 085270; 085271 and 085272; Patents Pending
SAFETY INSTRUCTIONS
SAVE THESE
INSTRUCTIONS
telephone company to determine the maximum REN for your calling area.
Connection to the telephone network should be made by using standard modular
telephone jacks, type RJ11. The plug and/or jacks used must comply with FCC Part 68
rules. If this telephone equipment causes harm to the telephone network, the telephone
company will notify you in advance that temporary discontinuance of service may be
required. But if advance notice isn't practical, the telephone company will notify the
customer as soon as possible. Also, you will be advised of your right to file a complaint
with the FCC if you believe it is necessary.
The telephone company may make changes in it's facilities, equipment, operations or
procedures that could affect the proper functioning of your equipment If they do, you
will be notified in advance in order for you to make necessary modifications to maintain
uninterrupted service.
NOTE: If your home has specially wired alarm equipment connected to the telephone
line, be sure that installing the system does not disable your alarm equipment. If you
have questions about what will disable your alarm equipment, contact your telephone
company or a qualified installer.
INDUSTRY C ANADA NOTICE
LIMITED WARRANTY
for Plantronics Commercial Products
Purchased in the US and Canada
•
•
•
•
•
TERMINAL EQUIPMENT
NOTICE: This equipment meets the applicable Industry Canada Terminal
Equipment Technical Specifications. This is confirmed by the registration number.
The abbreviation, IC, before the registration number signifies that registration was
performed based on a Declaration of Conformity indicating that Industry Canada
technical specifications were met. It does not imply that Industry Canada approved
the equipment.
NOTICE: The Ringer Equivalence Number (REN) for this terminal equipment is
marked on the equipment itself. The REN assigned to each terminal equipment
provides an indication of the maximum number of terminals allowed to be connected
to a telephone interface. The termination on an interface may consist of any
combination of devices subject only to the requirement that the sum of the Ringer
Equivalence Numbers of all the devices does not exceed five.
RADIO EQUIPMENT
The term “IC:” before the radio certification number only signifies that Industry
Canada technical specifications were met.
Operation is subject to the following two conditions: (1) this device may not cause
interference, and (2) this device must accept any interference, including interference
that may cause undesired operation of the device. “Privacy of communications may not
be ensured when using this telephone”.
•
•
This warranty covers defects in materials and workmanship of Commercial
Products manufactured, sold or certified by Plantronics which were
purchased and used in the United States and Canada.
This warranty lasts for one year from the date of purchase of the Products.
This warranty extends to you only if you are the end user with the original
purchase receipt.
We will, at our option, repair or replace the Products that do not conform to
the warranty. We may use functionally equivalent reconditioned/refurbished/
remanufactured/pre-owned or new Products or parts.
To obtain service in the U.S. contact Plantronics at (800) 544-4660 and in
Canada call (800) 540-8363. If you need additional information, please
contact our service centers at the numbers provided.
THIS IS PLANTRONICS’ COMPLETE WARRANTY FOR THE PRODUCTS.
This warranty gives you specific legal rights, and you may also have other
rights which vary from state to state or province to province. Please contact
your dealer or our service center for the full details of our limited warranty,
including items not covered by this limited warranty.
The Plantronics Technical Assistance Center (TAC) is
ready to assist you! Dial (800) 544-4660 x5538 Sunday
5p.m. through Friday, 5p.m. Pacific Time or visit the
Support section of our website at www.plantronics.com.
For accessibility information also call the Technical
Assistance Center.
EXAMINE THE COMPONENTS OF THE CT11/12 SYSTEM
TELEPHONE REMOTE
BASE
CT12 CONVERTIBLE HEADSET
with Firefly
TM
26
Top View
Front View
Over-the-Ear
Configuration
Over-the-Head
Configuration
6
31
1
32
38
30
Back View
Front View
39
Back View
42
40
7
41
22
8
CONVERTIBLE HEADSET
33
4
2
34
15
9
16
10
11
5
32 Adjustable Headband
18
12
36
34 Clothing Clip
20
CT11 HEADSET
21
TELEPHONE REMOTE
1 Base Antenna/ Headset
Holder
2 CHARGE/IN USE Indicator
Headset Jack
7
MESSAGE WAITING Indicator*
8
3 PAGE key
14
6
9
10
5 Telephone Line Jack
Caller ID* and Display
TALK/FLASH Key
(phonebook)/ (left
cursor)/ SPEED (Speed Dial) Key
*Must be activated through your local phone company.
33 Microphone Boom
37
19
13
4 DC Power Input
31 Ear Cushion Assembly
35
17
3
BASE
30 Headset Assembly
35 Cord
36 2.5 mm Plug
In-the-Ear Headset
Also supplied:
11 ▼ DOWN Key
17 MENU/MUTE Key
12 ▲ UP Key
18 SELECT/CH
13
* TONE Key
14
Remote Charging
Contacts
(channel) Key
19 DELETE Key
20 PAUSE/REDIAL Key
15 END Key
21 # Key
16 CID (Caller ID)*/
22 Remote Battery
(right cursor) Key
23 AC Adapter
(not shown)
37 Firefly In-use Indicator
27 Headset
27
38 Cord Retainers
Speaker
28
28 FlexGrip
24 Battery Pack
®
Earloop
(not shown)
29 Adjustable
25 Telephone Cord
29
(not shown)
26 Belt Clip
Microphone
Boom
39 Earloop, Flexible
40 Thumb Loop
41 Pin for Pivot Ball
Ring Hole
42 Pivot Ball Ring
Compartment Cover
CT11/12 CORDLESS TELEPHONE HEADSET SYSTEM
Install Battery
Pack
1
Black
Red
White
1.1 Squeeze open
the latch on the
Remote Battery
Compartment
Cover 22 and lift the cover.
1.1
BLACK
noir
RED
rouge
WHITE
blanc
1.2 Connect the Battery Pack
24 connector using the
correct polarity. Do not force.
Plastic connectors will fit in
only one way.
1.3 Insert battery pack into
the battery compartment.
Do not let wires hang out,
tuck them in.
1.2
2
3
2.1 Connect the AC adapter power cord
to the base and an active AC outlet.
2.2 Route the power cord as shown in
the detail drawing allowing clearance
for the telephone plug to be inserted.
2.3 Insert the remote into the charging cradle on
the base. Charge for 15 hours. The CHARGE/ IN
USE indicator 2 light will go on.
2.4 Raise Base Antenna 1 to a vertical
position.
2.5 Once the remote is fully charged, plug
one end of the telephone cord into the base
and plug the other end into an active
telephone outlet.
LOCATION CONSIDERATIONS
1. Locate the system in a central part of your
working area near a phone and a power outlet.
2. Do not locate it near a computer, microwave, or other
electronic devices such as TV’s and other cordless devices.
3. Do not locate it near heat sources, noise sources,
excessive moist environments, dusty environments,
and mechanical vibration environments.
1
1.4 Insert tabs of cover into
slots and push down to
securely close the cover.
1.3
1.4
3
2
24
Set Up the Base
Install CT11 Headset
Mount headset and point
3.1
boom toward mouth.
27
28
Install CT12 Headset
29
Your Convertible Headset can be
configured for over-the-ear or over-thehead use.
For over-the-ear use
3.1 Press the headset to your ear, then
loop the Earloop 39 behind the ear as
shown.
3.2
3.2 Adjust the tip of the Microphone
Boom 33 toward the corner of your
mouth.
3.3 Plug the headset cord into the
2.5mm jack on the top of the remote.
3.4
3.3
3.4 Route the cord through the
handset’s cord retainer slot.
Or over-the-head use
CT11 and CT12
3.5 Place the headset on your head so
the speaker covers your ear.
3.6 Adjust the tip of the microphone
boom toward the corner of your
mouth.
3.5
3.7 Repeat 3.3 and 3.4
4
Make Basic Setting Changes,
if necessary
4.1 Language option
The default language is English.
To change to French or Spanish:
1. When in Standby mode**, press the MENU/MUTE 17 key.
2. Press the ▲ or ▼ key to move the pointer to language of
choice.
3. Press the SELECT/CH 18 key to select language.
4. Press the END 15 key to exit.
4.2 Dialing mode option
Most phone systems use tone dialing, which sends DTMF
tones through the phone lines. However some phone
systems in rural areas still use pulse dialing. The default
setting is tone dialing.
To change the dialing mode:
1. When in Standby mode**, press the Menu/Mute key.
2. Press the ▲ or ▼ key to move the pointer from Tone
Dialing to Pulse Dialing.
3. Press the Select/Ch key to select the dialing mode.
4. Press the End key to exit.
**Standby mode –The remote is not in use, it is off the
base, and the TALK/FLASH 9 key has not been pressed.
A dial tone is not heard and the display is blank.
This standby mode is starting point for most activity.
3.6
For more technical features, see the Product Information Booklet at our website www.plantroncs/documentation/
5
Make and Receive Test Calls
With your headset mounted from Step 3
and any required setting changes made
from Step 4, prepare to make your first call.
5.1 To make your first call
1. Remove remote from its base.
2. In the standby mode, dial the number as you
would on an ordinary phone.
3. Push the Talk/Flash key. After about two
seconds you will hear the number being dialed.
5.1
4. Talk once you connect.
5. Adjust the listen volume to Low, Medium, High, or
Maximum for your hearing comfort using the ▲ or ▼ keys.
6. Press the End key to disconnect and hang up the call.
5.2 To redial
1. In the standby mode, press the PAUSE/REDIAL key 20
once. The last number dialed will be displayed on the screen.
2. Press the Talk/Flash key to dial it.
Tips: 1) If the Talk/Flash key was pushed first and then you
pushed the Pause/Redial key, the last number dialed will be
immediately redialed. 2) The Pause/Redial key will store your
last three numbers dialed.
5.3 To answer a call
1. Press the Talk/Flash key and begin talking.
2. Press the End key to disconnect and hang up the call.
5.4 To mute a call
1. Press and hold the Menu/Mute key for 3 full seconds.
You will hear an activating beep and see Mute on the display.
2. Press the mute button to toggle off mute.
3. Press the End key or put the remote back into the base
charging cradle to disconnect and end the call.