1
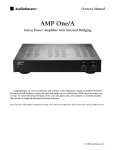
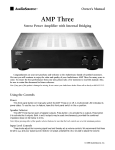
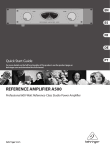
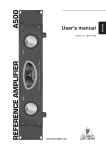
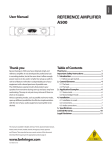
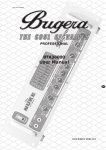
Owner’s Manual
AMP One
Stereo Power Amplifier with Internal Bridging
Congratulations on your purchase. We trust that you will enjoy the
value and quality of your AudioSource AMP One for many years to come.
To ensure that you get the best performance from this unit, please take
a few moments to read this manual. Also, be sure to retain this document
for reference.
Note: If any part of this product is damaged or missing, do not contact your AudioSource
dealer. Please call us directly at 800-435-7115.
© 1999 AudioSource, Inc.
INPUT
LINE IN
SPKR A
CD IN
MODEL AMP ONE
BRIDGING
LEFT
3
RIGHT
2
(–)
BRIDGING
OFF
(STEREO)
F
ON
(MONO)
1
(+)
USE
SPKR B
RIGHT
+
-
-
+
FUSE 4A
LEFT
Using the Controls (Front Panel)
Power
This front panel button switches the AMP One on or off. A multicolored LED indicates its power status.
Speaker Selector
The AMP One has two pairs of speaker outputs. Press button A to activate the A outputs. Press button B to activate the
B outputs. Both A and B outputs may be used simultaneously, provided the combined impedance does not fall below 2 ohms.
Note: Before pressing either of the speaker selector buttons, be sure the AMP One's level controls are set at the minimum position.
Phones
You can connect headphones to the AMP One using a standard 1⁄4 " stereo phone jack. To deactivate the speakers
while you listen through headphones, simply turn off the A and B speaker selector buttons.
Meter X0.1
This switch increases the sensitivity of the meters by a factor of ten, which is useful for monitoring the AMP One's
output at low volume. In other words, the meters will display ten times the actual power output when this feature is
active. A red LED in this switch indicates activation.
Peak Limiter
The peak limiter modulates high frequencies at high volume, protecting your speakers from damage or distortion. A
red LED also indicates activation of this feature.
Power Meters
These meters indicate the output level of your AMP One. When the AMP One is powered up, the meters will be
softly lit, indicating standby mode. Once the unit's power supply is stabilized, its meters will brighten completely.
Input Level Controls
These knobs adjust the incoming signal level and thereby act as volume controls. We recommend that these be set to
max and your signal source (receiver, CD player, preamplifier, etc.) be used to adjust the volume.
Hooking up the Wires (Back Panel)
Audio signals travel out of one component and into another. All of your connections should also go from out to in.
Input Jacks
1
Connect the line out jacks from your signal source (receiver, CD player, preamplifier, etc.) to the input jacks on the
AMP One.
Note: "Line In" and "CD In" jacks cannot be used simultaneously.
Bridging Switch (refer to wiring diagram)
2
In addition to providing 80 watts RMS per channel in the stereo mode, your AMP One can be used as a high power
mono amplifier, providing over 200 watts RMS. This can be accomplished by sliding the bridging switch from the stereo
position to the mono position. For mono applications, use only the right channel input. Similarly, use only the right
channel input level control.
Note: Be sure to observe the correct speaker connections for bridged applications. Because of the high power output in this
mode, we recommend initially setting the right level control at "min", and then adjusting the volume to the desired level.
Speaker Terminals
3
More than one pair of speakers can be used with the AMP One. We have provided two pairs of speaker outputs,
labeled Spkr A (left & right), and Spkr B (left & right). The speaker terminals are color coded. Red posts indicate positive (+) terminals and black posts indicate negative (–) terminals. Be sure to connect the positive output terminals of
your AMP One to the positive input terminals of your speakers and the negative output terminals of your AMP One to
the negative input terminals of your speakers.
Note: Refer to the wiring diagrams on the next page for proper connection of speaker cables.
INPUT
LINE IN
SPKR A
CD IN
MODEL AMP ONE
BRIDGING
LEFT
In this configuration, the
bridging switch is off for stereo
operation. Connect the line out
jacks from a stereo preamplifier
to the line in jacks of your
AMP One. Next, connect your
speakers to the terminals marked
Spkr A (observing proper polarity: red
for "+", and black for "-"). Connect a second
pair of speakers to the terminals marked Spkr B.
Select between the A and/or B speakers using the
front panel speaker selector buttons.
(+)
ON
(MONO)
OFF
(STEREO)
USE
SPKR B
RIGHT
RIGHT
-
+
-
Right Speaker
+
Mono Setup
(–)
BRIDGING
F
Stereo Setup
+
FUSE 4A
LEFT
Left Speaker
-
-
+
INPUT
In this configuration, the
bridging switch is on. Connect
the line out from a preamplifier
to the right line in of your
AMP One. Connect your
mono speaker to the terminals
of your AMP One, following the
example in the diagram opposite.
Use the right level control on the
front panel to adjust the volume.
LINE IN
SPKR A
CD IN
MODEL AMP ONE
BRIDGING
LEFT
(+)
OFF
(STEREO)
F
ON
(MONO)
RIGHT
(–)
BRIDGING
USE
SPKR B
RIGHT
+
-
-
+
FUSE 4A
LEFT
Mono Speaker
+
-
AMP One Specifications
Amplifier Power Output . . . . . . . . .80 watts per channel
200 watts monobridged
Total Harmonic Distortion . . . . . . . . . . . . . . . . . .<0.04%
Intermodulation Distortion . . . . . . . . . . . . . . . . . <0.04%
Frequency Response . . . . . . . . .20 Hz to 20 kHz, ±0.5 dB
Signal to Noise Ratio . . . . . . . . . . . . . . . . . . . . . .110 dB
Input Sensitivity . . . . . . . . . . . . .0.8 V (line), 1.3 V (CD)
Input Impedance . . . . . . . . . .30K Ω (line), 50K Ω (CD)
Headroom . . . . . . . . . . . . . . . . . . . . . . . . . . . . . . . . .2dB
Functions . . . . . . . . Peak Limiting Circuitry (defeatable)
Mono Bridging (rear panel)
Inputs . . . . . . . . . . . . . . . . . . . . . . . .Line (RCA, CD) In
Outputs . . .Line Out/Thru (RCA), Speaker A (left, right),
Speaker B (left, right), Headphone (1⁄4" stereo jack)
Dimensions . . . . . . . . . . . . .16 1⁄2"W x 2 3⁄8"H x 11 5⁄8"D
Weight . . . . . . . . . . . . . . . . . . . . . . . . . . . . . 14lbs., 5oz.
Design and specifications are subject to change without notice.
Enjoy your purchase. This manual provides detailed diagrams and instructions for setting up your
equipment. Our commitment to your satisfaction doesn't end there. We also offer friendly, toll-free assistance.
1-800-HELP-115
You may also fax us at 650-348-8083.
Safety Instructions
CAUTION:
RISK OF ELECTRIC SHOCK.
DO NOT OPEN.
Warning: To reduce the risk of fire or electric shock, do not expose this appliance to rain or moisture.
Caution: To reduce the risk of electric shock, do not remove cover (or back); no user serviceable parts inside. Refer servicing to
qualified service personnel.
Caution: To prevent electric shock, match wide blade of plug to wide slot, fully insert.
Attention: Pour eviter les chocs electriques, introduire la lame la plus large de la fiche dans la borne correspondante de la prise et
pousser jusqu'au fond.
The lightning flash with arrowhead symbol, within an equilateral triangle, is intended to alert the user to the presence of uninsulated dangerous
voltage within the product's enclosure that may be of sufficient magnitude to constitute a risk of electrical shock to persons. The exclamation point
within an equilateral triangle is intended to alert the user to the presence of important operating and maintenance (servicing) instructions in the
literature accompanying the appliance.
Read Instructions
Power Cord Protection
All the safety and operating instructions should be read before
the appliance is operated.
The safety and operating instructions should be adhered to.
Power supply cords should be routed so that they are not likely
to be walked on or pinched by items placed on or against them,
paying particular attention to cords at plugs, convenience receptacles, and the point where they exit from the appliance.
Heed Warnings
Cleaning
All warnings on the appliance and in the operating instructions
should be adhered to.
The appliance should be cleaned only as recommended by the
manufacturer.
Follow Instructions
Power Lines
All operating and use instructions should be followed.
An outdoor antenna should be located away from power lines.
Water and Moisture
Non-Use Periods
The appliance should not be used near water. For example, near a
bathtub, washbowl, kitchen sink, laundry tub, in a wet basement,
or near a swimming pool, etc.
The power cord of the appliance should be unplugged from the
outlet when left unused for a long period of time.
Ventilation
Care should be taken so that objects do not fall and liquids are
not spilled into the enclosure through openings.
Retain Instructions
The appliance should be situated so that its location or position
does not interfere with its proper ventilation. For example, the
appliance should not be situated on a bed, sofa, rug, or similar
surface that may block the ventilation openings; or, placed in a
built-in situation, such as a bookcase or cabinet that may impede
the flow of air through the ventilation openings.
Heat
The appliance should be situated away from heat sources such as
radiators, heat registers, stoves, or other appliances (including
amplifiers) that produce heat.
Power Sources
The appliance should be connected to a power supply only of
the type described in the operating instructions or as marked on
the appliance.
Grounding or Polarization
Precautions should be taken so that the grounding or polarization means of an appliance is not defeated.
1327 North Carolan Avenue
Burlingame, CA 94010
Tel. 650.348.8114
Fax 650.348.8083
[email protected]
www.audiosource.net
Object and Liquid Entry
Damage Requiring Service
The appliance should be serviced by qualified service personnel
when: a) The power supply cord or the plug has been damaged;
b) Objects have fallen, or liquid has been spilled into the appliance; c) The appliance has been exposed to rain; d) The appliance does not appear to operate normally or exhibits a marked
change in performance; or e) The appliance has been dropped,
or the enclosure damaged.
Servicing
The user should not attempt to service the appliance beyond that
described in the operating instructions. All other servicing
should be referred to qualified service personnel.
Product Servicing
In the event that your AMP One fails to operated properly, please
contact the dealer where you purchased the unit. Or you may
contact AudioSource directly for further assistance.
Printed in Taiwan