1
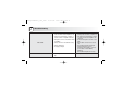
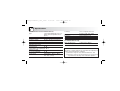
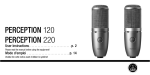
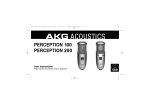
PerceptionManual_intl_final
07/11/05
11:27 Uhr
PERCEPTION 100
PERCEPTION 200
User Instructions
Please read the manual before using the equipment!
Seite 1
PerceptionManual_intl_final
07/11/05
1 Precaution/Unpacking
1.1 Precaution
Please make sure that the
piece of equipment your microphone
will be connected to fulfills the safety
regulations in force in your country
and is fitted with a ground lead.
1.2 Unpacking
Check that the packaging contains all of
the items listed for your microphone.
Should any item be missing, please contact your AKG dealer.
PERCEPTION 100: • Microphone
• Stand adapter
• Mini poster
PERCEPTION 200: •
•
•
•
2
Microphone
Spider suspension
Carrying case
Mini poster
11:27 Uhr
Seite 2
2 Description
2.1 Introduction
Thank you for purchasing an
AKG product. This Manual contains
important instructions for setting up and
operating your equipment. Please take a
few minutes to read the instructions
below carefully before operating the
equipment and keep the Manual for
future reference. Have fun and impress
your audience!
The PERCEPTION 100 and PERCEPTION
200 are heavy-duty, rugged true condenser microphones built to the same
strict quality standards as all other AKG
products.
Designed on the basis of AKG’s decades
of know-how and feedback from sound
engineers around the world using AKG
studio microphones every day, these
general-purpose 1-inch large-diaphragm
microphones bring AKG studio quality to
the worlds of recording, live sound, and
broadcasting.
2.2 Common Features
The PERCEPTION 100 and 200 share the
following features:
• Cardioid polar pattern: The microphone is most sensitive to sounds
arriving from in front of it while picking up much less of sounds arriving
from the sides or rear (from monitor
speakers or neighboring instruments). This makes the microphone
equally suited for recording and
onstage use.
• Gold-sputtered diaphragm: The
diaphragm is made of a plastic foil
that is gold-sputtered on one side
only to prevent shorting to the back
electrode even at extremely high
sound pressure levels.
PerceptionManual_intl_final
07/11/05
• All-metal body: The all-metal body
adds to the rejection of RF interference so you can use the microphone
near transmitter stations and along
with wireless microphones or other
communications equipment. The
extremely rugged, heavy body and
sturdy front grill protect the microphone from damage from tough handling on stage.
• High headroom, minimum distortion: Capable of handling sound
pressure levels up to 135 dB without
introducing perceptible distortion and
built to resist high temperatures and
humidity, the microphone will give
excellent results in a wide range of
applications.
2.3 PERCEPTION 200 Added Features
The PERCEPTION 200 is basically identical to the PERCEPTION 100 but provides
11:27 Uhr
Seite 3
the following additional features:
• Bass cut filter: Selector 1 on the
microphone front (refer to fig. 1) further reduces low-end distortion caused by footfall or wind noise, etc. The
filter also minimizes the proximity
effect that close-in miking from less
than 4 inches causes in any unidirectional microphone.The filter rolls off at
12 dB/octave from 300 Hz downward.
• Switchable preattenuation pad:
Selector 2 on the microphone front
(refer to fig. 1) lets you increase the
headroom by 10 dB for distortionfree close-in recording. The preattenuation pad prevents the microphone's output level, particularly at
low frequencies, from overloading the
miniature transformers used in many
mixer input stages, etc.
1
2
Fig. 1: Bass cut and preattenuation
switches on PERCEPTION 200 front.
3
PerceptionManual_intl_final
07/11/05
2.4 Optional Accessories
• MK 9/10 10-m (30-ft.) 2-conductor
shielded cable with male and female
XLR connectors
• N 62, N 66 AC phantom power supplies
• B 18 + A 48V battery supply and
DC/DC converter for 48-V phantom
powering
• PF 100 studio pop screen
• ST 102A, ST 200, ST 305 floor
stands
• W 4000 external windcscreen
11:27 Uhr
Seite 4
3 Interfacing
3.1 General
Section 3 applies to both the PERCEPTION 100 and the PERCEPTION 200.
The microphone uses a true condenser
transducer designed for 48-volt phantom powering to DIN 45 596/IEC 268-15.
Neither the diaphragm nor the backplate
are permanently polarized, so the microphone needs an external power supply.
The microphone provides a balanced
output on a 3-pin male XLR connector:
Pin 1: ground
Pin 2: hot
Pin 3: return
2
2.3
Mic
Phantom
1
Mic
2.2
Fig. 2: Connecting to a balanced input with (2.2) or without (2.3) phantom power.
4
PerceptionManual_intl_final
07/11/05
11:27 Uhr
Seite 5
You can connect the microphone either
to a balanced microphone input with or
without phantom power or an unbalanced microphone input.
Important: Using any power supply
other than those recommended by
AKG may damage your microphone and will void the warranty.
3.2 Input with Phantom Power
Refer to fig. 2.
1. Use an XLR cable (e.g., the optional
MK 9/10 from AKG) to connect the
microphone (1) to a balanced XLR
input with phantom power.
2. Switch the phantom power on. (Refer
to the user manual of the unit to which
you connected your microphone.)
3.4 Unbalanced Input
Refer to fig. 3.
Use a cable with a female XLR connec-
3.3 Input with No Phantom Power
Refer to fig. 2.
1. If your mixer provides no phantom
power, connect an optional AKG
phantom power supply (N 62, N 66,
B 18 + A 48V) between the microphone and the mixer.
1
2
Mic
Phantom
tor and TS jack plug:
1. On the XLR connector, use a wire
bridge to connect pin 1 to pin 3 and
the cable shield.
2. Connect the inside wire of the cable
to pin 2 on the XLR connector and
the tip contact of the jack plug.
Fig. 3: Connecting to an unbalanced input.
5
PerceptionManual_intl_final
07/11/05
Note: Unbalanced cables may pick up
interference from stray magnetic
fields near power or lighting cables,
electric motors, etc. like an antenna.
This may introduce hum or similar
noise when you use a cable that is
longer than 16 feet (5 m).
11:27 Uhr
Seite 6
4 Using Your
Microphone
4.1 General Hints
The PERCEPTION 100 and PERCEPTION
200 are general-purpose cardioid microphones for recording, broadcast, and
onstage use.
Every instrument radiates its sound in a
specific way. Therefore, to get the best
sound it is crucial to experiment with
microphone placement.
The following hints apply to both the
PERCEPTION 100 and PERCEPTION 200.
• The front of the microphone is the
side of the body with the AKG logo
on it. Therefore, always aim the logo
at the sound source you are going to
record!
Being a unidirectional (cardioid) microphone, the PERCEPTION will pick
up very little sound from the rear.
6
PERCEPTION 100
PERCEPTION 200
Fig. 4: Microphone front.
PerceptionManual_intl_final
07/11/05
• When recording wind instruments or
vocals, make sure not to blow or
sing directly into the microphone.
To avoid unwanted wind and pop
noise or moisture problems, place an
optional PF 100 pop screen from
AKG between the microphone and
vocalist/instrument.
• Keep the microphone dry. Moisture
from blowing or singing directly at the
capsule from a short distance, or
extremely high humidity may cause
the microphone to start crackling or
go very quiet due to partial short circuits in the polarization voltage.
• If you use the microphone in the
open air, use an optional AKG
W 4000 windscreen to protect the
microphone from moisture and reduce wind noise.
11:27 Uhr
Seite 7
4.2 PERCEPTION 200
• High volume instruments: You can
use this microphone for close-in
recording of very loud instruments
(brass instruments, kick drum, etc.).
Just switch the preattenuation pad in
to increase the microphone’s capability of handling sound pressure levels to
145 dB.
• Low-frequency noise: To suppress
low-frequency noise such as air conditioning rumble, footfall noise, or
traffic sounds, switch the bass cut filter in.
5 Cleaning
To clean the surface of the
microphone body, use a soft
cloth moistened with water.
7
PerceptionManual_intl_final
07/11/05
11:27 Uhr
Seite 8
6 Troubleshooting
Problem
No sound.
Possible Cause
Remedy
1. Power to mixer and/or amplifier is off.
2. Channel or master fader on mixer, or
volume control on amplifier is at zero.
1. Switch power to mixer or amplifier on.
2. Set channel or master fader on mixer
or volume control on amplifier to desired level.
3. Connect microphone to mixer or amplifier.
4. Check cable connectors for secure
seat.
5. Check cable and replace if damaged.
6. Switch phantom power on.
Phantom power supply: connect to
power outlet or insert battery
(batteries).
Check cable and replace if necessary.
3. Microphone is not connected to mixer
or amplifier.
4. Cable connectors are seated loosely.
5. Cable is defective.
6. No supply voltage.
Distortion.
8
1. Channel gain control on mixer set too
high.
1. Turn gain control down CCW.
PerceptionManual_intl_final
07/11/05
11:27 Uhr
Seite 9
6 Troubleshooting
Problem
(Distortion)
Crackling noises or low output.
Possible Cause
Remedy
2. Microphone too close to sound
source.
2. Move microphone further away from
sound source.
(PERCEPTION 200 only:) Switch preattenuation pad in.
• Partial short circuits due to excessive
humidity.
• Place microphone in warm, dry room
and allow to dry.
9
PerceptionManual_intl_final
07/11/05
11:27 Uhr
Seite 10
7 Specifications
7.1 PERCEPTION 100 and PERCEPTION 200
Type:
1-inch large-diaphragm, true condenser pressure-gradient microphone
Polar pattern:
cardioid
Open-circuit sensitivity:
18 mV/Pa (-35 dBV)
Frequency range:
20 Hz to 20 kHz (see frequency
response trace)
Impedance:
≥ 200 ohms
Recommended load impedance: ≥ 1000 ohms
Equivalent noise level
to CCIR 468-2:
26 dB
Equivalent noise level
to IEC 60268-4 (A-weighted): 16 dB-A
Signal/noise ratio
re 1 Pa (A-weighted):
78 dB
Max. SPL for 0.5% THD: 135 / 145 dB SPL (0 / -10 dB)
Environment:
temperature: -10°C to +60°C
R.H.: 80% (+25°C)
10
Powering:
Current consumption:
Connector:
Dimensions:
Net weight:
48 V ±5 V phantom power
to DIN 45 596 / 268-15IEC
≤2 mA
3-pin XLR (pin 2 hot)
53 dia. x 160 mm high / 2 x 6.3 in.
525 g / 1.2 lbs.
7.2 PERCEPTION 200 only
Bass cut filter slope:
12 dB/octave, 300 Hz
Preattenuation pad:
-10 dB (switchable)
FCC Statement
The device complies with part 15 of the FCC rules. Operation is
subject to the following two conditions:
(1) this device may not cause harmful interference, and
(2) this device must accept any interference received, including interference that may cause undesired operation.
PerceptionManual_intl_final
07/11/05
11:27 Uhr
Seite 11
7 Specifications
PERCEPTION 100 Frequency Response
PERCEPTION 100 Polar Diagram
PERCEPTION 200 Frequency Response
PERCEPTION 200 Polar Diagram
11
PerceptionManual_intl_final
07/11/05
11:27 Uhr
Seite 12
The International Page
English
This product conforms to the standards
listed in the Declaration of Conformity.
To order a free copy of the Declaration of
Conformity, visit http://www.akg.com or
contact [email protected]
Deutsch
Dieses Produkt entspricht den in der
Konformitätserklärung angegebenen
Normen. Sie können die Konformitätserklärung auf http://www.akg.com
oder per E-Mail an [email protected]
anfordern.
12
Français
Ce produit est conforme aux normes
citées dans la Déclaration de Conformité, dont vous pouvez prendre connaissance en consultant le site
http://www.akg.com ou en adressant un
e-mail à [email protected].
Español
Este aparato corresponde a las normas
citadas en la declaración de conformidad. Esta última está disponible en el
sitio http://www.akg.com o puede ser
s o l i c i t a d a a l c o r re o e l e c t r ó n i c o
[email protected].
Italiano
Questo prodotto corrisponde alle norme
elencate nella dichiarazione di conformità, che è disponibile al sito
http://www.akg.com oppure all'indirizzo
email [email protected].
Português
Este produto corresponde às normas
citadas na declaração de conformidade,
que pode pedir na nossa página da web
http://www.akg.com, ou enviando-nos
um email para [email protected].
PerceptionManual_intl_final
07/11/05
11:27 Uhr
Seite 13
Notizen • Notes • Notes • Note • Notas • Notas
13
PerceptionManual_intl_final
07/11/05
11:27 Uhr
Seite 14
Notizen • Notes • Notes • Note • Notas • Notas
14
PerceptionManual_intl_final
07/11/05
11:27 Uhr
Seite 15
Notizen • Notes • Notes • Note • Notas • Notas
15
Mikrofone · Kopfhörer · Drahtlosmikrofone · Drahtloskopfhörer · Kopfsprechgarnituren · Akustische Komponenten
Microphones · Headphones · Wireless Microphones · Wireless Headphones · Headsets · Electroacoustical Components
Microphones · Casques HiFi · Microphones sans fil · Casques sans fil · Micros-casques · Composants acoustiques
Microfoni · Cuffie HiFi · Microfoni senza filo · Cuffie senza filo · Cuffie-microfono · Componenti acustici
Micrófonos · Auriculares · Micrófonos inalámbricos · Auriculares inalámbricos · Auriculares con micrófono · Componentes acústicos
Microfones · Fones de ouvido · Microfones s/fios · Fones de ouvido s/fios · Microfones de cabeça · Componentes acústicos
Technische Änderungen vorbehalten. Specifications subject to change without notice. Ces caractéristiques sont susceptibles de modifications.
Ci riserviamo il diritto di effettuare modifiche tecniche. Nos reservamos el derecho de introducir modificaciones técnicas. Especificações sujeitas à mudanças sem aviso prévio.
AKG Acoustics GmbH
Lemböckgasse 21–25, P.O.B. 158, A-1230 Vienna/AUSTRIA, Tel: (+43 1) 86 654-0*, Fax: (+43 1) 86 654-7516, www.akg.com, e-mail: [email protected],
Hotline: (+43 676) 83200 888, [email protected]
AKG Acoustics GmbH
Bodenseestraße 228, D-81243 München/GERMANY, Tel: (+49 89) 87 16-0, Fax: (+49 89) 87 16-200, www.akg.com/de, e-mail: [email protected],
Hotline: (+49 89) 87 16-22 50, [email protected]
AKG ACOUSTICS, U.S.
914 Airpark Center Drive, Nashville, TN 37217, U.S.A., Tel: (+1 615) 620-3800, Fax: (+1 615) 620-3875, www.akgusa.com, e-mail: [email protected]
For other products and distributors worldwide see our website: www.akg.com
09/05/9100 U 1166