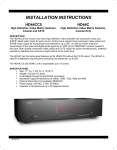
1
®
XT1
AM FM RDS / RBDS Tuner
User Manual
www.xantech.com
1/16
XT1
2/16
XT1
Thank you for purchasing the XT1 Tuner. We take great pride in the design and manufacturing
quality products, and are confident that your new XT1 will provide you with many years of
enjoyable and trouble-free service. Should you ever have any need to call upon our services,
please feel free to contact us at the address shown at the end of this manual or contact the dealer
or distributor from whom you purchased this product. Full details of the warranty coverage provided
can be found at the end of this booklet.
Important Safety Instructions
1. Important! Please read all the safety and operating instructions shown in this manual before
operating this equipment.
2. Heed all warnings and follow all operating instructions.
3. Warning: To assure safety during a lightening storm, the XT1 must be grounded, refer to the
diagrams on page 4. Also, if the unit is left unattended and unused for long periods of time, it is
recommended that you unplug the unit from the wall AC outlet.
4. Locate the product away from heat sources such as stoves, heat sources, radiators or other
appliances including other amplifiers that produce heat.
5. Mount the equipment in a wall or cabinet only as described in this owner’s manual.
6. Do not use this equipment near water, in damp locations, or outdoors.
3/16
XT1
Each XT1 package contains
-
XT1 AM/FM Tuner with RDS/RBDS
IR cable: 3.5mm mono socket - 3.5mm stereo jack
Serial cable: DB9 female - RJ45 male
Audio Cable: L/R RCA male to 3.5mm stereo female jack
Audio Cable: L/R RCA male to L/R RCA male
Power supply 12VDC 300mA
FM Dipole Antenna
AM loop antenna
User Manual
Optional (sold separately)
1U Rack mount kit for up to 3 tuners: Xantech part number 1U3XT1RM
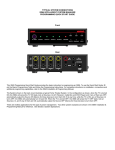
FM Antenna
AM Antenna
Serial cable to
3rd party device
GND
Power Supply
3.5mm Mono jack to 3rd
party IR output
RS232 control
The XT1 can be controlled via RS232. To connect a serial control device, the supplied serial cable
should be used. This cable establishes the RS232 communication to and from the tuner.
The pin layout and RS232 protocol can be found in the back of this manual.
IR Receiver input
To control the XT1 via IR, an IR extender system needs to be used. There is no IR receiver inside the
LCD display. To connect an industry standard IR extender system, use the supplied IR cable and
plug the stereo jack of this cable into the IR sensor input of the XT1, and use the mono socket to
attach the IR extender output to. Tip = IR-SIGNAL, Sleeve = GND.
Antenna’s
Position and secure both antennas individually until the clearest sound is heard.
4/16
XT1
Front Panel Controls
1
3
2
4
5
(1) MENU
Pressing this button allows you access to the following functions:
AM/FM band selection
Auto/Manual tuning selection
Scan the preset stations
Memorize a station
Set the IR Code.
(2) ENTER (Power)
When plugging in the power transformer the first time, the tuner will automatically turn on. Pressing this
button for 4 seconds will turn the unit ON from standby (sleep mode), or put the unit into standby from its
ON state.
(3) UP
Allows for tuning up to higher frequency stations.
(4) DOWN
Allows for tuning down to lower frequency stations.
(5) LCD DISPLAY
The display will turn off after approximately 3 to 4 minutes. To turn display ON, simply press the ENTER
button.
5/16
XT1
Tuner Operation
MAKE AM/FM BAND SELECTION
1.
Press and release the MENU button until either the ENTER and MHz characters flash, or the ENTER
and kHz characters flash.
2. Press the ENTER button until either MHz or kHz stops flashing.
3. Press either UP or DOWN button to obtain MHz or kHz. (note – MHz is the FM band and kHz is the
AM band)
4. Either wait until the ENTER stops flashing or depress the ENTER button.
EZ Steps:
1. Press MENU once
2. Press ENTER
3. Press UP
4. Press ENTER (or wait 3 seconds)
SELECT AUTO OR MANUAL TUNING
1.
2.
3.
4.
Press and release MENU button until AUTO and ENTER flash.
Press ENTER button to stop flashing.
Press UP or DOWN button to change to a new tuning mode.
Press ENTER to switch to the new mode.
EZ Steps:
1. Press MENU twice
2. Press ENTER
3. Press UP
4. Press ENTER (or wait 3 seconds)
LISTEN TO PRESET STATIONS OR SCANS
1.
2.
3.
Press and release MENU until P-SCAN and ENTER characters flash.
Press ENTER.
Preset stations or scans will continue to advance until the ENTER button is pressed.
EZ Steps:
1. Press MENU three times
2. Press ENTER
3. When desired station is playing, press ENTER
NOTE. Although the display only shows frequency steps of 0.1MHz, the actual tuning is done with
steps of 0.05Mhz. (in EU mode only)
6/16
XT1
TO PRESET MEMORIES
1.
2.
3.
4.
5.
Select a desired station.
Press and release MENU button until MEM and ENTER characters flash.
Press ENTER button.
Select desired PRESET number by pressing UP or DOWN button.
Press ENTER button.
EZ Steps:
1. Select desired station
2. Press MENU four times
3. Press UP or Down
4. Press ENTER button
RDS/RBDS INFORMATION
RDS/RBDS information is not shown on the XT1 display and is only available through its RS232
connection.
7/16
XT1
Xantech Limited Warranty
Xantech Corporation ("Xantech") warrants to the holder of a valid proof of purchase as the first
end-user purchaser ("You"), its products to be free from defects in materials and workmanship for
the periods specified below from the date of purchase. This limited warranty extends only to You for
product purchased and used in the United States of America. For product purchased outside of the
United States of America, You must contact the Xantech authorized distributor in your region for
warranty services. Product is not intended for end user installation. If within the applicable warranty
period above You discover such item was not as warranted above and You promptly notify
Xantech in writing, Xantech shall repair or replace the items at its option. Xantech may elect which
remedy or combination of remedies to provide in its sole discretion. Xantech may use functionally
equivalent reconditioned/refurbished/pre-owned or new products or parts under this limited
warranty. This warranty shall not apply (a) to product which shall have been installed by other than
an authorized Xantech installer, (b) to installed product which is not installed to Xantech's
specifications, (c) to product which shall have been repaired or altered by others than Xantech, (d)
to charges for installation or set up or adjustment of customer controls, (e) to product that has
suffered normal cosmetic deterioration (f) to product which shall have been subjected to
negligence, misuse, abuse, accident, or damage by circumstances beyond Xantech's control,
including, but not limited to, lightning, flood, electrical surge, tomado, earthquake, or any other
catastrophic events beyond Xantech's control, or (g) to product which shall have been subjected
to improper operation, connected equipment failure or malfunction, inadequate packing or
shipping damage, maintenance or storage, or to other than normal use of service. The foregoing
warranties do not cover reimbursement for labor, transportation, shipping, removal, installation, or
other expenses which may be incurred in connection with repair or replacement. All claims for
product shipping damage must be processes within 3 days of receipt by You.
A Xantech Retum Authorization (RA) must be obtained from Xantech by You, your installer or your
distributor for Product covered under this warranty. Covered product must be sent to Xantech
together with proof of purchase, RA number, prepaid and insured to Xantech. Freight collect
shipments will be refused. Risk of loss or damage in transit is borne by the sender. Xantech's warranty
does not cover Products which have been received improperly packaged, altered, or physically
damaged. Products will be inspected upon receipt.
Except as may be expressly provided and authorized in writing by Xantech, Xantech shall not be
subject to any other obligations or liabilities whatsoever with respect to equipment manufactured or
sold by Xantech or services rendered by Xantech.
THE FOREGOING WARRANTIES ARE EXCLUSIVE AND IN LIEU OF ALL OTHER EXPRESSED AND IMPLIED
WARRANTIES, INCLUDING BUT NOT LIMITED TO IMPLIED WARRANTIES OF MERCHANTABILITY AND
FITNESS FOR A PARTICULAR PURPOSE.
ATTENTION: TO OUR VALUED CONSUMERS
To insure that consumers obtain quality pre-sale and after-sale support and service, Xantech
products are sold exclusively through authorized dealers and authorized distributors. The warranties
on Xantech products are NOT VALID if the products have been purchased from an unauthorized
dealer or distributor. In order to determine if your Xantech re-seller is authorized, please call Xantech
(800) 843 - 5465.
8/16
XT1
Xantech products (go to xantech.com/warranty for model numbers)
IR Receivers and IR emitters
Warranty Duration
Limited lifetime
Remote Control Switchers
Limited lifetime
Modules and Connecting Blocks
Limited lifetime
Accessories
Limited lifetime
Speakers
Limited lifetime
Volume Controls and Speaker Selectors
5 year limited
MRC, BX, ZPR and Commercial Products
2 year limited
Amplifiers
2 year limited
Control Interfaces
2 year limited
Hand Held Remote Controls
1 year limited
SPLCD Product
1 year limited
Source Components (includes XT1)
1 year limited
Specifications
FM
Frequency Range:
Antenna Input Impedance:
Usable Sensitivity @30dB S/N:
Signal/Noise ratio - Mono
- Stereo
THD(1kHz)
- Mono
- Stereo
Image Rejection:
Frequency Response:
Stereo Separation:
Capture Ratio:
AM
Frequency Range:
Usable sensitivity:
IF rejection:
Selectivity:
Distortion:
Signal/Noise ratio:
Frequency Response:
Power requirement:
AC voltage for Power supply :
USA/Canada
Europe
88 to 108 MHz (US)
87.5 to 108 MHz (EU)
75 ohm
- 5 dBu (typical)
62 dB A
55 dB A
0.2 %
0.4 %
79 dB
50 to 15k Hz
33 dB
2 dB
530 to 1700 kHz (US)
525 to 1605 kHz (EU)
23 dBu
90 dB
100 dB
0.5% (typical)
50 dB A
50Hz to 3kHz
12VDC 300 mA
120V, 60Hz
230V, 50Hz
Dimensions: 6"(153mm) D x 4"(102mm) W x 1-1/4" (32mm) H.
9/16
XT1
Appendix 1
RS232 Protocol
Interface
Baud Rate :
Data Bits :
Transmission:
9600
8
In ASCII codes
Stop Bit: 1
Parity Bit: none
Format
<ZoneID><_><ProductID><_><TunerID>_<Command><_><Parameter1><_><Parameter2><_><CR>
<Zone ID>
Is number 00 to 99, a "00" selects all zones.
The maximum number is 99.
Zone ID is factory set at "0", can be reassigned to other number below 99.
<Product ID>
For the XT1, the factory default setting for product ID is 10
<Tuner ID>
Is number 00 to 99, a "00" selects all tuners. Default set to 01
<Command>
Is 1 to N, N may be in one or multiple digits as defined in the first column in the
table below
None, or is 1 to N, N may be in one or multiple digits as defined in the
"Parameter1" column below
<Parameter1>
<Parameter2>
None, or is 1 to N, N may be in one or multiple digits as defined in the
"Parameter2" column below
<_>
The fields are separated by an underscore "_"
<CR>
A character return to terminate the command line
<Zone ID>
If multiple XT1 tuners are used in one application, the Zone ID of each tuner shall
be reassigned with a unique number so that each tuner can be controlled
individually via the RS232 port. Use command 14 in the following list to program
a new Zone ID.
XT1
Purpose
Parameter1 Purpose of Parameter1
Parameter2
Command
1
2
Power on/off
Band switching
1
Power off
2
Power on
3
Toggle power on/off
1
AM
2
FM
3
Toggle between AM/FM
3
Preset access
1 to N
1 for preset 1, 32 for preset #32
4
Direct frequency
87..107
Enter the integal part of a FM frequency
Enter the 1st or first two digits of an AM
frequency
tuning
5..16
10/16
00..95
00..99
XT1
5
Auto Memory
1
Start scan from the current frequency and
write each station into preset sequentially
6
7
RS232 Output
Preset Scan
2
Start scan from FM 87.5MHZ to 107.95 then
AM 530 to 1690, write each station into preset
sequentially.
1
Outputs feedback one by one (i.e. on demand)
2
Outputs feedback every 0.5 seconds
3
Outputs feedback every 1 seconds
4
Outputs feedback every 2 seconds
5
Outputs feedback every 5 seconds
Scan up preset number to play each preset for 5
sec
Scan Down preset number to play each preset
for 5 sec
1
2
3
4
5
8
Write/Erase a
1
preset
9
10
Up/Down Tuning
Stereo/Mono
mode
Get frequency
Get Preset
number
Get Tuning mode
Get Receving
mode
Get Operating
Status
12
Purge EEPROM
13
MPU Reset
14
Reserved for
future use
Enter a "0" to erase the current preset shown in
the display
2
write the frequency into the entered number
1
Auto tune up frequency
2
Auto tune Down frequency
3
Manual tune up frequency one step
4
Manual tune down frequency one step
Let Tuner received signal control the mode
1
2
11*
Stop the preset scan
Move and stop only once at the next preset of
higher number
Move and stop only once at the next preset of
lower number
1
2
3
4
5
111
111
01..32
Force the tuner into Mono mode reception
(Stero mode is
set each time the auto-tuning is engaged)
Output in ASCII, the band and frequency
listening
Output in ASCII, the preset number that is
displaying
Output in ASCII, the current tuning in "auto" or
"manual"
Output in ASCII, the current receiving mode in
"Stereo" or "Mono"
Output in ASCII, the Frequency Preset number,
Tuning Mode, Receiving Mode, Zone ID, IR ID,
and Power status
Purge the EEPROM and restore it to the default
setting
Reset the MPU to default settings
11/16
XT1
15
Program XT1 Zone
ID
888
Program XT1 Zone ID "number"
222
Return XT1 Zone ID
666
Program XT1 Tuner ID "number"
444
Return XT1 Tuner ID
00..99
00..99
Examples:
01_10_00_1_1
Instruct Zone 1 XT1 to power off
01_10_06_1_2
Instruct Zone 1 Tuner 6 XT1 to power on
01_10_00_1_3
Instruct zone 1 XT1 to power on if it is off, or power off if it is on
12_10_00_3_21
Zone 12 XT1 to tune into preset #21
03_10_00_4_107_50
Zone 3 XT1 to tune to FM 107.50 MHZ
03_10_00_4_99_55
Zone 3 XT1 to tune to FM 99.55 MHZ (The 2nd digit after the decimal is
50K/step tuning for Europe)
03_10_00_2_1
Switch band to AM reception
03_10_00_4_05_80
Zone 3 XT1 to tune to AM 580 KHZ
03_10_00_4_10_00_30
Zone 3 XT1 to tune to AM 1030 KHZ
01_10_14_6_1
Returns the RDS information of Tuner 14
01_10_00_6_4
RDS information is fed to third party device every 2 seconds.
01_10_00_8_0
Zone 1 XT1 to empty the preset currently displaying
01_10_00_8_15
Zone 1 XT1 to write the displayed frequency into preset 15
02_10_00_11_1
02_10_00_11_5
When in FM 100.05 MHZ, Zone 2 XT1 outputs FM10005 in ASCII string
When in FM 100.05 MHZ, Zone 2 XT1 outputs a complete set of operating
data
IFM10005IIPRESET 02IITUNING AUTOIIMODE STEREOIIZONE 02IIIR 1IIPOWER
ONI
2_10_00_11_2
Simply output "21" in ASCII if the current preset listening is 21
00_10_00_15_888_12
Program XT1 Zone ID TO 12
00_10_00_15_222
Read Zone ID
00_10_00_15_666_40
Program XT1 Tuner ID TO 40
00_10_00_15_444
Read Tuner ID
Notes for Programming:
Each time after sending a command to operate a XT1, always pause for 0.5 sec then send
command 11 to receive the update data feedbacks from the XT1.
12/16
XT1
Pin Layout
CN12
5
9
4
8
3
7
2
6
1
RX
10
TX
Circuit Item
RJ45
DB9-Male
DB9-Female
Pin
1
3
2
Pin
2
2
3
RX
Pin
4
5
5
GND
TX
13/16
XT1
Appendix 2
Discrete IR HEX Codes
The carrier frequency: 38KHz.
Key
HEX
Code
IR Code
AM/FM
90
On/Off
60
Mem
98
Auto
F8
Dir
D8
Up
A8
Down
32
Pre-Set
B2
ST/MO
58
0000 006D 0000 0021 0156 00AB 0015 0015 0015 0015 0015 0015 0015 0015
0015 0015 0015 0015 0015 0015 0015 0015 0040 0015 0040 0015 0040 0015 0040 0015
0040 0015 0040 0015 0040 0015 0040 0015 0040 0015 0015 0015 0015 0015 0040 0015
0015 0015 0015 0015 0015 0015 0015 0015 0015 0015 0040 0015 0040 0015 0015 0015
0040 0015 0040 0015 0040 0015 0040 0015
0000 006D 0000 0021 0156 00AB 0015 0015 0015 0015 0015 0015 0015 0015
0015 0015 0015 0015 0015 0015 0015 0015 0040 0015 0040 0015 0040 0015 0040 0015
0040 0015 0040 0015 0040 0015 0040 0015 0015 0015 0040 0015 0040 0015 0015 0015
0015 0015 0015 0015 0015 0015 0015 0015 0040 0015 0015 0015 0015 0015 0040 0015
0040 0015 0040 0015 0040 0015 0040 0015
0000 006D 0000 0021 0156 00AB 0015 0015 0015 0015 0015 0015 0015 0015
0015 0015 0015 0015 0015 0015 0015 0015 0040 0015 0040 0015 0040 0015 0040 0015
0040 0015 0040 0015 0040 0015 0040 0015 0040 0015 0015 0015 0015 0015 0040 0015
0040 0015 0015 0015 0015 0015 0015 0015 0015 0015 0040 0015 0040 0015 0015 0015
0015 0015 0040 0015 0040 0015 0040 0015
0000 006D 0000 0021 0156 00AB 0015 0015 0015 0015 0015 0015 0015 0015
0015 0015 0015 0015 0015 0015 0015 0015 0040 0015 0040 0015 0040 0015 0040 0015
0040 0015 0040 0015 0040 0015 0040 0015 0040 0015 0040 0015 0040 0015 0040 0015
0040 0015 0015 0015 0015 0015 0015 0015 0015 0015 0015 0015 0015 0015 0015 0015
0015 0015 0040 0015 0040 0015 0040 0015
0000 006D 0000 0021 0156 00AB 0015 0015 0015 0015 0015 0015 0015 0015
0015 0015 0015 0015 0015 0015 0015 0015 0040 0015 0040 0015 0040 0015 0040 0015
0040 0015 0040 0015 0040 0015 0040 0015 0040 0015 0040 0015 0015 0015 0040 0015
0040 0015 0015 0015 0015 0015 0015 0015 0015 0015 0015 0015 0040 0015 0015 0015
0015 0015 0040 0015 0040 0015 0040 0015
0000 006D 0000 0021 0156 00AB 0015 0015 0015 0015 0015 0015 0015 0015
0015 0015 0015 0015 0015 0015 0015 0015 0040 0015 0040 0015 0040 0015 0040 0015
0040 0015 0040 0015 0040 0015 0040 0015 0040 0015 0015 0015 0040 0015 0015 0015
0040 0015 0015 0015 0015 0015 0015 0015 0015 0015 0040 0015 0015 0015 0040 0015
0015 0015 0040 0015 0040 0015 0040 0015
0000 006D 0000 0021 0156 00AB 0015 0015 0015 0015 0015 0015 0015 0015
0015 0015 0015 0015 0015 0015 0015 0015 0040 0015 0040 0015 0040 0015 0040 0015
0040 0015 0040 0015 0040 0015 0040 0015 0015 0015 0015 0015 0040 0015 0040 0015
0015 0015 0015 0015 0040 0015 0015 0015 0040 0015 0040 0015 0015 0015 0015 0015
0040 0015 0040 0015 0015 0015 0040 0015
0000 006D 0000 0021 0156 00AB 0015 0015 0015 0015 0015 0015 0015 0015
0015 0015 0015 0015 0015 0015 0015 0015 0040 0015 0040 0015 0040 0015 0040 0015
0040 0015 0040 0015 0040 0015 0040 0015 0040 0015 0015 0015 0040 0015 0040 0015
0015 0015 0015 0015 0040 0015 0015 0015 0015 0015 0040 0015 0015 0015 0015 0015
0040 0015 0040 0015 0015 0015 0040 0015
0000 006D 0000 0021 0156 00AB 0015 0015 0015 0015 0015 0015 0015 0015
0015 0015 0015 0015 0015 0015 0015 0015 0040 0015 0040 0015 0040 0015 0040 0015
0040 0015 0040 0015 0040 0015 0040 0015 0015 0015 0040 0015 0015 0015 0040 0015
0040 0015 0015 0015 0015 0015 0015 0015 0040 0015 0015 0015 0040 0015 0015 0015
0015 0015 0040 0015 0040 0015 0040 0015
14/16
XT1
0
78
1
E8
2
48
3
68
4
02
5
12
6
20
7
40
8
A0
9
A2
0000 006D 0000 0021 0156 00AB 0015 0015 0015 0015 0015 0015 0015 0015
0015 0015 0015 0015 0015 0015 0015 0015 0040 0015 0040 0015 0040 0015 0040 0015
0040 0015 0040 0015 0040 0015 0040 0015 0015 0015 0040 0015 0040 0015 0040 0015
0040 0015 0015 0015 0015 0015 0015 0015 0040 0015 0015 0015 0015 0015 0015 0015
0015 0015 0040 0015 0040 0015 0040 0015
0000 006D 0000 0021 0156 00AB 0015 0015 0015 0015 0015 0015 0015 0015
0015 0015 0015 0015 0015 0015 0015 0015 0040 0015 0040 0015 0040 0015 0040 0015
0040 0015 0040 0015 0040 0015 0040 0015 0040 0015 0040 0015 0040 0015 0015 0015
0040 0015 0015 0015 0015 0015 0015 0015 0015 0015 0015 0015 0015 0015 0040 0015
0015 0015 0040 0015 0040 0015 0040 0015
0000 006D 0000 0021 0156 00AB 0015 0015 0015 0015 0015 0015 0015 0015
0015 0015 0015 0015 0015 0015 0015 0015 0040 0015 0040 0015 0040 0015 0040 0015
0040 0015 0040 0015 0040 0015 0040 0015 0015 0015 0040 0015 0015 0015 0015 0015
0040 0015 0015 0015 0015 0015 0015 0015 0040 0015 0015 0015 0040 0015 0040 0015
0015 0015 0040 0015 0040 0015 0040 0015
0000 006D 0000 0021 0156 00AB 0015 0015 0015 0015 0015 0015 0015 0015
0015 0015 0015 0015 0015 0015 0015 0015 0040 0015 0040 0015 0040 0015 0040 0015
0040 0015 0040 0015 0040 0015 0040 0015 0015 0015 0040 0015 0040 0015 0015 0015
0040 0015 0015 0015 0015 0015 0015 0015 0040 0015 0015 0015 0015 0015 0040 0015
0015 0015 0040 0015 0040 0015 0040 0015
0000 006D 0000 0021 0156 00AB 0015 0015 0015 0015 0015 0015 0015 0015
0015 0015 0015 0015 0015 0015 0015 0015 0040 0015 0040 0015 0040 0015 0040 0015
0040 0015 0040 0015 0040 0015 0040 0015 0015 0015 0015 0015 0015 0015 0015 0015
0015 0015 0015 0015 0040 0015 0015 0015 0040 0015 0040 0015 0040 0015 0040 0015
0040 0015 0040 0015 0015 0015 0040 0015
0000 006D 0000 0021 0156 00AB 0015 0015 0015 0015 0015 0015 0015 0015
0015 0015 0015 0015 0015 0015 0015 0015 0040 0015 0040 0015 0040 0015 0040 0015
0040 0015 0040 0015 0040 0015 0040 0015 0015 0015 0015 0015 0015 0015 0040 0015
0015 0015 0015 0015 0040 0015 0015 0015 0040 0015 0040 0015 0040 0015 0015 0015
0040 0015 0040 0015 0015 0015 0040 0015
0000 006D 0000 0021 0156 00AB 0015 0015 0015 0015 0015 0015 0015 0015
0015 0015 0015 0015 0015 0015 0015 0015 0040 0015 0040 0015 0040 0015 0040 0015
0040 0015 0040 0015 0040 0015 0040 0015 0015 0015 0015 0015 0040 0015 0015 0015
0015 0015 0015 0015 0015 0015 0015 0015 0040 0015 0040 0015 0015 0015 0040 0015
0040 0015 0040 0015 0040 0015 0040 0015
0000 006D 0000 0021 0156 00AB 0015 0015 0015 0015 0015 0015 0015 0015
0015 0015 0015 0015 0015 0015 0015 0015 0040 0015 0040 0015 0040 0015 0040 0015
0040 0015 0040 0015 0040 0015 0040 0015 0015 0015 0040 0015 0015 0015 0015 0015
0015 0015 0015 0015 0015 0015 0015 0015 0040 0015 0015 0015 0040 0015 0040 0015
0040 0015 0040 0015 0040 0015 0040 0015
0000 006D 0000 0021 0156 00AB 0015 0015 0015 0015 0015 0015 0015 0015
0015 0015 0015 0015 0015 0015 0015 0015 0040 0015 0040 0015 0040 0015 0040 0015
0040 0015 0040 0015 0040 0015 0040 0015 0040 0015 0015 0015 0040 0015 0015 0015
0015 0015 0015 0015 0015 0015 0015 0015 0015 0015 0040 0015 0015 0015 0040 0015
0040 0015 0040 0015 0040 0015 0040 0015
0000 006D 0000 0021 0156 00AB 0015 0015 0015 0015 0015 0015 0015 0015
0015 0015 0015 0015 0015 0015 0015 0015 0040 0015 0040 0015 0040 0015 0040 0015
0040 0015 0040 0015 0040 0015 0040 0015 0015 0015 0015 0015 0040 0015 0015 0015
0040 0015 0015 0015 0040 0015 0015 0015 0040 0015 0040 0015 0015 0015 0040 0015
0015 0015 0040 0015 0015 0015 0040 0015
15/16
XT1
®
Xantech Corporation
13100 Telfair Ave., Sylmar CA 91342 | Xantech.com Installation Instructions,
XT1, XT1E © 2009 Xantech Corporation Document # 08905219B
This document is copyright protected. No part of this manual may be
copied or reproduced in any form without prior written consent from
Xantech Corporation. Xantech Corporation shall not be liable for
operational, technical, or editorial errors/omissions made in this document.
Toll Free Number: 800.843.5465 press 2 for Tech Support
Email: Tech Support - [email protected]
Version: B
16/16
XT1