1
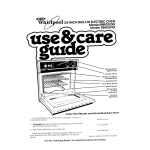
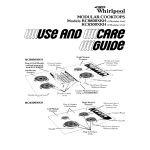
TKirlpool
BUILT-INELECTRICOVEN
ModelRJM-2840P
et1 Control
Microwave
Model and
Number
Panel
Oven
Senal
Plate
OWII Rack Guides
Refer to
the Cooking Guide for
important
safety information
and other general instructions
for the use and care of uour oven.
II
Minute
Clock
Timer
Start
Time
Knob
Panel
Light
Switch
Contents
PAGE
3
BEFORE YOU USE YOUR OVEN
HOW TO USE OVEN CONTROLS
3
* To hake
* To broil
l
To set the clock
l
To use the minute timer
l
To use the MEALTIMER.
clock automatic
4
5
6
7
7
7
7
7
9
feature
OVEN RACK POSITIONS
OVEN VENT
OVEN LIGHT
CONTROL PANEL LIGHT
OPTIONAL ROTISSERIE KIT.
YOUR CONTINUOUS
CLEANING OVEN
HOWTO CLEAN AND CARE FORYOUROVEN
BEFORE YOU CALL FOR SERVICE
WHIRLPOOL FRANCHISED TECH-CARE
10
” SERVICE
11
Tmk.
Oven
Temperature
Control
Knob
Before
you
use your
oven
It is your personal responsibility
and obligation to contact
qualified installer for your new oven. It is also your responsibility
to be sure that it:
l
Has been properly installed, electrically grounded,
the supply of electricity by a qualified person.
l
Has been installed where it is protected from the elements in a wellventilated room.
Has been installed and leveled properly in a cabinet strong enough
to support its weight.
Is properly used only for the job it is intended to do.
Is not used by small children or anyone not able to operate it properly.
Is properly maintained.
l
l
l
l
I
See Installation
Instructions
and connected
a
to
for complete information.
I
How to use oven controls
To bake:
1 Put oven rack(s) in the proper position (see page 6).
2 Turn Oven Selector to “PREHEAT.”
3. Turn Oven Temperature Control Knob to desired temperature.
The
Oven Signal Light will glow while the oven is preheating. When the
light turns off, the oven is preheated.
4 Turn Oven Selector from “PREHEAT”
to “BAKE.”
5. Make sure Oven Temperature
Control Knob was set to desired
temperature for “PREHEAT.”
6. Place food in oven. The Oven Signal Light will turn on and off during
baking .as the heating element cycles on and off to maintain the
selected oven temperature.
7. When you have finished baking, turn the Oven Temperature
Control Knob and Oven Selector to “OFF.”
NOTE: During oven use. you may hear a fan which cools the air around
the microwave. It may continue to run after the oven is turned off.
To broil:
1. Put oven rack in the proper position (see chart on page 6).
2. Turn Oven Selector to “BROIL.”
3. Turn Oven Temperature
Control
Knob to “BROIL”
or desired
temperature.
4. Place broiler pan with food on the oven rack.
5. Keep oven door at broil stop position (open about 4 inches.10
cm)during
broiling. To keep door open, swing clips located
on inside of door next to hinge slots across the slots.
6. When you are through broiling. turn the Oven Temperature
Knob and Oven Selector to “OFF,”
Control
3
tions
The following
timetable
for various
meats at the
Food
IMPORTANT:
Always
broil with the door
open about 4 inches
(10 cm).
Beef Steaks
Rare
Medium
Well
Beef Steaks
Rare
Medium
Well
Hamburgers
Lamb Chops
Medium
Ham Slice. precooked
or tenderized
Canadian Bacon
Pork Rib or Loln Chops
Well Done
Chtcken
FISh
Lower
Frankfurters
Variable
broil
gives
“BROIL”
suggested
broiling
times
temperature
setting.
and posi-
Description
Inches from
top of foal
to Broil
Element
Approximate
Minutes
1st side 2nd side
1” (2.5 cm)
1” (2 5 cm)
1” (2.5 cm)
3 (8 cm)
3 (8 cm)
3 (8cm)
7-9
9-11
11-13
3-5
4-7
5-7
1%“(4cm)
1%“(4cm)
1 L/2”(4 cm)
‘4” (1 cm)
4-5 (lo-13 cm)
4-5 (lo-13 cm)
4-5 (lo-13 cm)
3 (8 cm)
13-15
17-19
19-21
6-7
6-8
8-10
14-16
4-5
l”(2.5
cm)
3 (8 cm)
6-8
4-5
%l”(l-2.5cm)
‘4” (1 cm)
3 (8cm)
3 (8 cm)
7-8
6
3-4
4
$4.1” (2-2.5 cm)
2-3 lb.(l-1.5 kg)
fryer cut in half
whole
fillets
12-i4”(1-2cm)
4-5 (lo-13 cm)
15
10
7-9 (18-23 cm)
3(8cm)
3 (8 cm)
3 (8 cm)
4-5 (lo-13cm)
25-30
11-16
7-8
3
6-7
10-12
9-14
5-7
3
4-5
feature
The broiling temperature
can be varied by selecting a lower temperature setting on the Oven Temperature
Control Knob. Using lower
temperature
settings for broiling causes the broil element to cycle on and
off. The variable control can be used for broiling foods that need more
gentle, slow heating. If food is broiling too fast, the control can be set to
a lower temperature setting to reduce cooking speed.
(NOTE: The Oven Selector must remain in the “BROIL”
position for all
broiling. )
To set the clock
to the
correct
time
of day
1. Push in the Minute Timer Knob.
2. Turn knob until digits show the correct time of day.
3. The Minute Timer Dial will turn as you set the clock. Turn the Minute
Tmer counterclockwise
to “OFF” after the clock is set. Do not push
in the knob when setting the Minute lamer as that will move the
digits from the correct time of day.
To use the
Minute
4
Timer
Minute
Timer
Turn the Minute Timer Knob clockwise to the number of minutes
you want to time. Do not push in on the Minute Timer Knob as that will
move the clock. A buzzer will sound when time is up. Turn the Minute
Timer Knob counterclockwise
to “OFF” to stop the buzzer.
The Minute Timer does not start or stop cooking. it merely operates
a buzzer. It can be used with reasonable accuracy to time any cooking operation or to remind you to turn off an appliance. For the most accurate timing.
turn knob past the time desired. then back to the setting you wish
To use the
MEALTIMER‘.
clock
automatic
feature
The automatic feature of the MEALTIMER.
cclock lets you set the
controls. put the food In the oven and leave the house Your oven will turn
on and off automatically,
or lust turn off automatically.
For example. of you have a roast that must cook for thrtw hours. ~CIU
wdllt
It “done”
at 0 00 and vou have a mwtlny <lt 2 00. VOII i~ould f0ll0~~
this procedur+
To start and stop your oven automatically
1. Be sure the clock is set to the
2.
Place
the fond
OR TIMED
BAKE
in the oven.
correct time of day (start and
stop time hands
also will
show the correct time).
3.
Push in and turn the Start
Knob
to the time you want
food to start cooking.
Time
your
4.
Push in and turn the Stop
Knob to the time you want
food to stop cooking.
5.
Turn the Oven Temperature
trol Knob to the desired
ature.
Contemper-
6.
Set Oven
When cooking is finished:
* Turn Oven Selector to “OFF“
- Tbrn Oven Temperature Control
Selector
Time
your
to “TIMED.”
Knob to “OFF’
5
To start your oven immediately and stop automatically:
1. Be sure the clock is set to the correct time of day (start and stop time
2.
3.
4.
5.
6.
also will show the correct time).
Place the food in the oven.
Push in and turn the Stop Time Knob to the time you want your
food to stop cooking.
Turn the Oven Temperature
Control
Knob to the desired
temperature.
Set Oven Selector to “TIMED.”
When cooking is finished, turn the Oven Temperature Control Knob
to “OFF,” Turn Oven Selector to “OFF”
When using the MEALTIMER
* clock automatic
feature.. .
Choose foods that will not deteriorate or spoil while standing in the
oven before cooking starts
Foods that are to be cooked with a delayed start should be
thoroughly
refrigerated
or frozen before they are placed in the oven.
Most unfrozen foods should not stand more than two hours before
cooking is to start.
Avoid using dishes requiring milk or eggs, cream soups, cooked
meats. fish and doughs leavened with baking powder or yeast.
Smoked
or frozen meats may be used; vegetables.
fruit and
casserole-type
foods are good choices.
Vegetables should be cooked in a covered baking dish with about
one-half cup of water for one to one-and-one-half
hours.
.Tmk.
Oven
rack
positions
Your oven has two racks. One rack is raised, the other is flat.
Always arrange the racks before turning on the oven. To remove a
rack from the oven, grasp the front edge of the rack in the middle and
pull forward until it stops. Lift and pull until the rack slides out of the oven.
To put the rack back into the oven, fit it onto the guides at each side of
the oven. Slide the rack into place, tilting upward until it passes the stops
in the rack guides.
To remove rack, pull
forward until rack
stops,
lift
and pull.
To:
Place rack:
Bake on one rack
2nd or 3rd rack guides from top. so food is in
the center of the oven.
Bake on two racks
One rack on the top guides and one on the
suides 2nd from the bottom.
Broil
Position so that food is about the distance from
the broil element suggested in the broiling timetable. page 4.
Roast LARGE
cuts of meat
Place rack on bottom
Roast SMALLER
cuts of meat
So food is in center of oven.
rack guides.
When baking, always allow 1% to 2 inches (4 to 5 cm) of air
space on all sides of pans for proper air circulation.
For best results, refer to Cooking
on pan placement and utensils.
6
Guide for additional
information
Oven vent
The Lower Oven Vent is located under the vent trim at the top of
the lower oven Warm air will come out of the vent when the oven is on
This provides the necessan/ air circulation in the oven during baking
OVEN
PANEL
8
GD
Oven light
To turn the Oven Light on or off. turn the Oven Light Switch on the
control panel.
To replace the oven light:
1 Turn the power off at the main power supply.
2 Remove the light bulb from the upper right hand corner of the oven.
:3 Replace the burned-out bulb with a 4Gwatt appliance bulb (designed
to withstand oven temperatures) available at most grocery and variety
stores
Control
panel
light
To turn the light behind the control
Light Switch on the control panel.
Optional
rotisserie
panel on or off, turn the Panel
kit
If you would like a rotisserie with your oven. you can order a kit
from your dealer. Easy installation instructions come with the kit.
Your Continuous
How does a Continuous
Cleaning
Cleaning
Oven
Oven work?
The walls of a standard oven are covered with a smooth porcelain
enamel finish The walls of a Continuous Cleaning Oven are coated with a
specially treated porcelain enamel. Instead of being smooth like glass. It is
rough llke a brick A fat spatter will form a solid drop on an ordinary smooth
porcelain enamel surface But on the porous textured porcelain enamel in
a Continuous
Cleaning Oven. a fat spatter spreads out when It hits the
oven walls
For comparison. think of the difference between a drop of water on a
paper towel and one on waxed paper. The water on the waxed paper will
bead up into a large drop The drop of water on the paper towel is absorbed
into the paper and spreads out over a large area. This is close to what
happens to a fat spatter 111the Continuous Cleaning Oven. Then when the
oven IS on for baking and roasting, the fat is easily heated and gradually
burns away to leave the coated surface in a presentably clean condition.
This is a continuous process: it does not happen instantly. In effect
the walls are continuously
cleaning themselves-any
time the oven is set
for medium to high temperatures
for baking or roasting
Depending
on how the oven is used, it usually can be presentably clean with little or
no hand cleaning.
7
This continuous cleaning process does not apply to non-coated parts
such as the oven door wlndow and oven racks.
What soils are-and
are not-removed?
Fat spatters which occur during meat roasting. oven frying and broillng are the most frequent types of oven soils and can, in most instances.
he continuously cleaned away.
Splllovers from pies and casseroles. carbohydrate-type
soils (sugars
and starches). and other soils which frequently fall to the bottom of the oven
are very difficult to remove That IS why heavy-duty aluminum foil is placed
on the bottom of the oven It will help catch these spillovers. and can be
c.hanged as necrssarl
How to care for your Continuous
Cleaning
Oven
1 Follo\~ trusted recipes for baking. roasting and broiling They u.111give
t~rne. temperature and pan recommendations
to help eliminate smoke.
bpattcr and splllovers before they happen
2 Krcp heavy-duty aluminum foil 111place on the bottom of the oven at
all tomes If foil IS not used and a spillover occurs. it ~111cover the
porous finish and ma? create a prrmanent solled spot
X The windows of the coven door and oven racks should be cleaned with
hot sudsy icater as required
Ust~ a soapy steel wool pad or plastic
zcounny pad to remc,vcJ stubborn spots Rinse ikell and dry with a
yoft cloth
To replace aluminum
foil on oven bottom
1 Cut a piece of E-inch wide (45 cm) heavy-duty aluminum foil long
enough to cover the bottom of the oven and extend slightly up the
sides.
2 Remove the oven racks
3 Lift heating element enough to raise the feet off the oven bottom
4 Slide foil into the oven under the heating element
5 Be sure heating element is down with feet on the oven bottom.
This is needed to give proper baking It also will help prevent accidentally touching the hot element when using the bottom rack.
You can order an Aluminum Foil Kit (Part Number 241430) from
your dealer. or use l&inch-wide
(45 cm) heavy-duty
foil sold in most
grocery stores
If results aren’t what you expect
Remember, the oven is continuously
cleaning itself to a presentably clean appearance
at normal baking temperatures
If most of your
oven use is for broiling. and very little baking is done. you may see fat
spatters on the oven walls and door. This is because broiling normally
produces more spattenng than baking. If the appearance is of concern to
you. clean the oven following the directions given below.
To hand-clean
the Continuous
Cleaning Oven
If you have a lot of fat spatters on the oven walls or door. and wish to
clean them yourself, follou’ this procedure:
1 Wash the area with h(,t. soapy water and rinse well
2 Use a soapy steel wool pad or plastic scounng pad for more stubborn
5pots
13 DC, not use commercial oven cleaners. These cleaners may remain in
the textured prcclaln
enamel and reduce the effectiveness of the
continuous clcanlng surface.
NOTE:
The air-flow oven door keeps the outside of the door at the low
temperatures required for listing of the oven by Underwriters Laboratones. Inc. As a result. the inside of the door does not get as hot as the
oven walls. Because of the cool door. some hand-cleaning
of the door
may be required especially if oven is used often for broiling or if low
baking temperatures are frequently used.
How
to clean
and
care
for your
oven
1. To remove the control knob and chrome rim for cleaning:
l
l
l
l
l
l
PART
Be sure the control knob is in the “OFF” position.
Grasp the knob and pull straight out.
Pull chrome rim straight out.
Wash in warm, sudsy water.
Replace rim over the switch stem. If spring was removed
reassemble as shown at left.
Push knob back into position.
for cleaning,
WHAT TO USE
HOW TO CLEAN
Oven door
glass
Warm. soapy water or plastic
scrubbing pad
- Make certain oven is cool. Wash. rinse and dry well
with soft cloth.
Commercial glass cleaner
Warm. soapy water or
soapy steel wool pads
- Follow directions
Oven racks
Broiler pan
and grid
Warm, soapy water or
soapy steel wool pads
Control
panel
Continuous
Cleaning
Oven
provided
with cleaner.
- Wash. rinse and dry Use soapy steel wool pads for
stubborn areas.
l
Wash with other cooking
utensils
Warm. soapy water
- Wash, rinse and dy well with soft cloth.
Commercial
- Follow directions
glass cleaner
provided
Warm. soapy water or soapy
steel wool pads
- Clean stubborn
water.
Heavy-duty
aluminum foil
available at grocery stores or
order Part No. 241430 from
your Whirlpool dealer or
your TECH-CARE”
service
representative
- Place strip of aluminum
catch spillovers.
with cleaner.
spots or stains. Rinse well with clean
foil on bottom of oven to
Most fat spatters on porcelain
enameled interior surface
gradually reduce to a
presentably clean condition
during normal baking or
roasting operations
9
IF YOU NEED
YOU FOLLOW
SERVICE OR HELP, WE SUGGEST
THESE THREE STEPS:
1. Before you call for service +:
properly,
If your microwave oven and range do not seem to be operating
check the following before calling for service.
If oven will not operate.
l Is it hooked
up to electricity or plugged in?
l Have you checked
the main fuse or circuit breaker box’?
l Is the Oven Selector
turned to a setting (Bake. Broil)?
l Is the Oven Temperature
Control Knob turned to the desired temperature? Have you set a temperature?
l Are the automatic
MEALTIMER*
controls set correctly?
If oven soil is visible on Continuous
Cleaning Oven finish..
Remember: The specially treated finish is designed to gradually reduce
oven soil to a presentably clean condition during normal baking or roasting operations.
l If oven soils remain visible on the oven walls or the door for a period of
time without disappearing.
the following cleaning procedure
can be
followed: use hot sudsy water and a nylon scounng pad or a soapy. steel
wool pad. Rinse the area with clear water
l
If cooking results aren’t what you expect.. .
l Are you using pans recommended
for best results?
l Have you allowed
1 I:, to 2 inches on all sides of the pans for proper air
circulation in the oven when baking’?
l Have you preheated
the oven when necessary”
l Are the pans the size recommended
in the recipe’
l Are you followlng
a tested recipe from a reliable source’)
See pages 13-14-15 of the Cooking Guide for some common
baking problems and their probable causes and cures
2. If you need service?:
If your Whirlpool appliance ever needs service anywhere in the
United States, help is just a phone call away.. to your nearest Whirlpool
franchised TECH-CARE”
service representative.
Whirlpool
maintains
a nationwide
network
of franchised
TECH-CARE
service companies to fulfill your warranty and provide afterwarranty service and maintenance to keep your WHIRLPOOL
appliance
in peak condition.
You’ll find your nearest TECH-CARE
service company listed in
your local telephone book Yellow Pages under Washer/Dryers-Repairing or Servicing. Should you not find a listing, dial free, the Whirlpool
COOL-LINE@ service assistance telephone number (800) 253-1301.
When calling from:
Michigan . . . . . . . . . . . . . . . . . . . . . . . . . . . Dial (800) 632-2243
Alaska & Hawaii . . . . . . . . . . . . . . . . . . . . Dial (800) 253-1121
If you move. . .
To make sure that your appliance is correctly installed and to insure
its continued
satisfactory
operation,
please telephone
your nearest
TECH-CARE@
service company for installation or to get the name of a
qualified installer. (Installation cost will, of course, be paid by you.)
10
Helpful hints.. .
You can help your TECH-CARE
service representative
give you
faster service if you include the model and serial number of your appliance
when requesting service. Also, retain your sales slip and warranty to verify
your warranty status.
Remember.. .
Your TECH-CARE
service representative
is specially trained in the
expert repairing and servicing of your WHIRLPOOL
appliances. He can
help you maintain the quality originally
built into your WHIRLPOOL
appliance. So why not take the time, now, to look up his telephone
number and lot it down in the space provided below.
My TECH-CARE
service representative’s
My appliance
model number
Its serial number
Purchase and/or
telephone
number
is:
is:
is:
installation
date:
If you need to call your TECH-CARE”
service representative,
model and serial number of your appliance.
You will find these numbers on the model and serial number
the oven door.
tell him the
plate behind
3. If you have a problem ::
Call Whirlpool Corporation
in Benton Harbor at the COOL-LINE
service assistance telephone number (see Step 2) or write:
Mr. Stephen E. Upton, Vice President
WHIRLPOOL
Corporation
Administrative
Center
2000 U.S. 33 North
Benton Harbor, Michigan 49022
Model and Serial
Number Plate
’ If you must call or write, please provide: your name, address, telephone
number. type of appliance. brand. model, serial number, date of purchase,
the dealer’s name and complete description of the problem. This information is needed in order to better respond to your request for assistance.
11
FSP 1sa registered trademark
of Whirlpool Corporation
for
quality parts Look for this
symbol ofquollty whenever
FSP
you need a replacement
part
@ for your Whirlpool appliance
FSP replacement
parts
wrll fit right and work right, because they are
made to the same exacting specifications
used to build every new WhIrlpool appliance
0
~irlpool
CO!dPORAlION
Benron Harbor. hllchiaan Automatic Washers. Clothes Owen
Freezers,
Rel;,gerato~- Freezers,
Ice Make;r,
Onh&er;
Built-In Ovenr and Surface Un~ls. Ranger. Microwave Owens.
Compactors. Room AN Condilmnerr,
Dehumlddierr.
Central
Heatmg and An Cominlonmg Systems.
Part No. 311004
Printed
in U.S.A