1
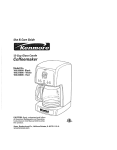
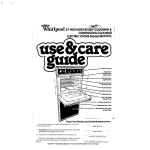
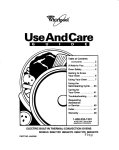
TKitil/ g 01
//
n
274NCH BUILT-IN
ELECTRIC OVEN
’ Control
-
Panel
Manual Oven
light Switch
Broil
Element
Silicone
Heat Seal
Oven Front
Frame
Bake
Element
Model and Serial
Number
If ycu need service, or call with a question,
Information ready:
1. Complete
Model and Serial Numbers
just behind the oven door].
2. Purchase
have this
dote from sales slip.
Copy this information in these spaces. Keep this book,
your warranty and the sales slip together in a handy
place. Please complete
and mail the Owner Registration Card furnished with this product.
See the “Cooking
Model
Number
Serial
Number
(from the plate
Guide”for
important
Purchase
Setvlce
safety
Company
information.
Dole
and
Phone
Number
Plate
Your responsibilities.
l
l
Proper installation
and safe use of the oven are your personal
responsibilities.
Read this”Use and CareGuide”and
the”Cooking
use and safety
information.
Guide”carefully
for important
Installation
You must be sure your oven is...
l
rnstalled and leveled in a wall
or cabinet
that will hold the
weight;
l
rnstalled in o well-ventilated
area protected
from the
weather;
w properly
connected
to the correct electric supply and
grounding
[See “lnstallotion
Instructions.“)
Proper use
You must be sure your oven is...
l
used only for jobs expected
of
home ovens,
l
used only by people who con
operote
it properly;
l
properly
maintained.
Contents
Page
3
;
2
3
4
4
4
4
5
5
6
6
7
8
8
9
9
9
10
10
11
..........................
Your Responsibilities
.................................
Installation
..................................
ProperUse
Safety ......................................
Using Your Oven ..............................
Setting the Controls .........................
Baking ......................................
Resetting the Oven Temperature
Control .....
Broiling ......................................
Oven Rack Positions ..........................
Setting the Clock ..............................
Using the Minute Timer ........................
Using the Automatic
MEALTIMER* Clock .......
Oven light. ...................................
....................................
OvenVent
Cleaning
and Caring for Your Oven ...........
Control Panel and Knobs ....................
Oven Door ..................................
.............
Using Foil ......................
Cleaning
Chart .............................
............
If You Need Service or Assistance
‘Tmk.
2
01987 Whirlpool
Corparaftcyr
i/
,’ J- .’
. FOR YOUR SAFETY.
DO NOT STOREOR USEGASOLINE OR OTHER FLAMMABLE VAPORS AND LIQUIDS
IN THEVICINITY OF THIS OR ANY OTHERAPPLIANCE.
Using your oven
Automatic
Minute
MEALTIMER’ Clock
Timer
Manual
Oven Light Switch
Stat-l Time Knob
Stop Time Knob
Oven Temperature
Control
O&n
Selector
Oven Indicator~ight
‘Tmk
SETTING
THE CONTROLS
BAKING
1.
2.
3.
4.
5.
6.
Put oven ‘QCK~ where ‘you want them
(See paLIe 5 for suggestions
)
Set Over Selector to BAKE.
Set Over Temperature
Control to the ti,akIng rempc?rature you want.
cet the o:en preheat until the Slgnal Light
(goes off
Put foofi ‘: rhe over,
Whet? dc:!e bul<lng. tu,Ti both knot!:; ta
OFF
During baking, the elements will turn on
and off to help hold the oven temperature
at
the setting. (The top element will never turn
red, but will be hot.) The Signal light will turn
on and off with the elements.
RESETTING THE OWEN TEMPERATURE CONTROL
Does your ew oven seem to be hotter or colder than your old oven at the
,irne settIny&,‘) The temperature
setting In your old oven may have changed
gradually
ovt?r the years. The accurate
setting of your new oven can seem differcrlt !f you thlr K the oven temperature
needs adjusting,
follow these steps
Lockinq
Notches-t
1,
?uil the 0
en ieni-
peratiire
~Zoirro
if!0 ,i C,’
2.
Screw
LTooth
Loosen the lochIng screw
NOTICF pos.tlor!
xr n:;tches
Tighten
the locking
3. To lower the
temperature,
move
CI notch closer to LO
Each notch equals
about 10°F (5”C].
screw.
Replace
the knob.
4. To raise the
temperature,
move
a notch closer to HI.
Each notch equals
about 10°F (5°C).
the rat x where you
want tt for brc:ll!ng (See
oelow ‘or suggestIons
!
1.
Place
4.
Set Oven Temperature
Control to BROIL [Set on a
lower
remperature
slower broll!rlg
5i?low ’
for
See
2.
Put broiler pan and food
on the rack
3.
5.
During broiling the oven
door must be purtly open
A built-in stop WIII hold It
there
6.
Set Oven Selector
BROIL
to
When broiling is done
turn both knobs to OFF
Broiling can be slowed by setting the Oven Temperature
Control to a setting
lc)wer ‘ban BROIL When Its on BROIL, the broil element is on all the time. When its
31-i a tr,mperature,
the element turns off and on The lower the temperature
setting,
the st-:)rter are the times when the element IS on
The Oven Selector must be on BROIL and the door partly
open for all brolllng temperatures.
OVEN RACK POSITIONS
Position
Loft rack
6AKlNG
at front
racks
before
turning
on the oven.
Broil Element
ynd pull Out
OR ROASTING
Food for baking or roasting should be
Ilaced
tr the c#:?nter of the oven
Always leave at least I’ 2 to 2 inches
4-5 cm] betwed-?n the sides of a pan and the
:,ven wall
and .nother pan For more informa-:..F see t%z .‘C oking Guide ”
BROILING
Adjust the top rack so the food to be broiled is
at a suggested
distance
from the broil element,
(see page 6). ALWAYS broil with the door open
to the broil-stop
5
Su gested oven-rack
positions
di f erent kinds of meats.
Food
e&4
Beef Steaks
Rare
Medium
Well done
Beef Steaks
Rare
Medium
Woli Done
Hamburgers
Lamb Chopi
Mealum
Ham slice, precocked
or tendered
Canadian
Bacon
Pork Rib or Loin Chop
Well done
Chicken
-.;,;q
1,:
,)
7’
FlSh
L,?/C?:
1.
PushinMclockwrrse
,‘q‘ !OV
USING
6
Approximate
Minutes Selector
set to BROIL
1st slde
2nd slde
Description
1 (2.5 cm)
1 (2.5 cm)
1 (2.5 cm)
3 (8cm)
3 (8cm)
3 (8 cm)
7-9
9-11
11-13
3-5
4-7
5-7
1’4
I?,,
1’:
‘2
4
4
4
3
13-15
17-19
19-21
6-8
6-8
8-10
14-16
4-5
3 (8 cm)
6-8
4-5
3 (8 err]
3 (8cm)
6-8
6
4-5
4
(4 cm]
(4 cm)
(4cm)
!I cm)
1 (2 5cm)
1 i -1
(I -2.5 cm)
1/Z (1 cm]
J,d 1
(2.2.5 cm)
2-Z lb
(I-l 5 kg)
cut In haif
whole
fiile!s
-5 (1 O-l 3 :mj
-5 (IO-13 :,m)
-5 (IO-13 cm)
(8cm)
4 -5 (IO-13 cm)
15
10
7 -9 (18-23 am)
25-30
11-16
7-8
IO-12
9-14
5-7
3 (8 cm!
3 (8 cm)
1 7 .+‘4
-5 (IO-13 cm)
THE CLOCK
mu t e T’lmer Knob and turn
~~itil ‘c?(:l >h:?‘NS !hf? “9’
THE MINUTE
DO NOT PUSH IN THE KNOB
1.
times for
Inches (cm] from top
of food to Broil Element
d
SETTING
and broiling
2.
f r -1 /
change
TIMER
il you
push
m when
turning.
wherl Jetrlr-ig ri7c MlniJte T~r~-le:
Without
pushing
it in, turn the Mlnule
Timer K ot- ‘3qtii ‘hex 53rG ;>osses tCe
x9rg
c,., ,v:: *
PUSHING
CHANGES
Let the Minute
Timer Knob pop out. Turn
;cJlinterrlociiwse
u~it;i the Minute Timer
31~2, sP. +v? OFF The clock
setting
will
IN AND TURNING THE KNOB
THE CLOCK SETTING.
2.
Without
pushing
the setting
3.
in, turn the knob
back
you ,want
When the time ,j up c; buzzer wtll sound.
To stop ‘he tsl,: zer. tilrr-1 the dlai to OFF
without
pushing
in the
knob.
to
USING THE AUTOMATIC
MEALTIMER::
The Acltomatlc
MEALTIMEI; Clock 1sdesigned
you Set even when you are “~‘1 clrcdn?d
To start and stop baking
1.
Put the racks where you
wan+ them and ,:,ace the
I’
f0 od In the eve 87
1.
2.
‘Tmk
2. Set the Oven Selector
After DokIng 1sdione. turr
Sot1 knsbs to OFC
on
TIMED BAKE
5.
Fusi~ In and turn the Star:
Tome KnoS clockwise
to rhe time vou vvc11t bar
1’19 to star:
8.
TC stop the o\:er> before
‘?e preset time turr: nott7
kncbs ti? OFF
to the r~ab:+~me
of dav
.,
To stop baking
to turn the 3v~n cr f-~nc aff a; time..
automatically:
4. MaKe stire ihe cl0c.K 1sset
7.
CLOCK
6.
PIJS!~1r1ant turn the Stop
‘ire Knot] clockwise
“. t:,? tlr’.C? you ssjant the
(“1 :c’ c,l-;(j- .Jff
automatically:
Put tne racks *here i/cd want ‘hen-’ [Jnd
plac? the fr_oC ,n tile oven
Set the Oven Selector 3n TIMED BAKE-
3.
Set the Over3 Temperature
Control r3r-Irhe
baking +eT,perarure
you wan’
4. Make surt3-the clock IS set rn the ,lqh! time
of dav
5.
6.
7.
Pusr, iri unc t’“:ri Abe 3rd~ F,rl:e K, :DG clockwise to the tirr-e ‘you .%/or-t‘Ile oven to shut
off
Pfte: oak:-~G I: 3or1d :sj[rl p,al,> 4r- s\:>s ,o
OF’
Tc s;op the oven r,efnre ‘t!e pfe:e! hme.
turn bctp, ,(qo!~~ +c [)pr
SPECIAL CAUTION:
Use focds that will not go bad or spool
while waitrng for cooking
to start Avoid
using dishes with milk or eggs, cream
soups, cookea
meats or fish, or any Item
with baking powder or yeast.
Smoked or frozen meats may be used:
so can vegetables,
fruits and casseroletype foods. Vegetables
can be cooked
in
a covered
baking d:sh with about a halfcup (Ile ml) of water for 1 to i’ 2 hours.
Any food that has to wait for cooking
to
start should be very cold or frozen before
it is put In the oven. MOST UNFROZEN
FOODS SHOULD NEVER STAND MORE THAN
TWO HOURS BEFORE COOKING STARTS
7
THE OVEN LIGHT
The oven Light WIII come on when you push the Oven Light switch. Push the switch
again to shut off the light
To replace
the light
1. Turn of? the electric
at the rnaln power
bu:b:
Rowe:
supply
2.
l?c~rT;\E
“e bu!b cover bv
p~l11ng cut on the wire
holder alla moving It to the
3. Remove the light bulb from
rts socket
Sicjr-‘
4. Replace the bulb wit- a
40.watt appliance
bulb
available
from most grocery, variety and
hardware stores
\
5. Replace ‘he bull3 cover
an? snap the wire holaer
in t 3ce The bulb must
have this cover when the
oven is being used.
6.
Turn electrical
power back
on at main power supply
THE OVEN VENT
tinen the oven is on, hot air and moisture
escape through vents over the control
oanel The vents are needed
for air circulation.
Do not block
the vents.
Poor baking
can result
Cleating and caring for your oven
CONTROL PANEL AND KNOBS
1y
First make SU- 1:
knobs are on OFF
then pull knob
straight ott.
2. 2.t’ YJCIl’7~
:,oocy
:vater <::(a a soft
(:lotk. ‘2 *due
t9f:. par:.t-I Rinse
,“8? A’II:+ dry
3.
Vyasr- ~‘io:;b
81
warm soaps
,water RII-v+ A -‘I,
ona
‘2’~
4.
Push knobs
straight back on
Make sure they
are on OFF
THE OVEN DOOR
REMOVING
1. .3perl the 3oor 3.f the crcl! ~I~~rt:a~~
2. Grasp the door firmly at both sides and lift
it tip and uway from the range.
REPLACING
1, 511~;hinge :.lvns
lto dool slots
2. Pusri In bottom of door until it snaps into
place. Close the door.
9
USING FOIL
Using foil on the oven bottom is recommended
only if the foil is used
properly.
Cut foil from a roll of heavy-duty
l&inch (45 cm) aluminum foil,
or buy a foil kit (Part No. 241430) from your Whirlpool Appliance
dealer.
2. Slide
bake
Make
iong
sides
1. 1oftthe cool bake element slightly to lift the
feet off the oven bottom
the foil under the
element
sure fzlil is centereu
enough to start up both
and without wrrnkles
3. c?r proper baking, lower the
oake element so all feet
rest solidly on the foil.
CLEANING CHART
PART
Outside of
Oven
WHAT TO USE
Soft cloth, warm
soapy water
HOW TO CLEAN
Wipe off regularly
l
r::? nor iJi!G+J ICOO ccxiaining
acids (such
,%:tg;negor, iomalo. lemon juice or milk]
to remain on surface P.cids will remove
tke glossy finish
Nylory 13i plasflc
scourlr;g pcz I,:
st;jQb!ii;; jpnr
Control
Warm, sudsy water and
bristle brush
Porcelcinename
broiler 1 an
and grl-?
Contro!
panel
Warm. soapy wa!C-r 3’
soapy steel woo! 7132:
Ovend
glass
or
* 0~ not use ucraslve or harsh cleansers.
‘Wash ri~1ss and dry well
l
-smWarm soapy water
* ‘Wasfi rtr,se c!nd dry well wrth soft cloth.
_-.
.<rmwt~r’:CI s;lG:-’
:!eaner
&arm, soapy ~~cter or
plastic scrut:b,i0q Gad
= i:2’;:.w
CommFlcial
Oven rc :ks
cleaner
Self-Cleaning
cycle
m-i
i*
-:!f:::.
t:t,..;:s Groy:;jecj
art? :.ieone:
leave in oven during Self-Cleaning
cycle
L y i‘
fJi,2\5
Over?
l
rinse (lnd dry Use soapy steel wool
pads for stuDborn areas.
?emove door for eosler access.
~-‘icre
newspaper or! f!oor to protect
“i!dl surface
:liii~~~~:jIrectlons prcvlded with the
:ver: -ieone,
-i!r:5e $849! * 111:uieu N’Ij!er
St’ wc.-I~LeTllatec rcioK>
10 n,:!t oilaw ~.:ommerCiUI oven cleaner
-! ;;orltact the neatrng elements oven
.eal or ex!er0 surfaces of oven.
m Wih.
Warm, soapy water or
soapy steel WOQI pads
*
0
Commercial
cleaners
.
pv?r,
f:fe< !:ons ,qi::, :1;;3aner
8 Mokp :8r+alrl .?VPP IS cool Wash, rinse
:i g a e.5
; ;’ ‘2~i: stirth SC;;! 10th
Warm, soapy water 01
soapy steel wool pads
Standar:
men
when oven is cool.
l
.
*
If you need service or assistance,
we suggest you follow these five steps:
1. Before calling for assistance.. . 3e-p. If you need service*.. .
Performance
problems often result from little
things you can firid and ftx yourself without
tools of any kind
Ii nothing operates:
Is the oven corr ?c?Iv alred to a live clrcdit
with the proper ,doltcae? (See Installation
Instructions
)
l Have you chec
<ed your home’s mclln fuses or
sircuit breaker
ic)c 1
l
If the oven will n‘l#t operate:
is the Oven Self sctor turned to a settlr18g (BAKE
or BROIL, but no. TIMED BAKE)7
l is the Oven Terr )erat;lre
Control turned i< .J
temperature
.se+ins?
Whirlpool
has a nationwide network of franchised
TECH-CARE
Service
Comi/
7ECH-CARE
oanles. TECH-CARE service
‘RANCH’SLDSERY’Ct
technicians
are trained to fulfili ?Qe prodiict
warranty
and provide
afterwarranty service anfwhere
in the United States.
To locate TECH-CARE service ;n your area, call
our COOL-LINE service assistance
telephone
nimber
[see Step ‘2; or look in your telephone
directorv Yellow Papes under
Whit ~$201
l
If cooking
results aren’t what you expected:
* !s the oven leve 1
l Are y3u using
F .jrl.y ~~crnme?Zec
it‘ ‘!-Y
Cooking Guide?
9 it oaking. have .O.J allowed 7:., to 2 !:!c.hes
(4-5 cm] on all I !des -if the pans for :.:I’
circulation?
l 2oes the oven.
~I~~Deiati~:e seem ioo I:~W (;I
too hiqh? See p:ige 5 Resetting the oven
temperature
cc ntroi’
. flave you prehi ;te:: ?QGJ?:jpr, ,s the ‘cz1p3~
zalls for?
‘:zr In the rrc!pe?
l Are the pans ti-,~ SIJ” c;arleti
l Are you fo!lowll
‘2 17tested recipe from a
reliable silurce
See the Cooking Guide ior r’;ore infar rllatioli
on cooking probi?ms anr; how to sclv? them
2 . If you
need assistance? “.
Call the Whirlpool
COOL-LINE
service
assistance
telephone
number. Dial free from
anywhere
in the U.S.:
1.,800-25343Ol
and talk with one of our tratned Consultants. The
Consultant can ir,struct you In how to obtain satisfactory operati-jr:
from your appliance
or, if
service is necessc’ry recommended
a qualified
service (cornoar-‘, lr- your area.
4
l
If you have a problem?..
Call cur COOL-LINE service assistance
telephone number [see Step 2) and talk with one of
odr Consultants. or if you prefer, write to:
Mr. RoDert Stanlev
Division Vice President
‘Whirlpool Corooratlon
2000 rv-63
sentor-; iiarbcr M; 49022
5.
If yoq need FSP
replacement parts*. . .
rSPb 1s a registered
trademark
of Whirlpool
Corporation
for qualified parts. Look forthis symbol of quality whenever
you need a replacement part for your Whirlpool appliance.
FSP replacement
parts will fit right and work right, because they are made to the same exacting
specifications
used to build
every
new
Whirlpool appliance
To locte FSP replacement
parts in your area,
refer ‘o Step 3 or call the Whirlpool COOL-LINE
service assistance number in Step 2.
-I! jou must cali or write, please provide: model
number, serral number, date of purchase, and
2 complete
description
of the problem. This in!~.Xmation is rleedetl In order to better respond
k your request 3r .xsistance.
11
i
Eenton Harbor. Michigan. Automatic Washers. Ciollres flvers,
Freezers. Relrigeralor-Freezers. Ice Makers, Oishwasttsro,
Buill-in Ovens and Surlace Units. Ranges. Microwave Ou~eo,
Compactors, Room Air Conditioners, Dehumidiliars. Crntraf
Heating and Air Conditioning Systems.
Part No. 56OGOO3PO4/816193
~,I987 Whirlpool Corporation