1
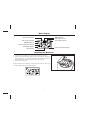
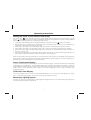
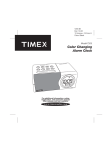
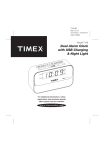
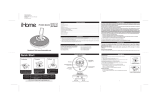
T035 IB
June 16,11
151mmw x 151mm H
Color: Black
Model T035
Color Changing
Alarm Clock
UP
T
E
S
DOWN
TIMER
TIM
E
DE
MO
SOUND
For additional information, online
registration, and exclusive special
offers please visit our website:
Introduction
Thank you for selecting this Timex Model T035 Color Changing Alarm Clock with Soothing Sounds. This model includes:
•
•
•
•
•
A large LCD display with momentary Indiglo ® color changing back light.
A programmable Auto-Snooze alarm.
Wake to one of 4 Soothing Sounds or a buzzer alarm.
Sleep to Soothing Sounds with auto-shutoff.
A 24-hour reminder/nap timer.
Please take the time to review this manual completely and carefully to insure that you are getting the maximum benefit from
all of the unique features included in this Timex product.
Once again, thank you for selecting Timex.
Table of Contents
Controls And Indicators................................................................................................................................................. 1
Main Display ................................................................................................................................................................... 2
Installing the Batteries.................................................................................................................................................. 2
Operating Instructions............................................................................................................................................... 3-6
Limited 90-day Warranty Information.........................................................................................................................7
Maintenance
•
•
•
Place the unit on a level surface away from sources of direct sunlight or excessive heat.
Protect your furniture when placing your unit on a natural wood and lacquered finish. A cloth or other protective material
should be placed between it and the furniture.
Clean your unit with a soft cloth moistened only with mild soap and water. Stronger cleaning agents, such as Benzene,
thinner or similar materials can damage the surface of the unit.
FCC Information
This device complies with Part 15 of the FCC Rules, operation is subject to the
following two conditions: (1) This device may not cause harmful interference, and
(2) this device must accept any interference received, including interference that
may cause undesired operation.
Warning: Changes or modifications to this unit not expressly approved by the party
responsible for compliance could void the user’s authority to operate the equipment.
NOTE: This equipment has been tested and found to comply with the limits for a Class
B digital device, pursuant to Part 15 of the FCC Rules. These limits are designed to
provide reasonable protection against harmful interference in a residential installation.
This equipment generates, uses and can radiate radio frequency energy and , if not
installed and used in accordance with the instructions, may cause harmful interference
to radio communications. However, there is no guarantee that interference will not occur
in a particular installation. If this equipment does cause harmful interference to radio
or television reception, which can be determined by turning the equipment off and on,
the user is encouraged to try to correct the interference by one or more of the following
measures:
• Reorient or relocate the receiving antenna.
• Increase the separation between the equipment and receiver.
• Connect the equipment into an outlet on a circuit different from that to which the
receiver is connected.
• Consult the dealer or an experienced radio/TV technician for help.
This Class B digital apparatus complies with Canadian ICES-003.
Cet appareil numérique de la classe B est conforme à la norme NMB-003 du Canada.
Battery Warning
For models that require more than one battery
• Do not mix with used or other battery types/brands
• Do not heat above 75ºC (167ºF)
• Replace all batteries at the same time
• Do not expose contents to water
• Do not open batteries
• Do not charge or recharge
• Do not dispose of in fire
• Do not install backwards
Controls and Indicators
Front Panel
TIM
TIMER
T
UP
SE
SET Button
DOWN
E
TIMER Button
TIME Button
E
MO
D
MODE Button
SOUND
SOUND Button
1
DOWN Button
UP Button
Main Display
TIMER Indicator
Alarm ‘ON’ Indicator
Alarm Time Indicator
Current Time Indicator
Snooze ‘ON’ Indicator
AM/PM Indicators
Time and Alarm Time Display
Month/Date Display
Indoor Temperature Display
Day Indicator
Installing the Batteries
• Press down on the battery door locking tab and remove the door.
• Install 3 fresh alkaline “AAA” batteries in the compartment. Be sure to
follow the polarity (+ / - ) markings engraved in the battery compartment.
If the batteries are inserted incorrectly the unit will not work.
• Replace the battery door.
When the batteries are installed for the first time the clock will 'beep' once
and the display will appear as shown below:"
2
Operating Instructions
Setting The Clock To The Correct Time of Day
The clock symbol
in the upper left corner of the display indicates that the display is showing current time. The bell
symbol
in the upper left corner of the display indicates that the display is showing the wake-up time. Pressing the MODE
button cycles the display between the current time and wake-up time.
1. If necessary press the MODE button to change the display to the current time mode.
appears in the display.
2. Press the SET button. The lighting turns on briefly and the hour digits begin to flash. Press the UP or DOWN buttons to
adjust the hour. Be sure to set correctly for AM or PM.
3. Press the SET button again. The minutes begin to flash. Press the UP or DOWN buttons to adjust the minutes.
4. Press the SET button again. The Year begins to flash at 2011. Press the UP button to adjust the year if necessary.
5. Press the SET button again. The Month display begins to flash. Press the UP or DOWN buttons to adjust the month (1 =
January, 2 = February, etc)
6. Press the SET button again. The Date display begins to flash. Press the UP or DOWN buttons to adjust the date. The
DAY indicator changes automatically to match the Year, Month, and Date display.
When you are finished with the above settings you can press the SET button again to exit the setting mode and start the
clock running. Or, after 60 seconds the clock automatically exits the setting mode and begins to run. Note: The flashing colon
between the hour and minute digits acts as a seconds counter.
Indoor Temperature Display
This clock includes a built in temperature sensor and indoor temperature display. The indoor temperature can be displayed
in Centigrade (C°) or Fahrenheit (F°). The initial default setting when the batteries are installed is Centigrade. To switch the
display between Centigrade and Fahrenheit press the DOWN button. Note: If you place this clock on a windowsill or similar
location where it may be exposed to direct sunlight or cold winter temperatures you will not get an accurate room
temperature reading.
12/24-Hour Time Display
This clock can display the time in 12-hour format with AM/PM indicators, or in 24-hour format, often referred to as ‘military
time’. To switch the display between 12 and 24-hour time formats, press the UP button.
Momentary Lighting System
Each time you press any front panel button to make adjustment the lighting will turn on for approximately 5 seconds and the
shut off automatically to extend the battery life.
3
Operating Instructions
Setting the Wake-up Time, Auto Snooze Time, and Wake-up Sound
This clock features a programmable Snooze/ Repeat Alarm that you may turn ‘On’ or ‘Off’. If the Snooze function is turned
‘On’ the alarm will automatically enter the Snooze mode and shut ‘Off’ after two minutes, and then turn ‘On’ again one
minute later. You may adjust the amount of Snooze time between one minute and 60 minutes. The initial default setting is
one minute.
You may also choose which of the 4 soothing sounds or the electronic buzzer alarm you want to turn on at the wake-up
time.
1. Press the MODE button to change the display from current time mode to wake-up time mode. The bell symbol sert
appears in the display. The initial alarm setting is 12:00 AM.
2. Press the SET button. The wake-up hour digits begin to flash. Press the UP or DOWN buttons to adjust the wake-up
hour. Be sure to set correctly for AM or PM.
3. Press the SET button again. The wake-up minutes begin to flash. Press the UP or DOWN to adjust the wake up minutes.
4. Press the SET button again. The Snooze Indicator and Snooze time display (01) begin to flash. Press the UP or DOWN
button to select the desired amount of Snooze time. For example, if you select 5 minutes of Snooze time, the alarm will
automatically turn on again in 5 minutes.
5. Press the SET button again. The number ”1” begins flashing in the Time display. Press the UP or DOWN buttons to hear
and select from among the 4 soothing sounds or the electronic buzzer as your wake-up alarm sound.
6. Press the SET button once more and the clock will return to the wake-up time mode, then press the MODE button to
change to current time mode, or if you do not press any button for 1 minute the clock will return to the current time
display automatically.
Activating the Alarm and the Auto Snooze Time
After you have set the desired wake-up time, Snooze time, and wake-up sound as described in Steps 1 through 6 above
you must still activate the alarm and snooze functions as follows:
1. If the display is showing current time press the MODE button to change the display to your desired wake-up time.
2. While the wake-up time is showing on the display press the DOWN button once to activate the alarm. The alarm indicator
appears in the display to confirm that the alarm is activated.
3. While the wake-up time is showing on the display press the DOWN button once more to activate the snooze function.
The snooze indicator
appears in the display to confirm that the snooze function is activated.
4. To deactivate the alarm and the auto-snooze functions press the DOWN button once more. Both the alarm indicators
and the snooze indicators
disappear from the display.
At the selected wake-up time if only the alarm is activated the alarm will turn on to the selected soothing sound or buzzer
alarm. The alarm sound starts softly and gradually increases in volume. The alarm will continue for 2 minutes and then shut
off and reset itself for the following day. To stop the alarm sooner press any of the front panel buttons except the SOUND
button.
4
Operating Instructions
At the selected wake-up time if both the alarm and the auto-snooze functions are activated the alarm will turn on for 2 minutes
and then enter the auto snooze mode. The alarm will turn off for the number of snooze minutes that you selected above and
then turn on again for 2 minutes. During snooze operation the snooze indicator
flashes in the display. The alarm/snooze
cycle can be repeated a total of 3 times, but after the third time the alarm resets for the following day and the snooze indicator
stopstops flashing. When the alarm turns on you may press any button on the front panel (except the SET button) to stop
the alarm sooner and begin the auto snooze cycle immediately. The alarm will turn on again in 2 minutes.
Remember that if only the alarm indicator
appears in the display the alarm will turn on at the selected time for 2 minutes
and can be stopped and reset by pressing any button on the front panel except the SOUND button.
If both the alarm indicator
and the snooze indicators
appear in the display the alarm will turn on for 2 minutes and
then enter the auto snooze mode for the number of minutes that you selected. This cycle can be repeated up to 3 times and
then the alarm will reset for the same time the following day.
Sleep to Soothing Sounds with Auto-Shutoff
You may program the soothing sounds to play for up to 60 minutes and then shut off automatically.
1. Press the TIME button. The display will show “0:10” which is the initial default Sleep Timer setting. Continue to press the
TIME button to increase the Sleep Timer setting as follows: 0:10 -> 0:20 -> 0:30 -> 0:40 -> 0:50 -> 1:00 -> 0:10 -> etc.
2. When the display is showing the desired amount of Sleep Time Press the SOUND button to begin playback of the
soothing sound. To change to a different soothing sound press the SOUND button once to stop playing the current
sound and press again to begin playing the next sound. Repeat this process until you hear the desired sound. The
number of the selected sound will appear in place of the Date indicator.
3. Press the UP or DOWN button to adjust the volume level of the soothing sound.
4. The display will begin counting down from the time you selected. The remaining minutes and seconds will appear in the
display. As the soothing sounds are playing the color of the display and inside the cabinet will change every 5 seconds.
To pause the soothing sounds press the SOUND button once. To resume playback of the soothing sound Press the
SOUND button again.
5. When the display counts down to “0:00” the soothing sounds shut off automatically. To shut off the soothing sound
before the display counts down to 0:00, press the MODE button. The soothing sound stops and the display returns to
current time.
Countdown / Reminder / Nap Timer
This clock includes a countdown timer that can be used to remind you of an appointment, meeting, or any other event, or
when taking a nap, without disturbing your normal wake-up alarm setting. The countdown timer can be set for up to 24
hours in advance. When the timer counts down to “00” the alarm turns on for one minute.
5
Operating Instructions
To program the countdown timer:
1. Press the TIMER button. The display will show 23 Hours, 59 Minutes, and 59 Seconds which is the initial default setting
for the timer. The TIMER indicator also appears.
2. Press the SET button. The Hour display begins to flash. Press the UP or DOWN buttons to set the number of hours
before the alarm turns ‘On’.
3. Press the SET button again. The Minute display begins to flash. Press the UP or DOWN buttons to set the number of
minutes before the alarm turns ‘On’.
4. Press the SET button again. The Seconds display begins to flash. Press the UP or DOWN buttons to set the number of
seconds before the alarm turns ‘On’.
5. When the display is showing the desired Hours, Minutes, and Seconds, press the TIMER button once to enter the new
timer setting in the memory, and once more to start the countdown timer. The display will begin counting down. Note: If
you want to pause the countdown at any time press the TIMER button again. Press the TIMER button once more to
resume the countdown.
6. When the countdown has started you can press the MODE button to change the display back to the current time, or
after 60 seconds the display will change back to the current time automatically. To review the amount of countdown time
remaining, press the TIMER button at any time, and then press the MODE button to return to current time.
7. When the timer counts down to “00” the alarm will turn on and continue for one minute. To stop the alarm sooner, press
any button on the front panel.
NOTES:
• When you change the timer from the 23:59:59 default setting to a new setting, the new setting becomes the new default.
For example, if you program the alarm to turn on after 90 minutes, this becomes the new default setting. The next time
you press the TIMER button the new default setting on the display will be 90 minutes.
• When the timer begins counting down the display and cabinet lighting will remain ‘On’ for 5 seconds and then shut off
automatically to extend the battery life.
Replacing the Batteries
When the display becomes dim and begins to fade and the volume of the sounds becomes weak you should replace the
batteries as soon as possible. If weak or exhausted batteries are left in the battery compartment they will eventually leak and
cause damage to the unit and possible damage to the surface below the unit as well.
Always replace all 3 batteries at the same time and do not mix different types of batteries.
IMPORTANT: Make sure you have the 3 new batteries removed from their package and ready to install before you remove
the old batteries from the unit. If you can replace the batteries within one minute you will not need to reset the clock. But if
there are no batteries in the battery compartment for more than one minute it will be necessary to reset all clock functions
after the new batteries are installed.
6
Limited 90-Day Warranty Information
Timex Audio Products, a division of SDI Technologies Inc. (hereafter referred to as SDI Technologies), warrants this product
to be free from defects in workmanship and materials, under normal use and conditions, for a period of 90 days from the date
of original purchase.
Should service be required by reason of any defect or malfunction during the warranty period, SDI Technologies will repair
or, at its discretion, replace this product without charge (except for a $2.00 charge for handling, packing, return
UPS/postage, and insurance). This decision is subject to verification of the defect or malfunction upon delivery of this product
to the Factory Service Center listed below. The product must include proof of purchase, including date of purchase. The fee
for service after the warranty period or without proof of purchase is $4.00.
Before returning this product for service, please first replace the batteries (if applicable) with fresh ones, as exhausted or
defective batteries are the most common cause of problems encountered.
If service is still required:
1. Remove batteries (if applicable) and pack the unit in a well-padded, heavy corrugated box.
2. Enclose a photocopy of your sales receipt, credit card statement, or other proof of the date of purchase.
3. Enclose a check or money order payable to the order of SDI Technologies, Inc. for the sum of $2.00 (or $4.00 if after the
warranty period or without proof of purchase).
4. Send the unit prepaid to the Factory Service Center listed below:
Consumer Repair Department
SDI Technologies Inc.
Timex Audio Products Division
1330 Goodyear Drive
El Paso TX 79936-6420
NOTE: This warranty is valid only if the product is used for the purpose for which it was designed. It does not cover (i)
products which have been damaged by negligence, misuse or accident, or which have been modified or repaired by
unauthorized persons; (ii) cracked or broken cabinets, or units damaged by excessive heat; (iii) damage to tape cassettes (if
applicable); (iv) the cost of shipping this product to the Factory Service Center and its return to the owner.
This warranty is valid only in the United States of America and does not extend to owners of the product subsequent to the
original purchaser. Any applicable implied warranties are also limited to 90 days, and SDI Technologies will not be liable for
consequential damages. (Some states do not allow limitations on implied warranties or exclusion of consequential damages,
so these restrictions may not apply to you.) This warranty gives you specific legal rights, and you may also have other rights
which vary from state to state.
© 2011 SDI Technologies, Inc. All rights reserved
TIMEX is a registered trademark of Timex Corporation the United States and other countries
7
T035-061611-A
Printed in China