1
9A08814500
T-R670
AM / FM Stereo Tuner
OWNER’S MANUAL
MANUEL DU PROPRIETAIRE
MANUAL DEL USUARIO
Thanks for buying a TEAC. Read this manual carefully to get the best performance from this unit.
Nous vous remercions pour l’achat d’un appareil TEAC. Lire ce manuel avec attention pour obtenir les
meilleures performances possibles de cet appareil.
Enhorabuena por la adquisición de un TEAC. Lea detenidamente este manual a fin de obtener el mejor
rendimiento de esta unidad.
Important Safety Instructions
For U.S.A.
TO THE USER
This equipment has been tested and found to comply with the limits for a Class B digital device, pursuant to Part 15 of the FCC
Rules. These limits are designed to provide reasonable protection against interference in a residential area. This device
generates and uses radio frequency energy and if not installed and used in accordance with the instructions, it may cause
interference to radio or TV reception. If this unit does cause interference with TV or radio reception you can try to correct the
interference by one or more of the following measures :
a) Reorient or relocate the receiving antenna.
b) Increase the separation between the equipment and the receiver.
c) Plug the equipment into a different outlet so that it is not on the same circuit as the receiver. If necessary, consult the dealer
or an experienced radio/TV technician for additional suggestions.
CAUTION
Changes or modifications to this equipment not expressly approved by TEAC CORPORATION for compliance could void the user's
authority to operate this equipment.
For CANADA
Pour le CANADA
AC POWER CORD CONNECTION
CORDE DE CONNEXION CA
CAUTION:
ATTENTION:
TO PREVENT ELECTRIC SHOCK, MATCH WIDE BLADE OF PLUG
TO WIDE SLOT, FULLY INSERT.
POUR ÉVITER LES CHOCS ÉLECTRIQUES, INTRODUIRE LA
LAME LA PLUS LARGE DE LA FICHE DANS LA BORNE
CORRESPONDANTE DE LA PRISE ET POUSSER JUSQU’AU
FOND.
WARNING: TO PREVENT FIRE OR SHOCK HAZARD, DO NOT EXPOSE THIS APPLIANCE TO RAIN OR MOISTURE.
Y
E
R
CAUTION: TO REDUCE THE RISK OF ELECTRIC SHOCK, DO NOT REMOVE COVER (OR BACK). NO USERSERVICEABLE PARTS INSIDE. REFER SERVICING TO QUALIFIED SERVICE PERSONNEL.
THE LIGHTNING FLASH WITH ARROWHEAD SYMBOL, WITHIN AN EQUILATERAL TRIANGLE, IS INTENDED TO ALERT THE USER TO THE
PRESENCE OF UNINSULATED "DANGEROUS VOLTAGE" WITHIN THE PRODUCT’S ENCLOSURE THAT MAY BE OF SUFFICIENT MAGNITUDE TO
CONSTITUTE A RISK OF ELECTRIC SHOCK TO PERSONS.
THE EXCLAMATION POINT WITHIN AN EQUILATERAL TRIANGLE IS INTENDED TO ALERT THE USER TO THE PRESENCE OF IMPORTANT
OPERATING AND MAINTENANCE (SERVICING) INSTRUCTIONS IN THE LITERATURE ACCOMPANYING THE APPLIANCE.
2
Important Safety Instructions
CAUTION
< Read all of these Instructions.
< Save these Instructions for later use.
< Follow all Warnings and Instructions marked on the audio equipment.
1) Read Instructions — All the safety and operating instructions should
be read before the product is operated.
2) Retain Instructions — The safety and operating instructions should
be retained for future reference.
3) Heed Warnings — All warnings on the product and in the operating
instructions should be adhered to.
4) Follow Instructions — All operating and use instructions should be
followed.
5) Cleaning — Unplug this product from the wall outlet before cleaning.
Do not use liquid cleaners or aerosol cleaners. Use a damp cloth for
cleaning.
6) Attachments — Do not use attachments not recommended by the
product manufacturer as they may cause hazards.
7) Water and Moisture — Do not use this product near water — for
example, near a bath tub, wash bowl, kitchen sink, or laundry tub; in a
wet basement; or near a swimming pool; and the like.
8) Accessories — Do not place this product on an unstable cart, stand,
tripod, bracket, or table. The product may fall, causing serious injury to
a child or adult, and serious damage to the product. Use only with a
cart, stand, tripod, bracket, or table recommended by the manufacturer,
or sold with the product. Any mounting of the product should follow the
manufacturer’s instructions, and should use a mounting accessory
recommended by the manufacturer.
9) A product and cart combination should be moved with care. Quick
stops, excessive force, and uneven surfaces may cause the product
and cart combination to overturn.
10) Ventilation — Slots and openings in the cabinet are provided for
ventilation and to ensure reliable operation of the product and to
protect it from overheating, and these openings must not be blocked or
covered. The openings should never be blocked by placing the product
on a bed, sofa, rug, or other similar surface. This product should not be
placed in a built-in installation such as a bookcase or rack unless
proper ventilation is provided or the manufacturer’s instructions have
been adhered to.
11) Power Sources — This product should be operated only from the
type of power source indicated on the marking label. If you are not sure
of the type of power supply to your home, consult your product dealer
or local power company. For products intended to operate from battery
power, or other sources, refer to the operating instructions.
12) Grounding or Polarization — This product may be equipped with a
polarized alternating-current line plug (a plug having one blade wider
than the other). This plug will fit into the power outlet only one way. This
is a safety feature. If you are unable to insert the plug fully into the
outlet, try reversing the plug. If the plug should still fail to fit, contact
your electrician to replace your obsolete outlet. Do not defeat the safety
purpose of the polarized plug.
13) Power-Cord Protection — Power-supply cords should be routed so
that they are not likely to be walked on or pinched by items placed upon
or against them, paying particular attention to cords at plugs,
convenience receptacles, and the point where they exit from the
product.
14) Outdoor Antenna Grounding — If an outside antenna or cable
system is connected to the product, be sure the antenna or cable
system is grounded so as to provide some protection against voltage
surges and built-up static charges. Article 810 of the National Electrical
Code, ANSI/NFPA 70, provides information with regard to proper
grounding of the mast and supporting structure, grounding of the leadin wire to an antenna discharge unit, size of grounding conductors,
location of antenna-discharge unit, connection to grounding electrodes,
and requirements for the grounding electrode.
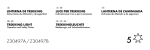
Note to CATV system installer:
This reminder is provided to call the CATV system installer’s attention to
Section 820-40 of the NEC which provides guidelines for proper
grounding and, in particular, specifies that the cable ground shall be
connected to the grounding system of the building, as close to the point
of cable entry as practical."
Example of Antenna Grounding
as per National Electrical
Code, ANSI/NFPA 70
ANTENNA
LEAD IN
WIRE
GROUND
CLAMP
ANTENNA
DISCHARGE UNIT
(NEC SECTION 810-20)
ELECTRIC
SERVICE
EQUIPMENT
NEC - NATIONAL ELECTRICAL CODE
GROUNDING CONDUCTORS
(NEC SECTION 810-21)
GROUND CLAMPS
POWER SERVICE GROUNDING
ELECTRODE SYSTEM
(NEC ART 250. PART H)
15) Lightning — For added protection for this product during a lightning
storm, or when it is left unattended and unused for long periods of time,
unplug it from the wall outlet and disconnect the antenna or cable
system. This will prevent damage to the product due to lightning and
power-line surges.
16) Power Lines — An outside antenna system should not be located in
the vicinity of overhead power lines or other electric light or power
circuits, or where it can fall into such power lines or circuits. When
installing an outside antenna system, extreme care should be taken to
keep from touching such power lines or circuits as contact with them
might be fatal.
17) Overloading — Do not overload wall outlets, extension cords, or
integral convenience receptacles as this can result in risk of fire or
electric shock.
18) Object and Liquid Entry — Never push objects of any kind into this
product through openings as they may touch dangerous voltage points
or short-out parts that could result in a fire or electric shock. Never spill
liquid of any kind on the product.
19) Servicing — Do not attempt to service this product yourself as
opening or removing covers may expose you to dangerous voltage or
other hazards. Refer all servicing to qualified service personnel.
20) Damage Requiring Service — Unplug this product from the wall
outlet and refer servicing to qualified service personnel under the
following conditions:
a ) when the power-supply cord or plug is damaged.
b ) if liquid has been spilled, or objects have fallen into the product.
c ) if the product has been exposed to rain or water.
d ) if the product does not operate normally by following the operating
instructions. Adjust only those controls that are covered by the
operating instructions as an improper adjustment of other controls may
result in damage and will often require extensive work by a qualified
technician to restore the product to its normal operation.
e ) if the product has been dropped or damaged in any way.
f ) when the product exhibits a distinct change in performance _ this
indicates a need for service.
21) Replacement Parts — When replacement parts are required, be
sure the service technician has used replacement parts specified by
the manufacturer or have the same characteristics as the original part.
Unauthorized substitutions may result in fire, electric shock, or other
hazards.
22) Safety Check — Upon completion of any service or repairs to this
product, ask the service technician to perform safety checks to
determine that the product is in proper operating condition.
23) Wall or Ceiling Mounting — The product should be mounted to a
wall or ceiling only as recommended by the manufacturer.
24) Heat — The product should be situated away from heat sources
such as radiators, heat registers, stoves, or other products (including
amplifiers) that produce heat.
3
Contents
Before Use..............................................................................................6
Connecting Antennas ..........................................................................8
Connection with an Amplifire............................................................10
Remote Control Unit ...........................................................................12
Name of Each Control ........................................................................14
Radio Reception .................................................................................16
Direct Tuning ...................................................................................18
Preset Tuning ..................................................................................20
Manual Memory Presetting ..........................................................22
Setting the Clock ................................................................................24
Sleep Timer .........................................................................................24
Setting the Timer ................................................................................26
Troubleshooting ..................................................................................28
Specifications .....................................................................................28
Voltage Conversion
(General export models only)
Be sure to remove the power cord from the AC outlet before
repositioning the voltage converter switch.
1. Locate the voltage selector on the rear panel.
2. Using a flat-bladed screwdriver, set to the appropriate
230V or 120V position according to your area.
IN NORTH AMERICA USE ONLY ON 120 V SUPPLY.
4
ENGLISH
Sommaire
Indice
Avant Utilisation ...................................................................................7
Previo al empleo ...................................................................................7
Raccordements d'antenne .................................................................9
Conexión de antenas ...........................................................................9
Raccordement à un amplificateur ...................................................11
Conexión con un amplificador .........................................................11
Télécommande ...................................................................................13
Control remoto .....................................................................................13
Nomenclature .....................................................................................15
Nombre de los controles....................................................................15
Réception de la radio .........................................................................17
Recepción de radio.............................................................................17
Syntonisation directe .....................................................................19
Sintonización directa ......................................................................19
Syntonisation préréglée ................................................................21
Sintonización preajustada .............................................................21
Préréglage manuel de la mémoire ..............................................23
Preajuste manual de memoria ......................................................23
Réglage de l'horloge ..........................................................................25
Ajuste del reloj .....................................................................................25
Temporisation de veille .....................................................................25
Temporizador para dormir .................................................................25
Réglage de la temporisation (Timer) ...............................................27
Ajuste del temporizador .....................................................................27
Dépannage ..........................................................................................29
Solución de problemas.......................................................................30
Spécifications .....................................................................................29
Especificaciones .................................................................................30
Changement de tension
Conversión de voltaje
(Modèles d’exportation générale seulement)
Bien débrancher le cordon d'alimentation de la prise
secteur avant de repositionner le sélecteur de changement
de tension.
(Únicamente modelos generales par a exportación)
Asegúrese de quitar el cable de energía de la salida de CA
antes de volver de colocar el interruptor convertidor de
voltaje.
1. Localiser le sélecteur de tension à l’arrière de l’appareil.
2. En utilisant un tournevis à lame plate, régler sur la
position appropriée 230V ou 120V en fonction de la
tension locale.
1. Localice el selector de voltaje en el tablero posterior.
2. Utilizando un destornillador de hoja plana, ajuste a la
posición adecuada de 230V o 220V de acuerdo con su
área.
DANS L'AMÉRIQUE DU NORD: UTILISABLE SUR 120 V
D'ALIMENTATION UNIQUEMENT.
EN NORTEAMÉRICA, UTILICE ÚNICAMENTE SUMINSITRO
DE 120 V
5
FRANÇAIS
ESPAÑOL
Before Use
Read this before operation
< Choose the installation location of your unit carefully. Avoid
placing it in direct sunlight or close to a source of heat. Also
avoid locations subject to vibrations and excessive dust, heat,
cold or moisture.
< Do not open the cabinet as this might result in damage to the
circuitry or electrical shock. If a foreign object should get into
the set, contact your dealer.
< When removing the power plug from the wall outlet, always
pull directly on the plug, never yank the cord.
< Do not attempt to clean the unit with chemical solvents as this
might damage the finish. Use a clean, dry cloth.
< Keep this manual in a safe place for future reference.
Resetting the Unit to Normal
In the following cases, function buttons may not work properly.
1) When the system is damaged by some electrical shock.
2) When the power is irregular or has electrical noises.
In these cases, unplug the AC power cord and plug it again.
6
ENGLISH
Avant Utilisation
Lire ceci avant de faire fonctionner l'appareil
< Choisir avec soin l'endroit où vous placerez votre appareil.
Eviter de le placer directement au soleil ou près d'une source
de chaleur. Eviter aussi les endroits sujets à des vibrations, à
de la poussière excessive, à la chaleur, au froid ou à
l'humidité.
< Ne pas ouvrir le coffret car ceci risquerait de provoquer des
dommages aux circuits ou des chocs électriques. Si un objet
rentre dans l'appareil, contacter votre revendeur.
< Lors du débranchement du cordon d'alimentation de la prise
murale, toujours tirer sur la fiche et non sur le cordon.
< Ne pas essayer de nettoyer l'appareil avec des solvants
chimiques car ceci pourrait endommager le fini de l'appareil.
Utiliser un chiffon propre et sec.
< Garder soigneusement ce manuel d'instructions pour une
référence ultérieure.
Previo al empleo
Lea lo siguiente antes de poner en
funcionamiento el aparato
< Elija con cuidado el lugar de instalación para su aparato. No
lo coloque a la luz solar directa o cerca de fuentes que
generen calor. Evite también lugares expuestos a vibraciones
y muy polvorientos, calurosos, fríos o húmedos.
< No abra el gabinete ya que esto podría producir daños en los
circuitos o electrochoques, Si se entrara algún objeto en el
interior del aparato, póngase en contacto con su
concesionario.
< Al desenchufar el cordón del tomacorriente, tire siempre de la
clavija, nunca del cordón.
< No utilice solventes químicos para limpiar el aparato ya que
podría dañar el acabado. Use un paño seco y limpio.
< Guarde este manual en un lugar seguro para usarlo como
referencia en el futuro.
Remise de l’appareil au normal
Vuelta del apparato a la normalidad
Dans les cas suivants, les boutons de fonctions peuvent ne pas
fonctionner correctement
1) Quand le système est endommagé par un choc électrique.
2) Quand l’alimentation est irrégulière ou bruyante
Los botones de las funciones pueden no responder
correctamente en los siguientes casos:
1) Cuando alguna descarga eléctrica haya dañado el sistema.
2) Cuando la corriente sea irregular o experimente
perturbaciones eléctricas.
Dans ces cas, débrancher le cordon d'alimentation et le
rebrancher.
En estos casos, desconecte el cable de alimentación y vuélvalo
a conectar.
7
FRANÇAIS
ESPAÑOL
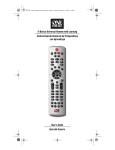
Connecting Antennas (1)
"T"-type FM Antenna (300Ω)(provided)
Antenne FM type "T" (300Ω) (fournie)
Antena FM tipo "T" (300Ω) (incluida)
FM Indoor Antenna
In an area with strong FM signals, the "T"-type FM antenna
provided is sufficient.
Extend this into a "T" shape and connect the two wires at the
base of the "T" to the provided matching transformer, as shown.
After completing connection, plug the transformer into the "FM
75Ω" socket. Extend the top of the "T" and fix with thumb tacks, or
the like, to a wall or window frame for the best possible
reception.
Matching Transformer(provided)
Transformateur d’adaptation (fournie)
Transformador de adaptación (incluido)
Outdoor FM Antenna (300Ω)
Antenne FM extérieure (300Ω)
Antena Externa de FM (300Ω)
Outdoor FM Antenna (75Ω)
Antenne FM extérieure (75Ω)
Antena Externa de FM (75Ω)
FM Outdoor Antenna
In an area where FM signals are weak, it will be necessary to
use an outdoor antenna with 3 or more elements. If you are using
a 300-ohm antenna, connect it to the tuner via the supplied
matching transformer. (No need for it in connecting a 75-ohm
antenna.)
Matching Transformer(provided)
Transformateur d’adaptation (fournie)
Transformador de adaptación (incluido)
8
ENGLISH
Raccordements d'antenne (1)
Conexión de antenas (1)
Antenne FM intérieure
Antena FM para Interiores
Dans une région ou les signaux FM sont forts, l'antenne de type
en "T" fournie est suffisante. Étendez-la en forme de "T" et
connectez les deux fils de la base du "T" au transformateur
d’adaptation fournie, comme montré. Aprés avoir effectué cette
opération, branchez le transformateur à la prise "FM 75Ω".
Etendre le haut du "T" et le fixer avec des punaises, etc. à un mur
ou un cadre de fenêtre pour la meilleure réception possible.
En un área con señales fuertes de FM, la antena FM tipo "T" que
se proporciona es suficiente.
Extienda ésta en forma de "T" y conecte los dos cables en la
base de la "T" al transformador de adaptación tal como se
muestra.
Después de terminar la conexión, conecte el transformador en el
socket “FM” de 75Ω. Extienda la parte superior de la "T" y fíjela
con tachuelas de cabeza plana, o algo similar, a una pared o
marco de una ventana para la mejor recepción posible.
Antenne FM extérieure
Antena externa de FM
Dans les endroits où les signaux FM sont faibles, il sera
nécessaire d’utiliser une antenne fm externe ayant un minimum
de 3 éléments. Si vous utilisez une antenne de 300 ohms, la
brancher au syntonisateur utilisant le transformateur
d’impédance. (Il n’est pas requi si l’antenne est de 75 ohms).
En un área en donde las señales de FM son débiles, será
necesario utilizar una antena exterior con tres o más elementos.
Si está utilizando una antena de 300 ohms, conéctela al
sintonizador a través del transformador de adaptación
suministrado. (No es necesario conectarlo a la antena de 75
ohms).
9
FRANÇAIS
ESPAÑOL
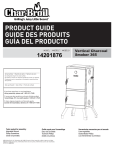
Connecting Antennas (2)
AM (MW) Antenna
> AM Indoor Loop Antenna
AM Outdoor Antenna
Antenne AM (MW) extérieure
Antena externa de AM (MW)
A high-performance AM loop antenna provided with the tuner is
sufficient for good reception in most areas.
Snap the supplied loop antenna into the hinge on the rear of the
unit, and connect the wires running out the loop antenna to the
AM terminals, as shown.
When you actually try listening AM programs later, you may
want to turn the loop antenna on the hinge for the best possible
reception.
> AM Outdoor Antenna
AM Loop Antenna (provided)
Antenne cadre AM (MW) (fournie)
Antena de cuadro de AM (MW)
(incluida)
If the AM loop antenna provided does not deliver sufficient
reception (because you are too far from the transmitter or in a
concrete building, etc.), it may be necessary to use an outdoor
AM antenna.
Use an insulated wire more than 15 ft (5 m) long, strip one end,
and connect this to the terminal as shown.
The antenna wire should be strung outdoors or indoors near a
window.
For better reception, connect the GND terminal to a reliable
ground.
Note:
< Even when using an outdoor AM antenna, do not disconnect
the AM loop antenna.
Connection with an Amplifier
Using appropriate audio cables connect the LINE OUT "L" jack to
the Line In Left jack on your amplifier, and the LINE OUT "R" jack
to its Line In Right jack.
10
ENGLISH
Raccordements d'antenne (2)
Conexión de antenas (2)
Antenne AM (MW)
Antena AM (MW)
> Antenne-cadre intérieure AM
> Antena de bucle AM interior
L'antenne cadre AM haute performance, fournie avec le
syntoniseur permet une très bonne réception dans la plupart des
régions.
Insérer l’antenne cadre fournie dans la charnière à l’arrière de
l’appareil et brancher les fils aux bornes AM tel que démontrer.
Durant l’écoute de postes AM il peut devenir nécessaire de
tourner l’antenne dans la charnière pour obtenir une meilleure
réception.
La antena de bucle AM de altas prestaciones suministradas con
el sintonizador es suficiente para una buena recepción en la
mayoría de los casos.
Coloque a presión la antena de bucle suministrada en la
abrazadera en la parte posterior de la unidad y conecte los
cables que salen de la antena de bucle a las terminales AM tal
como se muestra.
Cuando de hecho trate de escuchar programas de AM más
tarde, usted puede necesitar girar la antena de bucle en la
abrazadera para obtener la mejor recepción posible.
> Antenne extérieure AM
> Antena externa AM
Si l'antenne cadre AM fournie ne permet pas une réception
satisfaisante (du fait que vous êtes situé trop loin d'un émetteur
ou que vous habitez dans un bâtiment en béton, etc.), il peut être
nécessaire d'utiliser une antenne AM extérieure. Utilisez un fil
isolé d'une longueur supérieure à 5 m, dénudez l'une de ses
extrémités et raccordez la à la borne, comme décrit sur le
schéma.
Le fil d'antenne doit être tendu à l'extérieur ou à l'intérieur à
proximité d'une fenêtre.
Pour une meilleure réception, raccordez la prise de terre à une
masse fiable.
Si la antena incluida no entrega la suficiente sensibilidad a la
recepción (por que Ud. Demasiado lejos de la emisoras o en un
edificio con mala recepción, etc), puede que sea necesario el
uso de una antena externa AM. Utilice un cable aislado con una
longitud mayor de 5 metros (15dt) con el final del mismo pelado.
Conecte éste al terminal tal y como muestra el dibujo. El cable de
la antena deberá quedar extendido y tirante para su uso externo
y cerca de una ventana para interior. Para una mejor recepción,
conecte el terminal GND a una toma de tierra de la casa.
Remarque:
< Même si vous utilisez une antenne extérieure AM, ne
débranchez pas l'antenne-cadre AM.
Nota:
< Siempre que se use una antena AM externa deberá dejar
conectada la antena de bucle AM.
Raccordement à un amplificateur
Conexión con amplificador
Utilisant les cables audio appropriés, branchez la prise “LINE
OUT L” à la prise “Line In” de gauche de votre amplificateur et la
prise “LINE OUT R” à la prise “Line In” de droite de votre
amplificateur.
Utilizando los cables de audio apropiados, conecte la entrada
LINE OUT “L” (LÍNEA HACIA FUERA “L”) a la Línea en la entrada
izquierda de su amplificador y la entrada de LINE OUT “R”
(LÍNEA HACIA FUERA “R”) a su Línea en LA ENTRADA de la
derecha.
11
FRANÇAIS
ESPAÑOL
Remote Control Unit
Using the Remote Control Unit
By using the provided remote control unit, the tuner and some
other TEAC components used with it can be controlled from your
listening position.
To use the remote control unit, point it at REMOTE SENSOR on
the tuner (or of other TEAC component).
Notes:
< Even if the remote control unit is operated within the effective
range, remote control operation may be impossible if there are
any obstacles between the unit and the remote control.
< If the remote control unit is operated near other appliances
which generate infrared rays, or if other remote control
devices using infrared rays are used near the unit, it may
operate incorrectly.
Conversely, the other appliances may operate incorrectly.
< Battery Installation
1 Remove the battery compartment cover.
2 Insert two "AA" dry batteries.
Make sure that the batteries are inserted with their positive
"+" and negative "_" poles positioned correctly.
3 Close the cover until it clicks.
< If the distance required between the remote control unit and
main unit decreases, the batteries are exhausted.
In this case replace the batteries with new ones.
< Precautions concerning batteries
< Be sure to insert the batteries with correct positive "+" and
negative "_" polarities.
< Use batteries of the same type.
Never use different types of batteries together.
< Rechargeable and non-rechargeable batteries can be used.
Refer to the precautions on their labels.
< When the remote control unit is not to be used for a long time
(more than a month), remove the batteries from the remote
control unit to prevent them from leaking.
If they leak, wipe away the liquid inside the battery
compartment and replace the batteries with new ones.
< Do not heat or disassemble batteries and never dispose of old
batteries by throwing them in a fire.
12
ENGLISH
Télécommande
Control remoto
Utilisation de la télécommande
Utilización del control remoto (mando a distancia)
En utilisant la télécommande fournie, le syntoniseur et certains
autres appareils TEAC utilisés avec lui peuvent être commandés
à partir de votre position d'écoute. Pour utiliser la télécommande,
la pointer vers le REMOTE SENSOR du syntoniseur (ou d'un autre
appareil TEAC).
Utilizado la unida de control remoto suministrada, el sintonizador
y algunos de los otros instrumentos TEAC utilizados con el mismo
pueden ser controlados desde su posición de escucha. Para
utilizar la unidad de control remoto, apúntela al REMOTE SENSOR
del sintonizador (o de otros componentes TEAC).
Remarques:
< Même si le boîtier de télécommande est activé dans la zone
de fonctionnement, la commande à distance peut être
impossible s'il y a des obstacles entre le syntoniseur et le
boîtier de télécommande.
< Si le boîtier de télécommande fonctionne dans le voisinage
d'autres appareills générant des rayons infrarouges, ou si
d'autres télécommandes utilisant des rayons infrarouges sont
utilisées près du syntoniseur, le syntoniseur peut ne pas bien
fonctionner. Dans la situation inverse, les autres appareils
peuvent ne pas bien fonctionner.
Notas:
< Es posible que el mando a distancia no funcione
correctamente, incluso en el área operativa del mismo, si se
encuentran obstáculos en su camino.
< Si el mando a distancia se utiliza cerca de otros
electrodomésticos que generen rayos infrarrojos, o si cerca
de él se utilizan otros dispositivos de control remoto que
empleen rayos infrarrojos, puede funcionar incorrectamente.
A la inversa, los otros electrodomésticos también pueden
funcionar erróneamente.
< Remplacement des piles
< Instalación de las baterías
1 Retirer le couvercle du compartiment des piles.
1 Abra la tapa del compartimiento de las pilas.
2 Introduire deux piles "AA". S'assurer que les piles sont
installées correctement en respectant les polarités plus "+" et
moins "_" .
2 Coloque dos pilas “AA”. Asegúrese de que las pulas queden
ubicadas con sus polos positivo "+ " negativo "_ "
correctamente posicionados.
3 Fermer le couvercle jusqu'à son déclic.
3 Cierre la tapa hasta que se trabe.
< Si vous remarquez que la distance entre le boîtier de
télécommande et l’appareil devient plus courte pour un
fonctionnement correct, ceci indique que les piles sont usées.
Dans ce cas, remplacer les piles par des nouvelles.
< Se si notasse che la distanza di funzionamento diminuisce, ciò
indica che le batterie sono scariche. In tale caso sostituire le
batterie con altre di nuove.
< Précautions concernant les piles
< Precauciones con las baterías
< Bien placer les piles en respectant les polarités plus "+" et
moins "_".
< Utiliser des piles du même type.
Ne jamais essayer d'utiliser des types de pile différents
ensemble.
< Des piles ou des batteries peuvent être utilisées. Se référer à
leurs étiquettes pour les précautions à respecter.
< Si le boîtier de télécommande n'est pas utilisé pendant une
longue période (plus d'un mois), retirer les piles du boîtier de
télécommande pour éviter des fuites de pile. Si elles coulent,
essuyer le liquide dans le compartiment des piles et remplacer
les piles par des neuves.
< Ne pas chauffer, démonter les piles ni les mettre au feu.
< Asegúrese de que se inserta las baterías en correcta
polarización. "+ " con el positivo de la pila y "_ " con el
negativo de la pila.
< Use pilas del mismo tipo. Nunca use diferentes tipos de
baterías juntos.
< Se pueden usar pilas recargables y no recargables. Lea esta
información en las etiquetas de las pilas.
< Cuando no vaya a utilizar el mando a distancia durante un
tiempo (más de un mes), retire las pilas del mando para
prevenir su sulfatación. Si esto ocurre limpie el
compartimiento de las pilas y reemplace estas por unas
nuevas.
< No someter a calor ni intentar abrir las pilas y nunca tirarlas al
fuego.
13
FRANÇAIS
ESPAÑOL
Name of Each Control
c DIRECT TUNING button
Press this button and you can use the numeric buttons to
directly input frequency numbers.
d Display
e TIMER button
Press this button to put the tuner under the control of a built-in
timer in terms of automatically switching on power to the unit
at a predetermined time and turning it off after a
predetermined time period.
f FM MODE button
This button toggles Stereo and Mono modes.
g TUNING MODE button
Press this button to toggle Preset and Tuning modes.
h TUNING/PRESET/TIME buttons
These buttons are used to: 1) search out stations; 2) let the
unit tune in to a preset station; and 3) set a built-in clock and
timer.
i TIME SET button
Press this button and the MEMORY/SET button is available to
set a built-in clock and timer.
j SLEEP button
a POWER switch
Press this switch to turn the unit on and off.
This unit does not turn all the way off. When you press the
POWER switch (or the remote STANDBY button) to turn the
unit off, the center display is switched to show the current
time.
This button lets you set a time at the end of which this unit
automatically switches itself off.
k MEMORY/SET button
This button is used either to store stations in presets or to set
a built-in clock and timer.
b Numeric buttons
These are used either to directly input frequency numbers or
to select preset stations.
l AM/FM select button
14
ENGLISH
Use this button to select either of the frequency bands.
Nomenclature
a Commutateur POWER
Nombre de los controles
a Interruptor POWER (ENERGÍA)
Appuyer sur ce commutateur pour allumer ou éteindre
l’appareil.
Cet appareil ne s’éteint pas complètement. Quand vous
appuyez sur le commuateur POWER (ou la touche STANDBY)
pour éteindre l’appareil, l’heure est affichée.
b Touches numériques
Oprima este interruptor para encender y apagar la unidad.
Esta unidad no gira todo hasta apagado. Cuando oprima el
interruptor de ENERGÍA (o el botón remoto de ESPERA
(STANDBY)) para apagara la unidad, la pantalla central se
activa para mostrar la hora actual.
b Botones numéricos
Elles sont utilisées pour soit entrer les fréquences ou choisir
les postes pré-réglées.
Estos se usan ya sea para alimentar directamente los
números de la frecuencia o para seleccionar las estaciones
preestablecidas.
c Touche DIRECT TUNING
Appuyez cette touche et vous pouvez utiliser les touches
numériqus pour entrer directement les fréquences.
c Botón DIRECT TUNING (SINTONIZACIÓN DIRECTA)
Oprima este botón y puede utilizar los botones numéricos
para alimentar directamente los números de la frecuencia.
d Affichage
d Pantalla
e Touche TIMER
Appuyez sur cette touche pour placer le syntonisateur sous le
controle de la temporisation incorporée qui permet d’allumer
l’appareil à une période déterminée et d’éteindre l’appareil à
une période déterminée.
f Touche FM MODE
e Botón TIMER (TEMPORIZADOR)
Oprima este botón para poner el sintonizador bajo el control
de un temporizador integrado en términos encender la
energía de la unidad en forma automática a una hora
determinada y apagándola después de una hora
predeterminada.
Appuyer sur cette touche pour alterner entre Stéréo et Mono.
f Botón FM MODE (MODO FM)
g Touche TUNING MODE
Appuyer sur cette touche pour alterner entre Preset et
Tuning.
h Touches TUNING/PRESET/TIME
Ces touches sont utilisées pour: 1) Fureter les postes; 2)
Syntoniser à un poste pré-réglé; 3) Régler l’horloge et la
temporisation incorporées.
i Touche TIME SET
Appuyer sur cette touche et la touche MEMORY/SET permet
le réglage de l’horloge et la temporisation.
Este botón cambia entre los modos Estéreo y Monoaural.
g Botón TUNING MODE( MODO DE SINTONIZACIÓN)
Oprima este botón para seleccionar los modos Preset y
Tuning (Preestablecido y Sintonización).
h Botones TUNING/ PRESET/ TIME (SINTONIZACIÓN/
PREESTABLECIDO/ HORA)
Estos botones se utilizan para: 1) sintonizar las estaciones; 2)
dejar la unidad sintonizada en una estación preestablecida y
3) ajustar el reloj y un temporizador integrados.
i Botón TIME SET (ajuste de hora)
j Touche SLEEP
Cette touche permet de régler le temps que l’appareil reste
allumé.
Oprima este botón y el botón MEMORY/SET (ajustar) está
disponible para ajustar un reloj y un temporizador integrados.
j Botón SLEEP (DORMIR)
k Touche MEMORY/SET
Cette touche est utilisée pour soit mémoriser les postes préréglés ou régler l’horloge et la temporisation incorporées.
Este botón le permite ajustar una hora al final de la cual esta
unidad se apaga automáticamente.
k Botón MEMORY/ SET (MEMORIA/ AJUSTE)
l Touche sélecteur AM/FM
Utilisez cette touche pour choisir une des bandes de
fréquences.
Este botón se utiliza ya sea para almacenar estaciones en el
preajuste o para ajustar un reloj y un temporizador integrados.
l Botón de selección AM/FM
Utilice este botón para seleccionar cualquiera de las bandas
de frecuencia.
15
FRANÇAIS
ESPAÑOL
Radio Reception (1)
1
1 Select the AM or the FM band by pressing the corresponding button.
2
2 If the PRESET indicator is lit in the display, turn it off by
pressing the TUNING MODE button.
3
3 Select the station you want to listen to (auto selection).
Hold down the TUNING button for 0.5 to 2 seconds.
When a station is tuned in, the tuning process will stop
automatically.
Press the TUNING button to stop the auto selection.
< Selecting stations which cannot be tuned automatically
(manual selection)
Press the TUNING button repeatedly or hold down it, and
release it when the station you want to listen to is found.
When the TUNING button (‡/°) is pressed momentarily
(0.5 second or less), the frequency changes by a fixed step
(see STEPS below).
FM : 100 kHz steps
AM : 10 kHz steps
< "STEREO" is displayed when a stereo broadcast is tuned in.
< "TUNED" is displayed when a broadcast is correctly tuned in.
16
ENGLISH
Réception de la radio (1)
Recepción de radio (1)
1 Choisir la bande AM ou FM en appuyant la touche
correspondante.
1 Seleccione la banda AM o FM oprimiendo el botón
correspondiente.
2 Si le témoin PRESET est allumé, l’éteindre en appuyant
sur la touche TUNING MODE.
2 Si se enciende el indicador PRESET (PREESTABLECIDO)
en la pantalla, apáguelo oprimiendo el botón TUNING
MODE (MODO DE SINTONIZACIÓN).
3 Sélectionnez la station que vous voulez écouter (auto
sélection).
3 Seleccione la emisora que se desea escuchar
(selección automática)
Maintenez enfoncé le bouton TUNING entre 0,5 et 2 secondes.
Quand une station est captée, le processus de réglage
s’arrête automatiquement
Appuyez sur le bouton TUNING pour arrêter la sélection
automatique.
Mantenga pulsado el botón TUNING entre 0,5 y 2 segundos.
Al sintonizar una emisora, el proceso de sintonización separa
automáticamente.
Pulse el botón TUNING para detener la selección automática.
< Sélection des stations impossibles à régler automatiquement
(réglage manuel)
Appuyez sur le bouton TUNING de façon continue ou
maintenez-le enfoncé et relâchez-le quand la station
recherchée est trouvée.
Lorsque la touche TUNING (‡/°) est pressée
momentanément (0,5 seconde ou moins), la fréquence est
changée d'un palier fixe.
FM : paliers de 100 kHz
AM : paliers de 10 kHz
< "STEREO" apparaît dans l'affichage quand une émission
stéréo FM est reçue.
< "TUNED" apparaît dans l'affichage quand une émission est
correctement syntonisée.
< Selección de emisoras que no pueden sintonizar
automáticamente (selección manual)
Pulse de manera reiterada el botón TUNING, o manténgalo
pulsado y suéltelo al encontrar la emisora que desea
escuchar.
Cuando presiona el botón TUNING (‡/°)
momentáneamente (0,5 segundos o menos), la frecuencia
cambia en los pasos fijados.
FM : Pasos de 100 kHz
AM : Pasos de 10 kHz
< En la pantalla aparece “STEREO” cuando se sintoniza una
emisión en sonido estéreo.
< “TUNED” aparece en la indicación cuando la radiofusora está
correctamente sintonizada.
17
FRANÇAIS
ESPAÑOL
Radio Reception (2)
a FM MODE Button
Pressing this button alternates between Stereo mode and
Mono mode.
Stereo
FM stereo broadcasts are received in stereo and the STEREO
indicator lights in the display. If FM broadcasts with weak
signal strength are received, the FM muting function works
automatically to cut the signals, eliminating loud noise.
a
Mono
To compensate for weak FM stereo reception, select this
mode. Reception will now be forced monaural, reducing
unwanted noise.
Direct Tuning
Using this method, the required frequency is input directly, using
the numeric keys on the remote control unit.
1
1 Press the DIRECT TUNING button.
The frequency numbers that were displayed should go out.
They will come up again if you don't go on to the next step
within 5 seconds. If this happens, press the DIRECT TUNING
button again.
2
2 Input the frequency of the broadcast you want to hear
with the numeric keys.
FM:
100 kHz steps
paliers de 100 kHz
Pasos de 100 kHz
AM: 10 kHz steps
paliers de 10 kHz
Pasos de 10 kHz
Ex.:
FM 107.5 MHz
Ex.:
AM 1000 kHz
Notes:
< To directly tune to FM frequencies, you need to input two
digits after the decimal point.
< Either in FM or AM mode, if the number you enter in the
rightmost column is wrong and all the preceding numbers are
correct, the tuner tunes to the nearest frequency available.
18
ENGLISH
Réception de la radio (2)
a Touche FM MODE
Recepción de radio (2)
a Botón FM MODO
Une pression sur cette touche fait alterner entre le mode
Stéréo et le mode Mono.
El presionar este botón conmuta entre el modo estereofónico
o monofónico.
Stéréo
Les émissions stéréo FM sont reçues en stéréo et l'indicateur
STEREO est allumé dans l'affichage. Si des émissions FM
avec un signal faible sont reçues, la fonction de silencieux FM
est activée automatiquement pour couper les signaux,
éliminant du bruit parasite.
Estereofónico
Las radiofusoras estereofónicas de FM son recibidas en
estéreo y se enciende el indicador STEREO en la indicación.
Si las radiofusoras de FM tienen una señal débil, la función de
silenciamiento de FM se activa automáticamente cortando las
señales y eliminando de FM se activa automáticamente
cortando las señales y eliminando el ruido fuerte.
Mono
Pour compenser la réception stéréo FM médiocre,
sélectionner ce mode. La réception sera alors forcée en
monophonique, réduisant des parasites indésirables.
Monofónico
Para compensar la recepción estereofónica de FM débil
seleccione este modo. La recepción será monofónica,
reduciendo la interferencia indeseada.
Syntonisation directe
Sintonización directa
Avec cette méthode, la fréquence voulue est entrée directement
en utilisant les touches numériques.
Con este método es necesario ingresar la frecuencia deseada
directamente con las teclas numéricas.
1 Appuyer sur la touche DIRECT TUNING.
1 Oprima el botón DIRECT TUNING (SINTONIZACIÓN
DIRECTA).
Les fréquences qui apparaissait devrait disparaitre. Elles vont
revenir si vous ne suivez pas l’étape suivante en dedans de 5
secondes. Si cela se produit appuyer de nouveau sur la
touche DIRECT TUNING.
Los números de frecuencia que se mostraron deben salir.
Surgirán otra vez si usted no va al siguiente paso en 5
segundos. Si esto sucede, oprima el botón SINTONIZACIÓN
DIRECTA.
2 Entrer la fréquence de l'émission que vous voulez
entendre avec les touches numériques.
2 Ingrese por medio de las teclas numéricas la
frecuencia que desea escuchar.
Remarques:
< Pour une syntonisation directe de fréquences FM vous devez
entrer deux chiffres après le point décimal.
< Soit en mode FM ou AM, si vous entrez un chiffre faux à la
colonne de l’extrême droite alors que les chiffres précédents
sont tous corrects, le syntoniseur s’aligne sur la fréquence
disponible la plus proche.
Notas:
< Para sintonizar las frecuencias de FM, necesita ingresar dos
dígitos después del punto decimal.
< Ya sea en el modo de FM ó AM, si el número que ingresa en la
columna extrema derecha está equivocado y todos los
números que se ven están correctos, el sintonizador se va a la
frecuencia más cercana disponible.
19
FRANÇAIS
ESPAÑOL
Radio Reception (3)
Preset Tuning
This facility is used to store FM, AM broadcasting from Channel 1
to 30 respectively.
Automatic Memory Presetting
1
2
a
1 Select the AM or the FM band by pressing the
corresponding button.
2 Hold down the MEMORY/SET button for a while.
"AUTOSAVE" is momentarily displayed and the auto preset
process starts, scanning through frequencies searching for,
and automatically storing, receivable stations in presets from
1 to 30.
a How to select preset stations
If the PRESET indicator is lit in the display, press the TUNING
MODE button to turn the indicator off. Then press a preset
number. To tune in to a station stored in preset 2 for example,
press 0, followed by 2.
You could directly press 2 to select preset 2. But when you do
this and then press 6 for example, the unit understands that
you entered "26".
RESET Switch
The preset stations are held in memory for a virtually limitless
period of time. To clear all of them from memory, press the
RESET switch once or twice with a pencil or a ball-point pen
lightly.
20
ENGLISH
Réception de la radio (3)
Recepción de radio (3)
Syntonisation préréglée
Sintonización preajustada
Cette fonction est utilisée pour ranger des émissions FM, AM
respectivement du canal 1 à 30.
Esta función es empleada para almacenar radiofusoras de FM y
AM en el canal 1 a 30 respectivamente.
Préréglage automatique de la mémoire
Preajuste de memoria automática
1 Choisir la bande AM ou FM en appuyant sur la touche
correspondante.
1 Seleccione la banda AM o FM oprimiendo el botón
correspondiente.
2 Maintenir enfoncée la touche MEMORY/SET pour un
bout de temps.
2 Mantenga presionado el botón MEMORY/SET
(MEMORIA/ AJUSTE) por un momento.
“AUTOSAVE” est affiché momentanément et le processus de
pré-réglage automatique débute, balayant les fréquences
cherchant pour et entreposant les postes captables dans les
pré-réglables 1 à 30.
Se muestra momentáneamente la pantalla “AUTOSAVE”
(guardado automático) y empieza el proceso automático de
preajuste, pasando a través de las frecuencias buscando y
almacenando automáticamente las estaciones que se reciben
el número preestablecido del 1 al 30.
a Comment choisir les postes pré-réglés
Si le témoin PRESET est allumé, appuyer sur la touche
TUNING MODE pour l’éteindre. Ensuite appuyer sur un
numéro de pré-réglage. Par example pour syntoniser un poste
entreposé dans le numéro 2, appuyer sur 0 et ensuite 2.
Vous pouvez directement appuyer sur le 2, mais si vous faites
ça et qu'ensuite par examples vous appuyez sur le 6,
l’appareil interprète l’entrée comme étant “26”.
aCómo seleccionar las estaciones preajustadas
Si está encendido el indicador PRESET (PREESTABLECIDO),
en la pantalla, oprima le botón TUNING MODE (MODO DE
SINTONIZACIÓN) para apagar el indicador. Después oprima
un número preestablecido. Para sintonizar una estación
almacenada en el número preestablecido25, por ejemplo,
oprima 0, seguido de 2.
Podría oprimir directamente el número 2 para seleccionar el
número preestablecido. Pero, por ejemplo, cuando haga esto
y oprima 6, la unidad entiende que dado el número “26”.
Commutateur RESET
Interruptore RESET
L’information des postes pré-réglés reste en mémoire pour un
temps pratiquement illimité. Il vous est loisible de l’effacer de la
mémoire en appuyant une ou deux fois avec un crayon ou un
stylo sur le commutateur RESET qui se trouve à l’arrière de
l’appareil.
La memoria preajustada se mantenerá durante un periodo
prácticamente ilimitado. Para borrar todos los datos de la
memoria, pulse ligeramente el interruptor RESET una o dos
veces con un lápiz o bolígrafo, que se da en el tablero posterior.
21
FRANÇAIS
ESPAÑOL
Radio Reception (4)
Manual Memory Presetting
1
1 Select the AM or the FM band by pressing the
corresponding button.
2
2 Tune in to a station.
3
3 Press the MEMORY button.
4
4 While the MEMORY indicator is blinking in the display,
press the PRESET button to get a desired preset number
displayed.
5
5 Press the MEMORY button again.
Repeat the process to store other stations in presets.
22
ENGLISH
Réception de la radio (4)
Recepción de radio (4)
Préréglage manuel de la mémoire
Preajuste manual de memoria
1 Choisir la bande AM ou FM en appuyant sur la touche
correspondante.
1 Seleccione la banda AM o de FM oprimiendo el botón
correspondiente.
2 Syntoniser le poste.
2 Sintonice una estación.
3 Appuyer sur la touche MEMORY.
3 Oprima el botón MEMORY (MEMORIA).
4 Pendant que le témoin MEMORY clignote, appuyer sur
la touche PRESET pour que le numéro de pré-réglage
désiré est affiché.
4 Mientras esté parpadeando el indicador MEMORY,
oprima el botón PRESET para obtener un número
preajustado desplegado en pantalla.
5 Appuyer sur la touche MEMORY de nouveau.
5 Oprima otra vez el botón MEMORY (MEMORIA).
Répéter ce procédé pour enmagasiner d’autre postes dans
les pré-réglables.
Repita el proceso para almacenar otras estaciones en los
números preajustados.
23
FRANÇAIS
ESPAÑOL
Setting the Clock
1 Press the TIME SET button.
Every time the TIME SET button is pressed, the mode is
changed as follows:
1
ON-TIME and OFF-TIME are used when programming a builtin timer (more on this later).
Since you are now setting up the clock, select TIME SET.
2
2 Press the MEMORY/SET button.
3
The hours start blinking.
3 Press the TIME button to set the current hour.
4
4 Press the MEMORY/SET button.
The minutes start blinking.
5
5 Press the TIME button to set the current minute.
6 Press the MEMORY/SET button.
6
The clock starts from 00 second.
The display is automatically switched back to show time or a
frequency number depending on whether the tuner is
currently in STANDBY mode or in its powered-up mode.
Sleep Timer
a
a The power can be switched off at the desired time.
Press the SLEEP button in the on mode. Display becomes dark
and "SLEEP 90" is shown on the display. The sleep time can be
changed by 10 minutes’ step. Press the SLEEP button
repeatedly until the desired time appears.
SLEEP 90 : The power will be switched off 90 minutes later.
SLEEP 80, SLEEP 70 ...... SLEEP 10
SLEEP OFF : Sleep timer is off.
< You can check the remaining time by pressing the SLEEP
button.
24
ENGLISH
Réglage de l'horloge
1 Appuyez sur la touche TIME SET.
Ajuste del reloj
1 Pulse el botón TIME SET.
Chaque pression sur la touche TIME SET permet de changer
de mode selon l'ordre indiqué ci-après :
Cada vez que se pulsa el botón TIME SET, la modalidad
cambia de la siguiente manera:
Les temps de marche et d’arrêt (ON-TIME et OFF-TIME) sont
utilisés quand vous programmez la temporisation (plus de
détails plus tard).
Étant donné que vous êtes présentement en train de régler
l’horloge, choisir TIME SET.
ON-TIME y OFF-TIME se utilizan cuando se programa un
temporizador integrado (esto se verá más adelante).
Debido a que ahora está ajustando el reloj, seleccione TIME
SET (AJUSTE DE HORA).
2 Appuyer sur la touche MEMORY/SET.
Les heures devraient commencer à clignoter.
2 Pulse el botón MEMORY/SET.
El número de horas debe empezar a parpadear.
3 Appuyez sur la touche TIME pour régler les heures.
3 Pulse el botón TIME para fijar la hora actual.
4 Appuyez sur la touche MEMORY/SET.
4 Pulse el botón MEMORY/SET.
Les minutes devraient commencer à clignoter.
Los minutos deben empezar a parpadear.
5 Appuyez sur la touche TIME pour régler les minutes.
5 Pulse el botón TIME para fijar el minuto actual.
6 Appuyez sur la touche MEMORY/SET.
6 Pulse el botón MEMORY/SET.
L’horloge démarre à 00 seconde.
L’afficheur automatiquement montre l’heure ou une fréquence
dépendant du fait que le syntonisateur est en mode STANDY
ou tension.
El reloj empieza a funcionar partiendo del segundo 00.
La pantalla se regresa automáticamente para mostrar la hora
o un número de frecuencia dependiendo de si el sintonizador
está actualmente en el modo de ESPERA (STANDBY) o si está
en el modo de encendido.
Temporisation de veille
Temporizador de desconexión
a Cette fonction permet d'arrêter l'appareil à l'heure
voulue.
a La corriente puede desconectarse a la hora que se
desee.
Appuyez sur la touche SLEEP (sommeil) alors que l'appareil
est sous tension. L'afficheur s'obscurcit et la mention SLEEP
90 s'affiche. L'heure d'arrêt de l'appareil peut être modifiée
par pas de 10 minutes. Appuyez plusieurs fois de suite sur la
touche SLEEP jusqu'à ce que la durée voulue en minutes
s'affiche.
Pulse el botón SLEEP con el equipo encendido. La pantalla se
oscurece e indica "SLEEP 90". Puede cambiarse el tiempo
hasta la desconexión e incrementos de 10 minutos. Pulse de
manera reiterada el botón SLEEP hasta que se indique el
tiempo que le interese.
SLEEP 90 : l'appareil s'arrêtera 90 minutes plus tard.
SLEEP 80, SLEEP 70 ...... SLEEP 10
SLEEP OFF : la temporisation de veille est désactivée.
< Pour vérifier la durée programmée avant l'arrêt, il suffit
d'appuyer sur la touche SLEEP.
SLEEP 90 : La corriente se desconecta 90 minutos después.
SLEEP 80, SLEEP 70 ...... SLEEP 10
SLEEP OFF : EL temporizador de desconexión se apaga.
< Puede verificar el tiempo que falta para la desconexión
pulsando el botón SLEEP.
25
FRANÇAIS
ESPAÑOL
Setting the Timer
You can program a built-in timer to let the tuner automatically
turn on at a predetermined "On Time" and shift back to Standby
mode at a predetermined "Off Time," thus there is no chance that
you miss your favorite program.
Adjust the clock before setting the timer.
1
1 Press the TIME SET button twice so the display reads
ON-TIME.
2
2 Press the MEMORY/SET button.
The hours start blinking.
3 Enter the number of hours by pressing the TIME buttons.
4 Press the MEMORY/SET button.
3
The minutes start blinking.
5 Enter the number of minutes by pressing the TIME
buttons.
4
6 Press the MEMORY/SET button.
7 Press the TIME SET button three times so the display
reads OFF-TIME.
8 Repeat steps 2 to 6.
5
9 When you have set up both ON-TIME and OFF-TIME,
press the TIMER button.
6
7
9
A red indication, TIMER, appears in the lower left corner of
the display to indicate that the tuner is put under the control of
the timer.
To check the current timer settings, press the TIME SET
button twice, then press the MEMORY/SET button. If you are
happy with the current ON-TIME setting, press the TIME SET
button once, followed by the MEMORY/SET button, to check
the OFF-TIME setting.
To release the tuner from the control of the timer, simply press
the TIMER button to turn off the TIMER indicator in the
display.
26
ENGLISH
Réglage de la temporisation (Timer)
Ajuste del temporizador
Vous pouvez régler la temporisation incorporée pour permettre
au syntonisateur de s’allumer à une heure spécifique et de
s’éteindre aussi à une heure spécifique, donc aucune chance de
manquer votre programme favori.
Réglez l'heure sur l'horloge avant de régler la temporisation.
Usted puede programar un temporizador integrado para permitir
que el sintonizador se encienda automáticamente a una hora de
encendido ("On Time") predeterminada y regresar al modo de
ESPERA (STANDBY) a una hora predeterminada de apagado
("Off Time"), de esta forma no hay posibilidad de que se pierda su
programa favorito; Ajuste el reloj antes de ajustar el
temporizador.
1 Appuyer sur la touche TIME SET deux fois afin que ONTIME est affiché.
1 Oprima el botón TIME SET (AJUSTE DEL TIEMPO) dos
veces de manera que la pantalla muestre la indicación
ON-TIME (HORA DE ENCENDIDO).
2 Appuyer sur la touche MEMORY/SET.
2 Oprima el botón MEMORY/SET (AJUSTE).
Les heures commencent à clignoter.
Las horas deben empezar a parpadear.
3 Entrez les heures en appuyant sur la touche TIME.
3 Introduzca el número de horas oprimiendo los botones
TIME (HORA).
4 Appuyer sur la touche MEMORY/SET.
4 Oprima el botón MEMORY/SET.
Les minutes commencent à clignoter.
Los minutos deben a empezar a parpadear.
5 Entrez les minutes en appuyant sur la touche TIME.
5 Introduzca el número de minutos oprimiendo los
botones TIME.
6 Appuyer sur la touche MEMORY/SET.
6 Oprima el botón MEMORY/SET.
7 Appuyer sur la touche TIME SET trois fois afin que OFFTIME est affiché.
7 Oprima el botón TIME SET tres veces de manera que la
pantalla muestre OFF-TIME (HORA DE APAGADO).
8 Répétez les étapes 2 à 6.
8 Repita los pasos del 2 al 6.
9 Apès le réglage de la temporisation de marche et
d’arrêt appuyer sur la touche TIMER.
9 Cuando haya ajustado tanto ON-TIME como OFF-TIME,
oprima el botón TIMER (TEMPORIZADOR).
Un témoin rouge TIMER est affiché dans le coin gauche
inférieur de l’afficheur pour montrer que le syntonisateur est
sous le controle de la temporisation.
Una indicación roja, TIMER (TEMPORIZADOR), aparece en la
esquina izquierda inferior de la pantalla para indicar que el
sintonizador está puesto bajo el control del temporizador.
Pour vérifier la temporisation courante, appuyer sur la touche
TIME SET deux fois, ensuite appuyer sur la touche
MEMORY/SET. Si vous êtes satisfait du réglage de mise sous
tension, appuyer sur la touche TIME SET une fois, ensuite la
touche MEMORY/SET pour vérifier le réglage de la mise hors
tension.
Para verificar los ajustes actuales del temporizador, oprima el
botón TIME SET (AJUSTE DE HORA) dos veces, enseguida
oprima el botón MEMORY/SET (AJUSTE). Si usted está
satisfecho con el ajuste actual de ON-TIME, oprima una vez el
botón TIME SET, seguido del botón MEMORY/SET (AJUSTE),
para verificar el ajuste de OFF-TIME.
Pour désengager le syntonisateur du controle de la
temporisation, simplement appuyer sur la touche TIMER pour
éteindre le témoin TIMER sur l’afficheur.
Para liberar el sintonizador del control del temporizador
simplemente oprima le botón TIMER (TEMPORIZADOR) para
apagar el indicador TIMER de la pantalla.
27
FRANÇAIS
ESPAÑOL
Troubleshooting
Specifications
If you have problems with your system, look through this chart
and see if you can solve the problem yourself before calling your
dealer or TEAC service center.
No power
eCheck the connection to the AC power supply.
Cannot listen to any station, or signal is too weak.
eTune in the station properly.
eIf a TV is near the unit, turn it off.
eInstall the antenna again after locating the best reception
position.
eAn external antenna may be required.
Though the broadcast is stereo, it sounds monaural.
ePress the FM MODE button.
Remote control does not work.
eIf the batteries are exhausted, change the batteries.
eUse remote control unit within the range (5m/15ft) and point
at the front panel.
eClear obstacles between the remote control unit and the
main unit.
eIf a fluorescent light is near the unit, turn it off.
If normal operation cannot be achieved, unplug the power cord
from the outlet and plug it again.
FM Tuner Section
(Without notes 98 MHz, 65 dBf)
Tuning Range:
87.5 MHz – 108.0 MHz (100 kHz steps)
Usable Sensitivity (IHF):
Mono: 11.2 dBf
50 dB Quieting Sensitivity:
Mono: 15 dBf
Stereo: 20 dBf
Total Harmonic Distortion (1 kHz):
Mono: 0.4%
Stereo: 0.5%
Frequency Response: 30 Hz – 15 kHz, +1/ –1.5 dB
Stereo Separation (1 kHz): 40 dB
Signal-to-Noise Ratio:
Mono: 72 dB
Stereo: 70 dB
AM Tuner Section
Tuning Range:
530 kHz – 1,720 kHz (10 kHz steps)
Usable Sensitivity: 55 dB/m
Total Harmonic Distortion: 0.8% at 85 dB/m
Signal-to-Noise Ratio: 45 dB at 85 dB/m
General
Power Requirements:
120/230 V AC, 50-60 Hz
Power Consumption:
8W
Dimensions (W x H x D)
435 x 102 x 270 mm
Weight (net): 3.6kg
Standard Accessories:
AM Loop Antenna x 1
FM T-type Antenna x 1
Matching Transformer x 1
Remote Control Unit (RC-789) x 1
< Improvements may result in specifications and features
changing without notice.
< Illustrations may differ slightly from production models.
28
ENGLISH
Dépannage
Spécifications
En cas de problème, commencer par chercher dans ce tableau
pour voir si on peut trouver soi-même la solution avant de
contacter le revendeur ou le centre de service client TEAC.
L'appareil n'est pas alimenté
eVérifier que le cordon d'alimentation est bien branché.
Aucune station ne peut être captée, ou niveau sonore trop
faible.
eSe régler précisément sur la station désirée.
eSi l'appareil se trouve à proximité d'un poste de télévision,
éteindre ce dernier.
eInstallez de nouveau l'antenne après avoir repéré la
meileure position de réception.
eIl est recommandé d'utiliser une antenne externe.
Bien que l'émission soit en stéréo, le son est en mono.
eActionnez la touche FM MODE.
La télécommande ne fonctionne pas
eRemplacer les piles, si celles-ci sont usées.
eUtiliser la télécommande à une distance de 5m et l'orienter
en direction du panneau avant de l'appareil.
eDégager les obstacles qui peuvent se trouver entre la
télécommande et l'appareil.
eSi l'appareil se trouve à proximité d'une lampe
fluorescente, éteindre celle-ci.
Si vous ne parvenez pas à rétablir un fonctionnement normal,
débrancher le cordon d'alimentation et le rebrancher.
Section syntoniseur FM
(Sans remarques 98 MHz, 65 dBf)
Plage de syntonisation:
87,5 MHz à 108,0 MHz (paliers de 100 kHz)
Sensibilité utilisable (IHF): Mono: 11,2 dBf
Seuil de sensibilité à 50 dB:
Mono: 15 dBf
Stéréo: 20 dBf
Distorsion harmonique totale (1 kHz):
Mono: 0,4%
Stéréo: 0,5%
Réponse en fréquence:
30 Hz à 15 kHz, +1/ –1,5 dB
Séparation stéréo (1 kHz): 40 dB
Rapport signal sur bruit:
Mono: 72 dB
Stéréo: 70dB
Section syntoniseur AM
Plage de syntonisation:
530 kHz à 1.720 kHz (paliers de 10 kHz)
Sensibilité utilisable: 55 dB/m
Distorsion harmonique totale: 0,8% à 85 dB/m
Rapport signal sur bruit: 45 dB à 85 dB/m
Générales
Alimentation:
120/230 V CA, 50-60 Hz
Consommation:
8W
Dimensions (L x H x P): 435 x 102 x 270 mm
Poids (Net): 3,6 kg
Accessoires standard:
Antenne cadre AM x 1
Antenne FM type "T" x 1
Transformateur d'adaptation x 1
Boîtier de télécommande (RC-789) x 1
< Des améliorations peuvent produire des changements dans
les caractéristiques et fonctions sans préavis.
< Les illustrations peuvent différer légèrement des modèles de
production.
29
FRANÇAIS
Solución de problemas
Especificaciones
Si surge algún problema con la unidad, consulte la siguiente
tabla y pruebe a solucionarlo antes de ponerse en contacto con
su distribuidor o con el servicio técnico de TEAC.
No hay corriente.
eRevise la conexión al suministro de alimentación.
No se escucha ninguna emisora, o la señal es demasiado débil.
eSintonice correctamente la estación.
eSi hay un televisor cerca del equipo, apáguelo.
eVuelva a instalar la antena tras localizar la mejor posición
de recepción.
eSe recomienda una antena externa.
Aunque la emisión es en estéreo, el sonido parece mono.
ePulse el botón FM MODE.
No funciona el mando a distancia.
eCambie las pilas si están agotadas.
eUtilice el mando a distancia dentro del radio de acción (5
m/15 pies) y apunte al panel frontal.
eRetire cualquier obstáculo que haya entre el mando a
distancia y la unidad principal.
eSi hay algún fluorescente cerca de la unidad, apáguelo.
Si aun así la unidad no funciona correctamente, desconecte el
cable de alimentación y vuélvalo a conectar.
Sección del sintonizador de FM
(Sin notas 98 MHz, 65 dBf)
Límites de sintonización:
87,5 MHz–108,0 MHz (pasos de 100 kHz)
Sensibilidad utilizable (IHF):
Monofónico: 11,2 dBf
Sensibilidad de reducción de volumen 50 dB:
Monofónico: 15 dBf
Estereofónico: 20 dBf
Distorsión armónica total (1 Hfz):
Monofónico: 0,4%
Estereofónico: 0,5%
Respuesta de frecuencia:
30 Hz – 15 kHz, +1 / –1,5 dB
Separación del estéreo (1 Hkz): 40 dB
Relación de señal a ruido:
Monofónico: 72dB
Estereofónico: 70 dB
Sección del sintonizador de AM
Límites de sintonización:
530 KHz-1.720 KHz, (pasos de 10 KHz)
Sensibilidad utilizable: 55 dB/m
Distorsión armónica total:
0,8% a 85 dB/m
Relación de señal a ruido:
45 dB a 85 dB/m
Generalidades
Requisitos de eliminación:
120/230 V CA, 50-60 Hz
Consumo de energía: 8 W
Dimensiones (Ancho x Alto x Profundidad):
435 x 102 x 270 mm
Peso (neto): 3,6 kg
Accesorios estándar:
Antena de bucle AM x 1
Antena FM tipo "T" x 1
Transformador de adaptación x 1
Control remoto (RC-789) x 1
< Las especificaciones y especificaciones están sujetas a
cambio sin aviso para mejora.
< Las ilustraciones pueden ser levemente diferentes de los
modelos de producción.
30
ESPAÑOL
31
TEAC CORPORATION
3-7-3, Nakacho, Musashino-shi, Tokyo 180-8550, Japan Phone: (0422) 52-5081
TEAC AMERICA, INC.
7733 Telegraph Road, Montebello, California 90640 Phone: (323) 726-0303
TEAC CANADA LTD.
5939 Wallace Street, Mississauga, Ontario L4Z 1Z8, Canada Phone: (905) 890-8008
TEAC MEXICO, S.A. De C.V
Campesinos 184, Col. Granjas Esmeralda, 09810, Mexico Phone: (525) 581-5500
TEAC UK LIMITED
5 Marlin House, Croxley Business Park, Watford, Hertfordshire, WD18 8TE, U.K. Phone: 01923-819699
TEAC DEUTSCHLAND GmbH
Bahnstrasse 12, 65205 Wiesbaden-Erbenheim, Germany Phone: 0611-71580
TEAC FRANCE S.A.
17, Rue Alexis-de-Tocqueville, CE 005 92182 Antony Cedex, France Phone: (1) 42.37.01.02
TEAC NEDERLAND BV
Oeverkruid 15, NL-4941 VV Raamsdonksveer, Nederland Phone: 0162-510210
TEAC BELGIUM NV/SA
c/o TEAC NEDERLAND BV, Oeverkruid 15, NL-4941 VV Raamsdonksveer, Nederland Phone: +31-162-510860
TEAC ITALIANA S.p.A.
Via C. Cantù 11, 20092 Cinisello Balsamo, Milano, Italy Phone: 02-66010500
TEAC AUSTRALIA PTY., LTD.
A.B.N. 80 005 408 462
280 William Street, Melbourne, Victoria 3000, Australia Phone: (03) 9672-2400
This appliance has a serial number located on the rear panel. Please record
the model number and serial number and retain them for your records.
Model number
Serial number
PRNTED IN TAIWAN 0501 . MA-0504A