1
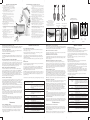
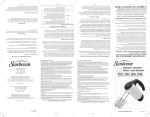
LISEZ LES INSTRUCTIONS AVANT L’EMPLOI
Pour éviter tout risque de choc électrique, n’immergez le batteur ni dans l’eau ni dans un autre
liquide. Ceci pourrait causer des blessures ou abîmer l’appareil.
2.
Redoublez de vigilance lorsque le batteur est utilisé par des enfants ou par des personnes
handicapées, ou bien en leur présence.
3. Débranchez le batteur en fin d’utilisation, avant de monter ou de démonter toute pièce et avant de
le nettoyer.
4.
Évitez tout contact avec les pièces mobiles. Gardez mains, cheveux et vêtements – ainsi que
spatules ou autres ustensiles de cuisine – à l’écart des fouets pendant l’emploi, afin de limiter les
risques de blessures ou d’endommagement du batteur.
5. Ne faites pas fonctionner un batteur dont le cordon d’alimentation ou la fiche est endommagé,
qui a mal fonctionné, a été échappé ou endommagé d’une façon quelconque. Si le batteur a été
abîmé, veuillez entrer en rapport avec le service à la clientèle. (Composez le 1 800 458-8407 aux
États-Unis ou le 1 800 667-8623 au Canada.)
6.
L’utilisation d’accessoires non conseillés ou vendus par Jarden Consumer Solutions ou le
constructeur présente des risques d’incendie, de choc électrique ou de blessures corporelles.
7.
N’employez cet appareil ni en plein air ni a des fins commerciales.
8. Ne laissez pas pendre le cordon au bord de la table ou du plan de travail et veillez à ce qu’il ne
touche pas à des surfaces chaudes, notamment à la cuisinière.
9. Séparez les fouets du batteur avant de les laver.
10. Ne placez pas le batteur sur ou à proximité d’un brûleur chaud ou dans un four allumé (four à
micro-ondes, de cuisinière ordinaire, à convection, ou autre), ou sur toute autre surface chaude.
11. N’utilisez pas le batteur à des fins autres que celles auxquelles il est destiné.
12. Ne laissez jamais le batteur sans surveillance quand il fonctionne.
13. Le service, outre l’entretien que préconise la notice d’emploi, et les réparations ne doivent être exécutés
que par le personnel compétent autorisé.
14. Lors du mélange de liquides, et tout particulièrement de liquide chaud, servez-vous du grand bol ou bien
ne travaillez que de faibles volumes à la fois pour éviter les éclaboussures.
15. Ne maltraitez pas le cordon – ne portez jamais le batteur en le tenant par son cordon et ne tirez pas le
cordon d’un coup sec pour le débrancher : tenez la fiche entre le pouce et l’index pour la sortir de la prise.
1.
BIENVENUE
Nous vous félicitons d’avoir sélectionné ce batteur sur socle MIXMASTER® de SUNBEAM® ! Pour
vous familiariser avec les produits SUNBEAM®, visitez notre site Web au www.sunbeam.com.
À APPORTER AU BATTEUR
NETTOYAGE
DU BATTEUR
Pour nettoyer le batteur, passez un linge humide sur la tête, sur le socle et sur le plateau tournant puis
asséchez-les. NE PLONGEZ PAS LE SOCLE DANS L’EAU. Évitez l’emploi de produits abrasifs,
ils endommagent irrémédiablement le fini. Lavez les fouets et les bols à l’eau savonneuse chaude après
chaque utilisation ; rincez-les à fond et asséchez-les. Les fouets et les bols de malaxage sont également
lavables au lave-vaisselle.
RANGEMENT
DU BATTEUR
Rangez le batteur en lieu propre et sec – sur un plan de travail, une table, dans un placard ou sur une
étagère, par exemple. Placez les fouets dans leurs douilles respectives et les crochets pétrisseurs ou
autres accessoires dans les bols.
Posez les bols sur le plateau tournant. Enroulez le cordon d’alimentation puis attachez-le à l’aide d’un
lien souple.
ENTRETIEN
Le moteur a été soigneusement lubrifié à l’usine et ne nécessite pas de graissage ultérieur. Outre le
nettoyage conseillé, le batteur ne requiert aucun entretien supplémentaire de la part de l’utilisateur.
Pour tout service ou toute réparation, veuillez entrer en rapport avec le service à la clientèle. (Composez
le 1 800 458-8407 aux États-Unis ou le 1 800 667-8623 au Canada.)
•
•
•
•
•
— — — FOLD — — —
When using electrical appliances, basic safety precautions should always be followed including
the following:
READ ALL INSTRUCTIONS BEFORE USE
1. To protect against risk of electrical shock, do not put mixer in water or other liquid. This may cause
personal injury or damage to the product.
2. Close supervision is necessary when mixer is used by or near children or incapacitated persons.
3. Unplug from outlet while not in use, before putting on or taking off parts, and before cleaning.
4. Avoid contacting moving parts. Keep hands, hair, clothing, as well as spatulas and other utensils
away from beaters during operation to reduce the risk of injury to persons and/or damage to the
mixer.
5. Do not operate mixer with a damaged cord or plug or after the appliance malfunctions or is dropped
or damaged in any manner. If the mixer becomes damaged please contact Consumer Services for
assistance. (1-800-458-8407 in the U.S. or 1-800-667-8623 in Canada)
6. The use of attachments not recommended or sold by Jarden Consumer Solutions or the manufacturer
may cause fire, electrical shock or injury.
7. Do not use outdoors or for commercial purposes.
8. Do not let cord hang over edge of table or countertop or touch hot surfaces, including the stove.
9. Remove beaters from mixer before washing.
10. Do not place mixer or bowls on or near a hot gas or electric burner, in a heated oven (microwave,
convention, convection, etc.), or on any other heated surface.
11. Do not use mixer for other than intended use.
12. Do not leave mixer unattended while it is operating.
13. Any servicing, other than cleaning and user maintenance should be performed by any authorized
service representative.
14. When mixing liquids, especially hot liquid, use a tall container or make small quantities at a time
to reduce spillage.
15. Don’t Abuse Cord. Never carry the mixer by the cord or yank it to disconnect from an outlet;
instead, grasp the plug and pull to disconnect.
WELCOME
Congratulations on your purchase of a SUNBEAM® MIXMASTER® Stand Mixer!
To learn more about SUNBEAM® products, please visit us at www.sunbeam.com.
CARING FOR YOUR MIXER
CLEANING YOUR MIXER
To clean the mixer, wipe the mixer head, stand and turntable with a damp cloth, then dry.
DO NOT IMMERSE THE STAND MIXER IN WATER. Avoid the use of abrasive
cleaners, as they may damage the finish of the mixer. Wash the beaters and bowls in hot, soapy
water after each use. Rinse thoroughly and dry. Beaters and bowls may also be washed in an
automatic dishwasher. If mixing bowls are scratched or chipped, do not use mixer.
STORING YOUR MIXER
Store the mixer in a dry location, such as on a countertop or table top, or in a closet
or cupboard. Insert the beaters into the proper sockets. Place the dough hooks and
other attachments in the mixing bowl.
Store the bowl(s) on the turntable. Wind the electric cord into a coil, then secure it with a
twist fastener.
MAINTENANCE
The motor of your stand mixer has been carefully lubricated at the factory and does not require
any additional lubricant. Other than the recommended cleaning, no further user maintenance
should be necessary.
For servicing or repairs please contact Consumer Services for assistance. (1-800-458-8407 in the
U.S. or 1-800-667-8623 in Canada)
CET APPAREIL N’EST DESTINÉ QU’À L’USAGE DOMESTIQUE
Le moteur du batteur MIXMASTER est protégé par une isolation thermodurcie, un procédé standard.
Par suite du thermodurcissement de l’isolation, il est possible qu’il se dégage une certaine odeur et
peut-être même un petit ruban de fumée du moteur du batteur. Absolument normal, ce phénomène
cessera après quelques utilisations.
®
PRATIQUES
Quand vous malaxez des liquides – et tout spécialement s’ils sont chauds – servez-vous du grand
bol ou malaxez par petites quantités afin de réduire les éclaboussures.
Déposez les ingrédients dans le bol dans l’ordre qu’indique la recette.
Utilisez la vitesse de malaxage qu’indique la recette. Servez-vous du guide de malaxage du variateur
de vitesse pour vous aider à trouver la vitesse appropriée.
Si la recette indique la durée de malaxage, observez-la ! NE MALAXEZ PAS PLUS QUE
NÉCESSAIRE. Une préparation battue de façon excessive peut devenir extrêmement ferme.
Si un objet, une spatule par exemple, tombe dans le bol au cours du malaxage, ARRÊTEZ
immédiatement le batteur puis retirez l’article en question.
Pour simplifier le nettoyage, démontez les fouets dès que vous cessez de les utiliser et rincez-les sans
délai à l’eau tiède.
IMPORTANT SAFEGUARDS
the use of an extension cord is necessary, please follow these guidelines:
Use only extension cords having an electrical rating not less than the rating of the mixer.
Examine the extension cord before using and do not use if the extension cord is damaged.
Do not abuse the extension cord and do not yank on any cord to disconnect.
Keep all cords away from heat and sharp edges.
SAVE THESE INSTRUCTIONS
SÉCURITÉ
CONSEILS
•
If
•
•
•
•
L’utilisation de tout électroménager exige certaines précautions fondamentales, y compris les suivantes:
GARDEZ CES INSTRUCTIONS
SOINS
— — — FOLD — — —
— — — FOLD — — —
CONSIGNES IMPORTANTES
S’il est indispensable d’utiliser une rallonge, observez les conseils suivants :
• N’employez qu’une rallonge dont la puissance nominale soit au moins égale à celle du batteur.
• Examinez soigneusement la rallonge avant de l’employer et ne l’utilisez pas si elle présente le moindre
endommagement.
• Traitez la rallonge avec délicatesse et ne la tirez pas brusquement pour la débrancher au niveau de
la prise de courant.
• Éloignez la rallonge de la chaleur et des surfaces ou arêtes coupantes.
THIS UNIT
The motor of your MIXMASTER® Mixer is protected by a heat cured insulation. This is a
standard process. Due to the heat curing of the insulation, you may experience an
odor and possibly a slight wisp of smoke from your mixer’s motor. This effect will disappear
after the first few uses.
HELPFUL HINTS
• When mixing liquids, especially hot liquid, use the large mixing bowl or make small quantities
at a time to reduce spillage.
• Ingredients should be added to the mixing bowl as they are specified in the recipe.
INSTRUCTIONS SPÉCIALES
SPECIAL INSTRUCTIONS
• Use the mixing speed that is recommended in the recipe. Use the mixing guide on the speed
control dial of the mixer to help you find the correct speed to use.
POUR LES PRODUITS ACHETÉS AUX ÉTATS-UNIS ET AU CANADA
FOR PRODUCTS PURCHASED IN THE U.S. AND CANADA ONLY
• If times are specified in the recipe, use them! BE CAREFUL NOT TO OVER MIX. Over
mixing can cause the mixture to become very tough.
Pour réduire le risque de choc électrique, cet appareil est équipé d’une fiche polarisée (ayant une lame
plus large que l’autre). La fiche n’enfonce dans les prises polarisées que d’une façon ; si elle ne rentre
pas complètement dans la prise de courant, inversez-la. Si elle n’enfonce toujours pas entièrement,
contactez un électricien compétent. Ne modifiez le dispositif de sécurité de la fiche en aucune façon.
De plus, ne donnez pas de coups secs sur le cordon, ne le tortillez pas et ne le maltraitez pas ; pour le
débrancher, tenez la fiche entre le pouce et l’index et tirez-la doucement hors de la prise.
SAFETY
IS FOR HOUSEHOLD USE ONLY
To reduce the risk of electrical shock, this appliance is equipped with a polarized plug (one
blade is wider than the other). This plug fits a polarized outlet only one way; if the plug does
not fit fully into the outlet, reverse the plug. If it still does not fit, contact a qualified electrician.
Do not attempt to defeat this safety feature. Also, do not pull, twist or otherwise abuse the
power cord; instead, grasp the plug and pull to remove from the outlet.
• Should an object, such as a spatula, fall into the bowl while the mixer is operating, turn the
mixer OFF immediately, then remove the object.
• For easier clean-up, remove beaters and rinse immediately with warm water.
— — — FOLD — — —
— — — FOLD — — —
DO NOT RETURN THIS PRODUCT TO THE PLACE OF PURCHASE
For product questions:
Jarden Consumer Service
Canada : 1.800.667.8623
USA : 1.800.458.8407
www.sunbeam.com
Two Year Limited Warranty
Garantie limitée de deux ans
Sunbeam Products, Inc. doing business as Jarden Consumer Solutions, or if in Canada, Sunbeam
Corporation (Canada) Limited doing business as Jarden Consumer Solutions (collectively “JCS”) warrants
that for a period of two years from the date of purchase, this product will be free from defects in material
and workmanship. JCS, at its option, will repair or replace this product or any component of the product
found to be defective during the warranty period. Replacement will be made with a new or
remanufactured product or component. If the product is no longer available, replacement may be made
with a similar product of equal or greater value. This is your exclusive warranty.
Sunbeam Products, Inc. faisant affaire sous le nom de Jarden Consumer Solutions, Canada Sunbeam
Corporation (Canada) Limited faisant affaires sous le nom de Jarden Consumer Solutions, (collectivement
« JCS ») garantit que pendant une période de deux ans à partir de la date d’achat, ce produit sera exempt
de défauts de matériaux et de main-d’œuvre. JCS, selon son choix, réparera ou remplacera ce produit ou tout
composant du produit étant trouvé défectueux durant la période de couverture de la garantie. Le remplacement
sera réalisé au moyen d’un produit ou composant neuf ou reconstruit. Si le produit n’est plus disponible,
un produit d’une valeur similaire ou supérieure fera lieu de replacement. Ceci est votre garantie exclusive.
This warranty is valid for the original retail purchaser from the date of initial retail purchase and
is not transferable. Keep the original sales receipt. Proof of purchase is required to obtain warranty
performance. JCS dealers, service centers, or retail stores selling JCS products do not have the right
to alter, modify or any way change the terms and conditions of this warranty.
Cette garantie est valide pour l’acheteur au détail d’origine à partir de la date d’achat au détail initiale
et n’est pas transférable. Gardez le reçu de vente d’origine. Une preuve d’achat est requise pour obtenir
l’application de la garantie. Les concessionnaires, les centres de réparation JCS ou les magasins au détail
vendant des produits JCS n’ont pas le droit d’altérer, de modifier ou de quelconque façon changer les
termes et conditions de cette garantie.
This warranty does not cover normal wear of parts or damage resulting from any of the following: negligent
use or misuse of the product, use on improper voltage or current, use contrary to the operating instructions,
disassembly, repair or alteration by anyone other than JCS or an authorized Jarden service center. Further, the
warranty does not cover: Acts of God, such as fire, flood, hurricanes and tornadoes.
JCS shall not be liable for any incidental or consequential damages caused by the breach of any express,
implied or statutory warranty or condition.
Dans la mesure des lois applicables, toute garantie ou condition tacite d’aptitude à être vendu ou utilisé
dans un but particulier est limitée en durée à la durée de la garantie ci-dessus.
JCS shall not be liable for any damages of any kind resulting from the purchase, use or misuse of,
or inability to use the product including incidental, special, consequential or similar damages or loss of
profits, or for any breach of contract, fundamental or otherwise, or for any claim brought against
purchaser by any other party.
JCS rejette toute autre garantie, condition ou représentation exprimée, tacite, statutaire ou autre.
JCS ne sera pas responsable les dégâts, quelle qu’en soit la sorte, résultant de l’achat, de l’utilisation,
de l’abus du produit ou de l’incapacité à utiliser le produit y compris les dégâts secondaires, spéciaux,
conséquents ou similaires ; ni des pertes de revenus ; ni de toute rupture de contrat, fondamentale ou autre
; ni de toute plainte contre l’acheteur par toute autre partie.
Some provinces, states or jurisdictions do not allow the exclusion or limitation of incidental or consequential
damages or limitations on how long an implied warranty lasts, so the above limitations or exclusion may
not apply to you.
Quelques provinces, états ou juridictions ne permettent pas l’exclusion ou la limitation des dégâts
secondaires ou conséquents ni les limitations sur la durée de garantie tacite, donc il se peut que
les limitations ou exclusions ci-dessus ne s’appliquent pas à vous.
This warranty gives you specific legal rights, and you may also have other rights that vary from province
to province, state to state or jurisdiction to jurisdiction.
GSC-MM0607
How To Obtain Warranty Service
Cette garantie vous donne des droits légaux précis et il se peut que vous ayez aussi d’autres droits
qui varient d’une province, d’un état ou d’une juridiction à l’autre.
In the U.S.A.
Comment obtenir une réparation sous garantie ?
If you have any question regarding this warranty or would like to obtain warranty service, please call
1 800-458-8407 and a convenient service center address will be provided to you.
Aux États-Unis –
In Canada
Pour toute question au sujet de cette garantie ou si vous désirez obtenir une réparation sous garantie,
veuillez appeler le 1.800.458.8407 et l’adresse d’un centre de réparation convenable vous sera fournie.
If you have any question regarding this warranty or would like to obtain warranty service, please call
1 800-667-8623 and a convenient service center address will be provided to you.
Au Canada –
Pour toute question au sujet de cette garantie ou si vous désirez obtenir une réparation sous garantie,
veuillez appeler le 1 800-667-8623 et l’adresse d’un centre de réparation convenable vous sera fournie.
In the U.S.A., this warranty is offered by Sunbeam Products, Inc. doing business as
Jarden Consumer Solutions located in Boca Raton, Florida 33431. In Canada, this warranty is offered
by Sunbeam Corporation (Canada) Limited doing business as Jarden Consumer Solutions located at
20B Hereford Street, Brampton, Ontario L6Y 0M1.
Imprimé en Chine
Aux États-Unis, cette garantie est offerte par Sunbeam Products, Inc. faisant affaires sous le nom de
Jarden Consumer Solutions sise à Boca Raton, Florida 33431. Au Canada, cette garantie est offerte par
Sunbeam Corporation (Canada) Limited faisant affaires sous le nom de Jarden Consumer Solutions
située à 20B Hereford Street, Brampton (Ontario) L6Y 0M1.
PLEASE DO NOT RETURN THIS PRODUCT TO ANY OF
THESE ADDRESSES OR TO THE PLACE OF PURCHASE.
www.sunbeam.com
— — — FOLD — — —
— — — FOLD — — —
NE RETOURNEZ CE PRODUIT NI À L’UNE DES
ADRESSES NI AU LIEU D’ACHAT.
— — — FOLD — — —
Printed in China
2379-33, 2385-33
&2623-33
JCS ne sera pas responsable des dégâts secondaires ou conséquents provoqués par la rupture de toute
garantie ou condition exprimée, tacite ou statutaire.
JCS disclaims all other warranties, conditions or representations, express, implied, statutory or otherwise.
©2007 Sunbeam Products, Inc. faisant affaires sous le nom de Jarden Consumer Solutions
Tous droits réservés.
Importé et distribué par Sunbeam Corporation (Canada) Limited faisant affaires sous le nom de
Jarden Consumer Solutions, 20B Hereford Street, Brampton (Ontario) L6Y 0M1
MODELS/
MODÈLES
Quelles Sont les Limites de Responsabilité de JCS ?
Except to the extent prohibited by applicable law, any implied warranty or condition of merchantability
or fitness for a particular purpose is limited in duration to the duration of the above warranty.
NE RETOURNEZ PAS CE PRODUIT AU LIEU D’ACHAT
Pour toute question quant à ce produit, entrez en rapport avec le
service à la clientèle de Jarden:
Canada : 1 800 667.8623
États-Unis : 1 800 458.8407
www.sunbeam.com
Notice d’emploi
Cette garantie ne couvre pas l’usure normale des pièces ni les dégâts provenant d’un des suivants:
mauvaise ou négligente utilisation du produit, emploi sur un mauvais courant ou une mauvaise tension,
utilisation contraire aux instructions de fonctionnement, démontage, réparation ou modification
par quiconque autre que JCS ou un centre de réparation Jarden agréé. De plus, la garantie ne couvre pas
les cas de force majeure, tels qu’incendies, inondations, ouragans et tornades.
What are the limits on JCS’s Liability?
©2007 Sunbeam Products, Inc. doing business as Jarden Consumer Solutions. All rights reserved.
Imported and distributed by Sunbeam Corporation (Canada) Limited doing business as
Jarden Consumer Solutions., 20B Hereford Street, Brampton, Ontario L6Y 0M1
Mixmaster Stand Mixer
Batteur sur socle Mixmaster
®
User Manual
P.N. 120329
®
OF
YOUR STAND MIXER
CARACTÉRISTIQUES
A. ATTACHMENT EJECT BUTTON – The eject button, located on the top
of the handle, releases the beaters or dough hooks for easy cleaning.
A
B. TÊTE ET BATTEURS DÉCENTRÉS – La tête du batteur MIXMASTER® et
les fouets sont décentrés par rapport au bol de malaxage afin que vous
puissiez facilement ajouter des ingrédients au cours du fonctionnement.
J
C. STAINLESS STEEL MIXING BOWLS – 2.0 and 4.0 quart mixing bowls
are ideal for mixing large or small quantities of ingredients.
C. BOLS DE MALAXAGE EN ACIER INOXYDABLE – De 2,2 litres et 4,4 litres,
sont parfaits pour amalgamer petites et grandes quantités d’ingrédients.
D. TURNTABLE BOWL SELECTOR – Simply slide the bowl selector
lever to the left when using the small bowl and to the right when
using the large bowl.
B
H
F. TILT BACK LOCKING HEAD BUTTON – The head of the
MIXMASTER® Stand Mixer tilts back and locks securely into
position to allow easy removal of mixing bowls and attachments.
E. PLATEAU TOURNANT – Étudié pour accueillir le petit bol ou le grand bol
et les faire tourner durant le malaxage.
F. TÊTE BASCULANTE ET VERROUILLABLE – La tête du batteur
MIXMASTER® bascule et se verrouille commodément pour faciliter le
retrait des bols de malaxage et des accessoires.
L
C
POWER /SPEED INDICATOR LIGHT
TÉMOIN DE SOUS TENSION ET DE VITESSE
TURNTABLE BOWL SELECTOR
Slide the bowl selector lever to the left when using the small
bowl and to the right when using the large bowl.
G. GÂCHETTE DE DÉGAGEMENT DU BATTEUR – Libère la tête du batteur et
permet de la séparer du socle pour le nettoyage et le rangement.
G
H. POWER/SPEED INDICATOR LIGHT – The ON/OFF light is also
used to indicate speed setting.
I. 12 VARIABLE SPEEDS – The 12 variable speeds with softstart
ensure superior mixing control and maintains speed regardless
of the mixing load.
F
J. SOFT GRIP HANDLE – The soft grip molded handle gives you
comfort and a firmer grip while mixing.
K. BURST OF POWER® BUTTON – Press down on button to
automatically increase the beater speed for an
immediate burst of power.
D. SÉLECTEUR DE BOL DE MALAXAGE – Vous faites glisser le levier à gauche
pour utiliser le petit bol ou à droite pour employer le grand.
I
E. TURNTABLE – Designed to fit both the large and small bowl, the
turntable allows the bowl to turn while mixing.
G. MIXER RELEASE TRIGGER – Remove the mixer head from the base
for convenient cleaning and storage.
M
L
DU BATTEUR SUR SOCLE
A. BOUTON D’ÉJECTION DES ACCESSOIRES – Placé sur la poignée, il sert à
éjecter les fouets à pales ou les crochets pétrisseurs pour permettre de les
laver aisément.
K
B. OFF-CENTER HEAD AND BEATERS – The head of the MIXMASTER®
Stand Mixer and beaters are positioned off-center to the bowl to make
it easier to add ingredients during mixing.
— — — FOLD — — —
— — — FOLD — — —
— — — FOLD — — —
FEATURES
SÉLECTEUR
H. VARIATEUR DE VITESSE ET TÉMOIN – Le témoin lumineux MARCHEARRÊT sert également à indiquer la vitesse de fonctionnement.
MIXER RELEASE TRIGGER
DE BOL DE MALAXAGE
Vous faites coulisser le levier à gauche pour employer le petit
bol de malaxage et à droite pour employer le grand.
GÂCHETTE
I. VARIATEUR À 12 VITESSES – Les 12 vitesses à mise en marche progressive
assurent un contrôle supérieur du malaxage ; la vitesse choisie est en outre
maintenue, quelle que soit la densité du mélange.
DE DÉGAGEMENT
TILT BACK LOCKING HEAD BUTTON
BOUTON
DU BATTEUR
DE VERROUILLAGE DE LA
TÊTE BASCULANTE
J. POIGNÉE DOUCE AU TOUCHER, DE BONNE TENUE EN MAIN –
Confortable, la poignée moulée fournit une préhension sûre.
K. SURPUISSANCE BURST OF POWER® – Vous appuyez sur le bouton pour
augmenter automatiquement la vitesse des fouets et obtenir un surcroît de
puissance immédiat.
D
L. STAINLESS STEEL BEATERS – For creaming butter and sugar, plus
mixing heavy cake mixes.
2,2 L
L. FOUETS À PALES EN ACIER INOXYDABLE – Pratiques pour mettre le
beurre et le sucre en crème ou malaxer les préparations à gâteaux denses.
E
M. STAINLESS STEEL DOUGH HOOKS – Dough hooks take the hard
work out of kneading dough and other heavy mixtures.
M. CROCHETS PÉTRISSEURS EN ACIER INOXYDABLE – Simplifient le
pétrissage des pâtes et des autres préparations lourdes.
4,4 L
SPEED CONTROL DIAL
VARIATEUR DE VITESSE
M
(A)
FIGURE 1
OPERATING INSTRUCTIONS
THE STAND MIXER FOR USE
Before preparing the mixer for use, be sure the speed control dial is in the OFF position and
the electric cord is unplugged. Be sure to wash bowls and attachments before initial use.
THE
TURNTABLE
THE
SPEED CONTROL DIAL
The speed control dial is used for turning the mixer ON and OFF and for selecting its
12 mixing speeds. (See Figure 3)
Place the revolving turntable into the base of the stand by pressing the turntable into the
center hole of the adjustable slot until it snaps into place.
THE TURNTABLE
The turntable must be adjusted depending upon which bowl size is being used. To adjust,
press down on the Turntable Bowl Selector Switch and slide the switch to the proper icon.
(See Figure 1)
AJUSTEMENT
AND REMOVING THE MIXING HEAD
To attach the mixing head, press in on the mixer-release trigger, located at the rear of the
stand. Place the mixer head on the stand so that the metal pivot on the bottom of the mixer
head goes into the latched opening on top of the stand. As you release pressure from the
mixer-release trigger, the top of the latch should clamp around the metal pivot. Once the
mixing head is lowered into position, it will lock into place. (See Figure 2A)
For most recipes, it is better to begin your mixing on a slower speed until the ingredients
begin combining, then move to the appropriate speed range for the particular task.
AND LOWERING THE MIXING HEAD
Press the head lock button located on the neck of the stand mixer. While the button is
depressed, hold the handle and ease the head of the stand mixer back. The MIXMASTER®
mixer head will lock into this position. To lower the mixing head, press the head lock
button. While the button is depressed, hold the handle and ease the head of the stand mixer
down. A “click” sound will indicate when the mixer head has locked into position.
(See Figure 2B) Be sure the mixer head is securely in position before using. NOTE: This
mixer is NOT intended for use away from the stand.
When mixing larger quantities you may need to increase the speed due to the amount of
mixing required and the larger load on the machine.
LEVÉE
Use the chart below to determine the best setting to use when preparing your favorite recipes.
THE ATTACHMENTS
Be sure the speed control dial is in the OFF position and unplug electric cord from the electrical
outlet. Lift mixer head up and back to pull it out of the way of the bowl. (See Figure 2B)
NOTE: It is important that the beaters or dough hooks go into the correct sockets,
otherwise the mixer will not give you the proper mixing action. Do not risk ruining a recipe
or damaging your mixer. Read the following instructions carefully.
Insert the beaters or dough hooks, one at a time, using a combination pressing and twisting
motion, until they snap into position. If an attachment does not properly snap into place,
pull it out of the socket and rotate it one quarter turn. Reinsert the beater or dough hook
into the socket until it snaps into position.
BEATERS
One of the beaters is shaped like a cone and has a nylon button on the bottom. It goes into
the socket on the side of the mixer nearest the side of the bowl. The other beater is squareshaped and goes into the socket nearest the center of the bowl. (See Figure 4) See beater
symbols located on the bottom of the mixer head.
DOUGH HOOKS
The dough hook with the smaller washer and foot goes into the socket on the side of the
mixer nearest the side of the bowl. The other dough hook with the large washer goes into
the socket nearest the center of the bowl. See the dough hook symbols located on the
bottom of the mixer head.
ET BAISSÉE DE LA TÊTE
MONTAGE
SETTING
1
PREPARATION
ADDING
THE MIXING BOWL
Once you have selected the bowl you wish to use, move the turntable bowl selector switch to
the proper setting – the large bowl icon if you are using the large bowl, and the small bowl
icon if you are using the small bowl. Place the desired mixing bowl onto the turntable.
NOTE: Mixing bowls should NEVER be used in a conventional oven, microwave oven,
on top of the range or on any other heated surface. If mixing bowls are scratched
or chipped, do not use the mixer.
MIXING GUIDE
Fold-Knead
EXAMPLE
Use when mixing dry ingredients or when folding two
portions of a recipe together, such as a beaten egg white into
a batter or when directions call for LOW speed. Use for
kneading bread.
2
Stir
Use when stirring liquid ingredients or when gentle action
is needed to moisten dry ingredients.
3
Blend
Use when quick breads require a brisk action, just enough
to blend ingredients but not enough to develop
a smooth batter.
Use when mixing dry ingredients and liquid ingredients
together alternately in a recipe.
4
Mix
5
Combine
6
Cake Mixes
7
Cream
Use when creaming sugar and butter together.
8
Whip
Use to whip potatoes or to develop a smooth batter.
9
Whip/Cream
10
Use when recipe calls for combining ingredients together.
Use when preparing packaged cake mixes or when directions
call for MEDIUM speed.
PRÉPARATION
MISE
Desserts
Use to beat air into whipped desserts.
11
Frostings
Use when preparing light, fluffy frostings and candies.
12
Egg Whites
Quand vous avez décidé quel bol utiliser, faites glisser le levier du sélecteur de bol (du
plateau tournant) à la position voulue – à l’icône du grand bol si vous employez le grand
bol ou à l’icône du petit bol si vous employez le petit bol. Posez alors le bol de malaxage
désiré sur le plateau tournant.
Use when aerating eggs and egg whites.
Use when directions call for HIGH speed.
EN PLACE DU BOL DE MALAXAGE
REMARQUE : Les bols ne devraient JAMAIS être mis dans un four de cuisinière, dans un
four à micro-ondes, sur un foyer de cuisinière ou sur toute autre surface chauffée.
Note: Due to variations in ingredient temperatures and quantities, the Mixing Guide speeds are only suggested.
If necessary, adjust speeds as needed to achieve desired results.
— — — FOLD — — —
DES ACCESSOIRES
Use to whip cream or to develop a light, fluffy texture.
DE VITESSE
DE MALAXAGE
Utilisez le tableau ci-dessous pour établir les vitesses propres à procurer les résultats
escomptés pour vos recettes favorites.
Assurez-vous que le variateur de vitesse soit réglé à l’arrêt (OFF) puis débranchez le cordon à la
prise. Levez la tête et tirez-la en arrière pour l’écarter du bol. (Voyez la figure 2B)
REMARQUE : Il est primordial que les fouets ou crochets soient insérés dans les douilles
appropriées pour malaxer convenablement les ingrédients. Ne risquez ni l’échec de la recette
ni l’endommagement du batteur. Lisez attentivement les instructions qui suivent.
Insérez les fouets ou les crochets un par un, en enfonçant et en tournant simultanément
jusqu’à ce que l’accessoire soit correctement encliqueté. Si l’un d’eux ne s’adapte pas
convenablement, sortez-le de la douille et tournez-le d’un quart de tour. Insérez-le alors de
nouveau dans la douille jusqu’à ce qu’il soit parfaitement encliqueté.
FOUETS
Le fouet de forme conique comporte un bouton de nylon à sa partie inférieure. C’est celui
que vous enfoncez dans la douille la plus proche de la paroi périmétrique du bol. Le fouet
de forme carrée est destiné à la douille la plus proche du centre du bol. (Voyez la figure 4)
Les symboles des fouets sont représentés sur la partie inférieure de la tête du batteur.
CROCHETS PÉTRISSEURS
Le crochet à petite rondelle et petit pied se place dans la douille la plus proche de la paroi
périmétrique du bol. L’autre crochet est destiné à la douille la plus proche du centre du bol.
Les symboles des crochets sont représentés sur la partie inférieure de la tête du batteur.
SPEED
D’EMPLOI
Rappelez-vous que les différents malaxages et les vitesses données au tableau suivant
risquent de varier légèrement d’une recette à une autre.
Il est généralement préférable de débuter le malaxage à une vitesse inférieure à la vitesse
jugée appropriée jusqu’à ce que les ingrédients commencent à se mélanger puis de passer
à la vitesse préconisée pour l’achever.
Dans le cas des grosses quantités, il vous faudra peut-être augmenter la vitesse du batteur
par suite du gros malaxage requis et du poids accru des ingrédients.
Quand une recette requiert l’addition d’ingrédients – de farine, par exemple – réduisez la
vitesse de fonctionnement pour les ajouter afin d’éviter la formation d’un nuage de farine.
Une fois que les nouveaux ingrédients commencent à s’amalgamer, revenez lentement à la
vitesse appropriée pour le genre de malaxage.
Appuyez sur le bouton de verrouillage de la tête basculante (au haut du pied du socle).
Alors que le bouton est enfoncé, saisissez la poignée puis tirez la tête du batteur en arrière.
La tête du MIXMASTER® se bloquera dans cette position. Pour baisser la tête, appuyez sur
le bouton de verrouillage de la tête. Alors que le bouton est enfoncé, saisissez la poignée
pour abaisser la tête. Vous entendrez un « clic » qui signale que la tête est bloquée en
position. (Voyez la figure 2B) Assurez-vous que la tête soit sûrement fixée avant l’utilisation.
REMARQUE : Ce batteur n’est PAS conçu pour fonctionner lorsque libéré de son socle.
When building up a recipe that requires the addition of dry ingredients, such as flour, slow
the speed down while these ingredients are being added to avoid a snow storm effect. Once
the extra ingredients begin combining, slowly increase to the appropriate speed for the
particular mixing task.
INSTALLING
GUIDE
ET DÉMONTAGE DE LA TÊTE DU BATTEUR
Pour fixer la tête du batteur, appuyez sur la gâchette de dégagement (elle se trouve à
l’arrière du socle). Placez la tête sur le socle de telle façon que le pivot en métal situé à la
partie inférieure de la tête du batteur s’enclenche dans le dispositif de blocage du haut du
socle. Tandis que vous réduisez votre pression sur la gâchette, le dispositif de blocage du
haut du socle s’enclenche avec le pivot de métal. Une fois la tête en position baissée, le
dispositif se bloque. (Voyez la figure 2A)
Please keep in mind that the various mixing tasks and related speeds listed in the following
table may vary slightly from recipe to recipe.
RAISING
DU PLATEAU TOURNANT
MONTAGE
MIXING GUIDE
FOUET
CARRÉ
Le variateur de vitesse sert à METTRE le batteur EN MARCHE, à l’ARRÊTER et à
sélectionner l’une des 12 vitesses. (Voyez la figure 3)
Vous tournez le variateur de vitesse dans le sens des aiguilles d’une montre pour augmenter
la vitesse et dans le sens contraire des aiguilles d’une montre pour la réduire.
Alors que vous tournez le variateur de vitesse, vous remarquerez qu’un numéro de vitesse
coïncide avec le témoin lumineux du haut de la tête. Le nombre indique la vitesse à laquelle
fonctionne le batteur.
Faites tourner le variateur de vitesse jusqu’à ce que le nombre de la vitesse désirée
corresponde avec le témoin.
Le plateau tournant doit être réglé en fonction du bol de malaxage employé. Pour faire la
modification, appuyez sur le levier du sélecteur de bol et faites-le coulisser jusqu’à l’icône
voulue. (Voyez la figure 1)
Rotate the speed control dial until the indicator is opposite the numbered speed you wish
to use.
ATTACHING
VARIATEUR
EN PLACE DU PLATEAU TOURNANT
Fixez le plateau tournant à la base du socle, en l’enfonçant dans le trou central de la fente
réglable jusqu’à ce qu’il s’enclenche avec un déclic.
As you rotate the speed control dial, notice that a numbered speed is aligned with the
indicator light on the side of the mixer head. This numbered speed indicates the speed at
which the mixer is operating.
FOUET
CONIQUE
FIGURE 4
MODE
MISE
Rotate the speed control dial in a clockwise direction to increase mixing speed, and in
a counterclockwise direction to decrease mixing speed.
ADJUSTING
SQUARE
BEATER
FIGURE 3
EN VUE DE L’UTILISATION
Avant de commencer à préparer le batteur pour l’employer, assurez-vous que le variateur de
vitesse soit à la position OFF (arrêt) et que le cordon d’alimentation soit débranché. Lavez
bien sûr les bols et les accessoires avant la toute première utilisation.
— — — FOLD — — —
ATTACHING
ABOUT
PRÉPARATION
(B)
RÉGLAGE
GUIDE DE
DE VITESSE
MALAXAGE
1
Mélanger
délicatement,
pétrir
2
Brasser
3
Mélanger
À utiliser lorsque des pains éclairs nécessitent un mélange
bref, qui soit suffisant pour mélanger les ingrédients sans
homogénéiser la pâte.
4
Malaxer
À utiliser pour amalgamer en alternant les ingrédients secs
et liquides d’une recette.
5
Combiner
6
Préparation
pour gâteaux
7
Mettre en crème
8
Fouetter
9
Fouetter/crémer
À utiliser pour faire la crème fouettée ainsi que pour obtenir
une texture très légère.
10
Desserts
À utiliser pour charger les desserts de minuscules bulles d’air.
11
Glaçages
À utiliser pour préparer des confiseries et des glaces légères.
12
Blancs d’œufs
À utiliser pour monter les œufs et les blancs d’œufs ainsi
que quand le malaxage doit se faire à GRANDE VITESSE.
EXEMPLE
À utiliser pour mélanger des ingrédients secs, incorporer
des ingrédients de la recette à d’autres – des œufs montés
en neige dans une pâte, par exemple – ou lorsque la recette
requiert un malaxage à BASSE VITESSE. Sert aussi à pétrir
la pâte à pain.
À utiliser pour ajouter des ingrédients liquides ou lorsqu’un
mélange délicat est requis pour mouiller des ingrédients secs.
À utiliser lorsque la recette indique de tout mélanger.
À utiliser pour les mélanges à gâteaux préemballés et
quand le malaxage doit se faire à VITESSE MOYENNE.
À utiliser pour mettre le beurre et le sucre en crème.
À utiliser pour fouetter les pommes de terre ainsi que pour
homogénéiser les pâtes.
Remarque : Par suite des variations que présentent les ingrédients (température et quantité, par exemple) les
vitesses du guide de malaxage ne sont fournies qu’à titre indicatif. Ajustez les vitesses au besoin pour obtenir
les résultats recherchés.
— — — FOLD — — —
PREPARING
FIGURE 2
CONE
BEATER