1
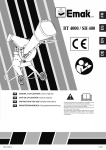
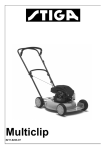
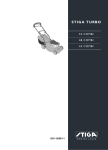
DEUTSCH
Multiclip 46 Battery
8211-3417-05
D
S
SVENSKA
2.
230 V
1.
3.
4.
5.
1
6.
2
7.
2
SVENSKA
S
8.
1
4
9.
2
3
11.
36 mm
19 mm
10.
3
GB
ENGLISH
SYMBOLS
The following symbols are displayed on the machine in order to remind you about the safety precautions and attention necessary when using the
machine.
dle and assemble the components. Note! Washer A is fitted between the screw and the plastic
bushing (fig. 1).
3. Mount the upper part of the handle onto the
lower part with screws, washers and locking
nuts (fig. 2).
The symbols mean:
Warning! Read the Instruction Book and
Safety Manual before using the machine.
Warning! Keep spectators away. Beware of
objects being flung out.
Warning! Take out the safety key before
any type of maintenance is carried out.
GENERAL
Before starting the mower for the first
time and after winter storage, you should
charge the battery for 1 - 2 days otherwise the battery can be damaged.
In order for the battery to maintain its
capacity and to give optimum performance, it is important that the charging
and storage instructions are carefully followed.
Warning! Do not put hands or feet under the
cover of the machine when it is running.
• The battery used in this machine is a lead-acid
type battery. This type of battery must always
be stored fully charged.
Warning! The blades continue to rotate
even after the machine has been switched
off.
• Always charge the battery indoors, in a garage,
etc. where the battery is dry and protected from
the weather.
When a red lamp lights up on the mower’s
control panel and/or a sound signal is activated, take out the safety key.
• Only charge the battery when the temperature is
at least 0°C and not over +40°C. Charging in
lower or higher temperatures can damage the
battery.
STOP
ASSEMBLY
When the machine was packed, it is possible that it
was equipped with a lead for maintenance charging. When the mower is taken out of the packaging, this lead is no longer required and can be
removed.
HANDLEBAR
1. Set the highest cutting height (position 4, see also
under heading “cutting height”)
2. The components for assembling the handle’s
lower part are mounted for packaging. Remove
the components from the lower hole on the
chassis. Then fold up the lower part of the han-
4
BATTERY
• Always keep the mower battery away from water, sources of heat (ovens, radiators, open fires,
etc.) and hazardous chemicals.
• Always use the accompanying genuine Stiga
charger. Never use the charger for any other
product.
• Never use the charger if it is damaged in any way.
A damaged lead or charger should immediately
be replaced at an authorised service workshop
• Take care of the leads. Never carry the charger
by the lead. When charging is complete pull out
the plug not the lead. If an extension cable is
used, use a robust sort suitable for outdoor use,
even if the battery is never charged outdoors.
• The charger always feels warm to touch, during
the first hours of charging.
GB
ENGLISH
CHARGING INSTRUCTIONS
The battery must always be charged
directly after finishing mowing and as
soon as it has cooled down (after
about 30 minutes).
1. Charge the battery outside of the mower in a
dry and cool place.
2. First connect the round plug from the charger to
the battery (fig. 3).
3. Then connect the charger to a wall socket
(~220/230V).
4. Charge for 1 - 2 days, depending on how long
the machine has been used. Whilst the battery
is charging, the red charging lamp on the battery is continuously lit, for as long as the battery charger is connected
5. Finish charging by firstly pulling out the plug
from the wall socket.
If the charger is first removed from
the battery, the plug leads can shortcircuit if they come into contact with
conductive material.
CHARGING BEFORE WINTER
STORAGE
The battery should always be stored fully charged.
1. Take the battery out of the mower.
2. Carefully wipe off the battery.
3. Store the battery outside of the mower in a dry
and cool place.
USING THE MOWER
STARTING/STOPPING THE MOWER
Keep hands and feet well away from the
rotating blade(s). Never put your hand
or foot under the blade casing or in the
grass ejector unit while the motor is
running.
1. Fix the battery in place in the mower (fig. 4).
2. Insert the safety key into the control panel (fig.
5). When the safety key is in place, the green
lamp will be lit. If it is not, check that the engine
protection on the safety key is pressed in (fig. 6)
and that the battery is fully charged.
3. Press down the handle to lift the front wheels off
the grass, thereby reducing grass resistance in the
starting moment.
4. Press in the power on/off button 1 (fig. 7). Start
the engine by pressing in the safety handle 2. To
stop, release the safety handle.
After finishing mowing:
1. Remove the safety key and keep it out of
reach of children.
2. Clean the mower (see the “Maintenance” section under the heading “Cleaning”).
3. Recharge the battery once it has cooled down
(after about 30 minutes).
If the safety handle has stopped working, remove the safety key and take the
mower to an authorised service workshop to be repaired.
CONTROL PANEL (fig. 8)
The control panel has the following functions:
1. It includes the socket for the safety key. The safety key also has an in-built engine protection. If
the engine protection has been activated, remove
the safety key and reset the engine protection
(fig. 6).
2. It includes three lamps which indicate the battery’s charge level:
A Green = the battery is charged to between 30%
and 100% of full capacity.
B Yellow = the battery’s power has reduced. Between 5% and 30% remains.
C Red = 5% or less of the battery power remains.
The machine will begin to beep and will switch
itself off automatically. Stop mowing and recharge the battery once it has cooled down (after
about 30 minutes). Do not use the mower again
until the battery is fully charged.
Important: do not allow the battery power to completely run down as this may damage the battery and
shorten its operational life.
5
GB
ENGLISH
MOWING TIPS
For best cutting results and to ensure that the battery lasts as long as possible, the following rules
should be followed:
• Drive the mower at a slow and even pace
• Try to avoid excessive starting and stopping, as
this draws a lot of current.
• Make sure that the motor is running at full speed
at all times when mowing.
• Mow regularly and often, especially when the
grass is growing quickly. Do not mow more than
a third of the total height of the grass during one
mowing session.
• Always use a sharp blade.
• Do not use the mower when it is raining or when
the grass is wet.
• Make sure that the underside of the cutting deck
is kept clean.
CUTTING HEIGHT
Do not set the cutting height so low that
the blade/blades can hit uneven ground.
When adjusting the cutting height, firstly pull out the safety key.
The cutting height can be adjusted to four positions
by moving the wheel axles (fig. 9).
Position 1 = Lowest cutting height
Position 4 = Highest cutting height
MAINTENANCE
Take out the safety key and remove the
battery before any type of maintenance is
carried out.
CLEANING
The mower should be cleaned after each use. Use a
damp rag or sponge with a mild soap solution. Do
not use water or detergents for cleaning. Remove all
grass clippings which have gathered under the
cover.
6
CHANGING THE BLADE
Check, before and after each use, that the
blade is tightly fixed and that it is not
damaged. A bent or damaged blade
should immediately be replaced. Use protective gloves to avoid cutting injuries.
Blunt and/or damaged blades tear off the grass and
make the lawn look ugly after mowing. New, wellsharpened blades cut off the grass and ensure that it
looks green and fresh after it has been mown.
Remove the battery. Put the accompanying wrench
(36 mm) on the hexagon holder. Loosen the blade
nut with an adjustable wrench or another type of
fixed wrench (19 mm) (fig. 10). Turn the blade nut
in an anti-clockwise direction in order to remove the
blade.
Fit the new blade and refit all the other parts exactly
as they were before they were dismantled, see fig.
10. Tighten the blade nut fully.
SHARPENING THE BLADE
Water grinding with whetstone or a grinding stone
should be used to sharpen the blade.
For safety reasons, the blade should not be sharpened on an emery wheel. Too high a temperature
can result in the blade becoming brittle.
If the blade is sharpened, it must be balanced afterwards to avoid vibration
damage (fig. 11).
ENGLISH
Problem
GB
Possible causes
1. Mower does not start when safety A. Check to make sure the safety key has been properly inserted and that the
key is inserted and the safety hanengine protection is pressed in.
dle is pressed in
B. Remove safety key, turn mower over on side and check that blade is not
obstructed.
C. Is battery fully charged? Plug in charger and check lamps.
2. Mower stops while mowing (for
reason other than releasing the
safety handle).
A. The engine protection in the safety key has cut off power to protect
engine. Wait a couple of seconds for it to cool and then press in the
engine protection.
B. Remove safety key. Turn mower over and check that blade is free to turn.
Also check deck and ejector for clogging.
C. Mover is trying to cut too much grass. Raise it to higher cutting height
and try to start again.
D. Check to see if battery needs to be recharged.
3. Mower vibrates excessively or
makes excessive noise.
A. Remove safety key. Turn mower over to check if blade is properly tightened.
B. Remove safety key. Turn mower over to check if blade has been bent,
damaged or worn out. Replace with an original blade.
C. Remove safety key. Turn mower over to check mower deck for damage.
If damaged, contact an authorised service dealer.
D. If no visible damage to mower or blade, return mower to an authorised
service dealer.
4. Mower runs but cutting perform- A. Was battery fully charged at the start?
ance is unsatisfactory and/or there B. Remove safety key. Turn mower over to check if:
is a loss of power while mowing.
-blade is correctly attached.
-blade is sharp.
-blade is bent, loose or damaged.
-deck and/or ejector and/or grass collector are clogged
C. Cutting height may be set too low, causing heavy strain on motor by trying to cut too much grass. Raise to a higher cutting position.
5. Mower is hard to push.
A. Mower is trying to cut too much grass (See problem 4, Cause C.)
B. Remove safety key. Turn mower over to check if all wheels rotate freely
and check them for damage. Obtain original replacement wheels from an
authorised service dealer.
6. Mower engine will not stop when A. Remove safety key to shut off motor. Mower can not then be started.
the safety handle is released.
Contact an authorised service dealer.
7. Mower cannot finish cutting the A. Was battery fully charged at the start?
lawn on a single charge any more. B. Mower is trying to cut too much grass (See problem 4, Cause C.)
C. Contact an authorised service dealer for battery check.
8. Red lamp on charger does not
A. Wall outlet does not have power. (Verify with another electric device.)
come on when charger is plugged B. The charger fuse may need to be replaced. Contact an authorised service
into wall outlet.
dealer
C. Charger or cord may be defective. Contact an authorised service dealer.
If the mower still doesn't work, despite measures taken according to this table, contact an authorised service dealer.
7