1
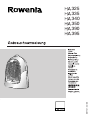
087731 - 23/00
325
335
340
350
390
395
Mod. : HA 325 - HA 335 - HA 340 - HA 350
Mod. : HA 390 - HA 395
A
A
B
B
C
C
D
D
G
G
E
E
F
F
H
I
G
G
A
EC
O
6
9
1
5
8
2
3
4
7
B
1
2
50 cm
50 cm
30 cm
30 cm
30 cm
20 cm
20 cm
3
4
30 cm
3
E
E
G
G
4
SEHR WICHTIG:
NIEMALS DAS GERÄT ABDECKEN, auch nicht kurzzeitig, da
sonst Überhitzungsgefahr besteht.
Zwischen dem Gerät und anderen Gegenständen (Vorhänge,
Wände, Sprühdosen ...) einen Abstand von 30 cm lassen.
DAS GERÄT NIEMALS GEKIPPT ODER AUF DER SEITE LIEGEND BENUTZEN.
Dieses Gerät darf nicht in einem feuchten Raum benutzt werden.
Dieses Gerät nicht in der Nähe einer Badewanne, Dusche,
eines Waschbeckens oder eines Schwimmbads benutzen.
ES DARF NIEMALS WASSER IN DAS GERÄT EINDRINGEN.
Das Gerät nicht mit feuchten Händen anfassen.
Bei längerer Abwesenheit: Stellen Sie den Schalter (A) auf die
mod.HA 325 - HA 340) und ziehen Sie
Anfangsstellung (
den Stecker heraus.
1 - SPANNUNG
Überprüfen Sie vor der ersten Benutzung, ob die Netzspannung mit
der auf dem Gerät angegebenen Spannung übereinstimmt.
Das Gerät kann an eine nicht geerdete Steckdose angeschlossen
werden. Es entspricht der Klasse II (doppelte elektrische Isolation ).
2 - SICHERHEIT
Überhitzungssicherung
Bei anormaler Überhitzung unterbricht eine Sicherheitsvorrichtung automatisch den Betrieb des Geräts. Um das Gerät wieder in Betrieb zu setzen, müssen Sie die Stromversorgung ausschalten, indem Sie den
Schalter (A) auf die Stellung (Mod. HA335 - HA350 - HA390 - HA395)
(mod. HA 325 - HA 340) bringen, den Netzstecker ziehen und warten, bis die Temperatur des Geräts wieder normal ist (ca. 15 Minuten).
Signal Protect: akustischer Alarm (nur Modell HA395)
Das Gerät verfügt über ein exklusives akustische Sicherheitssystem.
Befindet sich das Gerät in einer anormalen Situation, die ein mögliches
Risiko darstellen könnte (Abdeckung, gefährliches Kippen,
Verschmutzung, teilweise oder vollständige Verstopfung des Gitters),
unterbricht eine Sicherheitsvorrichtung automatisch den Betrieb des
Geräts.
Ein exklusives Elektroniksystem wird aktiviert und warnt Sie mit einem
akustischen Signal vor der anormalen Überhitzung.
Um das akustische Signal auszuschalten und das Gerät wieder in
Betrieb zu setzen, müssen Sie:
– den Schalter (A) auf die Stellung bringen,
– den Netzstecker ziehen,
– die Ursache für die Überhitzung beseitigen,
– warten, bis die Temperatur des Geräts wieder normal ist (ca. 15
Minuten).
Ertönt das akustische Signal erneut, sehen Sie bitte im Abschnitt “BEI
STÖRUNGEN” am Ende dieser Anleitung nach.
3 - BETRIEB
Einschalten und Auswählen der Funktion:
Frostschutz-Stellung
In dieser Funktion kann die Temperatur in einem normal isolierten
Raum mit einer der Geräteleistung entsprechenden Größe automatisch über 0°C gehalten werden.
Schließen Sie hierzu das Gerät an, und stellen Sie den Schalter (A)
so ein, daß sich das Symbol
auf der Markierung (B) befindet.
Kontrolleuchte. (mod. HA 340 - HA 350 - HA 390 - HA 395)
Diese Kontrolleuchte (D) leuchtet nur dann auf, wenn sich das Gerät im
Heizbetrieb befindet.
Modell HA325 - HA340
Sobald Ihr Gerät an das Stromnetz angeschlossen ist; bringt es eine
Leistung von 2000 W auf (mod. HA 325) oder 2400 W (mod HA 340).
Die Einstellung der Temperatur erfolgt nach Ihrem Wunsch durch Drehen
des Schalters (A). (Abb. 1):
Stellung 9 auf der Markierung (B) = wärmer.
Stellung 1 auf der Markierung(B) = kälter.
Modell HA335 - HA350 - HA390 - HA395
Das Gerät verfügt über 3 Funktionsweisen. Zur Auswahl brauchen Sie
bloß das entsprechende Symbol auf die Markierung (B) des
Gehäuses (Abb. 2) zu stellen.
Stellung nur Lüften:
Diese Funktion ermöglicht Ihnen die Verwendung des Heizlüfters als
Ventilator im Sommer.
Auswahl der Leistung:
Stellung ECO : In dieser Stellung arbeitet das Gerät durchgehend mit
•
1000 W (HA 335) oder 1200 W (HA 350 - HA 390 - HA 395).
Stellung : In dieser Stellung arbeitet das Gerät durchgehend mit
2000 W (HA 335) oder 2400 W (HA 350 - HA 390 - HA 395).
In dieser Stellung können Sie einen Raum schnell aufheizen und dann
die gewünschte Temperatur beibehalten, indem Sie den Schalter (A)
auf eine Position innerhalb des Regelbereichs zwischen den Symbolen “ ”
(maximale Temperatur) und “ ” (Frostschutz) stellen.
••
HINWEISE
Bitte lesen Sie die vorliegende Anleitung unbedingt aufmerksam durch,
und beachten Sie die folgenden Empfehlungen :
Dieses Gerät entspricht den europäischen Richtlinien 73/23/CEE und
89/336/CEE.
Überprüfen Sie vor jeder Benutzung das Gerät, den Stecker und das
Kabel auf einwandfreien Zustand.
Den Stecker weder am Gerät noch am Netzkabel aus der
Wandsteckdose ziehen.
Das Netzkabel vor jeder Benutzung vollständig abwickeln.
Ist das Gerät an der Wand befestigt, muss die Steckdose zugänglich
sein. Das Gerät nicht direkt unter einer Steckdose anbringen.
Stecken Sie niemals Gegenstände (z.B.: Nadeln...) in das Gerät hinein.
Während des Betriebs ist das Gerät außerhalb der Reichweite von
Kleinkindern, Tieren und Personen mit bestimmten Behinderungen zu
halten.
Benutzen Sie das Gerät nicht in staubigen Räumen oder in Räumen
mit Brandgefahr.
Dieses Gerät ist ausschließlich Haushaltszwecken vorbehalten. Es darf
nicht für industrielle Verwendungen benutzt werden.
Bei Beschädigungen durch unsachgemäße Verwendung erlischt der
Garantieanspruch.
Ist das Stromkabel beschädigt, muß es aus Sicherheitsgründen vom
Hersteller, in dessen Kundendienstwerkstaff oder von einer Person mit
entsprechender Qualifikation durch ein Neues ersetzt werden.
••
DEUTSCH
VOR DER BENUTZUNG AUFMERKSAM DURCHLESEN UND AUFBEWAHREN
Sie haben soeben einen Heizlüfter erworben, der ideal für das schnelle Aufheizen der verschiedenen
Zimmer im Haus geeignet ist. Dank seiner äußerst kompakten Bauform ist er leicht
unterzubringen und bequem von einem Zimmer in ein anderes zu transportieren.
4 - WANDBEFESTIGUNG
Das Gerät kann auch an der Wand befestigt werden. Es muß dazu senkrecht und unter Beachtung der minimalen Abstände angebracht werden (Abb. 3) .
Zur Befestigung des Geräts an der Wand benötigen Sie 3 Schrauben
und 3 entsprechende Dübel.
Beginnen Sie mit dem obersten Loch oberhalb des Griffes (E) (Abb. 4).
Bohren Sie in der gewünschten Höhe ein Loch in die Wand, setzen Sie
einen Dübel und eine Schraube ein.
Hängen Sie das Gerät an die Wand und fixieren Sie es in senkrechter
Position mit Hilfe der Fixierbohrungen (G) in den Füßen des Geräts.
5 - PFLEGE
Vor der Durchführung von Pflegearbeiten ist unbedingt der
Netzstecker herauszuziehen.
Sie können das Gerät mit einem feuchten Tuch reinigen.
Wichtig : Niemals Schleifmittel benutzen, da diese die Oberflächen
Ihres Gerät beschädigen könnten.
Wir empfehlen Ihnen, die Lufteintritts- und Luftaustrittsgitter mindestens einmal pro Jahr zu reinigen (falls erforderlich mit Hilfe eines
Staubsaugers).
6 - UNTERBRINGUNG
Wenn Sie das Gerät wegräumen, können Sie das Kabel aufrollen
und in das Fach (I) hinten am Gerät legen. (mod. HA 390 - HA 395).
Lassen Sie das Gerät unbedingt gut abkühlen, bevor Sie das
Netzkabel aufrollen.
Wenn Sie das Gerät nicht benutzen, muß es in einem vor
Feuchtigkeit geschützten Raum aufbewahrt werden.
7 - BEI STÖRUNGEN
Nehmen Sie das Gerät niemals selbst auseinander. Ein falsch repariertes Gerät kann für den Benutzer eine große Gefahr darstellen.
Bevor Sie sich an unseren Kundendienst (siehe beigefügte Liste) wenden, stellen Sie sicher:
– daß sich das Gerät in normaler Betriebsposition befindet ;
– daß die Lufteintritts- und Luftaustrittsgitter vollständig frei sind.
READ CAREFULLY BEFORE USING AND THEN KEEP IN A SAFE PLACE
If the appliance is fixed to the wall, the socket must be acces
sible. Do not place the appliance just below a power socket.
Never insert objects into the appliance (e.g. needles...).
When in use, this appliance must be kept out of the reach of young
children and animals.
Do not use your appliance in a dusty room or a room where there is a
risk of fire.
This appliance is intended for domestic use only. It must therefore not
be used in industrial applications.
The warranty will be void in the event of damage arising from improper use.
If the power cable is damaged, it must be replaced by the manufacturer, its after-sales service or a person with similar qualifications to
avoid any danger.
VERY IMPORTANT :
NEVER COVER THE APPLIANCE, even temporarily, as there is
a danger of overheating.
Keep the appliance 30 cm away from any objects (curtains,
walls, aerosols, etc.)
NEVER USE IT TILTED OR LYING ON ITS SIDE.
This appliance must not used in damp places.
Do not use the appliance near a bath, shower, sink or
swimming-pool.
NEVER ALLOW WATER TO PENETRATE THE APPLIANCE.
Do not touch the appliance with wet hands.
In the event of a long absence: turn the button (A) to the
initial setting (
mod.HA 325 - HA 340) and unplug the
appliance.
1 - VOLTAGE
Before using the appliance for the first time, ensure that your mains
voltage corresponds to the voltage indicated on the appliance.
Your appliance can be used with a power plug without an earth
connection. It is a class II appliance (dual electrical insulation
).
2 - SAFETY
Heat safety
In the event of abnormal overheating, a safety device automatically
cuts out the appliance. Before re-using your appliance, you must turn
it off by turning the button (A) to setting (mod. HA 335 - HA 350 HA 390 - HA 395)
(mod. HA 325 - HA 340) then unplug the
power plug and wait for the temperature of the appliance to return to
normal (approximately 15 min).
Protect Signal: safety beep (mod. HA 395 only)
Your appliance is fitted with an exclusive audible safety system.
If your appliance is not working properly, creating a potential risk
(appliance covered, tipping over, grill clogged up, partially or completely blocked), a safety device automatically cuts it out.
An exclusive electronic system starts up and issues a beep, to warn
you that the appliance is overheating.
To stop the beep and restart your appliance, you must:
– turn the button (A) to the setting
– unplug the power plug,
– eliminate the cause of overheating,
– then wait for the temperature to return to normal (approximately 15
min).
If your appliance starts beeping again, please consult the paragraph
entitled “IN THE EVENT OF PROBLEMS”, at the end of this instruction booklet.
3 - OPERATION
Starting up the appliance and choosing the operating mode:
Frost-free setting
This setting enables you to automatically maintain the temperature above 0°C in a normally insulated room, whose volume corresponds to the power of your appliance.
To do this, plug in your appliance and turn button (A) so that the “ “ symbol is placed
opposite indicator (B).
Heating light. (mod. HA 340 - HA 350 - HA 390 - HA 395)
This light (D) only comes on when your appliance is in heating mode.
Mod. HA 325 - HA 340
As soon as your appliance is connected to the mains, it delivers power of 2000 W. (mod.
HA 325) or 2400 W (mod. HA 340). Adjust the temperature setting, according to your own
comfort, by turning button (A) (fig. 1):
Setting 9: opposite mark (B) = warmer
Setting 1: opposite mark (B) = cooler.
Mod. HA 335 - HA 350 - HA 390 - HA 395.
Your appliance has 3 operating modes. Simply position the symbol corresponding to the
chosen mode opposite mark (B) on the housing (fig. 2).
Cold ventilation setting :
This setting enables you to use your fan heater as a fan in summer.
Power selection:
ECO position : this position constantly delivers power of 1000 W
• HA 335) or 1200 W (mod. HA 350 - HA 390 - HA 395).
(mod.
position : this position constantly delivers power of 2000 W
(mod. HA 335) or 2400 W (mod. HA 350 - HA 390 - HA 395).
It enables you to heat a room quickly and then maintain the required temperature by
positioning button (A) to a setting between symbols “ ” (max. heating) and “ “ (frostfree setting).
••
WARNINGS : It is essential that you read these instructions carefully and
comply with the following recommendations.
This appliance complies with European directives 73/23/EEC and
89/336/EEC.
Before using, always check the condition of the appliance, the power
socket and the power lead.
Do not pull on the power cable or the appliance, even to unplug it from
the wall socket.
Fully unwind the lead each time before use.
••
ENGLISH
You have just purchased a fan heater, ideal for quickly heating the different rooms in your house.
This highly compact appliance can be easily stored or moved around
from one room to another for your comfort.
4 - INSTALLATION ON WALL
Your appliance can be bolted to the wall. It must be positioned vertically, respecting the
minimum distances (fig. 3).
To bolt your appliance to the wall, use 3 appropriate screws and 3 wall-plugs.
Start with the upper hole (G), located above the handle (E) (fig. 4).
Drill a hole in the wall at the required height, insert a wall-plug and a screw.
Hang your appliance on the wall and lock it in a vertical position using the holes (G)
located on the appliance stand.
5 - CLEANING
Your appliance must be unplugged before proceeding with any cleaning work.
You can clean it with a slightly damp cloth.
Important : never use abrasive products which might damage the
appearance of your appliance.
We recommend that you clean the air inlet and outlet grills at least once a year ; (clean
with a vacuum cleaner if necessary).
6 - STORAGE
When storing your appliance you can roll the cord up and put it away in the storage compartment (I) (mod. HA 390 - HA 395).
It is important to allow the appliance to cool before winding the lead.
When you are not using your appliance, store it in a dry place.
7 - IN THE EVENT OF PROBLEMS
Never dismantle your appliance yourself. A poorly repaired appliance may be dangerous
for the user.
Before contacting one of our Approved Service Centres (see enclosed list), ensure that:
– the appliance is set to normal operating mode;
– the air inlet and outlet grills are totally clear.
WIRING INSTRUCTIONS - FOR U.K. ONLY.
SAFETY NOTES - FOR REWIREABLE OR HOULDED PLUG.
The mains lead of this appliance may be already fitted with a BS 1363 13 A plug.
Should the fuse need to be replaced, a 13 A ASTA approved BS 1362 fuse must be used.
If your socket outlet is not suitable for the plug, then the plug must be removed (cut off if it is a moulded on plug) and a appropriate one fitted. Warning : dispose of a plug that has been cut from the
power supply cord, as such a plug is hazardous if inserted in a live 13 A socket outlet elsewhere in
the house.
Always replace the fuse cover after fitting a fuse. The plug must NOT be used if the cover is omitted
or lost until a replacement is obtained - make certain that only the correct fuse cover is used and
fitted.
For plugs with a detachable fuse cover the replacement must be thesame as the colour insert in the
base of the plug, or as directly by the embossed wording on the base of the plug.
If the detachable fuse cover is lost, a replacement may be purchased from Rowenta Service Centre
(see enclosed Service Information leaflet). Information for supply may also be obtained from the plug
manufacturer.
U.K. ONLY - FITTING A PLUG.
Important : The wires in the mains cord are coloured in accordance with the following code Blue,
Neutral, Brown, live.
Please read the instructions given below before connecting the cord to a plug. If in doubt, please
consult a qualified electrician.
As the colours of the wires in the mains lead of this appliance may not correspond with the coloured
markings identifying the terminals in your plug, proceed as follows :
• the wire which is coloured BLUE must be connected to the terminal which is marked with the letter
“N” or coloured BLACK ;
• the wire which is coloured BROWN must be connected to the terminal which is marked with the letter “L” or coloured RED.
Brown
or red
Neither core is to be connected to the earth terminal of a threepin plug.
This appliance requires a 13 A fuse ASTA approved to BS 1362.
N
Blue or
black
L
Fit correct
fuse
Use cable
gripper