Transcript
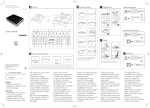
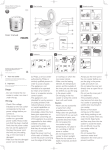
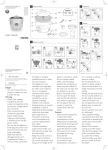
www.philips.com/welcome
HD4928
HD4929
1
2 Preparing for use
Overview
3 Use below cookware
10cm
10
cm
Register your product and get support at
f
a
b
www.philips.com/welcome
e
User manual
d
c
Use cookware with a flat bottom made of
iron or magnetic stainless steel, and with a
bottom diameter of 12-20cm.
User manual
HD4928
g
h
i
j
k
l
m
n
7 Cleaning
u
t
s
r
q
p
5 Using the induction cooker
4 Do not use below cookware
> 20cm
o
HD4929
6 Using the timer
<12cm
Do not use cookware with a concave or
convex bottom made of non-iron metal, heat
resistant glass pots, ceramic, glass, aluminum
and copper, or with a bottom diameter of
less than 12cm or more than 20cm.
Unplug the appliance 3 minutes after the
cooking is finished and let it cool down.
All registered and unregistered trademarks are
property of their respective owners.
© 2012 Koninklijke Philips Electronics N.V.
All rights reserved.
HD4928_4929_UM_India_V1.0_121019
1
Your induction cooker
Congratulations on your purchase and welcome to Philips! To fully
benefit from the support that Philips offers, register your product at
www.philips.com/welcome.
2
What’s in the box
Induction cooker main unit
User manual
Overview (Fig.1)
a
Cooking plate
d
Control Panel
b
Cooking zone
e
Air outlets
c
Air inlet
f
Power cord
Using the induction cooker (Fig.5)
g
Manual Button
o
ON/OFF button
h
Roti/Dosa button
p
Pause button
i
Gravy button
q
Increase button
j
Residual heat indicator
r
Cooking temperature and
power
k
Screen
s
Decrease button
l
Stir Fry button
t
Timer Button
m
Slow Cook button
u
Temp. Button
n
Pressure Cook button
Before first use
Remove all packaging materials from the induction cooker.
Preparing for use (Fig.2)
1 Place the appliance on a dry, stable and level surface.
2 Make sure there is at least 10cm free space around the appliance
to prevent overheating.
3 Always place the cookware on the cooking zone during cooking.
4 Make sure you use cookware of the correct types and sizes (see
the tables below).
Choosing the proper cookware
Use cookware that meets below requirements: (Fig.3)
4 When the cooking is finished, press the ON/OFF button ( to switch off the appliance.
5 Unplug the appliance after the fan stops working.
)
Increase ( ) or Decrease ( ) button (not applicable in Slow
Cook mode).
•• The time for induction cooking may be less than the time taken on
a gas stove. Make sure that you keep all the ingredients you need
ready before you start cooking.
•• Press the "Temp." button, and the induction cooker starts working
at the power of 800W.
•• Press the "Pause" button to stop the cooking process at any time.
Press the "Pause" button again to resume cooking.
•• When the "Residual heat" indicator lights up, do not touch the
cooking plate as the temperature is high.
Getting to know the cooking modes
Refer to below tables for more details of different cooking modes.
Cooking
mode
Default
cooking
time
(minute)
Cooking
temperature range
Adjustable
cooking time
range (minute)
Manual
120
Keep warm - 240°C
1-180
Roti/Dosa
60
Keep warm - 160°C
1-180
Gravy
45
You can use the Timer button to decide how much time you want
the appliance to work at different cooking modes.
1 Follow the steps in “Preparing for use”.
2 Press the ON/OFF ( ) button, the ON/OFF ( ) indicator
lights up.
3 Press the desired cooking mode button, and the corresponding
indicator lights up. The induction cooker starts working in the
selected mode.
4 Press the Timer button and the timer indicator lights up.
5 Press the Increase ( ) or Decrease ( ) button to adjust
the time by minute.
6 When the time has elapsed, the induction cooker turns off
automatically.
60
100 - 180°C
1-180
30
Keep warm - 220°C
1-45
•• After the timer is set, you can press the Timer button again to
Weight
Cookware with a weight up to 8kg (including
contents)
Roti/Dosa
Note
before the induction cooker automatically confirms it.
cancel the timer.
This setting can be used for all types of cooking
especially if you want to control the time and
temperature setting yourself. Press the manual
button and use the ( ) or ( ) button to
increase or decrease the cooking temperature.
Cookware with a weight over 8kg (including
contents)
Using the timer (Fig.6)
Pressure
Cook
Manual
This setting can be used to cook food on a
flat induction type tawa. In case the tawa gets
overheated or is less heated, the temperature can be
adjusted using the ( ) or ( ) button.
5Specifications
Models
HD4928
HD4929
Voltage
220-240V/50-60Hz
220-240V/50-60Hz
Power
2100W
2100W
Dimension
340x270x65mm
160x280x65mm
Net weight
2.1kg
2.1kg
6
Cleaning (Fig.7)
Note
•• Do not unplug the appliance before the fan stops working.
•• Never immerse the appliance in water nor rinse it under the tap.
•• Never use scouring pads, abrasive cleaning agents or aggressive
liquids such as petrol or acetone to clean the appliance.
•• Do not put vinegar on the cooking plate.
7Maintenance
Improper use can lead to scratches on the cooking plate. To avoid
discoloring and scratches, use the appliance according to the
instructions in this user manual and always clean the appliance and
cookware properly after use.
8Storage
• Do not place heavy objects on the cooking plate as it is
breakable.
• Do not store the appliance in a hot place, for example near a
cooker.
• If you are not going to use the appliance for a longer period of
time, store the appliance in a cool and dry place.
The appliance does
not switch from
one preset mode to
another.
You need to switch off the appliance and
restart with another cooking mode.
The cooking
temperature of the
preset modes are too
high or too low.
You may switch to the Manual mode for
better control of temperature. You may
also adjust the cooking temperature in
these modes: Manual, Roti/Dosa, Stir Fry
and Pressure Cook.
When I press one of
the cooking mode
buttons, the light of
the selected mode
does not go on.
The light is defective. Take the appliance
to your Philips dealer or a service centre
authorised by Philips.
The cooking
temperature
automatically changes
in some preset modes.
In Gravy mode, the cooking temperature
automatically changes. Switch to Manual
mode for better control over the
temperature.
The fan works but
the appliance has not
started working.
You have to press a cooking mode
button after you have pressed the ON/
OFF ( ) button. If you do not press a
cooking mode button within one minute,
the induction cooker will switch off and
the fan continues to work for a while to
cool down the appliance.
9Environment
Stir Fry
Cookware with a bottom diameter of 12-20cm
Weight
This setting can be used for pressure cooking on
induction type pressure cookers. Pressure cooking
on an induction cooker may be faster than pressure
cooking on the gas stove. If you do not remove
the pressure cooker for more than 30 minutes, the
induction cooker will switch off automatically.
•• After you have selected the cooking time, wait for a few seconds
Cookware with a flat bottom
Cookware with a bottom diameter of less than 12cm
or more than 20cm
Pressure
Cook
1-180
Size
Size
This setting can be used to cook foods which
are continuously stirred like dry vegetables. The
temperature can be adjusted using the ( ) or
( ) button.
1-180
Shape
Cookware with a concave or convex bottom
Stir Fry
100°C
Usage
Shape
This setting is ideal for cooking at a low temperature
for a long time.
Keep warm - 160°C
Cooking
mode
Cookware with a bottom made of non-iron metal,
heat resistant glass pots, ceramic, glass, aluminum or
copper.
Slow Cook
Slow Cook 180
Cookware with a bottom made of iron or magnetic
stainless steel
Material
This setting can be used to make a gravy dish from
the beginning to the end. The induction cooker
provides moderate heating for 5 minutes. You
can prepare the Tadka during that time. Then the
induction cooker switches to a higher power level
to roast vegetables, meat, and other ingredients for
13 minutes. After that it automatically switches to a
lower power level for another 27 minutes.
You may also switch to the manual mode for better
temperature control when making gravies.
Note
Material
Do not use cookware described as below: (Fig.4)
Gravy
There are six preset cooking modes: Manual, Roti/Dosa, Gravy, Stir
Fry, Slow Cook and Pressure Cook.
1 Follow the steps in “Preparing for use”.
2 Press the ON/OFF button ( ) to switch on the appliance, and
the ON/OFF indicator lights up.
3 Press the desired cooking mode button, and the corresponding
indicator lights up.
»»The appliance starts working in the selected mode.
•• During cooking, you can change the power level by pressing the
Controls overview
3
4
Unplug the appliance 3 minutes after the cooking is finished and let
it cool down.
Clean the appliance with a damp cloth and, if necessary, with some
mild cleaning agent.
Do not throw away the appliance with the normal
household waste at the end of its life. Dispose of
responsibly. By doing this, you help to preserve the
environment.
10
Guarantee and service
If you need service or information or if you have a problem,
please visit the Philips website at www.philips.com or contact the
Philips Consumer Care Centre in your country (you will find its
phone number in the worldwide guarantee leaflet). If there is no
Consumer Care Centre in your country, go to your local Philips
dealer.
11Troubleshooting
If your induction cooker does not function properly or if the
cooking quality is insufficient, consult the table below. If you are
unable to solve the problem, contact a Philips service centre or the
Consumer Care Centre in your country.
For a list of authorized Philips services centers, visit www.philips.
com or contact our consumer care at 1800 102 2929 (toll free) or
1860 180 1111 (standard call rates apply).
Problem
Solution
The On/Off button
( ) does not
respond.
There is a connection problem. Check if
the induction cooker is connected to the
mains and if the plug is inserted firmly
into the wall socket
The appliance beeps
continuously and then
stops working.
You may have put unsuitable cookware
on the cooking plate or you may have
removed the cookware from the
cooking plate during cooking. Make sure
the cookware is made of steel, iron or
aluminum with stainless steel cladding
base and has a base diameter larger than
12cm.
You may have placed the cookware
outside of the cooking zone.
The cookware does
The bottom of the cookware may not be
not heat up to the
flat. Use cookware with a flat bottom. If
required temperature. the problem still exists, take the appliance
to your Philips dealer or a service center
authorised by Philips.
Error code E1 or E2
is displayed on the
screen.
The main sensor is in open circuit or
short circuit state. Take the appliance to
your Philips dealer or a service center
authorised by Philips.
Error code E3 or E4
is displayed on the
screen.
The heat sink sensor is in open circuit or
short circuit state. Take the appliance to
your Philips dealer or a service center
authorised by Philips.
Error code E5 or E6
is displayed on the
screen.
The voltage is either too high or too
low. Wait for the voltage to stabilize and
try again.
Error code E7 is
displayed on the
screen.
The fan has malfunction. Take the
appliance to your Philips dealer or a
service center authorised by Philips.
Error code E8 is
displayed on the
screen.
The main sensor is not working. Take
the appliance to your Philips dealer or a
service center authorised by Philips.
Error code E9 is
displayed on the
screen.
The fuse has malfunction. Take the
appliance to your Philips dealer or a
service center authorised by Philips.
Warranty and Service
For any information or problem, contact your local Philips dealer or
authorized service center. For a list of authorized Philips service centers
visit: www.philips.com or contact our consumer care at 1800 102 2929
(Toll free) or 1860 180 1111 (standard call rates apply). This apparatus is
covered under warranty against any defect due to defecitve material or
workmanship for ONE YEAR from the date of purchase. Should a defect
develop during the period of warranty, PHILIPS ELECTRONICS INDIA
LTD. undertakes to repair the apparatus FREE OF CHARGE through
the dealer from whom it has been purchased or at any of the Philips
authorized Service Centers.
The warranty is not valid in case:
1.
2.
3.
4.
5.
6.
7.
8.
Apparatus is not used according to user manual.
Defects caused by improper or reckless use.
Repairs done by persons other than Philips Authorized service center.
Modifications of any nature made in the apparatus.
Tampered serial number.
Incomplete warranty card after purchase.
Product if used for commercial purpose (i.e. other than domestic use).
Usage of parts not recommended by Philips or those made by other
manufacturers.
All consumables and parts susceptible to normal wear and tear are not
covered under warranty.
Week/S.No.
Date of purchase: Dealer’s name: Dealer’s stamp: Customer’s name and address:
Model No.: Dealer’s signature: