1
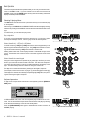
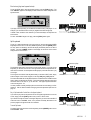
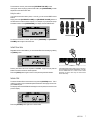
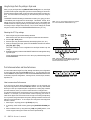
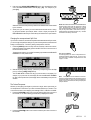
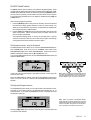
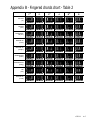
DEUTSCH
Owner’s manual
271284
FRANÇAIS
ITALIANO
ENGLISH
○
○
○
○
○
○
○
○
○
○
○
○
○
○
○
○
○
○
○
○
○
ENGLISH
Owner’s manual
Care of your keyboard
Your keyboard will give you years of playing pleasure if you follow the simple rules outlined
below:
◆
Do not expose the keyboard to high temperature, direct sunlight and excessively dusty
places.
◆
Avoid physical shocks caused by dropping, bumping, or placing heavy objects on the keyboard.
◆
Never use cleaners such as alcohol or solvents to clean the keyboard.
◆
Always turn the power off when making any connections.
Generalmusic web site: http://www.generalmusic.com
The information in this publication has been carefully prepared and checked. The manufacturers however decline
all liability for eventual errors. All rights are reserved. This publication may not be copied, photocopied or
reproduced in part or in whole without prior written consent from Generalmusic S.p.A. Generalmusic reserves the
right to apply any aesthetic, design or function modifications it considers necessary to any of its products without
prior notice. Generalmusic declines all liability for damage to property or persons resulting from improper use of
the instrument.
Copyright Generalmusic © 1999. All rights reserved.
Contents
Introduction .......................................................................................................... 1
The GK310 features: ........................................................................................... 1
Power supply ....................................................................................................... 1
Using the AC adaptor .......................................................................................... 1
Using batteries ..................................................................................................... 1
To insert the batteries .......................................................................................... 1
Important battery information ............................................................................... 1
Connections ......................................................................................................... 2
The Phones jack .................................................................................................. 2
The Damper jack ................................................................................................. 2
The Aux. Out jack ................................................................................................ 2
The MIDI IN, MIDI OUT and MIDI THRU ports .................................................... 2
Listen to the Demo Songs ................................................................................... 2
Select a single Demo Song ................................................................................. 3
Basic Operation ................................................................................................... 4
Selecting & playing Voices .................................................................................. 4
Play a single voice ............................................................................................... 4
Select a Voice with the [–/OFF] and [+/ON] buttons ............................................ 4
Select a Voice with the numeric keypad .............................................................. 4
Keyboard percussion ........................................................................................... 4
Dual voice (play two layered voices) ................................................................... 5
Split keyboard ...................................................................................................... 5
Play in Split mode with a Dual effect on the Upper keyboard .............................. 5
To cancel Split mode ........................................................................................... 5
The Performances ............................................................................................... 6
Selecting the Performances ................................................................................ 6
Balancing the Lower and Upper sections ............................................................ 6
Muting the sections .............................................................................................. 7
Instant Piano Voice .............................................................................................. 7
Sustain effect ....................................................................................................... 7
Add Pitch Bend to your playing ........................................................................... 8
Styles - Auto-Accompaniment ............................................................................. 8
What are the Styles? ........................................................................................... 8
Selecting Style Mode ........................................................................................... 8
Selecting the Styles using the [-/OFF] and [+/ON] buttons .................................. 9
Selecting the Styles using the numeric keypad ................................................... 9
Selecting the Styles by recalling the Performances ............................................ 9
Playing the Styles ................................................................................................ 9
Changing the Style Tempo ................................................................................ 10
Restoring the memorized Tempo ....................................................................... 10
GK310 Contents
A
About the Chord Recognition Modes ................................................................. 10
Using the Style Auto functions ........................................................................... 10
Select the Fill In and change Style Variation ..................................................... 10
Start the Style accompaniments with Key Start ................................................. 11
Start the Style with an Intro pattern ................................................................... 11
Stop the Style with an Ending phrase ................................................................ 11
Balancing the Style accompaniment tracks with the Mixer ................................ 11
Muting the Style tracks ...................................................................................... 11
Using the Single Touch Play settings in Style mode .......................................... 12
Selecting the S.T. Play settings ......................................................................... 12
The Performance buttons and Store Performance ............................................ 12
How to memorize e Performance ...................................................................... 12
Changing the accompaniment Split Point .......................................................... 13
The Octave Transposer ..................................................................................... 13
Cancelling the Octave Transpose setting .......................................................... 14
Record & Play - the Sequencer ......................................................................... 14
Listen to the playback of a recorded Song ........................................................ 14
The GK310 General functions ........................................................................... 15
General function programming procedure ......................................................... 15
The Percussion function - play the Drumpads ................................................... 15
The Keyboard Transpose function ..................................................................... 15
The Tune function .............................................................................................. 16
The Pan function ............................................................................................... 16
The MIDI function .............................................................................................. 16
The Split Point function ...................................................................................... 16
The Beat function .............................................................................................. 17
Touch Response ................................................................................................ 17
Practice using the Metronome ........................................................................... 17
Specifications .................................................................................................... 18
Music Stand ....................................................................................................... 18
Index .................................................................................................................. 19
B
GK310 Contents
Introduction
Thank you for purchasing the new GEM GK310 electronic keyboard.
The GK310 offers the following features:
•
•
•
•
•
•
•
•
61 note keyboard with Touch Response;
132 PCM voices + 1 keyboard percussion kit;
96 Styles (automatic accompaniments) with 2 Variations;
Two chord recognition modes for the Styles: Fingered and One Finger;
384 Single Touch Play settings;
50 Demo songs with the play along feature;
On-board Sequencer with Record, Play/Stop and Melody Off functions;
MIDI compatibility.
Power supply
This keyboard can be powered by current from a standard household wall outlet
(using the specified AC adaptor) or by batteries.
Using the AC adaptor
Always ensure that the istrument is turned OFF when connecting or disconnecting
the power adaptor. Applying power while the power switch in depressed may damage the components inside the unit.
Do not use adapters other than the one specified for this keyboard. The technical
specifications of the adapter must be: 9~12V DC output, 1800MA, centre positive
type.
Using batteries
CAUTIONS:
Use only the specified AC adaptor. Use of another
type of adaptor creates the danger of fire and electric
shock.
For safety sake, be sure to unplug the AC adaptor from
the wall outlet whenever leaving the keyboard unattended for a long time.
Always make sure you turn the keyboard off before inserting new batteries or replacing old ones.
To insert the batteries
1. Carfully turn the instrument upside-down and remove the battery compartment
cover.
2. Insert six D size (SUM-1 or R-20) batteries into the battery compartment, being careful to follow the polarity markings on the
cabinet.
3. Replace the compartment cover, making sure that it locks firmly
in place, then turn the instrument the right way up.
Important battery information
Any of the following symptoms indicate low battery power. Replace the batteries as
soon as possible whenever any of the following occurs.
• A dim and difficult-to-read LCD display.
• Abnormally low speaker/headphone volume.
• Distortion of the sound output.
• Sudden power failure when playing at high volume.
• Abnormal playing of the rhythms or demo songs.
• Dimming of the display when playing at high volume.
CAUTIONS:
Improper handling of the batteries can cause them to
burst and leak, creating the danger of personal injury
or damage of the keyboard. Be sure to take the following important precautions when using batteries:
• Never use batteries of different types.
• Never mix old batteries with new ones.
• Replace the batteries as soon as possible after any
sign of discharge.
• Always make sure to remove the batteries from the
keyboard’s battery compartment when the keyboard
is not expected to be used for a long period of time.
GK310
1
Connections
The Phones jack
If you prefer to play with headphones for high quality personal monitoring, plug a
standard stereo headphone set into the rear panel PHONES jack. The internal speakers are automatically disconnected.
Use the VOLUME slider to adjust the headphone volume.
The Damper jack
An optional footswitch can be plugged into the DAMPER jack for sustain control.
The footswitch operates like the damper pedal of an acoustic piano. Press for sustain, release for normal sound.
The Aux. Out jack
Connect the rear-panel AUX. OUT jack to amplified speakers, amplifiers or domestic hi-fi units for external amplification. Use audio cables with standard 1/4" jacks
and plug the other end into the LINE IN or AUX. IN of the external amp. system. To
use the external amp. system only and exclude the internal speakers of the GK310,
plug a headphones jack into the PHONES jack.
The MIDI IN, MIDI OUT and MIDI THRU ports
The GK310 is fitted with a standard MIDI interface consisting of In, Out and Thru
ports for MIDI connections.
The MIDI IN port receives MIDI data from an external MIDI device.
The MIDI OUT port transmits MIDI data to an external MIDI device.
The MIDI THRU port retransmits the same MIDI data received at the MIDI IN port to
another external MIDI device.
Listen to the Demo Songs
You can listen to the automatic playback of your GK310 to get an idea of what the
instrument is capable of doing. You can also play along with the demos in playback.
1. Turn the power ON by pressing the [POWER] switch.
After a short period, the display will appear showing the NORMAL playing mode
with a piano sound (Piano1) ready to play across the full keyboard.
2. Set the volume of the instrument as a whole by using the [VOLUME] slider. A
comfortable level is around the halfway mark.
This control increases or decreases the volume of the internal speakers, the
headphones and the Aux. Out jack.
2 GK310 Owner’s manual
3. Press the [DEMO ALL] button to start a chained Demonstration. The display
shows the first Demo Song number:
Playback starts automatically from the first Demo song and continues non stop
until you either change demo or stop the playback.
4. Press the [DEMO ALL] button again to stop the playback.
Select a single Demo Song
1. Select SONG mode by pressing the [VOICE/STYLE/SONG] button as many
times as necessary until the right display arrow points to the SONG function.
The number of the first demo song available is shown as above.
2. Use the numeric keypad to input the two-digit number of a demo song.
For example, to select Song 35, LONG, LONG AGO, input 3 then 5.
1
2
For a list of Demo Song names, refer to the Demo Songs table in Appendix C.
3. Press the [START/STOP] button to start the demo song.
You can also use the [DEMO ALL] button to start the playback.
If you use the [START/STOP] button to start the Song, it will play as an endless
loop, restarting after it reaches the end. [DEMO ALL] starts the chained Demo
Songs from the selected song.
During the demo playback, you can press the [+/ON] button to step to the next
demo song or the [–/OFF] button to step back to the previous one.
While the demo plays, all the control panel buttons, except [DEMO ALL],
[MELODY OFF] and the [+ON]/[–OFF] buttons, are temporarily disabled.
Play along with the Demo Song
1. While the demo song is playing, press the [MELODY OFF] button to turn off the
melody and start to play on the keyboard.
This button is useful if you want to play the melody yourself, or if a singer wants
to sing along with the backing only.
2. Use the [TEMPO ] buttons to adjust the Tempo of the selected demo song.
3. Press the [MELODY OFF] button again to restore the melody of the demo song.
4. Press the [START/STOP] or [DEMO ALL] button to stop the playback.
DECREASE
TEMPO
INCREASE
TEMPO
GK310
3
Basic Operation
This section explains all the basic operations that you can carry out when the instrument is in NORMAL mode. If you are uncertain how to return the instrument to
NORMAL mode, press the [MODE] button as many times as necessary until the left
display arrowhead points to NORMAL.
Selecting & playing Voices
The GK310 has 132 PCM voices and 1 percussion kit that you can select and play
on the keyboard.
After turning on, the GK310 sets to NORMAL/VOICE mode with the display showing
a black arrow pointing to the NORMAL mode on the left and the VOICE mode on the
right.
In VOICE mode, you can select and play voices.
Play a single Voice
If you play on the keyboard after turning the instrument on, you will hear a piano
sound (in this example, Voice 01, “Piano 1”) play across the entire keyboard.
Select a Voice with the [–/OFF] and [+/ON] buttons
<----------------------- PIANO 1 ----------------------->
In VOICE mode, the [–/OFF] and [+/ON] buttons of the numeric keypad allow you to
step through the individual Voices one by one. The [+/ON] button selects in increasing numerical order while the [–/OFF] button selects in reverse order.
Holding either button down scrolls rapidly forwards or backwards through all the
voices. The selected voice number is shown in the bottom right hand corner of the
display.
Select a Voice with the numeric keypad
Using the numeric keypad is the quickest way to go directly to the Voice you need,
but first, you must know the exact number of the voice. The name and corresponding number of all the Voices in memory are silkscreened above the display on the
right. You’ll see that they start from number 01 through to number 132.
Two-digit voice numbers are selected by entering the two digits in sequence.
For example, to select Voice number 17 (Organ 1), press button [1] then button [7].
Three digit voice numbers are entered by first pressing the [+100] button, then pressing the remaining two digits in sequence.
1
2
Keyboard percussion
To play drums and percussive instruments on the keyboard, press the [PERCUSSION] button.
In PERCUSSION mode, each note of the keyboard plays a different drum instrument. You can see what kind of percussive instrument each note plays by referring
to the silkscreened markings on the rail under the keyboard.
Press the [PERCUSSION] button again to deactivate the function and return to
NORMAL playing.
4 GK310 Owner’s manual
<------------ PERCUSSIVE SOUNDS ------------->
Dual voice (play two layered voices)
To play the DUAL effect, (with two layered sounds), press the [DUAL] button. The
word “VOICE 2” appears in the display as well as the voice number assigned to the
layered section.
If you play on the keyboard, you will hear two sounds for every note played. In our
example, you will hear the Piano voice (01) together with Slow Strings (50).
In DUAL mode, whatever voice selection you make will always correspond to the
second voice.
To return to NORMAL single voice play, press the [DUAL] button again.
<----------------------- PIANO 1 ----------------------->
<----------------- SLOW STRINGS ----------------->
Split keyboard
To play on a split keyboard with one or two voices on the right hand side (UPPER
keyboard) and one voice on the left (LOWER keyboard), press the [MODE] button
as many times as necessary until the left display arrowhead points to the SPLIT
function. The word “LOWER” appears in the display as well as the voice number
assigned to the Lower section:
Split Point (F#3)
The keyboard splits into a Lower section and an Upper section. If you play on the
keyboard, you will hear one sound on the right hand side of the keyboard and another sound on the left. Our example shows Strings (49) on the left and Piano 1 (01)
on the right.
To change the voice of the Lower keyboard while you are still in SPLIT mode, simply
enter two digits on the numeric keypad, or use the [+/ON] and [–/OFF] buttons.
The note that divides the two keyboard sections is called the SPLIT POINT and the
factory setting corresponds to note F#3. The Lower keyboard extension starts from
the lowest note on the left, C2, up to note F#3. The Upper keyboard extension
covers the range G3 - C7.
It is also possible to modify the Split point and memorize the new setting to a Performance. See the section entitled “Changing the accompaniment Split Point” on
page 13.
<-STRINGS-> <-------------- PIANO 1 -------------->
Play in Split mode with a Dual effect on the Upper keyboard
If you want to play with two layered sounds on the Upper keyboard and one on the
Lower, simply press the [DUAL] button while you are in SPLIT mode.
If you want to change the voices on the Upper keyboard, you must cancel the SPLIT
mode and return to NORMAL mode, then proceed as already described on the
previous pages for Single and Dual voice selection.
To cancel Split mode
Split Point (F#3)
<-STRINGS-> <-------------- PIANO 1 -------------->
<-------- SLOW STRINGS -------->
To escape Split mode and return to a full keyboard, press the [MODE] button once to
select NORMAL mode.
GK310
5
The Performances
So far, you have learnt how to select single and combined Voices in Normal, Dual
and Split modes using several panel interventions. If, every time you want to create
a preferred sound combination, you have to take several steps to arrive at your goal,
you would ask yourself if there wasn’t a quicker way of selecting what you want. The
answer lies in the PERFORMANCES which offer a quick and simple method of recalling a panel situation at the touch of a single button.
A PERFORMANCE is simply a combination of voices and other panel settings (Voices,
Track Volumes, Style, Variation, Chord Recognition mode, Split Point, etc.). The
GK310 contains six Performances which recall factory-set panel configurations, but
you can memorize your own combinations using the STORE PERFORMANCE feature.
Selecting the Performances
1. Take a quick look at the display, then press one of PERFORMANCE buttons (P1
- P6); for example, press the [P1] button.
The display shows the situation recalled by the Performance.
NOTE: The Performance/Pads buttons can also be
set to operate as DRUM PADS. See the PERCUSSION function on page 16.
If you were playing in NORMAL mode, after selecting the Performance you will
find that the keyboard will be split and the mode will have changed to either
Fingered or One Finger, to enable the Styles. You will also see a change of
Style number. Further ahead in the manual, you will learn how the Performances can be used for quick panel changes, including the Styles (see “The Styles”
on page 8).
2. Repeat the selections for all the other Performance buttons, observe the changes
in the display and play on the keyboard to listen to the change of voices.
Balancing the Lower and Upper sections
If you are playing in Normal mode with Voices on a Split keyboard, you may at some
stage want to adjust the volume of one section with respect to the other. Using the
[MIXER] Volume controls, you will be able to balance your Upper and Lower voices
to the levels required very easily.
The MIXER consists of 5 twin buttons organized in two rows. The top row of buttons
are [INCREASE VOLUME] controls while the bottom row are [DECREASE VOLUME] controls. When you are playing with voices only, voice balancing tasks require the use of the [UPPER] and [LOWER] controls only. The other three controls,
(Drums, Bass and Accomp), are explained under Styles on page 11.
To increase the volume of, the Upper section, for example, press the top [INCREASE
VOLUME] button and hold it down until you reach the Volume required. The display
shows the Volume level of the Upper section.
INCREASE VOLUME
DECREASE VOLUME
6 GK310 Owner’s manual
To decrease the volume, press the bottom [DECREASE VOLUME] control.
If the Upper section is playing with the DUAL effect, the [UPPER MIXER] controls
adjust both voices at the same time.
Muting the sections
If you want to exclude a section (mute, or turn off), you can use the MIXER control
buttons.
Simply press both [INCREASE VOLUME] and [DECREASE VOLUME] buttons at
the same time to mute the section required. For example, if you press both the top
and bottom buttons of the [UPPER MIXER], the display will show UPPER OFF.
MUTE SECTION
To restore the volume to normal, press both the [INCREASE] and [DECREASE
VOLUME] buttons again at the same time.
Instant Piano Voice
Regardless of the current situation, you can recall the Piano Voice instantly by pressing
the [PIANO] button.
<----------------------- PIANO 1 ----------------------->
Pressing this button returns the keyboard to NORMAL single voice play with the
PIANO voice active across the entire keyboard.
Press the [PIANO] button again to return to the previously selected situation.
The [PIANO] button always returns you to a single piano voice playing across the full keyboard. You may
use the PIANO button as a “return to start” button
whenever you wish to have only one sound active
across all 61 keys.
Sustain effect
To add the Sustain effect to the overall sound, press the [SUSTAIN] button. This is
useful if you haven’t yet purchased the optional footswitch which plugs into the rearpanel DAMPER jack.
The display shows the SUSTAIN ON message for a short period, then returns to the
previous display:
Press the [SUSTAIN] button again to turn off the effect.
GK310
7
Add Pitch Bend to your playing
PITCH UP
While you play, you can add Pitch Bend to your keyboard sounds by using the [PITCH
BEND] buttons located to the left of the control panel. You can obtain a Pitch Bend
excursion of 2 semitones above or below normal pitch with these controls.
Hold down the top [PITCH BEND] button to bend the notes up.
Hold down the bottom [PITCH BEND] button to bend the notes down.
The pitch returns to normal when you release the button.
Pitch Bend is a “glide” (or glissato) effect which simulates the effect heard in certain
instruments (trombone, guitar, violin, etc.).
PITCH DOWN
Styles - Auto-Accompaniment
What are the Styles?
Styles are a collection of musical patterns representing many types of music, ranging from rock and pop to traditional and ethnic music. The GK310 contains 96
different auto-accompaniment Styles that can be used to provide fully-orchestrated
arrangements. The sophisticated Auto Accompaniment system can provide automated bass and chord backing that is perfectly matched to the selected accompaniment Style. The Styles a formed by 5 sections, or tracks, that generate the automatic arrangements: Drums, Bass and 3 Accomp, and an additional two tracks,
Upper and Lower, for the keyboard sounds. The automatic arrangements are triggered by playing chords (fingered or one-finger) on the lower part of the keyboard
below the split point.
Selecting Style Mode
To select the Styles, you must set the GK310 to STYLE mode.
1. Press the [VOICE/STYLE/SONG] button as many times as necessary until the
right display arrowhead points to the STYLE function.
To enable the Style auto-accompaniments, you must select one of the two chord
recognition modes (ONE FINGER or FINGERED).
2. Press the [SINGLE TOUCH PLAY] button.
Pressing this button activates the KEY START function automatically and enables the Style auto-accompaniments by recalling one of the two chord recognition modes (ONE FINGER or FINGERED). The left display arrowhead points to
FINGERED or ONE FINGER. The display example below shows FINGERED
selected.
Note: When SINGLE TOUCH PLAY is on, the sounds
memorised in the Style Performance are assigned to
all the tracks. Selecting a Style changes the sounds
of the accompaniment sections (Drums, Bass,
Accomp) as well as the keyboard sections (Upper 1,
Upper 2, Lower). When SINGLE TOUCH PLAY is off,
selecting a Style changes the sounds of the accompaniment sections only.
The FINGERED and ONE FINGER chord recognition modes are explained in
detail further ahead.
8 GK310 Owner’s manual
Selecting the Styles using the [-/OFF] and [+/ON] buttons
In STYLE mode, the [–/OFF] and [+/ON] buttons of the numeric keypad step through
the individual Styles one by one.
3. Press the [+/ON] button to select the Styles in increasing numerical order.
4. Press the [–/OFF] button to select the Styles in reverse order.
Holding the button down scrolls rapidly forwards or backwards through all the
Styles. The selected Style number is shown at the center of the display.
Selecting the Styles using the numeric keypad
Using the numeric keypad is the quickest way to go directly to the Style you need,
but first, you must know the exact number of the Style. The name and corresponding number of all the Styles in memory are silkscreened above the display on the
left. You’ll see that they are organized in Groups (8 BEAT, 16 BEAT, ROCK, etc.)
and numbered from 01 through to 96. Select the Style you want by entering the
corresponding two digits in sequence.
5. For example, to select Style number 17 (Shuffle 2), press button [1] then [7].
1
2
Selecting the Styles by recalling the Performances
Another quick way of selecting the Styles is by selecting the Performances, but this
means that you have to remember which Style is memorized in the Performances.
You can also memorize your preferred Styles to these buttons with Store Performance. This argument is explained in detail further ahead on page 12.
Playing the Styles
6. Press the [START/STOP] button.
You’ll hear the Drums accompaniment track start to play.
7. Play a note or chord on the left part of the keyboard below note F#3 to trigger the
automatic accompaniments.
<---- Lower ----><------------------ Upper ------------------>
An automatic accompaniment will start to play, generated by the Style sections:
Drums, Bass and Accomp.
As you change chord from Major to minor or seventh, etc, you will note a change
of style pattern. Each time you change key, for example, from C to F, the Style
pattern will transpose automatically.
The symbols of the recognized chords are displayed in the left hand corner. For
example, if you play the chord of C, the display will show the large letter “C”. If
you play a chord not recognized by the instrument’s chord recognition system,
the current pattern will rest unchanged until you play a recognized chord.
To play your Style using the automatic functions (Var, Key Start, Intro, Fill, Ending), see the section entitled “Using the Style Auto functions” further ahead.
8. Press the [START/STOP] button to stop the Style.
NOTE: If you hear a Drum pattern only without automatic accompaniment when you play a note or chord
on the Lower keyboard, check that you are not in NORMAL or SPLIT mode. The arrowhead must point to
either FINGERED or ONE FINGER for the Style accompaniment to play.
Recognized
Chord Symbol
GK310
9
Changing the Style Tempo
Every time you select a Style, you also recall a memorized playing speed, (TEMPO),
shown in the top left hand corner of the display. You can speed up or slow down the
tempo, before or after starting the Style, by pressing the [TEMPO] buttons.
• Press the [TEMPO ] button to increase the Tempo value, or the [TEMPO ]
button to decrease the value.
Holding down either button changes the Tempo value at high speed continually
until released.
Note: If you change Style while the rhythms are playing, the current Tempo rests unchanged. The memorized Style Tempo is recalled only when the Style is
not playing.
DECREASE
TEMPO
INCREASE
TEMPO
Restoring the memorized Tempo
To restore the Style’s memorized Tempo, press both Tempo buttons at the same
time.
About the Chord Recognition Modes
The GK310 allows you to choose between two different Chord recognition modes:
FINGERED and ONE FINGER. The chords that you play (Fingered or One Finger
type) must be played on the lower part of the keyboard dedicated to the Auto Bass
Chords (from note C2 up to and including note F#3).
FINGERED mode requires that you press at least 3 notes for a chord to be
recognized.
ONE FINGER mode requires that you press only one note for a Major chord to
be recognized. Other chords require more notes.
1. If a Chord recognition mode isn’t selected, press the [MODE] button as many
times as necessary until the left display arrowhead point to either FINGERED or
ONE FINGER.
2. Press the [START/STOP] button to start the current Style.
3. If you select FINGERED, play a chord of at least 3 notes on the Auto Bass Chord
section of the keyboard to trigger the auto-accompaniments.
If you select ONE FINGER, play one note on the Auto Bass Chord section of the
keyboard to trigger the Major chord of the auto-accompaniments Other chords
using the “One finger” method involves the use of two or three fingers.
In the Appendix you’ll find useful reference charts for Fingered and One Finger
chords:
FINGERED (Appendix A);
ONE FINGER (Appendix B).
Using the Style Auto functions
The Styles provide a wide variety of automatic functions that make the GK310 very
easy to play.
Select the Fill In and change Style Variation
Each Style has two accompaniment patterns, NORMAL and VARIATION, which
you can select at any time before or after starting to play the Styles by pressing the
corresponding button. The stutus of the LED on the FILL 1 or FILL 2 buttons tells
you which Style pattern is active for play, Normal or Variation.
When you press the [FILL 1 /NORMAL] or the [FILL 2 /VAR] button during playback, the current pattern will be interrupted by an appropriate Fill In, or “break”, then
proceed with the same pattern or variation, depending on which button you press.
The LED of the button pressed will turn on while the LED of the other button will turn
off.
10 GK310 Owner’s manual
AUTO BASS
CHORDS
Start the Style accompaniments with Key Start
The KEY START function allows you to synchronize the start of your Style with a
note or chord pressed on the keyboard without using the Start/Stop button. When
you press the [KEY START] button, the display shows 4 flashing black dots after the
word TEMPO to indicate the synchro start standby. Now, if you play a note or chord
on the lower part of the keyboard, the Style pattern stgarts automatically.
Start the Style with an Intro pattern
Before starting the Style, press the [INTRO/ENDING] button to place the keyboard
on introduction start standby. The LED of the current Style pattern (Fill1/Normal or
Fill2/Var) starts to flash to indicate that the INTRO has been preset. Now press the
[START/STOP] button and play a note or chord on the lower part of the keyboard.
The Style starts with an introductory pattern then proceeds with the selected autoaccompaniment (Normal or Variation).
Stop the Style with an Ending phrase
You can stop your Style automatically with a well-executed Ending pattern without
using the Start/Stop button. While the Style is playing, simply press the [INTRO/
ENDING] button. The Style auto-accompaniment will stop automatically with an
Ending phrase.
Balancing the Style accompaniment tracks with the Mixer
When playing with Styles, you can adjust the volume of one section with respect to
the others using the [MIXER] Volume controls. You will be able to balance all the
Style sections; Drums, Bass, Accomp as well as the Lower and Upper keyboard
sectinos. How the MIXER controls are organized is explained on page 6.
In Style mode, to increase the volume of the Bass track, for example, press the top
[INCREASE VOLUME] button and hold it down until you reach the Volume required.
The display shows the Volume level of the section being controlled, in this case the
Bass section.
INCREASE VOLUME
DECREASE VOLUME
To decrease the volume, press the bottom [DECREASE VOLUME] control.
Note: The volumes of the three Accompaniment tracks
are contolled simultaneously by the [ACCOMP] Volume buttons.
Muting the Style tracks
If you want to exclude a section (mute, or turn off), simply press both [INCREASE
VOLUME] and [DECREASE VOLUME] buttons at the same time to mute the section required.
For example, to play your Upper and Lower voices with the BASS accompaniment
only, mute the DRUMS and ACCOMP tracks. The display will show OFF for the
respective section. For example, muting the DRUMS shows the following display:
To restore the volume to normal, press both the [INCREASE] and [DECREASE
VOLUME] buttons again at the same time.
MUTE TRACKS
GK310
11
Using the Single Touch Play settings in Style mode
When you play the Styles with the [SINGLE TOUCH PLAY] button on, each Style
you select recalls a panel configuration (voices and volume settings) for the accompaniment sections (Drums, Bass, Accomp) as well as for the Upper and Lower sections. This means that for the 96 Styles, you have 96 factory set voice configurations.
The SINGLE TOUCH PLAY settings increases this number by four, giving you 96 x 4
= 384 different panel configurations for the 96 Styles. The SINGLE TOUCH PLAY
settings are a quick and easy way of reconfiguring the voices of the UPPER and
LOWER sections of a Style by pressing only one button while you are playing, without having to stop to change voices manually. The S.T. PLAY settings are recalled
using the first four buttons of the PERFORMANCE/PADS section [P1 - P4].
Note: The S.T. PLAY settings change the configuration of the UPPER and LOWER sections only.
Selecting the S.T. Play settings
1. Select a Style using the methods already described.
Make sure that one of the two chord recognition modes have been selected.
2. Press the [S.T. PLAY] button.
3. Start the Style using the methods already described (Key Start, Intro, etc.).
4. While you are playing the Style, press one of the SINGLE TOUCH PLAY buttons
([P1], [P2], [P3] or [P4]).
You’ll hear a change of voice configuration and the Style Variation may also
change.
5. Repeat the selection procedure of the SINGLE TOUCH PLAY settings after changing other Styles.
On the next page are instructions on how to store your preferred settings to the
6 PERFORMANCES.
Note: When the [S.T. PLAY] button is on (LED on),
the PERFORMANCE buttons [P5] and [P6] are disabled for Performance selection.
The Performance buttons and Store Performance
You have seen that the Single Touch Play settings recall factory-set configurations
for the current Style when the [S.T. PLAY] button is on. You have also seen that,
when S.T.PLAY of off (LED off) the 6 buttons of the PERFORMANCE/PADS section
recall factory-set panel configurations, including Voices, Volumes, Style, Variation,
Split Point, etc..
How to memorize e Performance
If you don’t want to use the factory Performance settings, you can memorize your
own panel configurations to the PERFORMANCE buttons. This very useful feature
allows you to store up to 6 preferred panel configurations, including Style, Variation
and other selections, which you can then recall at the touch of a single button.
To memorize a Performance, the first thing to do is to modify one of the factory set
situations. For example, if you select STYLE number 45 (Swing), the voices recalled for the Upper and Lower sections will be Organ 2 and Strings respectively.
You only need to change one aspect of any factory setting to be able to save the new
setting as a new Performance. In our example, let’s change the voice assigned to
the Voice 1 section.
1. Select Style n. 45 (Swing) and turn [S.T.PLAY] off (if on).
2. If necessary, select VOICE mode by pressing the [VOICE/STYLE/SONG] button.
3. Select a different Voice by using either the [+/ON] and [–/OFF] buttons, or the
numeric keypad, entering the number of the voice required directly.
12 GK310 Owner’s manual
4. Hold down the [STORE PERFORMANCE] button, then simultaneously press
one of the PERFORMANCE/PADS buttons [P1] - [P6]. For example, if you
press [P5]:
Whatever information was previously stored in the selected button will be erased
by the new data.
5. At this point, you can check if your new Performance has been stored. Changing the panel situation (for example, select a Voice or Style), thne press the
PERFORMANCE button that you used to store your Performance in point 4 above.
NOTE: All the data memorized to the PERFORMANCE
buttons remains intact while the instrument is being
used. The instant you turn your GK310 off, you will
lose all memorized data, including any other settings
that you may have made in other areas of the keyboard (Split Point, Keyboard Transpose, etc.). All data
is restored to the factory-set status.
Changing the accompaniment Split Point
If you want to increase or decrease the keyboard area dedicated to the Style chords,
you can change the Split Point setting to any note of the keyboard and memorize the
setting to a Performance. The factory setting corresponds to note F#3.
1. Press the [SELECT] button as many times as necessary until the black arrowhead at the bottom of the display points to the SPLIT function in the lower row of
functions under the screen.
The display will show the current Split Point setting expressed as the MIDI NOTE
NUMBER for a short period of time.
2. With the temporary display showing, press a key corresponding to the new Split
point, (or use the [+/ON]/[–/OFF] buttons).
The new MIDI NOTE number of the key you press is shown in the display. For
example, if you press note C4, the display will show the MIDI NOTE NUMBER
60. After a short period of time, the display returns automatically to the previous
situation.
MIDI NOTE NUMBERS
For MIDI purposes, the notes of a keyboard are expressed as numbers ranging from 00 - 127 (or 01-128).
This range 128 of numbers corresponds to the note
range C–1 to G9.
Note: The Split Point can be different for each Performance, and the settings remain memorized until you
change them again or until you turn the keyboard off.
When you turn on the GK310, the factory set split point
(F#3) is restored.
The Octave Transposer
Whether you are playing with Styles or just Voices in single, dual or split mode, you
can transpose the current Voice up or down 2 octaves (maximum) in real time. The
current Voice is shown in the display by the message VOICE 1, VOICE 2 or LOWER.
1. Press the [OCTAVE ] button once or twice to raise the pitch of the voice one or
two octaves. A one octave setting (12 semitones) is displayed as follows:
2. Press the [OCTAVE ] button once or twice to lower the pitch of the voice one or
two octaves.
GK310
13
Cancelling the Octave Transpose setting
3. To cancel the octave transposition, press both OCTAVE buttons at the same
time.
Record & Play - the Sequencer
Your GK310 contains a very simple and easy-to-use sequencer which records whatever you play, and plays back the recorded sequence just as you played it. You can
record in Voice mode or Style mode. The following example explains how to record
a sequence using a Style.
1. Set the instrument for Style play and select a Style.
2. Press the [REC] button.
The LED of the [REC] button turns on and the KEY START function is selected
automatically.
In “record-pending” status, you can change voices, select Dual mode to add two
voices, select Split mode to add a Lower voice, change track volumes, etc.,
before starting the recording.
If you want to start the recording of the Style with an introduction, press the
[INTRO] button to preset the Intro.
3. Start to record the notes you play. The Key Start function triggers the Style
accompaniment patterns by playing a chord or note on the lower part of the
keyboard.
4. While playing, use the Fills, change the Variation, change Voices, select Dual
mode, Split mode, etc..
5. To stop the recording with an ending, press the [INTRO/ENDING] button.
You can also stop the recording with the [START/STOP] button. The [REC]
button deactivates automatically when the Style stops.
Listen to the playback of a recorded Song
6. Press the [PLAY] button to listen to the playback of your recording.
The recorded sequence remains in memory for all the time that the instrument is
being used. You can listen to your recorded song at any time simply be pressing
the [PLAY] button. If you record another song, the previous one will be overwritten
(cancelled).
If you turn the instrument off, the recorded sequence will be erased, together
with all other memorized data.
If you press [PLAY] when the sequencer doesn’t contain recorded notes, the
display will show the message “NULL”.
14 GK310 Owner’s manual
The GK310 General functions
The GK310 features several functions which affect the keyboard globally. These
correspond to the names silkscreened below the display: SPLIT, MIDI, PAN, TUNE,
TRANSP, BEAT, PERCUS and they are selected by pressing the [SELECT] button
as many times as necessary until the black arrow points to the function required.
The corresponding parameter shown in the display is modified with the [+/ON] and
[–/OFF] buttons.
General function programming procedure
1. Press the [SELECT] button as many times as necessary until the arrowhead at
the bottom of the display appears above the function you want to change. The
display shows the parameter of the function in abbreviated form together with
the corresponding value or ON/OFF status.
2. Use the [+/ON] and [–/OFF] buttons to change the parameter value or the on/off
status of the function. After a short period of time, the display returns to the
previous situation automatically.
The programmed settings remain in memory until changed again, or until the
instrument is turned off. When you turn the instrument on again, all the settings
of the general functions are restored to the factory status.
The Percussion function - play the Drumpads
The PERCUSSION function allows you to use the 6 PERFORMANCE/PADS buttons as DRUM PADS. Every time you turn on the GK310, the 6 buttons of the
PERFORMANCE/PADS section select PERFORMANCES, while the first 4 select
SINGLE TOUCH PLAY settings when the [S.T. PLAY] button is on.
If you set the PERCUSSION function ON, the PERFORMANCE/PADS buttons will
operate as DRUM PADS.
In this mode, each pad pressed plays a percussive sound both in Voice play mode
as well as Style mode.
When the DRUM PADS are enabled, the 6 buttons are disabled for Performance
recall. If S.T. PLAY is turned on in STYLE mode, the DRUM PADS are temporarily
disabled.
Note: When you activate the PERCUSSION function
to enable the DRUMPADS, the small PERCUS display pointer indicates that the function is on at all times,
until you disable it again, or turn the instrument off.
The Keyboard Transpose function
The TRANSPOSE function allows you to change the pitch of the instrument in semitone steps, up to a maximum setting of 15 semitones above standard pitch, or –12
semitones below. If you select the TRANSPOSE function, the display shows the
standard pitch setting (0).
Note: When you program a KEYBOARD TRANSPOSE value above or below standard pitch, the small
TRANSP display pointer indicates at all times that the
instrument has been transposed, until the transposition is cancelled, or the instrument is turned off.
Use the [+/ON]/[–/OFF] buttons to raise or lower the pitch in semitone steps until
you reach the value required.
GK310
15
The Tune function
The TUNE function allows you to fine tune the instrument in steps on one cent at a
time. If you select the TUNE function, the display shows the standard pitch setting (0).
Note: When you program a KEYBOARD TUNE value
above or below standard pitch, the small TUNE display pointer indicates at all times that the instrument
has been Tuned, until the tuning is cancelled or the
instrument is turned off.
Play on the keyboard and use the [+/ON]/[–/OFF] buttons to raise or lower the tuning until you reach the value required.
The Pan function
The PAN function allows you to change the stereo pan position of the overall sound,
moving the sound at the speakers either to the left or to the right. If you select the PAN
function, the display shows the value corresponding to the Pan at the centre (0).
Note: When you program a new PAN setting, the small
PAN display pointer indicates at all times that a Pan
modification has been made, until the fun ction is disabled or the instrument is turned off.
Use the [+/ON] button to pan the overall sound to the right or the [–/OFF] button to
pan the sound to the left.
The MIDI function
The MIDI function allows you to set the Transmission/Reception channel for the
keyboard as a whole. You can set any MIDI channel from 1 -16. If you select the
MIDI function, the display shows the factory-set MIDI channel assignment.
Note: It is not possible to assign separate and independent MIDI channels to the voices and accompaniment sections.
Use the [+/ON] button to increase the channel number value, or the [–/OFF] button
to decrease the channel number value.
The Split Point function
The SPLIT POINT function allows you to set a new SPLIT POINT for the AUTO
BASS CHORD section of the Styles. If you select the SPLIT function, the display
will show the default Split Point setting expressed as the MIDI NOTE NUMBER.
Press a key corresponding to the new Split point that you want, or use the [+/ON]
and [–/OFF] buttons to change the value.
16 GK310 Owner’s manual
See also the section entitled, “Changing the accompaniment Split Point” on page 11.
The Beat function
The BEAT function allows you to set a time signature (number of beats in a measure) for the Metronome. The factory setting corresponds to 4 beats for every measure. If you select the BEAT function, the display will show the factory setting.
Use the [+/ON] button to increase the Beat number, or the [–/OFF] button to decrease it. For example, if you want to practice a piece with a time signature of 5/4,
assign the number 5 to the BEAT function. The BEAT value has the range, 0 - 9.
Setting a value of 0 deactivates the Metronome.
Touch Response
The [TOUCH] button is also a General function which affects the keyboard globally.
The GK310 keyboard is Velocity Sensitive; in other words, the harder you play on
the keys, the louder the sound becomes, as occurs in an acoustic piano.
If you prefer to play on the keyboard without TOUCH RESPONSE, you can disable
the function by pressing the [TOUCH] button. The display shows the Touch Off
setting for a short period of time, then returns to the previous situation.
To restore the Touch Response function to normal, press the [TOUCH] button again.
Practice using the Metronome
At any time, you can activate the METRONOME for practicing purposes. As soon as
you press the [METRONOME] button, the Metronome starts beating time with a
‘tick’. If you press the [METRONOME] button while you are playing a Style, the auto
accompaniment stops and the Metronome takes over as the provider of the beat.
The Metrome is useful to practice keeping time when playing with Styles, or when
you have to practice a study piece.
To stop the Metronome tick play, press the [METRONOME] button again or [START/
STOP].
GK310
17
Specifications
Keys :
Voices :
Polyphony :
Styles :
Modes :
Styles Control :
Demo songs :
Overall Control :
Sequencer :
Other controls :
MIDI :
Connectors :
Dimensions :
61 keys with Touch Response
132 PCM voices + 1 percussion keyboard kit
32 notes
96 styles with 2 Variations (Normal and Var)
Normal, One Finger, Fingered, Split, Dual
Start/Stop, Key Start, Intro/Ending, Fill-in, Variation, Tempo, Metronome
50 demo songs with play along feature, Melody Off, Demo All
Pitch Bend, Mixer, Octave, Split, MIDI, Pan, Tune, Transpose, Beat, Percus
Record, Play
Single Touch Play settings, Store Performance, Performance/Pads
MIDI channel control
DC 9~12 V, Aux. Out, Damper, Phones jack, MIDI In/Out/Thru ports
955 x 330 x130 mm
Music Stand
The keyboard is supplied with a music stand that can be mounted on the instrument by inserting the two lower pegs of the music stand into
the two holes located on the top panel of the GK310.
To remove the music stand, lift up.
18 GK310 Owner’s manual
Index
N
Numeric keypad 4, 9
O
A
AC adaptor 1
Auto-Accompaniment 8
Aux. Out 2
Octave buttons 13
Octave Transposer 13
ON+/OFF– buttons 4, 9
One Finger 8, 10
B
P
Balancing the Lower and Upper sections 6
Balancing the Style tracks 11
Batteries 1
Beat function 17
Pan function 16
Percussion button 4
Performance/Pads 15
Performance/Pads section 12
Performances 6, 12
Phones 2
Piano button 7
Piano Voice 7
Pitch Bend 8
Play along with the Demo Song 3
Play drums 4
Playing a single Voice 4
Playing Styles 9
C
Chord Recognition Mode 8
Chord Recognition Modes 10
Connections 2
D
Damper 2
Demo Songs 2
Drum Pads 15
Dual button 5
Dual voice 5
E
Ending 11
R
Rec button 14
Record 14
Replacing the batteries 1
F
S
Fill1/Normal button 10
Fill2/Var button 10
Fingered 8, 10
Layered voices 5
Listen to the playback of a recorded Song 14
Lower keyboard 5
S.T. Play button 12
Select button 15
Selecting Styles 8
Sequencer 14
Single Demo Song 3
Single Touch Play 12
Split Point 13
Split point 5
Split Point function 16
Split Point, program a new setting 13
Split voice 5
Start/Stop button 9
Store Performance button 13
Style Auto functions 10
Style, selection 9
Styles 8
Sustain button 7
Sustain effect 7
M
T
Metronome 17
MIDI function 16
MIDI interface 2
Midi Note number 13
Mixer 6, 11
Mode button 5, 8
Muting the sections 7, 11
Tempo buttons 10
Touch button 17
Touch Response 17
Transpose function 15
Tune function 16
G
General functions 15
I
Intro 11
Intro/Ending button 11
K
Key Start 11
Keyboard percussion 4
L
GK310 Index
19
U
Upper keyboard 5
V
Variation 10
Voice mode 4
Voice/Style/Song button 8, 12
Voices, selection 4
20
GK310 Index
Appendix
GK310
A•1
A•2
GK310
Appendix A - One finger chords chart
C
Cm
C7
Cm7
F#/Gb
F#m/Gbm
F#7/Gb7
F#m7/Gbm7
C # Db
C#m/Dbm
C#7/Db7
C#m7/Dbm7
G
Gm
G7
Gm7
D
Dm
D7
Dm7
G#/Ab
G#m/Abm
G#7/Ab7
G#m7/Abm7
D#Eb
D#m/Ebm
D#7/Eb7
D#m7/Ebm7
A
Am
A7
Am7
E
Em
E7
Em7
A#/Bb
A#m/Bbm
A#7/Bb7
A#m7/Bbm7
F
Fm
F7
Fm7
B
Bm
B7
Bm7
GK310
A•3
Appendix B - Fingered chords chart - Table 1
C
MAJOR
(C)
MINOR
(Cm)
DOMINANT
7th (C7)
MINOR 7th
(Cm7)
MAJOR 7th
(Cmaj7)
DIMINISHED
(Cdim)
AUGMENTED
(Caug)
6th
(C6)
MINOR 6th
(Cm6)
A•4
GK310
C#
D
Eb
E
F
Appendix B - Fingered chords chart - Table 2
F#
G
Ab
A
Bb
B
MAJOR
(C)
MINOR
(Cm)
DOMINANT
7th (C7)
MINOR 7th
(Cm7)
MAJOR 7th
(Cmaj7)
DIMINISHED
(Cdim)
AUGMENTED
(Caug)
6th
(C6)
MINOR 6th
(Cm6)
GK310
A•5
Appendix C - Demo Songs List
01
SERENATA
26
ONLY YOU
02
SERENADE
27
END OF THE WORLD
03
RONDEAU
28
HOUSE OF RISING SUN
04
FROHLICHER LANDMAN
29
OLD FOLKS AT HOME
05
PIZZICATO POLKA
30
DREAMING OF HOME AND MOTHER
06
FORELLE
31
ANNIE
07
NOCTURNE
32
KILLING ME SOFTLY WITH HIS SONG
08
SYMPHONY NO.94 SUPRISE
33
LOVE
09
HEIPENROSLEIN
34
LAST ROSE OF SUMMER
10
NIGHT
35
LONG, LONG AGO
11
TURKISH MARCH
36
YOU ARE MY SUNSHINE
12
SKIP TO MY SIDE
37
FUNK
13
KAT HOISA
38
I CAN......
14
RED RIVER VALLEY
39
SEASHORE
15
JESUS SAVIOUR PILOT ME
40
GUITAR & SAXPHONE
16
TPO H KA
41
COUNT DOWN
17
TENNESSEE WALTZ
42
BLUE LUNCH
18
TURKEY IN THE STRAW
43
COBWEB
19
OLD BLACK JOE
44
WINE
20
COUNTRY
45
OVER THE RAINBOW
21
GOOD TIME
46
BEAUTIFUL DREAMER
22
SUSANA
47
LONG TIME
23
BRIDGE
48
EDELWEISS
24
ON LONDON BRIDGE
49
CARLOS
25
ARE YOU LONESOME TONIGHT
50
END SUMMER
A•6
GK310
FEDERAL COMMUNICATIONS COMMISSION
Note: This equipment has been tested and found to comply with the limits for a Class B
digital device, pursuant to Part 15 of FCC Rules. These limits are designed to provide
reasonable protection against harmful interference in a residential installation. This
equipment generates, uses, and can radiate radio frequency energy and, if not installed
and used in accordance with the instructions, may cause harmful interference to radio
communications. However, there is no guarantee that interference will not occur in a
particular installation. If this instrument does cause harmful interference to radio or
television reception, which can be determined by turning the instrument off and on, the
user is encouraged to try to correct the interference by one or more of the following
measures:
- Reorient or relocate the receiving antenna.
- Increase the separation between the equipment and the receiver.
- Connect the equipment into an outlet on a circuit different from that to which the receiver
is connected.
- Consult the dealer or an experienced radio/TV technician for help.
CAUTION:
Changes or modifications to this product not expressly approved by the
manufacturer could void the user’s authority to operate this product.
GENERALMUSIC Code 271284
Specifications are subject to change without prior notice.
Specifiche soggette a cambiamento senza preavviso.
Les spécifications sont sujettes à modifications sans préavis.
Änderungen -auch ohne Vorankündigung- sind vorbehalten.
PRINTED IN ITALY
Sales Division: I -47048 S.Giovanni in Marignano (RN) - Italy – Via delle Rose, 12
tel. +39 0541 959511 – fax +39 0541 957404 – tlx 550555 GMUSIC I
Internet site: www.generalmusic.com