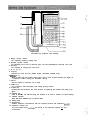
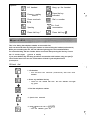
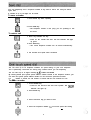
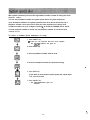
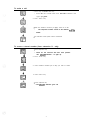
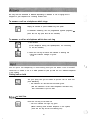
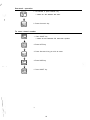
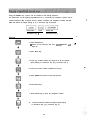
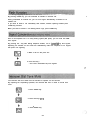
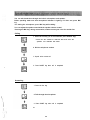
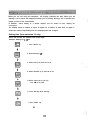
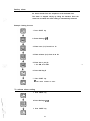
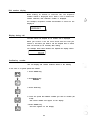
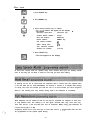
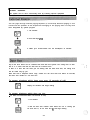
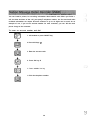
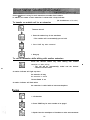
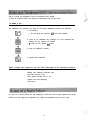
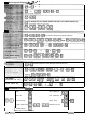
1
Operating
Instructions
Before operating this unit, please read these instructions completely.
PanasoniC
Thank you for purchasing the Panasonic Easa-Phone VA-309182411232, Key Telephone
System.
.:
* This system is equipped with the Hearing Aid device installed within the handset
receiver.
* Each outside (CO/PBX) line can be individually programmed for either tone dialing or
rotary pulse dialing.
* All the keys on this unit are the non-lock type.
-
Notification to your local telephone company
Before connecting or disconnecting telephone lines, call the telephone company and inform
them of the following:
COL 1:
Telephone
numbers
-
COL 7:
COL 2 :
COL 8:
COL 3 :
COL 9:
COL 4 :
COLI 0:
COL 5:
COLI 1:
COL 6 :
COLI 2:
Model number
kmsonic
FCC registration number for VA-309 KSU at factory
ACK8GR-16979-KF-E
VA-309l82411232
VA-309 KSU for modify ACK8GR-19152-MF-E
FCCregistration
number for VA-824 KSU at factory
ACK8GR-19274-KF-E
VA-824 KSU for modify ACK8GR-19273-MF-E
FCC registration number for VA-1232 KSU at factory
ACK8GR-17656-KF-E
VA-1232 KSU for modify ACK8GR-17655-MF-E
Facility interface code
02LS2
Service order code
9.OF
Ringer equivalence
0.4B
Required network interface jack
USOC RJllW, RJllC,
The FCC registration number will be found on the key service unit.
This unit must not be connected to a coin operated line.
If you are on a party line, check with your local telephone company.
Notice
To assure the safe use of your telephone, please observe the following guide lines for
installation and use.
* This product is an electrical device and can be hazardous if immersed in water.
To avoid the risk of electrical shock, do not use this unit while in the bathtub, shower,
or when wet. If you accidentally drop the unit into water, unplug it first, then retrieve
it by pulling it by the cord.
* Do not use the telephone near sources of electric “noise” such as fluorescent lamps, air
conditioner, washing machine, TV sets or radios.
* The telephone should not be exposed to heat sources, direct sunlight, extreme
temperatures, moisture, strong vibrations, greasy of dusty environments.
* Never attempt to insert wires, pins, of similar objects in the vents or openings of the
telephone.
* Never clean the telephone with benzene, paint thinner or other solvent materials.
Wipe with a soft cloth to clean.
,‘
I
* Do not change the unit installation location without consulting the dealer/installer.
1
TABLE OF CONTENTS
Names and Function . . . . . . . . . . . . . . . . . . . . . . . . . . . . . . . . . . . . . .
Symboles . . . . . . . . . . . . . . . . . . . . . . . . . . . . . . . . . . . . . . . . . . . . . . . . .
4
6
,
OUTSIDE CALLS
Making Calls
...............................
; ...........
Manual dial
Redial . . . . . . . . . . . . . . . . . . . . . . . . . . . . . . . . . . . . . . . . . . . . . . . .
Save dial . . . . . . . . . . . . . . . . . . . . . . . . . . . . . . . . . . . . . . . . . . . . . .
One touch speed dial . . . . . . . . . . . . . . . . . . . . . . . . . . . . . . . . . .
System speed dial . . . . . . . . . . . . . . . . . . . . . . . . . . . . . . . . . . . . . .
Answering Calls
Answer . . . . . . . . . . . . . . . . . . . . . . . . . . . . . . . . . . . . . . . . . . . . . . .
Hold . . . . . . . . . . . . . . . . . . . . . . . . . . . . . . . . . . . . . . . . . . . . . . . . . .
Transfer . . . . . . . . . . . . . . . . . . . . . . . . . . . . . . . . . . . . . . . . . . . . . . .
Conference . . . . . . . . . . . . . . . . . . . . . . . . . . . . . . . . . . . . . . . . . . . .
Privacy release . . . . . . . . . . . . . . . . . . . . . . . . . . . . . . . . . . . . . . . .
6
7
8
8
10
12
12
13
14
14
INTERCOM CALLS
Making Calls
Voice call . . . . . . . . . . . . . . . . . . . . . . . . . . . . . . . . . . . . . . . . . . . . .
Tone call
............................................
Operator call
........................................
Paging
Zone paging . . . . . . . . . . . . . . . . . . . . . . . . . . . . . . . . . . . . . . . . . .
All zone paging . . . . . . . . . . . . . . . . . . . . . . . . . . . . . . . . . . . . . . .
Answering Calls
Answering with handset . . . . . . . . . . . . . . . . . . . . . . . . . . . . . . .
Hands-free answer back . . . . . . . . . . . . . . . . . . . . . . . . . . . . . . .
Call pick-up . . . . . . . . . . . . . . . . . . . . . . . . . . . . . . . . . . . . . . . . . . .
Paging . . . . . . . . . . . . . . . . . . . . . . . . . . . . . . . . . . . . . . . . . . . . . . . .
Hold . . . . . . . . . . . . . . . . . . . . . . . . . . . . . . . . . . . . . . . . . . . . . . . . . .
Transfer . . . . . . . . . . . . . . . . . . . . . . . . . . . . . . . . . . . . . . . . . . . . . . .
Three-party conference . . . . . . . . . . . . . . . . . . . . . . . . . . . . . . . .
ADDITIONAL
15
15
15
15
16
16
16
17
17
17
18
18
FEATURES
Automatic Outside Line Selection . . . . . . . . . . . . . . . . . . . . . .
Direct Outside Line Access . . . . . . . . . . . . . . . . . . . . . . . . . . . . .
Flexible Feature Key . . . . . . . . . . . . . . . . . . . . . . . . . . . . . . . . . . .
Call Forward . . . . . . . . . . . . . . . . . . . . . . . . . . . . . . . . . . . . . . . . . .
Night Transfer . . . . . . . . . . . . . . . . . . . . . . . . . . . . . . . . . . . . . . . .
.............. : .........................
Do-Not-Disturb
One-Touch Function . . . . . . . . . . . . . . . . . . . . . . .
.-. . . . . . . . . . .
2
19
19
20
22
23
23
24
.-
..,‘.”
Pause Function . . . . . . . . . . . . . . . . . . . . . . . . . . . . . . . . . . . . . . . .
Flash Function . . . . . . . . . . . . . . . . . . . . . . . . . . . . . . . . . . . . . . . . .
Signal Conversion (from pulse to tone) . . . . . . . . . . . . . . . . . . . . .
Intercom Dial Tone Mute . . . . . . . . . . . . . . . . . . . . . . . . . . . . . .
Speakerphone . . . . . . . . . . . . . . . . . . . . . . . . . . . . . . . . . . . . . . . . .
Display . . . . . . . . . . . . . . . . . . . . . . . . . . . . . . . . . . . . . . . . . . . . . . . .
Long Speech Alarm ....................................
Hold Recall . . . . . . . . . . . . . . . . . . . . . . . . . . . . . . . . . . . . . . . . . . . .
.I. ....
Toll Restriction . . . . . . . . . . . . . . . . . . . . . . . . . . . . . . . . . . .
26
28
28
28
29
30
33
33
33
OPTIONAL EQUIPMENT
34
34
35
35
External Paging . . . . . . . . . . . . . . . . . . . . . . . . . . . . . . . . . . . . . . . .
Door Box . . . . . . . . . . . . . . . . . . . . . . . . . . . . . . . . . . . . . . . . . . . . . .
Door Opener . . . . . . . . . . . . . . . . . . . . . . . . . . . . . . . . . . . . . . . . . .
Sensor . . . . . . . . . . . . . . . . . . . . . . . . . . . . . . . . . . . . . . . . . . . . . . . . .
Station Message Detail Recorder (SMDR)
(VA-824/1232 system only)
. .
36
. .
37
. . . . . . . . . . . __. . __. . _. . . __. __. . . . . .
38
38
39
39
..... _....................
Direct Station Selector (DSS) Console
(VA-824/l 232 system only)
.......... _...............
Single Line Telephone (SLT)
(tone dial telephone only)
. . .. . .
In Case of a Power Failure . . . . . . . . . . . . . . . . . . . . . . . . . . . . .
Specifications . . . . . . . . . . . . . . . . . . . . . . . . . . . . . . . . . . . . . . . . . .
Memo for your Convenience ...........................
3
--
.. ;
-.
.’
_’
(VA-12022 key telephone with display)
1 Ringer volume control
For adjusting incoming ringing tone.
2 Speaker volume control
For adjusting voice level of intercom voice call and speakerphone receiving voice level.
3 Speaker
For listening to ringing tone and voice.
4 H a n d s e t
5 Display
Indicates the time and the number dialed. (VA-12022, 12022-B only)
6 REDIAL k e y
Used to redial the last number dialed. Also, use to insert a pause between the digits of
a telephone number storing for automatic dialing.
7 HOLD
Puts an outside or intercom call on hold.
8 CONF key
For conference with three-party and setting privacy release.
9 FLASH key
Pressing this key performs the same function as replacing the handset and lifting it up
again.
1 0 ON/OFF key _
Used to place a call without lifting the handset or to store a number for speed dialing.
11 ON/OFF indicator
Stays ON while ON/OFF key is pressed down.
12 Dialing keys
13 Microphone
Enables telephone conversations with the handset on-hook and hands-free speach.
14 Telephone number list
A list for people whose numbeys are stored in the respective memory for your
convenience.
4
Names and Functions
:.
(24)
(18)-f
22)
(Feature keys field)
I.
‘I
-(26)
(Direct station selection console
for VA-824/l 232 system)
15 AUTO key
For storing numbers and automatic dialing.
16 SAVE key
Temporarily saves a telephone number during call.
17 MIC indicator
This indicator lights up when MIC key is pressed, enabling you to answer an intercom
call without lifting the handset.
18 MIC key
Used for muting microphone during hands-free conversation and hands-free answer
back setting.
19 One-touch key
Automatic dialing for any of the stored telephone numbers, extension numbers and
other features.
20 Line (CO/PBX)/FF key
Press to select a vacant telephone line or to answer an incoming call. You can also
assign features or extension numbers to these keys.
21 LinelFF indicator
Lights up or flashes green to indicate your operation mode and red for others.
Lift-inruse blink:Hold
22 Intercom indicator
Flashes when on hold for an intercom call. Stays ON while you are speaking on an
intercom call.
23 DNDKF indicator (DO-Not-Disturb/Call Forward)
Lights up when Call Forwarding or Do-Not-Disturb feature is set.
24 Station indicator
Indicates the status of an extension.
25 Station key
To call an extension.
26 ZONE key
Paging.
5
Symbols
Hang up the handset
Lift handset
\I,
M
# Press the key
fia indicated
Press line/FF key
Press one-tuoch
key
.
:
.’
Dial a number
cl
& On-fook
conversation
Speaking
Press dial key i5t.
Press dial key *
This is for dialing the telephone number on an outside line.
Calls can be made either by lifting the handset or without lifting the handset.(on-hook dial)
While you are making the call, the line indicator light-up green and sometime blinks.
For on-hook dialing, dial the number within 15 seconds after pressing the line key. If more
than 15 seconds elapses,
,it reverts to stand-by.
If you press ON/OFF key and hang up while a conversation with handset, only your party’s
voice can be heard. You can also conversation off-hook if your telephone has a
speakerphone.
.
Off-hook dial
. _’
1. Lift handest
* You will hear the intercom (continuous) dial tone from
handset.
f
,I,
2. Press any available line key
kEl
l
Listen for the outside dial tone. The line indicator will light
up green.
f
3. Dial the telephone number
+ L.
@iI
4. Speak when answered
5. Hang yp when the call is c.omplete
* The line indicator goes off.
\
1.
.’
.’
6
1. Press any available line key
* Listen for the outside dial tone from speaker. The line
indicator will light up green.
2. Dial the telephone number
3. Speak or lift handset
4. Press ON/OFF key or hang up when the call
is completed
* The line indicator goes off.
You can redial the last telephone number dialed simply by pressing the REDIAL key.
A telephone number of up to 16 digits can be redialed.
1. Press any available line key
* listen for the outside dial tone from speaker. The line
indicator will light up green.
2. Press REDIAL key
3. Lift handset and speak when answered
You can temporarily save a telephone number at any time so that it can easily be dialed
again later.
A number of up to 16 digits can be saved.
To save a number
AUTO
1. Press AUTO key while speaking
IEI
+
SAVE
2. Press SAVE key
* The telephone number of the party you are speaking to will
IEI
be saved.
To make a call
1. Press any available line key
* Listen for the outside dial tone. The line indicator will light
up green.
2. Press SAVE key
* The saved telephone number will be dialed automatically.
3. Lift handset and speak when answered
You can store up to 10 telephone numbers for speed dialing on your own telephone.
This is particularly convenient for storing long numbers which you call frequently.
You can store up to 16 digits including *, #, FLASH and PAUSE.
By entering AUTO plus system speed address number instead of the telephone number, you
can store the system speed address number on the one-touch speed dial function.
If a new number is stored, the old number is erased and the new contents are set.
To store a number
1. Press ON/OFF key
* Listen for the intercom dial tone from speaker. The ON/OFF
indicator will light up.
2. Press AUTO key
3. Press One-touch key you wish to store
4. Press the telephone number .for one touch speed dial storing
-
8
5. Press HOLD key
(if you wish to store another one-touch speed dial, repeat
steps 2 to 5 for each case)
6. Press ON/OFF key
* The ON/OFF indicator goes off.
To make a call
\I,
IEI
I
1. Press any .available line key
* Listen for the outside dial tone. The line indicator will light
up green.
2. Press One-touch key
* The telephone number stored on this key will be dialed.
3. Lift handset and speak when answered
:
To erase a number stored
ON/OFF
ml
+
1. Press ON/OFF key
* Listen for the intercom dial tone from speaker. The (IN/OFF
indicator will light up.
2. Press AUTO key
3. Press the One-touch key you wish to erase
4. Press HOLD key
5. Press ON/OFF key
* The ON/OFF indicator goes off.
~’
:
With system speed dial you use a two digit address number instead of dialing the whole
telephone
number.
You can use the address number for system speed dial on all system telephones.
Up to 90 address numbers for system speed dial from 00 to 89 can be stored, and a
telephone number can be stored even while the other telephones are being used.
Telephone numbers of up to 16 digits including *, #, FLASH and PAUSE can be stored.
If a new telephone number is stored, the old telephone number is erased and new
contents are set.
To store a number (from extension 10 only)
1. Press ON/OFF key
* Listen for the intercom dial tone from speaker.
The ON/OFF indicator will light up.
2. Press AUTO key
3. Press any address number from 00 to 89
4. Press the telephone number for speed dial storing
.
+
HOLD
KJ
5. Press HOLD key
(If you wish to store another system speed dial, repeat steps
2 to 5 for each case)
6. Press ON/OFF key
* The ON/OFF indicator goes off.
...
;:
10
To make a call
1 . Press
I
any available line key
* Listen for the outside dial tone. The line indicator will
light up green.
2. Press AUTO key
Dial the address number (2 digits) from 00 to 89
*
The telephone number stored in the address will- be
dialed.
Lift handset and speak when answered
To erase a stored number (from extension 10 only)
Press ON/OFF- key
* Listen for the intercom dial tone from speaker.
The ON/OFF indicator will light up.
kzl
2. Press AUTO key
AUTO
3. Press address number (00 to 89) you wish to erase
4. Press HOLD key
Press ON/OFF key
* The ON/OFF indicator goes off.
11
The way calls are answered is different depending on whether or not a ringing tone is
assigned to your telephone for incoming outside calls.
To answer a call on a telephone which rings
Simply lift handset or press ON/OFF key and speak
If automatic answering has not programmed (system program);, ’
press the line key (and then lift the handset).
.
To answer a call on a telephone which does not ring
6
m
1. Lift handset
(if the telephone having the speakerphone, not necessary
to lift the handset.)
+
$1,
kEl
2. Press the line key for where the indicator is flashing red
* -The line indicator changes to green.
:
You can put a call temporarily on hold. During hold you can make a call on another
vacant line or answer a call. It is also possible to pick up held line on a different telephone
in the system.
Putting call on hold
Tell your party that you are about to put the call on hold and
press HOLD key
* The indicator for ‘the held line will flash green.
(The line indicators of the other telephones will flash red.)
Your conversation is put on hold.
Pickinq up held line
Press the line key of the held line
* The line indicator will light up green.
(When releasing from another telephone in the system,
press the line key for the line flashing red.)
12
.:
You can transfer an outside call to another extension.
Transferrinq a call to another extension
HOLE
FE!
1. Press HOLD key to place the call on hold
* The line indector
will blink green at the short inter-vals
+
2. Dial the desired extension number
3. When answered, indicate the number of the line being
transferred
4. The transferee then presses the red-flashing line key
Alternatively
1. Press HOLD key to place the call on hold
2. Dial the desired extension number
3. Press CONF key when answered
* The three parties can talk together.
4. Hang up
* The party on the outside line and the transferee can talk
together.
Neither the party on the outside line nor the transferee
will hear you hang up.
If the extension is busy
Press the line key of the held line
* You can talk once more with the pa_rty on hold.
13
Three-party conference
You can converse with three parties at the same time.
Put the conversation initiated between two parties on hold and call the other outside
number.
Then by pressing CONF key when answered you can have a three-party conference.
Conferences can involve two outside lines and one extension or one outside line and two
extensions. Also, it can be done among the three extensions.
1. Press HOLD key to place the call on hold
HOLD
* The line indicator will flash green.
l!d
2. Call the third party on any available line
3. When the third party answers, indicate that you want to
have a three-party conference
4. Press CONF key to enable the three-party conference
It is possible for a party on another extension to join a conversation you are having with a
party on an outside line.
In the usual your conversations on outside lines are private and cannot be interrupted from
other extension. The party on the other extension should press the line key within 10
seconds of your pressing CONF key.
Ia
CONF
-
1. Press CONF key during conversation
2. The third party presses the line key to join the conversation
* The three parties can converse together.
(Note that: With privacy release a conference can be held
by more than three parties, but the acoustic level may be
reduced.)
14
This can be to telephones in all zones in the system.
r3
lzl
1. Lift handset
* Listen for the intercom dial-tone.
+
2. Press dial keys #OO
m
+
3. Make your announcement into the mouthpiece of handset
When answering a paging call, pick up the handset and
press * key twice.
(Note that if external speaker is connected, the paging
both for all zone and external will be made. To make
the external paging only, see page 34.)
When answering to a voice call or tone call, simply lift handset.
(If the telephone having speakerphone, simply press the
ON/OFF key.)
You can .answer to call without lifting handset (on-hook).
Before receiving any calls check to see that the microphone indicator lights up.
If it does not light up (microphone is off), press the MIC key so that the microphone
indicator lights.
Speak through the built-in microphone and speaker
* M/C indicator will flash.
G&5
cl
IF MIC key is not pressesd
MC
bEI
1. Press MIC key
* M/C indicator will flash.
+
LQ
2.
YOU
can speak with telephone on-hook
16
You can answer an’ intercom call to your extension on another telephone.
However, you cannot pick up a call for door box calls and for the telephone for which
hands-free answer back is set.
1. Lift handset
2. Enter ** with dial key to answer the call
You can respond to zone or all zone paging on any extension.
1. Lift handset
2. Enter * * with dial key to respond to the paging
:,
You can put an intercom call temporarily on hold. During hold you can make a call or
answer a call.
However, paging, door box conversations and conferences cannot be put on hold.
Putting an intercom call on hold
Tell your party that you are about to put a call on hold and
then press HOLD key
* INT indicator will flash. You will hear the continuous
intercom dial tone.
your conversation is put on hold.
To release hold
Press HOLD key
* INT indicator will light up.
17
You can transfer an intercom call to another extension. When transferring, temporarily put
:
._I
the call on hold, dial the other extension and have a three-party conversation. Then when
you hang up or press FLASH key you drop out of the conversation leaving the other two
parties to continue.
!a
HOLD
1. Press HOLD key to put the call on hold
* /NT indicator will flash. You will hear the continuous
intercom dial tone.
2. Dial the desired extension number
3. When answered, indicate that you want to transfer the call
a
CONF
4. Press CONF key
* You have a three-party conversation.
5. Hang up
* The other two parties continue their conversation.
.
..’
You can converse with three parties at the same time.
1. Press HOLD key to put the call on hold
* /NT indicator will flash. You will hear the continuous tone.
2. Dial the extension number of the additional party
3. When answered, indicate that you wish to have a three- party
conference
4. Press-CONF key to enable three-party cbnference
* INT indicator will light up.
18
-
ADDITIONAL FEATURES
This system has various features for your added convenience.
By system programming you can establish functions to suit your objectives.
Please consult your dealer/installer about programming.
By pressing dial key 9 you are connected with an available outside line automatically.
When you use this feature you do not need to select an available line by pressing a line
key.
If all the lines are being used, you will hear the busy tone.
This feature is convenient for when using a single line telephone.
In the FCC rules, this feature is regarded as one of the distinguishing features of the key
system as against the PBX.
In the form the unit is shipped from the factory this feature cannot be programmed unless
one jumper on the key service unit board is cut.
When you use this feature, inform the telephone company of registration number which
for the system modification.
1. Lift handset or press ON/OFF key
* You will hear the intercom dial tone.
2. Press dial key 9
* Listen for the outside dial tone.
3. Dial the telephone number
You can specify a particular line for dialing outside calls. If the line is being used, you will
hear the busy tone. Idle COL key can be used for FF key.
1. Lift handset or press ON/OFF key
* You will hear the intercom dial tone.
2. press dial key 8
3. Press the dial key to obtain the desired outside line
l-3
for VA-309
l-8
01 - 12
for VA-824
for VA-1232
* Listen for the outside dial tone.
4. Dial the telephone number
19
-
Vacant line keys can be used to enable one touch access to system features.
All features can be stored with the exception of the fjxed functions HOLD, FLASH, SAVE,
REDIAL, CONF and ON/OFF. Up to 8 digits can be stored under edch keys.
Note that even if “0” is stored, you cannot call the extension IO (operator call).
Features are stored as follows
Extension number:
ON/OFF
IEl
1. Press ON/OFF key
* Listen for the intercom dial tone from speaker. The ON/OFF
indicator will light up.
+
AUTO
2. Press AUTO key.
IEI
3. Press FF key
4. Press the extension number for storing
a
HOLD
LJ
ON/OR
5. Press HOLD key
6. Press ON/OFF key
* ON/OFF indicator goes off
20
Other
features:
1. Press ON/OFF key
f
2. Press AUTO key
3. Press FF key
4. Press a number for the feature
lntecom call
extension number 1 m)<ey for DSS
and BLF using (In this case, you can
confirm the busy status of the
extension through the indicator
lighting.)
Zone or all
zone paging
L#ol ktcozl b#03jfor zone paging,
I#001for all zone paging
I* * I for answering
m for door box A,mfor door box B
I* for answering
m bxtension number 1
1#2# for clearing
@%I EEKJfor clearing
Door box
Call pick-up
Call forward
q
Do-not-disturb
Night transfer
Alarm setting
SMDR account
number
Door opener
m”1” o r om “ 2 ” a
1#2#lfor clearing
m bccount number ]m
mto opener 1, 79 for opener 2,
E$r;ing door box call
Intercom dial
tone mute
Kl
HOLD
5. Press HOLD key
+
6. Press ON/OFF key
ON/OFF
&!I
When using FF key
By simply pressing the desired FF key (line key) you can access
any of the above mentioned features.
21
All incoming outside and intercom calls can be routed to set extension.
This feature can be set for each telephone separately and while it is set the DNDKF
indicator light up.
-;
Note that this indicator also lights up when the Do-Not-Disturb feature is set.
Settinq
1. Press ON/OFF key
* Listen for the intercom dial tone from speaker.-ON/OFF -. ’
indicator will light up.
2. Press dial keys #3
3. Press the extension number for forwarding
4. Press dial key #
* DNDICF indicator will light up.
5. Press ON/OFF key
* ONIOFF indicator will go off.
To release
1. Press ON/OFF key
2. Press dial keys #2#
* DNDICF indicator will go off
3. Press ON/OFF key
22
:
While this feature is set, the outside incoming ringing tone sounds on a predetermined
telephone (by system programming) only.
The setting and release operation are only possible on telephone specified in the system
programming.
During the time this feature set, INT indicators of the specific telephone flash.
Releasing is done in the same way as setting.
K!l
ON/OFF
t
1. Press ON/OFF key
l
Listen for the intercom dial tone from speaker. ON/OFF
indicator will light up.
2. Press dial keys #6#
* /NT indicators will flash.
3. Press ON/OFF key
* ONIOFF indicator will go off.
With this feature set the call tones for all incoming outside and intercom calls and paging
do not sound. However, the line indicators flash in the case of outside incoming calls.
By using this feature you will not be disturbed by the telephone ringing while you are
having a meeting. While this feature is set, DNDKF indicator lights up.
Note that this indicator also lights up when the Call Forward feature is set.
&!I
ON/OR
1. Press ON/OFF key
* Listen for the intercom dial tone from speaker. ON/OFF
indicator will light up.
2. Press dial key #3#
* DNDICF indicator will light up.
3. Press ON/OFF key
* ON/OFF indicator will go off.
To release
1. Press ON/OFF key
* Listen for the intercom dial tone from speaker. ON/OFF
indicator will light up.
2. Press dial key #2#
- * DNDICF indicator will light up,
3. Press ON/OFF key
23
:
Pressing a one-touch key allows you quick access to a system feature.
For example the one-touch keys can be employed for features which are frequently used,
such as extension numbers, door box call numbers and paging numbers up to 16 digits can
,
._
be stored under each key.
As with the storing operation, if a new feature is stored, the old feature is erased and the
new contents are set
Storing
1. Press ON/OFF key
* Listen for the intercom dial tone from speaker. ONIOFF
indicator will light up.
2. Press AUTO key
Press One-touch key for storing
Press the number for storing
For example, enter 75 for calling door box A
5. Press HOLD key
6. Press ON/OFF key
* ON/OFF indicator will go off.
.:
,
24
,I 1.
,‘“?,
i
.,.,f
One-touch
operation
1. Lift handset or press ON/OFF key
* Listen for the inter&m dial tone.
:
2. Press One-touch key
To erase stored number
1. Press ON/OFF key
* Listen for the intercom dial tone from speaker.
2. Press AUTO key
3. Press One-touch key you wish to erase
El
HOLD
4. Press HOLD key
5. Press ON/OFF key
25
Using the REDIAL key a pause can be inserted in the dialing sequence.
The pause time can be system programmed to 2 or 3 seconds. For example, a pause can be
i
::
inserted between, MCI or Sprint access number 123-4567 and telephone number 201-3924382 and stored for speed dialing or on a one-touch key as follows.
Access No.
..
Phone No.
Pause
One-touch key 1
One-touch key 2
.-
Storinq
.
1. Press ON/OFF key
* Listen for the intercom dial tone. ON/OFF indicator will
light up.
2. Press AUTO key
3. Press any numbers within the range 00 to 89 for system
speed dialing or One-touch key (e.g. one-touch key 1)
. ..,
4. Press the access number 1234567 for storing
5. Press REDIAL key twice to store two pauses
6. Press HOLD key
IEIAUTO
7. Press AUTO key to store the telephone number
a.
Press the address number for system speed dialing
or One-touch key (e.g. one-touch key 2)
26
9. Press the telephone number 201-392-4382 for storing
K!l
Ea
HOLE
10. Press HOLD key
f
ON/OR
11. Press ON/OFF key
* ON/OFF indicator will go off.
When dialinq
1. Press any available line key
2. Press the address number or One-touch key where the access
number is stored (e.g. one-touch key 1)
3. Press the address number or One-touch key where your party’s
telephone number is stored (e.g. one-touch key 2)
27
.i
By pressing FLASH key, you can terminate an outside or intercom call.
Having terminated an outside call, you are once again automatically connected to an
outside line.
If you wish to make a call immediately after another, without replacing handset press
FLASH key and dial.
When you want to answer a call waiting which rings, press FLASH key.
Even if the telephone line is a rotary dialing system (dial pulse), you can send out DTMF
tone signals.
By pressing the * key after dialing telephone number, call is transmitted by tone signals.
Replacing the handset on the cradle will automatically return the telephone to its original
dial pulse line signaling.
1. Make a call on dial pulse line
2. Press dial key *
* The call is transmitted by tone signals.
::
The intercom dial tone heard from the handset or speaker can be silenced.
By repeating the suspending operation, the intercom dial tone is made to sound once
more.
1. Press ON/OFF key
2. Press dial keys #51#
L.
3. Press ON/OFF key
28
You can talk hands-free through the built-in microphone and speaker.
Before speaking make sure that microphone indicator is lighting. If it does not, press MIC
key.
For muting the microphone, press MIC key while talking.
You can adjust the speaker sound with the speaker volume control.
Pressing the MIC key, during conversation, enable to mute your voice for outside line.
Calling
1. Press the line key (or for an extension press ON/OFF key)
* Listen for the outside or intercom dial tone from the
speaker. M/C indicator will flash.
2. Dial the telephone number
3. Speak when answered
4. Press ON/OFF key when call is completed
I
Answering
1. Press the line key
2. Talk through the microphone
3. Press ON/OFF key when call is completed
29
When you are not using the telephone, the display indicates the time. When you are
making a call, it shows the telephone number you are dialing. During a call it indicates the
length of time for the conversation.
In addition,
alarm setting or a stored number can be shown on the. display for
confirmation.
The display shows a number of up to 12 digits For a number of more than 12 digits, it
shows the number sequentially until it is displaying the last 12 digits.
Setting time (from extension 10 only)
Hours and minutes are entered each in two digits.
Example: Setting for 2:30 pm
1. Press ON/OFF key
2. Press dial keys * 5
3. Enter hour (0 2) from 01 to 12
4. Enter minutes (3 0) from 00 to 59
5. Enter either am or pm (2)
1 for AM, 2 for PM
6. Press dial key # for storing
7. Press ON/OFF key
30
Settinq alarm
An alarm sounds from the telephone at the desieard time.
The alarm is stopped simply by lifting the handset. Once the
alarm has sounded, the alarm setting is automatically released.
Example : Setting for noon
1. Press ON/OFF key
2. Press dial keys #4
3. Enter hour (1 2) from 01 to 12
4. Enter minutes (0 0) from 00 to 59
5. Enter am or pm (2)
1 for AM, 2 for PM
6. Press dial key #
7. Press ON/OFF key
+ The alarm sounds at noon.
To release alarm setting
1. Press ON/OFF key
2. Press dial keys #4#
3. Press ON/OFF key
31
Dial number display
When
making
an
outside
or
intercom
call,
the
telephone
number dialed is displayed. Also, when a call is made from
another extension, that extension number is displayed.
_.
-.:
For example, telephone number 03-123-4567 is shown on the
display as
I 031234567
I
Display during call
The time which has elapsed for an outside call is displayed
When you receive a call the count starts from the time you
answer it, and when you make a call the elapsed time is shown
from 15 seconds (or 30 seconds) after dialing.
For example, when three minutes has elapsed the display shows
Confirminq
number
You can display and confirm numbers stored in the memory
In the case of a system speed dial number:
1. Press ON/OFF key
2. Press REDIAL key
3. Press AUTO key
4. Press the speed dial address number you wish to confirm (00
to 89)
*The stored number will appear on the display.
5 Press ON/OFF key
*The time appears on the display.
32
:\
‘,’
Other cases
1. Press ON/OFF key
2. Press REDIAL key
3. Press desired function key or number
* The’stored number will appear on the display.
One-touch speed dial:
One-touch
Flexible feature number :
FF key
Save dial number:
SAVE key
Redial number:
REDIAL key
Call forward number:
#3
Alarm setting time:
#4
Your extension number:
1
Outside line number:
Line key
’
key
4. Press ON/OFF key
* The time appears on the display.
A short tone sounds from the speaker every three minutes when you are making outside
calls. In this way you can keep a check on how long you have been talking.
A warning can be set to sound from the telephone after a certain time has elapsed when
a call has been put on hold (immediately, 30 seconds, 1 minute or 2 minutes after placing
on hold). The tone will remind you that the call is on hold should you have forgotten
about it. The warning tone only sounds during hold if the telephone is on-hooked.
Each telephone can be ranked so that its use may be restricted, for example, to local calls
or long distance calls. The ranking is of four types: intercom calls only, local calls only,
local calls and 41 1, 976 and 555 calls, and no restriction. Before using your telephone, as
certain which type it is. -
:.
.-
Telephones which are to local calls only or local calls and 41 l,-976 and 555 calls can also
;;;
be programmed for the system speed dialing.
33
1
i
OPTIONAL
EQUIPMENT
This system can be more conveniently used by installing optional equipment
You can page through external paging amplifier (if connected). External paging is also
heard from the speakers of the telephones belonging to the paging zone-3 if they have
been designated by system program.
1. Lift handset
2. Press dial keys #03
3. Make your announcement into the mouthpiece of handset
Up to two door boxes can be installed and used with this system. The calling tone of door
box A is a chime and that for door box B is tremolo tone.
If there is a door box call while you are talking with the other door box, the calling tone
will be heard only by you.
Note that with a telephone which rings, answer the call from door box within 15 seconds,
dial door box number to call door box.
To answer telephone which rinqs (when within 15 seconds of call)
Simply lift handset and begin talking
To answer telephone which does not ring
_ (or when not answered within 15 seconds of call)
1. Lift handset
2. Dial the door box number -from where the call is coming (75
for door box A, 76 for door box B) and begin talking
34
:
_: .:
You can control the door opener terminal (if connected) from your telephone.
Up to two devices can be attached. The control numbers are 78 for opener 1 and 79 for
opener 2. This operation is possible even when you are talking with a door box.
To release door lock
1. Lift handset or press ON/OFF key
2. Press opener control number 78 or 79 to release the lock
Alternatively, if you are talking with a door box, you can dial
77 to release the door opener for the door box you are
talking with
The alarm of a fire sensor, gas leak sensor,
etc. (if connected) will sound from your
telephone at times of emergency.
You can silence the alarm either on the sensor or on the telephone and you can select
either by system programming. If two or more telephones are sounding an alarm and one of them is silenced, the alarm stops sounding for all the telephones.
To silence an alarm on telephone
Simply lift handset
To silence an alarm on sensor
Refer to the owner’s manual for the sensor
35
You can install a printer, for recording information about outside calls. When you finish a
call, the date and time of the call, your party’s telephone number, the line used and other
recorded information are output. Account numbers of up to 10 digits can be used. As an
example of use, if you set an account number for each customer, you can ‘bill the total
phone charge to the customer.
To enter an account number and dial
1. Lift handset or press ON/OFF key
2. Press dial keys #7
3. Enter the account code
4. Press dial key #
5. Press available line key
6. Dial the telephone number
-.;
:.
‘. ._’
36
‘,
On the DSS there is a key for each extension to enable direct contact.
In addition, the status of each extension is shown with a lamp indicator.
(VA-1232:Maximum of 4 units.)
To transfer an outside call to an extension -
Answer the call
2 . Press the station key for the transferee
* The outside call is automatically put on hold.
F!l
CONF
3 . Press CONF key when answered
4 . Hang up
To call an extension while talking with another extension
Press
\I!
ha
the
desired
station
key
while
talking
with
another
extension or while calling
* The call will be automatically ended and the desired
extension will be called.
A station indicator will light up when
An extension is busy
An extension is called
Do-not-disturb is set
A station indicator will flash when
An extension is called with an intercom telephone
rsm
1. Lift handset
f
ZONE
2. Press ZONE key for zone number to be paged
hEI
+
3. Speak into the mouthpiece of handset to make announcement
37
_
:”
_’
Up to 4 single line telephones can be connected to this system.
h.,
-.:’
In case of a power failure, the single line telephones only can be used.
i
To make a call
For automatic line selection, see page 19 concerning ‘Automatic Outside Line Selection.
1. Lift handset
* You will bear the intercom dial
tone from handset
2. Press 9 for automatic line selection, or 8 for specified line
dialing and the desired line number
* Listen for the outside dial tone.
3. Dial the telephone number
4. Speak when answered
With a single line telephone you can take advantage of the following features
Making and answering intercom calls
Door box call (75 or 76)
Door opener function (78 or 79)
Outside call hold (Flashing)
Hold recall
In case of, a power failure, the key telephones cannot be used. If your system have power
failure unit and single line telephones, the single line telephones only can be used.
38
Dimensions (Inch) (Heigh x Width x Depth), Weight (Pound)
Telephone
VA-30920
6.7.x 2.4 x 8.5
--
2.0
VA-l 2020:
- 6.7x2.4x8.5
2.0
VA-12021:
6.7 x 2.4 x 815
2.2
VA-12022(B):
6.7 x 2.4 x 8.5
2.2
VA-82430:
VA-2086 1:
3.7 x 2.4 x 8.5
Door box
Power failure unit
VA-309651
9.4 x 4.7 x 1.8
Power consumption
VA-309:
Maximum:
Direct station selection console
3.4x6.9x 1.1
VA-824:
VA-l 232:
Date when purchased:
I
0.9
07’
0.9
60 W
13ow
18OW
I
Model No.:
VA-309NA-82411232
Store where purchased:
Phone No. (
39
_
)-
21
44
67
22
45
68
40
m Receiving and Following Th?@i% ‘cr ‘-‘*-
-
m Storing and Setting
(Only extension assigned by system program)
(Outside telephone number dialed is stored for later use)
(Extension 10 only) :‘,’
(Hour 00-12)
(Minute 00-59)
(For A.M.)
(For P.M.)
Flexible feature key
(Phone No. or any feature Nos.)
I
Confirmation of Stored Nufrtbers
r
REOliL
0
LA
SP.“E
Redial :
Save dial:
Call forward No.: ma
Your extension No.:
Id
One-touch dial :
Alarm time:
IEI
System speed dial: m-
ma--mm
Outside line No:
1
!a
) ON/Off
mm
!a
m
I Flexible feature :
“’
kil(Press key you with to confirm)
detasls of
operation.
please
consult
the
manual
of
operating
instructions.
7A0026Z9AJ
Printed In Japan
/
11
Ringer volume
Adjust incoming ring tone.
\
Press El one-touch key
.-
Adjust voice level for intercom
:::::::csll/
free
ress
CONF
(Making an outside call)
(When you using the line, just press REDIAL)
(Saved telephone number is dialed)
(Line No. for callins
1 WA-824NA-1232 system only)
1
or picking UP held line)
(Account No.)
(Phone No.)
I