1
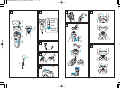
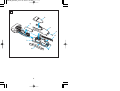
P00-03_ES8807_USA 05.10.28 6:57 PM ページ 1
R
IN USA CONTACT:
Division of Panasonic Corporation of North America
Panasonic Consumer Electronics Company
One Panasonic Way 2F-3 Secaucus, NJ 07094
Wet/Dry Rechargeable Shaver
Rasuradora Recargable Agua/Seco
IN PUERTO RICO CONTACT:
Panasonic Sales Company
Division of Panasonic Corporation of Puerto Rico, Inc.
San Gabriel Industrial Park 65th Infantry Avenue KM9.5
Carolina, Puerto Rico 00630
Operating Instructions
Instrucciones de operación
IN CANADA CONTACT:
AU CANADA, CONTACTER:
Panasonic Canada Inc.
5770 Ambler Drive, Mississauga, Ontario L4W 2T3
(905) 624-5010
Vancouver: (604) 278-4211
Calgary: (403) 295-3955
Toronto: (905) 624-8447
Montréal: (514) 633-8684
Model No.
Modelo No.
ES8807
ES8807
En México:
Panasonic de México, S.A de C.V.
México D.F.
Moras 313 Col. Tlacoquemecatl Del Valle Del.
Benito Juarez Mexico, D.F. 03200 Mexico
Tel: 54 88 10 00
Service • Assistance • Accessories
Dépannage • Assistance • Accessoires
Call 1-800-338-0552 (In USA)
panasonic.com/shavers (In USA)
Call 1-800-467-3405 (In Canada, only for shavers)
Composer 1-800-467-3405 (Au Canada, pour les rasoirs seulement)
No.1 EN ES (U.S.A./CANADA)
Printed in Japan
Imprimé au Japon
B Before
B Antes
operating this unit, please read these instructions completely.
de operar este producto, lea este instructivo en su totalidad.
P00-03_ES8807_USA 05.10.28 6:57 PM ページ 2
IMPORTANT SAFETY INSTRUCTIONS
When using an electrical appliance, basic precautions
should always be followed,
DANGER
To reduce the risk of electric shock:
1. Do not reach for the appliance if it has fallen into
water. Unplug immediately.
2. Do not place or store the
power cord where it can fall
into a tub or sink. Do not
place or drop it into water or
other liquid.
3. Before charging the shaver,
wipe off any moisture from the
shaver and power cord.
Always handle with dry hands.
WARNING
including the following:
Read all instructions before
using this appliance.
4. Always charge the shaver in
a cool, dry place.
5. Except when charging,
always unplug the power
cord from the electrical outlet
immediately after using.
6. Unplug this appliance before
cleaning.
7. Charger unit is not for immersion or for use in shower.
8. Do not use an extension
cord with this appliance.
Index
Indice
ENGLISH
Page
ESPAÑOL
Página
To reduce the risk of burns, fire, electric
shock, or injury to persons:
1. Do not use this shaver with
damaged shaving blades and/or
foil, as facial injury may occur.
2. Close supervision is necessary
when this shaver is used by,
on or near children or invalids.
3. Use this appliance only for its
intended use as described in
this manual. Do not use
attachments not recommended by the manufacturer.
4. Never operate this appliance if
it has a damaged cord or plug,
if it is not working properly, if it
has been dropped or damaged or dropped into water.
5.
6.
7.
8.
Return the appliance to a service center for examination
and repair.
Never drop or insert any
object into any opening.
Keep the cord away from
heated surfaces.
Do not use outdoors or operate where aerosol (spray)
products are being used or
where oxygen is being administered.
Always attach plug to appliance first, then to outlet. To
disconnect, turn off the switch,
then remove plug from outlet.
SAVE THESE INSTRUCTIONS
2
3
7
12
P04-06_ES8807_USA 05.10.28 6:58 PM ページ 4
1
2
-high
-mid
-low
-charge
status
A
B
6
H
I
C
D
8
7
-high
-mid
-low
-charge
status
G
E
F
3
9
4
J
K
5 (a)
4
(b)
5
P04-06_ES8807_USA 05.10.28 6:58 PM ページ 6
10
b
g
c
a
d
f
d
e
6
P07-19_ES8807_USA 05.10.28 6:58 PM ページ 7
Before use
Charging
This Wet/Dry shaver can be used for
wet shaving with shaving lather or for
dry shaving. You can use this watertight shaver in the shower and clean
it in water. The following is the symbol of Wet shaver. The symbol means
that hand-held part may be used in
a bath or shower.
Connect the power cord to the
shaver, and plug the adaptor into an
AC outlet. (see fig. 3)
The shaver will be adjusted automatically to voltages between 100-240V
AC.
In some areas, a special plug adaptor may be required.
• When charging the shaver for the
first time or when it has not been in
use for more than 6 months, the
charge status lamp may not illuminate for a few minutes after operation. It will eventually illuminate if
kept connected.
Treat yourself to wet lather shaves
for at least three weeks and notice
the difference. Your Panasonic Wet/
Dry shaver requires a little time to get
used to because your skin and beard
need about a month to adjust to any
new shaving method.
Adequate ambient temperature for
charging is between 15 to 35 °C.
• If it is far below or over the
appropriate temperature, the
charging time may be extended, or
the adaptor may not function.
• In particular, low temperature may
shor ten the life span of the
rechargeable battery. In this case,
the charge status lamp blinks twice
in 1 second.
Parts identification
(see fig. 1)
A Protective cap
B System outer foil
C Inner blades
D System outer foil release buttons
E Battery capacity monitor
F Charge status lamp
G On/Off switch
H Trimmer
I Trimmer handle
J Adaptor
K Power cord
The charge status lamp will glow
when the shaver is being charged.
The battery capacity monitor will fully
illuminate and the charge status lamp
will blink after charging is completed
(see fig. 2).
10 minutes after charging is completed, the battery capacity monitor
will extinguish and the charge status
lamp will continue to blink (see fig.
2).
READ ALL INSTRUCTIONS BEFORE USE.
7
7
P07-19_ES8807_USA 05.10.28 6:58 PM ページ 8
You can fully charge the shaver in
1 hour if the battery capacity monitor
shows “low”.
The battery capacity monitor indicates the charge remaining in the
battery in 3 levels (high/mid/low).
The unit can be used once or twice
more after “low” starts to blink.
(Differs depending on the use situation.)
Do not place fingers on the On/Off
switch during use.
This may cause the shaver to stop
during use or change it to the
“sonic” vibration cleaning mode.
Hold the shaver at a right angle (90°)
to your skin (see fig. 4). Start out
shaving by applying gentle pressure
to your face. Stretch your skin with
your free hand and move the shaver
back and forth in the direction of your
beard. You may gently increase the
amount of pressure as your skin becomes accustomed to this shaver.
Applying excessive pressure does
not provide a closer shave.
A full charge will supply enough
power for approx. 14 shaves (3 minutes per shave for a normal beard).
Before travelling, charge your shaver
fully for 1 hour if you will not be
taking the adaptor with you.
In case your shaver is without charge,
you may quick charge it for 1 shave
in about 5 minutes.
System outer foil
(see fig. 5)
System outer foil has a slit blade (a)
between 2 foils (b). They move up
and down independently to follow the
contours of your face.
The slit blade catches and cuts
longer and lying hairs easily.
Using your shaver
Caution – The system outer foil is
very thin and can be damaged if
handled improperly. Before each
use, always check the foil for damage. To avoid personal injury, do
not use if the foil or other parts of
the shaving head are damaged.
For wet shaving
Put a thin layer of shaving foam on
your face which works as a lubricant.
Shaving foam is the most suitable
among many other shaving aids (gel,
soap, cream, etc.). Do not put a thick
layer of shaving foam as it may affect shaver’s performance. If the
shaving head is clogged with foam,
simply rinse it under running water.
Disconnect the power cord from the
shaver, and push the On/Off switch
to turn the shaver on.
If you push and hold the On/Off
switch for more than 2 seconds, it
will activate the turbo mode for
“sonic” vibration cleaning.
(see “Cleaning your shaver”)
Caution:
Shaving with “sonic” vibration may
damage your skin. Please turn it
off and on again to deactivate the
turbo mode.
Using the trimmer
(see fig. 6)
Slide the trimmer handle up to open
the trimmer.
8
8
Place the trimmer at a right angle to
your skin and move it downward to
trim sideburns.
Replacing shaving head
components
It is recommended that you replace
the system outer foil at least once a
year and the inner blade at least once
every 2 years to maintain your shaver’s cutting performance.
Cleaning your shaver
(see fig. 7)
Warning – To prevent electric
shock or personal injury, disconnect the power cord from the
shaver before cleaning with water.
Replacing the system outer foil
(see fig. 8)
Squeeze the system outer foil release buttons and lift the system
outer foil upward to remove it. To insert the new system outer foil, press
down until it snaps into place.
For cleanliness and convenience, we
recommend that you clean your
shaver with water and a liquid hand
soap. Regular cleaning will keep your
shaver in good condition while preventing odors or bacteria from developing, and maintain the cutting performance.
With the system outer foil in place,
apply some hand soap onto the outer
foil.
Push and hold the On/Off switch for
more than 2 seconds to activate the
turbo mode for “sonic” vibration
cleaning.
At the same time, the lamps of the
Battery capacity monitor illuminate
randomly.
Pour some water over the outer foil.
After about 20 seconds, it will be
automatically turned off, or you can
turn it off by pushing the On/Off
switch.
Remove the system outer foil and
push the On/Off switch more than 2
seconds to activate the turbo mode
for “sonic” vibration cleaning and
clean it with running water.
Wipe off any moisture from the
shaver with a dry cloth and dry it without the system outer foil.
Replacing the inner blades
(see fig. 9)
Squeeze the system outer foil release
buttons and lift the system outer foil
upward to remove it. Remove the inner blade one at a time by grasping
each firmly at both ends and pulling
straight away from the shaver.
Do not touch the metal parts of inner
blades.
To insert the new inner blade, hold
the blade one at a time at both ends
and press downward until each
snaps into the shaver.
ATTENTION:
A Lithium-ion battery that is recyclable powers the product you
have purchased. Please call
1-800-8-BATTERY for information
on how to recycle the battery.
9
9
P07-19_ES8807_USA 05.10.28 6:58 PM ページ 10
Caution – To prevent
personal injury or damage
to the product,
WARNING for Lithium Battery:
Fire, explosion, and severe burn
hazard.
Do not crush, disassemble, heat
above 100°C (212°F), or incinerate.
• Do not charge the shaver where it
will be exposed to direct sunlight
or a heat source, or where there is
a lot of moisture.
• Use only the included adaptor
RE7-27 to charge the ES8807
shaver.
• Dry the shaver completely before
charging it.
• The shaver and adaptor will become slightly hot during use or
charging, however, this is not a
malfunction.
• Keep the adaptor away from water
and handle it only with dry hands.
• Grip the adaptor when disconnecting it from an AC outlet; tugging on
the power cord may damage it.
• Store the adaptor in a dry area
where it will be protected from damage.
• Do not pull, twist, or severely bend
the power cord.
• Do not wrap the power cord tightly
around the appliance.
• If the power cord gets damaged, it
alone can not be replaced.
Contact an authorized service
center.
• In cases where static noise is emitted from the television during use
or recharging, connect the adaptor to a different outlet.
• Do not touch the edge (metal part)
of the inner blade.
Failure to observe this may lead to
hand injuries.
How to remove the built-in
rechargeable battery before
disposal of the shaver
(see fig. 10)
WARNING:
Do not attempt to replace the battery for the purpose of reusing the
shaver. This could result in the risk
of fire or electric shock.
The battery in this shaver is not intended to be replaced by consumers. However, the battery may be replaced at an authorized service
center. The procedure described below is intended only for removal of
the rechargeable battery for the purpose of proper disposal.
1. Disconnect the power cord from
the shaver when removing the
battery.
2. Remove the bottom cover screw
(a).
3. Remove the trimmer (b).
4. Slide the back panel (c) and remove it.
5. Remove the side panel (d).
6. Remove the three housing
screws (e).
7. Remove the housing (f).
8. Lift the battery (g) and remove it.
10
10
• Wash the shaver in tap water. Do
not use salt water or boiling water.
Also, do not use cleaning products
that are designed for toilets, bathrooms or kitchen appliances. Do
not submerge the shaver for a long
time.
• Do not wipe any part of the shaver
with thinner, benzine or alcohol.
Clean it by using a cloth dampened
with soapy water.
• Do not take the housing apart as
this can affect the watertight construction.
• Do not clean with water when the
shaver is connected to the power
cord.
• When cleaning the shaver with
water, do so with both the inner
blades attached. (Doing so with
only one of the inner blades attached makes an abnormal noise
and may damage the shaver.)
• Keep the unit away from children.
• Keep instructions in a safe place.
• The adaptor is intended to be correctly orientated in a vertical or floor
mount position.
Specifications
Power source: 100-240V AC,
50-60 Hz (Automatic voltage conversion)
Motor voltage: 3.6 V DC
Charging time: 1 Hour
This product is intended for household use only.
FOR YOUR CONVENIENCE, WE HAVE ESTABLISHED A TOLL-FREE
(IN USA ONLY) NATIONAL ACCESSORY PURCHASE HOT LINE AT
1-800-338-0552.
FOR CANADA, PLEASE CONTACT ONE OF THE SALES BRANCHES
MENTIONED ON THE BACK PAGE.
11
11
P07-19_ES8807_USA 05.10.28 6:58 PM ページ 12
IMPORTANTE PARA SU SEGURIDAD
Al usar un aparato eléctrico,
siempre se debe tomar ciertas
precauciones
básicas,
incluyendo las siguientes:
Lea todas las instrucciones antes
de usar este aparato.
PELIGRO
Para evitar descargas eléctricas:
1. No coja el aparato si este ha caído al
lugar fresco y seco.
agua. Desenchufe inmediatamente.
5. Desconecte siempre el cable de
2. No coloque ni guarde el cable de
alimentación del tomacorriente
alimentación donde corra el riesgo
eléctrico, excepto durante la
de caerse dentro de una bañera o
operación de carga.
lavabo. No lo coloque ni deje caer 6. Desenchufe este aparato antes de
dentro de agua u otro líquido.
limpiarlo.
3. Antes de cargar la afeitadora, 7. El cargador no es apto para
seque bien la afeitadora y el cable
inmersión (sumergible en líquidos)
de alimentación. Manipúlelos
ni para uso en la ducha.
siempre con las manos secas.
8. No use un cable de extensión con
4. Cargue siempre la afeitadora en un
este aparato.
evitar quemadural, incendios,
ADVERTENCIA Para
descargas eléctricas y lesiones personales:
1. No use esta afeitadora con
cuchillas y/o hojas de afeitar
dañadas, ya que esto podría
causarle heridas faciales.
2. Es necesaria una acuciosa supervisión
cuando la afeitadora sea utilizada por,
en o cerca de niños o inválidos.
3. Use este aparato solamente para
el fin que ha sido diseñado como
se describe en este manual. No
use accesorios que no hayan sido
recomendados por el fabricante.
4. Nunca use este aparato si tiene el
cable o enchufe de alimentación
dañado, si el aparato no funciona
correctamente o si éste se ha caído,
está dañado o ha caído al agua. Lleve
5.
6.
7.
8.
el aparato a un centro de servicio
para que sea revisado y reparado.
Nunca deje caer o inserte ningún
tipo de objetos por las aberturas del
aparato.
Mantenga el cable alejado de
superficies calientes.
No use la afeitadora al aire libre ni
en lugares donde se estén usando
productos
tipo
aerosol
(pulverizadores) o donde se esté
administrando oxígeno.
Siempre conecte primero el enchufe
al aparato, luego al tomacorriente
eléctrico. Para desconectar, desactive
el interruptor, luego desconecte el
enchufe del tomacorriente eléctrico.
CONSERVE ESTAS INSTRUCCIONES
12
G
H
I
J
K
Antes de su utilización
Esta afeitadora para uso en húmedo/seco puede ser empleada para
afeitarse tanto con espuma o jabón
de afeitar como en seco. Además,
por ser totalmente hermética, puede utilizar esta afeitadora mientras
se está duchando y limpiarla con
agua. Este es el símbolo de que la
afeitadora es adecuada para uso en
húmedo. El símbolo indica que la
parte que se toma con la mano se
puede utilizar en el baño o en la ducha.
Interruptor de encendido
Recortadora
Mango de la recortadora
Adaptador
Cable de alimentación
LEA TODAS LAS INSTRUCCIONES ANTES DE UTILIZAR EL
APARATO.
Carga de la batería
Conecte el cable de alimentación a
la afeitadora y conecte el adaptador
a una toma de CA. (véase la fig. 3).
La afeitadora se ajustará
automáticamente a la tensión
suministrada dentro de las gamas
100-240 V CA.
En ciertas zonas, es posible que
necesite un adaptador especial para
el enchufe.
Al principio y durante al menos tres
semanas, procure afeitarse con jabón y notará la diferencia. Será necesario un cierto tiempo para que se
acostumbre a su afeitadora en HÚMEDO/SECO puesto que su piel y
su barba necesitan más o menos un
mes para adaptarse a un nuevo
modo de afeitarse.
• Al cargar la afeitadora por primera
vez o si no se ha utilizado durante
más de 6 meses, el indicador de
estado de carga no se iluminen
durante los primeros minutos de
funcionamiento. Si continúa
conectada, finalmente se iluminará.
Identificación de los componentes
(véase la fig. 1)
A Tapa protectora
B Conjunto de láminas
C Cuchillas interiores
D Botón de apertura del conjunto
de láminas
E Monitor de capacidad de la
batería
F Indicador de estado de carga
13
13
La temperatura adecuada para la
carga está entre 15 y 35 °C.
• Si la temperatura está muy por
encima o por debajo de este rango,
es posible que el tiempo de carga
aumente o que el adaptador no
funcione.
• En
par ticular,
las
bajas
temperaturas pueden reducir la
vida útil de las baterías
recargables. En tal caso, el
indicador de estado de carga se
iluminará dos veces por segundo.
P07-19_ES8807_USA 05.10.28 6:58 PM ページ 14
El indicador de estado de carga
permanece encendido mientras se
carga la afeitadora.
El monitor de capacidad de la batería
se ilumina completamente y el
indicador de estado de carga
parpadea cuando se completa la
carga (véase la fig. 2).
10 minutos después de que se haya
completado la carga, el monitor de
capacidad se apagará, aunque el
indicador de estado de carga
continuará parpadeando (véase la
fig. 2).
Si el monitor de capacidad de la
betería muestra “low” (baja), podrá
cargar completamente la afeitadora
en 1 hora aproximadamente.
El monitor de capacidad de la batería
indica la carga restante en tres
niveles “high/mid/low” (alta/media/
baja). La unidad se puede utilizar una
o dos veces más antes de que el
“low” (baja) comience a parpadear.
(Dependerá según la situación).
Utilización de su afeitadora
Precaución – El conjunto de
láminas es muy delgado y se
puede dañar si se maneja
incorrectamente. Antes de utilizar
la afeitadora, compruebe si
presenta daños. Para evitar daños
personales, no utilice la afeitadora
si el conjunto de láminas u otras
partes del cabezal están dañadas.
Desconecte el cable de alimentación
de la afeitadora y pulse el interruptor
de encendido para ponerla en
funcionamiento.
Si mantiene pulsado el interruptor
durante más de 2 segundos, se
activará el modo turbo para la
limpieza por vibración “sónica”.
(véase “Limpieza de la afeitadora”).
Precaución:
Si se afeita con el modo de
vibración “sónica” activado, podría
dañar su piel. Para desactivar el
modo turbo, apague la máquina y
vuelva a encenderla.
Una carga completa suministrará
potencia suficiente para afeitarse
unas 14 veces (afeitado de 3 minutos
para una barba normal).
Antes de emprender un viaje y si no
desea llevarse el adaptador de
carga, cargue completamente la
máquina de afeitar durante 1 hora.
En el caso de que la afeitadora esté
sin carga, puede realizar una carga
rápida para 1 afeitado en unos 5
minutos.
Mientras se afeita, no coloque los
dedos sobre el interruptor de
encendido.
Si lo hace, la afeitadora se detendrá
o pasará al modo de limpieza por
vibración “sónica”.
Coloque la máquina de afeitar en
ángulo recto (90°) con respecto a la
piel (véase la fig. 4). Empiece a
afeitarse aplicando una leve presión
sobre la cara. Tire de la piel con la
mano libre y desplace la afeitadora
adelante y atrás siguiendo la
14
14
dirección de la barba. A medida que
su piel se acostumbre al afeitado con
esta máquina, podrá aumentar
ligeramente la presión. El afeitado no
será más apurado si aplica
demasiada presión.
Conjunto de láminas
(véase la fig. 5)
El conjunto de láminas exteriores
comprende una cuchilla ranurada (a)
entre 2 láminas (b). Se mueven arriba
y abajo de forma indepen-diente
siguiendo el contorno de la cara.
La hoja ranurada agarra y corta los
pelos más largos y aplastados
fácilmente.
Limpieza de la afeitadora
(véase la fig. 7)
Advertencia – Para evitar descargas eléctricas o daños personales,
desconecte el cable de alimentación de la afeitadora antes de
limpiarla con agua.
Afeitado húmedo
Aplique una fina capa de espuma de
afeitar sobre la piel; la espuma
actuará como lubricante. De todos
los productos para facilitar el afeitado
(gel, jabón, crema, etc.), la espuma
es el más adecuado. No aplique
demasiada espuma, ya que podría
alterar el funcionamiento de la
afeitadora. Si el cabezal de la
máquina queda taponado con
espuma, sólo tiene que enjuagarlo
bajo el agua corriente.
Utilización de la recortadora
(véase la fig. 6)
Deslice el mando de la recortadora
hacia arriba hasta que oiga un clic.
Coloque la recortadora en ángulo
recto con respecto a la piel y muévala
hacia abajo para recortar las patillas.
15
15
Por razones de limpieza y
comodidad, recomendamos que
limpie su afeitadora con agua y jabón
líquido para manos. La limpieza
habitual de su afeitadora le permitirá
conservarla en buenas condiciones
impidiendo la aparición de bacterias
u olores y preservando su capacidad
de corte.
Una vez colocado el conjunto de
láminas, aplique un poco de jabón
sobre él.
Pulse el interruptor de encendido
durante más de 2 segundos para
activar el modo turbo para la limpieza
por vibración “sónica”.
Al mismo tiempo, las lámparas del
monitor de capacidad de la batería
aleatoria-mente.
Vierta un poco de agua sobre la
lámina exterior. Después de unos 20
segundos, la afeitadora se apagará
automáticamente, aunque también
puede apagarla pulsando el
interruptor de encendido.
Extraiga el conjunto de láminas y
pulse el interruptor de encendido
durante más de 2 segundos para
activar el modo de limpieza por
vibración “sónica” y límpielo con
agua corriente.
Quite con un paño seco cualquier
rastro de humedad de la afeitadora
y séquela sin el conjunto de láminas.
P07-19_ES8807_USA 05.10.28 6:58 PM ページ 16
• Si durante el uso o la recarga, el
televisor produce ruidos estáticos,
conecte el adaptador a una toma
distinta.
• No toque los bordes (par tes
metálicas) de las cuchillas
interiores.
De hacerlo, podría sufrir daños en
las manos.
• Lave la afeitadora con agua
corriente. No utilice agua salada ni
agua muy caliente. Tampoco utilice
productos diseñados para lavabos,
baños o cocina. No deje la
afeitadora sumergida durante
periodos prolongados.
• No limpie ninguna parte de la
afeitadora con aguarrás, benceno
o alcohol. Límpiela únicamente con
un paño húmedo y agua jabonosa.
• No retire la carcasa de la
afeitadora, pues esto podría afectar
a su hermeticidad.
• No limpie la afeitadora con agua si
está conectada al cable de
alimentación.
• Cuando limpie la afeitadora con
agua, hágalo con las dos cuchillas
internas colocadas. (Si lo hace con
una sola de las cuchillas
colocadas, se producirá un ruido
anormal y la afeitadora podría
resultar dañada).
• Mantenga la unidad alejada de los
niños.
• Mantenga las instrucciones en un
lugar seguro.
• El adaptador debe ser orientado
correctamente en la posición
montura vertical o sobre el piso.
5. Quite el panel posterior (d).
6. Quite los tres tornillos de la
carcasa (e).
7. Quite la carcasa (f).
8. Levante la batería (g) y extráigala.
Sustitución de los componentes del cabezal de
afeitar
Se recomienda cambiar el conjunto
de láminas una vez al año y la
cuchilla interior al menos cada 2
años para mantener la afeitadora en
óptimas condiciones de corte.
Sustitución del conjunto de
láminas
(véase la fig. 8)
Pulse los botones de liberación del
conjunto de láminas y levante hacia
arriba este conjunto para extraerlo.
Para colocar otro conjunto nuevo,
empújelo hacia abajo hasta que se
asiente.
Sustitución de las cuchillas
interiores
(véase la fig. 9)
Pulse los botones de liberación del
conjunto de láminas y levante hacia
arriba este conjunto para extraerlo.
Retire las cuchillas una a una,
cogiéndolas firmemente por ambos
extremos y tirando en línea recta
para sacarlas de la afeitadora.
No toque las partes metálicas de las
cuchillas interiores.
Para introducir una nueva cuchilla
interior, sujete la cuchilla por ambos
extremos y presione hacia abajo
hasta que se acople con un clic a la
afeitadora.
ADVERTENCIA sobre la batería
de litio: riesgo de incendio, explosión y quemaduras graves.
No la aplaste, desmonte, caliente
por encima de 100 °C (212 °F) o
incinere.
Cómo extraer la batería recargable
incorporada antes de desechar la
afeitadora
(véase la fig. 12)
ADVERTENCIA:
No intente sustituir la batería con
la intención de volver a utilizar la
afeitadora. Podría provocar un
incendio o sufrir una descarga
eléctrica.
La batería de esta afeitadora no está
destinada a ser sustituida por el
usuario. Sin embargo, la batería
puede ser reemplazada en un centro
autorizado. El procedimiento que se
describe a continuación sólo sirve
para quitar la batería recargable con
vistas a desecharla de manera
adecuada.
1. Desconecte el cable de
alimentación de la afeitadora
antes de comenzar a quitar la
batería.
2. Extraiga el tornillo de la cubierta
inferior (a).
3. Extraiga la recortadora (b).
4. Deslice el panel posterior (c) y
extráigalo.
ATENCIÓN:
El producto que ha adquirido funciona con una batería de litio-ión
reciclable. Para más información
sobre cómo reciclar las pilas, llame al 1-800-8-BATTERY.
16
16
Cuidado – Para evitar
lesiones personales o
daño en la afeitadora,
• No cargue la afeitadora en lugares
expuestos a la luz directa del sol o
una fuente de calor, o donde haya
mucha humedad.
• Utilice únicamente el adaptador
RE7-27 para cargar la afeitadora
ES8807.
• Seque
completamente
la
afeitadora antes de cargarla.
• La afeitadora y el adaptador se
calientan ligeramente durante el
uso y la carga; esto no es un
problema de funcionamiento.
• Mantenga el adaptador alejado del
agua y manéjelo únicamente con
las manos secas.
• Para desconectar el adaptador de
una toma de CA, sujételo por el
enchufe; si tira del cable podría
dañarlo.
• Guarde el cargador en un lugar
seco y protegido.
• No retuerza, doble de forma
agresiva o tire del cable.
• No enrolle el cable de alimentación
alrededor del aparato dejándolo
tirante.
• Si el cable se daña, tendrá que
sustituir todo el cargador.
Póngase en contacto con un centro
de asistencia autorizado.
17
17
P07-19_ES8807_USA 05.10.28 6:58 PM ページ 18
Características técnicas
Fuente de alimentación: 100 V - 240 V
ca, 50 Hz - 60 Hz (Conversión automática de la tensión)
Tensión del motor: 3,6 V ca
Tiempo de carga: 1 hora
Uso doméstico.
PARA SU CONVENIENCIA, AHORA DISPONEMOS DE UNA LÍNEA NACIONAL DE LLAMADA GRATIS PARA LA COMPRA DE ACCESORIOS
(SOLEMENTE EN USA); LLAME AL 1-800-338-0552.
PARA CANADÁ, CONTACTE A NUESTRAS SUCURSALES DE VENTA
QUE SE MENCIONAN EN LA CONTRATAPA.
18
18