1
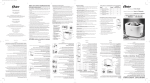
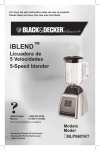
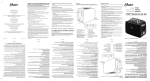
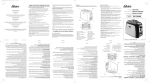
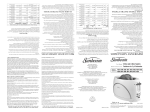
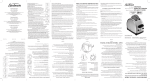
IMPORTANT SAFEGUARDS
When using your toaster, basic safety precautions should always be followed, including
the following:
l
Read all instructions before use.
l
Do not touch hot surfaces. Metal parts can become hot. Use handles or knobs.
l
To protect against electrical hazards, do not immerse cord, plug or toaster in water
or other liquids.
l
Do not let cord hang over edge of table or counter or touch hot surfaces.
l
Never leave appliance unattended when in use.
l
Young children or incapacitated persons should not use this appliance. Supervise
older children closely.
l Do not operate or place the toaster:
- on non-heat-resistant or flammable surfaces
- near a hot gas stove flame or electric element
- in a heated oven or microwave oven
l To reduce the risk of fire or electric shock, do not insert:
- utensils or foil-covered or oversized foods into the toaster
- fingers or metallic utensils into slots when toaster is plugged in
l Do not attempt to dislodge food when toaster is plugged in.
l Do not use foods that will drip coatings or fillings when heated. Such accumulations
inside the toaster create unsanitary conditions and the possibility of fire or toaster
malfunction. Clean out accumulated crumbs frequently to avoid risk of fire or toaster
malfunction. Do not operate the toaster without the crumb tray being replaced in its
correct position.
l Do not operate any appliance with a damaged cord or plug or after the appliance has
malfunctioned or has been damaged in any manner. Return the toaster to the nearest
Sunbeam Appliance Authorized Service Center for examination, repair or electrical or
mechanical adjustment.
l Use this appliance only for its intended use as described in this manual. Do not use
attachments that are not recommended by the manufacturer; they may cause injury.
l A fire may occur if toasters are covered or touching flammable material, including
curtains, draperies, walls and the like when in operation.
l
Unplug toaster from outlet when not in use and before cleaning.
l Toast lift lever must be in the up position before attaching or disconnecting the plug
from the wall outlet.
SAVE THESE INSTRUCTIONS
l
ii
Do not use the toaster outdoors or for commercial purposes; this appliance is for
household use only
i
Power cord instructions
Please follow the instructions below to ensure the safe use of the power cord.
This toaster has a power cord area that allows you to adjust the length of the cord
so that it is the appropriate length for your situation. Try to position the toaster near
the power source to reduce the hazards associated with power cords (such as
becoming entangled or tripping over a long power cord).
You may use an extension cord, if necessary, but be certain to follow these
guidelines:
- The marked electrical rating of the extension cord must be at least 120/127
volt, 60 Hz.
- The extension cord must be arranged so that it will not drape over the
countertop or tabletop, will not be within the reach of children and will not be
tripped over.
For toasters purchased in the U.S. and Canada: this appliance has a polarized plug
(one blade is wider than the other). To reduce the risk of electric shock, this plug
will fit into a polarized plug in only one way. If you cannot completely insert the
power plug into the power outlet, reverse the direction of the plug. If it still does
not fit, contact a qualified electrician. Do not modify the plug in any way.
Do not pull, twist or otherwise abuse the power cord.
Do not operate any electrical appliance with a damaged cord or plug or after the
appliance malfunctions or has been dropped or damaged in any manner.
Unplug the toaster when it is not in use and before cleaning.
Do not wrap the power cord around the main body of the toaster during or after use.
111
Table of contents
.
learning about your toaster . . . . . . . . . . . . . . . . . . . . . . . . . . . . . . . . . . .
.2
Using your,toaster for the first time . . . . . . . . . . . . . . . . . . . . . . . . . . . . . .4
Using your toaster . . . . . . . . . . . . . . . . . . . . . . . . . . . . . . . . . . . . . . . . . . .
6
Selecting the food type . . . . . . . . . . . . . . . . . . . . . . . . . . . . . . . . . . . . . . . . . . .
.7
Adjusting the lighter/darker setting . . . . . . . . . . . . . . . . . . . . . . . . . . . . . . . . .
.7
Using the frozen food feature
[PERFECTIONIST” Toaster; model 6322 only). . . . . . . . . . . . . . . . . . . . . . . . . . .
.8
Keeping toasted food warm
(PERFECTIONIST” Toaster model 6322 only) . . . . . . . . . . . . . . . . . . . . . . . . . . .
.8
Inserting the food into the bread slats and toasting . . . . I 1 1 . . . . . . . . . . . . . .8
Canceling the toast process . . . . . . . . . . . . . . . . . . . . . .
Cleaning your toaster ..a.....:
. . . . . . . . . . . . . . .lO
. . . . . . . . . . . . . . . . . . . . . . . . . . . . . . . 11
Two-year limited warranty ‘1.. . . . . . . . . . . . . . . . . . . . . . . . . . . . . . . . .
How to obtain warranty service . . . . . . . . . . . . . . . . . . . . . . . . . . . . . . . . . . . .
.12
.13
Welcome
Congratulations on your purchase of an Oster” toaster! Your toaster includes the
following technology and features:
.
An exclusive microprocessor control gives you consistent and precise toasting
performance. This means that you can expect your toast to be just the way you like
it, slice after slice and day after day.
.
Extra-wide, BAGEL-FIT ‘” slots for toasting bagels, thickly sliced homemade
bread, English muffins and pastries.
.
Single-side toasting - Ideal for toasting bagels and buns.
.
ACCURATE TOUCH” food select feature that allows you to choose between
Toast, Bagel or English Muffin (the English Muffin option is available on model
6322 only).
.
Fully removable, non-stick crumb tray.
.
Toast Lift for retrieving the smallest of toasted items.
.
Frozen feature that allows you to defrost and toast frozen food in one easy step
(model 6322 only).
.
Warm feature that allows you keep a toasted item warm without further toasting
(model 6322 only).
.
A COOL TOUCH” exterior that keeps the toaster surface cool to the touch, even
during use.
.
Sleek, timeless product design.
1
learning about your toaster
1. Bread slots - Extra wide, BAGEL-FIT N slots allow you to toast bagels, homemade
bread, English muffins and pastries.
2. Dual, self-adjusting, stainless steel bread guides - Automatically adjust to
bread thickness.
3. Non-stick surface on the top of bread slots - Makes clea up easy.
4. Bread carriage lever - Press to begin toasting your food.
5. Toast lift - Press up on the bread carriage lever to pop toast out of the bread slots.
6 . Cancel button - Press to pop the food out of the bread slots and stop the toasting process.
7. Fully removable, non-stick, easy wipe crumb tray
8. Cord storage - Allows you to store extra cord under the toaster and out of the way.
9. Power cord
SIGNATURE" toaster models 6320 and 6321 only
10. Toast button and indicator - Press this button if you want to toast bread items.
The indicator will light to confirm that Toast is selected.
11. Bagel button and indicator - Press this button if you want to toast a bagel. The
indicator will light to confirm that Bagel is selected. The inside of the bagel will be
toasted and the outside of the bagel will be warmed. Press the bread carriage lever
down to begin the cycle. Note: ONLY the inner toasting elements will glow in this
mode. The outer element will not glow when the bagel button is seleted.
12. Lighter/Darker knob - Turn the knob to select how dark you would like your
food toasted; 1 is the lightest; 7 is the darkest. The exclusive microprocessor
technology of the Oster” toaster ensures consistent, precise toasting.
PERFECTIONIST" toaster; model 6322 on/y
13. Lighter/Darker display - Displays the Lighter/Darker settings. The number in the
display indicates the setting on a scale of 1 to 7 (the lightest setting is 1; the darkest
setting is 7) and the V* l l l l c: Cv light in correspondence to the setting. When
toasting, the pie graph will fill in to indicate the time remaining in the toasting
process. The exclusive microprocessor technology of the Oster” toaster ensures
consistent, precise toasting.
14. ACCURATE TOUCH’” Food Select button - Press repeatedly to display the type
of food you are toasting: Toast, Bagel or English Muffin. The toaster will adjust the
toasting time based upon the type of food. Toast is the default setting.
3
15. Warm button and indicator - Press this button to keep your toasted food warm
after the toasting cycle is complete without further toasting. The indicator will light
to confirm your selection. Press the bread carriage lever down to begin the cycle.
16. Lighter/Darker buttons - Press the buttons (Lighter to toast the food less,
Darker to toast the food more) to adjnst how dark yon would Like your food
toasted.
17. Frozen button and indicator - Press this button if your food is frozen. The
toaster till automatically defrost your food and then toast it in one easy step. The
indicator will light to confirm your selection. Press the bread carriage lever down
to begin the cycle.
Using your toaster for the first time
If you are using your toaster for the first time, please be sure to:
1
2
Remove any stickers from the surface of the toaster and
wipe the outside of your toaster with a damp cloth.
Select a iocation for the toaster. The iocation
should be:
l
l
l
l
3
A flat, heat-resistant, non-flammable surface.
At least three inches away from walls or the
back of countertops.
Away from flammable materials, such as
curtains and wall fabric.
Away from a gas stove flame or electric element.
Plug the power cord into 1201127 volt, 60 HZ AC
outlet.
The toaster will chime when you plug it in
(model 6322 only).
Adjusting the power cord length
Your toaster’s cord storage area allows you to adjust
the length of the power cord so that it is the exact
length you desire.
To adjust the length of the power cord:
Wrap the power cord around the cord storage
posts on the base of the toaster until the cord is
the length you desire.
Be certain to read “Power cord instructions” on page
iii for safety information.
4
Without inserting any food into the bread slots,
push the bread lever all the way down until it
locks. (The carriage will not lock if the toaster is
not plugged into a power source.>
,’
The first toasting process will preheat the new
elements and burn off any dust which may have
accumulated during storage. It is normal for this
burn off to create an odor.
Your Oster” toaster is now ready for use.
5
Using your toaster
Selecting the food type
Your Oster” toaster will adjust the light/dark range
based upon the type of food you are toasting. Select
which type of food you are toasting so that the toaster
can adjust accordingly.
To select the food type:
SIGNATURE” Toaster
models 6320 and 6321
Choose between the Toast or Bagel setting:
l
Press the Toast button if you are going to toast
bread items.
The Toast indicator will light.
l
Press the Bagel button if you are going to toast
a bagel.
The Bagel indicator will light.
To select the food type:
PERFECTIONIST” Toaster
model 6322
Choose between the Toast, Bagel or English Muffin
setting:
l
l
l
6
Press the Food Select button until it displays the
word “toast” if you are going to toast bread items.
Press the Food Select button until it displays the
word “bagel” if you are going to toast a bagel.
Press the Food Select button until it displays the
words “english muffin” if you are going to toast an
English muffin.
\
Adjusting the lighter/darker setting
You can adjust how light or dark the toaster toasts
your food. The lightest setting is 1; the darkest setting
is 7. Your selection should vary based on the moisture
content, thickness of bread and your darkness
preference. The setting will remain unless the toaster
is unplugged or the settings are changed.
To select the darkness setting:
SIGNATURE” Toaster
models 6320 and 6321
Turn the Lighter/Darker knob to the setting you desire.
To select the darkness setting:
PERFECTIONIST” Toaster
model 6322
Press the Lighter and Darker buttons to select the
setting you desire. The Lighter button decreases the
setting; the Darker button increases the setting.
7
Using the frozen food feature
PERFECTIONIST” Toaster; model 6322 only
Your toaster can defrost your frozen food and then
toast it. Now you can take a frozen bagel out of the
freezer and defrost and toast it - all in your toaster in
one easy step. To defrost and toast your food:
1
Press the Frozen button if the food is frozen, then
select your food type. Toast is the default setting.
5
The Frozen indicator will light.
2
Press the bread carriage lever down.
Keeping toasted food warm
PERFECTIONIST” Toaster;
model 6322 only
Will your toasted food be ready before you are ready
to eat it? The Warm feature will allow you to keep the
food warm, without further toasting. To keep your
toasted food warm:
1
Press the Warm button.
The Warm indicator will light.
2
Press the bread carriage lever down.
The toaster will keep your food warm for a short
period of time.
8
toast
tQ%it
Inserting the food into the bread slots
and toasting
Now you are ready to insert your food into the bread
slots. Keep the following tips in mind when inserting
your food.
l
l
l
l
Most types of breads and pastries can be toasted
such as bagels, tea cakes, thickly sliced breads,
English muffins, waffles, etc. Slices should not,
however, be so thick as to jam the bread slots.
Remember, the toast setting is the default setting.
When toasting two slices at a time, the slices
should be of equal size and freshness to ensure
even toasting.
When toasting two slices of bread, place one slice
in the center of each bread slot.
When toasting one slice of bread, place the slice
in the center of either bread slot.
After you insert the food into the bread slots:
1
Press the bread carriage lever down until it locks.
The self-adjusting, stainless steel bread guides will
automatically center the food for even browning.
The Lighter/Darker display will count down the
time remaining until your food is toasted (model
6322 only).
ST) lip: The OsteP toaster has been designed for
1J optimum toast balance. Some elements on the
inside of the toaster may glow more brightly
than others when in use. This is part of normal
toaster operation.
After the desired level of darkness has been
reached, the toaster will chime (model 6322 only)
and the food will pop up automatically. The bread
carriage lever will return to its original position.
9
2
Carefully remove the toasted food from the bread
slots.
n
,
*
Warning: Toasted food can be very hot, especially
pastry fillings. Handle with care.
la lip: To remove food jammed in the bread slots,
fA unplug the toaster and remove the food once the
toaster has cooled down.
n
!
Warning: Never insert fingers or metallic utensils
into the bread slots.
Canceling the toast process
To cancel the toast process:
Press the Cancel button.
The toaster will stop toasting immediately and
the food will pop up automatically.
10
Cleaning your toaster
After use and before cleaning, unplug the toaster
power cord from the power outlet and wait for the
toaster to cool.
1
Wipe the outside of the toaster with a damp cloth
and then dry it with another cloth or paper towel.
Do not use abrasive cleaners; they will damage the
toaster’s finish.
!
Warning: Do not use any pointed or sharp articles
n for cleaning the inside of the toaster; this may
damage the toaster.
2
Lightly tap the sides of the toaster to dislodge any
crumbs caught in the toast chamber. Remove the
crumb tray and empty it. Wipe the tray clean with
a damp cloth or place it in the top rack of your
dishwasher for cleaning. Be certain to put the
crumb tray back into the toaster before using the
toaster again.
Warning: Empty the crumb tray frequently.
A! Crumbs will accumulate in the crumb tray and
could catch fire if not emptied periodically.
3
Wipe the non-stick surface on the top of the bread
slots with a damp cloth and dry it with another
cloth or paper towel.
11
Two-year limited warranty
Sunbeam Products, Inc. (“Sunbeam”) warrants that for a period of two years from the
date of purchase, this product will be free from defects in material and workmanship.
Sunbeam, at its option, will repair or replace this product or any component of the
product found to be defective during the warranty period. Replacement will be made
with a new or remanufactured product or component. If the product is no longer
available replacement may be made with a similar product of equal or greater value.
This is your exclusive warranty.
This warranty is valid for the original retail purchaser from the date of initial retail
purchase and is not transferable. Keep the original sales receipt. Proof of purchase is
required to obtain warranty performance. Sunbeam dealers, service centers, or retail
stores selling Sunbeam” products do not have the right to alter, modify or any way
change the terms and conditions of this warranty
This warranty does not cover normal wear of parts or damage resulting from any of the
following: negligent use or misuse of the product, use on improper voltage or current,
use contrary to the operating instructions, disassembly, repair or alteration by anyone
other than Sunbeam or an authorized service center. Further, the warranty does not
cover Acts of God, such as fire, flood, hurricanes and tornadoes.
Sunbeam shall not be liable for any incidental or consequential damages caused by the
breach of any express or implied warranty, Except to the extent prohibited by applicable
law, any implied warranty of merchantability or fitness for a particular purpose is limited
in duration to the duration of the above warranty Some states, provinces or jurisdictions
do not allow the exclusion or limitation of incidental or consequential damages or
limitations on how long an implied warranty lasts, so the above limitations or exclusion
may not apply to you. This warranty gives you specific legal rights, and you may also
have other rights that vary from state to state or province to province.
12
How to obtain warranty service
Take the product to an authorized Sunbeam service center. You may obtain a list of
service centers and other repair/replacement instructions by calling:
(800) 621-6929
or send an e-mail to:
ConsumeraffairsBconsumer.sunbeam.com
Please include name, address, telephone number, product model number, description of
the problem and date of purchase.
DO NOT RETURN THIS PRODUCT TO THE PLACE OF PURCHASE.
13
For product questions:
Sunbeam Consumer Service
PO BOX 948389
Maidand, FL 3279443389
Do not send product to the above address.
01999 Sunbeam Corporation. All rights reserved.
Sunbeam@ and Oster@ are registered trademarks of Sunbeam Products, Inc.
ACCURATE TOUCHTM , BAGEL-FIT”, COOL TOUCH’“, PERFECTIONIST’” and
SIGNATURE’” are trademarks of Sunbeam Corporation or its a&hated
companies. Distributed by Sunbeam Products, Inc., Boca Raton, FL 33431,
or an affiliated company.
Rev. 3/99 0 1.
c
REGUARDOS DE IMPORTANCIA
Obedezca siempre las precauciones elementales de seguridad cuando vaya a hacer uso de su
tostadora, incluyendo las siguientes:
l Lea todas las instrucciones antes del uso.
l No toque las superficies calientes. Las piezas de metal pueden volverse calientes. Wce las
asideras o las perillas.
l Para evitar 10s peligros eléctricos, no sumerja el cordón, el enchufe ni la tostadora en
sí en
agua o cualquier otro líquido.
l No permita que el cordón cuelgue sobre el borde de la mesa o del mostrador, ni que entre en
contacto con las superficies calientes,
l Jamás permita que los enseres queden desatendidos durante el uso.
l Los niños y las personas incapacitadas no deben hacer uso de estos enseres. Supervise
cuidadosamente a los niños de mayor edad,
l No opere ni coloque la tostadora:
- sobre superficies que no sean termorresistentes ni inflamables.
- cerca de las llamas de una estufa de gas o elemento eléctrico,
- dentro de un horno calentado o microondas.
l
Para reducir el riesgo de los incendios o los choques eléctricos, no inserte:
- utensilios ni alimentos cubiertos en papel aluminio, ni de grandes dimensiones, en la
tostadora.
- los dedos ni utensilios de metal en la tostadora cuando el aparato se encuentre enchufado.
l
No intente desalojar alimentos cuando la tostadora esté enchufada.
l
No utilice alimentos cuyas cubiertas o rellenos puedan gotear a consecuencia del calentamiento.
Tales acumulaciones dentro de la tostadora crean condiciones poco sanitarias así como la
posibilidad de incendios o malfuncionamientos de la tostadora. Elimine con kecuencia las migas
acumuladas para evitar el riesgo de incendios o el malfuncionamiento del tostadora. No opere la
tostadora sin haber antes devuelto la bandeja para migas a su posición correcta.
. No opere ningún aparato que tenga un cordón o enchufe dañado, o después de que se haya
producido un malfuncionamiento en el aparato o que haya sido dañado en cualquier forma.
Devuelva la tostadora al centro de servicio autorizado de Sunbeam para su inspección, ajuste,
reparación 0 cualquier ajuste electromecánico.
. Sólo utilice este aparato para su uso original conforme a lo descrito en este manual; no utilice
aditamentos que no hayan sido recomendados por el fabricante, ya que pueden producir
lesionamientos.
. Puede producirse un incendio si se cubre la tostadora o si entra en contacto con material
inflamable, incluyendo cortinas, tapicería, paredes y afines mientras que se encuentre
funcionando.
. Desenchufe la tostadora del tomacorrientes cuando no se encuentre en servicio y antes de
limpiarla.
. El mando elevador de tostadas debe estar en la posición elevada antes de conectar o
desconectar el enchufe de la pared.
GUARDE ESTAS INSTRUCCIONES
l
No utilice la tostadora a la intemperie o para usos comerciales: esta tostadora es para el uso
doméstico exclusivamente.
ii
1
Instrucciones para el cordón de potencia
Obedezca las siguientes instrucciones para asegurar el uso correcto del cordón de
potencia.
l
l
Esta tostadora cuenta con una zona de cordón de potencia que le permite ajustarlo
a la longitud correcta para su situación. Trate de colocar la tostadora cerca del
tomacorrientes apropiado para disminuir los riesgos asociados con los cordones
de potencia (tales como enredarse con un cordón de potencia de longitud excesiva
o tropezarse sobre él).
Si resulta necesario, se puede hacer uso de una extensión eléctrica, pero asegúrese
de seguir estas direcciones:
-
.
l
l
l
l
La notación eléctrica de la extensión eléctrica debe ser de un mínimo de
120027 voltios, 60 Hz.
La extensión eléctrica debe estar colocada de tal manera que no se envuelva
sobre el mostrador o la superficie de la mesa, ni que tampoco quede al
alcance de los niños, ni que tampcko pueda tropezarse sobre ella.
Para los tostadoraes cuya compra se efectúa en EE.UU. y el Canadá: este aparato
cuenta con un enchufe polarizado (una hoja es mas ancha que la otra). Para
disminuir el riesgo de los choques eléctricos, dicho enchufe se adaptará a un
tomacorrientes polarizado de una manera solamente. Si no puede insertar el
enchufe en el tomacorrientes completamente, invierta la dirección del enchufe. Si
aún no cabe, comuníquese con un electricista experto. No modifique el enchufe.
No tire, tuerza ni abuse el cordón de potencia.
No opere ningún aparato eléctrico que tenga un cordón o enchufe dañado, ni
después de que se haya producido el malfuncionamiento de la unidad, ni que se
haya caído o dañado en cualquier manera.
Desenchufe la tostadora cuando ésta no se encuentre en uso y antes de limpiarla.
No envuelva el cordón de potencia alrededor del cuerpo de la tostadora ni durante
ni después del uso.
. ..
111
Tabla de materias
Familiarícese con su tostadora . . . . . . . . . . . . . . . . . . . . . . . . . . . . . . . .
.2
Antes de usar la tostadora por primera vez . . . . . . . . . . . . . . . . . . . . . . . .4
Uso de la tostadora . . . . . . . . . . . . . . . . . . . . . . . . . . . . . . . . . . . . . . . . .
.6
Selección del tipo de alimento . . . . . . . . . . . . . . . . . . . . . . . . . . . . . . . . . . . . .
.7
Ajuste del selector de nivel de tostadura . . . . . . . . . . . . . . . . . . . . . . . . . . . . . .
.7
Uso de la función para congelados
(Tostadora PERFECTIONIST’“, modelo 6322 solamente) . . . . . . . . . . . . . . . . . . .
Cómo mantener calientes los productos tostados
.8
modelo 6322 solamente) . . . . . . . . . . . . . . . . . . .
.8
Inserción de alimentos en las ranuras para tostadura . . . . . . . . . . . . . . . . . . . .
.9
(Tostadora PERFECTIONISTTM,
Cómo cancelar el proceso de tostadura . . . . . . . . . . . . . . . . . . . . . . . . . . . . . .
.lO
limpieza de la tostadora . . . . . . . . . . . . . . . . . . . . . . . . . . . . . . . . . . . .
Garantía limitada de dos años . . . . . . . . . . . . . . . . . . . . . . . . . . . . . . . .
.l 1
Cómo obtener servicio bajo la garantía . . . . . . . . . . . . . . . . . . . . . . . . . . . . . .
.13
iv
.12
Bienvenido
iFelicitaciones por In compra de la tostadora Oster’! Su tostadora viene con la
tecnología y funciones siguientes:
.
Un control exclusivo por medio de microprocesador le brinda una tostadura
uniforme y precisa. Esto significa que las tostadas quedarán justo como le gustan,
rebanada tras rebanada y día tras día.
.
Las ranuras extra anchas BAGEL-FIT Tu para tostar bagels, pan casero de
rebanadas gruesas, panecillos ingleses y pasteles.
.
Tostadura de un solo lado - Ideal para tostar bagels y bollos.
.
La función de selección de alimentos ACCUBATE TOUCH’” que le permite
seleccionar entre tostada, bagel o panecillo inglés (la opción de panecillo inglés
está disponible en el modelo 6322 solamente.
.
Bandeja para migas completamente desmontable y antiadherente.
.
Elevador de tostadas para recuperar los pedazos de tostada más pequeños.
.
Función para congelados que le permite descongelar y tostar alimentos
congelados en un solo paso fácil (modelo 6322 solamente).
.
Función de calentamiento que le permite mantener caliente un producto
tostado, sin tostarlo más (modelo 6322 solamente).
.
Exterior COOL TOUCH’” que mantiene la superficie de la tostadora fría al tacto,
aún durante el uso.
.
Diseño estilizado y moderno.
1
Familiarícese con su tostadora
1. Ranuras - Las ranuras extra anchas BAGEL-FIT ” le permiten tostar bagels, pan
casero, panecillos ingleses y pasteles.
2. Guías para rebanadas dobles, autonivelantes, hechas de acero inoxidable se ajustan automáticamente al grosor del pan.
3. Superficie antiadherente sobre las ranuras - Para facilitar la limpieza.
4. Mando de resistencia del pan - Presiónelo para empezar a tostar los alimentos.
5. Elevador de tostadas - Presione el mando de resistencia del pan para hacer
saltar los alimentos fuera de las ranuras.
6. Botón de cancelación - Presiónelo para hacer saltar los alimentos de la
tostadora y cancelar el proceso de tostadura.
7. Bandeja para migas completamente desmontable, antiadherente y de
limpieza fácil.
8. Compartimento para guardar el cordón - Le permite almacenar la porción de
cordón sobrante debajo de la tostadora y donde no estorbe.
9. Cordón de alimentación eléctrica
Tostadora SIGNATURE’“, modelos 6320 y 6321 solamente
10. Botón para tostar e indicador - Presione este botón si desea tostar pan.
El indicador se encenderá para confirmar que se ha seleccionado Toast (tostar).
ll. Botón para bagel e indicador - Presione este botón si desea tostar un bagel. El
indicador se encenderá para confirmar que se ha seleccionado Bagel. El interior
del bagel se tostará y el exterior quedará caliente. Presione el mando de resistencia
del pan para empezar el ciclo. “Solamente los elementos centrales se ponen de
color rojos cuando la tostadora esta funcionando con el boton “bagel”. Los
elementos laterales nos pondran de color rojo
12. Selector de nivel de tostadura - Gire el selector para seleccionar el grado al
cual le gustaría tostar los alimentos; 1 es el menor nivel (claro) de tostadura, 7 es
el más alto (oscuro). La tecnología exclusiva de microprocesador de Oster@
asegura una tostadura uniforme y precisa.
Tostadora PERFECTIONISTTM,
modelo 6322 solamente
13. Pantalla de nivel de tostadura - Muestra el nivel de tostadura. El número que
aparece en la pantalla indica el nivel en una escala de 1 a 7 (el menor nivel, mas
claro, es 1; el más alto, más oscuro, es 7). Durante el proceso de tostadura, el
gráfico circular V**oooOoD se llenará para indicar el tiempo que falta para
terminar el proceso. La tecnología exclusiva de microprocesador de Oster” asegura
una tostadura uniforme y precisa.
2
14. Botón selector de alimentos ACCURATE TOUCH’” - Presiónelo repetidamente
para mostrar el tipo de alimento que se está tostando: tostada, bagel, panecillo
inglés. La tostadora regulará el tiempo de tostadura según el tipo de alimento.
Tostada es la selección por omisión.
15. Botón de calentamiento e indicador - Presione este botón para mantener los
alimentos tostados calientes al terminar el ciclo de tostadura sin necesidad de
tostarlos adicionalmente. El indicador se encenderá para confirmar su selección.
Presione el mando de resistencia del pan para empezar el ciclo.
16. Botones para más claro/más oscuro - Presione los botones (Lighter, mas
claro, para tostar menos el alimento; Darker, más oscuro, para tostarlo más) para
regular qué tan oscuro desea que se tuesten los alimentos.
17. Botón de congelado e indicador - Presione este botón si los alimentos están
congelados. La tostadora automáticamente descongelará los alimentos y los tostará
en un solo paso fácil. El indicador se encenderá para confirmar su selección.
Presione el mando de resistencia del pan para empezar el ciclo.
.
.
g/
.6
Antes de usar la tostadora por primera vez
Si va a utilizar la tostadora por primera vez, asegúrese de lo siguiente:
1
2
Quite las etiquetas engomadas de la superficie de
la tostadora y limpie la superficie de la tostadora
con un paño húmedo.
Elija una ubicación para la tostadora. Dicha
ubicación:
l
l
l
l
Debe ser una superficie plana,
termorresistente y antiinflamante.
Debe estar a un mínimo de 3 pulgadas de las
paredes o de la parte posterior de los
mostradores.
Debe estar alejada de los materiales
inflamables tales como las cortinas o los
tapizados.
Debe estar alejada de las estufas de gas o de
los elementos eléctricos.
!
/
3
Enchufe el cordón de alimentación electrica en un
tomacorriente de 120/127 voltios, 60 Hz CA.
La tostadora emitirá un sonido de campanas
cuando la conecte (modelo 6322 solamente).
Ajuste de la longitud del cordón de
alimentación eléctrica
El compartimento para guardar el cordón de la
tostadora le permite ajustar la longitud del cordón
hasta que tenga la longitud exacta deseada.
Para ajustar el cordón de alimentación eléctrica:
Envuelva el cordón alrededor de los postes del
compartimento que está en la base de la tostadora
hasta que el cordón tenga la longitud deseada.
Lea las “Instrucciones para el cordón de alimentación
eléctrica” en la página iii para obtener información de
seguridad.
4
Sin insertar alimentos en las ranuras, empuje el
mando de pan completamente hacia abajo hasta
engranarlo. (Las resistencias no quedarán
engranadas si la tostadora no está enchufada a
una fuente de alimentación eléctrica.)
El primer proceso de tostadura precalentará los
nuevos elementos y quemará cualquier polvo que
se haya acumulado durante el almacenamiento. Es
normal que dicho quemado produzca un olor.
Su tostadora Oster” ya se encuentra lista para el uso.
5
/
Uso de la tostadora
Selección del tipo de alimento
La tostadora regulará qué tan claro u oscuro desea
tostar según el tipo de alimentos que esté tostando.
Seleccione el tipo de alimento que va a tostar a fin de
que la tostadora pueda regularse apropiadamente.
Para seleccionar el tipo de alimento:
Tostadora SIGNATURA’”
modelos 63.20~ 6321
Seleccione entre las opciones de Toast (tostada) o Bagel:
.
Presione el botón Toast (tostada) si va a tostar pan.
El indicador Toast (tostada) se encenderá.
.
Presione el botón Bagel si va a tostar un bagel.
El indicador Bagel se encenderá.
’
’\ Toast
.,’
-/,-,
\“”
J
2.
1. ’
Para seleccionar el tipo de alimento:
Tostadora PERFECTIONIST”
modelo 6322
Seleccione entre las opciones Toast (tostada), Bagel o
English Muffin (panecillo inglés) :
l
.
l
6
Presione el botón Food Select (selección de
alimento) hasta que aparezca la palabra “toast”
(“tostada”), si va a tostar pan.
Presione el botón Food Select (selección de
alimento) hasta que aparezca la palabra “bagel”,
si va a tostar un bagel.
Presione el botón Food Select (selección de
alimento) hasta que aparezcan las palabras
“english muffin” (panecillo inglés) si va a tostar
un panecillo inglés.
1
5
,.
\
Ajuste del selector de nivel de tostadura
Se puede regular qué tan claro u oscuro la tostadora
tuesta los alimentos. La opción más clara es 1; la
opción mas oscura es 7. La selección variará según
el contenido de humedad, grosor del pan y su
preferencia de nivel de oscuridad. La selección se
mantendrá, a menos que se desenchufe la tostadora
o se cambie la selección.
Para seleccionar el nivel de oscuridad:
TostadoraSIGNATURE'"
modelos 6320~ 6322
Gire la perilla Lighter/Darker (mas claro/más oscuro)
hasta la posición deseada.
Para seleccionar el nivel de oscuridad:
TostadoraPERFECTIONIST"
modelo 6322
Presione los botones Lighter (mas claro) y Darker
(mas oscuro) hasta llegar a la selección deseada. El
botón Lighter (más claro) disminuye el nivel; el botón
Darker (mas oscuro) aumenta el nivel.
7
Uso de la función para congelados
Tostadora PERFECTIONIST: modelo @Z? solamente
La tostadora puede descongelar los alimentos
congelados y luego tostarlos. Ahora, puede tomar un
bagel congelado del congelador y descongelarlo y
tostarlo - todo en su tostadora y un solo paso fácil.
Para descongelar y tostar los alimentos:
1
Presione el botón Frozen (congelados) si el
alimento está congelado, luego, seleccione el tipo
de alimento. Tostada es la selección por omisión.
El indicador Frozen (congelados) se encenderá.
2
Presione hacia abajo el mando de resistencias de pan.
Cómo mantener calientes los
productos tostados
Tostadora PERFECTIONIST’“, modelo G$?Z
solamente
$‘a a estar listo el alimento tostado antes de que usted
este listo para comerlo? La función Warm
(calentamiento) le permitirá mantener los alimentos
calientes, sin tostarlos más. Para mantener los
alimentos tostados calientes, haga lo siguiente:
1
Presione el botón Warm (calentamiento).
El indicador Warm (calentamiento) se encenderá.
2
Presione hacia abajo el mando de resistencias de pan.
La tostadora mantendrá los alimentos calientes
durante un corto tiempo.
8
Inserción de alimentos en las ranuras
para tostadura
Ahora está listo para insertar los alimentos en las
ranuras. Al insertar los alimentos, tenga presente los
consejos siguientes:
l
La mayoría de los tipos de panes y pasteles, tales
como bagel, pasteles para té, rebanadas gruesas
de pan, panecilos ingleses, waffles, etc., pueden
tostarse. Sin embargo, las rebanadas no deben ser
tan gruesas que se atraquen en las ranuras.
Recuerde que la selección Toast (tostada) es la
selección por omisión.
l
l
l
Al tostar dos rebanadas a la vez, las rebanadas
deben ser de igual tamaño y frescura para
asegurar un tostado uniforme.
Al tostar dos rebanadas de pan, coloque una
rebanada al centro de cada ranura.
Al tostar una rebanada de pan, coloque la
rebanada al centro de cualquiera de las ranuras.
Después de insertar los alimentos dentro de las
ranuras:
Presione el mando de resistencias del pan hasta
engranarlo. Las resistencias autonivelantes y de
acero inoxidable automáticamente centrarán los
alimentos para asegurar un tostado uniforme. La
pantalla Lighter/Darker (más claro/más oscuro)
contará el tiempo que falta hasta que los
alimentos estén tostados (modelo 6322
solamente).
17 Consejo: La tostadora Oster @ ha sido diseñada
‘J para un tostado parejo óptimo. Algunos elementos
dentro de la tostadora pueden brillar con más
intensidad que los otros cuando estén en uso.
Esto es parte del funcionamiento normal de la
tostadora.
9
Una vez que se haya obtenido el nivel de
oscuridad deseado, la tostadora emitirá un sonido
de campanas (modelo 6322 solamente) y el
alimento saltará automáticamente. El mando de
resistencias del pan regresará a su posición
original.
2
Retire cuidadosamente los alimentos tostados de
las ranuras.
Los alimentos tostados pueden
A, Advertencia:
estar sumamente calientes, especialmente los
rellenos de pastelería. Sujételos con
cuidado.
i
Para extraer los alimentos atascados en
3 Consejo:
las ranuras, desenchufe la tostadora y retire los
alimentos una vez que la tostadora se haya
enfriado.
n
!
Advertencia: Nunca introduzca los dedos ni
utensilios de metal en las ranuras.
Cómo cancelar el proceso de tostadura
Para cancelar el proceso de tostadura, haga lo
siguiente:
Presione el botón Cancel (cancelar).
La tostadora dejará de tostar inmediatamente y el
alimento saltará automáticamente.
10
Limpieza de la tostadora
Después de usar y antes de limpiar, desenchufe el
cordón de alimentación eléctrica del tomacorriente y
espere a que la tostadora se enfríe.
1
Limpie el exterior de la tostadora con un paño
húmedo y luego séquelo con otro paño o papel
absorbente. No utilice limpiadores abrasivos ya
que dañarán el acabado de la tostadora.
No utilice artículos puntiagudos o
A! Advertencia:
filosos para limpiar el interior de la tostadora ya
que puede dañarse la tostadora.
2
Gl
o pee suavemente los lados de la tostadora para
desalojar las migar que puedan estar atrapadas en
la cámara de tostar. Quite la bandeja para migas y
vacíela. Limpie la bandeja con un paño húmedo o
colóquela en el nivel superior de la lavadora de
platos para lavarla. Asegúrese de volver a colocar
la bandeja para migas en la tostadora antes de
usar nuevamente la tostadora.
n
Advertencia: Vacíe con frecuencia la bandeja
! para migas. Si no limpia periódicamente la
bandeja, las migas pueden acumularse e
incendiarse.
3
Limpie la superficie antiadherente encima de las
ranuras con un paño húmedo y séquela con otro
paño o papel absorbente.
ll
l
Garantía limitada de dos años
Sunbeam Products, Inc. (“Sunbeam”) garantiza, por un período de dos años desde la
fecha de compra, que este producto estará libre de defectos de materiales y fabricación.
Sunbeam, a su entera discreción, reparará o sustituirá este producto o cualquier
componente del producto que resulte defectuoso durante el plazo de la garantía. La
sustitución se realizará con un producto o componente nuevo o remanufacturado. Si el
producto no se encuentra disponible, el reemplazo podrá efectuarse con un producto
de igual o mayor valor. Esta es su garantía exclusiva.
Esta garantía permanecerá válida para el comprador detallista original desde la fecha de
la compra inicial al detaf y no es transferible. Conserve el recibo de ventas original. Se
requiere un comprobante de compras para obtener servicio bajo la garantía. Los
concesionarios de Sunbeam, los centros de servicio o las tiendas de ventas al detal que
venden productos Sunbeam@ no tienen derecho a alterar, modificar ni cambiar los
plazos y condiciones de esta garantía.
Esta garantía no cubre el desgaste normal de las piezas ni el daño como resultado de
cualquiera de las siguientes causales: uso descuidado o incorrecto del producto; uso a
voltajes o corrientes indebidas; uso contrario a las instrucciones de funcionamiento;
desmantelamiento, reparación o alteración por cualquier parte que no sea Sunbeam o
uno de sus centros de servicio autorizados. Mas aún, la garantía no cubre eventos de
Fuerza Mayor tales como incendios, inundaciones, huracanes y torbellinos.
Sunbeam no asumirá la responsabilidad de los daños fortuitos o concomitantes
ocasionados por la violación de cualquier garantía expresada o implícita. Salvo al grado
que lo prohfben las leyes aplicables, la duración de cualquier garantía implícita de
comerciabilidad o de entereza para un propósito en específico se limita a la duración
de la garantía anterior. Algunos estados, provincias o jurisdicciones no permiten la
exclusión o la limitación de los daños o limitaciones fortuitos o concomitantes sobre la
duración de una garantía implícita, así que las anteriores limitaciones o exclusiones
pueden no aplicarse en su caso. Esta garantía le concede derechos legales específicos, y
puede también gozar de otros derechos que varían de un estado al otro o de una
provincia a la otra.
12
1
Cómo obtener servicio bajo la garantía
Lleve el producto a un centro de servicio autorizado de Sunbeam. Puede obtener un
listado completo de los centros de servicio y otras instrucciones de reparación/
sustitución llamando al:
l-800-831-9678 (en EE.UU.)
o enviando un correo electrónico a:
[email protected]
Tenga la bondad de incluir su nombre, dirección, número de teléfono, número de
modelo de producto, descripción del problema y fecha de compra.
NO DEVUELVA ESTE PRODUCTO AL LUGAR DONDE SE EFECTUÓ LA COMPRA.
13
Para preguntas acerca del producto:
Sunbeam Consumer Service
PO BOX 948389
Maitland, FL 42794-9398
No envíe el producto a la dirección que aparece arriba.
0 1999 Sunbeam Corporation. Se reservan todos los derechos.
Sunbeam@ y Oster@ son marcas registradas de Sunbeam Corporation.
ACCURATE TOUCH’“, BAGEL FIT’“, COOL TOLJCH’“, PERFECTIONIST’” y
SIGNATURE’” son marcas comerciales de Sunbeam Products, Inc. Distribuído
por Sunbeam Products, Inc., Boca Ratón, FL 33431 ó una empresa afiliada.
Rev. 3/99 0 1.
.