1
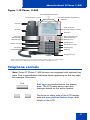
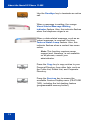
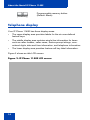
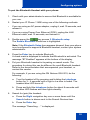
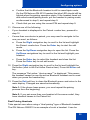
Title page
Business Communications Manager
IP Phone 1140E
User Guide
Revision history
Revision history
November 2005
Preliminary 0.22. This document is up-issued to support
Nortel Business Communications Manager Release 4.5 software.
3
Revision history
4
Contents
Contents
About the Nortel IP Phone 1140E . . . . . . . . . . . . . . . . . . . . . 7
Basic features . . . . . . . . . . . . . . . . . . . . . . . . . . . . . . . . . . . . . . 7
Telephone controls . . . . . . . . . . . . . . . . . . . . . . . . . . . . . . . . . . 9
Telephone display . . . . . . . . . . . . . . . . . . . . . . . . . . . . . . . . . 14
Entering and editing text . . . . . . . . . . . . . . . . . . . . . . . . . . . 15
Entering text using the telephone dialpad . . . . . . . . . . . . . . . 15
Entering text using the USB keyboard . . . . . . . . . . . . . . . . . . 15
Configuring options . . . . . . . . . . . . . . . . . . . . . . . . . . . . . . . 17
1. Preferences . . . . . . . . . . . . . . . . . . . . . . . . . . . . . . . . . . . . 17
1. Display Settings . . . . . . . . . . . . . . . . . . . . . . . . . . . . . . 17
2. Language . . . . . . . . . . . . . . . . . . . . . . . . . . . . . . . . . . . 18
3. Bluetooth Setup . . . . . . . . . . . . . . . . . . . . . . . . . . . . . . 18
2. Local Diagnostics . . . . . . . . . . . . . . . . . . . . . . . . . . . . . . . . 24
1. IP Set&DHCP Information . . . . . . . . . . . . . . . . . . . . . . 24
2. Network Diagnostic Tools . . . . . . . . . . . . . . . . . . . . . . 24
3. Ethernet statistics . . . . . . . . . . . . . . . . . . . . . . . . . . . . . 24
4. IP networks statistics . . . . . . . . . . . . . . . . . . . . . . . . . . 24
5. USB device information . . . . . . . . . . . . . . . . . . . . . . . . 24
3. Network Configuration . . . . . . . . . . . . . . . . . . . . . . . . . . . . 25
4. Lock Menu . . . . . . . . . . . . . . . . . . . . . . . . . . . . . . . . . . . . . 25
Telephone setup . . . . . . . . . . . . . . . . . . . . . . . . . . . . . . . . . . 26
Language choice . . . . . . . . . . . . . . . . . . . . . . . . . . . . . . . . . . 26
Ring type . . . . . . . . . . . . . . . . . . . . . . . . . . . . . . . . . . . . . . . . 26
Call log . . . . . . . . . . . . . . . . . . . . . . . . . . . . . . . . . . . . . . . . . . 26
Time offset . . . . . . . . . . . . . . . . . . . . . . . . . . . . . . . . . . . . . . . 27
About your programmable buttons . . . . . . . . . . . . . . . . . . . . . 27
5
Contents
Memory buttons . . . . . . . . . . . . . . . . . . . . . . . . . . . . . . . . 27
Program memory buttons . . . . . . . . . . . . . . . . . . . . . . . . . 27
External autodial . . . . . . . . . . . . . . . . . . . . . . . . . . . . . . . 28
Internal autodial . . . . . . . . . . . . . . . . . . . . . . . . . . . . . . . . 28
Features . . . . . . . . . . . . . . . . . . . . . . . . . . . . . . . . . . . . . . 28
Erase memory buttons . . . . . . . . . . . . . . . . . . . . . . . . . . . 28
Making a call . . . . . . . . . . . . . . . . . . . . . . . . . . . . . . . . . . . . . 29
Making external calls using line soft keys . . . . . . . . . . . . . . . . 29
Making external calls using intercom soft keys . . . . . . . . . . . 29
Making internal calls using intercom soft keys . . . . . . . . . . . . 29
Answering a call . . . . . . . . . . . . . . . . . . . . . . . . . . . . . . . . . . 30
While on an active call . . . . . . . . . . . . . . . . . . . . . . . . . . . . . 31
Placing a call on hold . . . . . . . . . . . . . . . . . . . . . . . . . . . . . . . 31
Using handsfree . . . . . . . . . . . . . . . . . . . . . . . . . . . . . . . . . . . 31
Using a headset . . . . . . . . . . . . . . . . . . . . . . . . . . . . . . . . . . . 31
Muting the microphone . . . . . . . . . . . . . . . . . . . . . . . . . . . . . . 32
Accessing External Server Applications . . . . . . . . . . . . . . 33
6
About the Nortel IP Phone 1140E
About the Nortel IP Phone 1140E
Your Nortel IP Phone 1140E brings voice and data to the desktop by
connecting directly to a Local Area Network (LAN) through an Ethernet
connection.
Note: In this guide, user-defined feature key labels appear beside the
keys, and soft key labels appear directly above the keys.
Basic features
Your IP Phone 1140E supports the following:
•
six user-defined feature keys with labels and indicators
•
four soft keys
Note: Some IP Phone 1140E phones are not configured to support
soft key functionality. Consult your system administrator.
•
graphical, high-resolution LCD display, backlit, with adjustable
contrast
•
high-quality speaker phone
•
volume control keys for adjusting ringer, speaker, handset, and
headset volume
•
six specialized feature keys:
— Quit
— Directory
— Message/Inbox
— Shift/Outbox
— Services
— Copy
•
six call-processing fixed keys:
— Mute
— Handsfree
7
About the Nortel IP Phone 1140E
— Goodbye
— Expand to PC
— Headset
— Hold
•
gigabit Ethernet ports
•
built-in gigabit Ethernet switch for shared PC access
•
support for a Bluetooth headset
•
headset jack with an On/Off key
•
USB port to support a keyboard or mouse
Note: Powered downstream 1.1-complaint USB hubs are supported,
including USB 2.0 hubs, if they offer USB 1.1 backwards compliancy.
•
automatic network configuration
•
hearing-aid compatibility
•
wireless headset support using a Bluetooth® 1.2 compliant Audio
Gateway (Headset Profile, Bluetooth Power Class 2)
CAUTION
Damage to Equipment
Do not plug the IP Phone 1140E into a
regular telephone jack. This results in
severe damage to the IP Phone. Consult
your system administrator to ensure that
you plug your telephone into a 10/100/
1000BaseT Ethernet jack.
CAUTION
The IP Phone 1140E is designed for use
in an indoor environment only.
Figure 1 on page 9 shows the IP Phone 1140E.
8
About the Nortel IP Phone 1140E
Figure 1: IP Phone 1140E
User-defined feature keys
Visual Alerter/Message Waiting
indicator
Feature Status Lamp*
Handset
High-resolution
graphical display screen
Speaker
Soft keys
Copy key
Services key
Quit/Stop key
Message/Inbox key
Shift/Outbox key
Directory key
Goodbye key
Volume control
Expand to PC key
Mute key
Headset key
Handsfree key
Hold key
Navigation keys
Dialpad
*Note: If supported by your server, the Feature Status Lamp provides a user-defined alert.
Contact your system administrator to find out if this feature is available for you.
Telephone controls
Note: Some IP Phone 1140E phones are equipped with optional key
caps. Text in parentheses indicates labels appearing on the key caps,
for example, (Services).
Fwd
Soft keys are located below the display
area. The LCD label above each key
changes based on the active feature.
The keys on either side of the LCD display
area are user-defined feature keys, with
labels on the LCD.
9
About the Nortel IP Phone 1140E
A steady LCD light beside a line (DN) key
indicates that the line is active. A flashing
LCD light indicates the line is on hold or the
feature is being programmed.
GrpCl Z
A steady LCD light beside a feature key
indicates that the feature is active. A flashing
LCD light indicates that the feature is being
programmed.
Use the Volume control buttons to adjust
the volume of the ringer, handset, headset,
speaker, and the Handsfree feature. Press
the top button to increase the volume, and
press the bottom button to decrease volume.
(Mute)
Press the Mute key to listen to the receiving
party without transmitting. Press the Mute
key again to return to two-way conversation.
The Mute key applies to handsfree, handset,
and headset microphones.
Note: The Mute LED indicator, located
on the Mute key, flashes to indicate that
the microphone is muted.
Press the Handsfree key to activate
handsfree.
(Handsfree)
10
Note: The Handsfree LED indicator,
located on the Handsfree key, lights to
indicate when handsfree is active.
About the Nortel IP Phone 1140E
Use the Navigation keys to scroll through
menus and lists appearing on the LCD
display screen. The outer part of this key
cluster rocks for up, down, left, and right
movements.
Use the Send/Enter key, at the center of the
Navigation key cluster, to confirm menu
selections.
In most menus, you can use the Send/Enter
key instead of the Select soft key.
(Hold)
Press the Hold key to put an active call on
hold. Tap the flashing line (DN) soft key to
return to the caller on hold.
Use the Expand to PC key to access
external server applications.
(Expand to PC)
(Headset)
Press the Headset key to answer a call
using the headset or to switch a call from the
handset or handsfree to the headset.
Note: The Headset LED indicator,
located on the Headset key, lights to
indicate that the headset is in use.
(Headset)
Press the Headset key twice to open the
Bluetooth Setup menu.
Note: If Bluetooth is not enabled on your
phone, this menu is not available.
(Headset)
11
About the Nortel IP Phone 1140E
(Goodbye)
Use the Goodbye key to terminate an active
call.
When a message is waiting, the orange
Visual Alerter/Message Waiting
indicator flashes. Also, this indicator flashes
when the telephone ringer is on.
When a data-related message, such as an
instant message, is received, the blue
Feature Status Lamp flashes. Also, this
indicator flashes when a contact has come
online.
Note: This function requires server
support and, therefore, is not available
on all phones; consult your
administrator.
12
(Copy)
Press the Copy key to copy entries to your
Personal Directory from other lists, such as
the Caller List, Redial List, and Corporate
Directory.
(Services)
Press the Services key to access the
scrollable Feature Display menu (FEATURE
*900), including the hot desking feature
(programmable memory button).
About the Nortel IP Phone 1140E
(Services)
(Services)
Press the Services key twice to access the
Local Tools menu, and use the navigation
keys to access the following items:
•
1. Preferences
•
2. Local Diagnostics
•
3. Network Configuration
•
4. Lock Menu
Press the Services key to close any menu or
menu item.
Note: Your system administrator can
establish a password for the Tools
menu. If you attempt to access the Tools
menu and a dialog box appears
prompting you for a password, contact
your system administrator.
(Stop)
(Outbox)
(Inbox)
Press the Quit/Stop key to close an active
menu or dialog box. Pressing the Quit/Stop
key does not affect the status of active calls.
Press the Express messaging key
(FEATURE 980; programmable memory
button) to send voice mail messages. For
more information on voice mail messaging,
refer to your CallPilot Quick Reference Card.
Press the Mailbox in key (programmable
memory button) to open your CallPilot
mailbox. For more information about mailbox
options, refer to your CallPilot Quick
Reference Card.
13
About the Nortel IP Phone 1140E
(Directory)
Programmable memory button
(Default: Blank)
Telephone display
Your IP Phone 1140E has three display areas:
•
The upper display area provides labels for the six user-defined
feature keys.
•
The middle display area contains single-line information for items
such as caller number, caller name, feature prompt strings, userentered digits, date and time information, and telephone information.
•
The lower display area provides feature soft key label information.
Figure 2 shows an idle LCD screen.
Figure 2: IP Phone 1140E LCD screen
14
Entering and editing text
Entering and editing text
You can enter and edit text on your IP Phone 1140E using the following
methods.
Which method you use for text entry or editing depends on the application. Table 1 shows the applications and input devices that you can use
for text entry.
Table 1: Application text entry
For:
Use:
Call Server-related applications
(for example, changing feature
key labels or dialing)
Dialpad
Graphical applications
USB keyboard
Local Tools menu
USB keyboard
USB keyboard for numeric
entries only
Dialpad for numeric entries
Entering text using the telephone dialpad
You can use the dialpad to enter text. For example, if you want to enter
the letter A, press the number 2 key once. If you want to enter the letter C,
press the number 2 key three times.
Note: No letters are associated with the number 1 or 0 keys.
Entering text using the USB keyboard
You can use the USB keyboard, when connected, to enter text in the tools
and graphical applications.
For number entry in telephone applications (for example, when dialing),
you can use the keyboard to enter digits (0–9), as well as asterisk (*) and
number sign (#). Other characters are not used.
15
Entering and editing text
When on a call, you can use the function keys (f1, f2, f3, f4, f5, f6, f7, and
f8) to control the telephone. Table 2 shows the function keys and their
associated action during telephone calls.
Table 2: USB keyboard function keys during telephone calls
Function key
Action
f1
Go to Handsfree mode
f2
Go to Headset mode
f3
Place the current call on hold
f4
Mute the current call
f5
Volume up
f6
Volume down
f7
Copy
f8
Quit
16
Configuring options
Configuring options
Note: Many of the options discussed in this section are for
administrator use only. Do not make any changes unless instructed
by an administrator.
Your IP Phone 1140E has both local and server-based options. Two
methods are available to navigate in the Local Tools menu:
•
Follow the prompts on screen.
•
Where a menu entry has a number in front of it, you can select that
entry by pressing the associated key on the dialpad. For example,
when you are in the Local Tools menu, you can access 2. Local
Diagnostics by pressing the 2 key on the dialpad.
Press the
key to open the Local Tools Menu and access the
following options:
1. Preferences
Use the Preferences menu item to configure local preferences.
1. Display Settings
Use the Contrast tool to alter the physical settings of the display. Use the
Sleep tool to control how long the display remains lit if the phone is
inactive.
1. Press
to open the Local Tools menu.
2. Press the 1 key on the telephone dialpad to open the 1. Preferences
menu, and press the 1 key on the telephone dialpad to open the
1. Display Settings menu.
3. Press the Up/Down navigation keys to scroll and select either
Contrast or Sleep. Press the Select soft key.
4. Press the Up/Down navigation keys to increase or decrease the
value.
5. Press the Exit soft key.
17
Configuring options
2. Language
Use the Language tool to select the language used on your phone.
1. Press
to open the Local Tools menu.
2. Press the 1 key on the telephone dialpad to open the 1. Preferences
menu, and press the 2 key on the telephone dialpad to open the
2. Language menu.
3. Press the Up/Down navigation keys to scroll and highlight the
desired language (for example, German [Deutsche]).
4. Choose one of the following:
•
Press the Select soft key to save the desired language and return to
the Telephone Options menu.
•
Press the Cancel soft key to keep existing configurations.
5. Press the Exit soft key. Changes are saved automatically.
3. Bluetooth Setup
Your IP Phone 1140E is equipped with a Bluetooth radio system to
support Bluetooth headsets.
You can access the Bluetooth Setup options using either of the following
two methods:
•
Double-press the Headset key to open the Bluetooth Setup dialog
box. This method is used in this document.
•
Double-press the Services key to open the Local Tools menu, press
1 on the dialpad to select 1. Preferences, and press 3 on the dialpad
to open the 3. Bluetooth Setup dialog box.
Note: The Bluetooth menu entry is not available on all phones. If the
menu entry appears dimmed, it is not enabled on your phone. Before
you can use a Bluetooth headphone with your phone, Bluetooth must
be enabled by the system administrator. Contact your administrator to
find out if Bluetooth functionality is available for your use.
18
Configuring options
To pair the Bluetooth Headset with your phone:
1. Check with your administrator to ensure that Bluetooth is available for
your use.
2. Restart your IP Phone 1140E using one of the following methods:
•
If you are using an AC power adapter, unplug it, wait 10 seconds, and
reinsert it.
•
If you are using Power Over Ethernet (POE), unplug the LAN
Ethernet cable, wait 10 seconds, and reinsert it.
3. Double-press the
key access 3. Bluetooth setup.
The Enable Bluetooth check box is highlighted.
Note: If the Bluetooth Setup item appears dimmed, then your phone
is not configured to support a Bluetooth headset; contact your system
administrator.
4. Press the Enter key to activate Bluetooth.
A check mark is displayed to indicate that Bluetooth is activated. The
message “BT Enabled” appears at the bottom of the display.
5. Put your Bluetooth headset in its pairing or search mode. The
procedure for doing this can be different for each Bluetooth headset.
Refer to the documentation that accompanied your headset, or
contact the vendor.
For example, if you are using the GN Netcom GN 6210, do the
following:
a. Turn the headset off by pressing and holding the telephone
button for 3 - 4 seconds until a high to low tone is heard. The
headset blue LED turns off.
b. Press and hold the telephone button for about 8 seconds until
the blue LED flashes and then lights steadily.
6. Search for (pair) the headset:
a. Press the Right navigation key one or more times until the
Search button is shown next to the Search Devices item.
b. Press the Enter key.
The message "Searching…." is displayed.
19
Configuring options
c.
If the search is successful, a list of Bluetooth devices appears in
the Found: combo box.
Note: If the search is not successful, the message "Search
completed. No device found" is displayed. If this happens, power off
the Bluetooth headset, and repeat steps 5 and 6.
7. When your headset appears in the Found: combo box, press the
Stop soft key or wait for the search to finish.
8. Choose one of the following:
•
If your headset is displayed in the Found: combo box, proceed to
step 9.
•
If your headset is not displayed in the Found: combo box, select your
headset from the list, as follows:
a. Press the Right navigation key to navigate to the Found: combo
box. Press the Enter key to start the edit mode.
b. Press the Down navigation key to open the list. Press the Up/
Down navigation keys to scroll and highlight your headset.
c.
Press the Enter key to select the headset and close the list.
Press the Enter key to exit edit mode.
9. Press the Right navigation key to scroll in the list and highlight the
Pair button (next to the Pair Device item) and press the Enter key.
a. A dialog box appears that prompts you to "Enter PIN#". Use the
telephone dialpad to enter the PIN for your Bluetooth headset;
check your headset's documentation to find its PIN (sometimes
called a passkey). Typically this value is 0000.
b. Enter the Bluetooth headset PIN and press the Enter key.
10. Choose one of the following:
•
If the headset is successfully paired with your phone, proceed to step
11. To verify that the pairing was successful, ensure that the headset
appears in the list next to the Paired: item. If pairing is successful, the
message "Pair completed" is also displayed at the bottom of the
screen.
•
If the headset is not successfully paired with your phone, an error
message is displayed at the bottom of the screen. If you get an error
message:
20
Configuring options
a. Confirm that the Bluetooth headset is still in search/pair mode.
On the GN Netcom GN 6210 headset the blue LED should still be
lighted when the pairing operation starts. If the headset timed out
and exited search/pairing mode, put the headset in pairing mode,
as discussed in step 5, and repeat step 9.
b. Check that you are using the correct PIN and repeat step 9.
11. Choose one of the following:
•
If your headset is displayed in the Paired: combo box, proceed to
step 12.
•
If more than one device is paired, you may need to navigate to the
one you want, as follows:
a. Press the Right navigation key to scroll in the list and highlight
the Paired: combo box. Press the Enter key to start the edit
mode.
b. Press the Up/Down navigation keys to open the list. Press the
Up/Down navigations key to scroll in the list and highlight your
headset.
c.
Press the Enter key to select the headset and close the list.
Press the Enter key to exit edit mode.
12. Press the Right navigation key to scroll in the list and highlight the
Set button (next to the Set Active Device item). Press the Enter soft
key.
The message "Set active: “device name”" is displayed. This means
the headset named is now the active Bluetooth headset and is used
when you press the headset key.
13. Press the Exit soft key to close the Bluetooth menu and return to the
main display. Changes are saved automatically.
Note 1: If the phone loses power, you must repeat the pairing
process from the beginning.
Note 2: If you pair more than one headset of the same model, they
have identical names in the Paired list.
Dual Pairing Headsets
Take special care when using a "dual pairing" type of Bluetooth headset.
The GN Netcom GN6210 is an example of such a headset. It can be
21
Configuring options
paired to its base as well as to the 1140E. If it is paired to both, the 1140E
is the second device, and the following applies:
Press the headset "telephone" key:
•
If a single tone sounds, the headset is connected to the base.
•
If a double beep sounds, the headset is connected to the 1140E.
If the base is powered off, the headset is only paired to the 1140E and
pressing the "telephone" key connects you to the 1140E.
Interaction between Bluetooth headset and wired headset
If you also connect a wired headset, the Bluetooth headset interacts with
the wired headset as follows:
•
If no Bluetooth headset is paired, the wired headset works as normal.
Likewise, if a Bluetooth headset is paired with the phone, but is not in
range, the wired headset works as normal.
•
If a Bluetooth headset is paired, it is always used as the phone
headset. Note the following:
— The Bluetooth headset can work only if it is within range of the
phone. When the Bluetooth headset is in connecting range, the
Headset key controls the Bluetooth headset, even if a wired
headset is attached.
— If a Bluetooth headset moves into connecting range, one of the
following occurs:
- If a wired headset is not attached, the phone displays the
message “headset attached”.
- If a wired headset is already present, the phone displays the
message “no headset attached”.
— If a Bluetooth headset moves out of connecting range, one of the
following occurs:
- If a wired headset is not attached, the phone displays the
message “headset disconnected”.
- If a wired headset is present, no message is displayed.
22
Configuring options
When you do not want to use Bluetooth
If a Bluetooth headset is connected, and you want to use the wired
headset, you can switch between the two. It is not necessary to unpair or
disable Bluetooth.
To switch between a wired headset and Bluetooth:
1. Double-press the
box.
key to open the 3. Bluetooth Setup dialog
2. Press the Left/Right navigation key to select the Use BT Headset
item.
3. Press the Enter key to toggle this option on or off.
A check mark indicates that the Bluetooth headset is used. Clear the
check mark to use a wired headset. On (o) by default.
To unpair a Bluetooth Headset:
1. Double-press the
box.
key to open the 3. Bluetooth Setup dialog
2. Press the Right navigation key to select the Paired: item.
3. Choose one of the following:
•
If your headset is displayed in the Paired combo box, proceed to
step 5.
•
If more than one device is paired, and your headset is not already
displayed in the Paired combo box, do the following:
a. Press the Right navigation key to select the Paired: combo box.
Press the Enter key to open edit mode.
b. Press the Up/Down navigation keys to open the list. Press the
Up/Down navigations key to scroll in the list and highlight your
headset.
c.
Press the Enter key to select the headset and close the combo
box. Press the Enter key to exit edit mode.
4. Press the Right navigation key to select the UnPair button (next to
the UnPair Device item).
5. Press the Enter key.
23
Configuring options
Your Bluetooth headset is unpaired and removed from the Paired:
item's list.
Note: Your Bluetooth headset is no longer paired with your phone,
and the wired headset can be used. To use the Bluetooth Headset
again, you must perform the pairing and activation procedure.
2. Local Diagnostics
1. IP Set&DHCP Information
The Network Configuration tool is used to view reports about IP set and
DHCP operation. This tool is for administrator use only.
2. Network Diagnostic Tools
The Network Diagnostic Tools menu contains tools that are used to
diagnose network problems. This menu is for administrator use only.
3. Ethernet statistics
The Ethernet statistics tool is used to view reports about Ethernet
operation. This menu is for administrator use only.
4. IP networks statistics
The IP networks statistics tool is used to view reports about network
operation. This menu is for administrator use only.
5. USB device information
The USB Devices tool provides information about any Universal Serial
Bus (USB) devices that you connect to your phone. Your IP Phone 1140E
automatically detects USB devices when you connect them to the USB
port in the back of the telephone.
1. Press
to open the Local Tools menu.
2. Press the 5 key on the telephone dialpad to select 5. USB Devices.
USB Device information is displayed.
3. Press the Return soft key.
24
Configuring options
3. Network Configuration
The Network Configuration tool displays information that was configured
when the telephone was installed. This tool is for administrator use only.
4. Lock Menu
The lock menu tool is used by the system administrator to protect the
Local Tools menu items from accidental or unwanted changes.
The lock menu tool is not available on all systems. If the menu entry
appears dimmed, it is not enabled on your phone. Contact your
administrator to find out of this feature is available for your use.
25
Telephone setup
Telephone setup
Note: For more information about the features available to your
telephone and how to use them, refer to the Business
Communications Manager Telephone Feature Card.
Language choice
Select the Primary Language for the telephone display. Choose one of
the following three options:
•
Press Feature *501. Select the Alternate Language for the telephone
display.
•
Press Feature *502. Select the Alternate Language 2 for the
telephone display.
•
Press Feature *503. Select the Alternate Language 3 for the
telephone display.
Ring type
Select the ring type for your telephone.
1. Press Feature *6.
2. Press 1, 2, 3, 4, or Next to hear the different ring types.
3. Press OK to store the ring type.
Call log
Press Feature *812 and use the navigation keys to scroll through and edit
the call log.
26
Telephone setup
Time offset
When your IP Phone 1140E is located in a different time zone than your
system, the display shows the system time instead of the local time. The
Time Offset feature allows you to adjust the time that appears on the
display. Before you begin, calculate the time difference, in hours, between
the server time and local time.
To change the time that appears on your telephone display to local time,
use the following steps:
1. Press Feature *510.
2. Press Change.
3. Press * to switch between adding or subtracting time.
4. Using the dialpad, enter the number of hours between local time and
system time.
Note: Press # to enter half-hour increments.
5. Press OK.
Note: It may take up to 1 minute for the change to appear on the
display.
About your programmable buttons
Your System Administrator assigns the six programmable buttons as line,
intercom or memory buttons. The label for each button appears on the
display next to the button. For more information, see your System
Administrator.
Memory buttons
These are buttons that are not assigned as line or intercom buttons.
Memory buttons store internal and external phone numbers or features to
give you one-touch dialing or feature activation.
Program memory buttons
You can program a memory button with a new number or feature.
27
Telephone setup
External autodial
1. Press Feature *1.
2. Press a memory button.
3. Dial the external phone number.
4. Press OK to store the phone number.
Internal autodial
1. Press Feature *2.
2. Press a memory button.
3. Dial the extension number.
4. Press OK to store the extension number.
Features
1. Press Feature *3.
2. Press a memory button.
3. Press Feature and enter the feature code.
4. Press OK to store the feature code.
Erase memory buttons
1. Press Feature *1.
2. Press a memory button.
3. Press OK to erase the phone number stored on the button.
28
Making a call
Making a call
There are many ways to place a call depending on your telephone
programming and the type of call.
Making external calls using line soft keys
1. Lift the handset.
2. Tap a line soft key.
3. Dial the external telephone number.
Making external calls using intercom soft
keys
1. Lift the handset.
2. Tap an intercom soft key, and enter a line pool access code.
3. When you hear an external dial tone, dial the external telephone
number.
Note: Contact your System Administrator for a list of line pool codes.
When entering a line pool access code on PRI lines, you do not hear
dial tone.
Making internal calls using intercom soft
keys
1. Lift the handset.
2. Tap an intercom soft key.
3. Dial the extension number.
Contact your System Administrator for a list of extension numbers.
29
Answering a call
Answering a call
When your telephone rings and the light flashes, or an intercom or line
soft key indicator flashes:
•
Lift the handset.
or
•
30
Press the line or intercom soft key with the flashing S indicator
before you lift the handset.
While on an active call
While on an active call
Placing a call on hold
•
Calls are put on hold automatically when you switch from one line to
another.
•
While on a call, press
flashes.
•
To retrieve a held call, tap the line soft key with the flashing S
indicator.
. The S indicator for the line on hold
Using handsfree
Your System Administrator must program the Handsfree feature for your
telephone.
•
Press
to make or answer a call.
•
To switch to handsfree when you are on a handset call, press
and replace the handset. Lift the handset to switch back.
•
To switch to handsfree when you are on a headset call, press
Press
to switch back.
.
Using a headset
You must have a headset installed on your telephone to use this feature.
•
Press
to activate the headset mode. When the
is on, press a line or intercom soft key to make a call.
•
To switch to your headset when you are on a handset call, press
and replace the handset. Lift the handset to switch back.
•
To switch to your headset when you are on a Handsfree call, press
. Press
to switch back.
light
31
While on an active call
Muting the microphone
You can use mute (
) on handset, handsfree, or headset calls.
•
While on a call, press
to turn the microphone off. The
button lights when the microphone is off.
•
Press
32
again to turn the microphone on.
Accessing External Server Applications
Accessing External Server
Applications
Use External Server Applications to access a variety of applications
directly from your IP Phone 1140E.
To find out what features and services are available, contact your system
administrator. Depending on what is available on your system, your
phone can provide information; for example, local news and weather,
stock market information, or traffic reports.
For more information about the External Server Applications, consult the
Nortel IP Phone External Server Applications User Guide.
33
Accessing External Server Applications
34
Business Communications Manager
IP Phone 1140E
User Guide
Copyright © Nortel Networks Limited 2005
All Rights Reserved
Information is subject to change without notice. Nortel Networks reserves
the right to make changes in design or components as progress in
engineering and manufacturing may warrant.
Nortel, Nortel (Logo), the Globemark, This is the Way, This is Nortel
(Design mark), SL-1, Meridian 1, and Succession are trademarks of
Nortel Networks.
Publication Number: NN-10300-064
Document Release: Preliminary 0.22
Date: November 2005
Produced in Canada
www.nortel.com