1
Installation Manual
IM-DOC-021
®
Using the DiskOnChip
with Linux OS
DEC-99
91-SR-005-10-7L REV. 2.0
Using the DiskOnChip with Linux OS
LIMITED WARRANTY
(a) M-Systems warrants that the Licensed Software — prior to modification and adaptation by
Licensee — will conform to the documentation provided by M-Systems. M-Systems does not warrant that
the Licensed Software will meet the needs of the Licensee or of any particular customer of Licensee, nor
does it make any representations whatsoever about Licensed Software that has been modified or adapted
by Licensee.
(b) Subsection (a) above sets forth Licensee’s sole and exclusive remedies with regard to the Licensed
Software.
M-SYSTEMS MAKES NO OTHER WARRANTIES, EXPRESS OR IMPLIED, WITH RESPECT TO
THE LICENSED SOFTWARE, INCLUDING BUT NOT LIMITED TO ANY WARRANTY OF
MERCHANTABILITY OR FITNESS FOR A PARTICULAR PURPOSE. THERE ARE NO OTHER
WARRANTIES WITH RESPECT TO THE LICENSED SOFTWARE ARISING FROM ANY
COURSE OF DEALING, USAGE, OR TRADE OR OTHERWISE.
IN NO EVENT SHALL M-SYSTEMS BE LIABLE TO LICENSEE FOR LOST PROFITS OR
OTHER INDIRECT, SPECIAL OR CONSEQUENTIAL DAMAGES, WHETHER UNDER THIS
AGREEMENT, IN TORT OR OTHERWISE.
(c) Licensee shall not make any promise, representation, warranty or guaranty on behalf of MSystems with respect to the Licensed Software except as expressly set forth herein.
Please note: The Licensed Software is not warranted to operate without failure. Accordingly, in any use of
the Licensed Software in life support systems or other applications where failure could cause injury or loss of
life, the Licensed Software should only be incorporated in systems designed with appropriate and sufficient
redundancy or back-up features.
91-SR-005-10-7L REV. 2.0
2
Using the DiskOnChip with Linux OS
Contents
1
Introduction................................................................................................................................... 4
2
Hardware Requirements for the DiskOnChip .......................................................................... 4
3
Requirements for Installation of the DiskOnChip into Linux ................................................. 5
3.1 Utilities Diskette Content ......................................................................................................... 5
3.2 Linux Driver for DiskOnChip ................................................................................................... 6
4
Installing the DiskOnChip as an Additional Drive.................................................................... 7
4.1 Updating the Firmware............................................................................................................ 7
4.2 Integrating the TrueFFS driver into Linux ................................................................................ 7
5
Booting Linux from the DiskOnChip........................................................................................ 13
5.1 Creating a Root File System ................................................................................................. 13
6
Troubleshooting......................................................................................................................... 16
7
Additional Information and Tools ............................................................................................. 18
Appendix I: Making a Root File System........................................................................................... 19
Appendix II: Booting from a HDD when the DiskOnChip Firmware is Active ............................ 22
Appendix III: Applying a Patch Manually.......................................................................................... 23
How to Contact Us............................................................................................................................. 25
91-SR-005-10-7L REV. 2.0
3
Using the DiskOnChip with Linux OS
1
Introduction
M-Systems’ DiskOnChip is a family of flash disks. It contains built-in firmware that provides full hard disk
emulation and allows the DiskOnChip to operate as a boot device.
When used under Linux, the DiskOnChip is managed by a device driver, based on M-Systems’ TrueFFS
(True Flash File System) technology. The TrueFFS driver is attached to the standard Linux file system
[ext2].
M-Systems provides two different TrueFFS drivers for Linux. One driver supports kernel versions 2.0.##
and the other driver supports kernel versions 2.2.##. This Installation Manual can be used for both drivers.
When there are differences in the installation, it will be pointed out in the text.
This Installation Manual note is intended for system integrators designing with the DiskOnChip 2000 or
DiskOnChip Millennium and describes how the DiskOnChip can be installed as an additional disk or as a
boot device under Linux.
It is assumed that the reader is familiar with the Operating System in use.
While the hardware requirements of the DiskOnChip will be briefly discussed, the main part of this
installation manual is related to software installation. This will include basic driver installation and boot issues.
2
Hardware Requirements for the DiskOnChip
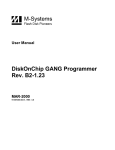
Originally designed for PC environments, the DiskOnChip can also be used in different hardware
environments. The minimum requirements are a 12-bit address bus, an 8-bit data bus, and three active low
control signals (CE#, OE#, WR#). Following is a drawing of the DiskOnChip and its pins. For more
detailed information of the DiskOnChip hardware environment, refer to the various DiskOnChip Datasheets
or to the following Application Notes:
•
AP-DOC-10 “Designing with the DiskOnChip”
•
AP-DOC-30 “Designing with the DiskOnChip Millennium in a RISC Environment”
•
AP-DOC-31 “Designing with the DiskOnChip Millennium in a PC Environment”
91-SR-005-10-7L REV. 2.0
4
Using the DiskOnChip with Linux OS
1
2
3
29
28
SA12
SA11
SA10
SA9
SA8
SA7
SA6
SA5
SA4
SA3
SA2
SA1
SA0
Active Low Chip Enable
Active Low Output Enable
Active Low Write
4
25
23
26
27
5
6
7
8
9
10
11
12
NC
NC (A16)
NC (A15)
NC (A14)
NC (A13)
5V
30
VCC 32
GND
A12
A11
A10
A9
A8
DiskOnChip
A7
D0
A6
D1
A5
D2
A4
D3
A3
D4
A2
D5
A1
D6
A0
D7
0.1
16
13
14
15
17
18
19
20
21
SD0
SD1
SD2
SD3
SD4
SD5
SD6
SD7
22
CE
24
OE
31
WR
Figure 1: DiskOnChip Pins
3
Requirements for Installation of the DiskOnChip into Linux
In order to prepare the DiskOnChip to boot Linux, the following software programs and tools are required:
•
Linux should be installed on your HDD. It is possible to check the kernel version by typing the command
uname -r.
•
The Linux kernel sources should be installed in Linux (if you don’t have them, refer to kernel-HOWTO at
http://sunsite.unc.edu/LDP/).
If you are about to install Linux, make sure that you also install the kernel sources package and that it is
possible to pass a full compilation of your sources.
•
A DOS boot diskette or a HDD that boots DOS.
•
M-Systems’ DiskOnChip DOS utilities diskette.
•
M-Systems’ TrueFFS driver for Linux.
Note: The latest Disk OnChip DOS utilites can be downloaded from M-System’ website: www.m-sys.com.
3.1 Utilities Diskette Content
The following files are needed from the DiskOnChip DOS utilities diskette:
91-SR-005-10-7L REV. 2.0
5
Using the DiskOnChip with Linux OS
dformat
DiskOnChip formatting utility
dupdate
Utility for updating DiskOnChip firmware
docpmap
Utility to retrieve information about the DiskOnChip
doc121.ex
b
DiskOnChip firmware image. “121” is the firmware version, the actual diskette might
contain higher versions of the firmware, e.g. doc122.exb, doc123.exb, etc.
doc2.fff
Alternative firmware image for the DiskOnChip
Note: The file doc2.fff can be found in the \AP012 directory when using DiskOnChip DOS utilities
version 1.21 or higher.
3.2 Linux Driver for DiskOnChip
The compressed file driver.tgz contains the following files:
/usr/src/linux/drivers/block/flash_doc/flobj.obj
TrueFFS device driver core object file
/usr/src/linux/drivers/block/flash_doc/fldrvlnx.c
Source code for driver integration with
kernel
/usr/src/linux/drivers/block/flash_doc/makefile
TrueFFS driver’s makefile
/tmp/doc-driver/lilo-patch
Patch for Lilo to make pLilo
/tmp/doc-driver/plilo
Linux loader, patched to use with the
DiskOnChip
/tmp/doc-driver/lilo.conf
Lilo sample configuration file
/tmp/doc-driver/boot.b
Boot loader, udpated to use with
DiskOnChip
/tmp/doc-driver/copy2doc
Sample scripts, aid tool to create a root file
system
/tmp/doc-driver/pam.d/other
File meant only for Redhat & Caldera,
defines permission access
/tmp/doc-driver/samplefs.txt
Sample root file system listing
/tmp/doc-driver/doc-patch-2.0.##
Patch for kernel sources 2.0.## (only
attached to TrueFFS driver for kernel
versions 2.0.##)
/tmp/doc-driver/doc-patch-example
Example patch for kernel sources 2.2.##
(only attached to TrueFFS driver for kernel
versions 2.2.##)
Note: The included patch files are different for the two TrueFFS drivers. When using the TrueFFS driver for kernel
versions 2.2.##, the kernel needs to patched manually and only an example patch file (/tmp/doc-driver/doc-patch-example)
is provided. Refer to appendix III on how to manually patch your kernel.
91-SR-005-10-7L REV. 2.0
6
Using the DiskOnChip with Linux OS
4
Installing the DiskOnChip as an Additional Drive
Before the DiskOnChip can be used as the boot disk for Linux (see Chapter 5), it first needs to be installed
as an additional disk in the system (Linux is booted from a HDD). This chapter describes how to prepare
the DiskOnChip and Linux to configure the DiskOnChip as an additional disk in the system. To achieve this,
the firmware on the DiskOnChip needs to be updated (par. 4.1) and then the TrueFFS device driver needs
to be integrated into Linux (par. 4.2). This is done as follows:
1. Configure Linux with the required devices (par. 4.2.1 Preparing Linux for Integration).
2. Add the TrueFFS driver to the kernel and recompile the kernel (par. 4.2.2 Adding the Driver to the
Kernel).
3. Boot the compiled kernel from your HDD (par. 4.2.3 Booting the Compiled Kernel from HDD).
4. Create a Linux partition on the DiskOnChip (par. 4.2.4 Creating a Linux Partition on the
DiskOnChip).
5. Create a native Linux file system on the DiskOnChip (par. 4.2.5 Creating a Native Linux File System
on the DiskOnChip).
4.1 Updating the Firmware
Before the DiskOnChip can be used as the boot disk or as an additional disk in Linux, it needs to be
formatted with the alternative firmware image.
1. Plug the DiskOnChip into its socket and boot DOS from your HDD.
2. Format the DiskOnChip with the alternative firmware:
dformat /win:d000 /s:doc2.fff /y
Note: If you receive the error: “No DiskOnChip 2000 (R) was found at D000:0”, then run the DOS command docpmap /i
to find out at which address the DiskOnChip is located.
4.2 Integrating the TrueFFS driver into Linux
4.2.1 Preparing Linux for Integration
To prepare Linux for integration of the driver, perform the following steps:
Note: To perform these steps, you must be logged in as the superuser (root).
91-SR-005-10-7L REV. 2.0
7
Using the DiskOnChip with Linux OS
1. The floppy drive must be active. Verify this by typing:
# mount
If the /dev/fd0 doesn’t appear in the first column, type:
# mount/dev/fd0 /mnt
From this point, it is assumed that the diskette that contains the TrueFFS driver for Linux is mounted at
/mnt.
2. The kernel sources must be installed. To check this, type:
# ls /usr/src/linux
If this directory exists, then the kernel sources are installed. If not, refer to http://sunsite.unc.edu/LDP/ or
type:
zcat /usr/doc/HOWTO/Kernel-HOWTO.gz | more
3. Unzip and untar the file driver.tgz, located on your diskette, as follows:
# cd /tmp
# mkdir temp
# cd temp
# tar -zxvf /mnt/driver.tgz
# cp -rf . /
# cd ..
# rm -fr temp
# cd /usr/src/linux/
4. If you are installing the TrueFFS driver for kernel versions 2.0. ##, type the following command:
# patch -p0 < /tmp/doc-driver/doc-patch-2.0.##
This will patch the current kernel sources to include the TrueFFS driver for Linux (with ## = kernel
version). Notice that the patch for the kernel is working only on original kernel sources, and that the patch
is version specific. In case the utility patch is not available in your Linux environment, refer to Chapter 6
“Troubleshooting”.
Note: If you are installing the TrueFFS driver for kernel versions 2.2.##, the kernel sourced need to be patched manually
(see Appendix III "Applying a patch manually"). For your reference, an example patch file is included with the driver.
91-SR-005-10-7L REV. 2.0
8
Using the DiskOnChip with Linux OS
5. Configure the kernel as follows:
# cd /usr/src/linux
# make menuconfig
or
# make config if the last command doesn’t work.
Define your system by marking the correct devices. If you aren’t sure what the purpose of the device is,
then leave it as it is. Make sure that you mark the DiskOnChip as “Y”es under ‘Floppy, IDE and other
devices’. When you are finished, exit and the new configuration will be saved.
For further details about compiling the kernel or how to apply a patch, refer to http://sunsite.unc.edu/LDP/
or type:
# zcat /usr/doc/HOWTO/Kernel-HOWTO.gz | more
6. Remove the old object files:
# make clean
4.2.2 Adding the Driver to the Kernel
To compile the TrueFFS driver for Linux:
1. Type the following command:
# cd /usr/src/linux/drivers/block/flash_doc
# make
2. Check dependencies:
# cd/usr/src/linux
# make dep
3. Compile the kernel (this may take up to 15 minutes):
# make zImage
If the kernel is compiled successfully, a message similar to the one below should be shown:
Root device is (3, 3)
Boot sector 512 bytes
Setup is 4332 bytes
System is 374 kB
Sync
91-SR-005-10-7L REV. 2.0
9
Using the DiskOnChip with Linux OS
Make[1]:Leaving directory ‘/usr/src/
linux-2.0.32/arch/i386/boot’
If there are any compilation errors, refer to Chapter 6 “Troubleshooting”.
4.2.3 Booting the Compiled Kernel from HDD
The new compiled kernel needs to be booted from the HDD. The following steps need to be performed:
1. Type the following commands:
# cp /usr/src/linux/arch/i386/boot/zImage/doc2000
# vi /etc/lilo.conf
2. Add the following lines at the bottom of the file (press ‘INS’ to edit the file and save and exit by typing
<Esc>, ‘:’, ‘w’, ‘q’):
image = /doc2000
root = /dev/hda1
label = doc2000
read-only
Note: The device /dev/hda1 points to the HDD that Linux boots from. hda1 is the first partition (1) on the first IDE
hard disk (a), hdb2 is the second partition (2) on the second IDE hard disk (b), etc. If it is not clear which device it is, look
at the start of the file lilo.conf and search for the line first root = ...)
3. Make the inodes for the DiskOnChip:
# cd /dev
# mknod fla
b 62 0
# mknod fla1 b 62 1
# mknod fla2 b 62 2
# mknod fla3 b 62 3
# mknod fla4 b 62 4
Number 62 stands for major device number. Since it is hard coded into the driver, no other number would
work.
4. Run Lilo (Linux Loader) to create the map for the kernel and make sure that “doc2000” is listed (if not,
return to the beginning of paragraph 4.2.3):
# lilo
5. Load the updated kernel with the TrueFFS, perform the following steps:
6. Reboot the computer and load Linux.
91-SR-005-10-7L REV. 2.0
10
Using the DiskOnChip with Linux OS
7. When the Lilo prompt is displayed, press <Ctrl> or <Alt> or <Tab>. The screen will show :
Lilo boot:
8. Load the recompiled kernel:
Lilo boot:doc2000
4.2.4 Creating a Linux Partition on the DiskOnChip
To create a Linux partition on the DiskOnChip, all the DOS partitions on the DiskOnChip need to be
removed and a Linux partition with the native Linux File system [ext2] needs to be created.
1. Run the fdisk utility.
# fdisk /dev/fla
Note: You may create more than one primary partition. Just make sure that the boot flag of the main partition boot is active.
Note: For further information on the fdisk utility, refer to the man pages.
2. Display the contents of the partition table:
Command(m for help):p
3. Delete all existing partitions, enter each partition number for deletion:
Command(m for help):d
4. Create a new Linux native partition:
Command(m for help): n
Command action e extended
p primary partition (1-4)p
Partition number (1-4): 1
First cylinder (1-XXX): 1
Last cylinder or +size or +sizeM or +sizeK ([1] XXX):XXX
5. Change the type of the partition to Linux native:
Command (m for help): t
Partition number (1-4): 1
Hex code (type L to list codes): 83
6. Make the partition bootable:
Command (m for help): a
Partition number (1-4): 1
91-SR-005-10-7L REV. 2.0
11
Using the DiskOnChip with Linux OS
7. Recheck the partition table:
Command (m for help): p
Disk /dev/fla: 16 heads, 9 sectors, 1002
Cylinder units = cylinders of 144 * 512 bytes
Device
/dev/fla1
boot begin Start End Blocks Id System
*
1
1
1002 72139+ 83 Linux native
8. Save the new partition table (disregard any fdisk warnings):
Command (m for help): w
9. Reboot the machine to let the new partition table load into memory and load Linux again with the new
compiled kernel. If there is more than one partition, this step is vital.
4.2.5 Creating a Native Linux File System on the DiskOnChip
To initialize the file system on the newly created Linux partition on the DiskOnChip
1. Type the following command:
# mke2fs /dev/fla1
Note: When a small capacity DiskOnChip is used (4MB or smaller), more space for inodes needs to be allocated. Type the
following command:
# mke2fs -i 2048 /dev/fla1
2. Mount the file system to a directory:
# mkdir /diskonchip
# mount /dev/fla1 /diskonchip
From now on, it is possible to use the DiskOnChip as an additional disk in your system.
Note: If you have created more than one partition, repeat the last step for each partition (dev/fla1, /dev/fla2,
etc.).
91-SR-005-10-7L REV. 2.0
12
Using the DiskOnChip with Linux OS
5
Booting Linux from the DiskOnChip
Being able to boot Linux from the DiskOnChip makes it possible to use the DiskOnChip as the only disk in
the system, holding the OS itself in addition to all other applications and files.
In order to make a block device bootable on Linux, the kernel and the Lilo program should be copied to the
block device and a root file system needs to be created. Creating a root file system on Linux is necessary, as
from this root file system the kernel is activating several programs, such as:
Init
Initialize all processes
Swapo
n
Activate swapping
Mount
Mount the root and proc
filesystems
Sh
Shell
For further details refer to http://sunsite.unc.edu/LDP/ or type:
#zcat /usr/doc/HOWTO/Bootdisk-HOWTO.gz | more
Warning: Notice that the DiskOnChip firmware (i.e. doc121.exb) collides with Lilo. This means that it
is not possible to load Linux from the HDD after the original firmware is restored (see par. 5.1.4). This
doesn’t mean that the HDD is non-functional. It only means that the alternate firmware (doc2.fff) needs
to be reloaded (see par. 4.1).
If it is required to boot Linux from both the HDD and the DiskOnChip, it is necessary to use both pLilo and
boot.b (provided with the TrueFFS driver). For further details, refer to Appendix II.
5.1 Creating a Root File System
5.1.1 Introduction
This section is based on Bootdisk-HOWTO and other experiments. Since each distribution has a different
file location and different installations, it is possible that you won’t succeed in booting Linux the first time
from the DiskOnChip. When you receive errors, follow each error and try to fix things, but reload Linux
from the HDD and remount the DiskOnChip each time.
Note: There are several programs that create a root file system. It is not possible to say that any of them is complete right
now, but they are worth trying. The following program is recommended:
Yard: Yard creates rescue disks (also called boot disks) for Linux. A rescue disk usually contains utilities for diagnosing
and manipulating hard disks and file systems. It is used when it is not possible (or if it is not required) to boot from your
HDD. This package contains mainly perl scripts. Refer to http://www.croftj.net/~fawcet/yard/.
Note: For a sample root file system, refer to the file /tmp/doc-driver/samplefs.txt which is part of the
compressed file driver.tgz.
91-SR-005-10-7L REV. 2.0
13
Using the DiskOnChip with Linux OS
5.1.2 Overview
A root file system must contain everything that is needed to support a full Linux system. To achieve this, the
disk must include the minimum requirements for a Linux system:
•
Basic file system structure
•
Minimum set of directories: /dev, /proc, /bin, /etc, /lib, /usr, /tmp
•
Basic set of commands: sh, ls, cp, mv, etc.
•
Minimum set of config files: rc, inittab, fstab, etc.
•
Devices: /dev/hd*, /dev/tty*, /dev/fd0, etc.
•
Runtime libraries to provide basic functions used by utilities
5.1.3 Populating the File System
From this point on, it is assumed that the DiskOnChip is mounted to the /diskonchip directory.
The sample script copy2doc that is provided with the driver is located in directory /tmp/docdriver. This sample script is created for RedHat 5, SuSE 5.2 and Caldera and is customized for RedHat
5. It might be necessary to change the script according to your distribution. Files that are specific to a
distribution can be found in the script with the distribution name written after it. To exclude a file, make sure
the ‘#’ mark is present at the beginning of the line. To include a file, make sure the ‘#’ mark is removed.
The sample script only copies the basic files that are needed for booting. For any other operation, it is
necessary to add more files.
To create a root file system based on the sample script copy2doc, perform the following steps:
1. Go to the /diskonchip directory:
# cd /diskonchip
2. If necessary, customize the sample script (for other distributions):
# vi /tmp/doc-driver/copy2doc
3. Run the script:
# sh /tmp/doc-driver/copy2doc
4. Create the list of files to be mounted:
# vi /diskonchip/etc/fstab
5. Press <INS> to start editing and insert the following lines:
/dev/fla1
/proc
/
ext2
/proc proc
91-SR-005-10-7L REV. 2.0
defaults 1 1
defaults 0 0
14
Using the DiskOnChip with Linux OS
Press <ESC>, ‘:’, ‘w’, ‘q’ to save the file. It is possible to
add more devices here (for more information, refer to the man
pages).
6. For RedHat and Caldera it is also necessary to copy the configuration file for the pam library (responsible
for making authentic users):
# cp /tmp/doc-driver/pam.d/other
/diskonchip/etc/pam.d/other
Note: Appendix I explains how to create your own root file system manually. Although this is more complicated than using
the above mentioned sample script, it is highly recommended.
All modules should be placed in /lib/modules/. It is necessary to include at least the programs
insmod, rmmod and lsmod. If it is required to load the modules automatically, then also include
modprobe, depmod and swapout. When using kerneld, include it along with
/etc/conf.modules.
Some system programs, such as login, complain when the file /var/run/utmp and the directory
/var/log do not exist. To solve this, type the following commands:
# mkdir -p /diskonchip/var/{log,run}
# touch /diskonchip/var/run/utmp
After all the needed libraries and programs are set up, run ldconfig to remake
/etc/ld.so.cache on the root file system. The cache tells the loader where to find the libraries. To
remake ld.so.cache, type the following command:
# cd /diskonchip
# chroot /diskonchip
/sbin/ldconfig
The command chroot is necessary, because ldconfig always remakes the cache for the root file
system.
5.1.4 Copying the Kernel, Updating the Boot Sector and Rebooting
To copy the kernel and to update the boot loader files.
1. Type the following commands:
# mkdir /diskonchip/boot
# cp /usr/src/linux/arch/i386/boot/zImage
/diskonchip/boot/doc2000
# rdev /diskonchip/boot/doc2000 /dev/fla1
# cp /tmp/doc-driver/plilo /diskonchip/sbin
91-SR-005-10-7L REV. 2.0
15
Using the DiskOnChip with Linux OS
# cp /tmp/doc-driver/boot.b /diskonchip/boot
# cp /tmp/doc-driver/lilo.conf /diskonchip/etc
# /diskonchip/sbin/plilo
-C /diskonchip/etc/lilo.conf -i
/diskonchip/boot/boot.b -m /diskonchip/boot/map
2. Verify that after the last command, the device doc2000 is listed on the screen.
3. If it is required to load other partitions, then the file /diskonchip/etc/lilo.conf should be
edited.
Note: pLilo is the patched Lilo, which ensures that the DiskOnChip firmware will not collide with the Linux bootloader.
The final steps in the process of making the DiskOnChip bootable for Linux are as follows:
1. Unmount the DiskOnChip:
# cd /
# unmount
/dev/fla1
2. Reboot and load DOS, and reinstall the original firmware:
A:> dupdate /win:D000 /s:doc121.exb
Note: Always use the latest firmware version. The latest version can be downloaded from M-Systems website (www.msys.com)
3. Reboot the machine and disable the HDD in the BIOS setup or make the DiskOnChip the first boot
device in the system by using the following command:
A:> dupdate /win:D000 /s:DOC110.EXB /FIRST
4. Linux will now boot from the DiskOnChip.
6
Troubleshooting
Adding more programs to Linux root file system
If the DiskOnChip boots Linux without a problem and it is required to add more programs to the Linux root
file system, then mount the HDD and copy the required files.
DiskOnChip does not boot Linux
There are several errors that you can encounter during boot:
•
If the DiskOnChip does not boot at all, follow all the instructions from the start of this Installation Manual.
In addition, remember to update the original firmware of the DiskOnChip (i.e. doc121.exb) with the
alternate firmware (doc2.fff) in order to boot Linux from your HDD.
•
If the kernel boots, but it gets stuck on:
91-SR-005-10-7L REV. 2.0
16
Using the DiskOnChip with Linux OS
VFS: Unable to mount -.
Most likely, you forgot to do:
# rdev /diskonchip/boot/doc2000
•
/dev/fla1
If the DiskOnChip boots and the kernel is loading, but it gets stuck after:
VFS: Mounted root (ext 2 filesystem) readonly.
Most likely, the init program or some if its configuration files weren’t copied.
Cannot log in
If you cannot login when booting Linux from the DiskOnChip, make sure that:
•
Your default shell is installed.
•
The pam libraries were placed as explained in par. 5.1.3 (only for RedHat and Caldera).
Refer to Appendix II in order to solve this problem.
Kernel does not compile correctly or patch utility is not available
If the kernel does not compile correctly, and the problem is not caused by the TrueFFS driver, refer to
http://sunsite.unc.edu/LDP/ or type:
#zcat /usr/doc/HOWTO/Kernel-HOWTO.gz | more
Kernel is too big
When you run pLilo and you receive the error ‘Kernel xxx is too big’, recompile the kernel with the
bzImage option (In step 0, use make bzImage instead of make zImage).
For further information, refer to http://sunsite.unc.edu/LDP/ or type:
#zcat /usr/doc/HOWTO/Kernel-HOWTO.gz | more
91-SR-005-10-7L REV. 2.0
17
Using the DiskOnChip with Linux OS
7
Additional Information and Tools
Additional information about the DiskOnChip, including Application Notes, can be found at http://www.msys.com.
Additional tools and documents are listed in the following table:
Document/Tool
Description
AP-DOC-10
Designing with the DiskOnChip 2000
AP-DOC-15
Obtaining DiskOnChip 2000 Information
AP-DOC-30
Designing with the DiskOnChip Millennium in a RISC Environment
AP-DOC-31
Designing with the DiskOnChip Millennium in a PC Environment
DiskOnChip 2000 Data Sheet
DiskOnChip 2000 Data Sheet
DiskOnChip Millennium Data Sheet
DiskOnChip Millennium Data Sheet
DiskOnChip Utilities
DiskOnChip Utilities User Manual
DiskOnChip DIP EVB
DiskOnChip Evaluation Board
DiskOnChip2000-PIK
DiskOnChip DIP Programmer and Integrators Kit
DiskOnChip-GANG
1+8 DIP Socket Gang Programmer
91-SR-005-10-7L REV. 2.0
18
Using the DiskOnChip with Linux OS
Appendix I: Making a Root File System
To create your own root file system, perform the following steps:
1. Make the following directories:
# cd /diskonchip
# mkdir bin dev etc lib mnt proc sbin tmp usr var
2. Create devices in the /dev directory. You can either do this manually or just copy the /dev directory
from the HDD. If you wish to save space, it is possible to remove non-required devices (i.e. if you don’t
have a SCSI drive, then remove all the sd* devices).
# cp -dpR
/dev
/diskonchip
This command copies many unnecessary inodes to the DiskOnChip. Removing them causes no problem,
as long as you make sure that the ones listed in the sample file system are present.
3. Copy and configure the files in the /etc directory:
# cp -dr
/etc/rc.d
/diskonchip/etc (for RedHat)
or
# cp -dr /sbin/init.d
/diskonchip/sbin (for SuSE)
# cp -d /etc/inittab
/diskonchip/etc
4. Copy the password file and make sure that each user has its default shell installed:
# cp /etc/passwd
/diskonchip/etc
# cp /etc/shadow /diskonchip/etc (it is possible that you do not have this)
# cp /etc/group
/diskonchip/etc
5. Create the file /etc/fsstab that contains the list of files to be mounted:
# vi /diskonchip/etc/fstab
6. Press <INS> to start editing and insert the following lines:
/dev/fla1 /
/proc
/proc
ext2
defaults 1 1
proc
defaults 0 0
Press <ESC>, ‘:’, ‘w’ and ‘q’ to save the file.
Note: It is possible to add more devices here. For more information, refer to the man pages.
7. There are several programs that need to be copied to have a functional environment. Other programs are
not as important, although it would be rather difficult to work without them. All other programs that are
91-SR-005-10-7L REV. 2.0
19
Using the DiskOnChip with Linux OS
not listed below are considered optional. Copy these programs to the directories /bin or /sbin as
follows:
# cp /bin/{program_name}
/diskonchip/bin/{program_name}
/bin directory:
cat
echo
mount
chmod
hostname
mv
chown
kill
ps
cp
Ln
rm
cut
login
rmdir
dd
Ls
sh
df
mkdir
su
dircolors
mke2fs
sync
du
mknod
umount
e2fsck
more
uname
/sbin directory:
halt
Shutdown
init
Swapoff
ldconfig
Swapon
mingetty
Telinit
mkswap
Update
reboot
rdev
runlevel
The file name of mingetty varies with the distribution, i.e. RedHat and SuSE use mingetty,
Slackware uses agetty. To find out what the name of this file in your distribution is, perform a grep on
“getty”:
# grep getty /etc/inittab
8. The /lib directory contains all the shared libraries and loaders. Only the appropriate libraries need to
be copied to the /lib directory. To check which libraries are needed, type the following command for
each file in these two directories:
# ldd /sbin/{filename}
or
# ldd /bin/{filename}
91-SR-005-10-7L REV. 2.0
20
Using the DiskOnChip with Linux OS
For example:
# ldd /sbin/mke2fs
libext2fs.so.2
libcom_err.so.2
libuuid.so.1
libc.so.5
/lib/libext2fs.so.2
/lib/libcom_err.so.2
lib/libuuid.so.1
/lib/libc.so.5
This will show which libraries are needed for the program mke2fs. In this example, it is necessary to copy
the following four libraries:
# cp /lib/ext2fs.so.2
/diskonchip/lib
# cp /lib/libcom_err.so.2
# cp /lib/libuuid.so.1
# cp /lib/libc.so.5
/diskonchip/lib
/diskonchip/lib
/diskonchip/lib
If you have a long list of files to be copied, it is also possible to run the following command:
# ldd /bin/* > lib_list
# more lib_list
Copy the library loaders as follows:
# cp lib/ld.so /diskonchip/lib
# cp /lib/ld_linux.so
(a.out loader)
/diskonchip/lib
(elf loader)
It is possible to use objcopy to reduce the size of the libraries. For example:
# objcopy -strip-debug
91-SR-005-10-7L REV. 2.0
/diskonchip/lib/lib.so.5
21
Using the DiskOnChip with Linux OS
Appendix II: Booting from a HDD when the DiskOnChip Firmware
is Active
Since Lilo and the DiskOnChip firmware (i.e. doc121.exb) share the same area in RAM, the system
will hang during boot when using an unpatched Lilo. Updating Lilo solves this problem. The existing boot
loader needs to be updated as follows:
# /tmp/doc-driver/plilo -i
/tmp/doc-driver/boot.b
This command uses the patched Lilo supplied by the TrueFFS driver and patched boot.b, and your
default /etc/lilo.conf. Make sure that you run this command in the Linux that booted from the
HDD.
pLilo is actually forcing you to use smaller kernels because it allocates part of the physical memory to the
driver. Therefore, big kernels (around 470 KB) will have a problem with pLilo (pLilo will stop with an error
‘Kernel xxx is too big’). There are two solutions to this problem:
1. Compile the kernel with the bzImage option (‘make bzImage’). Refer to
/usr/doc/HOWTO/Kernel-HOWTO.gz for more information.
2. Comment out all big kernels from lilo.conf (only during the installation procedure).
M-Systems provides a patch file to Lilo sources to make pLilo. To activate the patch, you must have the
Lilo sources available on your system. After you verify that the sources are available, type the following
command:
# patch -p0 < lilo-patch
You now have pLilo sources.
91-SR-005-10-7L REV. 2.0
22
Using the DiskOnChip with Linux OS
Appendix III: Applying a Patch Manually
There are two ways to integrate the TrueFFS driver into the kernel: manually or with a patch utility.
The TrueFFS driver for kernel versions 2.0.## contains patch files for kernel versions 2.0.29-2.0.35
(/tmp/doc-driver/doc-patch-2.0.##). See paragraph 4.2.1 for detailed information on
how to patch your kernel with these patch files.
When using the TrueFFS driver for kernel versions 2.2.##, the kernel needs to be patched manually. For
your reference, the driver contains an example patch file (/tmp/doc-driver/doc-patchexample). This appendix explains how to patch the kernel manually.
To patch your kernel manually, go to your local kernel sources:
# cd /usr/src/linux
There are 5 files that you will need to patch:
/usr/src/linux/include/linux/blk.h
/usr/src/linux/include/linux/major.h
/usr/src/linux/drivers/block/Makefile
/usr/src/linux/drivers/block/Config.in
/usr/src/linux/drivers/block/ll_rw_blk.c
Review the example patch file (/tmp/doc-driver/doc-patch-example) provided with the
TrueFFS driver (driver.tgz). The file will look something like this.
--- include/linux/major.h
Tue Aug 12 23:57:23 1997
+++ /tmp/package/usr/src/linux/include/linux/major.h
17 14:05:19 1998
Mon Aug
@@ -69,6 +69,8 @@
#define APBLOCK_MAJOR
60
/* AP1000 Block device */
#define DDV_MAJOR
61
/* AP1000 DDV block device */
+#define IGEL_FLASH_MAJOR 62 /* [email protected] 2.6.98 */
+
#define SPECIALIX_NORMAL_MAJOR 75
#define SPECIALIX_CALLOUT_MAJOR 76
Each of the above mentioned files needs to be edited to create the correct patch for your kernel.
91-SR-005-10-7L REV. 2.0
23
Using the DiskOnChip with Linux OS
In the above example, the file /usr/src/linux/include/linux/major.h is patched. The
two lines that start with the ‘+’ mark are added to the current source code, and the lines that start with the ‘‘ mark are removed from the source code. Repeat this process for all five of the above-mentioned files.
91-SR-005-10-7L REV. 2.0
24
Using the DiskOnChip with Linux OS
How to Contact Us
Internet:
http://www.m-sys.com
E-mail:
[email protected]
USA Office:
M-Systems Inc.
8371 Central Ave, Suite A
Newark CA 94560, U.S.A
Phone: 1-510-494-2090
Fax: 1-510-494-5545
Japan Office:
M-Systems Japan Inc.
1-11-15 Higashi Gotonda Shinagawa-ku
Tokyo, 141-0022 Japan
Phone: 03-3445-9042
Fax: 03-3445-9045
Taiwan Office:
M-System Asia Ltd.
11F-2, No. 81,Sec.2, Chang Teh Rd.
Taipei, Taiwan, R.O.C.
Phone: 886-2-2550-1741
Fax: 886-2-2550-1745
U.K. Office:
M-Systems UK Ltd.
PO Box 20
Chalgrove SPDO
OX44 7YP
Phone: 44 (0) 1865 891 123
Fax: 44 (0) 1865 891 391
Israel Office:
M-Systems Ltd.
Atidim Industrial Park P.O.B 58036
Tel Aviv 61580, Israel
Phone: 972-3-647-7776
Fax: 972-3-647-6668
M-Systems assumes no responsibility for the use of the material described in this document. Information
contained herein supersedes previously published specifications on this device from M-Systems. M-Systems
reserves the right to change this document without notice.
91-SR-005-10-7L REV. 2.0
25