1
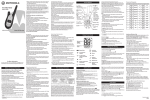
Model SX709 series
• International Commission on Non-Ionizing Radiation Protection
(ICNIRP) 1998
• Institute of Electrical and Electronics Engineers (IEEE) C95.1-1999
Edition
• American National Standards Institute (ANSI)/Institute of Electrical
and Electronic Engineers (IEEE) C95. 1-1992
• United States Federal communications Commission, Code of Federal
Regulations; 47CFR part 2 sub-part J
Exposure to Radio Frequency Energy
Your Motorola two-way radio complies with the following RF energy
exposure standards and guidelines:
Transmitting 50% of the time, or less, is important because the radio
generates measurable RF energy exposure only when transmitting (in
terms of measuring standards compliance).
• To transmit (talk), press the Push to Talk (PTT) button.
• To receive calls, release the PTT button.
• Transmit no more than 50% of the time.
Transmit and Receive Procedure
Your two-way radio contains a transmitter and a receiver. To control
your exposure and ensure compliance with the general
population/uncontrolled environment exposure limits, always adhere to
the following procedure:
The information provided in this document supersedes the general
safety information in user guides published prior to December 1, 2002.
Read This Information Before Using Your Radio.
Important Information on Safe and Efficient Operation
Safety and General Information
For further information, you may call at 1300 889 785 (Australia) or 0900
50 025 (Toll Call, New Zealand).
For More Information
KEM-PK14190-18
User’s Guide
Two-Way Radio
Do not place a portable radio in the area over an air bag or in the air
bag deployment area. Air bags inflate with great force. If a portable
radio is placed in the air bag deployment area and the air bag inflates,
the radio may be propelled with great force and cause serious injury to
occupants of the vehicle.
• Pull off the road and park before making or answering a call if driving
conditions so require.
• Use hands-free operation, if available.
• Give full attention to driving and to the road.
Safety and General Use While Driving
Check the laws and regulations regarding the use of radios in the area
where you drive, and always obey them. If you do use your radio while
driving, please:
Other Medical Devices
If you use any other personal medical device, consult the manufacturer
of your device to determine if it is adequately shielded from RF energy.
Your physician may be able to assist you in obtaining this information.
Medical Devices – Hearing Aids
Some digital wireless radios may interfere with some hearing aids. In
the event of such interference, you may want to consult your hearing
aid manufacturer to discuss alternatives.
• Turn the radio OFF immediately if there is any reason to suspect that
interference is taking place.
• Use the ear opposite the pacemaker to minimize the potential for
interference.
• Not carry the radio in the breast pocket.
• ALWAYS keep the radio more than 6 inches (15 cm) from their
pacemaker when the radio is turned ON.
People with pacemakers should:
Medical Devices – Pacemakers
The Advanced Medical Technology Association recommends that a
minimum separation of 6 inches (15 cm) be maintained between a
handheld wireless radio and a pacemaker. These recommendations are
consistent with the independent research by and recommendations of
the U.S. Food and Drug Administration.
Aircraft
When instructed to do so, turn off your radio when onboard an aircraft.
Any use of a radio must be in accordance with applicable regulations
per airline crew instructions.
Facilities
To avoid electromagnetic interference and/or compatibility conflicts,
turn off your radio in any facility where posted notices instruct you to
do so. Hospitals or health care facilities may be using equipment that is
sensitive to external RF energy.
2. This device must accept any interference received, including
interference that may cause undesired operation.
1. This device may not cause harmful interference; and
Electromagnetic Interference/Compatibility
Note: Nearly every electronic device is susceptible to electromagnetic
interference (EMI) if inadequately shielded, designed or otherwise
configured for electromagnetic compatibility. This device complies with
Part 15 of the FCC Rules. Operation is subject to the following two
conditions:
Approved Accessories
For a list of approved Motorola accessories, visit out Web site at
www.Motorola.com.
Data Operation
If applicable, when using any data feature of the radio with or without
an accessory cable, position the radio and its antenna at least one
inch (2.5 cm) from the body.
If you do not use one of the Motorola-supplied or approved body-worn
accessories and are not using the radio held in the normal use
position, ensure the radio and its antenna are at least 1 inch (2.5 cm)
from your body when transmitting.
Body-Worn Operation
To maintain compliances with FCC/Health Canada RF exposure
guidelines, if you wear a radio on your body when transmitting, always
place the radio in a Motorola-supplied or approved clip, holder, holster,
case or body harness for this product. Use of non-Motorola-approved
accessories may exceed FCC/Health Canada RF exposure guidelines.
Do NOT hold the antenna when the radio is “IN USE.” Holding the
antenna affects the effective range.
Antenna Care
Use only the supplied or an approved replacement antenna.
Unauthorized antennas, modifications, or attachments could damage
the radio and may violate FCC regulations.
Portable Radio Operation and EME Exposure
To assure optimal radio performance and make sure human exposure
to radio frequency electromagnetic energy is within the guidelines set
forth in the above standards, always adhere to the following
procedures.
• ANATAL ANNEX to Resolution No. 303 of July 2, 2002 “Regulation of
limitation of exposure to electrical, magnetic and electromagnetic
fields in the radio frequency range between 9 KHz and 300GHz” and
“Attachment to resolution #303 from July 2, 2002”
• Australian communications Authority Radiocommunications
(Electromagnetic Radiation—Human Exposure) Standard, 2003
• Ministry of Health (Canada) Safety Code 6. Limits of Human Exposure
to Radiofrequency Electromagnetic Fields in the Frequency Range
from 3 KHz to 300 GHz, 1999
The Radiocommunications (Citizen Band Radio Stations) Class Licence
2002 was signed by the Australian Communications Authority on 7
February 2002 and issued by a notice published in the Commonwealth of
Australia Gazette on 13 February 2002. The Radiocommunications
(Citizen Band Radio Stations) Class Licence 2002 replaces the Citizen
Band Radio Stations Class Licence.
Radiocommunications (Citizen Band Radio Stations) Class
Licence 2002
The Radiocommunications (Citizen Band Radio Stations) Class Licence
2002 contains the technical parameters, operating requirements,
conditions of licence and relevant standards for Citizen Band (CB)
radios. CB radios must comply with the class licence for their use to be
authorised under the class licence.
No Licence is required to own or operate this device in Australia and
New Zealand. FCC Licensing Information
OFF
Control Buttons
to:
QT
i VOX
MENU
to:
Microphone
• Turns weather
on/off (+)
• Scroll through
menus
Use – and +
to:
• Lock and unlock
the keypad (when
held down and
not in a Menu)
Accessory Jack
• Exit the Menu
(when pressed
while in a Menu)
• Select Menu
options
Use
• Monitor the
channel
– Scan
i VOX
– Vibrate
each feature
Getting Started
Without
Accessories
i VOX – Hands-Free Use
– Weather Alert
– Call Tone,
Keypad Tone
i VOX
i VOX
VOX
OFF
OFF
MON
• Scan to see if
anyone is oni VOX
the
selected channel
ON
ON – On/Off for
OFF
ON
Note: Remove the batteries before storing your radio for extended
periods of time. Batteries corrode over time and may cause permanent
damage to your radio.
Battery Meter
The battery icon shows the battery charge level, from full
to empty
. When the battery is empty, the radio chirps periodically
after releasing PTT (Low Battery Alert). The radio powers off when the
voltage drops below a predetermined level to protect the rechargeable
battery.
Installing the NiMH Battery Pack:
1. Follow step 2 above to remove the battery cover.
2. Remove the battery pack from the clear plastic bag. Do not
disassemble or unwrap the battery pack.
3. Insert the NiMH battery pack so the “This Side Up” is showing.
4. Reposition the battery cover and press down to secure.
NOTE: The SX709 model radio can use a NiMH rechargeable battery
instead of four AAA batteries.
Installing the Batteries:
Your radio uses four AAA Alkaline batteries and beeps when the
batteries are low.
1. Turn the radio off.
2. With the back of the radio facing you, lift the battery latch up to
release the battery cover and remove the cover.
3. Insert four AAA Alkaline batteries as shown on the inside of the
battery compartment.
4. Reposition the battery cover and press down to secure.
OFF
– Noise
ON Filtering
(Roger Beep)
– Lock
–
ON
ON
ON
OFF
OFF
Talk Confirmation Tone
QT
QT
QT
– Channel Indicator
QT
QT
QT
Use Monitor
OFF
to:
Display Screen Guide
Lo
Hi
– Battery Meter
Numbers for
Codes
Numbers for
Channel,
Call Tone
Speaker
• Transmit call tone
Use
• Talk
• Save a setting
• Boost the
radio’s power
up to two watts
PTT to:
Use Push to Talk
LED Indicator
Light
Use
to:
• Turn radio on/off.
• Increase or decrease volume
i VOX
• The cord size is 18 AWG for lengths up to 100 feet, and 16 AWG for
lengths up to 150 feet.
QT
ON
• The extension cord is properly wired and in good electrical condition.
• The pins on the plug of the extension cord are the same number, size
and shape as those on the plug of the charger.
8. An extension cord should not be used unless absolutely necessary.
Use of an improper extension cord could result in a risk of a fire
and/or electric shock. If an extension cord must be used, make sure
that:
7. Make sure the cord is located so it will not be stepped on, tripped over
or subjected to damage or stress.
6. Use of an attachment not recommended or sold by Motorola may
result in a risk of fire, electric shock or personal injury.
5. To reduce the risk of electric shock, unplug the charger from the outlet
before attempting any maintenance or cleaning.
4. To reduce the risk of damage to the cord or plug, pull the plug rather
than the cord when disconnecting the charger from the AC receptacle.
3. Never alter the AC cord or plug provided with the unit. If the plug will
not fit the outlet, have the proper outlet installed by a qualified
electrician. An improper condition can result in a risk of electric
shock.
2. Do not operate or disassemble the charger if it has received a sharp
blow, or has been dropped or damaged in any way.
1. Do not expose the charger to rain or snow.
Save these Instructions
Battery Charger Safety Instructions:
Batteries
All batteries can cause property damage and/or bodily injury such as
burns if a conductive material—like jewelry, keys or beaded chains—
touch exposed terminals. The conductive material may complete an
electrical circuit (short circuit) and become quite hot. Exercise care in
handling any charged battery, particularly when placing it inside a
pocket, purse or other container with metal objects.
Antennas
Do not use any portable radio that has a damaged antenna. If a
damaged antenna comes into contact with your skin, a minor burn can
result.
Operational Cautions
Blasting Caps and Areas
To avoid possible interference with blasting operations, turn off your
radio when you are near electrical blasting caps, in a blasting area, or in
areas posted “Turn off two-way radios.” Obey all signs and instructions.
Note: The areas with potentially explosive atmospheres referred to
above include fueling areas such as below decks on boats, fuel or
chemical transfer or storage facilities, areas where the air contains
chemicals or particles (such as grain, dust or metal powders) and any
other area where you would normally be advised to turn off your vehicle
engine. Areas with potentially explosive atmospheres are often—but not
always—posted.
Potentially Explosive Atmospheres
Turn off your radio prior to entering any area with a potentially explosive
atmosphere. Only radio types that are especially qualified should be
used in such areas as “Intrinsically Safe.” Do not remove, install or
charge batteries in such areas. Sparks in a potentially explosive
atmosphere can cause an explosion or fire resulting in bodily injury or
even death.
while rotating
until you reach a comfortable
i counterclockwise
VOX
to decrease the volume.
clockwise to increase the volume
MON
3. Press
PTT
ON
OFF
i VOX
MENU
OFF
ON
i VOX
to continue set up.
QT
. The current channel flashes.
to save the channel setting or
QT
MENU
2. Press + or – to set the channel.
1. With the radio on, press
Selecting the Channel
Your radios has 40 channels. When you press the bottom portion of the
PTT all channels are 0.5 Watts
displays. If you press the top portion
PT
PTT to boost the power channels will be 2 Watt,
displays.
of the PT
Initial Setup
Push to Talk PTT Timeout Timer
To prevent accidental transmissions and save battery life, the radio
i VOX
emits a continuous warning tone and stops transmitting if you press
PTT
60 continuous seconds.
PTTfor
Button
MonitorQT
ON
Pressing and holding M O N for three seconds allows you to listen to the
OFFradio when you are not receiving.
volume level of the
QTThis allows
ON you
to adjust the volume, if necessary. You can also press and hold M O N to
check for activity oni VOX
the current channel before you talk. OFF
Power Boost
To boost your radio’s power up to two watts, press the top portion of
the PTT button when talking. If you know your party is close by, you
can conserve your battery’s energy by pushing the lower part of the
PTT button to use less power.
Talk Range
Your radio is designed to maximize performance and improve
transmission range. Do not use the radios closer than five feet apart.
1. To talk, press and hold PTT .
2. When you are finished talking, release PTT .
For maximum clarity, hold the radio two to three inches away from your
mouth and speak directly into the microphone. Do not cover the
microphone while talking.
To communicate, all radios in your group must be set to the same
channel and Interference Eliminator Code.
Talking and Listening
Do not hold the radio close to your ear. If the volume is set to an
uncomfortable level, it could hurt your ear.
1. Rotate
2. Rotate
Press and hold
OFF
listening level.
Setting
Volume
QT the
ON
2. The display then shows the current channel, code and features that
are selected.
1. The radio chirps and briefly shows all features icons available on
your radio.
Turn
clockwise to turn the radio on and counterclockwise to turn
the radio off.
Turning Your Radio On and Off
Using the Belt Holster
Your radio includes a holster so you may carry it easily on your belt.
1. Adjust the holster’s clip so it fits onto your belt.
2. Slide your radio into the holster.
Notes
• The light on the desk stand charger will glow continuously when
radio/battery is inserted.
• When moving between hot and cold temperatures, do not charge the
battery until the battery temperature acclimates (usually about 20
minutes).
• For optimal battery life, remove the radio or battery from the charger
within 16 hours. Do not store the radio in the charger.
• Turn radio off while in charging tray.
1. Follow the steps above to install a NiMH Battery Pack.
2. Plug the AC power supply into the plug on the desk stand.
3. Plug the AC power supply into a standard wall outlet.
4. With a radio facing forward, slide it into one of the charging pockets.
Using the Desk Stand Charger (Optional Accessory)
The desk stand charger provides drop-in charging convenience for
NiMH batteries and can be placed on any flat surface, such as a desk
or workbench. Charge the NiMH battery overnight (at least 16 hours)
before using it for the first time. After the initial charge, an empty
battery is fully charged within 14 hours.
476.425
476.825
17
476.900
20
Simplex
Simplex
Simplex
Simplex
Simplex
Simplex
Simplex
Simplex
Simplex
Simplex (Calling Channel)
Simplex
Simplex
Duplex RX/Simplex
40
39
38
37
36
35
34
33
32
31
30
29
28
27
26
Duplex RX/Simplex
25
Emergency
24
23
22
21
Channel
Duplex RX/Simplex
Duplex RX/Simplex
Duplex RX/Simplex
Duplex RX/Simplex
Duplex RX/Simplex
Usage
477.400
477.375
477.350
477.325
477.300
477.275
477.250
477.215
477.200
477.175
477.150
477.125
477.100
477.075
477.050
477.025
477.000
476.975
476.950
476.925
Frequency
(MHz)
Simplex
Simplex
Duplex TX/Simplex
Duplex TX/Simplex
Duplex TX/Simplex
Emergency
Duplex TX/Simplex
Duplex TX/Simplex
Duplex TX/Simplex
Duplex TX/Simplex
Simplex
Simplex
Simplex
Simplex
Simplex
Simplex
Simplex
No Use
No Use
Simplex
Usage
MENU
Continued on back
SX709
Note: You must set the Interference Eliminator Code to 0 on a radio that
uses Interference Eliminator Codes to communicate with radios that do
not have Interference Eliminator Codes. Select 0 for “no tone, no code”
and OFF will flash on your radio’s display.
You can set a different code for each channel using this procedure. An
extended press of + or – allows you to scroll through the
Interference Code rapidly so you can quickly reach the code you want.
MENU
To set the code for a channel:
until the code starts to flash.
1. Short press
2. Press + or – to select the code.
to continue set up.
3. Press PTT to save the code setting or
Note: Channel 5 and 35 have no codes because these two channels are
emergency channels.
Some repeaters will require specifically setting these codes for access.
Interference Eliminator Code
Interference Eliminator Codes help minimize interference by providing
you with a choice of code combinations. Your radio has 121
Interference Eliminator Codes.
Duplex Mode
Repeater stations can re-transmit your signal over a wider area giving
you extended range depending on the location, height and availability
of the local repeater station. Your radio supports duplex mode on
channels 1-8. If the repeater channel in your area is channel 1, when
you are in duplex mode the transmit channel will be channel 31.
1. Select the repeater channel in your area (channel 1 to channel 8).
2. Press + , the current setting On/Off displays.
3. Press + or – to select On/Off to activate/deactivate the duplex
function.
You can find more information about channels and frequencies by
visiting the Web site
http://www.acma.gov.au/ACMAINTER.786700:STANDARD:1627891715:pc
=PC_1265#Repeaters
476.875
19
476.850
476.800
16
18
476.775
476.750
15
14
476.725
476.700
13
12
476.652
476.675
10
11
476.625
476.600
8
9
476.575
7
476.525
476.550
5
476.500
476.475
476.450
6
4
3
2
1
Channel Frequency
(MHz)
UHF Channels and Frequencies
Important Notes
Channels 5 and 35 (paired for Duplex repeaters) are reserved as
emergency channels. Channel 11 is a calling channel generally used to
find others. Once contact is established on the calling channel, both
stations should move to another unused "SIMPLEX" channel to allow
others to use the calling channel. Channels 22 and 23 are for Telemetry
and Telecommand use, voice communications are not allowed on these
channels by law.
Channels marked Duplex are reserved for repeater use in some areas.
These are paired with higher channels as output/input (1/31, 2/32, etc.)
Check for local repeater activity before using these channels in
Simplex mode to avoid interference. Channels 9 and above are the
best choices for general use in Simplex mode.
67
71.9
74.4
77
79.7
82.5
85.4
88.5
91.5
94.8
Octal
023
025
026
031
032
043
047
051
054
065
071
072
073
074
114
115
116
125
131
132
134
1
2
3
4
5
6
7
8
9
10
Code
39
40
41
42
43
44
45
46
47
48
49
50
51
52
53
54
55
56
57
58
59
Hz
127.3
123
118.8
114.8
110.9
107.2
103.5
100
97.4
29
28
27
26
25
24
23
22
21
20
Code
Hz
179.9
173.8
167.9
162.2
156.7
151.4
146.2
141.3
136.5
131.8
80
79
78
77
76
75
74
73
72
71
70
69
68
67
66
65
64
63
62
61
60
Code
311
306
271
265
263
261
251
245
244
243
226
223
205
174
172
165
162
156
155
152
143
Octal
101
100
99
98
97
96
95
94
93
92
91
90
89
88
87
86
85
84
83
82
81
Code
516
506
503
466
465
464
445
432
431
423
413
412
411
371
365
364
351
346
343
331
315
Octal
CDCSS Code Octal Table
19
18
17
16
15
14
13
12
11
Code
121
120
119
118
117
116
115
114
113
112
111
110
109
108
107
106
105
104
103
102
Code
38
37
36
35
34
33
32
31
30
Code
Hz
754
743
734
732
731
723
712
703
664
662
654
632
631
627
624
612
606
565
546
532
Octal
250.3
241.8
233.6
225.7
218.1
210.7
203.5
192.8
186.2
MENU
MENU
ON
MENU
MENU
1. Short press
until i VOX appears on the display. The current
setting On/Off will flash.
2. Press + or – to select On or Off.
3. Press PTT to set or
to continue set up.
4. To transmit, speak into the radio microphone. There is a short delay
between the time you start talking and when the radio transmits.
5. To receive, stop talking.
Hands-Free Use Without Accessories (iVOX)
You can use the iVOX
feature to transmit, hands-free without the need
OFF
for any voice activation accessories. Once iVOX is turned on, the radio
detects your voice and transmits when you speak.
QT
Note: Setting the call to 0 disables the call tone feature.
To transmit your call tone to other radios set to the same channel and
Interference Eliminator Code as your radio, press
.
until the current call tone setting
1. With the radio on, short press
flashes and
appears.
2. Press + or – to change and hear the call tone.
to continue set up.
3. Press PTT to set the new call tone or
To set a call tone:
Setting and Transmitting Call Tones
Your radio can transmit different call tones to other radios in your group
so you can alert them that you want to talk. You have 10 call tones from
which to choose.
Hz
Code
CTCSS Code Table
MENU
i VOX
PTT
and speak normally.
MENU
MENU
MENU
1. With the radio on, press
until the
appears. The current
setting On/Off flashes.
2. Press + or – to turn On or Off.
3. Press PTT to set or
to continue set up.
Transmitting a Talk Confirmation Tone
You can set your radio to transmit a unique tone when you finish
transmitting. It is like saying “Roger” or “Over” to let others know you
are finished talking.
When the Key Tone Feature is off, the following are not disabled:
• Transmit timeout alert tone;
• Power-down alert tone;
• Low battery alert tone; or
• The transmitted Talk Confirmation Tone.
MENU
until
appears. The current setting On/Off will flash
1. Press
2. Press either + or – to turn On or Off.
3. Press PTT to confirm or
to continue set up.
Keypad Tones
You may enable or disable the speaker key tones. You will hear the key
tone each time a button is pushed.
Note: If you skip step 2, the beginning of your message may not be
heard on the receiving radio. For a 30-second period, starting after the
last transmission, all transmissions received on the selected channel
and code will pass through the QT noise filter.
3. Press
1. Select the same channel and Interference Eliminator Code as the
other radio.
2. Press
to send a call tone. This allows your voice to pass through
the QT noise filter on the receiving radio.
To transmit to a radio that has QT noise filtering turned on:
MENU
1. Short press
until QT displays.
ON The current setting On/Off will
flash.
2. Press + or – to turn noiseOFF
filtering On or Off.
3. Press PTT to confirm your selection or
to continue set up.
To turn QT noise filtering on or off:
Note: QT noise filtering is not available when the radio is scanning.
QT
ON
MON
a second time to activate scan again.
Note: There is a short delay between the time you start talking and
when the radio transmits. There is a short delay before the
transmission is completed.
6. To turn off, simply remove the accessory.
5. To receive, stop talking.
1. Turn the radio off and plug the VOX accessory into the accessory
port.
2. Turn the radio on. VOX shows on the display.
3. Adjust the volume appropriately by rotating
. Lower the volume
before placing the accessory on your head or in your ear.
4. To transmit, speak into the accessory microphone.
Hands-Free Use With Accessories (VOX)
You can transmit hands-free with the use of optional accessories. Once
VOX is turned on, the radio detects your voice and transmits when you
speak.
Using Audio Accessories:
Many accessories (sold separately) are available for your radio. For
more information, visit our Web site at www.motorola.com.
i VOX
cannot remove your home channel from the scan list. The
Note: You
home channel is the channel your radio was set to when you started
the scanning.
OFF
restore a previously deleted channel, turn the radio off and then
4. To
backi VOX
on or just repeat step 2 and step 3.
OFF
3. Press
ON
Removing Channels from the Scan List (Nuisance Delete
Feature)
Note: If you press PTT while the radio is scanning,
i VOX the radio will
transmit on the channel you selected before you activated scan or the
channel which the radio stops at and is listening to. If no transmission
occurs within five seconds, scanning will resume.
OFF
1. To
start scanning, briefly press and release M O N . The scan indicator
ON
OFF through the channel but
displays
, and the radio begins to scroll
the 0 (if scanning on code 0) or "--" (two hyphens, if scanning on non
OFF
zero code) won't scroll.
i VOX
2. When the radio detects channel activity, it stops scanning and you
can hear the transmission.
3. To respond
i VOXand talk to the person transmitting, press PTT within five
seconds.
QT
ON
4. To stop scanning, briefly press and release M O N .
OFF
Priority Scan
Use scan to monitor channels and codes for transmissions or to find
QT
ON
someone in your group who has accidentally changed channels.
With priority scan, your homeichannel
VOX is scanned more frequently than
any other channel. The home channel is OFF
the channel where your radio
was set when you started to scan. If you activate scan while your
radio’s Interference Eliminator Code is set to a number between 1 and
121, the radio checks for activity on each programmed channel and
i VOX
code combination.
Notes:
• All transmissions using code 0 or any other code are ignored.
• The default code for each channel is 1.
• If scanning on code 0, all channels and code combinations are
scanned.
MENU
Length of Coverage
3. The balance of the original
warranty or for thirty (30) days
from the date returned to the
consumer, whichever is longer.
2. Thirty (30) days from the date of
purchase by the first consumer
purchaser of the product.
1. Limited lifetime warranty for
the lifetime of ownership by the
first consumer purchaser of the
product.
One (1) year from the date of
purchase by the first consumer
purchaser of the product unless
otherwise provided for below.
(Toll Call)
(cost of local call excludes calls from
mobiles)
You will receive instructions on how to ship the Products or
Accessories, at your expense, to an authorised repair Center. To obtain
service, you must include: (a) a copy of your receipt, bill of sale or other
comparable proof of purchase; (b) a written description of the problem;
(c) the name and location of the installation facility (if applicable) and,
most importantly; (e) your address and telephone number.
For Accessories, please call the telephone number designated above
for the product with which they are used.
Oricom International Pty Ltd
New Zealand call
- 0900 50 025
Oricom International Pty Ltd
Australia call
- 1300 889 785
How to Obtain Warranty Service or other Information?
To obtain service or information, please call:
What will the distributor do?
Distributor, at its option, will at no charge repair, replace any products
and Accessories that does not conform to this warranty. We may use
functionally equivalent reconditioned/refurbished/pre-owned or new
Products and Accessories or parts. No data, software or applications
added to your Product, Accessory, including but not limited to personal
contacts, games and ringer tones, will be reinstalled. To avoid losing
such data and applications please create a back up prior to requesting
service.
Who is covered?
This warranty extends only to the first consumer purchaser, and is not
transferable.
Notes: You are required to provide proof of purchase as a condition of
receiving warranty services. You are entitled to a replacement or repair
according to the terms and conditions of this document if your product
is found to be faulty within the Warranty Period. This Warranty extends
to the original purchaser only and is not transferable.
3. Products and Accessories that
are Repaired or Replaced.
2. Consumer Two-Way Radio
Accessories.
1. Decorative Accessories and
Cases. Decorative covers,
bezels, PhoneWrap covers and
cases.
Products and Accessories as
defined above, unless otherwise
provided for below.
Products Covered
What Does this Warranty Cover?
This limited warranty is a consumer's exclusive remedy, and applies as
follows to new Motorola branded Products, Accessories and Software
manufactured, distributed and sold by Giant International Ltd., Oricom is
the local distributor in Australia & New Zealand, which warrants
Motorola 2-way UHF Radio Products and Accessories (collectively
"Equipment') purchased against defects in material and workmanship
under normal use and service for the following period of time:
This express warranty is given in addition to any rights or remedies that
may be available to the Customer under the Consumer Guarantees Act
1993 (“CGA"), and does not limit any rights and remedies available to the
Customer under the CGA.
If the customer is a consumer (as that term is defined in the CGA) then:
A. This Warranty shall apply for the benefit of the Customer, and any
Consumer acquiring from or through the Customer: and
B. Any of the provisions of this warranty which reduce, limit or are
contrary to the guarantees and remedies contained in the CGA, shall be
deemed deleted and omitted from this Warranty UNLESS the Customer is
a Consumer who acquires the products for the purposes of a business,
and the supplier of the products to the Customer has contracted out of
the provisions of the CGA.
Limited Warranty for Personal Communication Products,
Accessories and Software Purchased in Australia or New
Zealand.
Warranty
Manufactured, distributed and sold by Giant International Ltd., official
licensee for this product. Motorola, the Motorola logo trademarks and
the Motorola trade dress are owned by Motorola, Inc. and are used
underlicense from Motorola, Inc. Oricom International is the local
distributor of Motorola 2-way UHF radios in Australia & New Zealand.
Please contact customer service hotline at 1300 889 785 (Australia) or
0900 50 025 (Toll Call, New Zealand) for questions/comments,warranty,
support, or service related to this product. MOTOROLA and the Stylized
M Logo are registered in the U.S. Patent & Trademark Office. All other
product or service names are the property of their respective owners. ©
Motorola, Inc. 2006. All rights reserved.
Keypad Lock
To avoid accidentally changing your radio settings:
1. Press and hold
until
displays.
2. When in lock mode, you can turn the radio on and off, adjust the
volume, receive, transmit, send a call tone, and monitor channels. All
QT are locked.
ON
other functions
To unlock the radio, press and hold
until
is no longer displayed.
MENU
Patent and Copyright Information
Special Features
1. To prevent the radio from scanning a channel, press and hold + or
– for at least three seconds, then release, when the scan first
stops on that channel. This temporarily removes the channel from
QT the
ONscan list.
2. Press M O N to exit scan mode.
QT
QT
QT Noise Filtering
The QT noise-filtering feature helps to ensure uninterrupted
communication with other Motorola radios that have this feature. This
feature filters out unwanted transmissions from other radios. This is
useful in places where there is heavy radio traffic, such as amusement
parks or ski resorts.
MENU
MENU
1. To turn vibrating alerts on, press
until
is displayed. The
current setting will flash.
2. Press + or – to change the setting to Off/On.
3. Press PTT to set or
to continue set up.
VibraCall TM Alert
VibraCall is a vibrating alert that notifies you that your radio is receiving
a message. This is useful in noisy environments. When the alert is on,
the radio vibrates once every 30 seconds when you receive a message
on the channel and code you set.
See Special Features section on Accessories.
Note: When you connect a VOX accessory or enable iVOX, the radio is
automatically set to the respective last chosen sensitivity level.
3 = High Sensitivity for quiet environments
2 = Medium Sensitivity for most environments
1 = Low Sensitivity for noisy environments
MENU
1. Short press
until icon VOX or iVOX appears and the level
number blinks.
2. Press + or – to select the sensitivity level.
3. Press PTT to set or
to continue set up.
MENU
Adjusting the radio’s sensitivity level helps minimize the possibility of
unintended noises triggering a transmission and helps the radio pick up
soft voices.
Setting the Sensitivity Level When in VOX or iVOX Mode
Laws in the United States and other countries preserve for Motorola
certain exclusive rights for copyrighted Motorola software such as the
exclusive rights to reproduce and distribute copies of the Motorola
software. Motorola software may only be copied into, used in, and
redistributed with, the Products associated with such Motorola software.
No other use, including without limitation disassembly of such Motorola
software or exercise of the exclusive rights reserved for Motorola, is
permitted.
Some states and jurisdictions do not allow the limitation or
exclusion of incidental or consequential damages, or
limitation on the length of an implied warranty, so the above
limitations or exclusions may not apply to you. This warranty
gives you specific legal rights, and you may also have other
rights that vary from state to state or from one jurisdiction to
another.
What Other Limitations Are There?
ANY IMPLIED WARRANTIES, INCLUDING WITHOUT LIMITATION THE
IMPLIED WARRANTIES OF MERCHANTABILITY AND FITNESS FOR A
PARTICULAR PURPOSE, SHALL BE LIMITED TO THE DURATION OF THIS
LIMITED WARRANTY, OTHERWISE THE REPAIR, REPLACEMENT, OR
REFUND AS PROVIDED UNDER THIS EXPRESS LIMITED WARRANTY IS
THE EXCLUSIVE REMEDY OF THE CONSUMER, AND IS PROVIDED IN
LIEU OF ALL OTHER WARRANTIES, EXPRESS OF IMPLIED. IN NO
EVENT SHALL MOTOROLA OR GIANT INTERNATIONAL LTD. BE LIABLE,
WHETHER IN CONTRACT OR TORT (INCLUDING NEGLIGENCE) FOR
DAMAGES IN EXCESS OF THE PURCHASE PRICE OF THE
PRODUCT, ACCESSORY OR SOFTWARE, OR FOR ANY INDIRECT,
INCIDENTAL, SPECIAL OR CONSEQUENTIAL DAMAGES OF ANY KIND,
OR LOSS OF REVENUE OR PROFITS, LOSS OF BUSINESS,
LOSS OF INFORMATION OR DATA, SOFTWARE OR APPLICATIONS OR
OTHER FINANCIAL LOSS ARISING OUT OF OR IN CONNECTION WITH
THE ABILITY OR INABILITY TO USE THE PRODUCTS, ACCESSORIES OR
SOFTWARE TO THE FULL EXTENT THESE DAMAGES MAY BE
DISCLAIMED BY LAW.
Nothing in this Warranty excludes, restricts or modifies any condition,
warranty, right or remedy which pursuant to the Trade Practices Act
1974 applies to this Warranty and which may not be so excluded,
restricted or modified. For warranties that cannot be excluded,
restricted or modified, Oricom limits the remedies available to those
specified in the relevant legislation.
1. as a result of lightning, over voltage, accident, misuse, abuse or other
external causes;
2. the operation outside the normal use of the product;
3. by the use of parts not manufactured or
4. Only batteries whose fully charged capacity falls below 80% of their
rated capacity and batteries that leak are covered by this warranty.
This Warranty in no way affects your statutory warranty rights under
the Trade Practices Act 1974 or any other similar legislation. This
Warranty does not extend to any product from which the serial number
has been removed, was purchased outside of Australia or that has
been damaged or rendered defective:
Communication Services. Defects, damages, or the failure of
Products, Accessories or Software due to any communication service
or signal you may subscribe to or use with the Products Accessories or
Software is excluded from coverage.
Altered Products. Products or Accessories with (a) serial numbers
or date tags that have been removed, altered or obliterated; (b) broken
seals or that show evidence of tampering; (c) mismatched board serial
numbers; or (d) nonconforming or non-Motorola branded housings, or
parts, are excluded from coverage.
Unauthorized Service or Modification. Defects or damages
resulting from service, testing, adjustment, installation, maintenance,
alteration, or modification in any way by someone other than Motorola,
Giant International Ltd. or its authorized service centers, are excluded
from coverage.
Use of Non-Motorola branded Products and Accessories.
Defects or damage that result from the use of Non-Motorola branded or
certified Products, Accessories, Software or other peripheral
equipment are excluded from coverage.
Abuse & Misuse. Defects or damage that result from: (a) improper
operation, storage, misuse or abuse, accident or neglect, such as
physical damage (cracks, scratches, etc.) to the surface of the product
resulting from misuse; (b) contact with liquid, water, rain, extreme
humidity or heavy perspiration, sand, dirt or the like, extreme heat, or
food; (c) use of the Products or Accessories for commercial purposes
or subjecting the Product or Accessory to abnormal usage or
conditions; or (d) other acts which are not the fault of Motorola or Giant
International Ltd., are excluded from coverage.
Normal Wear and Tear. Periodic maintenance, repair and
replacement of parts due to normal wear and tear are excluded from
coverage.Batteries. Only batteries whose fully charged capacity falls
below 80% of their rated capacity and batteries that leak are covered
by this limited warranty.
Exclusions
SX709