1
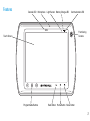
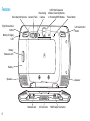
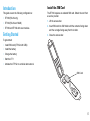
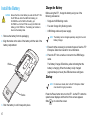
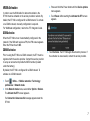
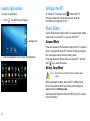
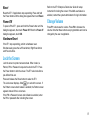
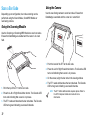
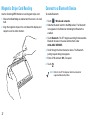
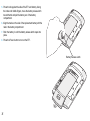
ET1
ENTERPRISE TABLET
QUICK START GUIDE
Motorola Solutions reserves the right to make changes to any product to improve reliability, function, or design. Motorola Solutions does not assume any
product liability arising out of, or in connection with, the application or use of any product, circuit, or application described herein. No license is granted,
either expressly or by implication, estoppel, or otherwise under any patent right or patent, covering or relating to any combination, system, apparatus,
machine, material, method, or process in which Motorola Solutions products might be used. An implied license exists only for equipment, circuits, and
subsystems contained in Motorola Solutions products.
Warranty
For the complete Motorola Solutions hardware product warranty statement, go to: http://www.motorolasolutions.com/warranty.
User Manuals
For more information about the ET1 Enterprise Tablet refer to the ET1 Enterprise Tablet User Guide and ET1 Enterprise Tablet Integrator Guide. For the
latest version of this guide and all ET1 guides, go to: http://supportcentral.motorolasolutions.com.
Service Information
If you have a problem using the equipment, contact your facility’s Technical or Systems Support. If there is a problem with the equipment, they will contact
the Motorola Solutions Global Support Center at: http://www.motorolasolutions.com/support.
Software Support
Motorola Solutions wants to ensure that customers have the latest release of entitled software at the time of product purchase. To confirm that your
Motorola Solutions device shipped with the latest release of entitled software, visit: www.motorolasolutions.com/support. Check for the latest software from
Software Downloads > Product Line/Product > Go. If your device does not have the latest entitled software release as of your product purchase date,
please e-mail a request to Motorola Solutions at: [email protected]. You must include the following essential device information
with your request:
• Model number
• Serial number
• Proof of purchase
• Title of the software download you are requesting.
If it is determined by Motorola Solutions that your device is entitled to the latest software release, you will receive an e-mail containing a link directing you to
a Motorola Solutions Web site to download the appropriate software.
2
Features
Decode LED
Microphone
Light Sensor Battery Charge LED
Communication LED
Front-facing
Camera
Touch Screen
Programmable Buttons
Back Button Home Button Menu Button
3
Features
Secondary Microphone
Rear-facing
Camera Flash
Camera
USB Host Expansion
Module, Scanning Module
or Scanning/MSR Module
Right Scan/Action
Button
Power Button
Left Scan/Action
Button
Battery Charging
LED
Battery
Release Latch
Battery
Speaker
Speaker
Headset Jack
4
I/O Connector
HDMI Output Connector
Introduction
Install the SIM Card
This guide covers the following configurations:
The ET1N2 requires an activated SIM card. Obtain the card from
a service provider.
•
ET1N0 (WLAN only)
•
ET1N2 (WLAN and WAN)
•
ET1N0 and ET1N2 with scan modules.
Getting Started
1. Lift the access door.
2. Insert SIM card into SIM holder with the contacts facing down
and the cut edge facing away from the holder.
3. Close the access door.
To get started:
•
Install SIM card (ET1N2 with GSM)
•
Install the battery
•
Charge the battery
•
Start the ET1
•
Activate the ET1N2 on a mobile data network.
SIM Card
5
Install the Battery
CAUTION
Charge the Battery
Ensure that the correct battery is used with the ET1. On
the ET1N0 use either the 4620 mAh battery, p/n
82-149690-xx or the 5640 mAh battery, p/n
82-158261-xx. On the ET1N2 use only the 5640 mAh
battery, p/n 82-158261-xx. The battery part number is
found on the battery label.
1. Remove the battery from the packaging.
Before using the ET1, charge the battery using one of the
following accessories:
•
Single-slot USB Docking cradle
•
Four-slot Charge Only Docking cradle
•
USB/Charge cable and power supply.
NOTE
2. Align the tracks on the sides of the battery with the rails of the
battery compartment.
The battery can be charged separately using the Four-slot
Battery Charger.
1. Ensure that the accessory is connected to power. See the ET1
Enterprise Tablet User Guide for more information.
2. Place the ET1 into a cradle or connect to the USB/Charge
cable.
Rails
The Battery Charge LEDs blinks yellow indicating that the
battery is charging. When the battery is fully charged
(approximately six hours) the LEDs becomes solid green.
Startup
NOTE
Tracks
3. Push the battery in until it snaps into place.
6
For multi-user mode, refer to the ET1 Enterprise Tablet
User Guide for login procedures.
Press the Power button to turn on the ET1. As the ET1 starts the
splash screen displays and then the Home screen appears.
Slide
up to unlock the screen.
WAN Activation
In order to use the WAN radio for data communication, the
ET1N2 must be activated on the service provider’s network. By
default, the ET1N2 is configured for a GSM network. To activate
on a CDMA network, manually configuration is required.
For WAN data configuration, refer to the ET1 Integrator Guide.
a. Press and hold the Power button until the Device options
menu appears.
b. Touch Reset. After resetting the Activate the ET1 screen
appears.
GSM Activation
When the ET1N2 turns on it automatically configures for the
network. If the SIM card requires a PIN, the PIN screen appears.
Enter the PIN and touch OK.
CDMA Activation
Prior to using the ET1N2 on a CDMA network, the ET1 must be
registered with the service provider. Contact the service provider
to set up an account and provide the MEID number (located
under the battery).
By default, the ET1N2 is configured for a GSM network. To
activate on a CDMA network:
3. Touch Activate. The ET1N2 begins the activation process. If
the activation is unsuccessful, contact the service provider.
1. Touch
> More... > Mobile networks > Technology
preferences > Network mode.
2. In the Network mode menu, select either Sprint or Verizon.
The Activate the ET1 screen appears.
If a Connection Unsuccessful message appears reset the
ET1N2:
7
Launch Applications
Configure the ET1
To launch an application:
To configure ET1 settings, touch
. Refer to the ET1
Enterprise Tablet User Guide and Integrator Guide for
information on configuring the ET1.
1. Touch
. The APPS screen displays.
Power Button
Use the Power button to place the ET1 in suspend mode, battery
swap mode, to reset the ET1 or to power off the ET1.
All Apps icon
2. Touch an application icon to launch the application.
Suspend Mode
Press and release the Power button to place the ET1 in suspend
mode. In Suspend Mode the ET1 turns off the display and goes
into a low power state to conserve battery power.
Press and release the Power button to wake the ET1, and then
slide
up to unlock the screen.
Battery Swap Mode
CAUTION
Do not remove microSD card during Battery Swap
mode.
Before replacing the battery, place the ET1 in Battery Swap
Mode. Press and hold the Power button until the dialog box
appears then touch Battery swap.
The Decode LED lights red. When the LED turns off, it is safe to
remove the battery.
8
Reset
Reset the ET1 if applications stop responding. Press and hold
the Power button until the dialog box appears then touch Reset.
Refer to the ET1 Enterprise Tablet User Guide for setup
instruction for locking the screen. If the Multi-user feature is
enabled, contact the system administrator for login information.
Power Off
Change Volume
To power off the ET1, press and hold the Power button until the
dialog box appears, then touch Power off. When the Power off
dialog box appears, touch OK.
Press P1 to decrease the volume. Press P2 to increase the
volume. Note that these buttons are programmable and can be
changed by the user or application.
Hardware Reset
If the ET1 stop responding, perform a hardware reset.
Simultaneously press the Left Scan/Action, Right Scan/Action
and Power buttons.
Lock the Screen
Lock the screen to protect access to data. When locked, a
Pattern, PIN or Password is required to unlock the ET1. Press
the Power button to lock the screen. The ET1 also locks after a
pre-defined time-out.
Press and release the Power button to wake the ET1.
The Lock screen displays. Slide
up to unlock the screen. If
the Pattern screen unlock feature is enabled, the Pattern screen
appears instead of the Lock screen.
If the PIN or Password screen unlock feature is enabled, enter
the PIN or password after unlocking the screen.
9
Scan a Bar Code
Using the Camera
Depending upon configuration, bar code scanning can be
performed using the Scan Module, Scan/MSR Module or
rear-facing camera.
Use the rear-facing camera to scan bar codes. Ensure that
DataWedge is enabled and the cursor is in a text field.
Using the Scanning Module
Use the Scanning or Scanning/MSR Module to scan bar codes.
Ensure that DataWedge is enabled and the cursor is in a text
field.
1. Point the back of the ET1 at the bar code.
2. Press the Left or Right Scan/Action button. The Decode LED
turns red indicating that a scan is in process.
3. On the screen, align the bar code in the viewing window.
4. The ET1 reads and decodes the bar code data. The Decode
1. Point the top of the ET1 at the bar code.
2. Press the Left or Right Scan/Action button. The Decode LED
turns red indicating that a scan is in process.
3. The ET1 reads and decodes the bar code data. The Decode
LED turns green indicating a successful decode.
10
LED turns green indicating a successful decode.
NOTE
The ET1 offers additional data capture options. Refer to
the ET1 Enterprise Tablet User Guide for more
information.
Photos and Videos
To capture video:
Use the rear-facing camera to take photos and capture video.
1. Touch
NOTE
A microSD card is required to save photos and videos.
>
and then touch the video icon
.
2. Point the ET1 at the subject.
3. On the screen, frame the subject in the window.
4. Touch the on-screen record button
5. Touch the on-screen stop button
to begin recording.
to end recording.
View photos and videos using the Gallery application.
To take a photo:
1. Touch
>
.
2. Point the ET1 at the subject.
3. On the screen, frame the subject in the window and then
touch the on-screen shutter icon
.
4. The ET1 takes the photo.
11
Magnetic Stripe Card Reading
Connect to a Bluetooth Device
Use the Scanning/MSR Module to read magnetic stripe card.
To enable Bluetooth:
1. Ensure that DataWedge is enabled and the cursor is in a text
field.
2. Align the magnetic stripe on the card toward the display and
swipe the card in either direction.
1. Touch
> Wireless & networks.
2. Slide the Bluetooth switch to the ON position. The Bluetooth
icon appears in the Status bar indicating that Bluetooth is
enabled.
3. Touch Bluetooth. The ET1 begins searching for discoverable
Bluetooth devices in the area and lists them under
AVAILABLE DEVICES.
4. Scroll through the list and select a device. The Bluetooth
pairing request dialog box appears.
5. Enter a PIN and touch OK, if required.
6. Touch
NOTE
12
.
Refer to the ET1 Enterprise Tablet User Guide for
supported Bluetooth profiles.
Connect to a WLAN Network
Connect to a Mobile Data Network
To set up a WLAN network:
To connect the ET1N2 to a mobile data network:
1. Touch
1. Touch
> Wireless & networks.
2. Slide the Wi-Fi switch to the ON position. Touch Wi-Fi. The
ET1 searches for WLANs in the area and lists them.
3. Select the desired network.
4. For open networks, the ET1 automatically connects. For
secure networks enter the required password or other
credentials then touch Connect. See the system
administrator for more information.
5. Touch
.
> More... > Mobile networks.
2. Touch the Data enabled checkbox to turn on data connection.
A blue check appears in the checkbox.
3. Touch Data roaming checkbox to allow data communication
while roaming outside of the network. A blue check appears in
the checkbox.
4. Touch
.
Battery Replacement
CAUTION
Do not remove microSD card while in Battery Swap
mode.
Ensure that the Battery Swap mode procedures are
followed, otherwise the backup battery will deplete
quickly and on the ET1N2, SIM card data corruption
might occur.
To replace the battery:
1. Press and hold the Power button until the menu displays.
2. Touch Battery Swap. The Scan LED lights red.
3. Wait until the Scan LED turns off.
4. Turn the ET1 over.
13
5. Press thumb against the side of the ET1 and battery. Using
the index and middle fingers, move the battery release latch
toward thumb and pull the battery out of the battery
compartment.
6. Align the tracks on the side of the replacement battery with the
rails in the battery compartment.
7. Push the battery in until the battery release latch snaps into
place.
8. Press the Power button to turn on the ET1.
Battery Release Latch
14
Accessories
The following accessories are available for the ET1:
•
Single-slot Docking Cradle
•
Four-slot Charge Only Docking Cradle
•
Four-slot Battery Charger
•
Scanning Module
•
Scanning/MSR Module
•
Handstrap
•
Holster
•
Protective Rubber Bezel
•
USB/Charge Cable
•
Two-way DC Cable
•
Power supplies.
15
Motorola Solutions, Inc.
1301 E. Algonquin Rd.
Schaumburg, IL 60196-1078, U.S.A.
http://www.motorolasolutions.com
MOTOROLA, MOTO, MOTOROLA SOLUTIONS and the Stylized M Logo are trademarks or registered trademarks of Motorola
Trademark Holdings, LLC and are used under license. All other trademarks are the property of their respective owners.
© 2013 Motorola Solutions, Inc. All Rights Reserved.
MN000021A01 Revision A - July 2013