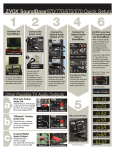
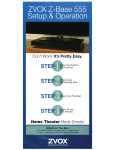
1
Fine Tuning
If you hear a consistent hiss or hum from the ZVOX 575 HSD, it is likely you
are using a variable audio signal output from your TV but ZVOX 575 HSD’s volume
is set too high. Lower the setting on the ZVOX 575 HSD remote VOLUME by at
least three steps or until the hiss is reduced, then set it aside. Use a higher
volume setting on your TV remote from this point forward.
Please keep in mind that your ZVOX 575 HSD is a highly accurate audio system.
It may reveal noise, distortion or other flaws inherent in some audio programs
that were masked with smaller TV speakers.
The PhaseCue control adjusts the size of the perceived “soundstage”. Feel free
to adjust it for different kinds of programs. In general, movies and live action video
programming benefit from a higher setting than music concert programming.
Remember, there are nine discrete steps of PhaseCue effect.
1-Year Limited Warranty
To the original purchaser, ZVOX Audio will warrant the ZVOX 575 HSD system to
be free of defects in material and workmanship for a period of one (1) year from
date of purchase. With respect to defects, ZVOX will, at its option, replace the
product or repair the defect in the product with no charge to the original purchaser
for parts or labor. Customer is responsible for shipping charges where required.
This warranty does not extend to any defect, malfunction or failure caused
by misuses, abuse, accident, faulty hookup, defective associated equipment
or use of the system with equipment for which it is not intended.
This warranty is only valid when the system is returned to the retailer
that sold the ZVOX 575 HSD system to the original purchaser.
This is the sole and express warranty. This warranty is in lieu of all other
warranties, expressed or implied, of merchantability, fitness for purpose or otherwise. In no event shall ZVOX Audio LLC be liable for incidental or consequential
damages or have any liability with respect to defects other than the obligations set
forth as stated. Except as provided herein, ZVOX Audio LLC shall have no
liability or responsibility to the purchaser or any other person or entity with respect
to any liability, loss or damage caused directly or indirectly by use of the product,
including, but not limited to, any incidental or consequential damages.
ZVOXZ-Base 575 HSD
™
Single-Cabinet Surround Sound System
O w n e r ’ s
M a n u a l
D o n ’ t W o r r y – T h i s I s G o i n g To B e S i m p l e
To ensure warranty coverage, it is incumbent upon the original purchaser of
the ZVOX 575 HSD system to inform the retailer of the defect within the warranty
period. The only acceptable method of establishing warranty status is a copy of
the original proof of purchase indicating customer’s name and purchase date.
Questions? E-mail us at [email protected]
® ZVOX is a registered trademark of ZVOX Audio LLC and Phasecue and Z-Base are trademarks of ZVOX Audio LLC.
® RadioShack is a registered trademark of RadioShack Corporation.
59 Thomas Road, Swampscott, MA 01907 USA Telephone: 866-367-9869
www.zvoxaudio.com [email protected]
READ THIS FIRST
Important Safety Instructions For ZVOX 575 HSD System
•
•
Contents
WARNING
TO PREVENT FIRE OR SHOCK HAZARD, DO NOT EXPOSE THIS APPLIANCE TO RAIN OR MOISTURE.
THIS APPLIANCE SHALL NOT BE EXPOSED TO DRIPPING OR SPLASHING WATER AND NO OBJECT FILLED WITH LIQUIDS
SUCH AS VASES SHALL BE PLACED ON APPARATUS.
1. Connect the AC power cord to the 120V~60Hz Power Connector on
the back of the ZVOX 575 HSD cabinet.
The exclamation point within an
equilateral triangle is intended to
alert the user to the presence of
important operating and maintenance
(servicing) instructions in the literature
accompanying the appliance.
Important Safety Instructions
1. Read these instructions.
2. Keep these instructions.
3. Heed all warnings.
4. Follow all instructions.
5. Do not use this apparatus near water.
6. Clean only with dry cloth.
7. Do not block any ventilation openings. Install in accordance
with the manufacturer’s instructions.
8. Do not install near any heat sources such as radiators, heat
registers, stoves, or other apparatus (including amplifiers)
that produce heat.
14. Refer all servicing to qualified service personnel. Servicing is
required when the apparatus has been damaged in any way, such
as power-supply cord or plug is damaged, liquid has been spilled
or objects have fallen into the apparatus, the apparatus has been
exposed to rain or moisture, does not operate normally, or has
been dropped.
Alternate Warnings–This product is equipped with a three-wire
grounding-type plug, a plug having a third (grounding) pin. This
plug will only fit into a grounding-type power outlet. This is a
safety feature. If you are unable to insert the plug into the outlet,
contact your electrician to replace your obsolete outlet. Do not
defeat the safety purpose of the grounding-type plug.
10. Protect the power cord from being walked on or pinched
particularly at plugs, convenience receptacles, and the point
where they exit from the apparatus.
16. Ventilation–Slots and openings in the cabinet are provided for
ventilation and to ensure reliable operation of the product and
to protect it from overheating, and these openings must not be
blocked or covered. The openings should never be blocked by
placing the product on a bed, sofa, rug, or other similar surface.
This product should not be placed in a built-in installation such
as a bookcase or rack unless proper ventilation is provided or the
manufacturer’s instructions have been adhered to.
12. Use only with the cart, stand, tripod, bracket, or table
specified by the manufacturer, or sold with the apparatus.
When a cart is used, use caution when moving the
cart/apparatus combination to avoid injury from tip-over.
13. Unplug this apparatus during lightning storms or when unused
for long periods of time.
17. The MAINS plug or an appliance coupler is used as the disconnect
device, the disconnect device shall remain readily operable.
18. CLASS II apparatus with double insulation, and no protective
earth provided.
Special Safety Warnings Regarding Placement of ZVOX 575 HSD and Other Equipment
Stable Placement. Do not place the ZVOX 575 HSD
on an unstable cart, stand, bracket or table. The
ZVOX 575 HSD may fall, causing serious injury to a
child or adult and serious damage to the product.
Do not use the ZVOX 575 HSD on any unstable surface.
Placement of a TV on the ZVOX 575 HSD. Televisions weighing less
than 140 pounds, and with base dimensions of less than 34" in width and
less than 15" in depth, can be placed on top of the ZVOX 575 HSD—BUT
ONLY WHEN THE FOLLOWING SAFETY PRECAUTIONS ARE STRICTLY
OBSERVED. PLACING A TV ON TOP OF THE ZVOX 575 HSD WITHOUT
FOLLOWING ALL THE PRECAUTIONS IS DANGEROUS AND SHOULD
NOT BE DONE.
Warning: Don’t plug AC cord into outlet before
it is connected to the power connector on the
rear of the unit.
2. After you have confirmed the AC power
cord is properly connected to ZVOX 575
HSD, connect the AC power cord plug
into a convenient AC receptacle.
3. After you have made the necessary
audio signal connections (see below),
set the POWER switch on the back
of the ZVOX 575 HSD to ON.
Rear AC panel of ZVOX 575 HSD
Audio Signal Connection
There are three ways to connect an audio signal to the ZVOX 575 HSD.
1) Digital Coaxial – labeled Coaxial
15. Grounding or Polarization–This product may be equipped with
a polarized alternating-current line plug (a plug having one blade
wider than the other). This plug will fit into the power outlet only
one way. This is a safety feature. If you are unable to insert the
plug fully into the outlet, try reversing the plug. If the plug should
still fail to fit, contact your electrician to replace your obsolete
outlet. Do not defeat the safety purpose of the polarized plug.
9. Do not defeat the safety purpose of the polarized or groundingtype plug. A polarized plug has two blades with one wider than
the other. A grounding type plug has two blades and a third
grounding prong. The wide blade or the third prong are provided
for your safety. If the provided plug does not fit into your outlet,
consult an electrician for replacement of the obsolete outlet.
11. Only use attachments/accessories specified by the manufacturer.
Placement
Power Connection
risk of electrical shock,
Do not open
Warning: To reduce the risk of electrical
shock, do not remove cover (or back) no
serviceable parts inside. Refer servicing
to qualified service personnel.
ZVOX Audio ZVOX 575 HSD cabinet
AC power cord
Remote Control and Battery
Analog Audio Connecting Cable (left and right RCA type plugs on
each end)
Place the ZVOX 575 HSD cabinet on a sturdy surface.
The ZVOX 575 HSD grille should face the listening area.
CAUTION
This lightning flash with arrowhead
symbol, within an equilateral triangle, is
intended to alert the user to the presence
of uninsulated “dangerous voltage” within
the product’s enclosure that may be
sufficient magnitude to constitute a risk
of electrical shock to persons.
Installation and Operating Instructions:
ZVOX 575 HSD Single-Cabinet Surround Sound System
• The television must weigh 140 pounds or less.
• The base of the TV, or the TV stand, must be 34" wide or less.
• The base of the TV, or the TV stand, must be 15" deep or less.
• The TV MUST be anchored to the rear wall using anchor bolts and
supporting cables supplied by the TV manufacturer, following the
installation guidelines provided by the TV manufacturer.
• Be sure to take measures to prevent the ZVOX 575 HSD from
becoming uneven or unstable. Install the ZVOX 575 HSD on a
solid and flat surface.
TV Audio Settings
Turn off the TV’s internal speakers
Push the MENU button on the TV’s remote control and navigate to the AUDIO
setting options. Choose INTERNAL SPEAKER: OFF (the wording may vary).
Analog audio option–“FIXED” versus “VARIABLE”
If you are using an analog signal connection, there may be an AUDIO setting
option to select AUDIO OUT as VARIABLE (the wording may vary). This is
sometimes labeled AOV. Variable audio output allows your TV’s remote control
to adjust the listening volume.
OUTPUT jack
Use this jack to connect an external powered subwoofer, if desired. This
jack supplies a full-range monaural analog audio signal. Set the subwoofer’s
crossover (sometimes labeled “Low Pass”) to 50 Hz or lower, then adjust the
subwoofer’s output to blend well with the ZVOX 575 HSD.
Remote Control
1. Insert the AAA batteries inside the remote control.
2. Turn on the ZVOX 575 HSD by pushing the power button on the remote
control. A blue LED light should come on.
3. Auto ON/OFF Function: In normal operation, the ZVOX 575 HSD enters
standby mode 5-8 minutes after turning off the audio program. The front
panel light will turn from blue to green to indicate standby mode. When you
turn on a new program, the light will turn blue again and the program will
play. To defeat this “automatic standby” mode, press the AUTO ON/OFF
button once (the light will blink). To restore the setting, press the button again.
Using The Remote Control
The ZVOX remote control has “+” and “-” buttons to control four ranges.
VOLUME | PHASECUE | SUBWOOFER | TREBLE
2) Digital Optical – labeled Optical
The blue light on the speaker will blink with each adjustment step up or down.
It will stop blinking when the maximum or minimum setting has been reached.
3) Analog Stereo – labeled Input 1
1.VOLUME: Adjust the ZVOX 575 HSD remote VOLUME buttons as desired.
When the MUTE button is pushed, the speaker output is silenced and a blue
light will blink until output is restored with another press of the MUTE button.
Rear input panel of ZVOX 575 HSD
Coaxial Digital. Use a coaxial digital connecting cable (not supplied).
Connect one end to the coaxial digital output of your TV or other source.
Connect the other end to the ZVOX 575 HSD “Coaxial” input.
Optical Digital. Use an optical or “TOSLINK” connecting cable (not
supplied). Connect one end to the optical digital output of your TV or
other source. Connect the other end to the ZVOX 575 HSD “Optical” input.
Analog Stereo (Input 1). Plug the supplied analog connecting cable into
the red and white jacks labeled “Input 1” on the back of the ZVOX 575 HSD.
Use the red plug for the red jack (right channel). Use the other plug for
the white jack (left channel). Plug the opposite ends of the cable into
the “Audio Out” jacks of your TV or other audio source following the same
color scheme.
Note: connecting an analog stereo signal to the ZVOX 575 HSD may allow
you to control the sound level produced with your TV remote. A headphone
output on a TV can also be used as a variable analog audio output if the
sound level of the headphones is controlled by the TV’s remote control.
A connecting cable matching the headphone output jack is necessary in
this case.
Controlling The Audio Sound Level
A standard digital audio signal (Coaxial or Optical) and a typical analog
audio output are fixed level. The level of the sound produced by the
ZVOX 575 HSD should be adjusted using its supplied IR remote control.
Note: A universal or programmable/learning remote can be substituted to
control the ZVOX 575 HSD and all of your TV and other connected devices.
One brand of universal remote controls containing the ZVOX audio IR codes
is Logitech® Harmony®. The ZVOX 575 HSD will respond to the following
preprogrammed audio remote codes listed in other universal remote
controls: candle 1004/hisense 1237/aiwa 1036. Not all universal remote
controls contain these codes.
If your audio source is variable: First, set the volume on the TV (or other
audio source) to about 3/4 of its full range. Then adjust the ZVOX 575 HSD
remote VOLUME buttons until the output is as loud as you require. From
this point forward, use the TV remote to control the volume. Use the ZVOX
remote as required to adjust the other audio qualities (PhaseCue, Subwoofer
and Treble).
2.PHASECUE: Adjust the level of virtual surround
with these two buttons. As you increase the
PhaseCue level, the apparent soundfield will
expand well to the left and right of the ZVOX
575 HSD. The effect is most obvious with DVD
movies and live action TV programming. News
broadcasts, talk shows and sitcoms do not
have much stereo content. PhaseCue may
have little or no effect on these programs.
NOTE: IF YOU FIND THAT CROWD NOISE
OR MOVIE SPECIAL EFFECTS ARE
“DROWNING OUT” THE DIALOG, TRY
TURNING DOWN THE PHASECUE LEVEL.
THIS WILL RESTORE CLARITY TO DIALOG.
3.SUBWOOFER: Adjust the bass output of the
ZVOX 575 HSD as desired. The control has
nine steps. Most users will find a single setting
that works for most audio programs. If you use
an external subwoofer, leave this control in the
mid point setting (five steps up from minimum),
then adjust the external subwoofer to your
preferred bass output.
4.TREBLE: Adjust as desired. Nine adjustment
steps are available and the difference between
each step is small. Most users will find a single
setting that works for most audio programs.
Fine Tuning
If you hear a consistent hiss or hum from the ZVOX 575 HSD, it is likely you
are using a variable audio signal output from your TV but ZVOX 575 HSD’s volume
is set too high. Lower the setting on the ZVOX 575 HSD remote VOLUME by at
least three steps or until the hiss is reduced, then set it aside. Use a higher
volume setting on your TV remote from this point forward.
Please keep in mind that your ZVOX 575 HSD is a highly accurate audio system.
It may reveal noise, distortion or other flaws inherent in some audio programs
that were masked with smaller TV speakers.
The PhaseCue control adjusts the size of the perceived “soundstage”. Feel free
to adjust it for different kinds of programs. In general, movies and live action video
programming benefit from a higher setting than music concert programming.
Remember, there are nine discrete steps of PhaseCue effect.
1-Year Limited Warranty
To the original purchaser, ZVOX Audio will warrant the ZVOX 575 HSD system to
be free of defects in material and workmanship for a period of one (1) year from
date of purchase. With respect to defects, ZVOX will, at its option, replace the
product or repair the defect in the product with no charge to the original purchaser
for parts or labor. Customer is responsible for shipping charges where required.
This warranty does not extend to any defect, malfunction or failure caused
by misuses, abuse, accident, faulty hookup, defective associated equipment
or use of the system with equipment for which it is not intended.
This warranty is only valid when the system is returned to the retailer
that sold the ZVOX 575 HSD system to the original purchaser.
This is the sole and express warranty. This warranty is in lieu of all other
warranties, expressed or implied, of merchantability, fitness for purpose or otherwise. In no event shall ZVOX Audio LLC be liable for incidental or consequential
damages or have any liability with respect to defects other than the obligations set
forth as stated. Except as provided herein, ZVOX Audio LLC shall have no
liability or responsibility to the purchaser or any other person or entity with respect
to any liability, loss or damage caused directly or indirectly by use of the product,
including, but not limited to, any incidental or consequential damages.
ZVOXZ-Base 575 HSD
™
Single-Cabinet Surround Sound System
O w n e r ’ s
M a n u a l
D o n ’ t W o r r y – T h i s I s G o i n g To B e S i m p l e
To ensure warranty coverage, it is incumbent upon the original purchaser of
the ZVOX 575 HSD system to inform the retailer of the defect within the warranty
period. The only acceptable method of establishing warranty status is a copy of
the original proof of purchase indicating customer’s name and purchase date.
Questions? E-mail us at [email protected]
® ZVOX is a registered trademark of ZVOX Audio LLC and Phasecue and Z-Base are trademarks of ZVOX Audio LLC.
® RadioShack is a registered trademark of RadioShack Corporation.
59 Thomas Road, Swampscott, MA 01907 USA Telephone: 866-367-9869
www.zvoxaudio.com [email protected]