1
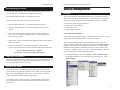
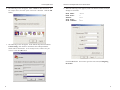
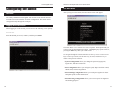
Instant Gigabit™ Series
EtherFast Dual Gigabit
with 24-Port 10/100
Switch
®
Use this guide to install:
Linksys EtherFast® Dual Gigabit
with 24-Port 10/100
Switch(EF24G2)
User Guide
COPYRIGHT & TRADEMARKS
Copyright © 2001 Linksys, All Rights Reserved. EtherFast is a registered trademark of
Linksys. Microsoft, Windows, and the Windows logo are registered trademarks of
Microsoft Corporation. All other trademarks and brand names are the property of their
respective proprietors.
LIMITED WARRANTY
Linksys guarantees that every EtherFast® Dual Gigabit with 24-Port 10/100 Switch is
free from physical defects in material and workmanship under normal use for FIVE
years from the date of purchase. If the product proves defective during this warranty
period, call Linksys Customer Support in order to obtain a Return Authorization
Number. BE SURE TO HAVE YOUR PROOF OF PURCHASE ON HAND WHEN CALLING. RETURN REQUESTS CANNOT BE PROCESSED WITHOUT PROOF OF PURCHASE. When returning a product, mark the Return Authorization Number clearly on
the outside of the package and include your original proof of purchase. All customers
outside of the United States of America and Canada shall be held responsible for shipping and handling charges.
IN NO EVENT SHALL LINKSYS’ LIABILITY EXCEED THE PRICE PAID FOR THE PRODUCT FROM DIRECT, INDIRECT, SPECIAL, INCIDENTAL, OR CONSEQUENTIAL DAMAGES RESULTING FROM THE USE OF THE PRODUCT, ITS ACCOMPANYING SOFTWARE, OR ITS DOCUMENTATION. LINKSYS DOES NOT ISSUE REFUNDS. WARRANTY DOES NOT COVER NATURAL DISASTERS OR ACTS OF NATURE.
Linksys makes no warranty or representation, expressed, implied, or statutory, with
respect to its products or the contents or use of this documentation and all accompanying software, and specifically disclaims its quality, performance, merchantability, or
fitness for any particular purpose. Linksys reserves the right to revise or update its
products, software, or documentation without obligation to notify any individual or entity.
Please direct all inquiries to:
Linksys P.O. Box 18558, Irvine, CA 92623.
FCC STATEMENT
The EtherFast® Dual Gigabit with 24-Port 10/100 Switch has been tested and found to
comply with the limits for a Class A digital device, pursuant to Part 15 of the FCC
Rules. These limits are designed to provide reasonable protection against harmful
interference in a residential installation. This equipment generates, uses, and can radiate radio frequency energy and, if not installed and used according to the instructions,
may cause harmful interference to radio communications. However, there is no guarantee that interference will not occur in a particular installation. If this equipment does
cause harmful interference to radio or television reception, which is found by turning
the equipment off and on, the user is encouraged to try to correct the interference by
one or more of the following measures:
•
•
•
•
Reorient or relocate the receiving antenna
Increase the separation between the equipment or device
Connect the equipment to an outlet other than the receiver’s
Consult a dealer or an experienced radio/TV technician for assistance
UG-EF24G2-10503NC DG
Instant Gigabit®Series
Table of Contents
EtherFast® Dual Gigabit with 24-Port 10/100 Switch
Introduction
Introduction
Package Contents
1
2
The Linksys EtherFast® Dual Gigabit with
24-Port 10/100 Switch
Getting to Know the Switch
LEDs
The RJ-45 Ports
The Gigabit Ports
The Console Port
3
3
4
4
4
Migrate your network to Gigabit speed with the EtherFast® Dual Gigabit with 24Port 10/100 Switch. This new Switch from Linksys provides blazing transfer
speeds for your network applications with integrated Gigabit over copper connectivity.
Installing the Switch
Pre-Installation Considerations
Rack-Mounting the Switch
Powering on the Switch
Uplinking the Switch
5
5
6
6
6
Apply this switching power to your current Ethernet network, and your data traffic
efficiency will improve several times over. Connect your workstations to the
Switch's 10/100 ports, and speed up access time for all your users in just one
move. Its maximum wire speed enables optimal internal processing, while data
flow control filters out faulty packets and address learning and aging prevents
data transfer errors. Connect your servers through the Gigabit ports for dedicated
bandwidth of up to 2000Mbps—the speed is yours!
Switch Management
Overview
7
7
Configuring the Switch
Overview
Logging On to the Switch
The Main Menu
The System Configuration Menu
The Port Configuration Menu
The Port Trunking Configuration Menu
The Port Mirroring Configuration Menu
The VLAN Configuration Menu
The Priority Configuration Menu
The Restart Menu
10
10
10
11
12
14
17
19
20
22
23
Glossary
24
Specifications
Environmental
28
28
Warranty Information
29
Contact Information
30
With the EtherFast® Dual Gigabit with 24-Port 10/100 Switch, you can connect your
server to one of the Gigabit ports and connect your workstations to any of the
available 10/100 ports, and you’ve maximized your network. In addition, the
Switch has easy, hassle-free setup with no configuration required.
Save money and time with this all-in-one solution for Gigabit over copper connectivity over your 10/100 Ethernet network.
1
Instant Gigabit®Series
EtherFast® Dual Gigabit with 24-Port 10/100 Switch
Getting to Know the Switch
LEDs
Power
(Green) The LED will illuminate when the switch is
powered on.
PER PORT
Link/Act
(Green/Amber) The LED will illuminate green when the
port makes a connection at 100Mbps, and flash green when
there is activity on the port at 100Mbps. The LED will
illuminate amber when the port makes a connection at
10Mbps, and flash amber when there is activity on the port at
10Mbps.
FD/Col
(Amber) The LED will illuminate amber when the port is
operating in full-duplex mode, and flicker amber when
collisions are being encountered.
Package Contents
• One EtherFast® Dual Gigabit with 24-Port 10/100 Switch
• One Power Cord
• Mounting Brackets (not shown)
• One Serial/Console Cable (not shown)
• User Guide and Registration Card
GIGABIT PER PORT (G1/G2)
2
1000Link
(Green) The LED will illuminate when the Gigabit Port
is successfully connected to a network.
FD/Col
(Amber) The LED will illuminate amber when the port is
operating in full-duplex mode, and flicker amber when
collisions are being encountered.
Rx
(Green) The LED will illuminate when the Gigabit Port is
receiving data.
Tx
(Green) The LED will illuminate when the Gigabit Port is
transmitting data.
3
Instant Gigabit®Series
The RJ-45 Ports
The EtherFast® Dual Gigabit with 24-Port 10/100 Switch is equipped with
twenty-four 10/100 RJ-45 ports. These RJ-45 ports support network speeds of
either 10Mbps or 100Mbps, and can operate in half- and full-duplex modes.
Auto-sensing technology enables each port to automatically detect the speed
of the device connected to it (10Mbps or 100Mbps), and adjust its speed and
duplex accordingly. Each port also auto-senses the type of cable being used,
either straight-through or crossover.
To connect a device to a port, you will need to use a network cable. UTP
Category 3 cable is acceptable for 10BaseT networks, however, if you are
using 100BaseTX devices you will need to use UTP Category 5 (or better)
cable. The two Gigabit ports require UTP Category 5e cable (or better).
EtherFast® Dual Gigabit with 24-Port 10/100 Switch
Installing the Switch
Pre-Installation Considerations
Fast Ethernet Considerations
If you will be using the Switch for Fast Ethernet (100Mbps) or Gigabit
(1000Mbps) applications, you must observe the following guidelines:
• The maximum UTP cabling length using Category 3 cable is 328 feet (100
meters).
• The maximum UTP cabling length using Category 5 cable is 328 feet (100
meters).
Full-Duplex Considerations
As previously mentioned, the Switch provides full-duplex support for its RJ45 ports. Full-duplex operation allows data to be sent and received simultaneously, doubling a port’s potential data throughput.
The Gigabit Ports
If you will be using the Switch in full-duplex mode, the maximum UTP cable
length using Category 5e (or better) cable is 328 feet (100meters).
The EtherFast® Dual Gigabit with 24-Port 10/100 Switch is equipped with
two Gigabit ports. These ports provide links to high-speed network segments
or individual workstations at speeds of up to 2000Mbps (Gigabit Ethernet).
The two Gigabit ports require UTP Category 5e cable (or better).
Positioning the Switch
The Console Port
The EtherFast® Dual Gigabit with 24-Port 10/100 Switch is equipped with a
serial port (located on the rear of the switch) that allows you to connect to a
computer (for configuration purposes) using the provided serial cable.
Before you choose a location for the Switch, observe the following guidelines:
• Keep cabling away from sources of electrical noise, power lines, and
fluorescent lighting fixtures.
• Position the Switch away from water and moisture sources.
• To ensure adequate air flow around the Switch, be sure to provide a
minimum of one inch (25mm) clearance.
• Do not stack free-standing Switches more than four units high.
4
5
Instant Gigabit®Series
Rack-Mounting the Switch
The EtherFast® Dual Gigabit with 24-Port 10/100 Switch can be used as a
free-standing unit, or installed in any standard 19-inch rack.
Use the following instructions to rack-mount the Switch:
Before you begin, disconnect all cables from the Switch.
1. Place the Switch right side up, with the front panel facing you.
2. Position a mounting bracket over the screw holes on one side of the
Switch.
3. Secure the mounting bracket by inserting three screws into the screw
holes. Use a screwdriver to tighten the screws, ensuring that they are
fastened firmly in place.
4. Repeat steps 2 and 3 to install the other mounting bracket on the opposite
side of the Switch.
5. Insert the Switch into the 19-inch rack and secure it with suitable
screws (not provided). Ensure that the ventilation holes are not obstructed.
The rack-mount installation is complete.
You can now re-connect the cables to the Switch.
Powering on the Switch
To power on the Switch, simply connect the AC power cord to the back of the
Switch, then plug the power cord into an electrical outlet. The Switch will
boot up within approximately 30 seconds.
EtherFast® Dual Gigabit with 24-Port 10/100 Switch
Switch Management
Overview
The Linksys EtherFast® Dual Gigabit with 24-Port 10/100 Switch offers an
easy-to-use, menu-driven console interface. Using this interface, you can perform various switch configuration and management activities, including:
• Configuring system and port parameters
• Configuring routing properties
• Setting VLAN policy
• Configuring Port Trunking
Local Console Management
You can manage the Switch locally by connecting the switch to a PC or workstation with terminal emulation software using the serial port.
The serial port settings need to be configured before connecting to the
Switch. In order to change the settings of your port, run the Hyperterminal
program. This program comes packaged with Windows, but it may not be
installed on your computer. It should be located as is shown below (varies
according to operating system). If it is not, consult your Windows documentation for instructions on installing Hyperterminal.
1. Click the Start button. Select Accessories and then Communications.
Hyperterminal should be one of the options listed in this menu. Select
Hyperterminal.
Uplinking the Switch
Any of the 26 ports on the EtherFast® Dual Gigabit with 24-Port 10/100
Switch can act as an uplink port, allowing you to uplink to other switches or
hubs using a standard Ethernet connection. UTP Category 5e (or better)
cable is recommended when using the Gigabit ports.
To uplink the switch, connect one end of a network cable into the Switch,
then connect the other end of the cable into the desired network device’s
uplink port.
6
7
Instant Gigabit®Series
2. The following screen will appear. Enter a Name for this connection. In
the example below, the name of the connection is EF24G2. Click the OK
button.
EtherFast® Dual Gigabit with 24-Port 10/100 Switch
4. When the following screen appears, make sure that the switch’s serial port
settings are as follows:
BAUD RATE:
DATA BITS:
PARITY:
STOP BITS:
FLOW CONTROL:
38400
8
None
1
None
3. The following screen will appear. In the bottom drop down box labled
Connect using:, click the arrow and choose the COM port that the
Switch will be connected to. In the example below, COM1 is the port
selected. Click the OK button.
Click the OK button. You can now go to the next section, Configuring
the Switch.
8
9
Instant Gigabit®Series
Configuring the Switch
Overview
EtherFast® Dual Gigabit with 24-Port 10/100 Switch
The Main Menu
After you log on to the Switch, the Main Menu screen will appear.
The Linksys EtherFast® Dual Gigabit with 24-Port 10/100 Switch features a
menu-driven console interface for switch configuration. The Switch can be
configured locally through the serial port.
Logging On to the Switch
When logging on to the Switch, you will receive the following screen prompt:
Password:
Enter the default password (“admin”), and then press Enter.
The Main Menu screen consists of a series of options. Each option leads you
to the screen for that management setting. Highlighting any option selects it;
pressing the Enter key takes you to that screen.
To navigate through the Console Interface use the Up Arrow or Down Arrow
keys to move up or down, use the Enter key to select, and the Esc key to
return to the previous selection.
• System Configuration allows you change the password, aging time,
logout time, and auto refresh time.
• Port Configuration allows you configure speed, duplex and flow control,
admin status, and auto negotiation.
• Port Trunking Configuration allows you trunk ports together for faster
backplane speeds in data transmission.
• Port Mirroring Configuration allows you to mirror ports for diagnostic
and tracking purposes.
10
11
Instant Gigabit®Series
• VLAN Configuration allows you to group individual ports into a small
“virtual” network of their own, independent of the other ports.
• Priority Configuration allows you assign varying degrees of priority to
each port, making it possible for the information being transmitted on specific ports to always take precedence over other ports.
• Restart allows you to restart the Switch, causing it to reboot.
• Exit takes you out of the Configuration.
The System Configuration Menu
The System Configuration Menu screen (shown here), allows you to view or
change the following values:
EtherFast® Dual Gigabit with 24-Port 10/100 Switch
• Aging time - This value indicates how long the Switch will keep an MAC
address which has had no activity in its buffer memory. Keeping the
MAC address in memory is valuable because the Switch does not have to
search the network in order to deliver data to that MAC address, significantly preserving network bandwidth. After the specified amount of time
passes, the Switch will “dump” the inactive MAC address, meaning that
when new data comes through for that MAC address, the Switch will have
to relocate it before transmitting. The higher the value, the longer the
Switch will remember the MAC address before dumping it. To change the
value, highlight it and press the Enter key. Enter the new value, which is
measured in seconds, and press the Enter key again. You will receive a
message in the white status bar near the bottom of the screen that indicates
whether or not the change was accepted.
• Logout time - This value, measured in minutes, is how long the Switch
will wait before logging an inactive user off the network. Once the specified number of minutes have passed, any inactive user will be automatically logged out. In order to change this value, highlight the Logout time
value and press the Enter key. Type in the new desired value and press
the Enter key. You will receive a message in the white status bar near the
bottom of the screen that indicates whether or not the change was accepted.
• Auto refresh time - This value, measured in seconds, is how often the
Switch will refresh the values on any screens in the menu. In order to
change this value, highlight the Auto refresh time value and press the
Enter key. Type in the new desired value and press the Enter key. You
will receive a message in the white status bar near the bottom of the
screen that indicates whether or not the change was accepted.
• Password - This is where the administrative password for the Switch is set.
With the password value highlighted, press the Enter key. Type in the new
desired password and press the Enter key. You will receive a message in
the white status bar near the bottom of the screen that indicates whether or
not the change was accepted. Passwords may be made up of any characters on the keyboard.
Once you have made all the changes you wish to make, highlight Return
and hit the Enter key to return to the Main Menu.
Note: When changing your Password, record the
new Password in a safe place. If this new
Password is lost, there is no method of recovering
it.. Without the Password, it will be impossible to
change any other settings on the Switch.
12
13
Instant Gigabit®Series
The Port Configuration Menu
The Port Configuration Menu screen (shown here), allows you to view or
change the following values for each of the 24 10/100 ports:
EtherFast® Dual Gigabit with 24-Port 10/100 Switch
value, highlight the desired port under Auto Negotiate and press the Space
Bar key. This will toggle back and forth between the options of Enabled
and Disabled. Once you have made your choice, press the Enter key.
You will receive a message in the white status bar near the bottom of the
screen that indicates whether or not the change was accepted. The default
setting for this value is Enabled.
• Speed/Duplex Current - This value is automatically determined by the
Switch and cannot be changed by the user. The value will reflect the current speed and duplex negotation of the port.
• Speed/Duplex Config (10HDX, 10FDX, 100TX-HDX, 100TX-FDX) Configuring this value determines the speed and duplex at which the port
will operate, if the port has not been configured to Auto Negotiate. If the
port has been configured to Auto Negotiate, the speed would be determined by the Switch, but this setting will still affect the duplex operation
of the port. To change the value, highlight the desired port under
Speed/Duplex Config and press the Space Bar key. This will toggle back
and forth between the 4 different options. Once you have made your
choice, press the Enter key. You will receive a message in the white status
bar near the bottom of the screen that indicates whether or not the change
was accepted. The default setting for this value is 100TX-FDX.
• Link Status - (On/Off) This value is automatically determined by the
Switch and cannot be changed by the user. If there is a successful connection to the Switch through that port, the Link Status will be On. The status will be Off if there is no connection through that port.
• Admin Status - (Enabled/Disabled) Under Admin Status, each port can
be completely disabled or enabled. Disabling a port turns the port off,
making it inoperable. Any port that you wish to make a connection
through must be enabled. To change the value, highlight the desired port
under Admin Status and press the Space Bar key. This will toggle back
and forth between the options of Enabled and Disabled. Once you have
made your choice, press the Enter key. You will receive a message in the
white status bar near the bottom of the screen that indicates whether or not
the change was accepted. The default setting for this value is Enabled.
• Auto Negotiate - (Enabled/Disabled) The Auto Negotiate function, when
enabled, allows the Switch to automatically determine the speed of the
connection of that port and adjust to it. When it is disabled, that port will
operate according to the settings determined by the user. To change the
14
• Flow Control - (On/Off) This setting determines whether or not the Switch
will be handling flow control. When set to On, the Switch will manage
data transfer to avoid overflow. When set to Off, there is either no flow
control, or it is managed by other hardware or software. To change the
value, highlight the desired port under Flow Control and press the Space
Bar key. This will toggle back and forth between the options of On and
Off. Once you have made your choice, press the Enter key. You will
receive a message in the white status bar near the bottom of the screen that
indicates whether or not the change was accepted. The default setting for
this value is Off.
Note: The settings for the two Gigabit ports are
slightly different than those of the 24 10/100 ports.
See the next page for information concerning the
settings and values of these two ports.
15
Instant Gigabit®Series
The two Gigabit ports have slightly different configuration settings under this
menu. There are four screens of ports (Ports 1-8 on the first screen, Ports 916 on the second screen, etc.), so the Gigabit ports (Ports 25 and 26) are on
the last screen by themselves (shown here).
• Link Status and Admin Status - Same as the other 24 ports. See the
beginning of this section.
• Auto Negotiate - This value is automatically determined for these two
ports by the Switch and cannot be changed by the user.
EtherFast® Dual Gigabit with 24-Port 10/100 Switch
The Port Trunking Configuration Menu
The Port Trunking Configuration Menu screen (shown here), allows you to
view or change the following values:
• Add - If you would like to trunk a group of ports together to increase the
backplane speed of the Switch, highlight Add and press the Enter key.
The following screen will appear, showing the preset trunk groups programmed into the Switch.
• Speed/Duplex - This value is automatically determined for these two ports
by the Switch and cannot be changed by the user.
• Flow Control - (Off - BothWay - SendOnly - Rcv/BothWay) Flow control
for the Gigabit ports is slightly more complex because of the greater speed
involved. Flow control for these two ports can be disabled (Off), set to
monitor both transmitting and receiving (BothWay), set to monitor just the
transmitting (SendOnly), or just the receiving (Rcv/BothWay). To change
the value, highlight the desired port under Flow Control and press the
Space Bar key. This will toggle back and forth between the 4 different
options. Once you have made your choice, press the Enter key. You will
receive a message in the white status bar near the bottom of the screen that
indicates whether or not the change was accepted. The default setting for
this value is Off.
Once you have made all the changes you wish to make, highlight Return
and hit the Enter key to return to the Main Menu.
16
17
Instant Gigabit®Series
Using the arrow keys, choose any of the preset groups that you wish to
trunk together and press the Enter key. Repeat the process until you have
chosen all the groups that you want to trunk. After hitting the Enter key
for each choice, that preset will disappear from the list and appear on the
previous screen. Once you have made all your choices, highlight the
Return option and press the Enter key. You will be returned to the previous menu. The trunk group(s) that you have entered should appear in the
order that you chose them.
Each trunk’s information will be displayed (i.e., how many ports are in the
trunk, and which port numbers). To delete any trunk group on this screen,
highlight that trunk and press the Enter key. You will receive a message
in the white status bar near the bottom of the screen that states Are you
sure you want to perform this operation? (y/n). Confirm the deletion
by pressing the Y key, or cancel the deletion by pressing the N key.
Once you have made all the changes you wish to make, highlight Return
and hit the Enter key to return to the Main Menu.
18
EtherFast® Dual Gigabit with 24-Port 10/100 Switch
The Port Mirrroring Configuration Menu
The Port Mirroring Configuration Menu screen (shown here), allows you to
view or change the following values:
• Port Mirroring (Enabled/Disabled) - Port mirroring allows the user to
assign two different ports to carry the same data stream. This is a diagnostic tool that permits the user to verify that all data is being transmitted
and received properly. In order to activate port mirroring, highlight the
value next to Port Mirroring and press the Space Bar key. This will toggle back and forth between the options of Enabled and Disabled. Once
you have made your choice, press the Enter key. You will receive a message in the white status bar near the bottom of the screen that indicates
whether or not the change was accepted. The default setting for this value
is Disabled.
If you have enabled Port Mirroring, a screen will appear with each of the
26 ports listed. Using the arrow keys, highlight the port you wish to mirror and press the Space Bar key. This will toggle back and forth between
the options of T, R and B. T represents “transmit”, R represents “receive”
and B represents “Both”. Once you have made your choice, press the
Enter key. You will receive a message in the white status bar near the bottom of the screen that indicates whether or not the change was accepted.
Then highlight the value next to Monitor Port Tx and hit the Enter key.
Enter the number of the port that you wish to mirror the tranmissions to (if
you are mirroring transmissions), and hit the Enter key again. You will
19
Instant Gigabit®Series
receive a message in the white status bar near the bottom of the screen that
indicates whether or not the change was accepted. Highlight the value
next to Monitor Port Rx and hit the hit the Enter key. Enter the number
of the port that you wish to mirror the received transmissions to (if you are
mirroring received transmissions), and hit the Enter key again. You will
receive a message in the white status bar near the bottom of the screen that
indicates whether or not the change was accepted. Only one port may be
mirrored (transmissions and received transmissions) at a time.
Note: The two Gigabit ports may only mirror each
other, because of their speed. Do not attempt to
mirror a Gigabit port to a regular port, or you will
overload that port, causing your Switch to malfunction.
Once you have made all the changes you wish to make, highlight Return
and hit the Enter key to return to the Main Menu.
The VLAN Configuration Menu
A Virtual Local Area Network (VLAN) is a method of separating some of the
ports of a switch or hub into a smaller subgroup and making this group its
own network. The VLAN Configuration Menu screen (shown here), allows
you to view or change the following values:
20
EtherFast® Dual Gigabit with 24-Port 10/100 Switch
• Link Status and Admin Status - Same as the other 24 ports. See the
beginning of this section.
• Auto Negotiate - This value is automatically determined for these two
ports by the Switch and cannot be changed by the user.
• Speed/Duplex - This value is automatically determined for these two ports
by the Switch and cannot be changed by the user.
• Flow Control - (Off - BothWay - SendOnly - Rcv/BothWay) Flow control
for the Gigabit ports is slightly more complex because of the greater speed
involved. Flow control for these two ports can be disabled (Off), set to
monitor both transmitting and receiving (BothWay), set to monitor just the
transmitting (SendOnly), or just the receiving (Rcv/BothWay). To change
the value, highlight the desired port under Flow Control and press the
Space Bar key. This will toggle back and forth between the 4 different
options. Once you have made your choice, press the Enter key. You will
receive a message in the white status bar near the bottom of the screen that
indicates whether or not the change was accepted. The default setting for
this value is Off.
Once you have made all the changes you wish to make, highlight Return
and hit the Enter key to return to the Main Menu.
21
Instant Gigabit®Series
The Priority Configuration Menu
Setting priority levels of ports allows the user to determine which ports will
always transfer their data first. The Priority Configuration Menu screen
(shown here), allows you to view or change the following values:
EtherFast® Dual Gigabit with 24-Port 10/100 Switch
press the Enter key. You will receive a message in the white status bar
near the bottom of the screen that indicates whether or not the change was
accepted.
Once you have made all the changes you wish to make, highlight Return
and hit the Enter key to return to the Main Menu.
The Restart Menu
The Restart Menu screen (shown here), allows you to view or change the following values:
• Priority Threshold (0~7) - The Priority Threshold is the dividing line, set
by the user, between high and low priority ports on the Switch. For
instance, if the user sets the Priority Threshold value at 4, then any ports
that have a value set to 4 or higher will receive the highest priority when
the Switch is transferring data. Ports that have a value set to 3 or below
must wait until the high priority ports are done to transmit. This option
allows the user to make sure that computers or devices connected to certain ports always have the highest priority. To change this value, highlight
the value next to Priority Threshold using the arrow keys and use the
Space Bar key to scroll through the options (0~7). Once you have made
your choice, press the Enter key. You will receive a message in the white
status bar near the bottom of the screen that indicates whether or not the
change was accepted. The default setting for this value is 3.
• Port Priority (per port) (0~7) - The Port Priority value allows the user to
set the priority of each port, depending on the user’s need. Each port can
be assigned a level of priority, based on the Priority Threshold (see above).
Each of the 26 ports are listed. Using the arrow keys, highlight the port
you wish to set the priority value for and press the Space Bar key. This
will toggle between the options (0~7). Once you have made your choice,
22
• Factory Default - The Factory Default option resets all of the Switch’s
settings from all the menus. Before selecting this option, you should
record all values from the other screens for reference. To reset the Switch,
highlight Factory Default using the arrow keys and press the Enter key.
You will receive a message in the white status bar near the bottom of the
screen that states “Are you sure you wish to perform this operation? (y/n)”.
Press the Y key to confirm the reset, or N to cancel.
• Restart - To restart the Switch, highlight Restart using the arrow keys
and press the Enter key. You will receive a message in the white status
bar near the bottom of the screen that states “Are you sure you wish to perform this operation? (y/n)”. Press the Y key to confirm the resart, or N to
cancel. The Switch will restart and return to the Main Menu.
23
Instant Gigabit®Series
Glossary
10BaseT - An Ethernet standard that uses twisted wire pairs.
100BaseTX - IEEE physical layer specification for 100 Mbps over two pairs of
Category 5 UTP wire.
1000BASE-T - provides half-duplex (CSMA/CD) and full-duplex 1000Mbps
Ethernet service over Category 5e links as defined by ANSI/TIA/EIA-568-A.
Topology rules for 1000BASE-T are the same as those used for 100BASE-TX.
Category 5e link lengths are limited to 100 meters by the ANSI/TIA/EIA-568A cabling standard. Only one CSMA/CD repeater will be allowed in a collision
domain.
Adapter - Printed circuit board that plugs into a PC to add to capabilities or
connectivity to a PC. In a networked environment, a network interface card
(NIC) is the typical adapter that allows the PC or server to connect to the
intranet and/or Internet.
Auto-negotiate - To automatically determine the correct settings. The term is
often used with communications and networking. For example, Ethernet
10/100 cards, hubs and switches can determine the highest speed of the node
they are connected to and adjust their transmission rate accordingly.
Backbone - The part of a network that connects most of the systems and networks together and handles the most data.
Bandwidth - The transmission capacity of a given facility, in terms of how
much data the facility can
transmit in a fixed amount of time; expressed in bits per second (bps).
CAT 3 - ANSI/EIA (American National Standards Institute/Electronic
Industries Association) Standard 568 is one of several standards that specify
"categories" (the singular is commonly referred to as "CAT") of twisted pair
cabling systems (wires, junctions, and connectors) in terms of the data rates
that they can sustain. CAT 3 cable has a maximum throughput of 16 Mbps and
is usually utilized for 10BaseT networks.
24
EtherFast® Dual Gigabit with 24-Port 10/100 Switch
CAT 5 - ANSI/EIA (American National Standards Institute/Electronic
Industries Association) Standard 568 is one of several standards that specify
"categories" (the singular is commonly referred to as "CAT") of twisted pair
cabling systems (wires, junctions, and connectors) in terms of the data rates
that they can sustain. CAT 5 cable has a maximum throughput of 100 Mbps
and is usually utilized for 100BaseTX networks.
CAT 5e - The additional cabling performance parameters of return loss and farend crosstalk (FEXT) specified for 1000BASE-T and not specified for
10BASE-T and 100BASE-TX are related to differences in the signaling implementation. 10BASE-T and 100BASE-TX signaling is unidirectional-signals
are transmitted in one direction on a single wire pair. In contrast, Gigabit
Ethernet is bi-directional-signals are transmitted simultaneously in both directions on the same wire pair; that is, both the transmit and receive pair occupy
the same wire pair .
Data Packet - One frame in a packet-switched message. Most data communications is based on dividing the transmitted message into packets. For example,
an Ethernet packet can be from 64 to 1518 bytes in length.
Dynamic Routing - The ability for a router to forward data via a different route
based on the current conditions of the communications circuits. For example, it
can adjust for overloaded traffic or failing lines and is much more flexible than
static routing, which uses a fixed forwarding path.
Ethernet - IEEE standard network protocol that specifies how data is placed on
and retrieved from a common transmission medium. Has a transfer rate of 10
Mbps. Forms the underlying transport vehicle used by several upper-level protocols, including TCP/IP and XNS.
Fast Ethernet - A 100 Mbps technology based on the 10BASE-T Ethernet
CSMA/CD network access method.
Full Duplex - The ability of a device or line to transmit data simultaneously in
both directions.
Half Duplex - Data transmission that can occur in two directions over a single
line, but only one direction at a time.
Hardware - Hardware is the physical aspect of computers, telecommunications,
and other information technology devices. The term arose as a way to distinguish
the "box" and the electronic circuitry and components of a computer from the program you put in it to make it do things. The program came to be known as the software.
25
Instant Gigabit®Series
Hub - The device that serves as the central location for attaching wires from
workstations. Can be passive, where there is no amplication of the signals; or
active, where the hubs are used like repeaters to provide an extension of the
cable that connects to a workstation.
IEEE - The Institute of Electrical and Electronics Engineers. The IEEE
describes itself as "the world's largest technical professional society -- promoting the development and application of electrotechnology and allied sciences
for the benefit of humanity, the advancement of the profession, and the wellbeing of our members."
The IEEE fosters the development of standards that often become national and
international standards. The organization publishes a number of journals, has
many local chapters, and several large societies in special areas, such as the
IEEE Computer Society.
EtherFast® Dual Gigabit with 24-Port 10/100 Switch
RJ-45 (Registered Jack-45) - A connector similar to a telephone connector that
holds up to eight wires, used for connecting Ethernet devices.
Throughput - The amount of data moved successfully from one place to
another in a given time period.
TX Rate - Transmission Rate.
UTP - Unshielded twisted pair is the most common kind of copper telephone
wiring. Twisted pair is the ordinary copper wire that connects home and many
business computers to the telephone company. To reduce crosstalk or electromagnetic induction between pairs of wires, two insulated copper wires are
twisted around each other. Each signal on twisted pair requires both wires.
Since some telephone sets or desktop locations require multiple connections,
twisted pair is sometimes installed in two or more pairs, all within a single
cable.
LAN - A local area network (LAN) is a group of computers and associated
devices that share a common communications line and typically share the
resources of a single processor or server within a small geographic area (for
example, within an office building).
Latency - The time delay between when the first bit of a packet is received and
the last bit is forwarded.
MAC Address - The MAC (Media Access Control) address is your computer's
unique hardware number.
Mbps (MegaBits Per Second) - One million bits per second; unit of measurement for data transmission.
Network - A system that transmits any combination of voice, video and/or data
between users.
NIC (Network Interface Card) - A board installed in a computer system, usually a PC, to provide network communication capabilities to and from that
computer system. Also called an adapter.
Port - A pathway into and out of the computer or a network device such as a
switch or router. For example, the serial and parallel ports on a personal computer are external sockets for plugging in communications lines, modems and
printers.
26
27
Instant Gigabit®Series
EtherFast® Dual Gigabit with 24-Port 10/100 Switch
Specifications
Warranty Information
Model Number
Standards
BE SURE TO HAVE YOUR PROOF OF PURCHASE AND A BARCODE
FROM THE PRODUCT'S PACKAGING ON HAND WHEN CALLING.
RETURN REQUESTS CANNOT BE PROCESSED WITHOUT PROOF OF
PURCHASE.
Protocol
Ports
Speed Per Port (Mbps)
10/100 Ports
1000 Ports
MAC Addresses
Max Frame Size
Buffer Memory
Cabling Type
LEDs
EF24G2
IEEE 802.1d, IEEE 802.1p, IEEE 802.1q,
IEEE 802.3, IEEE 802.3ab, IEEE 802.3ad,
IEEE 802.3u, IEEE 802.3x
CSMA/CD
24 10/100Base-TX RJ-45 Ports
2 1000Base-TX RJ-45 Ports
1 RS232 DB-9 Port
10 or 100 (Half Duplex)
20 or 200 (Full Duplex)
1000 (Half Duplex)
2000 (Full Duplex)
32k
1522 Bytes
2Mb
UTP Category 5 or Better (10/100)
UTP Category 5e or Better (1000)
Power,
FD/Col (per Port),
Link/Act (per Port)
IN NO EVENT SHALL LINKSYS’ LIABILITY EXCEED THE PRICE PAID
FOR THE PRODUCT FROM DIRECT, INDIRECT, SPECIAL, INCIDENTAL, OR CONSEQUENTIAL DAMAGES RESULTING FROM THE USE
OF THE PRODUCT, ITS ACCOMPANYING SOFTWARE, OR ITS DOCUMENTATION. LINKSYS DOES NOT OFFER REFUNDS FOR ANY PRODUCT.
LINKSYS OFFERS CROSS SHIPMENTS, A FASTER PROCESS FOR PROCESSING AND RECEIVING YOUR REPLACEMENT. LINKSYS PAYS
FOR UPS GROUND ONLY. ALL CUSTOMERS LOCATED OUTSIDE OF
THE UNITED STATES OF AMERICA AND CANADA SHALL BE HELD
RESPONSIBLE FOR SHIPPING AND HANDLING CHARGES. PLEASE
CALL LINKSYS FOR MORE DETAILS.
Environmental
Dimensions
Unit Weight
Power Input
Power Consumption
Certifications
Operating Temp.
Storage Temp.
Operating Humidity
Storage Humidity
28
17.3” x 9.7” x 1.7”(440mm x 247mm x 44mm)
5.95 lbs. (2.7Kg)
100-264V AC, 50-60Hz
60 watts
FCC Class A
0° C to 50° C (32° F to 122° F)
40° C to 70° C (-40° F to 158° F)
20 % to 95 % Non-Condensing
20 % to 95 % Non-Condensing
29
Instant Gigabit®Series
Contact Information
For help with the installation or operation of this product, contact Linksys
Customer Support at one of the phone numbers or Internet addresses below.
Sales Information
Tech Support and RMA Issues
Fax
Email
Web
FTP Site
30
800-546-5797 (LINKSYS)
800-326-7114
949-261-1288
949-261-8868
[email protected]
http://www.linksys.com
ftp.linksys.com
h t t p : / / w w w. l i n k s y s . c o m
© Copyright 2001 Linksys, All Rights Reserved.
Printed in the USA.