1
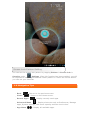
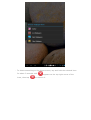
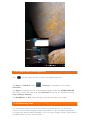
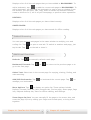
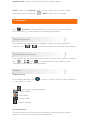
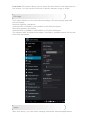
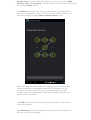
IdeaTab A2107A
User Guide
V1.0
Please read the
safety precautions and important notes
in the supplied manual before use.
Chapter 01
IdeaTab A2107A Overview
*Specific models only
1-1
IdeaTab Appearance
1-2
Buttons and SIM Card Slot
1-3
Turning On/Off Your IdeaTab
1-4
Activating/Deactivating the Display
1-5
Screen Lock/Unlock
1-6
Navigation Tips
1-7
Home Screen
1-8
Switching Home Screens
1-9
Status Bar
1-10
Recent Apps
1-11
Applications Management
1-12
Entering Text
1-1 IdeaTab Appearance
Images are for reference purposes only, and may differ from your IdeaTab
A2107A.
NOTE: You are advised to use the earphone/headset (not supplied) conforming
to OMPT (Open Mobile Terminal Platform).
1-2 Buttons and SIM Card Slot
Power Button
To turn on your IdeaTab, press and hold this button for about 4 seconds,
then release it.
If your IdeaTab is turned on, press this button to deactivate the display.
If the display is deactivated, press this button to activate the display.
To turn off your IdeaTab, press and hold this button for about 1 second,
then select OK in the Power off pop-up window to shut down your
IdeaTab.
Should it be necessary, press and hold this button for about 6 seconds to
force shutdown.
Volume Controls
Press the Volume Up or Down button to adjust the volume.
SIM Card Slot
Two SIM card slots are located on the top of the IdeaTab. Turn off the
IdeaTab, insert the SIM card. To remove the SIM card while turned off, pull
the card out of the SIM card slot gently.
The following table describes the service your IdeaTab provides after
inserting the SIM card(s).
SIM1 slot
SIM2 slot
Service
-
2G SIM card
2G in SIM2 slot
2G SIM card
-
2G in SIM1 slot
-
3G SIM card
3G in SIM2 slot
2G SIM card
2G SIM card
2G in SIM1 slot and 2G in SIM2 slot
2G SIM card
3G SIM card
2G in SIM1 slot and 3G in SIM2 slot
3G SIM card
2G SIM card
3G in SIM1 slot and 2G in SIM2 slot
3G SIM card
3G SIM card
If the SIM card last used for 3G service before
shutting down is still in the product
The SIM card last used for 3G continues to
provide 3G service. The other SIM card
provides 2G service.
3G SIM card
3G SIM card
If the SIM card last used for 3G service before
shutting down is not in the product
3G in SIM1 slot and 2G in SIM2 slot.
NOTE: There is no 2G network service provider in Japan. In Japan (or other
regions with no 2G network service), results for 2G in the above table should
be read as ‘no service’.
1-3 Turning On/Off Your IdeaTab
Turning On Your IdeaTab
Press and hold the Power button on your IdeaTab for about 4 seconds, then
release it. The Lenovo logo and the startup screen will appear in sequence,
indicating your IdeaTab has been turned on.
Turning Off Your IdeaTab
Press and hold the Power button on your IdeaTab for about 1 second. The
Power off pop-up window will appear. Tap OK to turn off your IdeaTab.
NOTE: When connecting to a computer with a USB cable, make sure that the
battery power is sufficient for normal operation; otherwise, charge with the AC
power adapter before USB connection.
1-4 Activating/Deactivating the Display
Activating the Display
With the display deactivated, press the Power button on the IdeaTab to
activate the display. The IdeaTab's display will then illuminate, indicating that
it has been activated.
Deactivating the Display
If you do not need to use your IdeaTab temporarily, you can press the Power
button to deactivate the display. Your IdeaTab will then enter standby mode to
save power.
1-5 Screen Lock/Unlock
Screen Lock
Auto-Lock
You can set screen timeout by tapping Screen timeout in Display under
Settings. If there is no operation within the preset standby time, the
display will automatically deactivate, and your IdeaTab will be locked
automatically.
Manual Lock
If you do not need to use your IdeaTab temporarily, you can press the Power
button for about 1 second to deactivate the display. Your IdeaTab will then be
locked, and will enter standby mode.
Screen Unlock
When in standby mode, press the Power button on your IdeaTab to activate
the display. Then, tap and hold the lock icon, and drag the slider over the
unlock icon, as shown in the illustration below.
Screen Lock Pattern Setting
You can set the screen lock pattern by tapping Pattern in Screen lock in
Security under
Settings. After this function has been enabled, you will
be required to trace a personalized unlock pattern to unlock the screen before
you can use your IdeaTab.
1-6 Navigation Tips
Back
: Return to the previous screen.
Home
: Return to the Home screen.
Recent Apps
: Display recently used apps.
Advanced Menu
: Display shortcuts such as Preferences, Manage
apps, System settings, Add more capacity and One touch clear.
App Menu
: Display all available apps.
1 - Back
2 - Home
3 - Recent Apps
4 - Advanced Menu
5 - App Menu
1-7 Home Screen
This desktop enables you to quickly view and open your most frequently used
applications.
In the Home screen, you can add shortcuts and change your wallpaper.
To add a shortcut to the Home screen, tap and hold the icon of the app
in the applications list until it is added to the Home screen.
To change your wallpaper, tap and press any blank area on the Home
screen for about 2 seconds. You can choose a wallpaper in the pop-up
window.
To delete something on the Home screen, tap and hold the selected item
for about 2 seconds until
icons, then tap
appears on the top right corner of the
to remove it.
1-8 Switching Home Screens
Your IdeaTab has multiple desktops.
Move through screens by sliding your finger across the display. Icons can be
moved from one desktop to another.
1-9 Status Bar
System messages, if any, will be displayed on the bottom right corner of the
display.
Information about WLAN connections and reception, power levels, charging
status, and other notifications are displayed in the status bar.
to open the
Tap the status bar to display the notification panel. Tap
setting details window which contains the Airplane mode switch, WLAN setting
shortcut, Auto-rotate screen switch, Brightness adjustment toolbar,
Notifications switch and Settings shortcut.
1-10 Recent Apps
Your IdeaTab remembers apps you have used recently.
Tap
to display a list of your recently used apps. Tap an app to open it.
1-11 Applications Management
Tap
on the Home screen to open the applications list.
Tap Apps in DEVICE under
Settings to manage all your apps.
Uninstall
Tap Apps to display the list of downloaded apps under the DOWNLOADED
tab. Then choose the app, and tap Uninstall at the top to uninstall the app.
Stop/Change Setting
Tap RUNNING or ALL, then the app, and tap the option you want.
1-12 Entering Text
You can easily enter text from the virtual keyboard directly on the touch
screen, such as when adding contact information in the Contacts application,
or typing and editing SMS messages. You can input English letters and numeric
symbols directly on the touch screen.
Virtual keyboard
on the bottom left bar to hide the virtual keyboard. Tap the text
Tap
input box to display the virtual keyboard.
Switch Input Method
Tap
/
to toggle letters and numbers.
Tap
to enter a capital letter. Or tap and hold
until
to turn caps lock on. Tap it again to unlock.
it changes into
To input a symbol, tap and hold the key until a blue pop-up box appears,
then drag your finger to the symbol you want.
In number input mode, tap
characters. Tap
to input symbols and special
to go back to number input mode.
Input Options
Tap
to open the Input options menu. You can select Input
languages or Android keyboard settings in this menu.
*Specific models only
Chapter 02: Connecting to the Internet
Chapter 02
Connecting to the Internet
2-1
Browser
2-1 Browser
Network support is required to access the Internet with the web browser. If
you have problems accessing your network, please consult your network
operator or service provider directly.
The web browser in your IdeaTab can access the Internet via a WLAN or 3G
network, for business and/or personal use.
Tap
Browser in the applications list to open the browser.
The browser supports the following functions:
Entering Web Addresses
Tap the address bar, and input a web address using the pop-up virtual
keyboard.
on the virtual keyboard to open the web page.
Tap
Exiting the Browser
Tap
screen.
on the bottom left bar to exit the browser and return to the Home
Managing Browser Web Pages
Tap
to open the Browser management interface, where you can manage
Bookmarks, Internet visiting history and pages read offline under their
corresponding tabs.
BOOKMARKS:
Displays a list of all the web pages that you have added to BOOKMARKS. To
add a bookmark, tap
to add the current web page to BOOKMARKS. To
edit a bookmark, tap and hold the bookmark to open a pop-up window. From
the window, you can open, edit, copy, share or delete the selected website,
create a shortcut for it, set it as your homepage, or perform other operations.
HISTORY:
Displays a list of all the web pages you have visited recently.
SAVED PAGES:
Displays a list of all the web pages you have saved for offline reading.
Tabbed Browsing
You can open several web pages in the same window to multiply your web
surfing fun. Tap
tap its tab. Tap
to open a new tab. To switch to another web page, just
on the tab to close it.
Additional Functions
Refresh: Tap
to manually refresh a web page.
Backward/Forward: Tap
go to the next page.
or
to return to the previous page or to
Select Text: Select text in the current page for copying, sharing, finding, and
web searching.
Add/Edit Bookmarks: Tap
manage your bookmarks.
to bookmark the current page. Tap
to
to display an option list. These options include
More Options: Tap
Refresh, Forward, New tab, New incognito tab, Find on page, Share page, Page
info, Request desktop site, Save for offline reading, and Settings.
Zoom Pages In/Out: You can manually fit the page to the screen size, and
zoom the page in/out by sliding your finger and thumb apart, or bring them
together.
Chapter 01: IdeaTab A2107A Overview
Chapter 03: Applications
Chapter 03
Applications
Tap
3-1
Calculator
3-2
Calendar
3-3
Camera
3-4
Clock
3-5
Email
3-6
Gallery
on the Home screen to open the applications list.
3-1 Calculator
Tap
Calculator in the applications list to open the calculator.
3-2 Calendar
Tap
Calendar in the applications list to open the calendar.
New Calendar Event
Tap
in the Calendar view to create a new event. You can also create a
new event by tapping and holding a time in the Week or Day view.
Manage Calendar Events
You can switch between DAY, WEEK, MONTH, and AGENDA by tapping the
appropriate tab at the top of the page.
Day view: Tap and hold an event in Day view to view, edit or delete the
event.
Week view: Tap and hold an event in Week view to view, edit or delete the
event.
Month view: Manage events in Week view from Month view by tapping any
date in the Month view.
Agenda view: Tap to view events across a range of dates.
NOTE: Within any Calendar view, you can easily return to the current
day/week/month by tapping
TODAY at the top of the page.
3-3 Camera
Camera in the applications list to open the camera interface.
Tap
In this interface, you can perform the following operations:
Switch Cameras
Your IdeaTab provides you with front/back camera. In the photo/video
interface, tap
/
to switch between the front and back cameras.
Switch Camera Modes
Your IdeaTab provides you with three camera modes. In the camera interface,
tap
,
and
to switch between photo taking, video
recording and panorama shooting modes.
Photos
Taking Photos
In the photo interface, tap
or - to zoom in or out.
Tap
to take a picture. Drag the slider towards +
to set the camera properties.
White balance
Color effect
Scene mode
Camera settings
Viewing Photos
Tap the photo preview in the photo interface to open the photo viewing
interface. You can set and play photo slideshows.
Photo Saving Location
Any photos you have taken will be saved in the
Gallery application.
Tap
Gallery in the applications list to open a list of all the photos you
have taken. You can view photos by Albums, Locations, Times, People or
Tags.
Videos
Recording Videos
Tap
recording.
in the video interface to start recording, or tap
Tap
to set the camera properties.
to stop
White balance
Color effect
Time lapse interval
Video quality
Camera settings
Viewing Videos
A thumbnail image of the latest recorded video will be displayed on the top
right corner of the video interface. Tap the image to open the video player.
Shooting Panoramas
Capturing Panorama Images
In the panorama interface, tap
to start capturing. Move your IdeaTab
again to stop capturing. The entire panned scene will be
slowly. Tap
captured in one photo.
Viewing Photos
Tap the photo preview in the panorama interface to open the photo viewing
interface. You can set and play photo slideshows.
Photo Saving Location
Any panoramas you have taken will be saved in the
application. Tap
Gallery
Gallery in the applications list to open a list of all the
photos you have taken.
3-4 Clock
Tap
Clock in the applications list to open the Clock.
To add an alarm, tap
Set alarm, and then Add alarm. After you have
finished editing the alarm, tap Done and select the check box in front of the
alarm time to activate the alarm.
To restart an already set alarm, select the check box in front of the alarm
time.
When an alarm sounds, tap Dismiss to deactivate the alarm, or Snooze to
delay it for ten minutes.
3-5 Email
Network support is required to use your IdeaTab's mailbox. If you have
problems accessing your network, please consult your network operator or
service provider directly.
Tap
Email in the applications list.
3-6 Gallery
Tap
Gallery to open the Photo application and view photos stored on
your IdeaTab. In the Photo application homepage, photos are automatically
displayed on the top left corner as Albums. You can select how to display your
photos: Albums, Locations, Times, People or Tags.
Chapter 02: Connecting to the Internet
Chapter 04: Settings
Chapter 04
Settings
*Specific models only
4-1
WIRELESS & NETWORKS
4-2
DEVICE
4-3
PERSONAL
4-4
SYSTEM
4-5
Statement
Tap
Settings in the applications list to open the Settings interface.
4-1 WIRELESS & NETWORKS
This setting module includes: SIM management, WLAN, Bluetooth, Data
usage and More... (Airplane mode, VPN, Personal hotspot and Mobile
networks*).
SIM management
SIM management allows you to enable/disable a SIM card, and set a SIM card
as the default, etc.
WLAN
This setting allows you to enable/disable WLAN connections.
When WLAN is enabled, your IdeaTab will automatically scan for available
wireless networks, displaying them in the WLAN network list.
The network status icon,
indicates that the network requires no
indicates that the
password, and can be connected to directly. However,
network has been encrypted, and can be connected to only after the required
password is entered.
You can select any network you want from the list. After selecting the network,
tap Connect to connect directly. Alternatively, select the check box in front of
Show advanced options to adjust the proxy and IP settings in the pop-up
text box, and then tap Connect to connect to a network. You can also select
ADD NETWORK to manually add a network. Tap
advanced WLAN settings.
, then Advanced for
Network notification: When activated, the system will notify you if
there are any open net works available.
Keep WLAN on during sleep: You can set WLAN connection policy
during sleep mode to Always, Only when plugged in or Never
(increases data usage) .
Bluetooth
You can establish a wireless connection with any other Bluetooth compatible
device using Bluetooth technology. Examples of Bluetooth compatible devices
can include stereo earphones, keyboard, etc.
Since a Bluetooth-enabled device communicates with other devices by radio
waves, you do not have to position your IdeaTab directly towards the other
device. You simply need to make sure that the maximum distance between the
two devices does not exceed 10 m (about 32 feet). However, please note that
the Bluetooth connection can sometimes be interrupted by obstacles, such as
walls, or other electronic devices.
Your IdeaTab supports V2.0 Bluetooth. To ensure effective operation of your
IdeaTab and another Bluetooth-enabled device, please use only Lenovoapproved accessories compatible with your IdeaTab. Also, check with the
manufacturer of the other device to determine whether the device is
compatible with your IdeaTab.
In some cases, the use of Bluetooth may be restricted. Please consult with
local authorities or your service provider.
Using applications that require Bluetooth technology or running such
applications in the background will consume the battery power of your IdeaTab
at a faster rate, and reduce the service life of your battery. You can perform
the following in Bluetooth settings:
AVAILABLE DEVICES: After Bluetooth has been activated, your IdeaTab
will automatically display a list of any Bluetooth-enabled devices it can
find within the effective range (i.e. scan for devices).
Data usage
You can check your data usage status for a specified period.
More...
Airplane mode: When the Airplane mode is enabled, all wireless connections
on your IdeaTab will be disabled.
VPN: These settings allow you to add and set up various types of VPN (Virtual
Private Network).
Personal hotspot: You can share your IdeaTab's mobile data connection
through USB, Bluetooth, or act as a Personal WLAN hotspot Configure WLAN
hotspot.
Mobile networks*: This setting module includes Data enabled, Data
roaming, Network Mode, System select, CDMA Subscription, Access
Point Names, Use only 2G networks and Network operators.
4-2 DEVICE
Audio profiles
Tap this option to enter the Sound settings interface. Settings include
PROFILES SETTINGS (General, Silence, Meeting, outdoors) and
CUSTOMIZE YOUR PROFILE (General, Silence, Meeting).
Display
Display settings include Brightness, Wallpaper, Auto-rotate screen,
Screen timeout and Font size.
Brightness: You can manually adjust the brightness or select Automatic
brightness, which allows your IdeaTab to adjust screen brightness
automatically according to ambient light.
Wallpaper: You can select any pictures from Gallery, Live Wallpapers or
Wallpapers as your wallpaper.
Auto-rotate screen: Allow or prevent the screen from automatically rotating.
Screen timeout: This option allows you to select how long your IdeaTab's
screen will remain activated without any operation before it is automatically
locked to save power. You can set the time to 15 seconds, 30 seconds, 1
minute, 2 minutes, 5 minutes, 10 minutes or Never sleep.
Font size: This option allows you to select the font size for text displayed on
the screen. You can set the font size to Small, Normal, Large or Huge.
Storage
This option allows you to view internal storage, SD card storage and USB
device storage.
Nominal capacity calculation
method:1GB=1,000MB=1,000,000KB=1,000,000,000 bytes
Operating system calculation
method:1GB=1,024MB=1,048,576KB=1,073,741,824 bytes
The system itself occupies some space; therefore, available space will be less
than that calculated.
Apps
With this option, you can easily manage and delete selected applications.
You can also filter any running applications or applications provided by thirdparty software developers in the applications list.
After selecting an application, you will then be able to see its details and
related information. You will also be able to perform functions such as Force
stop, Uninstall, Clear cache and Clear data.
4-3 PERSONAL
This setting includes: Accounts & sync, Location services, Security,
Language & input and Backup & reset.
Accounts & sync
Adjust these options to change general sync settings and manage accounts.
General sync settings enable you to select background data and Auto-sync.
Turn the switch on on the top right of the display to activate.
Account management settings enable you to add accounts or use an existing
account. You can log in by using an existing account to view information in
your account, or use advanced services and applications for the IdeaTab.
Location services
Select how your IdeaTab determines its location. Use either assisted GPS or
GPS.
A-GPS (3G only): Under certain conditions, this can improve startup
performance, or time-to-first-fix (TTFF) of a GPS satellite-based positioning
system.
GPS satellites (3G only): Pinpoint your location using GPS.
Security
Security settings include: SCREEN SECURITY, SIM CARD LOCK (3G version
only), PASSWORDS, DEVICE ADMINISTRATION and CREDENTIAL
STORAGE.
SCREEN SECURITY: You can set the screen lock method, and owner
information to be displayed on the lock screen.
Screen lock: You can unlock the display in one of four ways: Slide,
Pattern, PIN and Password. You can deactivate the screen lock as well
by selecting None as well.
Tap Pattern, and use your finger on the screen (as illustrated) to
draw an unlock pattern. Once you have set the unlock pattern, you
will then be able to toggle Make pattern visible on/off.
After you have set and activated the pattern unlock function, the
unlock keypad will be displayed whenever the display is to be
unlocked. Use your finger to trace your preset pattern on the
keypad. After the preset pattern has been correctly entered, the
screen will be unlocked.
Tap PIN to input the PIN code (minimum 4 digits) you will use to
unlock the display.
Tap Password to input the password (minimum 4 characters) you
will use to unlock the display.
Owner info: You can input the owner information to be displayed on the
lock screen.
SIM CARD LOCK*: Set SIM card lock-related settings.
PASSWORDS: Under this option, you can decide whether or not your chosen
password will be visible when you input it. If the check box is selected, then
the password will be visible. If it is not selected, then your password will only
be displayed as **** when you input it, thereby keeping your password more
secure.
DEVICE ADMINISTRATION: Set to administrate your IdeaTab and allow
installation of non-market apps.
Device administrators: These functions are not available to ordinary
users. Only TsingMail users who have previously set up the appropriate
security settings within their organizations can use these functions.
These features work in conjunction with the Enterprise Policy Center
(Lenovo Enterprise Policy Manager). The Enterprise Policy Center is
the executor of the security policies of the Lenovo enterprise
platform. Whenever the user enables the Lenovo enterprise mail
and service function, the Enterprise Policy Center will then be
enabled automatically. This will allow your IdeaTab to accept
security policies as set forth by the IT department of your
organization, for example, mandatory screensavers with increased
password protection. Enabling these functions also allows your
IdeaTab to accept management instructions from your company’s
IT department, for example, allowing them to erase data remotely
and reset your device.
Unknown sources: Select this option to allow installation of non-Market
apps.
CREDENTIAL STORAGE: This function allows your IdeaTab to access web
pages and LANs for which a specific security certificate or another certificate is
required.
Trusted credentials: Select this option to display all the trusted CA
certificates.
Install from SD card: Install certificates from SD card.
Clear credentials: Select this option to delete all your currently saved
certificates.
Language & input
Language: Select the language you wish to use to operate your IdeaTab.
Spelling correction: Toggle spelling correction on/off.
Personal dictionary: You can add new words or terms here to your IdeaTab's
dictionary.
KEYBOARD & INPUT METHODS: This option allows you to select and set the
input method (including Default and Android keyboard).
Backup & reset
This option allows you to reset your IdeaTab to the factory default settings.
4-4 SYSTEM
Date & time
These settings allow you to set a number of time-related options, such as
system time.
You can enable automatic time and time zone updates via a network (which
requires network support), select a time zone, set a specific date and time,
and display format for date and time.
Schedule power on/off
This option allows you to set the power on/off time.
Accessibility
SYSTEM: This option allows you to set touch & hold delay time, whether to
allow the installation of web scripts.
Developer options
This option is only available to developers, and allows you to set development
options to be available for a particular application.
USB debugging: Activates debugging mode when connected via USB.
You can toggle on/off.
Stay awake: The display will stay illuminated while the battery is being
charged after the check box is selected. Toggle on/off.
Allow mock locations: Toggle on/off.
About tablet
Under this option, you can view Firmware update, Status, Legal
information, Model number, Android version, Baseband version and
Build number etc.
4-5 Statement
For the device which tests accordance to EN 60950-1:
2006+A11:2009:+A1:2010+A12:2011, it is mandatory to perform audio tests
for EN50332.This device have been tested to comply with the Sound Pressure
Level requirement laid down in the applicable EN 50332-1and/or EN 50332-2
standards. Permanent hearing loss may occur if earphones or headphones are
used at high volume for prolonged periods of time.
Warning statement: A pleine puissance, l’écoute prolongée du baladeur peut
endommager l’oreille de l’utilisateur.
EU Contact: Lenovo, Einsteinova 21, 851 01 Bratislava, Slovakia
*Specific models only
Chapter 03: Applications