1
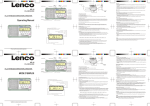
1
DT-10 Owner’s manual
Thank you for purchasing the Korg DT-10 digital tuner. Before you
begin using your new tuner, please read this manual carefully and use
the tuner as directed. After you have read the manual, keep it in a safe
place for future reference.
9. FLAT mode LED
This will light if you have specified a flat tuning.
Turning on the power
Installing the battery:
1 Lightly press on “A” of the battery compartment in the bottom
panel of the DT-10, and open the lid upward.
2 Attach the battery to the battery clip. Make sure that the polarity is
correct.
Precautions
10. Note display
Shows an alphabetical character and a dot (indicating a sharp “#”) to
indicate the note name that is nearest the pitch that is input from the
INPUT jack. This display also shows the calibration or flat tuning
setting at power-on or while you are making the setting.
3 Place the battery in the battery compartment, and close the lid.
Connections
A
Location
Using the unit in the following locations can result in a malfunction.
• In direct sunlight
• Locations of extreme temperature or humidity
• Excessively dusty or dirty locations
• Locations of excessive vibration
• Close to magnetic fields
Power supply
Please connect the designated AC adapter to an AC outlet of the correct voltage. Do not
connect it to an AC outlet of voltage other than that for which your unit is intended.
Interference with other electrical devices
Radios and televisions placed nearby may experience reception interference. Operate this unit
at a suitable distance from radios and televisions.
Handling
To avoid breakage, do not apply excessive force to the switches or controls.
Care
B
Turn off the power of all devices before you make connections.
The INPUT, OUTPUT, and BYPASS jacks are all mono. Stereo
cables cannot be used.
The battery also backs up the settings, and maintains the calibration
and flat tuning settings. If you remove the battery from the DT-10 or if
the battery runs low, the calibration will be reset to 440 Hz and the flat
tuning setting will be reset to 0. (If an AC adaptor is used with the DT10, the settings will not be lost.)
When the battery nears the end of its life, the LED meter and note
display will become darker. Install a new battery as soon as
possible.
If the exterior becomes dirty, wipe it with a clean, dry cloth. Do not use liquid cleaners such as
benzene or thinner, or cleaning compounds or flammable polishes.
Panel and functions
Keep this manual
After reading this manual, please keep it for later reference.
Keeping foreign matter out of your equipment.
Never set any container with liquid in it near this equipment. If liquid gets into the equipment,
it could cause a breakdown, fire, or electrical shock.
Be careful not to let metal objects get into the equipment. If something does slip into the
equipment, unplug the AC adapter from the wall outlet. Then contact your nearest Korg dealer
or the store where the equipment was purchased.
THE FCC REGULATION WARNING (for U.S.A.)
This equipment has been tested and found to comply with the limits for a Class B digital
device, pursuant to Part 15 of the FCC Rules. These limits are designed to provide
reasonable protection against harmful interference in a residential installation. This
equipment generates, uses, and can radiate radio frequency energy and, if not installed and
used in accordance with the instructions, may cause harmful interference to radio
communications. However, there is no guarantee that interference will not occur in a
particular installation. If this equipment does cause harmful interference to radio or
television reception, which can be determined by turning the equipment off and on, the user
is encouraged to try to correct the interference by one or more of the following measures:
• Reorient or relocate the receiving antenna.
• Increase the separation between the equipment and receiver.
• Connect the equipment into an outlet on a circuit different from that to which the receiver
is connected.
• Consult the dealer or an experienced radio/TV technician for help.
Unauthorized changes or modification to this system can void the user’s authority to
operate this equipment.
CE mark for European Harmonized Standards
CE mark which is attached to our company’s products of AC mains operated apparatus
until December 31, 1996 means it conforms to EMC Directive (89/336/EEC) and CE mark
Directive (93/68/EEC).
And, CE mark which is attached after January 1, 1997 means it conforms to EMC Directive
(89/336/EEC), CE mark Directive (93/68/EEC) and Low Voltage Directive (73/23/EEC).
Also, CE mark which is attached to our company’s products of Battery operated apparatus
means it conforms to EMC Directive (89/336/EEC) and CE mark Directive (93/68/EEC).
IMPORTANT NOTICE TO CONSUMERS
This product has been manufactured according to strict specifications and voltage
requirements that are applicable in the country in which it is intended that this product
should be used. If you have purchased this product via the internet, through mail order,
and/or via a telephone sale, you must verify that this product is intended to be used in the
country in which you reside.
WARNING: Use of this product in any country other than that for which it is intended
could be dangerous and could invalidate the manufacturer’s or distributor’s warranty.
Please also retain your receipt as proof of purchase otherwise your product may be
disqualified from the manufacturer's or distributor’s warranty.
7
6
5
4 3
INPUT
OUTPUT
or
BYPASS
Guitar
or bass
DT-10
Amp, etc.
-10
8
9
10
1
1. TUNER ON/OFF switch
Switches the tuner on/off.
This switch is valid if the instrument to be tuned is connected to the
INPUT jack.
2. INPUT jack (mono)
Connect the instrument to be tuned to this jack.
When not using the DT-10, disconnect the cable from this jack to extend
the life of the battery.
3. FLAT key
Specifies a flat tuning (semitone-dropped tuning).
The input signal is sent to the OUTPUT and BYPASS jacks via a
buffer amp. If a cable is connected to the INPUT jack, the buffer
amp will be consuming the battery regardless of whether the tuner
is on or off. When you are not using the DT-10, we recommend that
you disconnect the cable from the INPUT jack in order to extend
the life of the battery.
2 While the setting is shown in the display, press the CALIB key to
set the calibration.
Each time you press the key you will cycle through the following
settings.
0: 440 Hz
2: 442 Hz
4: 444 Hz
8: 438 Hz
1: 441 Hz
3: 443 Hz
5: 445 Hz
9: 439 Hz
When you have made the desired setting, wait approximately two
seconds without pressing the key.
The indication in the note display will blink three times, and the
calibration setting will be completed. You will then return to tuning
mode.
You can specify a dropped tuning in the range of one flat (semitone) to
seven flats (a fifth) lower than standard tuning.
With the factory settings, this is set to 0: off (standard tuning).
1 Press the FLAT key.
The current setting will appear for several seconds in the note display.
2 While the setting is shown in the display, press the FLAT key to
set the flat tuning.
Each time you press the key you will cycle through the following
settings.
0: off (standard tuning)
4: four flats (major third lower)
1: one flat (semitone lower)
5: five flats (perfect fourth lower)
2: two flats (whole tone lower)
6: six flats (tritone lower)
3: three flats (minor third lower)
7: seven flats (perfect fifth lower)
When you have made the desired setting, wait approximately two
seconds without pressing the key.
The indication in the note display will blink two times, and the flat
tune setting will be completed. You will then return to tuning mode.
If a flat tuning has been specified, the FLAT mode LED above the note
display will light.
When tuning, the note display will show a note name that is higher
than the actually-input pitch by the flat tuning setting. (For example if
you have specified a flat tuning of 1, the display will indicate “A#”
when you input an “A” pitch.)
The flat tuning setting is remembered even after the cable is
disconnected from the INPUT jack.
Tuning
1 Press the TUNER ON/OFF switch to turn on the tuner.
The LED meter will light.
The TUNER ON/OFF switch is valid only if the instrument to be
tuned is connected to the INPUT jack.
2 If necessary, set the calibration and/or flat tuning. (☞ “Adjusting
the calibration,” “Specifying a flat tuning”)
5. DC power jack (DC 9 V IN)
An AC adaptor (9 V
, 50 milliamps or greater) can be connected
to this jack.
3 Play a single note on your instrument.
The note name closest to the note you played will appear in the note
display. If it’s sharp such as A#, the dot will light.
7. OUTPUT jack (mono)
Connect this jack to your amp etc. The signal from the INPUT jack will
be output from this jack only when the tuner is off. The signal will not
be output when the tuner is on.
1 Press the CALIB key.
The current setting will appear for several seconds in the note display.
■ Specifying a flat tuning
1 Connect a cable from the OUTPUT jack or BYPASS jack to your
amp etc.
OUTPUT jack: Use this jack if you want the sound to be muted while
tuning.
BYPASS jack: Use this jack if you want the sound to always be output,
regardless of whether you are tuning.
4. CALIB key
Adjusts the calibration between 438-445 Hz.
6. BYPASS jack (mono)
Connect this jack to your amp etc. The signal from the INPUT jack will
always be output from this jack regardless of the on/off setting of the
tuner.
Here's how to adjust the calibration (the reference pitch for tuning,
shown as the middle A note on a piano “A4”). With the factory settings,
this is set to 0: 440 Hz.
The calibration setting is remembered even after the cable is
disconnected from the INPUT jack.
2 Connect a cable from the instrument to be tuned to the INPUT
jack.
When you connect a cable to the INPUT jack, the power will be turned
on, and the calibration setting will appear for several seconds in the
note display (lit → blinking). If you have specified a flat tuning (1–7),
the flat tuning setting will also be displayed (lit → blinking) following
the calibration setting.
Connecting a cable to the INPUT jack will turn the power on, but the
tuner will be off. Press the TUNER ON/OFF switch to turn on the
tuner. (☞ “Tuning”)
2
8. LED meter
Indicates the difference between the reference pitch and the input sound.
© 2003 KORG INC.
■ Adjusting the calibration
Note name “A”
Note name “A#”
# NOTE
# NOTE
Specifications
Scale
Meter
Detection range
Calibration range
Detection accuracy
Input impedance
Connectors
Power supply
Battery life
4 Tune your instrument so that the desired note name appears.
Current consumption
Dimensions (W x D x H)
5 When the note display shows the desired note name, tune your
instrument so that only the center indicator of the LED meter (the 0
position) is lit.
Weight
Included items
Options (sold separately)
: 12 note equal tempered
: CENT display
: E0 (20.60 Hz) – C8 (4186 Hz)
: A4 = 438 – 445 Hz (1 Hz steps)
: +/-1 cent
: 1 M-ohm
: INPUT (mono phone), OUTPUT (mono phone),
BYPASS (mono phone), DC 9V IN
: one 9 V type battery or AC adaptor (9 V,
, 50
milliamps or greater)
: approximately 3 hours continuous use with tuner on
(A4 input continuously)
approximately 50 hours continuous use with tuner off
(A4 input continuously)
: maximum 43 mA
: 104 mm x 119 mm x 51 mm/4.09" x 4.69" x 2.01"
(including rubber feet)
: 410 g/0.90 lbs (not including battery)
: one 9 V battery
: AC adaptor (9V,
)
* Appearance and specifications are subject to change without notice
for improvement.
DT-10 Manuel d’utilisation
Merci pour avoir fait l'acquisition de l'accordeur numérique Korg DT10. Afin d'assurer un fonctionnement durable et sans problème de votre
nouvel accordeur, veuillez lire ce manuel attentivement. Après l'avoir
lu, conservez-le en lieu sûr pour pouvoir vous y référer par la suite.
9. LED de mode FLAT
Elle s'allume si vous avez spécifié un accord en bémol.
Mise sous tension
Installez la pile comme suit.
1 Appuyez légèrement sur “A” du logement des piles sur le panneau
inférieur du DT-10, et ouvrez le couvercle vers le haut.
2 Fixez la pile dans la pince à pile. Assurez-vous que les polarités
correspondent.
Précautions
3 Mettez la pile dans le logement des piles, et refermez le couvercle.
10. Affichage de la note
Il affiche un caractère alphabétique ou un point (représentant un dièse
#) pour indiquer le nom de la note la plus proche de la hauteur du son
qui est envoyée par la prise INPUT. Cet affichage indique également le
réglage du calibrage ou de l'accord en bémol à la mise sous tension ou
pendant que vous effectuez un réglage.
A
Raccordements
Emplacement
L’utilisation de cet instrument dans les endroits suivants peut en entraîner le mauvais
fonctionnement.
• En plein soleil
• Endroits très chauds ou très humides
• Endroits sales ou fort poussiéreux
• Endroits soumis à de fortes vibrations
• A proximité de champs magnétiques
Alimentation
Branchez l’adaptateur secteur fourni à une prise secteur de tension appropriée. Evitez de
brancher l’adaptateur à une prise de courant dont la tension ne correspond pas à celle pour
laquelle l’appareil est conçu.
Interférences avec d’autres appareils électriques
Les postes de radio et de télévision situés à proximité peuvent par conséquent souffrir
d’interférences à la réception. Veuillez dès lors faire fonctionner cet appareil à une distance
raisonnable de postes de radio et de télévision.
Maniement
B
Mettez tous les appareils hors tension avant de procéder aux
raccordements.
Les prises INPUT, OUTPUT et BYPASS sont toutes monophoniques. Vous ne pouvez pas utiliser de câbles stéréo.
La pile assure également la sauvegarde des réglages, et elle conserve le
calibrage et les réglages d'accord en bémol. Si vous retirez la pile du
DT-10 ou que la pile est épuisée, le calibrage se réinitialisera à 440 Hz et
les réglages d'accord en bémol se réinitialiseront à 0. (Si vous raccordez
un adaptateur secteur au DT-10 et à une prise secteur, ces réglages ne se
réinitialiseront pas.)
Quand la pile est presque épuisée, l'indicateur à diodes et l'affichage des notes s'assombrissent. Insérez une pile neuve le plus tôt
possible.
Pour éviter de les endommager, manipulez les commandes et les boutons de cet instrument
avec soin.
Les commandes du DT-10 et leurs fonctions
Entretien
Lorsque l’instrument se salit, nettoyez-le avec un chiffon propre et sec. Ne vous servez pas
d’agents de nettoyage liquides tels que du benzène ou du diluant, voire des produits
inflammables.
7
Conservez ce manuel
Ne placez jamais de récipient contenant du liquide près de l’instrument. Si le liquide se
renverse ou coule, il risque de provoquer des dommages, un court-circuit ou une électrocution.
Veillez à ne pas laisser tomber des objets métalliques dans le boîtier (trombones, par ex.). Si cela
se produit, débranchez l’alimentation de la prise de courant et contactez votre revendeur korg
le plus proche ou la surface où vous avez acheté l’instrument.
5
4 3
2
8
9
10
Marque CE pour les normes européennes harmonisées
La marque CE apposée sur tous les produits de notre firme fonctionnant sur secteur
jusqu'au 31 décembre 1996 signifie que ces appareils répondent à la Directive EMC (89/
336/CEE) et à la Directive concernant la marque CE (93/68/CEE).
La marque CE apposée après le 1 janvier 1997 signifie que ces appareils sont conformes à
la Directive EMC (89/336/CEE), à la Directive concernant la marque CE (93/68/CEE)
ainsi qu'à la Directive Basse Tension (73/23/CEE).
La marque CE apposée sur tous les produits de notre firme fonctionnant sur piles signifie
que ces appareils répondent à la Directive EMC (89/336/CEE) et à la Directive
concernant la marque CE (93/68/CEE).
REMARQUE IMPORTANTE POUR LES CLIENTS
Ce produit a été fabriqué suivant des spécifications sévères et des besoins en tension
applicables dans le pays où ce produit doit être utilisé. Si vous avez acheté ce produit via
l’internet, par vente par correspondance ou/et vente par téléphone, vous devez vérifier
que ce produit est bien utilisable dans le pays où vous résidez.
ATTENTION: L’utilisation de ce produit dans un pays autre que celui pour lequel il a été
conçu peut être dangereuse et annulera la garantie du fabricant ou du distributeur.
Conservez bien votre récépissé qui est la preuve de votre achat, faute de quoi votre
produit ne risque de ne plus être couvert par la garantie du fabricant ou du distributeur.
1
1. Interrupteur d'alimentation (TUNER ON/OFF)
Il met l'appareil sous/hors tension.
Cet interrupteur est valide si l'instrument à accorder est raccordé à la
prise INPUT.
2. Prise INPUT (prise monophonique)
Raccordez l'instrument à accorder à cette prise.
Lorsque vous ne vous servez pas du DT-10, débranchez le câble de
cette prise pour économiser l'énergie de la pile.
3. Touche FLAT
Spécifie un accord en bémol (accord d'un demi-ton plus bas).
4. Touche CALIB
Règle le calibrage. (qui s’étend de 438 à 445 Hz)
5. Prise d'alimentation DC (DC 9 V IN)
Vous pouvez raccorder un adaptateur secteur (9 V
plus) à cette prise.
1 Raccordez un câble à prise OUTPUT ou la prise BYPASS de votre
ampli, etc.
Prise OUTPUT : Utilisez cette prise si vous souhaitez couper le son
pendant l'accord.
Prise BYPASS : Utilisez cette prise si vous souhaitez toujours envoyer
le son, que vous soyez en train d'effectuer un accord ou non.
Le signal d'entrée est envoyé aux prises OUTPUT et BYPASS via un
ampli tampon. Si vous raccordez un câble à la prise INPUT, l'ampli
tampon consommera l'énergie de la pile, que l'accordeur soit sous
tension ou non. Lorsque vous ne vous servez pas du DT-10, nous
vous recommandons de débrancher le câble de la prise INPUT afin
d'économiser l'énergie de la pile.
Accord
6. Prise BYPASS (prise monophonique)
Raccordez cette prise à votre amplificateur, etc. Le signal de la prise
INPUT sera toujours envoyé par cette prise, que l'accordeur soit sous
tension ou non.
7. Prise OUTPUT (prise monophonique)
Raccordez cette prise à votre amplificateur, etc. Le signal de la prise
INPUT ne sera envoyé par cette prise que lorsque l'accordeur est hors
tension. Le signal ne sera pas envoyé si l'accordeur est sous tension.
8. Indicateur à diodes
Il indique la différence entre la hauteur du son de référence et le son
envoyé.
2 Pendant que le réglage est affiché, appuyez sur la touche CALIB
pour régler le calibrage.
Chaque fois que vous appuyez sur la touche, vous parcourez le cycle
de réglage suivant.
0: 440 Hz
2: 442 Hz
4: 444 Hz
8: 438 Hz
1: 441 Hz
3: 443 Hz
5: 445 Hz
9: 439 Hz
Lorsque vous avez effectué le réglage souhaité, attendez environ deux
secondes sans appuyer sur une touche.
L'indication sur l'affichage de la note clignote trois fois, et le réglage
du calibrage est terminé. Vous revenez ensuite au mode d'accord.
Vous pouvez spécifier de baisser l'accord dans la plage de un bémol (demiton) à sept bémols (un cinquième) en-dessous de l'accord standard.
Avec les réglages d'usine, cette fonction est réglée sur 0 : désactivé
(accord standard).
1 Appuyez sur la touche FLAT.
Le réglage actuel s'affiche pendant quelques secondes sur l'affichage
de la note.
2 Pendant que le réglage est affiché, appuyez sur la touche FLAT pour
régler l'accord en bémol.
Chaque fois que vous appuyez sur la touche, vous parcourez le cycle
de réglage suivant.
0: arrêt (accord standard)
4: quatre bémols (tierce majeure en-dessous)
1: un bémol (un demi-ton en dessous)
5: cinq bémols (quarte parfaite en-dessous)
2: deux bémols (un ton entier en dessous) 6: six bémols (un triton en-dessous)
3: trois bémols (tierce mineure en-dessous) 7: sept bémols (quinte parfaite en-dessous)
Lorsque vous avez effectué le réglage souhaité, attendez environ deux
secondes sans appuyer sur une touche.
L'indication sur l'affichage de la note clignote deux fois, et le réglage de
l'accord en bémol est terminé. Vous revenez ensuite au mode d'accord.
Quand vous spécifiez un accord en bémol, la LED du mode FLAT audessus de l'affichage de la note s'allume. Pendant l'accord, l'affichage de
la note montre le nom de la note supérieure à la hauteur du son
effectivement entrée avec le réglage de l'accord en bémol. (Par exemple,
si vous avez spécifié un accord en bémol au point 1, l'affichage indiquera “A#” lorsque vous entrerez une hauteur de son “A”.)
Le réglage de l'accord en bémol reste mémorisé quand vous
débranchez le câble de la prise INPUT.
1 Appuyez sur l'interrupteur TUNER ON/OFF pour mettre l'accordeur
sous tension.
L'indicateur à diodes s'allume.
L'interrupteur TUNER ON/OFF n'est valide que si l'instrument à
accorder est raccordé à la prise INPUT.
2 Au besoin, réglez le calibrage et/ou l'accord en bémol. (☞“Réglage
du calibrage”, “Spécification d'un accord en bémol”)
50 mA ou
1 Appuyez sur la touche CALIB.
Le réglage actuel s'affiche pendant quelques secondes sur l'affichage
de la note.
■ Spécification d'un accord en bémol
DT-10
Ampli, etc.
Nous expliquons ci-dessous comment régler le calibrage (la hauteur du
son de référence pour l'accord, indiqué comme la note A au milieu d'un
piano (A4)). Avec les réglages d'usine, cette fonction est réglée sur 0 :
440 Hz.
Le réglage du calibrage reste mémorisé quand vous débranchez le
câble de la prise INPUT.
2 Raccordez un câble entre l'instrument à accorder et la prise INPUT.
Lorsque vous raccordez un câble à la prise INPUT, le réglage du
calibrage apparaît pendant quelques secondes sur l'affichage de la note
(allumé → clignote). Si vous avez spécifié un accord en bémol (1 à 7), le
réglage de l'accord en bémol s'affichera également (allumé → clignote)
après le réglage du calibrage.
Le fait de raccorder un câble à la prise INPUT mettra l'appareil sous
tension, mais l'accordeur sera hors tension. Pour mettre l'accordeur sous
tension, appuyez sur l'interrupteur TUNER ON/OFF. (☞ “Accord”)
-10
Après avoir lu ce manuel, veuillez le conserver soigneusement pour toute référence ultérieure.
Evitez toute intrusion d’objets ou de liquide
6
Guitare
ou contrebasse
INPUT
OUTPUT
ou
BYPASS
■ Réglage du calibrage
3 Jouez une note sur votre instrument.
Le nom de la note la plus proche de celle que vous avez jouée apparaît
sur l'affichage de la note. Si c'est un dièse, comme A#, le point s'allume.
Nom de la note “A”
Nom de la note “A#”
# NOTE
# NOTE
4 Accordez votre instrument de façon que la note souhaitée apparaisse.
5 Lorsque l'affichage de la note indique la note souhaitée, accordez
votre instrument de façon que seul l'indicateur central de l'indicateur à diodes (la position 0) s'allume.
Fiche technique
Echelle
Indicateur
Plage de détection
Plage de calibrage
Précision de détection
Impédance d'entrée
Connecteurs
: 12 notes à tempérament égal
: Affichage CENT
: E0 (20,60 Hz) à C8 (4186 Hz)
: A4 = 438 à 445 Hz (paliers de 1 Hz)
: +/- 1 centième
: 1 M-ohms
: INPUT (monophonique), OUTPUT (monophonique),
BYPASS (monophonique), DC 9V IN
Alimentation
: Pile de 9 V ou adaptateur secteur (9 V,
, 50 mA ou
plus )
Autonomie de la pile
: Env. 3 heures en utilisation continue avec l'accordeur
sous tension (entrée continue de la note A4)
: Env. 50 heures en utilisation continue avec l'accordeur
hors tension (entrée continue de la note A4)
Consommation
: 43 mA maximum
Dimensions (W x D x H)
: 104mmx 119mm x 51mm (Incluant les pieds en gomme)
Poids
: 410g (san la pile)
Accessoire fourni
: une pile de 9 V
Option (vendue séparément) : Adaptateur secteur (9 V,
)
* L'aspect extérieur et les spécifications sont sujets à modification sans
préavis à des fins d'amélioration.
DT-10 Bedienungsanleitung
Herzlichen Glückwunsch zum Kauf des automatischen digitalen Stimmgeräts DT-10 von Korg. Bitte lesen Sie die Anleitung vor dem Gebrauch
sorgfältig durch, denn sie enthält alle Informationen für langen und
störungsfreien Betrieb. Legen Sie die Anleitung nach dem Durchlesen
griffbereit zum Nachschlagen ab.
Vorsichtsmaßnahmen
Die Batterien wie folgt einlegen
1 Drücken Sie leicht auf „A“ am Batteriefach an der Unterseite des
DT-10 und öffnen Sie das Fach nach oben.
2 Bringen Sie die Batterie am Batterieclip an. Stellen Sie sicher, dass
die Polung richtig ist.
3 Setzen Sie die Batterie in das Batteriefach ein, und schließen Sie den
Deckel.
10. Notenanzeige
Zeigt einen Buchstaben und einen Punkt (der für ein Kreuz „#“ steht), um
den Notennamen anzuzeigen, der der von der INPUT-Buchse anliegenden
Tonhöhe am nächsten liegt. Die Anzeige zeigt auch die Eichung oder FlatTuning-Einstellung beim Einschalten oder während Sie die Einstellung
vornehmen.
Anschlüsse
A
Aufstellungsort
Vermeiden Sie das Aufstellen des Geräts an Orten, an denen
• es direkter Sonneneinstrahlung ausgesetzt ist;
• hohe Feuchtigkeit oder Extremtemperaturen auftreten können;
• Staub oder Schmutz in großen Mengen vorhanden sind;
• das Gerät Erschütterungen ausgesetzt sein kann.
• in der Nähe eines Magnetfeldes.
Stromversorgung
Schließen Sie das beiliegende Netzteil nur an eine geeignete Steckdose an. Verbinden Sie es
niemals mit einer Steckdose einer anderen Spannung.
Störeinflüsse auf andere Elektrogeräte
Dieser kann bei in der Nähe aufgestellten Rund-funkempfängern oder Fernsehgeräten
Empfangsstörungen hervorrufen. Betreiben Sie solche Geräte nur in einem geeigneten Abstand
von diesem Erzeugnis.
Bedienung
Vermeiden Sie bei der Bedienung von Schaltern und Reglern unangemessenen Kraftaufwand.
Reinigung
Bei auftretender Verschmutzung können Sie das Gehäuse mit einem trockenen, sauberen Tuch
abwischen. Verwenden Sie keinerlei Flüssigreiniger wie beispielsweise Reinigungsbenzin,
Verdünnungs- oder Spülmittel. Verwenden Sie niemals brennbare Reiniger.
Schalten Sie alle Geräte vor dem Herstellen von Verbindungen aus.
B
Die Buchsen INPUT, OUTPUT und BYPASS sind alle Mono-Buchsen.
Stereokabel können nicht verwendet werden.
Die Batterie sichert auch die Einstellungen und bewahrt die Einstellungen
für Eichung und Flat Tuning. Wenn Sie die Batterie aus dem DT-10 entfernen
oder wenn die Batterie leer wird, wird die Eichung auf 440 Hz zurückgesetzt, und die Einstellung für Flat Tuning wird auf 0 zurückgesetzt. (Wenn
ein Netzteil am DT-10 und am Stromnetz angeschlossen ist, werden diese
Einstellungen nicht zurückgesetzt)
HINWEIS: Wenn die Batterie das Ende ihrer Lebensdauer erreicht, werden
LED-Messanzeige und Notenanzeige dunkler. Jetzt muss so
schnell wie möglich eine neue Batterie eingesetzt werden.
Teile des DT-10 und ihre Funktionen
Bedienungsanleitung
7
6
5
4 3
2
Bewahren Sie diese Bedienungsanleitung gut auf, falls Sie sie später noch einmal benötigen.
Flüssigkeiten und Fremdkörper
Stellen Sie niemals Behältnisse mit Flüssigkeiten in der Nähe des Geräts auf. Wenn Flüssigkeit
in das Gerät gelangt, können Beschädigung des Geräts, Feuer oder ein elek-trischer Schlag die
Folge sein.
Beachten Sie, daß keinerlei Fremdkörper in das Gerät gelangen. Sollte ein Fremdkörper in das
Gerät gelangt sein, so trennen Sie es sofort vom Netz. Wenden Sie sich dann an Ihren KORGFachhändler.
-10
8
9
10
Das CE-Zeichen für die Europäische Gemeinschaft
Vor dem 31.12.1996 vergebene CE-Zeichen auf unseren netzgespeisten Geräten zeigen an,
daß diese Geräte gemäß der EMC-Richtlinie (89/336/EWG) und der CE-Richtlinie (93/68/
EWG) der EU arbeiten.
Nach dem 01.01.1997 vergebene CE-Zeichen auf unseren netzgespeisten Geräten zeigen an,
daß diese Geräte gemäß der EMC-Richtlinie (89/336/EWG), der CE-Richtlinie (93/68/
EWG) und der Niederspannungsstromrichtlinie (73/23/EWG) der EU arbeiten.
Die CE-Zeichen auf unseren batteriegespeisten Geräten zeigen an, daß diese Geräte gemäß
der EMC-Richtlinie (89/336/EWG) und der CE-Richtlinie (93/68/EWG) der EU arbeiten.
WICHTIGER HINWEIS FÜR KUNDEN
Dieses Produkt wurde unter strenger Beachtung von Spezifikationen und Spannungsanforderungen hergestellt, die im Bestimmungsland gelten. Wenn Sie dieses Produkt über das
Internet, per Postversand und/oder mit telefonischer Bestellung gekauft haben, müssen Sie
bestätigen, dass dieses Produkt für Ihr Wohngebiet ausgelegt ist.
WARNUNG: Verwendung dieses Produkts in einem anderen Land als dem, für das es
bestimmt ist, verwendet wird, kann gefährlich sein und die Garantie des Herstellers oder
Importeurs hinfällig lassen werden. Bitte bewahren Sie diese Quittung als Kaufbeleg auf, da
andernfalls das Produkt von der Garantie des Herstellers oder Importeurs ausgeschlossen
werden kann.
■ Einstellen der Eichung
9. FLAT-Modus LED
Leuchtet auf, wenn Sie Flat Tuning gewählt haben.
Einschalten
1
1. Netzschalter (TUNER ON/OFF)
Schaltet das Stimmgerät ein und aus.
Dieser Schalter ist wirksam, wenn das zu stimmende Instrument an die
Buchse INPUT angeschlossen ist.
2. INPUT-Buchse (Mono-Buchse)
Hier wird das zu stimmende Musikinstrument angeschlossen.
Wenn kein Instrument am DT-10 angeschlossen ist, trennen Sie das Kabel
von dieser Buchse ab, um die Lebensdauer der Batterie zu verlängern.
3. FLAT-Taste
Zur Eingabe von Flat Tuning (Stimmen mit abgesenktem Halbton).
4. CALIB-Taste
Stellt die Eichung ein. (der Bereich ist 438 – 445 Hz )
5. Betriebsstrombuchse (DC 9 V IN)
Ein Netzteil (9 V
, 50mA order mehr) kann an diese Buchse angeschlossen werden.
6. BYPASS-Buchse (Mono-Buchse)
Schließen Sie diese Buchse an Ihren Verstärker usw. an. Das Signal von der
INPUT-Buchse wird immer von dieser Buchse ausgegeben, ungeachtet ob
das Stimmgerät ein- oder ausgeschaltet ist.
7. OUTPUT-Buchse (Mono-Buchse)
Schließen Sie diese Buchse an Ihren Verstärker usw. an. Das Signal von der
INPUT-Buchse wird nur von dieser Buchse ausgegeben, wenn das Stimmgerät ausgeschaltet ist. Das Signal wird nicht ausgegeben, wenn das
Stimmgerät eingeschaltet ist.
8. LED-Messanzeige
Zeigt den Unterschied zwischen Referenztonhöhe und Eingangston an.
INPUT
OUTPUT
oder
BYPASS
Gitarre
oder Bass
Im folgenden beschreiben wir, wie Sie die Eichung einstellen (die Referenztonhöhe zum Stimmen, gezeigt als mittleres A auf einem Klavier (A4)).
Werkseitig ist diese Einstellung auf 0 vorgenommen: 440 Hz.
1 Drücken Sie die CALIB-Taste.
Die aktuelle Einstellung erscheint einige Sekunden lang in der Notenanzeige.
2 Während die Einstellung in der Anzeige erscheint, drücken Sie die
CALIB-Taste, um die Eichung einzustellen.
Bei jedem Tastendruck wird durch die Einstellungen weitergeschaltet,
wie folgt.
0: 440 Hz
2: 442 Hz
4: 444 Hz
8: 438 Hz
1: 441 Hz
3: 443 Hz
5: 445 Hz
9: 439 Hz
Wenn Sie die gewünschte Einstellung vorgenommen haben, warten Sie
etwa zwei Sekunden, ohne die Taste zu drücken.
Die Anzeige in der Notenanzeige blinkt dreimal, und die Eichungseinstellung ist abgeschlossen. Sie kehren damit zum Tuning-Modus
zurück.
HINWEIS: Die Eichungseinstellung wird bewahrt, auch wenn das Kabel
von der INPUT-Buchse abgetrennt wird.
DT-10
Verstärker usw.
1 Schließen Sie ein Kabel von der OUTPUT-Buchse oder BYPASSBuchse an Ihren Verstärker usw. an.
OUTPUT-Buchse: Verwenden Sie diese Buchse, wenn der Ton beim
Stimmen stummgeschaltet werden soll.
BYPASS-Buchse: Verwenden Sie diese Buchse, wenn der Ton immer
ausgegeben werden soll, ungeachtet, ob Sie ein Instrument stimmen.
2 Schließen Sie ein Kabel vom zu stimmenden Instrument an die
INPUT-Buchse an.
Wenn Sie ein Kabel an die INPUT-Buchse anschließen, wird das Gerät
eingeschaltet, und die Eichungsanzeige erscheint einige Sekunden lang in
der Notenanzeige (leuchtet → blinkt). Wenn Sie ein Flat Tuning gewählt
haben (1–7), wird die Flat-Tuning-Einstellung ebenfalls gezeigt (leuchtet
→ blinkt), nachdem die Eichung ausgeführt ist.
Durch Anschließen eines Kabels an die INPUT-Buchse wird die Stromversorgung eingeschaltet, aber das Stimmgerät ist ausgeschaltet. Durch
Drücken des Netzschalters (TUNER ON/OFF) wird das Stimmgerät
eingeschaltet. (☞ „Tuning“)
Das Eingangssignal wird zu den Buchsen OUTPUT und BYPASS
über einen Puffer-Verstärker ausgegeben. Wenn ein Kabel an die
INPUT-Buchse angeschlossen ist, verbraucht der Puffer-Verstärker
Batteriestrom, ungeachtet ob das Stimmgerät ein- oder ausgeschaltet
ist. Wenn Sie den DT-10 nicht verwenden, empfehlen wir, das Kabel
von der INPUT-Buchse abzuziehen, um die Lebensdauer der Batterie
zu verlängern.
Tuning
■ Festlegen eines Flat Tuning
Sie können ein abgesenktes Tuning im Bereich von einem „Flat“ (Halbton)
bis sieben „Flats“ (einer Quinte) unter dem normalen Tuning eingeben.
Werkseitig ist diese Einstellung auf 0 vorgenommen: Aus (Standard-Tuning).
1 Drücken Sie die FLAT-Taste.
Die aktuelle Einstellung erscheint einige Sekunden lang in der Notenanzeige.
2 Während die Einstellung in der Anzeige erscheint, drücken Sie die
FLAT-Taste, um Flat Tuning einzustellen.
Bei jedem Tastendruck wird durch die Einstellungen weitergeschaltet,
wie folgt.
0: Aus (Standard-Tuning)
4: vier Flats (große Terz niedriger)
1: ein Flat (Halbton niedriger)
5: fünf Flats (reine Quarte niedriger)
2: zwei Flats (ganzer Ton niedriger)
6: sieben Flats (Tritone niedriger)
3: drei Flats (kleine Terz niedriger)
7: sieben Flats (reine Quinte niedriger)
Wenn Sie die gewünschte Einstellung vorgenommen haben, warten Sie
etwa zwei Sekunden, ohne die Taste zu drücken.
Die Anzeige in der Notenanzeige blinkt zweimal, und die Flat-TuningEinstellung ist abgeschlossen. Sie kehren damit zum Tuning-Modus
zurück.
Wenn Flat Tuning eingegeben ist, leuchtet die FLAT-Modus LED über der
Notenanzeige auf. Beim Stimmen zeigt die Notenanzeige einen Notennamen, der um die Eingabe für Flat Tuning höher als die tatsächlich
anliegende Tonlage ist. (Wenn Sie z.B. ein Flat Tuning von 1 eingegeben
haben, zeigt das Display „A#“ an, wenn Sie eine Tonlage von „A“
eingeben.)
HINWEIS: Die Flat-Tuning-Einstellung wird bewahrt, auch wenn das Kabel
von der INPUT-Buchse abgetrennt wird.
1 Durch Drücken des Netzschalters (TUNER ON/OFF) wird das
Stimmgerät eingeschaltet.
Die LED-Messanzeige leuchtet auf.
HINWEIS: Der Netzschalter (TUNER ON/OFF) ist nur wirksam, wenn das
zu stimmende Instrument an die Buchse INPUT angeschlossen
ist.
2 Wenn erforderlich, stellen Sie Eichung und/oder Flat Tuning ein. (☞
„Einstellen der Eichung“, „Festlegen eines Flat Tuning“).
3 Spielen Sie eine einzelne Note auf Ihrem Instrument.
Die Note, deren Name der gespielten Note am nächsten ist, erscheint in
der Notenanzeige. Wenn eine Dur-Note wie A# gespielt wird, leuchtet
der Punkt auf.
Notenname „A“
Notenname „A#“
# NOTE
# NOTE
4 Stimmen Sie das Instrument so, dass der gewünschte Notenname
erscheint.
5 Wenn die Notenanzeige den gewünschten Notennamen zeigt,
stimmen Sie das Instrument so, dass nur die Mittenanzeige in der
LED-Messanzeige (die 0-Position) leuchtet.
Technische Daten
Stimmbereich
Messanzeige
Erkennungsbereich
Eichungsbereich
Messgenauigkeit
Eingangsimpedanz
Anschlüsse
: 12 Töne chromatisch
: CENT-Anzeige
: E0 (20,60 Hz) – C8 (4186 Hz)
: A4 = 438 – 445 Hz (1-Hz-Schritte)
: +/-1 Cent
: 1 MOhm
: INPUT (Mono-Cinchbuchse), OUTPUT (MonoCinchbuchse), BYPASS (Mono-Cinchbuchse), DC 9V IN
Stromversorgung
: 9V-Batterie oder Netzteil (9V,
, 50mA order mehr)
Batterielebensdauer
: ca. 3 Stunden kontinuierlicher Betrieb mit eingeschaltetem Stimmgerät (A4-Eingang kontinuierlich)
ca. 50 Stunden kontinuierlicher Betrieb mit ausgeschaltetem Stimmgerät (A4-Eingang kontinuierlich)
Leistungsaufnahme
: maximal 43 mA
Abmessungen(W x D x H) : 104mmx 119mm x 51mm (mit Gummifüssen)
Gewicht
: 410g (ohne Batterie)
Zubehör
: eine 9V-Batterie zur Funktionsprüfung
Optionen (getrennt erhältlich) : Netzteil (9 V,
)
* Änderungen des Designs und der technischen Daten ohne Vorankündigung bleiben im Sinne ständiger Produktverbesserungen vorbehalten.