1
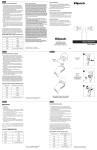
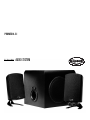
PROMEDIA 2.1
P E R S O N A L
C O M P U T E R
AUDIO SYSTEM
PACKING LIST
IMPORTANT SAFETY INSTRUCTIONS
Important Safety Information
2 Satellite speakers with pedestals attached
1 Control pod, attached to one satellite speaker
1 Subwoofer
1 Packet of two individual speaker connections
1 Packet of rubber isolation feet
1 Owner's manual
1. READ these instructions.
2. KEEP these instructions.
3. HEED all warnings.
4. FOLLOW all instructions.
5. DO NOT use this apparatus near water.
6. CLEAN ONLY with dry cloth.
SPEAKER PLACEMENT
7. DO NOT block any ventilation openings. Install in accordance with the manufacturer’s instructions.
8. DO NOT install near any heat sources such as radiators, heat registers, stoves, or other apparatus
(including amplifiers) that produce heat.
9. DO NOT defeat the safety purpose of the polarized or grounding type plug. A polarized plug has two
blades with one wider than the other. A grounding type plug has two blades and a third grounding
prong. The wider blade or the third prong is provided for your safety. If the provided plug does not
fit into your outlet, consult an electrician for replacement of the obsolete outlet.
10. PROTECT the power cord from being walked on or pinched, particularly at plugs, convenience
receptacles, and the point where they exit from the apparatus.
11. ONLY USE attachments/accessories specified by the manufacturer.
12. USE only with a cart, stand, tripod, bracket, or table specified by the manufacturer,
or sold with the apparatus. When a cart is used, use caution when moving the
cart/apparatus combination to avoid injury from tip-over.
13. UNPLUG this apparatus during lightning storms or when unused for long periods of time.
14. REFER all servicing to qualified service personnel. Servicing is required when the apparatus has
been damaged in any way, such as the power-supply cord or plug is damaged, liquid has been
spilled, objects have fallen into the apparatus, the apparatus has been exposed to rain or moisture,
does not operate normally, or has been dropped.
15. DO NOT expose this apparatus to dripping or splashing and ensure that no objects filled with
liquids, such as vases, are placed on the apparatus.
16. To completely disconnect this apparatus from the AC mains, disconnect the power supply cord plug
from the AC receptacle.
17. The mains plug of the power supply cord shall remain readily operable.
1. The two satellite speakers should be positioned on each side of your computer monitor. To wall
mount, the pedestal stands may be removed by unscrewing the 1/4" 20-thread bolt, which
accommodates a wide variety of wall brackets available through stereo and appliance stores.
Klipsch WB-1 wall brackets are available at www.klipsch.com.
2. Place the subwoofer directly under your computer desk, or close to the satellite speakers. Do
not cover up the sub driver or rear port of the enclosure and be sure to provide enough ventilation to the rear of the subwoofer. It is normal for this panel to be warm to the touch. The subwoofer should be at least 3 feet (1m) from the computer monitor to avoid interference.
3. Speaker or power cables running across an area of heavy foot traffic should be positioned
against a wall or corner and secured with tape.
SPEAKER CONNECTION DIAGRAM
1. Connect mini plug to PC soundcard from the control satellite preamp.
2. Connect the DIN plug to the subwoofer from the control satellite preamp.
3. Connect the speakers by inserting the tinned wire leads into the subwoofer and the back of the
satellites. The solid black wire (-) connects to the black spring clips; the black wire with white
dashes (+) to the red spring clips.
4. Do not plug in the AC power until your computer/audio system is set up.
5. Plug headphone mini stereo plug in headphone jack, if desired.
6. Plug stereo mini plug into MP3/Aux jack. Plug stereo mini plug into MP3 player (for example).
1
The exclamation point, within an equilateral triangle, is intended to alert the user to
the presence of important operating and maintenance (servicing) instructions in the
literature accompanying the product.
6
The lightning flash with arrowhead symbol within an equilateral triangle, is intended to alert the user to the presence of uninsulated “dangerous voltage” within the
product’s enclosure that may be of sufficient magnitude to constitute a risk of
electrical shock to persons.
3
(iPod)
2
(CD Player)
WARNING: To reduce the risk of fire or electrical shock, do not expose this apparatus to rain or moisture.
WARNING: No naked flame sources – such as candles – should be placed on the product.
4
WARNING
5
WARNING: Do Not Open! Risk of Electrical
Shock. Voltages in this equipment are hazardous to life. No user-serviceable parts inside.
Refer all servicing to qualified service personnel.
WARNING: This product is intended to be operated ONLY from the AC Voltages listed on the back
panel or included power supply of the product. Operation from voltages other than those indicated
may cause irreversible damage to the product and void the product's warranty. The use of AC Plug
Adapters is cautioned because it can allow the product to be plugged into voltages in which the
product was not designed to operate. If the product is equipped with a detachable power cord, use
only the type provided with your product or by your local distributor and/or retailer. If you are unsure
of the correct operational voltage, please contact your local distributor and/or retailer.
CAUTION: Place the equipment near a main power supply outlet and make sure that you can easily
access the power breaker switch.
Since the ProMedia 2.1 has its own internal amplifier, it was designed to
hook into the line out connector. Connection to the speaker level output jack
might result in poor sound quality.
SOFTWARE AND HARDWARE GAIN CONTROLS
Software Volume Controls in Microsoft Windows
1. Click the Start button on your taskbar
2. Choose Accessories
3. Windows 95: Choose Multimedia
Windows 98/2000: Choose Entertainment
Windows XP: Choose Entertainment
4. Click on the Volume Control
5. Adjust the Wave Volume Elevator Button to 70%
230 V
Volume Control Programs
Some soundcard and/or PC manufacturers may have software that must be adjusted separately
from the Windows volume control. Consult applicable manual for specific hardware documentation.
Subwoofer Level
For CD or DVD output, the optimum position will be indicated by the mark at 10 o'clock on the sub
level control. Optimum sub levels and user preference may vary from game to game. Usually a
high bass level is preferred, especially at low listening levels. Remember to reset the control settings before playing CDs or films on DVD.
CONTROL POD FEATURES
Headphones: The 1/8" stereo headphone output jack, located on the right-hand side of the
control pod, turns off the two satellite speakers and the subwoofer output. The main volume control will adjust the headphone output.
MP3/Aux: The MP3/Auxiliary input jack is used with portable audio players. This signal will be
mixed with the main source. The input has a +6dB input sensitivity to help compensate for the
lower output voltage of some portable players. To obtain the proper balance with the main signal,
the level adjustments in the computer software and in the portable player will need to be adjusted.
An example would be listening to an MP3 player while surfing the net and hearing associated
sounds from various websites. The mixed sound may not be desirable, and you will ultimately
determine how you use this feature.
NOTE: During playback of MP3s, overall sound quality may be perceptibly degraded compared to
other audio sources such as CD. This is caused by the encoding method and quality of the MP3
file. It is recommended that MP3 files be encoded at a minimum 128 bit rate.
SPECIFICATIONS
Satellite Impedance:
Preamplifier Control Pod:
Satellite:
Subwoofer:
Amplifier:
Subwoofer Limiter:
(Visit www.klipsch.com for more details)
4 ohms minimum
Subwoofer and Main volume level controls
LED power indicator
MP3/Aux player line input with soundcard mixing function
Headphone jack
Direct path interface
Sealed elliptical two-way enclosure with 25mm metalized
polymer dome tweeter mated to MicroTractrixTM Horn and
3" long-throw mid-bass driver
Bass-reflex enclosure with rear port and front-firing 8"
long-throw driver; slot tuned port; sixth-order enclosure
design
High-efficiency Class D power section and audio quality
transformer designed for uncompressed full
power sound
Protective limiter function protects the driver and amplifier
from extremely high volume playback
ACCESSORIES
All accessories are available at www.klipsch.com.
SAT-2 Speaker Stands
Telescopic floor stand for ProMedia satellites. Cast metal base, hollow tubing (allowing wire to be
hidden inside). Minimum height: 28 inches. Maximum height: 48 inches.
WB-1 Wall Mount Brackets
Versatile Wall Bracket 1 is made from high quality steel. The clean, simple design affords the most
extreme angle adjustment, with up to 160 degrees of movement for precise speaker positioning in
the horizontal plane. Wall stud wood screws included.
TROUBLESHOOTING
If no sound, ensure that:
- Power, input, speaker cables and connectors are securely attached
- Software is properly installed and functioning
- Computer sound (control panel) volume is turned up and not muted
- LED glowing
If one or more speakers have little or no sound, ensure that:
- All cables are connected properly
- Connectors are fully "seated" in soundcard and speakers
- Main and subwoofer level controls are properly adjusted on control pod
- Computer software audio settings are adjusted for proper use
- Computer system's sound (control panel) volume is turned up
If the satellites or subwoofer exhibit distortion or buzzing:
- Turn down computer's overall volume (via control panel), and reduce control pod volume
- Turn down subwoofer’s volume, as program signal may be too strong
- Plug the subwoofer’s power cord into a surge protector
If there is noise or hissing and the volume is low even when the main volume is turned up:
- Turn up computer's sound volume (via control panel)
- Turn down main volume on control pod to compensate
- Ensure that software/hardware is properly installed and operating
If there is computer monitor interference:
- Make sure the subwoofer is positioned at least 3 feet (1m) from the computer monitor
- Increase the distance between the satellite speakers and the computer monitor
For more detailed information and FAQs, please visit www.klipsch.com.
FCC and Canada EMC Statements
Approved under the verification provision of FCC Part 15 as a Class B Digital Device.
NOTE: This equipment has been tested and found to comply with the limits for a Class B digital
device, pursuant to part 15 of the FCC Rules. These limits are designed to provide reasonable
protection against harmful interference in a residential installation. This equipment generates, uses
and can radiate radio frequency energy and, if not installed and used in accordance with the
instructions, may cause harmful interference to radio communications. However, there is no
guarantee that interference will not occur in a particular installation. If this equipment does cause
harmful interference to radio or television reception, which can be determined by turning the
equipment off and on, the user is encouraged to try to correct the interference by one or more of
the following measures:
- Reorient or relocate the receiving antenna.
- Increase the separation between the equipment and receiver.
- Connect the equipment into an outlet on a circuit different from that to which the
receiver is connected.
- Consult the dealer or an experienced radio/TV technician for help.
This class B digital apparatus complies with Canadian ICES-003.
Cet appareil numérique de la classe B est conforme à la norme NMB-003 du Canada.
WARRANTY—U.S. AND CANADA
Klipsch warrants to the original retail purchaser that this product is to be free from defective materials and workmanship for a period of one (1) year, from the date of purchase, if it is properly used
and maintained. If this product proves defective in either material or workmanship, Klipsch, at its
option, will (a) repair the product, or (b) replace the product, at no charge for parts or labor. If the
product model is no longer available and cannot be repaired effectively or replaced with an identical model, Klipsch at its sole option may replace the unit with a current model of equal or greater
value. In some cases, modification to the mounting surface may be required where a new model is
substituted. Klipsch assumes no responsibility or liability for such modification. To obtain a repair or
replacement under the terms of this warranty, please contact our customer service group at 1800-KLIPSCH. You will be required to submit a copy of the original receipt via fax or email. The
receipt must reflect that you are the original purchaser, the product was bought from an authorized
Klipsch retailer, and the product is still within warranty. You will be issued a return authorization
number (RA#) and asked to ship the defective product, together with proof of purchase and RA#,
prepaid insured to the address set forth Klipsch 137 Heampstead #278 Hope, AR 71801. Freight
collect shipments will be refused. Risk of loss or damage in transit is to be borne by the purchaser.
Once Klipsch receives the defective product, a repair or replacement order will be initiated.
Limitations:
• This limited warranty does not cover failure of the product resulting from improper installation,
misuse, abuse, accident, neglect, mishandling, or wear from ordinary use or environmental deterioration.
• This limited warranty does not cover cosmetic damage, including paint damage, or
consequential damage to other components or premises which may result for any reason
from the failure of the product.
• This limited warranty is null and void for products not used in accordance with Klipsch’s
instructions.
• This limited warranty is null and void for products with altered or missing serial numbers and
for products not purchased from an authorized dealer.
• This limited warranty terminates if you sell or otherwise transfer this product to another party.
THIS WARRANTY GIVES YOU SPECIFIC LEGAL RIGHTS, AND YOU MAY ALSO HAVE OTHER RIGHTS
WHICH VARY FROM STATE TO STATE, JURISDICTION TO JURISDICTION OR COUNTRY TO COUNTRY. KLIPSCH’S RESPONSIBILITY FOR MALFUNCTIONS AND DEFECTS IN HARDWARE IS LIMITED
TO REPLACEMENT OR REPAIR AS SET FORTH IN THIS WARRANTY STATEMENT. FOR CANADIAN
CUSTOMERS, KLIPSCH DISCLAIMS ALL OTHER WARRANTIES AND CONDITIONS, EXPRESS OR
IMPLIED, STATUTORY OR OTHERWISE, FOR THE PRODUCT. FOR U.S. CUSTOMERS, ALL EXPRESS
AND IMPLIED WARRANTIES FOR THE PRODUCT, INCLUDING BUT NOT LIMITED TO ANY IMPLIED
WARRANTIES OF MERCHANTABILITY AND FITNESS FOR A PARTICULAR PURPOSE ARE LIMITED IN
TIME TO THE TERM OF THIS WARRANTY. SOME STATES, JURISDICTIONS OR COUNTRIES DO NOT
ALLOW THE EXCLUSION OF CERTAIN IMPLIED WARRANTIES OR CONDITIONS, OR LIMITATIONS ON
HOW LONG AN IMPLIED WARRANTY OR CONDITIONS LASTS, SO THIS LIMITATION MAY NOT
APPLY TO YOU. KLIPSCH DOES NOT ACCEPT LIABILITY FOR SPECIAL, INDIRECT, CONSEQUENTIAL
OR INCIDENTAL DAMAGES, INCLUDING WITHOUT LIMITATION, ANY LIABILITY FOR THIRD PARTY
CLAIMS AGAINST YOU FOR DAMAGES OR FOR PRODUCTS NOT BEING AVAILABLE FOR USE. THE
MAXIMUM LIABILITY FOR WHICH KLIPSCH MAY BE RESPONSIBLE WILL BE NO MORE THAN THE
AMOUNT YOU PAID FOR THE PRODUCT THAT IS THE SUBJECT OF THE CLAIM. SOME STATES,
JURISDICTIONS OR COUNTRIES DO NOT ALLOW THE EXCLUSION OR LIMITATION OF SPECIAL,
INDIRECT, INCIDENTAL OR CONSEQUENTIAL DAMAGES, SO THE ABOVE LIMITATION OR EXCLUSION MAY NOT APPLY TO YOU.
WARRANTY—OUTSIDE THE U.S. AND CANADA
The Warranty on this product if it is sold to a consumer outside of the United States and
Canada shall comply with applicable law. To obtain any applicable warranty service, please
contact the dealer from which you purchased this product, or the distributor that supplied this
product.