1
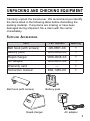
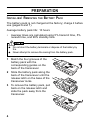
Instruction Manual
PacTronics, Inc.
800-607-2243
www.pactronics.com
UHF FM TRANSCEIVER
TK-3130
ProTalkXLS
© B62-1486-00 (K)
09 08 07 06 05 04 03 02 01 00
T HANK Y OU
We are grateful for your purchase of this KENWOOD product
and welcome you to the Business Radio Service (BRS). Your
KENWOOD 2-way Business Radio is called a “transceiver”,
meaning “transmitter & receiver”. We believe this easy-to-use
transceiver will provide you with dependable and reliable
communications. This KENWOOD transceiver is a precision
device. Treat it with care, and you will enjoy years of reliable
operation.
F EATURES
•
•
•
•
•
•
2 channels with 121 tone/code settings for each channel,
allowing you to ignore unwanted calls.
Voice scrambler, giving you complete privacy for your
conversations.
Automatic battery power saver, providing you with longer
battery usage.
Low battery power warning.
Key lock, preventing you from accidentally changing your
transceiver settings.
Hands free operation when using an optional headset.
O PERATING C ONDITIONS
Open locations
(no obstructions)
Up to 4 miles
(approximately 6 1/2 km)
Residential areas
(near buildings)
Up to 1 1/2 miles
(approximately 2 1/2 km)
In steel/ concrete reinforced
buildings
Up to 200,000 square feet
(approximately 18,580 m2)
In high rises
Up to 15 floors
Note: The listed ranges are based on field testing and may vary with
individual transceivers.
i
FCC L ICENSE I NFORMATION
Your KENWOOD radio operates on communications
frequencies which are subject to FCC (Federal
Communications Commission) Rules & Regulations. FCC
Rules require that all operators using Private Land Mobile
radio frequencies obtain a radio license before operating their
equipment. Application for license must be made on FCC
form 600, and schedules D, E, and G.
FAX: Forms can be obtained by fax from the FCC
Fax-On-Demand system. Call 1-202-418-0177 from your
fax machine and request document number 000600 for the
form, schedules, and instructions.
MAIL: Forms can be ordered by telephone, and will be sent
to you by first class mail. Call the FCC Forms Hotline at
1-800-418-FORM (1-800-418-3676).
INTERNET: Form 600 and instructions can be downloaded
from the FCC Forms website at:
http://www.fcc.gov/formpage.html
Before filling out your Form 600 application Technical Data
section, you must decide which frequency (or frequencies)
you will operate on. Refer to the frequency chart on page 26.
Questions? Call the FCC for license application questions at
1-888-CALL-FCC (1-888-225-5322).
B ANDS
FCC Regulations require that most new licenses must be
operating on 12.5 kHz channel spacing capable radios. The
ProTalkXLS radio operates on 12.5 kHz channel spacing and
may not have optimal sound quality when used with radios
operating on 25 kHz channel spacing. If you have any
questions, call Kenwood Product Services:
1-800-NNN-NNNN
ii
P RECAUTIONS
•
•
•
•
•
•
•
Refer service to qualified technicians only. Do not modify or
attempt to adjust the transceiver for any reason.
Do not expose the transceiver to long periods of direct
sunlight, nor place it close to heating appliances.
Do not place the transceiver in excessively dusty, humid, or
wet areas, nor on unstable surfaces.
Avoid extremes in exposure to weather, heat, and cold. This
transceiver can be used in mild weather conditions, but it is
not waterproof.
Turn OFF your transceiver while taking on fuel or while parked
in gasoline service stations.
Do not operate your transceiver or charge your battery pack in
an explosive atmosphere (gases, dust, fumes, etc.).
If an abnormal odor or smoke is detected coming from the
transceiver, immediately switch OFF the power and remove
the batteries from the transceiver. Contact your KENWOOD
dealer.
◆ Government law prohibits the operation of unlicensed radio
transmitters within the territories under government control.
◆ Illegal operation is punishable by fine and/or imprisonment
SAFETY: It is important that the operator is aware of and
understands hazards common to the operation of any transceiver.
iii
CONTENTS
UNPACKING AND CHECKING EQUIPMENT ......................... 1
SUPPLIED ACCESSORIES .......................................................... 1
ORIENTATION .......................................................................... 2
DISPLAY ................................................................................ 3
PREPARATION ........................................................................ 4
INSTALLING/ REMOVING THE BATTERY PACK ................................ 4
INSTALLING/ REMOVING BATTERIES ............................................ 5
CHARGING THE BATTERY PACK ................................................. 6
INSTALLING/ REMOVING THE BELT HOOK .................................... 8
INSTALLING/ REMOVING OPTIONAL ACCESSORIES ........................ 8
GETTING STARTED ................................................................ 9
QUIET TALK/ DIGITAL QUIET TALK .................................... 11
SCANNING THE CHANNELS ............................................... 12
REVERT CHANNEL ................................................................ 13
MONITORING A CHANNEL .................................................. 14
VOICE ACTIVATED CONTROL (VOX) .................................. 15
VOICE SCRAMBLER ............................................................. 18
OPERATING FEATURES ....................................................... 19
TRANSMISSION POWER .......................................................... 19
KEY LOCK ........................................................................... 19
DISPLAY ILLUMINATION ........................................................... 20
TIME-OUT TIMER ................................................................. 21
BATTERY POWER SAVER ....................................................... 22
BATTERY INDICATOR .............................................................. 23
CALL TONES ........................................................................ 24
CALL ALERT ........................................................................ 25
BUSY CHANNEL LOCKOUT ...................................................... 26
TRANSCEIVER BEEP .............................................................. 26
NOTICES TO THE USER ...................................................... 27
QT TONES/ DQT CODES ..................................................... 29
CHANNEL FREQUENCY CHART ......................................... 31
TROUBLESHOOTING GUIDE ............................................... 32
iv
UNPACKING AND CHECKING EQUIPMENT
Carefully unpack the transceiver. We recommend you identify
the items listed in the following table before discarding the
packing material. If any items are missing or have been
damaged during shipment, file a claim with the carrier
immediately.
S UPPLIED A CCESSORIES
Item
Part Number
Quantity
Belt hook (with screws)
J29-0691-XX
1
Battery pack
W09-0986-XX
1
Rapid charger
W08-0938-XX
1
AC adapter
W08-0937-XX
1
—
1
B62-1486-XX
1
Warranty card
Instruction manual
Belt hook (with screws)
Rapid charger
Battery pack
AC adapter
1
ORIENTATION
Antenna
MENU key
Press and hold while
switching the power ON
to enter Menu Mode.
Press to select settings
while in Menu Mode.
Power switch/ Volume control
Turn clockwise to switch
the power ON and counterclockwise to switch the power
OFF. Rotate to adjust the
volume.
MON key
Press to monitor
the current channel
for activity.
CAL key
Press before
making a call,
to alert the
other party
members.
Microphone
Speaker
/ keys
Press to change the operating
channel, to select a menu in
Menu Mode, and to perform
other functions.
PTT (Push to Talk) switch
Press and hold, then speak
into the microphone to
transmit.
2
SP/MIC jacks
Lift the covers
and insert the
accessory’s
plugs here.
D ISPLAY
3
PREPARATION
I NSTALLING / R EMOVING
THE
B ATTERY P ACK
The battery pack is not charged at the factory; charge it before
use (pages 6 and 7).
Average battery pack life: 10 hours
•
Average times are calculated using 5% transmit time, 5%
receive time, and 90% standby time.
◆ Do not short the battery terminals or dispose of the battery by
fire.
◆ Never attempt to remove the casing from the battery pack.
1
Match the four grooves of the
battery pack with the
corresponding guides on the
back of the transceiver.
2
Slide the battery pack along the
back of the transceiver until the
release latch on the base of the
transceiver locks.
3
To remove the battery pack, pull
back on the release latch and
slide the pack away from the
transceiver.
4
I NSTALLING / R EMOVING B ATTERIES
In place of the battery pack, you can use 3 AA batterie. Use
high quality alkaline batteries to enjoy longer periods of
battery life.
1
Match the four grooves of the
battery pack with the
corresponding guides on the
back of the transceiver.
2
Slide the battery pack along the
back of the transceiver until the
release latch on the base of the
transceiver locks.
3
To remove the battery pack, pull
back on the release latch and
slide the pack away from the
transceiver.
5
C HARGING
THE
B ATTERY P ACK
Initially charging the battery pack after purchase or extended
storage (greater than 2 months) will not bring the battery pack
to its normal operating capacity. After repeating the charge/
discharge cycle two or three times, the operating capacity will
increase to normal.
◆ Do not recharge the battery pack if it is already fully charged.
Doing so may cause the life of the battery pack to shorten or the
battery pack may be damaged.
◆ After recharging the battery pack, disconnect it from the charger.
Charging the battery pack for more than 5 days may reduce the
battery pack life due to overcharging.
Note:
◆ The ambient temperature should be between 41°F and 104°F
(5°C and 40°C) while charging is in progress. Charging outside
this range may not fully charge the battery.
◆ Always switch OFF the transceiver equipped with a battery pack
before charging. Using the transceiver while charging its battery
pack will interfere with correct charging.
◆ The battery pack life is over when its operating time decreases
even though it is fully and correctly charged. Replace the battery
pack.
6
1
Plug the AC adapter cable into
the adapter jack located on the
rear of the charger.
2
Plug the AC adapter into an AC
outlet.
3
Slide a battery pack using the
supplied holder or a transceiver
equipped with a battery pack
into the battery pack slot.
•
•
4
Make sure the metal contacts of
the battery pack mate securely
with the charger terminals.
The indicator lights red and
charging starts.
When charging is completed,
the indicator lights green.
Remove the battery pack or the
tran-sceiver from the battery
pack slot.
•
•
•
It takes approximately 2.5 hours
to charge the battery pack.
When the charger will not be
used for a long time, unplug the
AC adapter from the AC outlet.
When charging a second
battery pack, wait for
approximately 10 seconds after
removing the first battery pack
from the charger. If the LED
blinks red after installing the
second battery pack, remove
the battery pack and wait for a
few seconds before inserting it
again.
7
I NSTALLING / R EMOVING
THE
B ELT H OOK
If desired, attach the belt hook
to the rear of the transceiver
using the 2 supplied screws.
I NSTALLING / R EMOVING O PTIONAL A CCESSORIES
Note: Always switch OFF the transceiver power when installing or
removing the optional accessories.
The following accessories can be used with this transceiver:
•
KMC-21 Speaker-Microphone
•
KHS-21 Headset
•
EMC-3 Clip Microphone with Earphone
To install these accessories:
1
Open the SP/MIC tabs on the side of the transceiver.
2
Insert the accessory’s plugs into the SP/MIC jacks.
3
When you remove the accessory from the transceiver, be
sure to cover the SP/MIC jacks with the attached tabs in
order to keep dust and dirt away from the contacts.
Note: Refer to the accessory instruction manuals for detailed
instruction on each of the accessories.
8
GETTING STARTED
q Switch the Power ON.
Switch the transceiver power ON by turning the Power
switch/ Volume control clockwise.
•
A confirmation tone sounds.
To switch the transceiver power OFF, turn the Power
switch/ Volume control fully counterclockwise, until a click
sounds.
w Adjust the Volume.
Set your desired volume level by rotating the Power
switch/ Volume control.
•
Clockwise increases the volume and counterclockwise
decreases the volume.
Note: To adjust the volume using background noise as a reference,
use the monitor function (page 14).
e Select a Channel.
Select channel 1 or 2 by pressing the ▲ or ▼ key.
•
•
•
A confirmation tone sounds each time you press the ▲ or ▼
key.
When you receive a call on your selected channel, you will
hear audio from the speaker and the LED will light green.
To use a signalling code, refer to “QUIET TALK/ DIGITAL
QUIET TALK” on page 11.
9
You can change the frequency of each channel:
1
Turn the transceiver power OFF.
2
Press and hold the MENU key while turning the
transceiver ON (for 1 second).
3
Press the ▲ or ▼ key to select the frequency setting
menu.
•
4
Press the MENU key to select “1-F1” (channel 1,
frequency number 1) to “1-F8” (channel 1, frequency
number 8) or “2-F1” (channel 2, frequency number 1)
to “2-F8” (channel 2, frequency number 8).
•
5
The channel number appears with “F” and the current
frequency number.
Refer to page 31 for the frequencies available for each
channel.
Press the PTT, MON, or CAL key to exit Menu Mode.
r Make a Call.
1
Press and release the CAL key to alert the other
parties that you are making a call.
•
2
Press and hold the PTT switch, then speak into the
microphone to transmit.
•
•
3
10
A call tone will sound on the other party’s transceiver.
The LED lights red while transmitting.
For best sound quality, speak into the microphone in your
normal speaking voice while holding the microphone
approximately 1.5 inches (3 to 4 cm) from your lips.
Release the PTT switch when you have finished
speaking.
QUIET TALK/ DIGITAL QUIET TALK
QT (Quiet Talk) and DQT (Digital Quiet Talk) are functions that
reject signals from undesired parties that are using the same
channel as you. You will hear audio from the speaker only
when you receive a signal that contains a tone or code
matching the one set up on the channel you are using.
Likewise, when you transmit on a channel set up with QT or
DQT, the receiving station must have a matching tone or code
in order to hear your signal.
You can select a tone or code for each channel. There are 38
QT tones (1 to 38) and 83 DQT codes (DQT1 to DQT83).
After changing the QT/ DQT setting, confirm that the other
members in your group have selected the same tone or code.
1
Press the MENU key.
•
2
Press the ▲ or ▼ key to select your desired value.
•
•
•
3
The current setting blinks.
The values range from 1 to 38 for QT tones, then proceed to
1 to 83 for DQT codes. When you use a DQT code, the DQT
icon appears on the display.
“OF” means you have turned off both QT and DQT.
Refer to pages 24 and 25 for the actual QT tones and DQT
codes.
Press the MENU key 3 times, or press the PTT, MON, or
CAL key to confirm the setting.
11
SCANNING THE CHANNELS
You can scan both channels of the transceiver to search for a
signal. When the transceiver verifies a signal on a channel, it
proceeds to check whether or not its QT/ DQT setting
matches that which is set up on your transceiver. If the QT/
DQT matches, the transceiver stops at the channel and opens
the squelch so you can listen to the call. If the QT/ DQT does
not match, the call is ignored and scanning continues.
To begin scanning:
1
Press and hold the ▲ key for 1 second.
•
SCAn appears on the display.
2
When a signal is detected and the QT/ DQT matches, the
channel number appears on the display and blinks.
3
When the signal is no longer present, the transceiver waits
for 5 seconds before scanning continues.
•
4
To end the scan at any time, press and hold the ▲ key for
1 second.
•
12
If a new signal appears before the 5 seconds elapse, the
transceiver will remain on the channel until the signal is no
longer present again, at which time it will again wait for
5 seconds before continuing.
The transceiver returns to the channel you were using before
you started scanning.
You can turn the scan function (the ability to perform scan)
ON or OFF in Menu Mode:
1
Turn the transceiver power OFF.
2
Press and hold the MENU key while turning the
transceiver power ON (for 1 second).
3
Press the ▲ or ▼ key to select “SC”.
4
Press the MENU key to select “SC-OF” (scan function off)
or “SC-On” (scan function on).
•
5
If you select “SC-OF”, you will no longer be able to perform
scan by pressing and holding the ▲ key.
Press the PTT, MON, or CAL key to exit Menu Mode.
R EVERT C HANNEL
During scan, pressing the PTT switch will automatically select
the transceiver’s revert channel and you will begin
transmitting. However, if you are currently paused at a
channel, pressing the PTT switch will allow you to transmit on
your current channel, rather than returning to the transceiver’s
revert channel.
After transmitting on either your current channel or the revert
channel by pressing the PTT switch, the transceiver will wait
for 5 seconds before scanning continues. If a signal is
present on the channel before the 5 seconds elapse, the
transceiver remains on the channel until the signal is no
longer present. It then continues to function the same as
while scanning.
13
MONITORING A CHANNEL
When no signals are present, the squelch on the transceiver
automatically mutes the speaker so you will not hear
background noise. To manually deactivate the squelch, press
and hold the MON key.
•
When deactivated, the monitor icon appears on the display
and the LED lights green.
To return to normal operation, simply release the MON key.
14
VOICE ACTIVATED CONTROL (VOX)
Using the VOX feature, you can operate the transceiver
hands-free. In order to use this feature, however, you must
use an optional headset; VOX will not function with the built-in
mircrophone. For best operation conditions, we recommend
you use an optional headset with both an ear piece and a
microphone on a boom that rests in front of your mouth.
With VOX activated, your voice level will determine when the
transceiver transmits. Because of this, you must take care
that the ambient noise around you is not so loud that it causes
the transceiver to transmit. Due to the automatic switching
between transmission and reception, we recommend you set
the VOX gain such that it will not activate transmission when
in an area with excessive ambient noise.
To operate using VOX:
1
Set up a VOX gain level from 1 to 3 (page 15).
2
To transmit, simply speak into the microphone.
•
3
To stop transmitting, stop speaking.
•
4
You do not need to press the PTT switch; the transceiver
automatically detects your voice and begins transmitting.
Transmission will continue momentarily after you stop
speaking. You can select the delay time as described on
page 15.
To exit VOX mode, set the VOX gain level (page 16) to
“GL-OF” (OFF).
15
To enjoy the VOX function, take the time to properly adjust the
VOX Gain. This level controls the VOX circuit to detect the
presence or absence of your voice.
1
Turn the transceiver power OFF.
2
Press and hold the MENU key while turning the
transceiver power ON (for 1 second).
3
Press the ▲ or ▼ key to select “GL”.
4
Press the MENU key to select “GL-OF” (VOX function is off)
or “GL-1” (VOX gain level 1) to “GL-3” (VOX gain level 3).
•
While adjusting the VOX Gain, the LED lights orange.
Note: Setting the VOX gain to OFF deactivates VOX. In order to
transmit with VOX turned off, you must use the PTT switch.
5
Press the PTT, MON, or CAL key to exit Menu Mode.
If the transceiver returns to receive mode too quickly after you
stop speaking, the end of your message may not be
transmitted. To avoid this, select an appropriate delay time
that allows your entire message to be transmitted. However,
do not make the delay overly long.
1
Turn the transceiver power OFF.
2
Press and hold the MENU key while turning the
transceiver power ON (for 1 second).
3
Press the ▲ or ▼ key to select “dY”.
4
Press the MENU key to select “dY-0.1” (hold for 100 ms),
“dY-0.3” (300 ms), “dY-0.5” (500 ms), “dY-1.0” (1 second),
“dY-1.5” (1.5 seconds), or “dY-3.0” (3 seconds).
5
Press the PTT, MON, or CAL key to exit Menu Mode.
16
While using VOX, you can set the transceiver to detect when
the channel is busy. With this function turned on, VOX will not
allow you to transmit while the channel is being used. You can
transmit only when the channel is free.
1
Turn the transceiver power OFF.
2
Press and hold the MENU key while turning the
transceiver power ON (for 1 second).
3
Press the ▲ or ▼ key to select “bU”.
4
Press the MENU key to select “bU-On” (busy detection
turned on) or “bU-OF” (busy detection turned off).
5
Press the PTT, MON, or CAL key to exit Menu Mode.
17
VOICE SCRAMBLER
Whereas the Quiet Talk and Digital Quiet Talk functions give
you privacy in so much that you are able to ignore unwanted
calls, the voice scrambler gives you complete privacy. When
activated, any other party listening on your channel and using
the same QT/ DQT settings that you have on your transceiver
will be unable to understand your conversation.
In order for members of your group to understand your call
while you are using the voice scramber, all other members
must also activate their voice scramblers. This function both
scrambles and unscrambles voice messages.
1
Press the MENU key 2 times.
•
The “PRIVACY” icon appears on the display and blinks.
2
Press the ▲ or ▼ key to select “On” (privacy on) or “OF”
(privacy off).
3
Press the MENU key 2 times, or press the PTT, MON, or
CAL key to confirm the setting.
18
OPERATING FEATURES
T RANSMISSION P OWER
You can adjust the transmission power on all channels.
Selecting low power will allow longer use of the battery pack.
Selecting high power will allow you to transmit farther, in case
the other party is too far away for low power usage.
To change the transmission power:
1
Press the MENU key 3 times.
•
The “LOW” icon and “LO” appear on the display when low
power is selected. No icon and “HI” appear for high power.
2
Press the ▲ or ▼ key to select your desired output power.
3
Press the MENU key 1 time to confirm the setting.
K EY L OCK
You can lock the MENU, ▲, and ▼ keys to prevent
accidentally changing the operating mode and the channel
settings.
Press and hold the MENU key for 1 second to lock or unlock
the transceiver keys.
•
The key lock icon appears on the display when the transceiver
keys are locked. No icon appears when they are unlocked.
19
D ISPLAY I LLUMINATION
You can set the display illumination to remain off, remain on,
or turn on when you press any key other than the PTT switch
(auto). When set to auto, the lamp remains on for 5 seconds
after pressing a key before turning off again.
To turn the display backlight ON:
1
Turn the transceiver power OFF.
2
Press and hold the MENU key while turning the
transceiver power ON (for 1 second).
3
Press the ▲ or ▼ key to select “LP”.
4
Press the MENU key to select “LP-OF” (lamp off), “LP-On”
(lamp on), or “LP-A” (lamp auto).
5
Press the PTT, MON, or CAL key to exit Menu Mode.
20
T IME - OUT T IMER
The purpose of the Time-out Timer is to prevent any single
person from using a channel for an extended period of time.
If you continuously transmit for 3 minutes (default value), the
transceiver will stop transmitting and a tone will sound. To
stop the tone, release the PTT switch. You can press the PTT
switch again to resume transmitting.
This transceiver is also equipped with a pre-alert tone which
sounds 10 seconds before the Time-out Timer expires. This
will allow you time to finish your transmission before the
transceiver automatically cuts out.
To change the default value of 3 minutes:
1
Turn the transceiver power OFF.
2
Press and hold the MENU key while turning the
transceiver power ON (for 1 second).
3
Press the ▲ or ▼ key to select “tO”.
4
Press the MENU key to select “tO-3” (3 minutes) or “tO-10”
(10 minutes).
5
Press the PTT, MON, or CAL key to exit Menu Mode.
21
B ATTERY P OWER S AVER
This transceiver has been designed to give you the most out
of your battery power. While using the transceiver, the battery
saver will automatically switch ON after 10 seconds have
elapsed with no operations or received calls. Operating the
transceiver or receiving a call will switch this feature OFF until
10 seconds of non-operation occurs again.
You can turn this function ON or OFF:
1
Turn the transceiver power OFF.
2
Press and hold the MENU key while turning the
transceiver power ON (for 1 second).
3
Press the ▲ or ▼ key to select “bS”.
4
Press the MENU key to select “bS-On” (battery save on) or
“bS-OF” (battery save off).
5
Press the PTT, MON, or CAL key to exit Menu Mode.
22
B ATTERY I NDICATOR
When turned ON, the battery indicator on the display lets you
know approximately how much battery life is remaining. When
turned OFF, the battery indicator will appear and blink only
when the battery voltage level is low.
When the battery voltage becomes too low while transmitting,
the transceiver stops transmitting and a tone sounds until you
release the PTT switch. Recharge or replace the battery pack
at this time.
High battery power
Medium battery power
Low battery power
Time to recharge the battery pack
Note: This feature does not measure the accurate battery voltage
when using alkaline batteries. When using alkaline batteries in place
of the supplied battery pack, turn this function OFF.
You can turn this function ON or OFF:
1
Turn the transceiver power OFF.
2
Press and hold the MENU key while turning the
transceiver power ON (for 1 second).
3
Press the ▲ or ▼ key to select “bT”.
4
Press the MENU key to select “bT-On” (battery indicator
on) to “bT-OF” (battery indicator off).
5
Press the PTT, MON, or CAL key to exit Menu Mode.
23
C ALL T ONES
Call tones are used to alert you as to when a party member is
beginning a call. You can set up a call tone to one of 6 types
in order to easily identify yourself to your party members. If
each party member uses a different call tone, it is easy to
know who is making the call.
To set up your own call tone:
1
Turn the transceiver power OFF.
2
Press and hold the MENU key while turning the
transceiver power ON (for 1 second).
3
Press the ▲ or ▼ key to select “CA”.
4
Press the MENU key to select “CA-1” (call alert tone 1) to
“CA-6” (call alert tone 6).
5
Press the PTT, MON, or CAL key to exit Menu Mode.
24
C ALL A LERT
It is also possible to set up your transceiver so that you are
alerted using vibration. When vibration alert is activated, the
vibration icon appears on the display.
To select your received alert tone method:
1
Turn the transceiver power OFF.
2
Press and hold the MENU key while turning the
transceiver power ON (for 1 second).
3
Press the ▲ or ▼ key to select “Ct”.
4
Press the MENU key to select “Ct-1” (normal alert tone
sounds), “Ct-2” (you are alerted by vibration), “Ct-OF” (no
alert tone or vibration), or “Ct-3” (you are alerted by both
the tone and vibration).
5
Press the PTT, MON, or CAL key to exit Menu Mode.
Note: If you use alert tone and/or vibration, you must set a QT tone
or a DQT code (page 11).
25
B USY C HANNEL L OCKOUT
This function is used in order to prevent transmitting on a
channel that somebody else is currently using. When turned
ON, a beep sounds when you press the PTT switch while
another party is using the channel, and you cannot transmit.
1
Turn the transceiver power OFF.
2
Press and hold the MENU key while turning the
transceiver power ON (for 1 second).
3
Press the ▲ or ▼ key to select “bL”.
4
Press the MENU key to select “bL-On” (busy channel
lockout on) or “bL-OF” (busy channel lockout off).
5
Press the PTT, MON, or CAL key to exit Menu Mode.
T RANSCEIVER B EEP
On various occasions (such as when you turn the transceiver
power ON), a beep will emit from the transceiver. If desired,
you can turn this feature off:
1
Turn the transceiver power OFF.
2
Press and hold the MENU key while turning the
transceiver power ON (for 1 second).
3
Press the ▲ or ▼ key to select “bP”.
4
Press the MENU key to select “bP-On” (beep on) or
“bP-OF” (beep off).
5
Press the PTT, MON, or CAL key to exit Menu Mode.
26
NOTICES TO THE USER
This device complies with Part 15 of the FCC Rules. Operation is
subject to the following two conditions:
(1) this device may not cause harmful interference, and
(2) this device must accept any interference received, including
interference that may cause undesired operation.
One or more of the following statements may be applicable:
FCC WARNING
This equipment generates or uses radio frequency energy. Changes or
modifications to this equipment may cause harmful interference unless
the modifications are expressly approved in the instruction manual. The
user could lose the authority to operate this equipment if an
unauthorized change or modification is made.
INFORMATION TO THE DIGITAL DEVICE USER REQUIRED BY THE FCC
This equipment has been tested and found to comply with the limits for a
Class B digital device, pursuant to Part 15 of the FCC Rules. These
limits are designed to provide reasonable protection against harmful
interference in a residential installation.
This equipment generates, uses and can generate radio frequency
energy and, if not installed and used in accordance with the instructions,
may cause harmful interference to radio communications. However,
there is no guarantee that the interference will not occur in a particular
installation. If this equipment does cause harmful interference to radio or
television reception, which can be determined by turning the equipment
off and on, the user is encouraged to try to correct the interference by
one or more of the following measures:
• Reorient or relocate the receiving antenna.
• Increase the separation between the equipment and receiver.
• Connect the equipment to an outlet on a circuit different from that to
which the receiver is connected.
• Consult the dealer for technical assistance.
27
SAFETY INFORMATION:
Your wireless hand-held portable transceiver has been designed using a
low power transmitter.
When the PTT switch is pressed, the transceiver generates radio
frequency (RF) electromagnetic energy (EME).
This transceiver is designed to comply with the FCC Report and Order
FCC 96-326 (August, 1996).
• Do not transmit for more than 50% of the total operating time.
Transmitting for over 50% of the operating time may exceed the
FCC RF exposure compliance requirements. Transmission occurs
while you are pressing the PTT switch and is confirmed by the LED
that lights red while transmitting.
• To transmit, speak into the microphone in your normal voice while
holding the transceiver upright and keep the antenna at least 2
inches (5 cm) from your head and body.
• When using a headset, ensure that the antenna is at least 2 inches
(5 cm) away from your body whenever you are transmitting.
• Use only KENWOOD genuine accessories. Unauthorized
modifications, or attachments may damage the transceiver and
violate FCC rules and regulations.
28
QT TONES/ DQT CODES
Display Quiet Talk
Number Frequency
Display Quiet Talk Display Quiet Talk
Number Frequency Number Frequency
OFF
OFF
13
103.5 Hz
26
162.2 Hz
1
67.0 Hz
14
107.2 Hz
27
167.9 Hz
2
71.9 Hz
15
110.9 Hz
28
173.8 Hz
3
74.4 Hz
16
114.8 Hz
29
179.9 Hz
4
77.0 Hz
17
118.8 Hz
30
186.2 Hz
5
79.7 Hz
18
123.0 Hz
31
192.8 Hz
6
82.5 Hz
19
127.3 Hz
32
203.5 Hz
7
85.4 Hz
20
131.8 Hz
33
210.7 Hz
8
88.5 Hz
21
136.5 Hz
34
218.1 Hz
9
91.5 Hz
22
141.3 Hz
35
225.7 Hz
10
94.8 Hz
23
146.2 Hz
36
233.6 Hz
11
97.4 Hz
24
151.4 Hz
37
241.8 Hz
12
100.0 Hz
25
156.7 Hz
38
250.3 Hz
29
Display
Number
Digital
Quiet Talk
Code
Display
Number
Digital
Quiet Talk
Code
Display
Number
Digital
Quiet Talk
Code
DQT 1
DQT 2
DQT 3
DQT 4
DQT 5
DQT 6
DQT 7
DQT 8
DQT 9
DQT 10
DQT 11
DQT 12
DQT 13
DQT 14
DQT 15
DQT 16
DQT 17
DQT 18
DQT 19
DQT 20
DQT 21
DQT 22
DQT 23
DQT 24
DQT 25
DQT 26
DQT 27
DQT 28
023
025
026
031
032
043
047
051
054
065
071
072
073
074
114
115
116
125
131
132
134
143
152
155
156
162
165
172
DQT 2 9
DQT 30
DQT 31
DQT 3 2
DQT 33
DQT 3 4
DQT 35
DQT 36
DQT 3 7
DQT 3 8
DQT 39
DQT 40
DQT 4 1
DQT 42
DQT 43
DQT 4 4
DQT 45
DQT 4 6
DQT 47
DQT 48
DQT 4 9
DQT 50
DQT 51
DQT 5 2
DQT 53
DQT 5 4
DQT 55
DQT 56
174
205
223
226
243
244
245
251
261
263
265
271
306
311
315
331
343
346
351
364
365
371
411
412
413
423
431
432
DQT 57
DQT 58
DQT 59
DQT 60
DQT 61
DQT 62
DQT 63
DQT 64
DQT 65
DQT 66
DQT 67
DQT 68
DQT 69
DQT 70
DQT 71
DQT 72
DQT 73
DQT 74
DQT 75
DQT 76
DQT 77
DQT 78
DQT 79
DQT 80
DQT 81
DQT 82
DQT 83
44 5
46 4
46 5
46 6
503
50 6
51 6
53 2
54 6
565
60 6
61 2
62 4
62 7
631
63 2
65 4
66 2
66 4
70 3
712
72 3
73 1
73 2
73 4
743
75 4
30
CHANNEL FREQUENCY CHART
Frequency
Number
Transmit/ Receive
Frequency
Color/Code
F1
464.5000 MHz
Brown
F2
464.5500 MHz
Yellow
F3
467.7625 MHz
J
F4
467.8125 MHz
K
F5
467.8500 MHz
Silver Star
F6
467.8750 MHz
Gold Star
F7
467.9000 MHz
Red Star
F8
467.9250 MHz
Blue Star
Note: The default channel settings are F2 for channel 1 and F8 for
channel 2.
31
TROUBLESHOOTING GUIDE
Problem
Solution
Cannot turn the
transceiver power
ON.
• The batteries or battery pack may
be dead. Replace the batteries or
recharge or replace the battery pack.
• The battery pack may not be
installed correctly. Remove the
battery pack and install it again.
• The battery pack life is finished.
Replace the battery pack with a
new one.
• Make sure you are using the same
frequency and QT/ DQT setting as
the other members in your group.
• Other group members may be
using private mode. Turn on your
transceiver’s voice scrambler.
• Other group members may be too
far away. Make sure you are
within range of the other
transceivers.
• Change the QT/ DQT settings.
Make sure all group members
change the settings on their
transceivers to match the new QT/
DQT setting.
• Reset the transceiver as follows:
1) Turn the transceiver power OFF.
2) Press and hold the ▲, ▼, and
MON keys while turning the
transceiver power back ON.
Battery power
dies shortly after
charging.
Cannot talk to or
hear other
members in your
group.
Other voices
(besides group
members’) are
present on the
channel.
The transceiver is
malfunctioning for
no apparent
reason.
Note: All the transceiver data will be reset to
the factory default settings.
32